Qubo SO220 - Hi-fi system SONORO - Free user manual and instructions
Find the device manual for free Qubo SO220 SONORO in PDF.
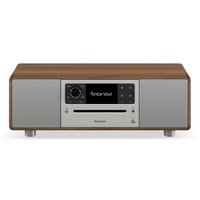
| Product type | Hi-fi system with FM/DAB+ radio, CD player, Bluetooth, USB, AUX |
| Brand | Sonoro |
| Model | Qubo SO220 |
| Dimensions (W×D×H) | 210 × 257 × 140 mm |
| Weight | Approximately 3.4 kg |
| Power supply | AC adapter 100-240 V ~ 50/60 Hz, output 15.5 V DC 2.9 A |
| Power consumption (standby) | Less than 1.0 W |
| Backup battery | CR2032 (3 V) for clock |
| FM radio reception | 87.5 MHz – 108.0 MHz |
| DAB/DAB+ radio reception | Band III, 174.928 MHz – 239.200 MHz |
| Supported CD formats | CD-DA, CD-R, CD-RW; MP3, WMA |
| USB audio formats | MP3, WMA; FAT16/FAT32 systems |
| Bluetooth | Version 4.1, profiles A2DP, AVRCP; range approx. 10 m |
| USB port | Charging: 5 V = 1.0 A; playback: USB devices |
| AUX input | 3.5 mm jack socket, sensitivity 300 mV |
| Headphone output | 3.5 mm jack socket |
| Main functions | FM/DAB radio, CD player, Bluetooth, USB, AUX, dual alarm, sleep timer, wake-up light (with optional sonoroLIGHT), integrated relaxation music |
| Control | Buttons on the unit and supplied remote control |
| Display | Backlit LCD screen with automatic dimming |
| Available languages | French, English, German |
| Operating temperature | 0 °C to 45 °C |
| Care and cleaning | Clean the exterior with a dry, soft cloth; do not use abrasive products |
| Supplied accessories | Remote control, batteries, power supply unit with universal adapter, FM/DAB antenna, user manual |
| Warranty | 2 years (except North America and Australia: 1 year) |
Frequently Asked Questions - Qubo SO220 SONORO
User questions about Qubo SO220 SONORO
0 question about this device. Answer the ones you know or ask your own.
Ask a new question about this device
Download the instructions for your Hi-fi system in PDF format for free! Find your manual Qubo SO220 - SONORO and take your electronic device back in hand. On this page are published all the documents necessary for the use of your device. Qubo SO220 by SONORO.
USER MANUAL Qubo SO220 SONORO
2. Scope of delivery 55
2.1 QUBO 55
2.2 sonoroLIGHT (available as an option) 56
3. Compatible formats 56
3.1 Compatible CD formats 56
3.2 Compatible audio formats 56
4. Controls and parts 57
5. Display 61
6.Unpacking the device and commencing operation 62
6.1 Unpacking the device 62
6.2 Inserting the battery 62
6.3 Connecting the power supply 62
6.4 Connecting the antenna 63
6.5 Preparing the remote control 63
6.6 Connecting sonoroLIGHT 64
6.7 Connecting the heaphones 64
7. Setting the basic functions 65
7.1 Switching on the device for the first time 65
7.2 Standby Mode 65
7.3 Making the basic settings 66
7.4 Setting the sound 69
7.5 Setting the sleptimer 70
7.6 Switching the light on and off 71
8. Alarm function 72
8.1 Setting the alarm time 72
8.2 Setting the alarm source 73
8.3 Setting the alarm volume 73
8.4 Setting the alarm repetition 74
8.5 Programming the alarm light (sunrise) 74
8.6 Switching the alarm clock on/off 75
8.7 Switching off the alarm clock after the alarm sounds 75
8.8 Setting the snooze function 76
9. General audio playback functions 76
9.1 Setting the volume 76
9.2 Muting the audio playback 76
9.3 Selecting a playback mode 77
10. Radio playback 77
10.1 FM-Radio 78
10.2 DAB-Radio 79
11. CD playback 82
12. Bluetooth playback 85
12.1 Connecting bluetooth devices 85
12.2 Connecting bluetooth devices 85
12.3 Playing music via bluetooth 86
13.AUX playback 86
14. USB playback 86
15. Relaxation and meditation music 87
16. Demo sound playback 91
17. Troubleshooting 92
18. Cleaning 94
19. Technical data 94
20. Warranty 95
1. Introduction
Thank you for purchasing QUBO. This operating manual and the safety manual provide all the information required for trouble-free and safe operation of QUBO.
- Read the operating manual and the safety manual in their entirety before using QUBO.
- Keep the operating manual and safety manual for future reference.
- If you pass the device on to a third party, please provide them with the instructions and safety instructions as well.
- Failure to follow the operating manual and safety manual can result in serious injury or damage to QUBO.
- We assume no liability for damage resulting from failure to observe this manual.
The images in this manual are intended for illustration purposes.
Enjoy your device!
1.1 Contact data
| Address sonoro au | audio GmbH, Nordkanalallee 94, D-41464 Neuss, Deutschland |
| Phone +49 2131 8834-141 | |
| Fax +49 2131 7517-599 | |
| E-Mail support@sonoro.de | |
| Internet www.sonoro.de | |
1.2 Intended use
The device is for personal use only. It is not intended for commercial use. The device is solely intended for the following tasks:
- Playback of FM/DAB radio stations.
- Playback of Audio CDs and MP3/WMA CDs.
- Audio playback from external USB devices.
- Audio playback from external devices connected via AUX...
- Audio playback from Bluetooth-enabled devices (e.g. mobile phones).
- Playback of relaxation and meditation music.
- Control of lamps connected to sonoroLIGHT via Bluetooth®. Follow the sonoroLIGHT operating instructions.
- Charging function for external devices that are connected via USB. Please note the specifications described in the manufacturer's operating instructions.
Any other use is considered improper use and is prohibited. We assume no liability for damages from improper use.
1.3 Cleaning
- Clean the device only from the outside with a soft, dry cloth. Never use abrasive or solvent-based cleaning agents as these may damage the surface of the device.
- If the device is extremely dirty, wipe it with a slightly damp cloth and dry it with a soft, dry cloth.
2. Scope of delivery
2.1 QUBO
Many additional components that you need to receive radio frequencies and connect additional devices are part of QUBO's scope of delivery.
- QUBO with protective cover
Remote control -
Two button cells (CR2032, 3 V)
-
AC adapter with universal adapter (CE and UK)
FM/DAB rod antenna - Operating instructions
- Safety instruction manual
2.2 sonoroLIGHT (available as an option)
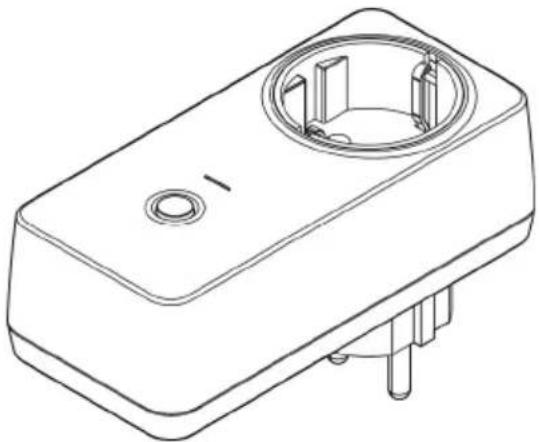
Fig, 1: sonoroLIGHT
To use the full scope of functions and be able to control a lamp that is connected via Bluetooth, you need the sonoroLIGHT dimmer module. sonoroLIGHT can be connected to QUBO and it is available from specialist shops. sonoroLIGHT is not part of the scope of supply of QUBO.
3. Compatible formats
3.1 Compatible CD formats
- Compact Disc Digital Audio CD-DA
CD-R
CD-RW
3.2 Compatible audio formats
CD-DA
MP3
WMA
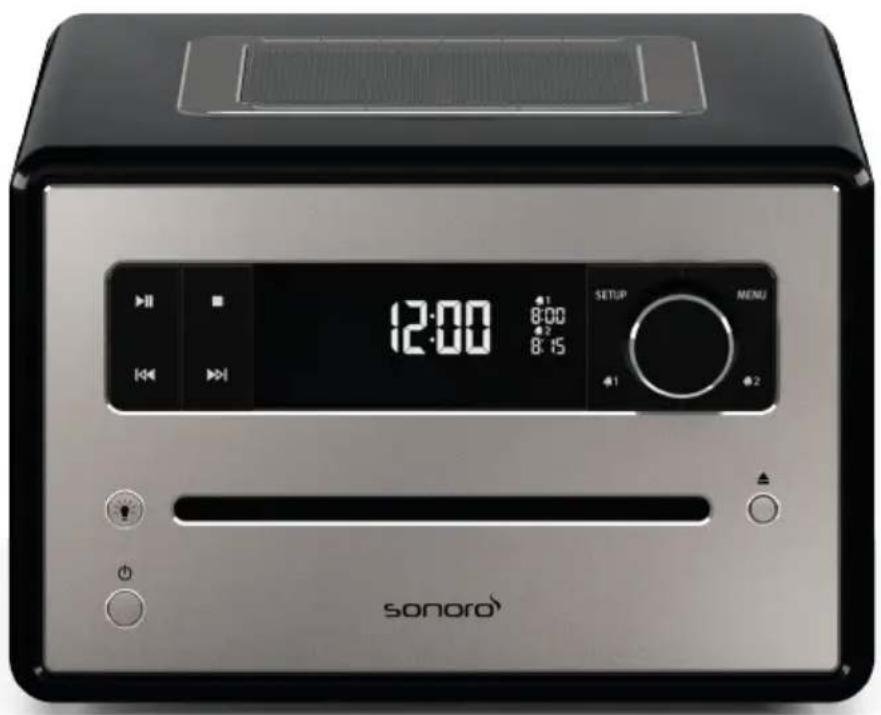
4. Controls and ports
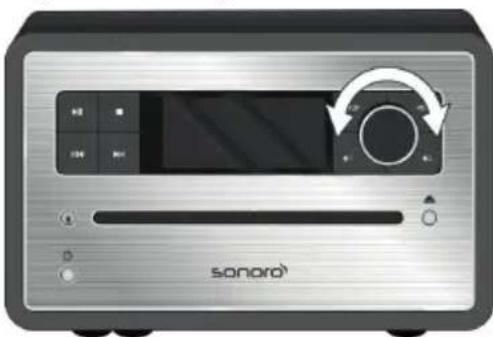
Front View
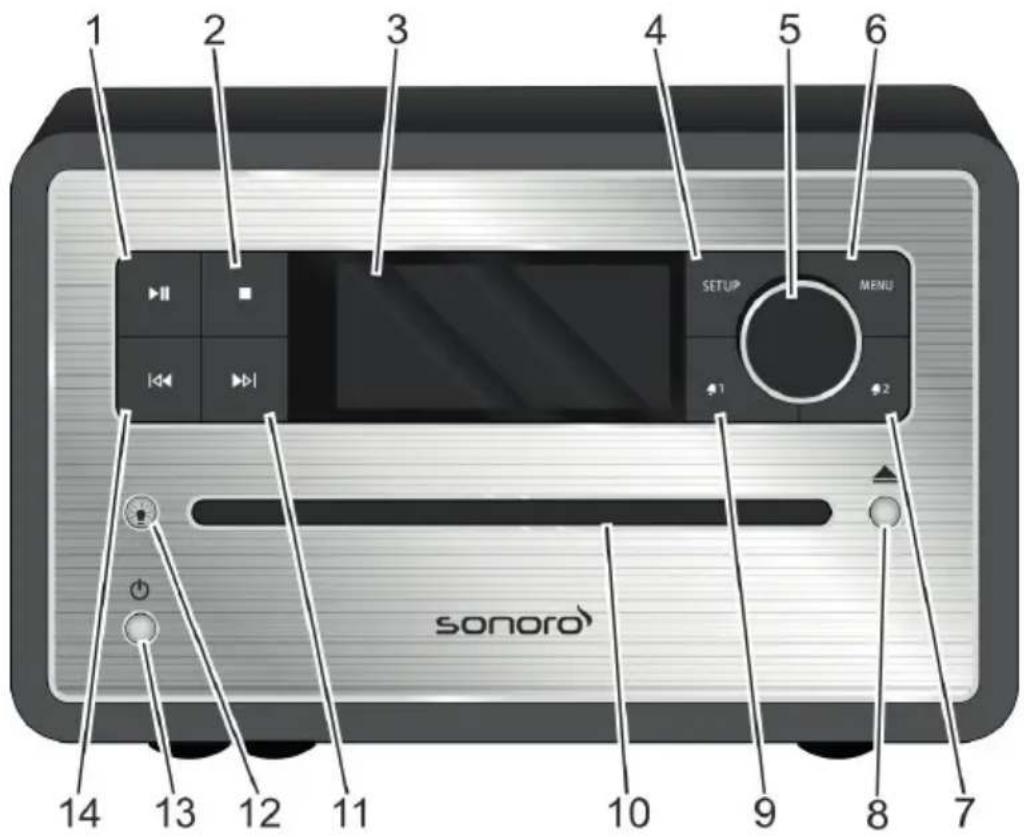
Fig, 2: Front view
- Play/Pause (

-
Eject
-
Stop (

-
Alarm 1
-
LC
Display
-
SETUP
-
Click
-
MENU
-
Alarm 2 (

-
Standby
-
Previous ()

Top View
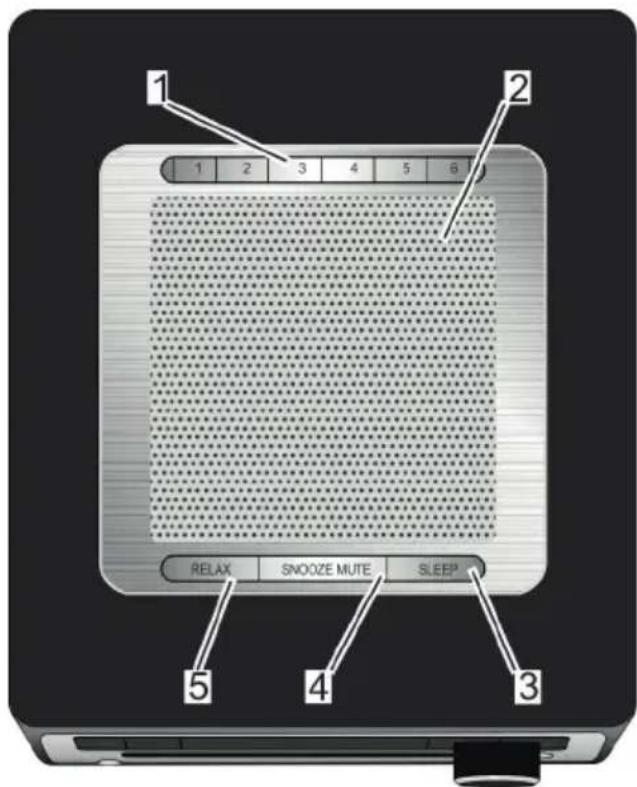
Fig, 3: Top view
- Memory 1-6 4. SNOOZE
- Speaker 5. RELAX
- SLEEP
Rear View
Fig, 4: Rear view
- DAB/FM socket 5. AC adapter port
- Battery compartment 6. USB-Charge & Playback
- Bass Reflex
-
Keylock 8.AUX IN
-
Headphones
Remote Control
Fig, 5: Remote control
- Standby (

- Light(

- MUTE/
SNOOZE
-
CD
-
Bluetooth (
-
TREBLE
-
VOL(
-
Next(
-
OK, Play/Pause (
-
Alarm 2 (
-
Memory
12.
Alam
1
13.
SLEEP
15.
4.
Previous
16.
BASS
17.
USB
18.
RELAX
19.
AUX
20.
FM
21.
DAB
22.
SETUP
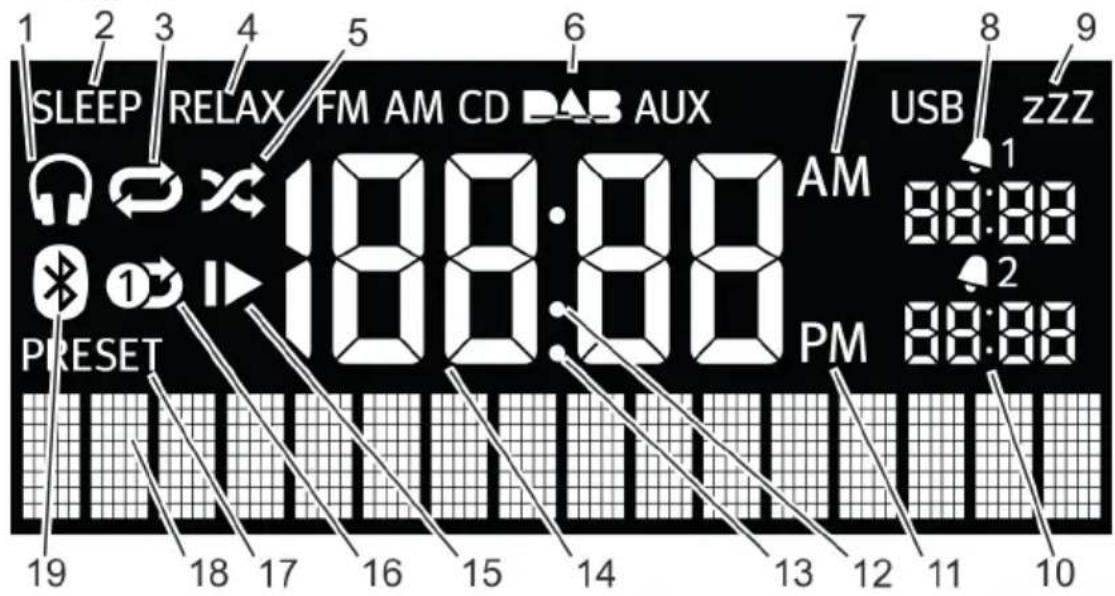
5. Display
Fig, 6: Display
| Item Symbol | Function | |
| 1 Headphones | Headphones are connected. | |
| 2 Sleep The Sleep Timer is on. | ||
| 3 | Repeat | CD: repeat all tracks on the CD. |
| 4 Relax The Relax mode is on. | ||
| 5 Shuffle CD: Random play order of individual tracks | ||
| 6 FM/CD/DAB/ AUX/USB Displays the selected operating mode. | ||
| 7 AM Time suffix in the 12-hour setting. | ||
| 8 Alarm 1 Displays the set Alarm 1 time. | ||
| 9 Snooze The Snooze function is on. | ||
| 10 Alarm 2 Displays the set Alarm 2 time. | ||
| 11 PM Time suffix in the 12-hour setting. | ||
| 12 Colon Flashes to indicate seconds. | ||
| 13 Point | For the FM frequency range (without RDS). | |
| 14 Time | Displays the current time. | |
| 15 Resume | CD: resume playback. | |
| 16 Repeat One | CD: repeat one track. | |
| 17 Preset | Station memory | |
| 18 Lower display section | Display for date, menus, frequencies, etc. | |
| 19 Bluetooth | Bluetooth is on. | |
6. Unpacking the device and commencing operation
Only use connection cables and external devices that comply with the electromagnetic compatibility and insulation quality of this device.
6.1 Unpacking the device
All parts of the device are delivered in a single cardboard box.
- Unpack the device and all accessories, and check the contents for completeness and integrity.
- Place the device in a suitable location and remove the protective film from the display.
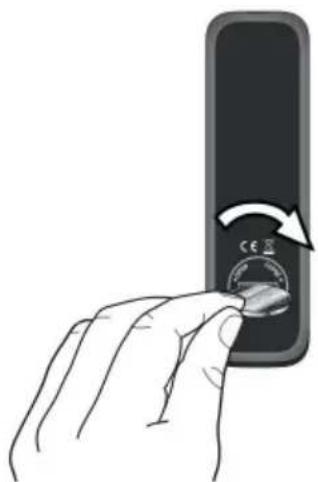
6.2 Inserting the battery
The battery ensures the clock functions in case of power failure.
Fig, 7: Inserting the battery
- Open the battery compartment cover on the back of the device with a small coin.
- Insert the supplied battery with the label side up.
- Insert the battery compartment cover and close with a small coin.
6.3 Connecting the power supply
Power is supplied to the device via the AC adapter (included). The AC adapter with universal adapter must be connected before use.
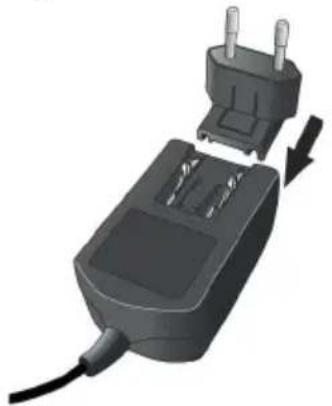
Fig, 8: Installing the universal adapter
- Push the universal adapter onto the AC adapter until it clicks into place.
- Insert the plug connector of the AC adapter into the 15.5 V, 2.9 A DC port at the back of the device.
- Insert the mains plug into the socket..
6.4 Connecting the antenna
- Screw the rod antenna located on the back of QUBO to the FM/DAB antenna socket.
- If you are using the rod antenna, pull the arms of the rod antenna apart and align the antenna so that you have the best possible reception.

For even better reception, attach the cable to a suitable house antenna.
6.5 Preparing the remote control
Fig, 9: Inserting the battery into the remote control
-
Open the battery compartment on the remote control with a small coin. (Fig. 10)
-
Insert the supplied button cell (CR2032, 3 V) with the label (+) side up.
- Close the battery compartment.
6.6 Connecting sonoroLIGHT
In order to be able to control a lamp using the Bluetooth function, you must connect sonoroLIGHT and QUBO once. Connected devices are stored and later connected automatically.

Follow the sonoroLIGHT operating instructions.
- Plug sonoroLIGHT into a socket.
- Ensure that sonoroLIGHT and QUBO are no more than 10m away from one another. Otherwise, no connection can be established.
- Press the button on your sonoroLIGHT.
sonoroLIGHT searches for another Bluetooth device.
- Press the [Light] button on your QUBO and hold it for 3 seconds.
The devices are connected to one another. No password needs to be entered. Once the devices are successfully connected, the [Light] button lights up in white. - Connect a lamp to the socket on your sonoroLIGHT.
6.7 Connecting the headphones
The headphones can be connected to the device with the 3.5mm stereo jacks (not included in the package).
- Turn the click wheel to the left to set the volume to minimum.
- Insert the headset jack into the headset port at the back of the device.
- Slowly turn the click wheel to the right to increase the volume.
7. Setting the basic functions
The individual menus let you select the functions and settings of the device.
7.1 Switching on the device for the first time
After you have switched the device on for the first time, the LCD display shows the clock display and the message [Tune to FM RDS station to set time & date].

In FM/DAB mode, time and date are set automatically as long as this has not been disabled.
7.2 Standby mode
You can adjust the following settings in standby mode:
- Manually set the time.
- Manually set the date.
- Switch the date on the display on/off.

Setting alarm light (only with sonoroLIGHT). Please see chapter 7.3
'Making the basic settings' on page 66.
The procedure for setting the individual functions is the same.
Setting the time manually
Fig, 10: Setting the time

- Press the [SETUP] button on the device or the remote control in Standby mode

The display shows [Set Time] (Fig. 11)
- Press the click wheel to set the hours.

The hour display flashes.
-
Turn the click wheel to set the hours.
-
Press the click wheel to confirm the setting.

The minute display flashes.
-
Turn the click wheel to set the minutes.
-
Press the click wheel to confirm the setting

The time is set.

Use the [Next] or [Previous] button to switch between the hours and minutes display.
After 10 seconds of inactivity, the device automatically goes into Standby mode without saving the settings.
Setting the date manually

Fig, 11: Setting the date
- Press the [SETUP] button on the device or the remote control in Standby mode.
The display shows [Set Time] (Fig. 11)
- Press the [Next] button.
The display shows the [Set Date] menu.
- Press the click wheel.
You can now set the date according to the same procedure as described in a 'Setting the time manually' on page 65.
Switching the date on/off

Fig, 12: Switching the date on/off
- Press the [SETUP] button on the device or the remote control in Standby mode.
The display shows [Set Time]
- Press the [Next] button twice..
The display shows the [Date]menu. (Fig. 12)
- Press the click wheel.
You can now switch the date on or off.
7.3 Making the basic settings
When the device is switched on, you can make the following configurations in the [Settings] menu:
- Set the time format.
-
Set the date format.
-
Setting display dimmer.
- Setting alarm light (only with sonoroLIGHT).
- Set the automatic time/date update function.
- Set the display language.
- Activate/deactivate Demo Sound.
Reset the device to the factory settings. To adjust the settings, proceed as follows:
- Press the [SETUP] button on the front of the device or the remote control to enter the corresponding submenu.
- Press the [Next] or [Previous] button or turn the click wheel to scroll through the individual menu items.
- To open the selected menu item, briefly press the click wheel or the [OK] button on the remote control.
- To exit the menu, briefly press the [SETUP] button on the device or on the remote control.

If you do not make any further entries, the menu will close and the display switches to the initial mode.
Setting the time format
Fig, 13: Setting the time format

You can choose between the 24-hour and 12-hour formats. In the 12-hour format, the time of day is indicated by [AM] and [PM].
Setting the date format
Fig, 14: Setting the date format

DDD dd.mm.yyyy

DDD mm.dd/yyyy

DDDmm dd,yyyy
You can set three different date formats (Fig. 14/A, B and C) as well as the current day. The configuration options are:
A: Current day, month, year.
B: Current month, day, year.
C: Current month (in words), day, year.
Setting display dimmer
Fig, 15: Setting display dimmer
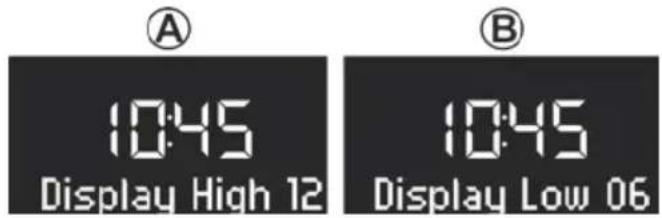
Depending on the ambient brightness, the display is switched to bright or dark. The ambient brightness is detected by a sensor beside the display.
You can set the desired brightness level.
- Display High: Level 08 to 15 (Fig. 16/A)
- Display Low: Level 01 to 08 (Fig. 16/B)
Setting alarm light
Fig, 16: Setting alarm light
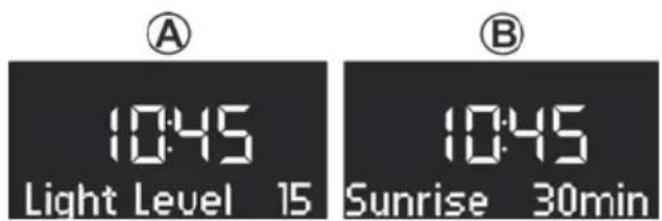
In addition to the alarm, you can also be woken up in the mornings with a light that gets gradually brighter (only in conjunction with sonoroLIGHT).
To this end, you can proceed as follows to set the desired brightness of the alarm light and the time-frame in which the alarm light should reach this brightness:
- Brightness: 01 to 32 (Fig. 16/A)
- Alarm light: 0 to 60 min (Fig. 16/B)
Setting the automatic time/date update function
Fig, 17: Setting the automatic update function

You can select the automatic update function in the [Set Time] submenu. Switching on this function automatically synchronizes the time and date in the FM radio and DAB radio operating modes. (Fig. 17)
Setting the display language
Fig, 18: Setting the language

You can set the language for the menu and the playback display (Fig. 18). The following languages are available:
- English
German - French
Switching Demo Sound on/off
Fig, 19: Switching Demo Sound on/off

You can switch the Demo Sound function on or off (Fig. 20).
Resetting the device to the factory settings
Fig, 20: Resetting to the factory settings

If necessary, you can reset all specified settings, such as language and time formats and saved stations, to the default factory settings (Fig 20).
7.4 Setting the sound
You can adjust the audio playback's sound using the bass and treble settings.
Fig, 21: Setting the sound
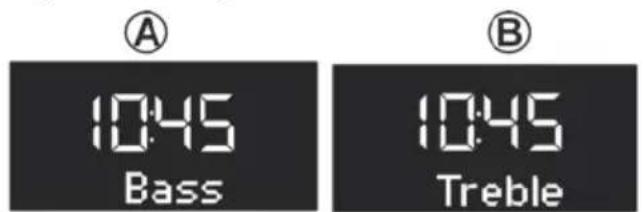
- Go to the corresponding submenu or press the corresponding button on the remote control.
- To adjust the bass, select [Bass] (Fig. 21/A) and turn the click wheel. To adjust the treble, select [Treble] (Fig. 21/B) and turn the click wheel.

Alternatively, you can also use the [Next] or [Previous] buttons to adjust the values.
- Press the click wheel to adopt the settings or wait 10 seconds.
7.5 Setting the Sleep Timer
The Sleep Timer is an automatic power-off function that switches the device to Standby mode after the specified time has expired.
Setting the Sleep Timer
Fig, 22: Switching on/off the Sleep Timer
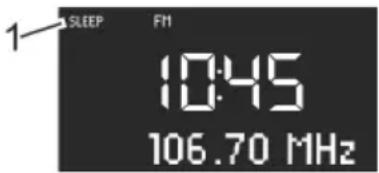
- Press [SLEEP] button on the top of the device or the remote control.

The display shows the [SLEEP] symbol (Fig. 23/1).
Switching off the Sleep Timer
- To switch off the sleep timer, press the [SLEEP] button again

The symbol on the display is hidden.

If the device was switched off by the Sleep Timer, it will start in the last heard mode when you turn it on again.
Setting the time interval for the Sleep Timer
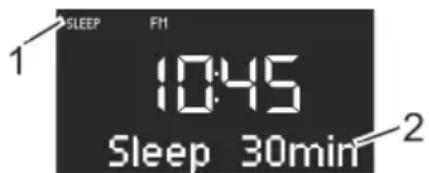
Fig, 23: Setting the time interval for the Sleep Timer
- Hold down the[SLEEP] button on the top of the device or the remote control.
The Sleep Timer appears (Fig. 23) and the Sleep symbol flashes.
(Fig. 23/1)
- Turn the click wheel to select the desired time interval length. (Fig. 23/2). The maximum time interval is 120 minutes.

Alternatively, you can also use the [Next] or [Previous] buttons to adjust the values.
- Press the click wheel to confirm the entry. When the specified time expires, playback gradually fades out.
GB
Dimming light (sunset)
In addition to a Sleep Timer, you can also dim or switch off a connected lamp (only in conjunction with sonoroLIGHT).
- Ensure that sonoroLIGHT is connected and that its dimmer function is switched on.
- Switch on the light, please see chapter 7.6 'Switching the light on and off' on page 71.
- Program a Sleep Timer.
After the Sleep Timer has elapsed, the light is reduced gradually and is
switched off after 40 seconds.

If you press the [Standby] button during the Sleep Timer, the light remains switched on. If you press the [Light] button while the light is being dimmed, the light is switched off immediately.
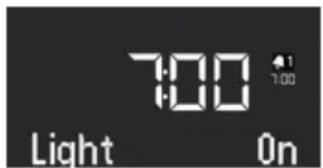
7.6 Switching the light on and off
You can switch a connected lamp on and off (only in conjunction with sonoroLIGHT).
- Ensure that sonoroLIGHT is connected and that its dimmer function is switched on.

Fig, 24: Switching on the light
- Press the [Light] button on the device or the remote control.
The light is switched on (brightness level 8) and the display shows the text [sonoroLIGHT On] (Fig. 24).
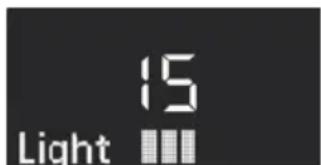
Fig, 25: Setting the brightness
- Turn the click wheel within 4 seconds to set the brightness of the light (level 00 to 32). (Fig. 26).

If the device is turned off, you can wait longer.
- Press the [Light] button again to switch the light off. If the device is turned off, you can turn the click wheel directly to switch the light on and set the brightness.
8. Alarm function
You can use the device to wake up with FM/DAB radio, CD, Relax Music or alarm ringtones. The alarm functions can also be set in the device's Standby mode.
The alarm setup menu is structured as follows:
Set the Alarm Time
Set the Alarm Source
Set the Alarm Volume
Set the Alarm Repetition
End

If you do not press any buttons for approx, 10 seconds when setting the alarm, the setting is terminated without saving it.
8.1 Setting the alarm time
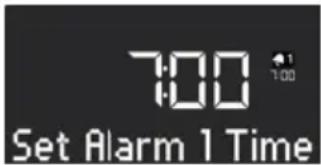
Fig, 26: Setting Alarm 1
- Keep the [Alarm 1] or [Alarm 2] button pressed.
The display shows:
[Set Alarm 1] (Fig. 26) or [Set Alarm 2] menu.
- Turn the click wheel to set the hours.
- Press the click wheel to confirm the entry.
The minute display flashes.
- Turn the click wheel to set the minutes.
- Press the click wheel to confirm the entry.

Use the [Next] or [Previous] button to switch between the hours and minutes display.
The alarm time is set.
8.2 Setting the alarm source
After you have set and confirmed the alarm time, you can set the source for the alarm.

Fig, 27: Setting the alarm source
- Turn the click wheel to select the medium you want to use: (Fig. 27)
| FM Select an | FM station preset from the station memory that you wish to start the device with and wake up to. |
| DAB Select a | DAB station preset from the station memory that you wish to start the device with and wake up to. |
| CD Select a | track from the CD you wish to start the device with and wake up to. |
| Relax Music Select | Select a Relax Music track from the memory you wish to start the device with and wake up to. |
| Ringtone Select | Select a ringtone from the memory that you wish to start the device with and wake up to. |
- Press the click wheel or the [OK] button on the remote control to confirm your setting.

The alarm source is set.
8.3 Setting the alarm volume
After you have set and confirmed the alarm source, you can set the alarm volume.
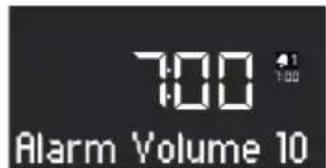
Fig, 28: Setting the alarm volume
-
Turn the click wheel to set the desired volume. (Fig. 28)
-
Press the click wheel or the [OK] button on the remote control to confirm your setting.
The alarm volume is set.


The alarm audio playback always starts with the minimum volume and gradually increases to the specified volume level.
8.4 Setting the alarm repetition
After you have set and confirmed the alarm volume, you can set the alarm repetition.
Fig, 29: Setting the alarm repetition

- Turn the click wheel to set the desired alarm repetition (Fig. 29). You can choose between the following settings:
Once
Daily
- At weekends
- On weekdays
- Press the click wheel or the [OK] button on the remote control to confirm your setting.
The alarm repetition is set.
8.5 Programming the alarm light (sunrise)
After you have set and confirmed the alarm repetition, you can set whether you would also like to be woken with an alarm light (with sonoroLIGHT only).
- Ensure that sonoroLIGHT is connected and that its dimmer function is switched on.
Fig, 30: Setting alarm light
- Turn the click wheel to switch the alarm light on and off. (Fig. 30).
- Press the click wheel or the [OK] button on the remote control to confirm your setting.
The alarm light is programmed.
To set the alarm light please see 'Setting alarm light' on page 68.
Example
Settings made:
Alarm time: 07:00 a.m.
- Brightness: 15
Timeframe: 30 min
At 06:30 a.m., the alarm light is switched on and the brightness is increased gradually from level 0 to level 15 by 07:00 a.m.
GB
8.6 Switching the alarm clock on/off
Switching on the alarm clock
- To switch on the alarm clock, briefly press the [Alarm 1] or the [Alarm 2] button on the front of the device or the remote control.
Switching off the alarm clock
- To switch off the alarm clock, briefly press the [Alarm 1] or [Alarm 2] button again.
8.7 Switching off the alarm clock after the alarm sounds
-
To switch off the alarm, press one of the following buttons:
-
[Alarm 1]
- [Alarm 2]
- Click wheel
- [Standby]
The alarm will remain activated for the next day. This does not apply if the non-recurring alarm setting is in use. The alarm light remains on and retains its current brightness.

After 60min the alarm is switched off automatically.
- Press the [Light] button to switch the alarm light off.
- To switch the alarm clock off and have it come back on after a set period of time (Snoopze), press the [SNOOZE] button on the remote control.

Alternatively, you can turn the click wheel when the alarm sounds to set the snooze time. Press the click wheel to confirm.
The remaining snooze time is displayed. After the set time expires, the alarm will sound again.
8.8 Setting the Snooze function
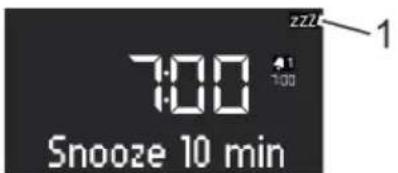
Fig, 31: Setting the snooze function
- Briefly press the [SNOOZE] button on the remote control in Standby mode. If the device is switched on, press and hold the [SNOOZE] button on the remote control until the Snooze sub-menu appears (Fig. 31).
The display shows the [Snoopze] symbol. (Fig. 31/1).
- Turn the click wheel to set the duration.
- Press the click wheel to confirm the entry.
9. General audio playback functions
9.1 Setting the volume
Fig, 32: Setting the volume
- Turn the click wheel to increase or decrease the volume.
The display shows a volume control. (Fig. 32)
9.2 Muting the audio playback
Mute

Fig, 33: Mute
- In playback mode, briefly press the [MUTE] button on the top of the device to turn off the sound during playback. Alternatively, you can also press the [MUTE] button on the remote control.

The [Volume Mute] text appears on the display.
Switching on the sound
- To turn the sound back on, press the [MUTE] button on the device or the remote control again.
The initial screen is displayed.
9.3 Selecting a playback mode
Select the desired mode to playback audio from different media or external devices.
Fig, 34: Selecting a playback mode
- Switch on the device.
- Press the [MENU] button on the front of the device or the appropriate button on the remote control.

The display shows the selected mode. (Fig. 34).

Alternatively, you can also rotate the click wheel after pressing the [MENU] button to toggle through the different modes. Confirm the mode by pressing the click wheel.
10. Radio playback
After you have selected radio playback from [FM] or [DAB] (digital radio), the display shows the FM or DAB symbol, as well as the following information:
Mode: FM or DAB.
- Stored programme channel, if the radio station is stored in the programme memory.
- Station name, if the station transmits RDS information.
- RDS information from the station, if the station transmits RDS information.

RDS ("Radio Data System") is only available for stations in the FM frequency range and only if the corresponding station transmits RDS data.
If the station does not broadcast RDS information, then the frequency is displayed instead of the station name.
10.1 FM-Radio
Finding FM stations
Automatic full scan
The automatic full scan function automatically creates and saves a station list with up to 30 stations. The stations are sorted according to the strongest reception.
Prerequisite:
- The antenna is connected.
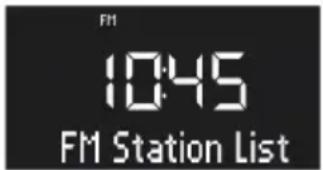
Fig, 35: FM station list
- Press the [SETUP] button.
The display shows the [FM Station List] (Fig. 35) - Press the [Next] button.
The display shows the [FM Auto Search] text. - Press the click wheel.
The display shows the [Auto Search YES] text.
- Press the click wheel again.
The automatic full scan is started. After the search is complete, the device will jump to the first station on the list.
Automatic tuning
Prerequisite:
- The antenna is connected
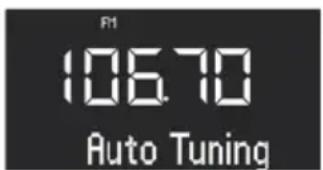
Fig, 36: Automatic tuning
- Press and hold the [Next] or [Previous] button in FM playback mode.
The display shows the [Auto Tuning] (Fig. 36) text. The device will search for available radio stations and play back the first available station.
Manual tuning
Prerequisite:
The antenna is connected.
Fig, 37: Manual tuning
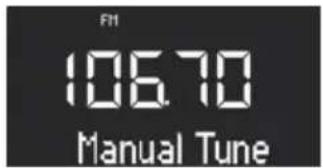
- Press and hold the click wheel to activate the manual station search function.

The display shows the [Manual Tune] text (Fig. 37)
- Turn the click wheel or press the [Next] or [Previous] buttons to change the frequency range.
- Press the click wheel to confirm your selection.
Storing FM stations as favourites
Fig, 38: Storing FM stations
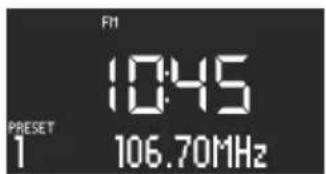
- Set the desired station.
- Press and hold one of the station preset buttons on top of the device or the remote control.

The display shows the station preset number. (Fig. 38).

You can save up to 6 FM stations as favourites.
Retrieving saved FM stations from the favourites
- Briefly press one of the station preset buttons 1-6 on top of the device or the remote control.

The selected station is played.
10.2 DAB radio
Finding DAB stations
Automatic tunning
Prerequisite:
The antenna is connected.
Fig, 39: Automatically finding DAB stations
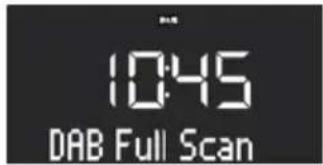
- Press the [SETUP] button in DAB playback mode
The display shows the [DAB Full Scan] text. (Fig. 39).
- Press the click wheel on the device or the [OK] button on the remote control to activate.
The device will search for available radio stations and play back the first available station.
Manual tuning
Prerequisite:
The antenna is connected.
Fig, 40: Manually finding DAB stations
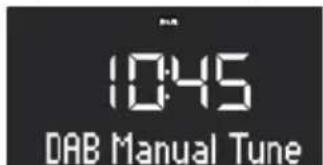
- Press the [SETUP] button in DAB playback mode.
- Press the [Next] button.
The display shows the [DAB Manual Tune] text. (Fig. 40).
- Press the click wheel on the device or the [OK] button on the remote control.
- Press the [Next] or [Previous] button, or turn the click wheel to scroll through the individual stations.
- Press the click wheel to confirm your selection.
Removing inactive stations - Prune list
If the DAB station list created using the DAB full scan function is out of date (e.g. after a change of address), you can remove inactive stations automatically.
Fig, 41: Deleting inactive DAB stations

- Press the [SETUP] button in DAB playback mode.
The display shows the [DAB Full Scan] text.
- Turn the click wheel until the display shows [Prune list] (Fig. 41)
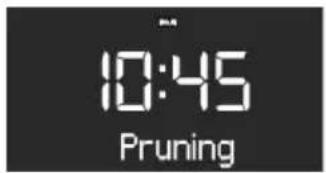
Fig, 42: Pruning
- Press the click wheel to confirm your selection.
Inactive DAB stations are deleted. In the meantime, [Pruning] is displayed.
Storing DAB stations as favourites
- To store a DAB station as a favourite, proceed as described in chapter 10.1 'FM radio' on page 78.

You can store up to 6 DAB stations as favourites.
Retrieving DAB info
In DAB playback mode, you can call up information on the station, programme, etc. The information is displayed in the following order:
- Station name (starting point)
- Broadcaster
- DLS ("Dynamic Label Service", programme-related information, such as artist, track, etc.)
Programme type (e.g. sport) - Station frequency
Signal quality
Prerequisite:
-
The device is in DAB playback mode. The display shows the station name.
-
To retrieve the different DAB information, press the [STOP] button on the device or the [DAB] button on the remote control.
The display shows the [Broadcaster] text.
- Press the [Stop] button again.
The display shows the [DLS] text. - Proceed accordingly to retrieve the remaining DAB information.
Setting the DRC
DRC ("Dynamic Range Compression") is used to compress the loudness level in pieces of music to allow for a uniform loudness level. Very loud and very quiet passages are equalised.
3 different settings are available:
- DRC HIGH: high degree of compression
- DRC LOW: low degree of compression
DRC OFF: no compression
Prerequisite:
-
The device is in DAB mode.
-
Press the [SETUP] button.
The display shows the [DAB Full Scan] text.
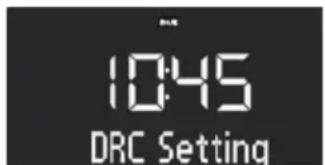
Fig, 43: Setting the DRC
- Press the [Next] button until the [DRC Setting] text is displayed.
- Press the click wheel on the device or the [OK] button on the remote control.
- Select the desired setting using the [Next] or [Previous] button.
- Press the click wheel to confirm the setting.
11. CD playback

NOTICE!
Material damage from improper operation!
Do not insert any recording media that deviate from the standard CD format (e.g. mini-discs, etc.) into the CD player. These may not be played and ejected correctly. Insert only one disc at a time into the CD player.
- Switch on the device.
- Insert the CD into the CD slot with the label side up.
The CD player will automatically pull in the CD and start playback.

If the device is in a different mode, it will automatically switch to CD mode.
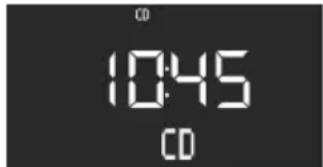
In CD mode, the display shows the following information:
Fig, 44: Display in CD mode
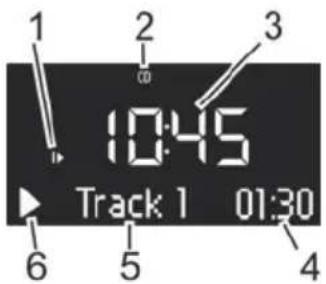
- Playback sequence (Repeat, Shuffle, CD Resume)
- CD mode
- Time
- Elapsed time in minutes
- Track number
- Playback status (Play/Pause)
Other functions
- To interrupt (pause) CD playback, press the [Play/Pause] button or the click wheel.
- To resume CD playback, press the [Play/Pause] button or the click wheel.
- To switch to the next track, press the [Next] button once.
- To fast forward through a track, press and hold down the [Next] button.
- To switch to the previous track, press the [Previous] button once.
- To fast reverse through a track, press and hold down the [Previous] button.
- To stop CD playback, press the [Stop] button.
- To eject the CD, press the [Eject] button.
- By pressing the [CD] button on the remote control (MP3 CD only), you can view the ID3 metadata, if available. The sequence for this is:
Track Artist Album Elapsed time
- Press the [Memory 2] button (MP3 CD only) to select the next folder.
- Press the [Memory 1] button (MP3 CD only) to select the previous folder.
Adjusting CD playback
You can choose different playback sequences to play tracks on a CD.
-
Press the [SETUP] button to open the CD menu. This includes the following functions:
-
Repeating a single track
- Repeat all tracks on the CD
Shuffle
CD Resume - Set bass
- Settreble
-
Settings
-
Turn the click wheel to select the function.
- Press the click wheel to confirm your selection.
Repeating a single track
The current track is played repeatedly. This function is terminated when you switch modes or eject the disc.
Repeating all tracks
All tracks on the CD are played repeatedly. This function is terminated when you switch modes or eject the disc.
Shuffle
All tracks on the CD are played in random order. This also happens when you press the [Next] or [Previous] button. This function is terminated when you switch modes or eject the disc.
CD Resume
The CD will resume playback from the last played position, even if you have switched modes or switch the device to Standby mode. This function is terminated when you eject the CD. This function is intended for audio books, for example.
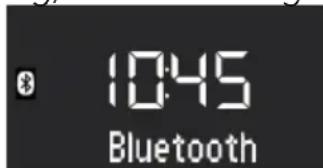
12. Bluetooth playback
12.1 Connecting Bluetooth devices
- Mobile phones and other Bluetooth-enabled devices can be connected to the radio via Bluetooth.

If necessary, use the manual of your mobile phone or your device for help.
- Switch on the device.
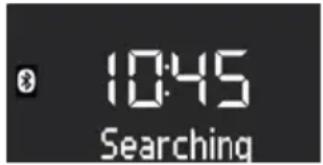
Fig, 45: Searching for Bluetooth
- Press the [MENU] button and select [Bluetooth] mode or press the [Bluetooth] button on the remote control.
The Bluetooth symbol flashes and the display shows the [Search] text.
(Fig. 45).
- Switch on the Bluetooth function of your mobile phone or device and select "QUBO" from the list of Bluetooth devices found.
The two devices are connected.

The radio can connect to up to 8 devices and connects automatically to previously configured devices if Bluetooth is enabled.
12.2 Connecting Bluetooth devices
Stored Bluetooth devices are connected automatically.
- Activate Bluetooth mode.
The Bluetooth symbol flashes and the display shows the [Search] text.
Fig, 46: Connecting Bluetooth devices
- Switch on the Bluetooth function of your mobile phone or device.
After pairing, the display permanently shows the [Bluetooth] text.
12.3 Playing music via Bluetooth
- To start playback, press the [Play/Pause] button or the click wheel.
- To interrupt (pause) playback, press the [Play/Pause] button or the click wheel.
13. AUX playback
You can connect and play additional audio devices via the AUX port on the back of the device.

Fig, 47: Activating AUX playback
- Switch on the device.
- Press the [MENU] button and select [AUX] mode or press the [AUX] button on the remote control.

The display shows the [AUX] symbol. (Fig. 47).
- Connect the external device to the AUX port using a cable.
- Turn on the external device and start playback on the external device

You cannot operate an external device using the buttons on the radio.
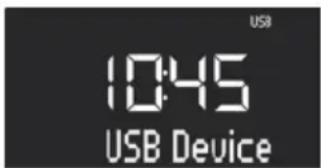
14. USB playback
You can connect additional devices to the radio and play music through the USB Charge & Playback port on the back.

The MP3 and WMA formats can be played.
Fig, 48: Set USB playback
- Switch on the device.
- Press the [MENU] button and select [USB] mode or press the [USB] button on the remote control.
The display shows the [USB] symbol. (Fig. 48).
- Connect an external USB device.

The display shows the text [Reading].
- Press the [Play/Pause] button to commence playback.
Other functions
- To interrupt (pause) playback, press the [Play/Pause] button or the click wheel.
- To continue playback, press the [Play/Pause] button or the click wheel.
- To switch to the next track, press the [Next] button once.
- To switch to the previous track, press the [Previous] button once.
- To stop playback, press the [Stop] button.
- By pressing the [USB] button on the remote control, you can view the ID3 metadata, if available. The sequence for this is:
"Track Artist Elapsed time
- Press the [Memory 2] button to select the next MP3 folder.
- Press the [Memory 1] button to select the previous MP3 folder.
15. Relaxation and meditation music
The device can offer language-specific relaxation and meditation music, which is sorted into various folders.
| Language | Folder Track Name | ||
| English 1-Brief relaxation 1 Quick Relaxation Exercise | |||
| 2 Quck Relaxation Exercise: Relaxing by letting go of stress | |||
| 2-Meditative relaxation 1 Relaxing by meditating on our breath | |||
| 3-Fantasising 1 A journey of the imagination "Beach and Warmth" | |||
| 4-Progressive muscle relaxation | 1 Progressive Muscle Relaxation according to Jacobson | ||
| 5-Relaxation music | 1 Relax Music 1 | ||
| 2 Relax Music 2 | |||
| 3 Relax Music 3 | |||
| 4 Relax Music 4 | |||
| 5 Relax Music 5 | |||
| 6 - Sounds of nature Ocean Surf | |||
| Whales | |||
| Birds | |||
| Rain | |||
| Wind Chimes | |||
| Fireplace | |||
- Switch on the device.
- Hold down the [RELAX] button on the top of the device or the remote control.
The display shows the [RELAX] symbol. - Press the [SETUP] button.
Fig, 49: Selecting the language menu

- Turn the click wheel until the display shows [Music Content].
- Press the click wheel to confirm your selection.
Fig, 50: Selecting the language

- Turn the click wheel to set the desired language.
- Press the click wheel to confirm your selection.
- Press one of the memory buttons 1-6 to select the desired folder.
Playback of the first track in this folder begins.
Fig, 51: Track name

- Press the [Next] or [Previous] button to select a track within the folder.
The display briefly shows the number and then the name of the track.
16. Demo Sound playback
Demo Sound can be played in Standby mode to demonstrate the device in a shop, for example.
Activating Demo Sound mode
- Press and hold the click wheel for approx. 3 seconds.
Demo Sound mode is activated.
- Press the 1-6 memory keys located on the top of the device or the remote control to select a Demo track.
The Demo Sound track is displayed.
Exiting Demo Sound mode
- Press and hold the [Standby] button or press and hold the click wheel for approx. 3 seconds to exit Demo Sound mode.

The following buttons are active:
-
Play/Pause.
-
Mute.
17. Troubleshooting
Malfunctions may occur with any electrical equipment. This is not necessarily due to a device defect. As such, you should check the following table to see if you can eliminate the problem yourself.
| Malfunction Possible | cause Elimination | |
| Device does not turn on | AC adapter with universal adapter is not properly connected | Properly connect the AC adapter with universal adapter (Please see chapter 7.3 'Connecting the power supply' on page 62). |
| No sound Volume is set | to minimum Increase the volume | (Please see chapter 9.1 'Setting the volume' on page 76). |
| Sound is turned off Switch on | the sound (Please see chapter 9.2 'Muting the audio playback' on page 76). | |
| Headphones are connected Pull the headphones out of the jack. | ||
| Another mode is set Set the correct mode (Please see chapter 9.3 'Selecting a play-back mode' on page 77). | ||
| CD playback does not start | CD format is not compatible Insert a different CD into the CD slot. | |
| CD is dirty Clean the CD. | ||
| CD is damaged Insert a different CD into the CD slot. | ||
| CD is upside down in the disc tray | Eject the CD and insert it correctly into the CD slot. | |
| USB playback does not start | USB device is not plugged in | Insert the USB device into the port on the back of the device (Please see chapter 14 'USB playback' on page 86). |
| USB device is not compatible | Check whether your USB device is compatible with the radio. | |
| USB device does not contain readable audio files | Check the files on your USB device. | |
| No Bluetooth connection, or Blue- tooth connection interrupted | Malfunctions due to other radio transmitters or devices | Increase the distance between the radio and your television. |
| Software not up to date Make sure that your external Blue- tooth device has the latest software version installed | ||
| Device not responding | Error in the device Switch the device off and on again. | |
| Poor FM/DAB reception | FM/DAB antenna is not properly aligned | Change the position of the FM/DAB antenna. |
| Remote control does not work, or only works sporadically | Distance too great Reduce the distance between the remote control and the device. | distance between the remote control and the device. |
| Battery empty Replace the battery in the remote control (Please see chapter 6.5 ‘Preparing the remote control’ on page 63). | ||
| Malfunctions due to other radio transmitters or devices | Increase the distance between the source of interference and the radio. Plug the device into another socket so that the source of interference and the radio are connected to different branch currents. | |
| Alarm does not work Alarm | arm is not switched on Switch on the alarm (Please see chapter 8.6 ‘Switching the alarm clock on/off’ on page 75). | the alarm (Please see chapter 8.6 ‘Switching the alarm clock on/off’ on page 75). |
| Alarm volume is set to minimum | Increase the volume (Please see chapter 8.3 ‘Setting the alarm volume’ on page 73). | |
| Headphones are connected | ull the headphones out of the jack. | |
| Alarm light does not work. | sonoroLIGHT is not connected. | Connect sonoroLIGHT and set the alarm light (Please see chapter 8.5 ‘Pro-gramming the alarm light (sunrise)’ on page 74). |
| sonoroLIGHT is connected but the dimmer function is switched | Switch on the dimmer function on sonoroLIGHT. | |
| The lamp connected to sonoro-LIGHT is switched off. | Switch the connected lamp on. | |
GB
18. Cleaning

NOTICE!
Material damage from improper cleaning!
Only clean the device from the outside using a dry, soft cloth. Never use abrasive or solvent- based cleaning agents as these may damage the surface of the device.
19. Technical data
| Specification Value | |
| Dimensions (W x D x H) approx. 210 x 257 x 140 mm | |
| Weight approx. 3.4 kg | |
| Operating temperature 0°C ~ +45°C | |
| Frequency range, FM 87.50 MHz | |
| DAB/DAB+ Band III, 174.928 | MHz-239.200 MHz |
| CD support formats CD-DA, CD-R*, CD-RW* Audio CD, MPEG 1 Layer 3 (MP3), Windows Media Audio (WMA, DRM not supported) Sampling rate 16KHz~48KHz, bit rate max. 320kbps (* Playback dependent on quality of recording and medium) | |
| USB charging Output: DC 5V | --- 1.0A |
| USB playback Compatibility system: FAT 16, FAT 32 (not compatible with NTFS or other systems) MPEG 1 Layer 3 (MP3), Windows Media Audio (WMA, DRM not supported) Sampling rate 16KHz~48KHz, bit rate max. 320kbps | |
| AUX-IN Port: 3.5mm jack Sensitivity: 300 mV | |
| Bluetooth Version 4.1, Profile : AVRCP v1.0, A2DP 1.0 2.402GHz-2.480GHz | |
| Transmitted power | 5dBm |
| AC/DC adapter | Ten Pao Industrial Co., Ltd. Model: S048CM1550290 Input: 100-240 V ~ 50/60 Hz 1,5 A Output: 15,5 V --- 2,9 A |
| Battery | CR2032 |
| Standby Power | < 1.0W |
20. Warranty
When submitting warranty claims, the following applies without restricting your legal rights:
- Warranty claims can only be asserted within a period of max. 2 years (1 year in North America and Australia), calculated from the date of purchase.
- sonoro audio GmbH shall, at its own discretion, repair or replace the device free of charge any defects caused by material or manufacturing defects within the warranty period.
- In case of a complaint, please contact our customer service department. You can find contact details under 'Contact data' on page 54 or at www.sonoro.de.
- No new warranty period begins following repair or replacement of the device. The warranty period of 2 years (1 year in North America and Australia) from date of purchase remains applicable.
- Excluded from the warranty are batteries, damage caused by improper use, normal wear and tear, as well as defects which only minimally affect the value or usability of the device. The warranty also expires for any modifications not made by our authorised service centre.
QUBOSO-220
SYSTEME AUDIO AVEC RADIO NUMÉRIQUE, RÉVEIL, LECTEUR CD & BLUETOOTH®
1. Introduction 100
10.Lecture radio 125
10.1 Radio FM 125
10.2 Radio DAB 127
11. Lecture de CD 130
12. Lecture Bluetooth 133
m = 311 ;
AUX
m = 311
FM

22.
SETUP
5. Weergave
Afb. 7: Weergave
NL
[Tune to FM RDS station to set time & date (Voor autoijd/datum RDS-zender
selecteren)].
NL

De alarmbron is ingesteld.
8.3 Wekvolume instellen
I'ora e il messaggio [Tune to FM RDS station to set time & date].

At sonoro we are putting the utmost effort in to developing state-of-the-art products with impeccable quality standards. It is very important to us that you stay satisfied with your sonoro product for the lifetime of the unit. If for any reason you need assistance or have a warranty claim, please do not hesitate to get in touch with our Service Team.