
Lono 04.1907.0011 - Vacuum packaging machines WMF - Free user manual and instructions
Find the device manual for free Lono 04.1907.0011 WMF in PDF.
| Brand | WMF |
| Model | Lono 04.1907.0011 |
| Product Type | Vacuum sealer |
| Rated voltage | 220-240 V~ 50-60 Hz |
| Power | 90 Watts |
| Protection class | II |
| Vacuum function | Dry and moist foods (Dry/Moist) |
| Sealing function | Single seal without vacuum, automatic seal after vacuum |
| Use with hose | For containers and special bags (vacuum hose) |
| Film roll compartment | Integrated, removable, for rolls up to 30 cm wide and 62 mm in diameter |
| Cutting device | Integrated removable cutter |
| Removable parts | Vacuum chamber, film roll compartment, cutting device, hose |
| Cleaning | Vacuum chamber and compartment dishwasher safe; appliance and cutter wiped with a damp cloth |
| Safety | Hot sealing bar (do not touch); emergency stop (Stop button); locking lever |
| Safety instructions | Domestic use; do not immerse in water; keep out of reach of children under 8 years |
| Repairs | Only by the manufacturer, its customer service or a qualified professional |
| Recommended accessories | WMF vacuum bags (200×300 mm) and film rolls (300×6000 mm) |
| Compliance | European directives 2014/35/EU, 2014/30/EU, 2009/125/EC |
| Disposal | Do not dispose of with household waste; recycle via collection points |
Frequently Asked Questions - Lono 04.1907.0011 WMF
User questions about Lono 04.1907.0011 WMF
0 question about this device. Answer the ones you know or ask your own.
Ask a new question about this device
Download the instructions for your Vacuum packaging machines in PDF format for free! Find your manual Lono 04.1907.0011 - WMF and take your electronic device back in hand. On this page are published all the documents necessary for the use of your device. Lono 04.1907.0011 by WMF.
USER MANUAL Lono 04.1907.0011 WMF
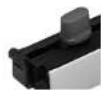
- Vacuum packer
- Detachable film box for vacuum film rolls
- Silicone rubber
- Detachable vacuum chamber
- Welding bar
- Detachable cutting unit with knife
- Vacuum tube connection point
- Lock-release lever
- Storage box for vacuum tube
- Control panel
Composition
Important safety information
-
This appliance can be used by children aged from 8 years and above and persons with reduced physical, sensory or mental capabilities or lack of experience and knowledge if they have been given supervision or instruction concerning use of the appliance in a safe way and understand the hazards involved. Children shall not play with the appliance. Cleaning and user maintenance shall not be made by children without supervision.
-
If the supply cord is damaged, it must be replaced by the manufacturer, its service agent or similarly qualified persons in order to avoid a hazard.
-
This appliance is not a toy.
- Keep the appliance and its power cord out of reach of children under the age of 8.
- Appliances can be used by persons with reduced physical, sensory or mental capacities or a lack of experience and/or knowledge if they are supervised or have been instructed on how to use the appliance safely and they understand the hazards involved.
- Do not immerse the appliance in water to clean it.
Always use the appliance in accordance with these instructions. Improper use may result in electric shocks or other hazards. - Improper use may cause injury. After use, clean all parts that come into contact with food, as described in the section on "Cleaning and maintenance".
- Repairs may only be carried out by the manufacturer, its after-sales service or similarly qualified professionals. Improper repairs may put users at serious risk.
-
This appliance is designed to be used in the household and for similar applications, such as:
-
Staff kitchen areas in shops, offices and other commercial environments;
Farmhouses - By guests at hotels, motels and other residential facilities;
-
At bed-and-breakfast establishments.
-
The appliance is not intended for purely commercial use.
Before use
The appliance may be used only for the intended purpose and in accordance with this instruction manual. No claims of any kind may be made for damage resulting from improper use. You are therefore advised to read the instruction manual carefully before use. It contains instructions for using, cleaning and looking after the appliance. We accept no liability for any damage resulting from non-observation.
Keep this instruction manual in a safe place and pass it on to any subsequent user together with the appliance. Please also note the separate warranty information. The safety precautions must be observed during use.
Technical data
Rated voltage: 220-240 V ~ 50-60 Hz
Power consumption: 90 walls
Protection class: II
Additional safety information
- The appliance should be connected only to wall sockets that have been installed in accordance with the regulations. The power cable and plug must be dry.
- Do not pull or clamp the connection cable over sharp edges. Do not leave it dangling. Protect it from heat and oil.
- Only use an extension cable if it is in perfect condition.
- Never pull the mains plug out of the socket by the power cord or with wet hands.
Do not carry the appliance by the cable. - Do not place the appliance on hot surfaces such as hotplates or near open gas flames because this could melt the casing.
- Do not place the appliance in the vicinity of flammable materials.
- Do not place the appliance on water-sensitive surfaces. Splashes of water may damage such surfaces.
- Caution: The appliance's welding bar gets very hot! Do not touch it. In order to avoid burns, never touch the welding bar while the appliance is in use.
- Only use sachets and film rolls that are suitable for vacuum packing. Make sure that the sachets and film rolls are also suitable for defrosting and reheating in the microwave and do not exceed the temperatures permitted for the sachets and film rolls.
- Do not use or store the appliance outside, in damp rooms or within reach of children.
The appliance must be supervised when in use. - When the appliance is not being used, pull the mains plug out of the socket.
- Stop using the appliance and/or pull the mains plug out of the socket immediately if: the appliance or the mains cable is damaged or
you suspect that the appliance may be defective following a fall or similar incident.
In such cases, arrange for the appliance to be repaired.
- No liability shall be accepted for any damage resulting from misuse, incorrect operation or improper repairs. Warranty claims shall likewise be excluded in such cases.

Safety information for handling food
- Once perishable foods have been heated, defrosted or stored at room temperature, they must be consumed immediately.
- Before you vacuum pack food, wash your hands thoroughly, as well as any objects and surfaces that come into contact with food.
- Store perishable food in the refrigerator or freezer immediately after vacuum packing. Do not leave out at room temperature.
- Store dry foods, such as nuts, coconut or grains, in a dark place once vacuum packed. This will extend their shelf life.
- To prevent the fats in particularly fatty foods from turning rancid, they should not come into contact with oxygen or warmth.
- Fruit and vegetables, such as apples, bananas, potatoes and root vegetables, that are peeled before vacuum packing can be stored for longer.
- Some vegetables, such as broccoli, cauliflower, and cabbage, produce gasses. In order to seal these foods and make them completely airtight, they must be briefly blanched and then frozen before vacuum packing.
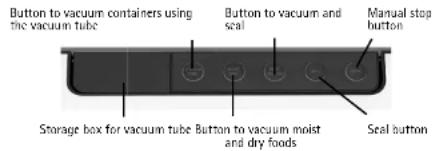
Control panel
Use
You can use the Lono vacuum packer to vacuum pack and seal various dry and moist foods in sachets or fi lm. Generally speaking, foods in vacuum-sealed packaging stay fresh eight times longer than when traditional storage methods are used. The fi avour is also entirely preserved. Use the Lono vacuum packer to store cooked foods under an airtight seal. You can choose to store individual portions or entire meals. Vacuum pack meat, fi sh, poultry, sea food, fruit and vegetables for storage in the refrigerator or freezer.
You can use the enclosed vacuum tube to vacuum pack delicate foods, such as berries, in containers designed specifically for this purpose.
Note:
For perfect results, we recommend that you use the following WMF vacuum sachets and fi lm rolls, which have been optimally tailored to the appliance:
Item no. 04 1997 0041: WMF vacuum sachets 200 x 300 mm
Item no. 04 1998 0041: WMF vacuum fi Im rolls 300 x 6,000 mm
If you use vacuum sachets or fi lm rolls from another manufacturer, make sure that they do not exceed the maximum width of 30~cm and maximum fi lm roll diameter of 62~mm . The vacuum sachets and fi lm rolls must also be suitable for vacuum packing.
Before using for the first time
Cleaning
Before using the appliance for the fi rst time, clean all parts thoroughly and dry them. Wipe the vacuum packer (1) with a slightly damp cloth and then dry the appliance. You must also observe the cleaning information in this instruction manual.
Initial operation
Each time before you use the appliance and after each time you seal food, you must thoroughly clean the vacuum packer and all parts that come into contact with food. You must also wash your hands thoroughly.
Vacuum packing using sachets
- Fill the vacuum sachet with food.
- Clean and, if necessary, smooth down the open end of the sachet. Make sure that there are no wrinkles, folds or spices at the end of the sachet, as these prevent the appliance from sealing the sachet completely.
- Now insert the mains plug into the socket.
- Open the lid on the vacuum packer (1)
- Place the sachet with the open side in the vacuum chamber (4). Make sure that the end of the sachet is roughly in the middle of the vacuum chamber, in order to produce an optimal vacuum.
- Hold the vacuum sachet in place and close the lid.
- Press and hold down the appliance's lid and turn the lock-release lever (8) towards the 0 lock icon until it is almost vertical.
- The appliance is pre-set to vacuum pack dry foods, such as coffee beans, nuts and rice. If you would like to vacuum pack moist foods, such as marinated meat or blanched vegetables, press the MOIST DRY button once. The ring of light around the button will turn from white to blue to indicate that the Moist function has been activated. Note: After vacuum packing moist food, empty and clean the detachable vacuum chamber (4).
- Then press the SEAL VACUUM button to seal the sachet after vacuuming. The ring of light around the button will turn white. If you have selected the wrong function by mistake, you can interrupt the process at any time by pressing the STOP button.
- The appliance will turn off automatically once the process is complete.
- To seal the sachet without fi rst producing a vacuum, press the SEAL button. The ring of light will turn white for the duration of the sealing process.
- Turn the lock-release lever (B) towards the lock icon, then open the lid on the vacuum packer. 13. If you have finished using the appliance, clean it, close the lid and turn the lock-release lever (B)
until it reaches a horizontal position. In this position, the lid is only gently locked and the seals are protected.
Vacuum packing using fi lm rolls in the detachable fi lm box
- Push back the cover on the detachable fi lm box (2).
- Place the fi lm roll in the fi lm box. Ensure that the fi lm roll is positioned in the fi lm box as shown in the image.
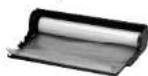
Then close the cover on the fi lm box again.
- Pull the fi lm roll out of the fi lm box. The fi lm should come out at least 10 cm over the front edge of the fi lm box.
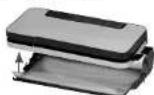
- Carefully lower the vacuum packer onto the hooks on the sides of the fi lm box. Make sure that the guides on both sides of the vacuum packer click into place. You will hear the click.
- Now insert the mains plug into the socket.
- Open the lid on the vacuum packer.
- Remove the detachable cutting unit (6). You can remove this easily using the snap-on hooks on each side of the cutting unit.
- Fold the excess fil im to the vacuum packer and reinsert the cutting unit. Make sure that the cutting unit is level and clicks into place on both sides.
- Place the film sieve with the open end on the welding bar (5). The film may enter the vacuum chamber (4) slightly at this point.
- Hold the film sleeve in position and close the lid.
- Then press the SEAL button to seal the fi lm sleeve. The ring of light will turn white for the duration of the scaling process.
- After sealing, pull the film upwards to the desired length.
- Fold the filim forwards and cut it by pushing the knife that is integrated into the cutting unit from left to right.
- The resulting fi lm pouch can now be filled with food and vacuumed and sealed as described under "Vacuum packing using sachets".
Using the vacuum tube
You can use the vacuum tube to vacuum suitable sachets and containers. Before you use it, check whether your sachet or container is suitable for vacuum packing using a vacuum tube (9).
- Remove the vacuum tube from the storage box (9) and connect it to the designated opening on the right-hand side of the vacuum packer.
- Now insert the mains plug into the socket.
- Press and hold down the appliance's lid and turn the lock-release lever (8) towards the lock icon until it is almost vertical.
- Now attach the tube to the sachet/ container.
- Then press the VACUUM TUBE button to extract the air from the sachet/container. Note: The volume of air to be extracted may vary depending on the sachet/container used.
- The appliance will turn off automatically once the process is complete.
- Now close the valve or the seal on the sachet/container to prevent air from entering.
- Remove the vacuum tube and store it in the storage box [9] provided.
- Turn the lock-release lever (8) towards the lock icon, then open the lid on the vacuum packer.
Cleaning and care
Cleaning
Pull out the mains plug and allow the appliance to cool down.
Do not immerse the appliance in water. Instead, wipe it clean using a damp cloth and a little washing-up liquid.
| dishwasher-safe | can be rinsed under running water | wipe clean with a damp cloth | |
| Vacuum packer (1) | - | - | ✓ |
| Detachable fi lm box (2) | - | ✓ | ✓ |
| Detachable vacuum chamber (4) | ✓ | ✓ | ✓ |
| Detachable cutting unit (6) | - | - | ✓ |
| Vacuum tubc | - | - | ✓ |

For UK use only
- This product is supplied with a 13 A plug conforming to BS 1363 fitted to the mains lead. If the plug is unsuitable for your socket outlets or needs to be replaced, please note the following. If the plug is a non-rewritable one, cut it from the mains lead and immediately dispose of it. Never insert it into a socket outlet as there is a very great risk of an electric shock.
The replacement of the plug at the mains lead has to be done according to the following
instructions:
Important: The wires in this mains lead are coloured in accordance with the following code:
blue Neutral brown live
As the colours of the wires in the mains lead of this
appliance may not correspond with the coloured markings
identifying the terminals in your plug, proceed as follows:
the wire which is coloured blue must be connected to the terminal which is marked with the
letter N or coloured black.
the wire which is coloured brown must be connected to the terminal which is marked with
the letter L or coloured red.
Do not connect any wire to the terminal which is marked
with the letter E or by the earth symbol 念 ,or coloured green or green and yellow.
If a 13 A (BS 1363) plug is used it must be fitted with a 13 A fuse conforming to BS 1362 and be
ASTA approved. If any other type of plug is used, the appliance must be protected by a 10 A fuse
either in the plug or adapter or at the distribution board.
If in doubt - consult a qualified electrician.
- Never use the plug without closing the fuse cover.
The appliance complies with European directives 2014/35/EU, 2014/30/EU and 2009/125/EU.
At the end of its life, this product may not be disposed of in normal household waste, but must instead be taken to a collection point for recycling electrical and electronic appliances.
The materials are recyclable in accordance with their labelling. Reuse, recycling and other ways of reutilising old appliances make an important contribution to protecting our environment.
Please ask your local authorities for information about the appropriate disposal point.
End users are personally responsible for deleting any personal data that may be stored on appliances they are disposing of.