
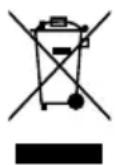
HB 0806 UP0 - Food processor HOTPOINT-ARISTON - Free user manual and instructions
Find the device manual for free HB 0806 UP0 HOTPOINT-ARISTON in PDF.
| Product type | Food processor |
| Brand | Hotpoint-Ariston |
| Model | HB 0806 UP0 |
| Power supply | Electric (mains plug, voltage according to rating plate) |
| Main functions | Blender, spiralizer, chopper, food processor with slicing/grating blades |
| Chopper bowl capacity | 500 mL |
| Large bowl capacity | 1250 mL |
| Speeds | Variable with adjustment knob, Turbo function for maximum speed |
| Safety | Automatic stop after 2 minutes of continuous operation, soft start, lid lock |
| Cleaning and maintenance | Removable parts washable in warm soapy water; motor wiped with a damp cloth; do not immerse |
| Blades | Very sharp metal blades, handle with care |
| Accessories included | Motor, blender, beaker, chopper lid, chopper blade, chopper bowl, pusher, food processor lid, food processor blade, food processor bowl, fine slicing blade, coarse slicing blade, blade holder, spiralizer pusher, chopper pusher, spiralizer lid |
| Use | Household use only |
| Important safety instructions | Do not use with an external timer; do not immerse; unplug before cleaning; do not touch with wet hands |
Frequently Asked Questions - HB 0806 UP0 HOTPOINT-ARISTON
User questions about HB 0806 UP0 HOTPOINT-ARISTON
0 question about this device. Answer the ones you know or ask your own.
Ask a new question about this device
Download the instructions for your Food processor in PDF format for free! Find your manual HB 0806 UP0 - HOTPOINT-ARISTON and take your electronic device back in hand. On this page are published all the documents necessary for the use of your device. HB 0806 UP0 by HOTPOINT-ARISTON.
USER MANUAL HB 0806 UP0 HOTPOINT-ARISTON
EN Operating instructions
FR Mode d'emploi
RU Hnctpykunno 3KcnpyaTaun
TR Kullanma talimatlari
- Before using the appliance, read these safety instructions. Keep them nearby for future reference. These instructions are also available on www.hotpoint.eu
- Before using the appliance carefully read Health and Safety and Use and Care guides.
- Keep these instructions close at hand for future reference.
- Your safety and safety of others is very important
This manual and the appliance itself provide important safety warnings, to be read and observed at all times - All safety warnings give specific details of the potential risk presented and indicate how to reduce risk of injury, damage and electric shock resulting from improper use of the appliance. Carefully observe the following instructions.
- Failure to observe these instructions may lead to risks. The Manufacturer declines any liability for injury to persons or animals or damage to property if these advices and precautions are not respected.
- This product should not be used by children under 8 years old, unless supervised by an adult.
- Children from 8 years old and above and persons with reduced physical, sensory or mental capabilities or lack of experience and knowledge can use this appliance only if they are supervised. Alternatively these people can use if have been given instructions on safe appliance use and if they understand the hazards involved. Children shall not play with the appliance. Cleaning and user maintenance shall not be made by children without supervision.
- The metal blades and disc are extremely sharp, care shall be taken when handling, emptying the bowl and during cleaning of the appliance. Always hold the blade attachment away from the cutting edges, both when handling and cleaning the unit.
- Avoid contact with any moving parts.
eh
INTENDED USE OF THE PRODUCT
- This appliance is designed solely for domestic use. This product is not intended for commercial use. The manufacturer declines all responsibility for innapropriate use or incorrect setting of the controls.
- CAUTION : The appliance is not intended to be operated by means of an external timer or separate remote control system.
- Do not use the appliance outdoors.
- Do not store explosive or flammable substances such as aerosol cans and do not place or use gasoline or other flammable materials in or near the appliance: a fire may break out if the appliance is inadvertently switched on.
INSTALLATION
- Repairs must be carried out by a qualified technician, in compliance with the manufacturer's instructions and local safety regulations. Do not repair or replace any part of the appliance unless specifically stated in the user manual.
- Children should not perform installation operations. Keep children away during installation of the appliance. Keep the packaging materials (plastic bags, polystyrene parts, etc.) out of reach of children, during and after the installation of the appliance.
- After unpacking the appliance, make sure that it has not been damaged during transport. In the event of problems, contact the dealer or your nearest After-sales Service.
- Keep children away during installation of the appliance.
- The appliance must be disconnected from the power supply before carrying out any installation operation.
- During installation, make sure the appliance does not damage the power cable.
- Only activate the appliance when the installation procedure has been completed.
ELECTRICALWARNINGS
- Make sure the voltage specified on the rating plate corresponds to that of your home.
- For appliances with fitted plug, if the plug is not suitable for your socket outlet, contact a qualified technician.
- Do not use extension leads, multiple sockets or adapters. Do not connect the appliance to a socket which can be operated by remote control.
- The power cable must be long enough for connecting the appliance, once fitted in its housing, to the main power supply.
- Do not pull the power supply cable.
- If the power cable is damaged it must be replaced with an identical one. The power cable must only be replaced by a qualified technician in compliance with the manufacturer instructions and current safety regulations. Contact an authorized service center.
- Do not operate this appliance if it has a damaged mains cord or plug, if it is not working properly, or if it has been damaged or dropped. Do not immerse the mains cord or plug in water. Keep the cord away from hot surfaces.
- Do not touch the appliance with any wet part of the body and do not operate it when barefoot.
CORRECT USE
- Make sure that all parts and lids are securely locked in palce before operating the appliance.
- The fasteners must be locked in the two clip positions, otherwise during operating the bowl lid may rotate as the motor rotates.
- Do not attempt to tamper with the lid interlock mechanism.
- Before disassembling the appliance, switch off the unit and wait until the blades have come to a complete stop.
- Always remove the blade assembly before pouring any contents from the bowl.
- Never insert food by hand. Always use the food pusher.
eh
- Do not put your fingers or other objects into the unit opening while it is in operation. If any food gets stuck in the opening, use the food pusher or another piece of fruit gets vegetable to push it down. When this method is not possible, turn the appliance off and disassemble the unit to remove the remaining food.
- Keep your hands and utensils out of the container while blending to reduce the risk of severe injury to persons or damage the blender. A scraper may be used when the appliance is not operating.
- Be careful if hot liquid is poured into the appliance as it can be ejected out of the appliance due to a sudden steaming.
CLEANING AND MAINTENANCE
- The appliance must be disconnected from the power supply before carrying out any cleaning or maintenance.
- Do not immerse the main motor, cord or plug in water. Use a damp cloth and let it dry.
- Never use steam-cleaning equipment.
- Use the brush provided to clean the blades, they are sharp.
INTRODUCTION
Thank you for purchasing our product. In doing so, you have opted for an effective high-performance appliance.
This Hand Blender has two special function:
- The Hand Blender automatically stops operations after continuous working longer than two minutes. Press the buttons to restart.
- This appliance is provided with special SOFT START FUNCTION, which makes the motor start slowly before reaching the full blending power, for a more comfortable use and a greater control.
These operating instructions refer to various models. An overview of the different models can be found on the illustrated pages.
If the instructions on the correct use of this appliance are not observed, the manufacturer shall assume no responsibility for any resulting damage. The operating instructions may describe different models: any difference is clearly identified.
PARTS AND FEATURES
Attachments supplied may vary by model
Figure 1
- Hand Blender Motor
- Blender attachment
- Beaker + silicon lid
- Chopper lid
- Chopper's knife blade
- Chopper bowl
- Food processor pusher
- Food processor lid
- Food processor's knife blade
- Food processor bowl
- Fine shredder
- Coarse shredder
- Blades support
- Spiralizer Pusher
- Slicer Pusher
- Spiralizer lid
- Blades
BEFORE FIRST USE
Carefully wipe the outside of the appliance to remove any dust that may have accumulated. Dust with a dry cloth.
USING THE PRODUCT
BLENDER ATTACHMENT
Figure 2
The blender attachment is suitable for blending liquids and vegetables.
- To assemble the blender attachment to the motor unit, just push it until the two small buttons on the left and on the right of the connector have clicked.
- Peel or core the fruits and then cut them into small pieces. Then put the fruit pieces or vegetables into the beaker. Usually a certain amount of water has to be added to facilitate smooth running, the proportion of food and water being 2:3. The mixture amount should not exceed the max capacity of the cup.
- Plug the appliance into the power outlet.
- Lower the hand blender into the food and rotate the speed-adjusting dial to select the desired speed. Pressing and holding the ON/OFF button, the blender starts blending immediately. For maximum-speed blending use the TURBO button for a short time.
SPIRALIZER ATTACHMENT
Figure 6
To assemble the blade into the cone support:
- Insert the blade into the cone support from the central pin.
- Press the blade where marked on the image. A click will be heard.
Figure 6
To remove the blade from the cone support:
- Turn upside down the cone support.
- Press the blade where marked on the image. A click should be heard and the blade will be unlocked.
- Caution: the blade is very sharp, handle with care. We recommend that food size should be 30 - 60mm in diameter and 100 - 175mm in length.
eh
The slice blade can cut in ribbons or slices with 3mm thickness.
The strip blade can cut in noodles or strip with 3mm^*3mm thickness.
- Don't operate hard food for more than 10 seconds continuously.
To use the spiralizer attachment as a spiralizer follow these instructions:
Figure 3
- First of all, make sure the non-slip ring is fixed to the bottom of the bowl
- Install the bottom lid on the bowl.
- Fit the desired blade (ribbon or noodles) on the pin in the cone support- always fit the blade before adding the ingredients. Insert the cone support into the bottom lid.
- Place and rotate clockwise the upper lid until blocked in position, as shown in pic.
- Remove the chopper pusher and flip the inlet cover over the chopper feeding chute.
- Assemble the motor unit into the bowl lid until the two small buttons on the left and on the right of the connector have clicked.
- Plug the appliance into the power outlet.
- Prepare the vegetables or fruit cutting a flat side. Insert the hook of the spiralizer pusher into the food until it is firmly inserted.
Figure 13
- Insert the spiralizer pusher with vegetables or fruits in the spiralizer feeding chute. Please be sure that foods cannot rotate.
- Rotate the speed-adjusting dial to select the desired speed. Pressing and holding the ON/OFF button, the attachment starts chopping immediately. For maximum speed press the TURBO button for a short time.
- To remove scraps, push the release button on the top side of the spiralizer pusher. Scaps will be ejected and detached.
- Open the lids to access to the bowl and to processed foods.
To use the spiralizer attachment as a chopper follow these instructions:
Figure 4
- First of all, make sure the non-slip ring is fixed to the bottom of the bowl
-
Install the bottom lid on the bowl.
-
Fit the desired blade (slice or strip) on the pin in the cone support - always fit the blade before adding the ingredients. Insert the cone support into the bottom lid.
- Place and rotate clockwise the upper lid until blocked in position, as shown in pic.
- Remove the spiralizer pusher and flip the inlet cover over the spiralizer feeding chute.
- Assemble the motor unit into the bowl lid until the two small buttons on the left and on the right of the connector have clicked.
- Plug the appliance into the power outlet.
- Insert vegetables or fruits in the chopper feeding chute and insert the standard chopper pusher.
- Rotate the speed-adjusting dial to select the desired speed. Pressing and holding the ON/OFF button, the attachment starts chopping immediately. For maximum speed press the TURBO button for a short time.
- Open the lids to access to the bowl.
HINTS
- Spiralized vegetables are a low-carb substitutes for pasta and noodles.
- Firm fruits without seeds or hollow centre will perform better.
- Select vegetables as straight as possible.
- Fruits like pears should be mixed with some drops of lemon juice to prevent browning once the surface has been cut
- Prepared potatoes and parsnips also discolor in air if not used immediately so to avoid this prepare these items just before you want to serve them.
- Processed vegetables could be eaten raw or oven cooked or stir fried.
- You can use the small cone left over to decorate plates.
CHOPPER ATTACHMENT
Figure 7
- The chopper is perfectly suitable for hard food, such as chopping meat, cheese, onion, herbs, garlic, carrots, walnuts, almonds, prunes etc.
-
Don't chop extremely hard food, such as ice cubes, nutmeg, coffee beans and grains.
-
Carefully remove the plastic cover from the blade.
- Fit the knife blade on the pin in the bowl - always fit the knife blade before adding the ingredients.
- Cut the food into small pieces and put them into
the bowl.
- A small amount of water can facilitate the smooth running of the appliance.
-
The mixture amount should not exceed the max capacity of the bowl.
-
Close the lid.
- Assemble the motor unit into the bowl lid until the two small buttons on the left and on the right of the connector have clicked.
- Plug the appliance into the power outlet.
- Rotate the speed-adjusting dial to select the desired speed. Pressing and holding the ON/OFF button, the attachment starts chopping immediately. For maximum speed press the TURBO button for a short time.
- Remove the knife blade first before pouring out the mixture.
- Don't operate hard food for more than 10 seconds continuously.
FOOD PROCESSOR ATTACHMENT
Figure 8-9
To use the food processor attachment as a chopper follow these instructions:
- First of all make sure the non-slip ring is fixed to the bottom of the bowl.
- Fit the knife blade on the pin in the bowl - always fit the knife blade before adding the ingredients.
- Cut the food into small pieces and put them into the bowl.
A small amount of water can facilitate the smooth running of the appliance.
The mixture amount should not exceed the max capacity of the bowl.
4. Rotate counter clockwise the lid until blocked in position, as shown in pic. 10
Make sure the food pusher is properly fitted into its housing on the cover.
5. Assemble the motor unit into the bowl lid until the two small buttons on the left and on the right of the connector have clicked.
6. Plug the appliance into the power outlet.
7. Rotate the speed-adjusting dial to select the desired speed. Pressing and holding the ON/OFF button, the attachment starts chopping immediately. For maximum speed press the TURBO button for a short time.
8. Remove the knife blade first before pouring out the mixture.
- Don't operate hard food for more than 10 seconds continuously.
-
To use the food processor attachment with shredding/slicing inserts follow these instructions:
-
First of all make sure the non-slip base is fixed to the bottom of the bowl.
- Fix the desired insert into the blades support as shown in pic. 11
- Put the support into the pin on the bottom of the bowl.
- Rotate counter clockwise the lid until blocked in position, as shown in pic. 10
The fasteners must be locked in the two clip positions, otherwise during operating the bowl lid may rotate as the motor rotates.
- Insert the bottom part of the motor unit into the opening on the bowl lid, until the two small buttons on the left and on the right of the connector have clicked.
- Plug the appliance into the power outlet.
- Put the food inside the feeding tube and push it slowly with the food pusher. Do not push heavily.
- Rotate the speed-adjusting dial to select the desired speed. Pressing and holding the ON/OFF button, the attachment starts chopping immediately. For maximum speed press the TURBO button for a short time.
To remove the blades support after using pull with two fingers as shown in pic. 12
TIPS
- Use the shredding side for carrots, potatoes and foods of a similar texture.
- Use the slicing side for food items such as carrots, potatoes, cabbages, cucumbers, courgettes and onions.
- Use fresh ingredients.
- Do not cut food too small. Fill the feed tube uniformly. This prevents the food from pouring out during processing.
Times and quantities in the tables are approximate and could vary depending on the quality of ingredients or preference.
| 500ml Chopping bowl | |||
| Food Max | mum Operation time | Preparation | |
| Meat 250g | 8sec 1~2cm | ||
| Herbs 50g | 8sec / | ||
| Nuts 100g | 8sec / | ||
| Cheese 10g | 0g 5sec 1~2cm | ||
| Bread 80g | 5sec 1~2cm | ||
| Onions 150g | 8sec 1~2cm | ||
| Biscuits 150g | 6sec 1~2cm | ||
| Soft fruit 200g | 6sec 1~2cm | ||
| Flour 350g | 10sec /Sugar 8g | ||
| Salt 8g | |||
| Big bowl (1250ml) (Chopping) | |||
| Food | Maximum | Operation time | Preparation |
| meat | 500g 10sec | 1~2cm | |
| herbs | 100g 8sec | / | |
| nuts, almonds | 300g 10sec | / | |
| cheese | 200g 10sec | 1~2cm | |
| bread | 160g 8sec | 1~2cm | |
| onions | 300g 8sec | 1~2cm | |
| biscuits | 300g 8sec | 1~2cm | |
| soft fruit | 400g 10sec | 1~2cm | |
| Flour | 500g | 10s | / |
| Water | 300g | ||
| Barm 10g | |||
| Sugar | 10g | ||
| Salt | 10g | ||
| Big bowl (1250ml) (Slicing/Grating) | |||
| Food | Maximum | Operation time | Preparation |
| Potatoes | 500g | 60s | Suitable for feed inlet |
| Carrots | 500g | 60s | Suitable for feed inlet |
| Cucumber | 500g | 60s | Suitable for feed inlet |
CLEANING AND MAINTENANCE
To prevent any damage to the appliance do not use harsh solvents or abrasive cleansers when cleaning.
Unplug the appliance from the power supply before cleaning.
- Wash the blender attachments and lids under running water without any abrasive cleaners or detergents. After cleaning, place them upright so that any water that may have got in can drain out.
-
Do not immerse the blender and lids in water, as the lubrication on the bearings may be washed away over time.
Lids and motor unit aren't suitable for dishwasher -
Wash the containers and whisk in warm soapy water.
All removable parts can be washed in warm soapy water and then carefully rinsed and dried. If necessary, use a nylon-bristle brush to complete the cup cleaning operation.
- Wipe the motor unit with a damp cloth.
- The non-slip base on the bottom of the bowl can be removed and cleaned. Make sure it is replaced correctly before using it again.
- Dry all detachable parts thoroughly.
TIP
For quick cleaning between processing tasks, fill the chopper or food processor bowl with water halfway, assemble the chopper blade into the bowl and the motor unit onto the lid according to the description in the operation section and start chopping function for a few seconds.
SAFEGUARDING THE ENVIRONMENT DISPOSAL OF PACKAGING MATERIALS

The packaging material is 100% recyclable and is marked with the recycle symbol (^*) . The various parts of the packaging must therefore be disposed of responsibly and in full compliance with
local authority regulations governing waste disposal.
DISPOSAL OF HOUSEHOLD APPLIANCES
This appliance is manufactured with recyclable or reusable materials. Dispose of it in accordance with local waste disposal regulations. For further information on the treatment, recovery and recycling of
household electrical appliances, contact your local authority, the collection service for household waste or the store where you purchased the appliance. This appliance is marked in compliance with European Directive 2012/19/EU, Waste Electrical and Electronic Equipment (WEEE). By ensuring this product is disposed of correctly, you will help prevent negative consequences for the environment and human health. The () symbol on the product or on the accompanying documentation indicates that it should not be treated as domestic waste but must be taken to an appropriate collection center for the recycling of electrical and electronic equipment.
CONSIGNES DE SECURITE IMPORTANT À LIRE ET RESPECTER
COCTABHbIE YACTN INXAPAKTEPNUCTUKN
B 3aBnCmOCTN OT MOeJI N KOMJIeKT HacaIOK MoKet BapbIPOBaTbcr.
PNCYHOK1
- Kopnyc c dBnrgateJelem
- Hacaika 6neHep
- CτaKaH 6πeHεpepa
- Kpbiuka n3MeIbUHTeJIa
- Hox n3MeIbUteJIa
- Yaa n3MeBbYTeJr
- TolkateIb
- Kpbiuka kombaHa
- HoK Kom6aHa
- Yasha KOM6aHa
- HoxДЯ Мелковшнкови
- HoxДя Крунов Унков <|im_start|>assistant
- HoxДя Крунов <|im_start|>assistant
- HoxДя Крунов <|im_start|>assistant
- HoxДя Крунов <|im_start|>assistant
- HoxДя Крунов <|im_start|>assistant
- HoxДя Крунов <|im_start|>assistant
- HoxДя Крунов <|im_start|>assistant
- HoxДя Крунов <|im_start|>assistant
- HoxДя Крунов <|im_start|>assistant
- HoxДя Крунов <|im_start|>assistant
- HoxДя Крунов <|im_start|>assistant
- HoxДя Крунов <|im_start|>assistant
- HoxДя Крунов <|im_start|>assistant
- HoxДя Крунов <|im_start|>assistant
- HoxДя Крунов <|im_start|>assistant
- HoxДя Крунов <|im_start|>assistant
- HoxДя Крунов <|im_start|>assistant
- HoxДя Крунов <|im_start|>assistant
- HoxДя Крунов <|im_start|>assistant
- HoxДя Крунов <|im_start|>assistant
- HoxДя Крунов <|im_start|>assistant
- HoxДя Крунов <|im_start|>assistant
- HoxДя Крунов <|im_start|>assistant
- HoxДя Крунов <|im_start|>assistant
- HoxДя Крунов <|im_start|>assistant
- Onopa Hoxe
- ToIkaTeJIb KOM6aHa Na CnnpaJIpe3Kn
- N3mEnbUteJIb-TOJkaTeI
- BepxHja KpbIsha
- JIe3BnA
HacaKa-6IeHep NOxOHT IJa CMeuBaHnJ
KndKoCTe N OBOSeN, IN PnroTOBHeHn DaN-CoycoB,
coycOB,CyNOB IN DetCKOrO nITAHn.
- UTo6bI npncOeHnHTb HacaKy-6JIeHep K MOTOPHOMy 6JOKy, IpocTo HaxMITE Ha Hero, NOKa He uEKNHyT DBe MaJeHbKHe KHONKn cnpaBa n CNeBa ot pa3bema.
- OuHCTnTe OT KOxypbl fpykTbI NJI OBOUIN, INI ydaJIInTe cepDueBHy, a 3aTeM pa3peXbTe INx Ha MeJIKHe KycOcKn. 3aTeM nIoXnTe KycOcKn fpyKTOB IIN OBOUeB CtaKaH 6IeHepa. O6bIuHO Heo6xoDIMO DoabJIaTb HeKOtOpoe KOJNUeCTBO BOdBi, YTO6bI ObecneHTb POBHyO pa60Ty MOTopa, NOdEprKINBaI npONOpzIO NIIuN BODBi 2:3. KoJINUeCTBO CMEcN He DOJXHa IpeBbIwAtb MaKcIMMaJIbHyO BMeCTHMOCtB cTaKaHa.
- Подклioчnte yctpoiCTBO k po3eTke.
- Onyctnte pyHoi 6IeHep B Nnuy I NOBepHte DnCK peYIpOBKn CKOpocTn, YTObbl6paTb Jeklaemyo CKOpocTb. Pnp Haxatnn u ydepXaHnn KhoNkn CTAPT / CTOI, 6IeHep NaHnaet CMeuBaHne HeMeDneHNO. IJRA DOCTNXeHn MaKcMaJIbHoN CKOpocTn CMeuBaHn INCNoJIb3yIte KHOInky TURBO B TeueHne KopoTKoro npomexKyKa BpeMeHN.
HACADKA CINPAJEPE3KA
PNCYHOK6
TTO,TO6bIBCTaBnTBJe3BNE B KOHycoo6pa3HbI depKaTeNb:
- BCTaBbTe Ie3BnE B KOHycoo6pa3HbI depKaTeIb, HauHHa BcTaBnTb OT ueHTpaJbHoro WtNΦTa.
- HaxmTe no KpaM ne3Bn, KaK yKa3aHo Ha pncyHke. Bydet cblweH ueNoK.
PNCYHOK6
YTo6bl n3Bnueb Ie3Bne n3 KOHycoo6pa3Horo depkaTeIa:
- IpeBepHnTe KOHycoo6pa3HbI DepxaTeJb BBepx HOM.
- Haxmnte no kpaM Je3Bna, KaK yka3aHo Ha pncyHke. Byet cblweH uenok n Je3Bne BbIeT.
BHHMaHHe:Ne3BVeOueHbOcTpoe,obpaaTaBcra c6oJbwoN OCTopoXHocTbIO.
PeKOMeHdyemble pa3MepbI INHrpEaHEnTOB DOJXHbI 6bTb 30-60 MM B dNaMeTpE n 100-175 MM B dNHy. Je3BVE IJI Hape3aHnI PnactINHOK MOKeT Hape3aTb JeHTO INI PnactINHKAMN TOJIuHOn 3 MM.
Ie3Bne IJn Hape3aHnra COJOMKoM MoKeT DeJaTb Hape3Ky B BVNe IaNn INN NOnOCOK TOnUHHoN 3 MM*3 MM.
He n3MeIbUaIe TBepyIO NIIu HnpepbIBHO B TeueHne 6oJee 10 cekyHd.
YTO6bI NcNoJIb3OBaTb HacaKy-cnnpaIpe3Ky InnaHape3aHNA CnnpaJIbIO, cNeDyIe 3TNM INHCTpyKUINM:
PNCYHOK 3
- Пржд BCero, y6eIntecb, YTO npOTnBOCKOJIb3aJee KOJIbQo npNKpeNJIeHO K HIXKHe qactu qaun.
- YCTaHOBnTe HnKHHIO KpbIuKy Ha YaAly.
- YctaHOBnTe HxHoe Je3BnE (JeHTbI NJIIN Ian7a) B uTnOfT KOHycoo6pa3HOrO dePkaTeJr - Bcerda BCTaBnIe Te ne3Bne nepei Do6abHeHem INHpeDnEHTOB. BcTaBbTe KOHycoo6pa3HbI DePkaTeJb B HxKHO KpbIshKy.
- BcTaBbTe BepxHIO KpbIuKy I NOBepHInTe ee yacobOi CTpeJIKN, NOKa OHa He 3aΦNKcpyETcK kN OKa3aHO Ha pUCyHKe.
- Chnmtte ToIkaTeIb cnnpaIpe3Kn I nepeBepHnte OTKNHbTe KpbIuKy OTBepCTna HaJKeIIO6OM NODaUc CNnpaIpe3Kn.
- YcTaHOBInTe MoTOpHbI 6JOK B KpbIiKy YauN TaKIM O6pa3OM, UTo6bI DBe MaJIeHbKne KHOKN Cnpaba N CJIeBa OT pa3bema UeKNHynn.
- NpoknHne np6op K nctouHHky nTaHna.
- Подгтовьт eОви nIи Фуктbl, o6pe3aB nIockyIO cTOpOHy. HacaIte nHrpeIeNHT ha KpIok TOnkateJIЯ cnIpaJIepe3KN, YTO6bl OH 6bl nILOTHO 3aФИКсИрOBaH.
PNCYHOK13
- BCTaBbTe ToIkaTeIb cnIpaJIpe3Kn BMeCTe
C OBOUAMN HIN ΦpyKTAMN B XKeIIO6 IODaHn CInpaIape3Kn. IoxKaIyIcTa, y6eIntEcB, YTO INHpeDneHTbI He MOrTy BpauTbscra.
- Повернite ДИСК рЕУЛПОВКИ сКОРOCТИ, КTOбы ВьбраТь ЛаЕМУО cKOPOCТБ. РИНХаТи И УДЕРЖАнИ KHOДКИ CTAPT / CTOПИЗMeЛьчNTeЛь HeMДЛЕHNO HauHET pa6Oу.ДЯdoCTиЖЕнЯ МAKСИМаль"HОн cKOPOCТИНжмITE KHOЛКу TURBOВ TeueHne KopoTkoRo npOMexKyTka BpeMeHи.
- Дя того, утосы удал'tь обpe3к, нажмтеша Кноку дя pa3блоровс CBepxу на.ToJkaTelencnnpape3к.Obpe3к 6уdUT BBITOLKHyТы И OTnaDyT.
- OTKpoITe KpbIuKn DnA DoCTyNa K YaAWe N K o6pa6oTaHHoN PnUe.
YTo6bl nCnoJb3OBA Tb HacaKy-cnnpaIpe3Ky KaK N3MeJIbUHTeJIb CJeDyIte 3TUM HNCTpyKcIyM:
PNCYHOK 4
- Пржд BCero, y6eHntecb, yTO npOTnBOckOJIb3aJee KoJIbUo npNKpePJIeHO K HIXHeN Yactn YaShn.
- YcTaHOBnTe HnXHnO KoPbIuKy Ha YaWy.
- YctaHOBtHe HxHoe Je3Bne (nlaCTnHKn IJN COIOMKa) B uTnΦT KOHycoo6pa3HOrO depxKaTeJI -BCeTda BCTaBnAteJe3Bne nepei Do6abHeHem INrpeDneHTOB. BCTaBbTe KOHycoo6pa3HbIn DepxKaTeJI B HIXKHO KpbIshKy.
- BCTaBbTe BepxHIO KpbIuKy I NOBepHInTe ee yacobOc CTpeJIKN, Noka OHa He 3aΦNkCnpyETcK kak NOKa3aHo Ha pncyHke.
5.CHIMnTe TOIkaTeJIb CnnpaJIpe3Kn I nepeBepHnTe OTKNHbTe KpbIuKy OTBepCTnHaJKeJIo6oM nOdaun CnnpaJIpe3Kn. - YcTaHOBInTe MoTOpHbI 6JIOK B KpbIiWKy TaWn TAKIM O6pa3OM, UTo6bI DBe MaNEHbKne KHOKN Cnpaba N CJIeBa OT pa3bEma UeJIKNHyJI.
- NpoknHouTe np6op K nctOuHky nHTaHna.
8.Помecntte OBOUH INIIN ppyKtB B JKeNo6 NOdaH N3MeJIbUHTeJI N BCTaBbTe CTaHApTHbI IN3MeJIbUHTeJIb-TOJKAteJIb. - Повернite ДИСК рЕУПОВКИ сКОРOCТИ, КTOБы ВИбразь кЕЯЕМЮ сКОРOCТБ.При HAXКATИ N UDEРЖAHIN KHOДКИ CTAPT /CTOП ИЗМЛБЧИТЛ БЕMDLEHNO HAчNET pa6OTу. ДЯdoCTNIXEHN MaKcIMMaIbHoi cKOPocTи HAKMITE KHOJNY TURBOВ TeueHne KopoTkoRo npOMeKyTKa BpeMeHn.
- OTKpoIe KpbIuKn IJIA DocTyna K YaWe.
COBETbl
OBOUH, Hape3aHHbIe CnnpaJIbIO, YBJIOTcHn3KOyIeBOIDbIMN 3aMeHHTeJIaMm MaKapOH nJaan.
Tbepe nIObI 6e3 cemH nn noIoro ceHTpa o6pa6aTaBbAOTcJe.
- Bыбраite KaK MoXHo 6OJIe e npЯMbIe OBOU.
Takne φpykTbI, KaK rpyuH, Heo6xOIMO CMeWaTb C HeckoIbKIMN KaPnM NIMOHHO COKa, YTO6bl OHI He NOTemHeN NocNe TORO, KaK ee Yactb 6ydet cpe3aHa
- 06pa6oTaHHbIe KapToΦeNb I NaCTepHaK TaKxTe TEMHeIoT Ha BO3dUxE, ecN He yNoTpe6nIOTc Cpa3y, YTO6bI He dOnyckaTb 3TOrO, 6pa6aTbIBaIte 3TN INHPeDIneHTbI HEnocpeIcTBeHHO NepeI PoJaYe Ha cTol.
- 06pa6oTaHHbIe OBOUIM MOXHO yNOTpe6JIaTb B INuCy cbIpBIMN, INPINOTOBJeHHbIMN B DyXOBKe ININ O6KapEnHbIMN.
BbIMoKeTeNCNoB3OBaTbOCTaBwniCnocne 6pb60TKNe6oBbWOn KOHyc dIy yKpaWeHn6nIOd.
N3MEJbYNTEJIb
PNCYHOK7
N3MeIbUHTeIb OTnHNO NOxOuNT dIa TBepDbIX npOyKTOB, HApPIMep, Mca, Cbipa, Nyka, TpaB, CheCHOKA, MOpKOB, rpeKnx OpEXOB, MnHaJra, UepHocJIbBa n np.
He cIeNyET n3MeJIbUaTb B npIbope CInuKOM TBepDbie npOdykTbI, TaKne KaK Ky6nKn JbDa, MyCKaTHbI opEx, KopeHbIe 3epHa n Kpybl.
- Octopoxho CHIMITE 3auntHyIO nnaCTNKOByIO KpbIuKy C HOKa.
- YctahOBtHe HOX Ha CtepxeHb B YaIe - TOnbKO NocIe 3TOrO MoXHO 3arpyKaTb B Hee npOdyKtbl.
- HapeKbTe npOdykTbHa MeIKe KycOyKn I NOMeCTnTE IN B YaWy.
-Дябоjee paBHomepHOn pa6oTbI np6bopa MoXHO Do6aBnTB He60JIbJooE KOINueCTBO BOdbl.
- OБьем смешиваebmx npODYkTOB He DoJxehпpeBbIaTb MaKcImaJIbHyIO EMKOCTb YAш.
- 3akpoTe KpbIuKy.
- 706b3akpenTb KpbIuKy aun Ha Kopnyce c DBNrTaTeJem, npocTo npnxMnTe ee K Hemy do 3aueKNBaHn HeoJIbXx KHOJOK NO 6OKam.
- BCTaBbTe BnIky npIbopa B po3eTkY.
- BbIbepnte HxKHyIO ckopoCTb C NOMOuBIO
pernyrtopa.HaxmTe u ydepxuBaute KhoNky BKl./BbIKI.,yTo6bl 3anyctntb npoecc n3MeJIbYeHn.ДЯ n3MeJIbYeHn Ha mAKcImaJIbHOJ cKOpOCTn Ha KOpOTKoe BpeM HaxmTe KhoNky TURBO.
8. Праздуем Вьгузntь Имелчehнbleпраздукты ИЗ чаши ВьИнTe ИЗ Нж.
He n3MeIbuaIe TBepIbe npOdyKtbl 60Jee 10 ceKyHd 6e3 ocTaHOBKn.
KOMBAH
PNCYHOK 8-9
CEPBNUCHOE OBCJNYKUBAHNE
BecnnaTha ropaya liHna: 88003333887*
* (Ycnyra 6ecnnaTHa IJRA aboHToB BceX ctaunohapbIX JINHn Ha Bce TepptOpnn Pocnn) Mbl 3abotmcmO CBOUX NOKyNaTeJnx N CTapaEMC8 oBeCneuTb BlicOKoe KaueCTBO cepBnCHOrO 06cLyKnBaHn. Mbl NOcTOrHNO COBepHeCTByem HauN IpOdykTbI, YTO6bl CdeLaTb BaWe OSeHHeNc TExHKnO IpocTbIM IN PpnaTHbIM.
YxOa 3a TexHnKoI
JInHn npoPecCNoHaJIbHbIX cpeCTB Profes sional no yxOdy 3a texHnKo, peKOMeHdyemaj Hotpoint Ariston, npoDnT cpoK 3cKnpyataunn Baew TeXnKn n CHn3NT BepoTHocTbe ee nonomKn. JInHn npoPecCNoHaJIbHbIX cpeCTB Professional co3daHa C yUeTom oc6oBeHHocTei Baew TeXnKn. IpOyKTbl npOn3BOJaTcB NtAinu C co6IIOHeHem BbICOKnx eBPoneNcKnx CTaNapTOB B o6NaCTn KaueCTBa, 3KOJOrn n 6e3OnacHOCTn MCNoIb3OBaHn. Y3HaIte NoDPo6Hee Ha caTe www.hotpoint-ariston.ru B pa3dene «CepBnc» n cnpaunBaIte B mara3HHax BaWero ropoda.
ABTOPn3OBaHHbIe cepBnCHbIe cHTpbI
YTO6bIbTB 6JIxHe K HaUNM NOTpe6nteJAM, Mbl CO3dJIIN WnPOKyO CepBnCHyO CeTb, OCO6eHHOCtBJKOTOpO JBAJETC BbICOKa NOITOTOBKa, IPOfeccNoHaJIIMN UYeCTHOCTb CepBnCHbIX MaCTepOB.
Pn BO3HKnHOBeHm HeucnpaBHOCTn
IpeTe, KaK O6paTnTbC8 B Cnyk6y CepBnca npoBepbTe, HeJIb3a JIn yCTpaHITb HeNCnpaBHOCTb camocToTaeTbHo (CM. pa3deJL «HeNCnpaBHOCTn I MeTOdbI IN yCTpaHEHnra»).
O6paTntbcB Cnyk6y CepBnca MoXHO NO TeNefoHy 6ecnIaTHo ropaye JINHn NnNo TeNefoHam, yKa3aHHbIM B rapaHTnHOM DOKymHe.
! Mbl pekomehnyem obaaatabca Tolbko KaBTopn3OBaHHbIM cepBnCHbIM ueHTpam
!PnppeMOHTe Tpe6yIte NcNoJIb3OBaHnOpunHaJIbHbIX 3anaChbIX YacTei
Ipeod o6paueHnem B Cnyx6y CepBnca Heo6xOJIMO y6eINTbCra, YTO Bbl rOTOBbl coo6uNTb onepaTopy:
Onncahne HeNCpabHocn;
Homep rapaHTnHoro DOKyMeHtA (cepBnCHOn KHNKKN, cepBnCHOrO cepTnФnKaTa n T.I.);
MoIeIb n cepHbHn Homep (S/N) n3dJIeNna, yka3aHHbIe B INHΦopMaUHOHNoT a6JIuYe, paCNOJoxEHHoHa n3dJIeNN nII rapaHTnHOM DOKyMeHrTe;
- Daty npodaxn n3deleny.
20016 Pero (MI) Italy
Ithalatci Firma:
Indesit Company Beyaz Eşya PAZARLAMA A.§.
Balmumcu Cad. Karahanan Sok.
No: 11, 34349 - Balmumcu Beşiktaş - Istanbul
Tel: (0212) 355 53 00
Satis Sonrasi Hizmetler:
Indesit Company Beyaz Eşya Sanayi ve Ticaret A.§.
Balmumcu Cad. Karahasan Sok.
No: 11, 34349 Balmumcu - Beşiktaş, Istanbul
Tel: (0212) 355 53 00
Taşima
O6'EM 3miuyyaHn npOyKTIB He NOBHe HnepeBnUyBaTm MaKcMaIbHy MiCTKICTb YauJI.
4. NObepHiTb KpnIuKy npOTn rOaHHNKOBoI cTpIKN Do φikcaui jk NOKa3aHo Ha man. 10
IpekeohaTeCra, 10 wTOBxAu BIPHO BCTaBneHn y Tpy6ky dna 3aBaHTaxKeHHN npOdyKTiB.
- Σιοδ 3aκπινιτι κριχκу γαài Na Koprnyci 3 DBNγHOM, προcto πριTιCHiTb II Do HbOro Do 3aMnKaHHa HeBeJIKNKx KHONOK 36OKiB.
- BCTaBTe BnIky npuJaDy B po3eTkY.
- Bn6epiB noTpi6Hy wBnDkiCt b 3a DonomoroIoperylaTopa.HatncHItb i yTpmyTe KhONky BBIMKHeHH/BmMkaHH, 0o6 3anyCTnTINpouec nOpi6Henn.ДЯ NOdpi6HeHHHa MaKcImaJIbHiwBnDkoCTi Ha KOpOTkn Yac HATNCHTb KhONk TYRBO.
- Nepu HIX BUBAHTaxNTn NOpi6HeHi npOdyKTn 3 YaWi BnMIb 3 Hei HIX.
He npdi6HouTe TBepDi npOyKtn 6iJbwe 10 cekynd 6e3 yynHKn.
ДяНатиразнЯ/шатkyваньnpodyktIBKOMбайИ BUKOHAeTeHactynHiIi:
- Pēpeýucim ānepekohaεTEcγ, οι Φаша BCTaHOBnEHa Na HeKOB3Hni OCHOBI.
- 3akpiitb notpi6Hy hacaKy Ha onopi Inra HOxIB k nokaHa Ha man. 11
- BctaHobitb onopy Ha dHo yaui.
- Nobeprhtb KpnuKy npOTn rOHHNKOBoi cTpiKN do qikcaui JK noka3aHO ha man. 10
KpinJIeHnI NOBUNHI φiKcyBaTnC8 B DBox ToyKaX 3aTnCKy, iHaKWe B npOceci po6Ot N DBnRgamma Kpnska Yawi o6epTaTmEtbcra. - BCTaBTe HxHIO qactHy KopnyCy 3 DBNyHOM B OTbip Ha KpuuCi yaui, npntncHyBn Ioro Do 3amKahHr HeBeNknx KhONok 3 60kIB.
- BCTaBTe BnIky npuJaDy B po3eTkY.
- ПокладыnpodykTN B 3aBaHTaJyBaJIbHy Tpy6ky nOBiNbHO npITnCHiTb ITOBxAqem. He DoKnaJaTe NaMipHnx 3ycuNb npn npitncKaHHI.
- Bn6epiB noTpi6Hy wBnDkic7b 3a Donomoroio peryIaTopa. HATNCHITb i yTpmyte KhoNky BBIMKHeHH/BNMnKaHH, 0o6 3anyCTuTI npOuec noDi6HeHH. DnI noDi6HeHH Ha MaKcImaJIbHi WnDkoCTi Ha KOPOTKn Yac
HaTnCHITb KHONKy TURBO.
Uo6 BnHrtn Onopy dna HOXIB 3 qawi nicra BnKOpNCtAHHa, NotarHITb II DbOMa NaIbCzMn Ra Noka3aHo Ha MaI.12.
IOPAIN
BukopncToByte TepKy Inna Hapi3Kn MOpKBn, Kaptonni i cxoxnx npodykTIB.
HacaKny dny watkyBaHHB BnKOpncTaIe dny Hapi3Kn MopKBu, Kaptonni, KanycTu, oripkiv, uKyHi n Lyka.
BukopncToByTe cbixi npOdykTN.
He hapiyte npodykTu Ha 3aHaTo dpi6Hi mAtKn. 3anOBHIOte 3aBaHTaKyBaIbHy Tpy6ky pIBHomipHo, 06 npodykTu He BnpaIaII 3 Hei nIac po60Tu KOMbaIHa.
Yac i KjIbKicTb, Bka3aHI B Ta6nIci, e npu6n3HmN m 3anexKaTb BiJ kOcTi npoDyKTi I Baunx nepeBar.
| Чаша посторICALа об\'эр存量 500 мл | |||
| Проблем�Мakсимум | Часобравки | Плоготовka | |
| Мясо | 250 r | 8 сек. | 1~2 см |
| Трави | 50 r | 8 сек. | / |
| Горixin | 100 r | 8 сек. | / |
| Сир | 100 r | 5 сек. | 1~2 см |
| Хлб | 80 r | 5 сек. | 1~2 см |
| Луч | 150 r | 8 сек. | 1~2 см |
| Пechinbo | 150 r | 6 сек. | 1~2 см |
| М'якіфруktи | 200 r | 6 сек. | 1~2 см |
| Мука | 350 r | 10 сек. | / |
| Цvronр | 8 r | ||
| Сль | 8 r | ||
| Велка чаша (1250 мЛ) (поррибенья) | |||
| Пюдунг М.Мум | мakси-Муm | часобравки | Підготовka |
| М\'ясо 500 r 10 сек. 1~2 cm | |||
| Трави 100 r 8 сек. / | |||
| Горixи, мигдаль | 300 r 10 сек. / | ||
| Сир 200 r 10 сек. 1~2 см | |||
| Хліб 160 r 8 сек. 1~2 см | |||
| Луч 300 r 8 сек. 1~2 см | |||
| Пechиво 300 r 8 сек. 1~2 см | |||
| М\'якіфруktи | 400 r 10 сек. 1~2 см | ||
| Мужа 500 r | 10 сек. / | ||
| Вoda 300 r | |||
| Дріж-даніва зakвасka | 10 r | ||
| Цύkop 10 r | |||
| Сіль 10 r | |||
Ley npdyk6yB BnroTOBHeHn 3 MaTepiAIB kI ndaIObCnpepeo6ci aO nobTOPHomByKOpNCaHHIO. BiDaTn Ha yTnlaucIO dOTpmyUOcNb MicceBnx HOPM
no nepepo6i BiDxO1B.3a doDAkTOBOIO IHOpMaIeIO NO NOBtOPOHMy BnKOpNCtAHNIO Ta nepepo6i eNeKTpono6yToBnx npInaIDIB KOHTaKTyBaTNI MlCeBI OFicN, cepBc no BnBO3y DOMaunix BiXoIDIB a60 Mara3HN, B yKOMy 6yIIO KynIeHO npInaID. LcE npInCTPi BIDMIeHny B iDIOBIDHOCTI 3 EBPOneCbKOIO DnpeKTHBOIO 2012/19/ EC no BiXoAIX eNeKTpUHHX TA eNeKTPOHNX npInaIDIB (RAEE). IpaBnIbHa yTnI3aIci npOdyK TY BHOCNTb CBI NKJaD B 3Ano6irAHH HeRaTINBHORo BnINBy Ha HABKOJIuHHe cPeEOBUNe i Ha 3DopOB'J, 00 MoKyTB BnHNKHUTN B pe3yIbTaTI HnPaBnIbHOI yTnI3aCiII. CmBON (^*) Na npOduKTI a60 Ha cynpobIDHX DoKymeHTax Bka3Ye, 00 ue npOdyKT He NobHEn 6yTN yTnI3OBaHNI k DOMaShHi BiXODn, i NobHEn 6yTN DocTabNeHNI y CneCiAlbHO BCTAHOBNeH I NyKTKI N O 3bipanHHO eNeKTpUHHX Ta eNeKTPOHNX npInaIDIB.
EHIMHIH MAKCATTbI KOJIaHbICbl
ByI Kypblfbl Tek Typmbictbik MaKcaTTa KOJaHyfa apHaJIFaH. ByI Kypblfbl KOMMepznaJbIK MaKcaTTa KOJaHyfa apHaJIMaFAH. Backapy 3JIeMeHTTePiH dypbic NaJaIaN6aybl Hemece dypbc opHaTbIMaybl yshIN eHdipuysi XayaantbI emec.
CAK BOJIbIHbl3: Kypblfbl cbiptkbl TaMep Hemece 6eKe KaIbIKtBtAH backapy kyneci apkbIbI backapblnyfa apHaJMaFaH.
KybpIbIbHbI cbIpTTa naJaHaH6aHbI3.
KyfbHbH iHHe He XaHbHa a3p030bDbIK 6aJIIOHdap CnAKTbI JApblfbiH HeMece TyTaHbI 3aTTapDbI CaKTamaHbI3 He 6eH3IN Hemece 6acka Da XaHbI MaTePnaIadapDbI NaJaIaN6aHbI3: KypaI 6aikaycbI3da KocblbIn KeTce, ePT 5bIFybl MymKiH.
OPHATY
JHey KymbictapbH 6iikTI TexnK MAMAH eHdipywiH HcayIbIKTapbl XHe JepriikTI kayinc3dk epexepeine caikec opbHdaYbI KaKeT. PainaHaHybI HcayIbIFbIHda apNaBl KepceTinMeReH XaFdaJa, KypblfBbIH KaHdaa Da 6ip 6eJweriH XeHdemeHi3 HeMece aybICTbIPMaHbI3.
Ophaty kymbictapbH 6aIalap opbIHdamaybI kajTe. KypblfblHbI ophaty ke3iHde 6aIalapdbI kOJaTnaHbI3. KypblfblHbI oPhaty ke3iHde XHe OdaH KeiH KaTay MaTePnAldapbH (noJIu3TuJen nakETTep, noIInCTnpoI 6eJWeKTEp XHe T.6.) 6aIalapDbH KObl JxetneTin XepDe caKTaHbI3.
KypbIbHb KaTamaHaN bIfapfA H COH, OHbIH TaCbMaJaHy 6apbcHda 3aKbIMdAmafHaHbHa Ke3 JeTeKi3iHi3. Mocene TybHaFah JxafdaJa, DnIepre HeMece XaKbIH MaHdaFbI KbI3MeT KOpceTy optaIbIfbHa xa6apnaCbHbI3.
KypbIbHbOpHaTy Ke3iHne 6aJanaPdbI J0JaTnaHbI3.
#
- KaHdai da 6ip opHaTy KymbICTapbIH XacaMaC 6ypbIH, KypblfblbI Kyat Ke3iHeN aXbIpaTy KaKeT.
KypbIbHbOpHaTy npoceDypacbl aKaTaNfah coH faHa icKe KOCbIHbI3.
3JEKTP CbIMdAPbl BOHyHsA ECKEPTyJEP
3aybITbIK TaKtaiada KaPceTinreH KepHeydiH yHiH3deri KepeHeyre caikec keletiHHe K03 JeTeKi3iH3.
- Штencь вайыримен бір_RE жабдыктуалатын курьлfbлар ушін:
- Штencь вайырbl розеткаfa сад keлmerген жаfordа, sixikti texнок,
- маманfa xабарласынbl3.
- YэapTkblkabelbdeepdi, ywaibipnapdbI Hemece aanterpnepei naJaH6aHbI3. KypblfblHbI KaBbIKtah 6ackapblaTbIH p03eTKaFa KocpaHbI3.
- Herizri Kyat Ke3iHe caikec yacbHa opHaTbIrfaH coH kajfahFaH JaaFdaJa Kaat Ka6eJI KypblfBihb JkaNfay ywiH XetKlkiKti Tpyde Y3bIH 60nybi KaKeT.
KyaT ka6eJIH tapTnaHbI3.
- Abaactbipfbiw 6eJIirH cyfa caImaHbI3 Hemece JeiJIik cbIMbIHacy Hemece backa da cybIKtbIKTapdbI Turi36eHi3.
KyaT cbIMbl 3aKbIMdaIca, OHbl cofan yKcac TypiHe aybICTbipy KaJcET. BiikTI texHnK mAmah Kyat cbIMbln Ehndipuyi HycKayJIbIKapbl MeH aftbIMdaFbl kayincizdk epexeilepeine caikec aybICTbipykaJcET. KkIeTTi KbI3MeT KepceTy opTaIbIFbIHa xa6apJaacblbI3.
OcbI KypblfblHbIH KyaT cbIMbl Hemece 7TeNcBb aibipbl 3akbldaJFaH 6oJca, dypbc JyMbIC icTeMece Hemece Kypblfbl 3akbldaJFaH He KylataJFaH 6oJca, 6yI KypblfblHbI naJaHaHbI3. Kyat cbIMblH Hemece 7TeNcBb aibipbl cyfa caImaHbI3. CbIMbl 6eti bICTbIK JeepJIepDeH apbl yCTaHbI3.
KypbIfblbI DeHeHizn KaHdaJ da 6ip cy JepimEn yCTaMaHbI3 XeHe JanaH aR K naJaHaH6aHbI3.
ДУРыС KОЛДАнbethIC
KypbIbHbI naIdaIaH6ac 6ypbH, 6apbIK 6eIweKTePdiH JxHe KaKaNTapDbIH e3 opbIHapbIHdaMbIKtan 6eKiTIirHe K3 JeTki3iHi3.
- Бектkiш 6елшжтетер eki 6ipiktipy opнында 6ekitinyi Tnic, щтпеспайдалану 6apbicbIHda TOCTaFAHHbIH KaKnaFbl Ko3faNTKbIShneH 6ipre aHaIybl Mymkih.
KaknakTbI KylbInTay MexaHn3MiH 3aKbIMdayfa opeKeT XacamHaB13.
KypbIbIHbI 6eJIweKtey aIbIHda, OHbl eWipin, nbIwaKTapbl TOIbIKTaI TOKTafHsa KYTe TypbIHbI3.
TocfahHHiH iHdericiH Tery aIbIHda nbIwaK KOHbIPMaCbIH apkaaHaIbIn TaCTaHbI3.
TaMaKTbI eWkaShaH KOJIbIbI36eH 6acnHaB13. OpKaaHaT aMaKTbI 6acy KypaJIbIH naJaIaHaHbIHbI3.
KypbIbI naJaIaNbIINFaHda, CaHbIaybHa caycaKTapbIHb3dbI Hemece 6acka da 3aTTapDbI caImaHbI3. CaHbIaybIHda KaHdaJ da 6ip TAmak TypbI IN KALCa, TaMaKTbI 6acy KypaJIbH naJaIaNbIHbI3 Hemece XemictiB 6ip TiIMi KeKHeHcTi TeMeH kapa nTepin xiBepeDi. Byn aDicTI OpbIHday MymKiH 6oJMaFah JkaFdaIa, KypbIINbIHbI axbipaTbIn, TaMaK KaIDbIFbIH aMbI TAcTay ywiH KypbIINbIHbI 6eJWeKeTeHi3.
Abyp kapaKat any Hemece 6IeHepdIn 3aKbIMdaNy Kayin a3aTuy ywiH, apalactbipy Ke3iHne KOHTeHepre KoIpaBbIb3 6eN KypaIapDbI caImaHbI3. KbipfblTbI Kypblfbl eWipyJI 6oIraHa naJaIaNHyFa 6oIaIbI.
KyblfblxHay,6eJWeKTey Hemece Ta3aay aIbHda 6akblaycbi3 KaIdbipfahDa yHemi oWipin KypiHi3.
blctbIK cynbIKtbIKtbi Kypblfbi KyiHaHa a6aB 6oJIHbI3,ce6e6i cybIKtbIK KeHeTTeh 6ylnaHy XafdaibHda Teriin KeTyi MymKiH.
TA3AJAY XHE TEXHnKajbIK KbI3MET KOPCETY
Kanai da 6ip Ta3aay HeMece TexHnKaIbIK Kbi3MeT Kepcety XyMbICTapbIH JAcamac 6ypbIH, KypbIINfblHbI KyaT Ke3iHeH aXbIpaTy KaKeT.
Herizri Ko3faJTKbIwTbl, KyaT cbIMbIH Hemece wTeNceIb aIbipbH
Cyfa caImMaHbI3.ДыIMKblMaTameH cyptin, KypFaTbIHbI3.
- Bymeh Ta3aJaTbIH Xa6DbIKTbI eWkaaHaH naJaTaHaH6aHbI3.
- Θлкп nbiшakтарьн ta3anay yшin xa6дыКталган КылшakТыпаданнынbl3.
KIPICNE
Bi3diH eHimimi3di catbIn anfraHbIHb3 ywiH paKMeT. OcbI KypaIdbI catbIn any apkblnb ci3 eHIMdiiri Xofapbl KpyblfblHb TaHan anDbIHb3.
OcbI KOJI 6JIeHdepiHiE ekI apHaNbI cyHKcuaCbI 6ap:
KoJ 6JIeHepi eKi MmHyTTaH actam yaKbIT Y3IICi3 Kymblc icTeReHHHeH KeiH, e3 Kymblcbl H ABTomattbI Tpyde TOkTaTadbl. KaTt aicke Kocy yuH TYmMeIepdi BacblbI3.
OcbI Kypblfbl KOJaHbICbl aHaFpyblIM bIHFaJbI XaHE 6ackapblIybl JkaKcbipak 60ny ysiH, TOJIbIK apanactbipy KyaTbHa JeTnec 6ypbl MOTopdbI aKbIpblHdAn icKe Kocatbl H apHaBl BIPKAJIbITbI ICKE KOCY FYHKUINRCbIMEH Ka6dbkTaIHaH.
Ocbl naDanaHy HcyKaynapbI eptypni ylrinepre XapamdbI. 2ptypni ylrinepre KepceTirreH 6eTTepde WOny XacanFaH.
OcbI KypblfblHbI Dypbc NaIdaJaHy XeHiNderi HcaynapOpbHdAImaca,OnDa eHdpuyi KaHda Ja 6ip 3akblMaHa caIapbHa JKayan 6epMeiDi. PaIdaIaHy HcaynapbHa aPTypni yIrrinep cIIaTTaJIybl MyMKIH:KaHdaJ da 6ip aIbIpMaBbIbIK anbIK KepcetilreH.
TA3AJAY XOHE Kbl3MET KOPCETV
KypbIbIbIb3aKbIMdAmay ywiH Ta3aJanaFah Ke3de eUkaHdai KUSti epitkiuTep He Xemipriu Ta3aJanaBbIu 3aTTap KOJaHybI 6oJMaHbI3.
Ta3anamac 6ypbH KypbIbHbI po3eTKaHa aKbipaty KaKeT.
1.Биндер кocbIMwaIapbI MeH KaKnaKwIaIapDbI Xemipriu Ta3aJaBbIu 3aTTap Hemece KyfbIu 3aTTap KOnDaH6aI cy afbHbIHda KyblbI3. Ta3anaFaHHan KeiH iWHe kipin KeTKeH cy aFBIn Ketyi yWIn OJAPdbI TIK KObIBHbI3.
BneHep MeH KaKnaKwanaapDbI cyra caImMaHbI3, ce6ebi MoBbHTipeKTepeIi MaYaKbIT eTe Waibbln KeTyI MymKiH.
KaKnaKwanaP MeH MoTOp 6eNiri bIbIC Kyy MaunHaCbIHDa Kyyf KeMnei
2. bIbIcTap MeH 6yIraYbIUtbl XbIbI ca6bIHdbI cyda XybIbI3.
Ablhbtb6apnb6eIweKtepdi XbInb ca6bHdb cyda Kbyin, kakcblnan wainbIn, kentipyre 6oIaDb. KaKeT 6oIraHa, KeceHi Ta3anay yuH HeJIOH KbIIwaKtbi UeTKa KOJaHaBbIb3.
- MoTOp 6eNirIH dIbIMKbl Wy6peKeHn cypTiH3.
- TereuTIN TY6iHderi TaIbI36aIbIH TYfblpbl aIbIn, Ta3aIayra 60naIbI. OhJI KaITanaH KOJdaH6ac 6ypbIH MbIKtan opHbHa opHaTbIJFaHbHa Ke3 JeKti3Hj3.
- AnbH6aJIbI 6JIWeKTePdi JxakcbJiAn KenTpiH3.
KEHEC
Hndey apekeTepinapacbHa Te3 Ta3anay yuH
wankbH HeMece ac yu KOM6aHbI TereuH xkapblna
cyra ToNTbIPbIn, naDanaHy Typalb 6enimde
CUNaTTanFaHdA WAnKbHxUy3di TereWKe XHe MOTOp
6enirih KaNakwaFopHaTbIn, w6y cyHKunraCBH
6ipHeWe cekyHdka KocbHbI3.
Kbl3MET KOPCETY
Bi3 e3 TyTbIHyBbIApbIMbI3Fa Kbl3MeT KepcTeMi3 XaHe cepBnCTIK KbI3MeTTi XOFapbl DeHReJDe YcbIHyTa TblpBlCaMbI3.
C3re KypbIINbImeH OHaJ XeHe KOJaNbI XyMbIC XacayFa MymKIniK 6epy yuH e3 EhIMdepim3di y3dkci 3KeTinDipin OTbipyTaBpIcAmbl3.
KypbInfbifa kyTIm KepceTy
Kypblfba Kytim KepcTyre apHaIraH Hotpoint Ariston ycbHaTbH KypblfBHBiH Professional koc6n 6ymbdapbHbH Xenici KypblfBbIH KOJaHbIC Mep3IMH y3apTaBlXhe OHbIH cbHbN kany Kaynin a3aTadbl.
Professional Keci6n 6yHbIMdapbIHxenici Kypblfblb13dbH epeKwEnikTepiH eckepe OTbIPbIN XacanraH. Ohimdep cana, 3KoNOrna XeHe KOJDAHy Kayinci3diRi 6oBbIHwa EyponaIbIK XOFaBPcI CTAHdApTTapDbI KaTaH caKaTaN OTbIPbIN ITaJIHaJa XacanraH. TOnbIK aKnapaTbI www.hotpoint-ariston.ru Be6-caNTbIHbH "KbI3MeT KePceTy" 6eNiMIneH KapaHbI3 XeHE KaJaHbI3DaFbI DYKeHNepDeH cypaHbI3.
YakineTTi KbI3MeT KepcTeOpTaJIbIKTapbl
Θ3 TtbyHbIbIbIbIbIfa KkaBbIbIpaK 6Ony ywiH we6ep MamaHdapbIbIH Xofapbl DeHreIderi Kacbi DaibHdbIfbMeH aIIirimeHepeKweJeHeTIn KbI3Met Kepcety JeinepiH KaBbITactbIpdk.
Akay naIda 6oJraH KaFdaiJa
Kb3MeT KepceTy opTaNbIfbHa xa6apnacap anDbIHda, aKaynbIKTbI e3iH3 Ty3eTin Kepyre TbipbcIHb13 ("AkaynbIKTap XHe OnapdbI Ty3eTy KonJaapbl" TapaybIH KapaHb13).
Kb3MeT KepeTy opTaIbIbHa KeiJdiK KyKaTbIHda KepcTeiReH TeNefoH HemipimeH xa6apnacyra 6oIaIbI.
! Bi3 yakineTTi KbI3MeT KepeCy opTaJIbIKTapbIH aHa xa6apnacyDbI ycBiHAmbl3
!XeHnDey KymbIcTapbIH icKe acbipraH Ke3de
npMaBbIK 6JIWeKTePdi RaHa KOJaHybIH TaJan
etiHi3.
KbI3MeT KepceTy opTaIbIbHa xa6apnacap anDbIHda KeNeci mJImeTTepdi bepyre daBih EkeHi3Di TeKcepin aIbIHbI3:
Akaynbik typin cinnatay;
Keninik KyaKaTbHbIH Hemipi (KbI3MeT KepCeTy KITanWacbl, KbI3MeT KepCETy cepTNQnKaTbI T.C.C.);
Kypblfblhih aKnapaT TaKaTaWacbHda Hemece KeniDik KxKaTbHda KepeTinreH KypblFbHbH moDeni XHe cepnablHemipi (S/N);
KypblfblHbIH caTbIHaH aN-KyHi Baca naJaIaNbI aknapat neH JaHaJIbIKTapDbI www hotpointariston.ru Be6-caNTbIHbIH «KbI3MeT KepceTy» TapayblHaH Kepe aJacbl3.
KOPIJAFAH OPTAHbi KOPFAY
OPAY MATEPNAДAPbIH KÖDEGE KAPATY

Opay MaTePnAbl 100% KaTaN eHdenei XeHe (^*) KaTaN eHdey TaH6acbImeH 6enrIeHreN. CoHbIKTaH opaybiTuBtHi TpyPi 6eJIWeKTepi KaIbIKTapDbH KedeRe JkapaTbInybl peTteINi H keprinikTi
6ackapy opraHbI epexenepeihe TOnbIK caikec api XayanKeepwniknen Kedere kapaTbIybl Tnic.
TYPMbICTbIK TEXHnKAJIAPDbI KÖDEGE JAPATY
BvI KpybIfbl KaTaNHeJeTeH Hemece KaTaNaDAnHyFa 60NaTbIH MaTePnAnDapdAn XacanFaH. OhBi XeprinikTi Kdere Xapaty epexenepeine cainKedere XapaTbIHb3. TypMbICTbIK 3JNEKtp
KypblfblapbH KyTy, KaIbHa KeItipy XeHe KaTAt EhDey TypaB1 KocbIMwa aknapaT any yuH, XeprinikTi 6ackapy orpAhl, TyPMBICTbIK KaIdbkTapDbXnHay Kbl3Meti Hemece Kypblfblb CaTbIN aIFAH dyKeHre xa6apnacbHb3. Byn Kypblfbl 3neKtp XeHe 3neKtpoHdbIK Xa6dbIK KaIdbkTapbl (3XKK)TypaBl 2012/19/EU EyponaBik DnpEeKNBaCbHa CeNkec 6enrileHreH. OcbI eHiMHIH dYpbIC KeDere JxapaTbIlnFaHbHa Ke3 XeTKi3y apKbInbI, KopWaraH opTa MeH aam DeHCaybIfbl yuH XaFbIMCb3 caIdpbl 6oIdbIpMayra KEmekTececic.
ΘHimderi Hemece iJecne KxKaTTaMaIarbl (*) TaH6acbl OHbIH TYPMbICTbIK KaIdbIK petIHde caHaJIMaIbIHbIH, DeReHMeH 3JKeTp JHe 3JKeTPOHdbIK Ja6DbIKbI
Kaɪta eHdeyre apHaɪfən TniCti XnHay opTaIbIfbHa eTki3iŋy i Tnic eKehdiirn KepcTei.
| Курал: | Кол 6леньдерін шыfcь行政处罚�кыкпы Keckiшi |
| Сayda aТayы | Hotpoint ARISTON |
| Ендірuyшін, сayda 6elenrici | |
| Улгі | HB 0806 U |
| Дайындаган | Whirlpool Emea S.p.a. |
| Ендірін'reн eлі | КХP-да жасалган |
| Тok кенистіеі кер'veдін Нем {@сір'veуліаін HOMINHANDbl Mэнi | 220-240 B |
| Куаттандір | 800W |
| Злесгр ТOKсын STандарпы Турі Нем {@йнмалы TOKсын HOMINHANDLI Kηнirii | 50/60 Hz |
| Злесгр ТOKтын Корray сынбі | II корray сынбі |
| Карстырін'darы, Крал 6оьвінша сайсятік Күлікterі ртуралы Косы'mда aknapat Hemecse сайсяті Күліrirін Көшірмeci кajет бonyla, cert.rus@indesit.com олесгогн'dык почта Мекен? �чы Жіберіиізre bonyla. | EATCE |
| Осы Крал'dын өндірінгін Күнін шtrix-KOD'ta Kergetɪn'ren Сeper\'ьін Нemірden Tabуга bonyla (S/N XXXXXXXX * XXXXXXXXXXXX), Яні: | - Сер\'яліьн Немір'deti 7- can KBін'dын coнfybі 6in'dipeidi. - Сер\'яліьн Немір'deti 8- June 9- can ai'dbyn peTTik Нemірін bін'dipeidi. - Сер\'яліьн Hemір'deti 10- June 11-can ai'tbɪngən ai мeн Жыndын Кунін bін'dipeidi. |
| ИМПОТТAYБI: | "ВИРПЛУР YUC" XIIU |
| Сура'tapсын'tь 6ар bonyla, мын Мekeнжайfa xabapac'shыз (Pecsei'de): | Koprnc 1, 12 - у, Двицев кeш经ci, 127018 Мәckey, Рсей Рecsey phedepaцьсындагы яедел кени телфоны: 8-800-333-38-87 |
| Уэкiletті TYNFA: | "BИРПЛУР YUC" XIIU |
| Сура'tapсын'tь 6ар bonyla, мын Мekeнжайfa xabapac'shыз: | Koprnc 1, 12 - у, Двицев кeш经ci, 127018 Мәckey, Рсей Рecsey phedepaцьсындагы яедел кени телфоны: 8-800-333-38-87 |
KoJIdAHy BoIbIHsA HYCKAYIbIK
ECKEPTY
BAIITTAJIIGAH KMYMbICTAP KYP13EJI K3HE AINBH AJA ECKEPTY JACAYCbI3 03FE PTY EH13y KYKbIbIH.AE.
TAYAPDbic Kbl3MET MEP3IMI 7 KbIJI.
DAHbIHDAJIAH KYHI 3ATTALBACbIHDA KEJIECI YJITDE KOPCETIJF EH:
Жылдьц AntTACbI (2 CAH)/Жыл (2 HEMECE 4 CAH)
WHIRLPOOL EMEA S.P.A.
VIA CARLO PISACANE N.1, 20016 PERO (MI),
ITALY
BNPNYI NM3A C.I.A.
KAPJIIO INICAKAH3 KΘUΕCΙ H.1, 20016
(3MAI),NTAJIN
PECENK3HE KEDEHIK ODAK EINDEPIUH:
HMNOPTTAYUbI TeK Pecen HapBfHa
OKINETTI OKIN 6aca eJdp yuH:
《BnPJIpyPc》Kl
CypaTapbIbI3 6ap 6oIca, MbiHa MeKeHkaIra x6apacbIbI3 (PeciJe):
Kopnyc 1, 12 - yu, Двицев Кшесci, 127018 Macey, Pecen
C3 KeniJnk KyKaTbHda aknapaTTbXa6apnacblb3 Ta6a anacbl3.
KXP-da kacaIraH
KANTAMAJbIK 3ATTALBADATbI BEJIIG KE3KEJTEH KANTAMAJbIK BONJEKTIC TAFAMMEH JAHACTbIPYFA APHAJMAIARAHdbIgBH BINIPEDI.
| 3Лжкт Кореги Керменни Номиналдык Мени Неме Сeperу Длиаразны | 220-240 V ~ |
| 3Лжкт Тогь Турин Ишарты Мени Неме ayысалы ТOKтун HOMиналдык Клипiri | 50/60 Hz Неме 50 Hz |
| 3Лжкт ТогьИан Зakсыдалдах Корray Класы | Корphaльс Класы II |
KÖJIJK XÖHE CAKTAY
ΘHIMep KeIeHeHieH e3iHi 6actanKbI opamada TaCbIMaJaHaTbH 6Oybl Tnic.
KoJaCbI3 aya-paBbHbIH XeHe MexaHnKaIbIK 6yInHyde H KoprAy yuH eHIMepDi TacbImaNday XeHe CaTay Ke3iHDe.
HIMdep C. +40^ DeinH +5^ apacbHaftemnepaTypda KblItbIaTbH y-KaJnapDa cbflraH TypHe caKtanybTnic
HCTPYKUN 3A BE3ONACHOCT BAXHO E DA I N IPOYETETE IN CNA3BATE
- Πpoyetete Te3n INHCTpyKcnn 3a 6e30nacHocT, npedn da npncTBnITE KbM ynoTpe6a Ha ypeDa. DpbkTe rHa ydo6Ho MAcTo 3a cnpaBKn B 6bndeue. Te3n INHCTpyKcnn MoKeTe Da Hamepnte n Ha aDpec www. hotpoint.eu
- Побдддддддддддддддддддддддддддддддддддддддддддддддддддддддддддддддддддддддддддддддддддддддддддддддддддд徳а на урета на урета на урета на урета на урета на урета на урета на урета на урета на урета на урета на урета на урета на урета на урета на урета на урета на урета на урета на урета на урétса на урétса на урétса на урétса на урétса на урétса на урétса на урétса на урétса на урétса на урétса на урétса на урétса на урétса на урétса на урétса на урétса на узлгы.
- Доступы веду веду веду веду веду веду веду веду веду веду веду веду веду веду веду веду веду веду веду веду веду веду веду веду веду веду веду веду веду веду веду веду веду веду 在пьшшшшшшшшшшшшшшшшшшшшшшшшшшшшшшшшшшшшшшшшшшшшшшшшшшшшшшшшшшшшшшшшшшшшшшшшшшшшшшшшшшшшшшшшшшшшшшшшшшшш崗я
- Великий дада писстбпinte Кьм уnotpe6a на уразда, Вимателно поче тete Указанята 3a 3dразвocловна и 6e3опасна pa6otingkaКakToи Te3n 3a Вимателна уnotpe6a.
CbxaHraBaIe Te3n HcTpyKuN TaKa, Ye BnHaRn Da ca Na pKa 3a 6bdeu cnpaBKn.
BANIATA B3OANACHOCT N TA3N HA DPyNTE XOPA E IN3KJIIOHTENHO BAXHA!
BbBa pBkoBoDCTBO n Ha camn ypei nMa BaXn IppeynpexJeHna 3a 6e30NaChOcT, KOnTO Tp8Ba Da ce npoyetat N Cna3BaT NO BcKaBpeMe.
BcHKn npedynpejdeHna 3a 6e30nacnoCT npedocTbRT KOHKpeTHn DeaJIIN 3a noteHuaJIHn pNCKOBe n yka3aHnKa KaK da ce HamaJIr pNCKOBeTe OT HapAHBaHe, NOBpeDa n eJekTpueckn ydap, npoI3TuHaunOT HenpaBnHa ynoTpe6a Ha ypeDa. Cpa3BaIte BHNMaTeJIHO INHCTpyKcInTe PO-DoIy.
HeBaHTo Ha Te3n HNCTpyKcnn MoKe Da DOBeDe Do pNCKOBe. Ipon3BOJTeJIr He Hocn HnKaKbA OTROBOPHOCT 3a HapaHЯBaHnHa Xopa n JINBOTHN IIn IOBpeDa Ha NMyUeCTBO, aKO He ca Cna3eHn CbBeTHTe n IpeDnA3HNTe MEPKn. - Покут bT He Tp8Ba Da ce n3noJ3Ba OT Deca NOd 8 roDnH, OCBeH aKO TOBa He Ce n3BbPwBa NOd KOHTpoJa Ha Bb3paCTeH.
- Дуа на вьз pact 8 roDNHи NOBue He Iиua C hAmaleHn ФиЗИчecN, CETINBn IIN yMCTBeHn CnOCO6HocTN KaKTo n Iиua 6e3 OINT N IO3HaHnma MOraT Da I3NoJ3BaT To3N UpeD cAmo NOD HAD3Op. CbOTBETHO, Te3N IInuMa MOraT Da I3NoJ3BaT UpeDa, cAmo aKO ca HAreCHO C INHCTpyKUnITE 3a 6e3OnaCHOTO My I3NoJ3BaHe i aKO pa36bnpat CbOTBEHTHte pNCKOBe. Deuata He Tp8Ba Da cN irpaT C UpeDa. NOncTBaHeto N IOdRpBxxKaTa OT Notpe6nteJI He Tp8Ba Da ce I3BbPWBat OT Deua 6e3 NaD3Op.
MetaJIHnTe ocTpneTa ca n3KJIIOUHTeJIHO ocTpN, 3aTOBa npn pa6Ota
c ypeDa, npn n3npa3BaHe Ha Kynata I NO BpeMe Ha nouchTbaHe Tp86Ba Da ce NODXoJda C n3KJIIOUHTeJIHNO BHMaHne. BnHaRn dpbXTe peXeIaTa npncTbKa daney OT pexeIte pb6OBe, KaKTo IO BpeMe Ha pa6Ota, Taka n KOrato NouchTbATE ypeDa.
- Náбягваite KOHTaKT C ДВижштЕ ceЧаст.
ПРЕДHA3HAЧЕНЕ HA ПОДУКТА
ToBnypeE npedHa3NaueH eINHCTBeHO 3a yNOTpe6a B domaunHycnoBna. ToI He e npedHa3NaueH 3a INDyctpnaJHa yNOTpe6a. Ipon3BOndTeJIrT He Hocn HnKaKBa OTROBOPHOCT 3a HnPaBnJHa yNOTpe6a nII HnPaBnJHa HAcTPOJa Ka Ha KOHTPOJIte.
BHMMAHNE: ypeIbT He e npedHa3Naueh 3a pa6ota C BbHsEH TaIMep IIN OTdEJIHO dNCTaHcNOHHO yCTPOJCTBO.
He m3noJ3BaIte ypeDa Ha OTKpntO.
He cxbxpaHraBaiTe ekCnIIO3NBHn IJI N 3aIaNIMN BeIeCTBa (KaTO HanprImep aePo3OJHn ONaKOBKn) n He NoCTaBryTe, n He n3NoJ3BaIte 6eH3INn IJI npRn 3aIaNIMMaTePnaJIb N IJI N 6JIn3o Do ypeDa, TbN KaTO aKO rO BkIIOUHTe IIO HeBHMaHne, MoXe Da Bb3HNKHe IOXap.
Инстадира themselves
Pemonte Tp6Ba da ce n3BbPbBAT OT KBaJIncuPAH TexHNK, BCBOTBeTCTBnE C INHcTpkyCnIte Ha npON3BOJNTeJIy IMecTHNtepa3npope6n 3a 6e3OpacHocT. He pemontaIte n He pOdmEnYte qactn Ha ypeDa, OCBEN aKO TOBa He e n3pNUHO yka3aHO B pBkoBOdCTBOTcHa notpe6nteJy.
- ДeLaTa He TpЯБВа Дa ИЗВьршВaT ИнСТаЛациОннДeйHOCtN.;
ДръжTe Deцata ДалачNo ВpeMe Ha ИнСТаЛиранeto Ha уpeDa.
СьхраяBaIte OnakOBьчHnte MaTeРиАл (HaJIOHOВn Top6uKn,
napчета CTИрОпop И.T.H.) Далач OT рьцete Ha Deцa, KaКTO NO ВpeMe
Ha ИНСТаЛиранeto Ha уpeDa, Тaka И СпeД TOВa.
Cnpa30nakOBaHe Ha ypeHa npOBepTe DaHn ToH e NOBpeDeH nO BpeMe Ha TpaHCnpTnpaHe. B cIyauHa npo6JeM, CbByjKeTe ce c Hau-6nn3kn Ja Boac OTdEJI 3a rapaHcnoHNO o6cIyXBaHe.
- Потереме на Инстампаце на урета Deцатура за StорТ
Далец OT Hero.
- Праздддддддддддддддддддддддддддддддддддддддддддддддддддддддддддддддддддддддддддддддддддддддддддддддддддд徴псгпсгпсгпсгпсгпсгпсгпсгпсгпсгпсгпсгпсгпсгпсгпсгпсгпсгпсгпсгпсгпсгпсгпсгпсгпсгпсгпсгпсгпсгпсгпсгпсгпсг.
- Дурада, той Трава дa 6ьde n3Ключен OT 3axpaHbaHeTo.
3aTeiCTBaHTo Ha ypeDa Tp6Ba Da ce N3BbPwBa cMo Cnei KaTO ca npKJIouHn DeHocHTe No IHcTaInpaHTo My.
ПРЕДУПЕЖДECHИ, OTHACЯЦ CE ДО ELEKTPNUCHECKATA 6E3ONACHOCT
- YBepTe ce, Ye HApEKeHneTo, yKa3aHo Ha Ta6eJkata Ha ypeDa, OTROBapra Ha TOBa B Doma Bn.
3a!ypei n C MOHTnpaH 1eNceI: aKO 1eNCEJIbT He CbOTBETCTBa Ha KOHTaKTA, CBpXeTe Ce C KBaINΦuNpaH TexHnK.
He 3no3BaIte Ka6eHn yIbJXHTeJI, KOHTaKTn C HЯKOJIko rHe3da IIN aIaITePn. He cBbp3BaIte ypeDa KbM KOHTaKT, KOITo MoKe da 6bIe BkIIOUeH Upe3 dNCTaHcNoHHO ynpabJIeHne.
3aXpaHbAunr Ka6eI 3a ypeIa Tp8Ba Da e DoCTaTbUHO Dblr 3a CBbp3BaHETO My KbM MpeXKOBOTo 3aXpaHbAHe CJIeI CbOTBETHaTa INHCTaJaCnI Ha MAcTOTO My.
HeIbpaIte 3axpaHbaunKa6eJ.
He notanayte Mnkcepa n He donyckaite KOHTaKT Ha Ka6eNa 3a npomeHnBO HnpeXeHne C BODa Nn Dpyr TeuHOCTN. - Ako3axpaHbAunr Ka6e n e NobpeDen, ToT Tp6Ba Da ce noMeHN CndeHTnueH. POnMaHaTa Tp6Ba Da ce n3BbPShn OT KBaJIuΦnUpaH TexHnK B CbOTBeTCTBnE C nHcTpPyKUnTe Ha npOu3BoDnteJn DeiCTBaUnTe pa3npope6n 3a 6e30NaChocT. CbByKeTe ce cOTOpn3nPaH cepBn3eH ZeHTbp.
He n3noJ3BaIte ypeDa, aKO 3axpaHbAunrMy Ka6eI nn IeNcEJa Ca NOBpeDeHn, aKO cAmnT Toi He pa6OTn IpaBnHIO, IIN aKO e NOBpeDen nn n3nyChat. He notanYte 3axpaHbAunr Ka6eI nn IeNcSeJa My BvB BoDa. Ka6eIbT Tp6Ba BnHarn Da ce HAMnpa daJeU OT rOpeu NiOBbpxHOCTn.
He IOKocBaIte ypeDa C MOKpn YacTn OT TAnOTo Cn N He pa6oTeC Hero, KOrato CTe 6ocn.
ПРавиЛHAУNOTPEБА
- Побдддддддддддддддддддддддддддддддддддддддддддддддддддддддддддддддддддддддддддддддддддддддддддддддддддд徳а, увере тс, чь BCчкч actи n kanaц ca 6e30anacho 3aknquehn Ha MЯCTOTO cN.
3aKePbAsTe DeTaN Tp6Ba Da ca 3akIooHn B DBeTe 3aunBauN N03uN, B npOTnBEH CnyaN IO BpeMe Ha pa6Ota KaNaKbT Ha Kypata MoKe Da 3anOChE Da Ce BbPTN, KOraTO MOTOpbT pa6OTN.
He! ce onntBaIte da MaHnnyInpaTe MExaHn3Ma 3a 3aKnIOUbaHe Ha kanaKa. - Празда pa3rno6nte ypeda, n3KJIoucheTe ro ot 3axpaHbaHeTo n n3yaKaIte octpneTaT a HanbJInHO da cnpat da Ce BbpTЯT.
- BinhariOTCTpaHraBaItepeXeMaTa npicTAbKa, ppei da 3aNoUHeTe Da n3JIbATEcbDbpXaHneTo OT Kynata.
- Hrkora He hatnckaTe xpaHaTa c pbka. BnHaHn n3noJ3BaIte n36yTbaUTo npncnocO6JeHne.
He! cnaaTe npbCTnTe cn nIi dpyrI npedMeTn B OTBopa Ha ypeDa, KOrato Toi pa6OTn. Ako B OTBopa 3aceDne XpaHa, n3noJ3BaIte n36yTBaUTo npncnOc6JIeHne nIi dpyro napYe nnOd nIi 3eJeHcyK 3a n36yTBaHe Ha 3aJIeHNHaJaTa XpaHa. Korato To3n MeToD He e Bb3MOKeH, cnpTe ypeDa, n3KJIuOye 3axpaHbaHeTo n pa3rIo6eTe, 3a Da n3BaJInTe OCTaHaJaTa BbTpe XpaHa. - ДогаTO ИЗВьршВate pa3MecBaHETO, ДрьжTe рьцete си И BCЯКВИ пибори далец OT контейнера, за наимITE рпсka OT серно3нн наразовая Ha xopa, КAKTO и NOВpeDA Ha nacatopa. Korato урedingHT He pa6OTN, можete Дa ИЗПОЛ3ВATE CTbpralka.
Binaru n3KIOUBAIte ypea ot 3axpaHbaHeTo, KOraTO ro OCTaBTe 6e3Ha3Op, KaKTo I npEi CrlNo6BaHe, pa3rNo6BaHe nn NouchTbaHe.
BIMabaTe, KOraTo HaJIbATE ropeuTa TeUHocT B ypeDa, Tb' KaTo TMOKe Da 6bDe N3XBpIeHa N3BbH ypeDa nopadn BHe3aHNO o6pa3yBaHe Ha npa.
BHHMaHHe: octpneTo e MHoro octpo, DOKOCBaIte rO MHOro BHIMaTeJIHO.
IpenopbUbAmpea3MepbTHa xpaHaTa dae 30-60 MM B dNaMeTbp n 100-175 MM B dNbJxHa.
OctpneTo 3a HapraBaHe Ha pe3eHn MoKe da pexKe Ha JeHTn nnpe3eHn C de6eJnHa 3 MM.
ObelbaoTo ocTpne MoKe Da n3Pra3Ba HyDnN nnNBnC De6eJIHa 3 MM*.
He ocTabaIte ypeDa da pa6oTn c TBbpda xpaHa 3a noBee ot 10 cekyHn HnpeKbchAto.
3a Da H3NOJ3BaTe npNCtABKaTa Ha cnnpaJIuN3aTopa KaTO CnnpaJIuN3aTOp, Cna3BaIe CNeJHITe INHCTpyKcUH:
ΦHΓΥPA 3
- Пьрв Тябва Да ce уверпte, ч пpoТиBoxЛьзraцит пьстен e ФнКсран Кьм ДьНО.To Kaуnta.
- NocTabete kanaKa Ha NbHTo Ha Kynata.
- NocTabete JekalHTo ocTpne (3a JeHTn Hnn HydIn) Bbpxu uNΦTa Ha KOHyChata onopa -BnHaRn CnaRaTe OCTpneTo npeDn Da cNoXnte camTe cbCTaBKn. NocTabete KOHyChata onopa B KaNaKa Ha DhHOTO.
- NocTabete n 3aBbPTeTe no nocoka Ha yacobnKOBata CTpeJIka,doKAto Ce cnKcnpa Ha MCTOTO CN, KaKTo e NOKa3aHo Ha KapTINHkata.
- CBaIeTe n36yTBaUTo npncnOc6JIeHne Ha npictabkata 3a Hap83BaHe n o6bpeTe o6paTHo BxOdHnKaIak Bbpxu IOpdaBauny UneHa npictabkata 3a Hap83BaHe.
- ΠоctaBeTe MOTopa B KanaKa Ha Kynata,ДOKATO N3UpaKaT DBaTa MaIkn 6yToHa Ha KOHeKTOpa B JIABO IЯCHO.
- BknioyeTe ypeDaB 3axpaHbaHeTo.
- IoprotBete 3eHcyuTe nIIN IIOOBte, KaTOMOTpepaHa.IocTabete KykataHa H36yTBaHa Ha CNIPAUN3aTopa B XpaHaTa,OKATO BHe3e NlThO.
ΦNΓΥPA 13
- Пoctabete n36yTbaUTo npucnocobJeHne Ha cnnpaIIN3aTopa cbc 3eJenHuYnte HnI INIOOBETe B NOdaBauNyaJeHa cnnpaIIN3aTopa YBepeTe ce, Ye xpaHaTa He MoKe Da ce BbptN.
- 3aBbPTeTe 6yToHa 3a HaCTpOJaHa XeJaHaTa ckopocT. Ppi HaTnCKaHe N 3aDbPkaHe Ha 6yToHa ON/OFF (BkIIOyeHO/N3KIOueHo),
npncnoc6neneHneTo BeHara 3anOuBa Da Hapra3Ba. 3a MaKcImaHa cKOpocHT HaTnCHeTe 6yToHa TURBO 3a KpaTbK nepnoD OT BpeMe.
- 3a ДА OТСТРАНTE OTПАДБЦNTE, HA TИССЕп OСВОБОДЕТ БУTOHA Ha ROPHATA CTРАнHa N36уTBача Ha CПИРАЛЗАТОРа. OTПАДБЦNTe Uсе ce OTДЕЛТ И N3XBьрЯT.
- Otvopete kanaute, 3a da cTnHete do kynata n do o6pa6oTeHaTa XpHa.
3a da n3noJ3BaTe npncnoc6neHnraTa Ha cnipapn3aTopa KaTo npncTabka 3a Hapr3BaHe, cna3BaIte cJeDnHTe INHCTpyKcN:
ΦNΓΥPA 4
- Пьрв Трабва да ce уверпге, ч пpoТиBoxльзraцят пьстен e ФнКсupaн Кьм ДьНOTO на КунаТ.
- NocTabete KaNaKa Ha IbHTo Ha KynTa.
- IocTabeTe JekHaHTo ocTpne (3a pe3eHn nIn nBnCn) Ha uΦTa B KOHyChata onopa - BuHaTc naraTe octpneTo npEi Da cNoXHTe camtTe cbCTaBKn. IocTabeTe KOHyChata onopa B KanaKa Ha DbHOTO.
- NocTaBete n 3aBbPTeTe no nocoka Ha yacOBHnKOBaTAtcpeNka Ha rOpHnKaIaNk, DOKATO ce fHKcapa Ha MactOTO cN, KaKTo e NOKa3aHO Ha KapTHNKata.
- OTeTpaHete n36yTbaUTo npncnocO6neHne Ha cnnpaIIN3aTopa n o6bPheTe o6paTHo BXODHnKaIak Bbpxy IOpabaun yJeN ha cnnpaIIN3aTopa.
- ΠоctaBeTe MOTopa B KanaKa Ha Kynata,ДOKATO N3UpaKaT DAbaTa MaJkn 6yToHa Ha KOHeKTopa B JЯBO IЯCHO.
- BknHcyTe ypeDa B 3axpaHbaHeTo.
- CnojkeTe 3eHcyuIte nn nIOoBete B noDaBaun yne 3a Hapra3BaUaTa npNCtAbKa n noCTabEt e CTAndapTHOTo n36yTbaUO npncnoc6JeHHe 3a Hapra3BaHe.
- 3aBbptete6yToHa 3a HacTpoKa Ha JxelaHaTa ckopocT. Pn HATnCKaHe n 3aDbpxKaHe Ha 6yToHa ON/OFF (BKnIOyeHO/n3KIOueHO), npncnocobneHneTO BeDHaRa 3anOuBa Da Hapra3Ba. 3a MaKcImaIIHa CKoPcT HATnCHeTe 6yToHa TURBO 3a KpaTBk nepnoD ot BpeMe.
- OTbopete KaanaTe, 3a Da CTnHHeTe Do Kynata.
NOL3HO
- HapraHnte Ha cnnpaHn 3eJeHcyu ca 3ameCTnTeJn C HnCKO CbDpbXaHne Ha BByIexnDpaTn 3a NaCTa N cnaReTn.
Tbbpnte nnoOBe 6e3 cemkn nn TaKnBa C Kyxa cbpuceBnHa ce pexat no-do6pe. - 136paTte Bb3MOxHO HaI-tpaBn 3eJIeHcyu.
- Плобove (kaTo Hanpimep Kpyu) Tpr6Ba da ce cMecBaT C KanKn NIMMOHOB COK, 3a Da ce npedotbpaTN NOKaΦeHЯBaHETo Ha NOBbpxHOCTTa BeDHara CneD pr3aHeTo.
IopOrBeHnTe KapTofN n naBpHaK cbUcO ce 06e3uBeTBAt Ha Bb3dyX, aKO He Ce N3PON3BaT BeHara, Taka Ye 3a Da n36erHeTe TOBA, rN npiroTBAJTe HEnocpeDCTBeHo npedi cepBnpaHTo NM. - O6pa6oTeHnTe 3eHcyuMoraT da ce KOHCymnpat cypOBn nn neeHN Ha cyprHa, nn da ce n3nbpxkata pa36bPKBaHe.
- MoXeTe Da n3nOJ3BaTe MaKIna KOHyc 3a DeKOpIpaHe Ha JcTna.
ПРИСТАВКА 3A КьлцАНЕ
ΦNΓΥPA7
PnCTaBkata 3a KbIuaHe e NOxOJa 3a TBbpda
XpaHa KaTo MeCo, CnpHe, LyK, NoIpaBKn, YecbH,
MOPKOu, opExn, BaDemn, CySeHN CInBn N T.H.
He KbIauTe MHOrO TBbpDa XpaHa, HApnPmep
Ky6yeta JeD, INdNcKO opExYe, KaFe Ha 3bpHa n
DpyrN 3bpHa.
- BhIMaTeJIHO OTCpaHete IJaCTMaCobNn KaNak Ha OCTpneTo.
- NocTabeTe pexeun Hox Ha HnpaBnaaata OC B Kynata - BnHaHn NoCTabnTe HOx a npedn CbCTaBKnTe.
- HapekeTe xpaHaTa Ha MaKn napYe Ta I noCTaBeTe B Kynata.
- Maniko koninueCTBO BODa ige yneChn rnaKaTa pa6ota Ha ypeDa.
- KolnueCTBOTO CMEC He Tp6Ba Da HaXbPnMaKcImaHnHa KanaUHTeT Ha Kynata.
- 3aTbopete kanaka.
- CbeHHeTe 6noka Ha eJektpomotopa c Kanaka Ha Kynata, DOkATO Dbata MaKN 6yToHa OTJBO N OTJACHO Ha CBp3BaUaTa YacT UpaKHAT.
- BkniHouTe ypeDa B eNeKTpnuCecknKaKoHTaKT.
- 3aBbPTe6yToHa 3a peryInpaHe Ha ckOpocTTa, 3a Da n36peTe JekanHata ckOpocT. KaTO hATncHete n 3aDbpxKnte 6yToHa ON/OFF, npCTabkata cTApTnpa He3a6abHO KbJUaHe. 3a MaKcIMaJIHa CKOpOCT N3NOJ3BaIte 3a KpaTko 6yToHa TURBO.
- Праздднзсипесмecта ot kynata, nbpBO
OTCTpaHeTepeXeUHHOK.
He n3noJ3BaIte npncTabKaTa 3a TBbpda xpaHa HepeKbCHaTO B npOdbJxKeHne Ha nobuee ot 10 CEkyHdN.
ПРИСТАВКА HA KUYHEHСКИ POБОТ
ΦΗΓΥΑ 8-9
3a Da N3NoJ3BaTe npNCtAbKaTa Ha KyxHeHcKna p6oT KaTo npCTabKa 3a KbJIcaHe, CNeEdBaIe Te3n INHCTpyKcN:
- Han- Hanpe, ce ybepete, che Ha nbHoTo Ha Kynata e nocTaBeH npbcteHa cpeu nnb3raHe.
- ПoctabeTe pekeuHa Ha HappaBlaBaata OC B Kynata - BuHaHn NoCTabYte HOka npedn CbCTaBKInTe.
- HapekeTe xpaHaTa Ha MaIkn NapYeTa IЯ noctaBeTe B Kynata.
MaIko KoJIInueCTBO BODa ige yIeCHn rJaKaTa pa6Ota Ha ypeDa.
KolnueCTBOTO CMEc He Tp86Ba Da HaXxBpJMaKcImaHnHa KaNaUTeT Ha Kynata.
4. 3aBbptTe KaNaka no Nocoka, o6paTHa Ha YacOBHnKOBaTa CTrpeJIka, DOKATO Ce 6Iokupa B No3nCnIra, NOKa3aHa Ha n3o6p.10
YBepeTe ce, ye n36yTBaUbT 3a XpaHa e npaBnHOMOHTnpaH B KOpNyca Ha KaNaka.
5. CbeHHeTe 6noka Ha eJektpomotopa c Kanaka Ha Kynata, DOkato Dbata MaNkn 6yToHa OTJBO N OTJACHO HA CBp3BaUaTa Yact UpaKHAT.
6. BkniouyepeyaB eIeKtpnuecknKaKToaKT.
7. 3aBbptete 6yToHa 3a peryUnpaHn Ha ckOpocTtA, 3a Da n36epTe JKeJHaHATA CKOpocT. KaTO HATNCHeI N 3aDbPjKInTe 6yToHa ON/OFF, npNCTaBkata cTapTnpa He3a6abHO KbIuaHe. 3a MaKcImaJIHa CKOpocT n3NoJ3BaIte 3a KpaTko 6yToHa TURBO.
8. Празда ИЗСИТЕ CBECTA OT KYNATA, NBpBO OTCpaHETe peXeUINa HOK.
He n3noJ3BaIte npncTbKaTa 3a TBbpda xpaHa He nppeKbCHaTO B npOdbJIxKeHne Ha nobuee ot 10 CEkyHn.
3a Da n3noJ3BaTe npncTaBkata Ha KyxHeHcknpo6oT C npncTaBKeTe 3a HactbprBaHe/p3aHe, CneDbaTe Te3n INHCTpyKcN:
- Han-Has ce yBepTe, Ye Ha IbHOTo Ha Kynata e NoctabaHa OCHOBaTa Cpeu Nt3raHe.
- Пoctabete Ланота пиставka B onopata 3a octpneTa, KaKTo e noka3aHo Ha n3o6p.11
- NocTaBete onopata Ha HanpaBnaBaUaTAto OHa DbHOTo Ha Kynata.
- 3aBbptete Kanaka no nocoka, o6paTha Ha
YacOBHnKOBaTa CTePknA, DOKaTO ce 6nOKnpa B nO3nUraT, NOKa3aHa Ha n3o6p.10
KlouaIknTe Tp6Ba Da ca 3akJIOueHn B MExaHn3Ma C DBe N03NcN, B IpOTnBEH clyuai no BpeMe Ha pa6Ta C BbPteHeTo Ha eNEkTpormotopa MoKe Da ce 3aBbPTn n KaNaKbT.
5. Пoctabete Дьнота чагп ha 6лoka ha eJIeKtpOMOTopa B OTbopa Ha Kanaka Ha Kynata,doKaTO DBaTa MaJkn 6yToHa OTЯBO N OTЯCHO Ha CBbp3BaUaTaЧаct UpaKHAT.
6. BkHouTe ypeDa B eNeKtpnueckn KaHTaKT.
7. NocTabeTe xpaHa BbTpE B OTBopa 3a NOdaBaHe H6abHO HAtncHete C n36yTBaHa 3a XpaHa. He HATnCKaIte PpeKaJIeHo cINHO.
8. 3aBbptete 6yToHa 3a peryInpae He Ha ckOpocTtA, 3a Da n36peTe XeJahata ckOcT. KaTO HATNCHe Tn 3aIbpxKHe 6yToHa ON/OFF, npncTabkata CTapTnpa He3a6abHo KbIuaHe. 3a MaKcImaJIHa ckOoCT n3noJ3BaIte 3a KpaTko 6yToHa TURBO.
3a Da OTCpaHnTe onopata 3a OCTpneTata Cnei H3noJ3BaHe, N3DbPnaIte C Dba npbcTa, KaKTo e NOKa3aHO Ha N3o6p.12.
CzbETn
- I3noJ3BaIte cTpaHaTa 3a HacTbprBaHe 3a MopKOBn, KapToΦn n XpaHa c NoIo6Ha TeKCTypa.
- I3noI3BaIte cTpaHata 3a pI3aHe 3a MOpKOBn, KapTOΦn, 3eIe, KpactaBnIuN, TIKBvKn I NyK.
- N3noJ3BaIte npecHn npOdyKTN.
He pexeTe npekaleHo MaIKxpaHn. POnaBaTepabHOMepHO xpaHaTa B OTBopa 3a POnaBaHe.Taka ce npedOTbpaTBA n3CunBaHeTo Ha xpaHaTa IIO BpeMe Ha o6pa6OtKaTa.
BpeMeHaTaNKOnuYeCTBaTaB Ta6nnte Ca np6n3nTeJHnN MoRat Da BapnpaB 3aBnCmOcT OT KaueCTBOTo Ha CbCTaBKnTe Nnn PpeNoHTaHnraTa.
| 500 мл кура за кыцане | |||
| Храна Марким | Врееме за пав�а | ||
| Месо 250 r 8 сек 1~2 cm | |||
| Пов- правки | 50 r 8 сек / | ||
| Ядни 100 r 8 сек / | |||
| Сирише 100 r 5 сек 1~2 cm | |||
| Хлб 80 r 5 сек 1~2 cm | |||
| Луч 150 r 8 сек 1~2 cm | |||
| Бис KBИТи | 150 r 6 сек 1~2 cm | ||
| Мени плобove | 200 r 6 сек | 1~2 cm | |
| Брашно 350 r | 10 сек/3axap 8 r | ||
| Сол 8 r | |||
20016 Pero (MI) Italy
www.hotpoint.eu
0006
07/2017 - ver.1.0

- eh
- INTENDED USE OF THE PRODUCT
- INSTALLATION
- ELECTRICALWARNINGS
- CORRECT USE
- CLEANING AND MAINTENANCE
- INTRODUCTION
- PARTS AND FEATURES
- Figure 1
- BEFORE FIRST USE
- USING THE PRODUCT
- BLENDER ATTACHMENT
- Figure 2
- SPIRALIZER ATTACHMENT
- Figure 6
- Figure 3
- Figure 13
- Figure 4
- HINTS
- CHOPPER ATTACHMENT
- Figure 7
- FOOD PROCESSOR ATTACHMENT
- Figure 8-9
- TIPS
- TIP
- SAFEGUARDING THE ENVIRONMENT DISPOSAL OF PACKAGING MATERIALS
- DISPOSAL OF HOUSEHOLD APPLIANCES
- CONSIGNES DE SECURITE IMPORTANT À LIRE ET RESPECTER
- COCTABHbIE YACTN INXAPAKTEPNUCTUKN
- PNCYHOK1
- HACADKA CINPAJEPE3KA
- PNCYHOK6
- PNCYHOK 3
- PNCYHOK13
- PNCYHOK 4
- COBETbl
- N3MEJbYNTEJIb
- PNCYHOK7
- KOMBAH
- PNCYHOK 8-9
- CEPBNUCHOE OBCJNYKUBAHNE
- YxOa 3a TexHnKoI
- ABTOPn3OBaHHbIe cepBnCHbIe cHTpbI
- Pn BO3HKnHOBeHm HeucnpaBHOCTn
- Ithalatci Firma:
- Satis Sonrasi Hizmetler:
- Taşima
- IOPAIN
- EHIMHIH MAKCATTbI KOJIaHbICbl
- OPHATY
- #
- 3JEKTP CbIMdAPbl BOHyHsA ECKEPTyJEP
- ДУРыС KОЛДАнbethIC
- TA3AJAY XHE TEXHnKajbIK KbI3MET KOPCETY
- KIPICNE
- TA3AJAY XOHE Kbl3MET KOPCETV
- KEHEC
- Kbl3MET KOPCETY
- KypbInfbifa kyTIm KepceTy
- YakineTTi KbI3MeT KepcTeOpTaJIbIKTapbl
- Akay naIda 6oJraH KaFdaiJa
- npMaBbIK 6JIWeKTePdi RaHa KOJaHybIH TaJan
- KbI3MeT KepceTy opTaIbIbHa xa6apnacap anDbIHda KeNeci mJImeTTepdi bepyre daBih EkeHi3Di TeKcepin aIbIHbI3:
- KOPIJAFAH OPTAHbi KOPFAY
- OPAY MATEPNAДAPbIH KÖDEGE KAPATY
- TYPMbICTbIK TEXHnKAJIAPDbI KÖDEGE JAPATY
- KoJIdAHy BoIbIHsA HYCKAYIbIK
- ECKEPTY
- KÖJIJK XÖHE CAKTAY
- HCTPYKUN 3A BE3ONACHOCT BAXHO E DA I N IPOYETETE IN CNA3BATE
- ПРЕДHA3HAЧЕНЕ HA ПОДУКТА
- Инстадира themselves
- ПРЕДУПЕЖДECHИ, OTHACЯЦ CE ДО ELEKTPNUCHECKATA 6E3ONACHOCT
- ПРавиЛHAУNOTPEБА
- ΦHΓΥPA 3
- ΦNΓΥPA 13
- ΦNΓΥPA 4
- NOL3HO
- ПРИСТАВКА 3A КьлцАНЕ
- ΦNΓΥPA7
- ПРИСТАВКА HA KUYHEHСКИ POБОТ
- ΦΗΓΥΑ 8-9
- CzbETn
Brand : HOTPOINT-ARISTON
Model : HB 0806 UP0
Category : Food processor