EBG 3760 - Grill plate CLATRONIC - Free user manual and instructions
Find the device manual for free EBG 3760 CLATRONIC in PDF.

| Product type | Electric grill plate |
| Brand | Clatronic |
| Model | EBG 3760 |
| Power supply | 230 V~, 50/60 Hz |
| Power | 1600 W |
| Protection class | I |
| Net weight | Approx. 4.5 kg |
| Automatic programs | 6 programs: Entrecôte, Roast beef, T-bone, Fillet, Chicken, Extended cooking (REST) |
| Maximum temperature | 850 °C |
| Control type | Touch buttons (TEMP, TIME) and rotary selection knob |
| Display | Digital screen with temperature and time |
| Standby function | Yes, after 3 minutes of inactivity |
| Preheating | Mandatory before inserting food |
| Heating element | Ceramic |
| Included accessories | Grill, fat drip tray, removal tool |
| Care and cleaning | Housing: damp cloth; grid and tray: hot water and detergent; do not immerse appliance |
| Safety | Hot surface, automatic shut-off, cooling fan, minimum distance of 30 cm from flammable objects |
| Intended use | Grilling and gratinating solid foods |
| Recommended extension cord | Minimum cable cross-section 1.5 mm² |
Frequently Asked Questions - EBG 3760 CLATRONIC
User questions about EBG 3760 CLATRONIC
0 question about this device. Answer the ones you know or ask your own.
Ask a new question about this device
Download the instructions for your Grill plate in PDF format for free! Find your manual EBG 3760 - CLATRONIC and take your electronic device back in hand. On this page are published all the documents necessary for the use of your device. EBG 3760 by CLATRONIC.
USER MANUAL EBG 3760 CLATRONIC
natural_image
Black Clatronc® oven with digital display and control knob (no visible text or symbols on main body)natural_image
Simple line drawing of a hand holding a flatboard with circular indentations (no text or symbols)natural_image
Simple line drawing of a hand pressing down on a flat surface with circular indentations (no text or symbols)natural_image
Line drawing of a hand holding a metal plate with circular indentations (no text or symbols)natural_image
Line drawing of a hand pressing down on a flat surface with circular indentations (no text or symbols)natural_image
Line drawing of a hand holding a small object over a flat surface with circular indentations (no text or symbols)Thank you for choosing our product. We hope you will enjoy using the appliance.
Symbols in this Instruction Manual
Important information for your safety is specially marked. It is essential to comply with these instructions in order to avoid accidents and prevent damage to the appliance:

WARNING:
This warns you of dangers to your health and indicates possible injury risks.

CAUTION:
This refers to possible hazards to the appliance or other objects.

NOTE:
This highlights tips and information.
Contents
Overview of the Components....3
General Notes......40
Special Safety Precautions for this Appliance....41
Intended Use 42
Unpacking the Appliance....42
Overview of the Components/Scope of Delivery......43
Notes for Use....43
Location....43
Connected Wattage 43
Electric Connection 43
Switching the Appliance On/Off 43
Standby (Standby Mode)....43
Buttons and Controls on the Control Panel....43
Auto Functions 43
Changing the Temperature 43
Changing the Time....44
Starting the Program....44
Before Initial Use....44
Using the Removal Tool 44
Meat Preparation....44
Grilling at Higher Temperatures 44
Simmering 44
Au Gratin, Pizza, Vegetables, Bread 44
Using the Appliance 44
End of Operation 45
Cleaning 45
Housing 45
Inner Surfaces....45
Grill Rack and Grease Drip Tray....45
Storage....46
Technical Data....46
Disposal 46
Meaning of the "Dustbin" Symbol 46
General Notes
Read the operating instructions carefully before putting the appliance into operation and keep the instructions including the warranty, the receipt and, if possible, the box with the internal packing. If you give this appliance to other people, please also pass on the operating instructions.
- The appliance is designed exclusively for private use and for the envisaged purpose. This appliance is not fit for commercial use.
- Do not use it outdoors. Keep it away from sources of heat, direct sunlight, humidity (never dip it into any liquid) and sharp edges. Do not use the appliance with wet hands. If the appliance is humid or wet, unplug it immediately.
- When cleaning or putting it away, switch off the appliance and always pull out the plug from the socket (pull the plug itself, not the lead) if the appliance is not being used and remove the attached accessories.
- Do not operate the appliance without supervision. If you leave the room you should always turn the appliance off. Remove the plug from the socket.
- The appliance and the mains lead have to be checked regularly for signs of damage. If damage is found the appliance must not be used.
- Use only original spare parts.
- In order to ensure your children's safety, please keep all packaging (plastic bags, boxes, polystyrene etc.) out of their reach.

WARNING:
Do not allow small children to play with the plastic foil.
There is a danger of suffocation!
Special Safety Precautions for this Appliance
You will find the following symbol with warning character on the appliance:

WARNING: Hot Surface! Danger of Burns!
The temperature of accessible surfaces can be very hot during and after operation.
- Therefore, only touch the appliance at the control panel. Use fireproof oven gloves when inserting or removing accessories!
- Do not carry or lift the appliance during operation, but wait until the fans have cooled down the appliance. Then disconnect the mains plug.
- Always operate the appliance under supervision. Very dry bread can catch fire inside the appliance!
- Place the appliance on a heat resistant surface!
- Keep sufficient distance (30 cm) to highly flammable objects such as furniture, curtains, etc.! Never place the appliance inside a cabinet!
- Due to rising heat and vapours do not place the appliance under wall cupboards.
- Do not cover the air inlet and air outlet openings, in order to ensure sufficient air circulation.
- Do not place anything on top of the appliance.
- Make sure the food never comes into contact with the heating element.
- Never leave the removal tool in the grill grate, otherwise it will become very hot.
- Always fill the grease drip tray with water to avoid the collected grease being ignited.
- Fats and oils may ignite if used improperly. In such a case, smother the flames with a damp cloth!
- Ensure that the mains cord does not touch hot parts of the appliance during operation.
- Do not operate the appliance with an external timer or separate remote control system.
- Do not repair the appliance by yourself. Always contact an authorized technician. If the supply cord is damaged, it must be replaced by the manufacturer, its service agent or similarly qualified persons in order to avoid a hazard.
• This appliance shall not be used by children. - Keep the appliance and its cord out of the reach of children.
• Children may not play with the appliance. - Appliances can be used by persons with reduced physical, sensory, or mental capabilities or lack of experience and / or knowledge, if they are supervised or have been instructed concerning safe use of the appliance and understand the hazards involved.
CAUTION:
This appliance is not intended to be immersed in water during cleaning. Please observe the instructions that we have included for you in the chapter “Cleaning”.
Intended Use
This appliance is intended for grilling (barbecues) and baking toppings of solid foods.
It is exclusively intended for this purpose and may be only used appropriately.
It may only be used in the manner described in these operating instructions.
You may not use the appliance for commercial purposes.
Use for any other purpose is considered improper and not for the intended purpose and can result in damage to property and personal injury.
The manufacturer shall not be liable for damages caused by not intended use.
Unpacking the Appliance
- Remove the appliance from its packaging.
- Remove all packaging material such as plastic films, filler material, cable ties and cardboard packaging.
- Check the content for any missing parts.
- In the event that the packaging content should be incomplete or if damages are noticeable, do not operate the appliance. Return it to the dealer immediately.
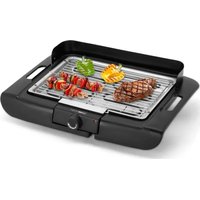
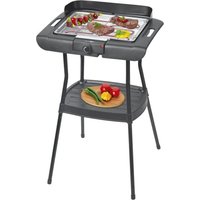
Overview of the Components / Scope of Delivery
1 Air outlet openings
2 Housing
3 On / off switch (10)
4 Control dial / START/STOP button (start / stop)
5 TEMP button (temperature)
6 TIME button (time)
7 Display
8 Grease drip tray
9 Grill rack
No illustration:
Removal tool
Notes for Use
Location
- Set the appliance onto a non-slip, level, and heat-resistant surface.
• Take care that the appliance and the mains cable never are placed onto hot surfaces or near heat sources (e.g. range, hob).
Connected Wattage
The total power consumption of this appliance can be up to 1600 W. With this connected load a separate supply line protected by a 16 A household circuit breaker is recommended.

CAUTION: Overload!
- If you use extension leads, these should have a cable cross-section of at least 1.5 ~mm^2 .
- Do not use any multiple sockets, as this appliance is too powerful.
Electric Connection
- Before inserting the power plug into the outlet, check that the mains voltage to be used matches that of the appliance. You can find the required information on the nameplate.
- Connect the appliance to a properly installed earthed socket.
Switching the Appliance On/Off
The on / off switch is located at the back of the appliance:
$$ \mathbf {0} = \text { turned off } $$
$$ I = \text { turned on } $$
When turning on the appliance, a signal will sound and the fan will turn on for about 3 seconds. The display will then show “---” next to the TEMP button and “Next to the TIME button. In addition, all the indicator lights light up briefly.
Standby (Standby Mode)
i NOTE:
The appliance is in standby mode when the power plug is plugged in, the switch is set to the I position and the display is not on.
- If no button is pressed for approx. 3 minutes, the appliance will automatically switch into standby mode.
- You may exit standby mode by either pressing a button or by using the control dial.
Buttons and Controls on the Control Panel
- The TEMP and TIME buttons on the appliance are touch keys. Gently touch the buttons with a finger to execute the function. Whenever a button is pressed, it will be confirmed by a beep sound.
• The control dial has two different functions:
Turning:
- Selection of the automatic programs
- Change of temperature or time
Pressing:
- Starting and stopping the programs
Auto Functions
Use the control dial to select an automatic program. The corresponding indicator light indicates the selected program.
| Mode | Pre-set temperature in °C | Pre-set time in min. |
| (Entrecôte) | 850 3 | |
| (Roast beef) | 850 5 | |
| (T-Bone) | 850 7 | |
| (Fillet) | 800 4 | |
| (Chicken) | 850 4 | |
| REST (Simmering) 300 | 5 |
i NOTE:
• These shall be considered as guide values. Depending on the size and weight, the time and temperature may be longer and higher or shorter and lower.
- You may change the pre-set temperature and time of the automatic programs as desired. However, this is not possible with the “REST” program.
- Turn the meat over halfway through the cooking time.
Changing the Temperature
Press the TEMP button. The temperature display will start flashing for about 3 seconds. During this time, use the control dial to set the temperature.
Changing the Time
Press the TIME button. The time display will start flashing for about 3 seconds. During this time, use the control dial to set the cooking time.
Starting the Program
Press the control dial to start the program.
Before Initial Use
- There is a protective layer on the heating element. To remove this, operate the appliance for about 10 minutes without any contents.

NOTE:
Any smoke or smells produced during this procedure are normal. Please ensure sufficient ventilation.


WARNING:
Allow the appliance to cool down before you clean it!
- Disconnect the mains plug from the wall socket.
- Wipe the inside of the appliance and clean the accessories before using it.
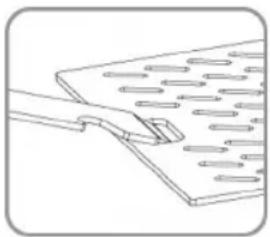
Using the Removal Tool

WARNING: Danger of Burns!
All accessible parts will become very hot during use as well as thereafter. Use fire-proof oven mitts!
natural_image
Simple line drawing of a hand pressing down on a flat surface with circular indentations (no text or symbols)Meat Preparation

CAUTION:
• Always season the meat after grilling.
- Do not use marinades. These burn too quickly.
- Do not coat the meat with oil, butter or lard. This would produce too much smoke.
- The meat is best when it is cooked sous-vide beforehand.
- Meat with a lot of fat is juicier.
Grilling at Higher Temperatures
- Lay the meat on a grille which has not been preheated. For a uniformly distributed crust, place the meat on the marked area of the grill grate.
- Use the removal tool to place the grille in one of the upper slots.
-
Only use the upper slots for roasting.
-
Always insert the grease drip tray. Slide this in under the lowest slot.
- Grilling time per side should not be too long, as the high temperatures may cause the meat to burn.
• Dark, less reflective meat heats faster than white meat. - Grilling duration depends on the type, age and thickness of the meat.
- Keep an eye on the meat the whole time to avoid burning.
- Always remove the grille completely when turning the meat. To avoid flowing out of cooked juices, use tongs rather than sharp objects.
Simmering
- Set the "REST" program and allow the meat to simmer at a low temperature. To do this, slide the grill grate into one of the lower slots.
- The core temperature of the food will indicate when it is done. We recommend the use of a roasting thermometer. The core temperature of the meat can be monitored with it.
Au Gratin, Pizza, Vegetables, Bread
Use only the lowest slot for this.
Using the Appliance

NOTE:
- The countdown does not start until the appliance has been pre-heated to the set temperature. Note that the food should be inserted only when the set temperature is reached.
-
Important note about the ceramic heating element:
During heating operation, the ceramic heating element shows a visible dark spot in the centre. Due to its design, no heating wires can be routed at this spot. This is not a defect. -
Set the on / off switch, located at the back of the appliance, into position I.
- Use the control dial to select an automatic program.
- Start the program by pressing the control dial.

NOTE:
- The appliance shows the current temperature in the display.
-
Once the set temperature has been reached, an alarm sounds and the countdown starts.
-
Fill the grease drip tray with water. Slide this in under the lowest slot.
-
Pay attention to the markings on the grill grate. Place the food in the centre of the marked area of the grill grate.

NOTE:
When the food is not placed in the marked area, it is not optimally located beneath the heating element. Thus, no perfect result can be achieved.
- Insert the grill grate into a slot using the removal tool.
- Observe the grilling process and, if necessary, turn the food around.
End of Operation
There are two options to stop the operation:
- The appliance will turn off automatically after the set time has elapsed.
- You press the control dial to end the program.
A signal will sound to confirm the end of the program.

CAUTION:
After the end of operation, the fans keep running to cool down the appliance. Do not disconnect the appliance from the mains during this period!

WARNING: Danger of Burns!
- Be careful when removing the grill grate!
-
Allow the appliance to cool down before removing the grease drip tray.
-
Remove the grill grate by using the removal tool. Put the grill grate only on a heat-resistant surface!
- Remove the grease drip tray.
- Set the on / off switch, located at the back of the appliance, into position 0.

NOTE:
- The stainless steel surface of the front of the appliance can become discoloured due to the high temperatures. In addition, splashes of fat may accumulate.
- Promptly clean the appliance after it has cooled down. This way you avoid "burning" in of this grease residue.
Cleaning

WARNING:
- Wait until the fans have cooled down the appliance. Always turn the appliance off before cleaning it and remove the mains plug.
- Do not immerse the appliance in water! Doing so may result in an electric shock or fire.

CAUTION:
- Do not use any wire brush or other abrasive objects.
- Do not use any acidic or abrasive detergents.
- Clean the barbecue after each use!

NOTE:
If the grill is left to burn on maximum heat for around 15 minutes without food to be grilled after operation, any accumulations / deposits of grease will be almost completely burned away.
Housing
Clean the housing only with a damp cloth and a squirt of detergent.
Inner Surfaces
- Clean the surface thoroughly with highly concentrated, hot soap suds.
- Wipe off with water and leave the surface to dry.
Grill Rack and Grease Drip Tray
- Clean these parts in hot water by adding some washing-up detergent. For stubborn stains, you can also use a nylon brush.
- Then dry the parts well.
Storage
- Clean the appliance as described. Let the accessories dry completely.
• We recommend that you store the appliance in its original packaging when it is not to be used for a longer period.
• Always store the appliance at a well ventilated and dry place outside the reach of children.
Technical Data
Model: EBG 3760
Power supply: 230 V\~, 50 / 60 Hz
Power consumption: 1600 W
Protection class:....I
Net weight: .... approx. 4.5 kg
The right to make technical and design modifications in the course of continuous product development remains reserved.
This appliance has been tested according to all relevant current CE guidelines, such as electromagnetic compatibility and low voltage directives, and is manufactured according to the latest safety regulations.
Disposal
Meaning of the "Dustbin" Symbol
Protect our environment: do not dispose of electrical equipment in the domestic waste.
Please return any electrical equipment that you will no longer use to the collection points provided for their disposal.
This helps avoid the potential effects of incorrect disposal on the environment and human health.
This will contribute to the recycling and other forms of re-utilisation of electrical and electronic equipment.
Information concerning where the equipment can be disposed of can be obtained from your local authority.
Instrukcja obsługi
natural_image
Pure technical line drawing of a mechanical component with no text or symbolsCTC Clatronic Sp. z o.o
Ul. Brzeska 1
45-960 Opole
Usuwanie
natural_image
Simple line drawing of a hand holding a rectangular object with circular elements, no text or symbols present.Hús elkészítése

VIGYÁZAT:
natural_image
Line drawing of a hand holding a flatboard with circular indentations (no text or symbols)Приготовление мяса
ВНИМАНИЕ:
natural_image
Simple line drawing of a hand holding a tool near a grid-patterned surface (no text or symbols)تحضر اللحم
تنييه: