
EAHT700 - Earphones TECHNICS - Free user manual and instructions
Find the device manual for free EAHT700 TECHNICS in PDF.

| Product type | Direct-drive turntable |
| Brand | Technics |
| Model | EAHT700 |
| Dimensions (Width × Height × Depth) | 453 x 169 x 353 mm |
| Weight | Approx. 9.6 kg |
| Power supply | 110-240 V AC, 50/60 Hz |
| Power consumption | 8 W (on), 0.2 W (off) |
| Rotation speeds | 33 1/3, 45, 78 rpm (switchable) |
| Speed variation range | ±8% or ±16% (selectable) |
| Starting torque | 1.8 kg·cm |
| Drive system | Brushless DC motor, direct drive |
| Platter | Die-cast aluminum, diameter 332 mm, weight 1.8 kg (with mat and slip sheet) |
| Tone arm | Static balanced type, effective length 230 mm, overhang 15 mm |
| Stylus pressure | 0-4 g (direct reading) |
| Tone arm height | Adjustable from 0 to 6 mm |
| Anti-skating device | Adjustable, scale from 0 to 3+ |
| Special features | Reverse playback, torque adjustment (4 levels), brake adjustment (4 levels), LED color (red/blue) |
| Supplied accessories | Turntable, mat, slip sheet, dust cover, 45 rpm adapter, counterweight, headshell, PHONO cables, ground wire, power cord, control vinyl labels |
| Maintenance | Clean the stylus with a soft brush; clean records with a record cleaner; wipe the cover and casing with a soft cloth; do not use solvents |
| Safety | Do not expose to moisture; disconnect before maintenance; use only recommended accessories |
| Operating temperature | 0 °C to +40 °C |
| Operating humidity | 35% to 80% RH (no condensation) |
Frequently Asked Questions - EAHT700 TECHNICS
User questions about EAHT700 TECHNICS
0 question about this device. Answer the ones you know or ask your own.
Ask a new question about this device
Download the instructions for your Earphones in PDF format for free! Find your manual EAHT700 - TECHNICS and take your electronic device back in hand. On this page are published all the documents necessary for the use of your device. EAHT700 by TECHNICS.
USER MANUAL EAHT700 TECHNICS
Music is borderless and timeless, touching people's hearts across cultures and generations.
Each day the discovery of a truly emotive experience from an unencountered sound awaits.
Let us take you on your journey to rediscover music.
Rediscover Music™/Technics
Delivering the Ultimate Emotive Musical Experience to All
At Technics we understand that the listening experience is not purely about technology but the magical and emotional relationship between people and music.
We want people to experience music as it was originally intended and enable them to feel the emotional impact that enthuses and delights them.
Through delivering this experience we want to support the development and enjoyment of the world's many musical cultures. This is our philosophy.
With a combination of our love of music and the vast high-end audio experience of the Technics team, we stand committed to building a brand that provides the ultimate emotive musical experience by music lovers, for music lovers.
Director
Michiko Ogawa

Introduction
Thank you for purchasing this product. Please read these instructions carefully before using this product, and save this manual for future use.
- About descriptions in these operating instructions
- Pages to be referred to are indicated as "(⇒ 00)".
The illustrations shown may differ from your unit.
Sales and Support Information Customer Communications Centre
For customers within the UK: 0333 222 8777
For customers within Ireland: 014475229
- Monday-Friday 9:00 am - 5:00 pm, (Excluding public holidays).
For further support on your product, please visit our website: www.technics.com/uk/
Features
Coreless direct drive motor for high torque and reliability
- The newly developed coreless direct drive motor can reduce minute vibration during rotation while maintaining high torque.
- The high-precision motor control technology switches the drive mode depending on the operational status of the motor and thus enables high torque and stability.
The digital control method improves tracking and accuracy, allowing for accurate and stable pitch control.
High-precision bearings for highly sensitive tone arm
- The machine-cut, high-precision bearing used in the tone arm bearing with gimbal suspension allows for improved tracking, making skating less likely even during the most intense performances.
Vibration-cutting highly rigid cabinet and high-damping insulator
- This unit is designed to not only deliver high-quality sound and high feedback resistance, but also to efficiently cut off external vibration in very loud environments.
Functions to deliver a wide range of performances
- Allows for torque and brake speed adjustment.
- Allows for reverse playback.
- Allows the user to select from two LED lamp colours depending on user's preference or the environment.
Table of contents
Before use
Safety precautions .04
Accessories .06
Parts Name 08
Getting started
Putting the player together 09
- Attaching the cartridge 09
- Attaching the head shell 09
Before fitting the turntable 11
Fitting the turntable 11
Fitting the slipmat 11 - Attaching the balance weight 11
To remove turntable 11
Connections and installation 12
- Connecting to a pre-main amplifier or component system / Connecting to a mixer 12
Installation 13 - Fit the dust cover 13
Adjustment 14
Horizontal balance 14
Stylus pressure 14
- Anti-skating 15
- Tone arm height 16
Armlift height 17
Operation settings (LED colour setting / Reverse playback setting / 78 rpm setting / Torque setting / Brake setting) 17
Playing back
Playing records 18
Pitch control (fine adjustment to pitch) 20
Maintenance
Maintenance. 21
Troubleshooting guide 22
Specifications 23
Safety precautions
Warning Caution
Unit
- To reduce the risk of fire, electric shock or product damage,
-Do not expose this unit to rain, moisture, dripping or splashing.
-Do not place objects filled with liquids, such as vases, on this unit.
-Use only the recommended accessories.
-Do not remove covers.
-Do not repair this unit by yourself.
Refer servicing to qualified service personnel.
-Do not let metal objects fall inside this unit.
-Do not place heavy items on this unit.
AC mains lead
- To reduce the risk of fire, electric shock or product damage,
-Ensure that the power supply voltage corresponds to the voltage printed on this unit.
-Insert the mains plug fully into the socket outlet.
-Do not pull, bend, or place heavy items on the lead.
-Do not handle the plug with wet hands.
- Hold onto the mains plug body when it is disconnecting the plug.
-Do not use a damaged mains plug or socket outlet.
-
The mains plug is the disconnecting device. Install this unit so that the mains plug can be unplugged from the socket outlet immediately.
-
Ensure the earth pin on the mains plug is securely connected to prevent electrical shock.
-
An apparatus with CLASS I construction shall be connected to a mains socket outlet with a protective earth connection.
Unit
- Do not place sources of naked flames, such as lighted candles, on this unit.
- This unit may receive radio interference caused by mobile telephones during use. If such interference occurs, please increase separation between this unit and the mobile telephone.
- This unit is intended for use in moderate and tropical climates.
- Do not put any objects on this unit.
This unit becomes hot while it is on.
Placement
- Place this unit on an even surface.
- To reduce the risk of fire, electric shock or product damage,
-Do not install or place this unit in a bookcase, built-in cabinet or in another confined space.
Ensure this unit is well ventilated.
-Do not obstruct this unit's ventilation openings with newspapers, tablecloths, curtains, and similar items.
-Do not expose this unit to direct sunlight, high temperatures, high humidity, and excessive vibration.
- Ensure that the placement location is sturdy enough to accommodate the weight of this unit ( 23) .
- Do not lift or carry this unit by holding the knobs. Doing so may cause this unit to fall, resulting in personal injury or malfunction of this unit.
- Keep any IC card or magnetic card such as a credit card away from the turntable.
-Otherwise the IC card or magnetic card may become unusable due to the magnetic effect.
Disposal of Old Equipment
Only for European Union and countries with recycling systems

These symbols on the products, packaging, and/or accompanying documents mean that used electrical and electronic products must not be mixed with general household waste.
For proper treatment, recovery and recycling of old products, please take them to applicable collection points in accordance with your national legislation.
By disposing of them correctly, you will help to save valuable resources and prevent any potential negative effects on human health and the environment.
For more information about collection and recycling, please contact your local municipality.
Penalties may be applicable for incorrect disposal of this waste, in accordance with national legislation.
Product Identification Marking is located on the bottom of the unit.
Accessories
In order to prevent damage during shipping some of the equipment has been disassembled. Please check and identify the supplied accessories. (Some accessories parts are supplied in a bag.)
| Turntable (1 pc.) (TYL0332) | Slipmat (1 pc.) Slip sheet (1 pc.) | Dust cover (1 pc.) (TTFA0454) |
| One of each is provided with the unit. The slip sheet is a thin, transparent sheet. Be careful not to throw it away by mistake. | Technics label (1 pc.) Technics | |
| EP record adaptor (1 pc.) (TPH0339) | Balance weight (1 pc.) (TYL0295) | Head shell (1 pc.) |
| Screw set for cartridge (1 set) • Nuts (2 • Screws-short (2 pc.) • Screws-long (2 pc.) • Washers (2 pc.) (Supplied in a bag) | PHONO cable (1pc.) (K4PY4YY00003) | PHONO earth lead (1pc.) (K4EY1YY00189) |
| AC mains lead (1 pc.) (K2CM3YY00055) | Control vinyl labels (2pc.) | |
| • With your control vinyl installed on the turntable, affix the label passing the spindle through its centre hole. |
- In case of repair, they might be different in colour, logo, and so on.
- The model numbers of the accessories are as of June 2020. They are subject to change without notice.
- Keep the packaging materials after taking out the goods.
- You will need them when carrying the product over long distances.
- Follow the local regulations when disposing of the product.
- Do not use any other AC mains lead, PHONO cable and PHONO earth lead except the supplied one.
- Keep the cartridge, nuts, screws and washers out of reach of children to prevent swallowing.
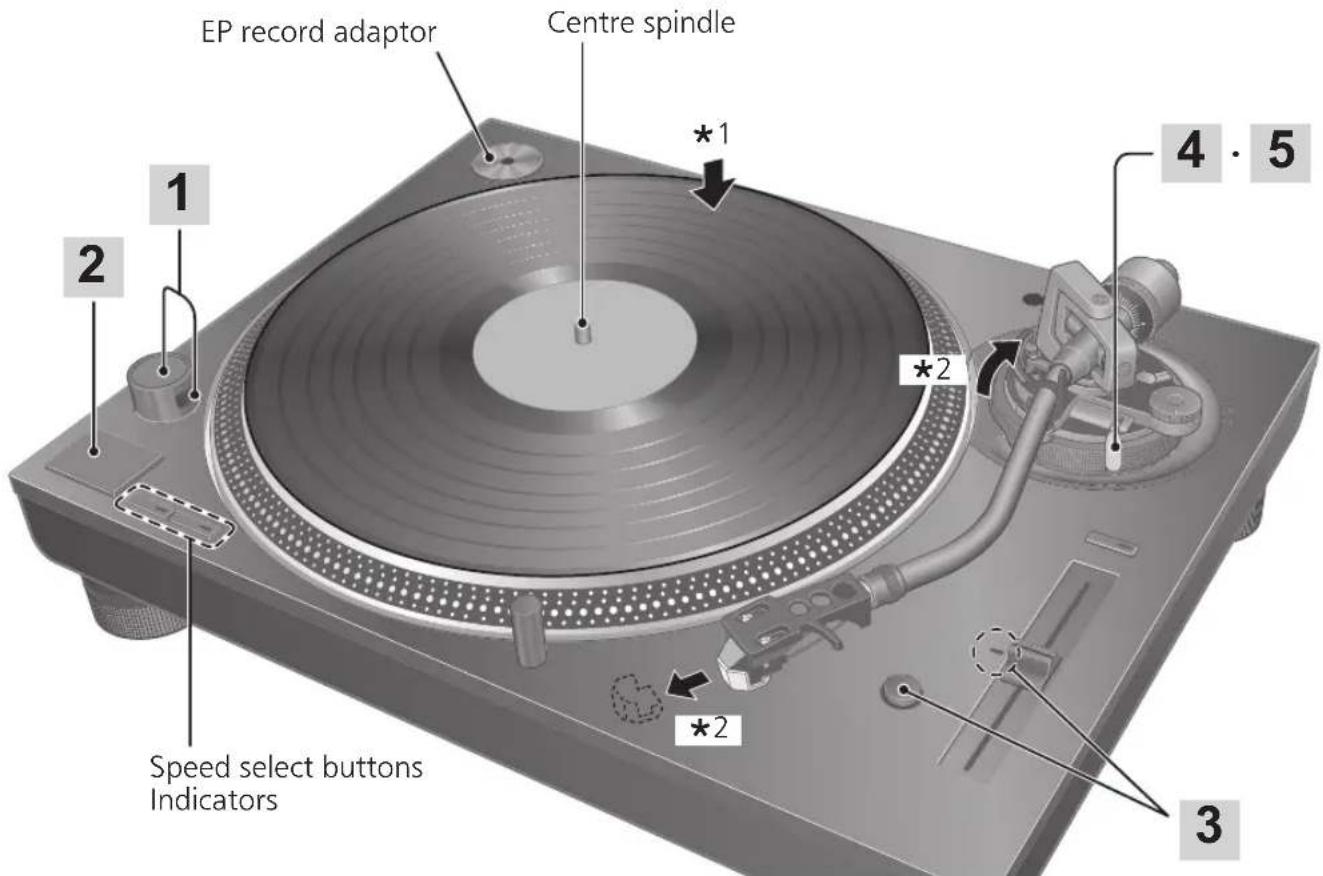
Parts Name
Numbers such as ( 00) indicate reference pages.
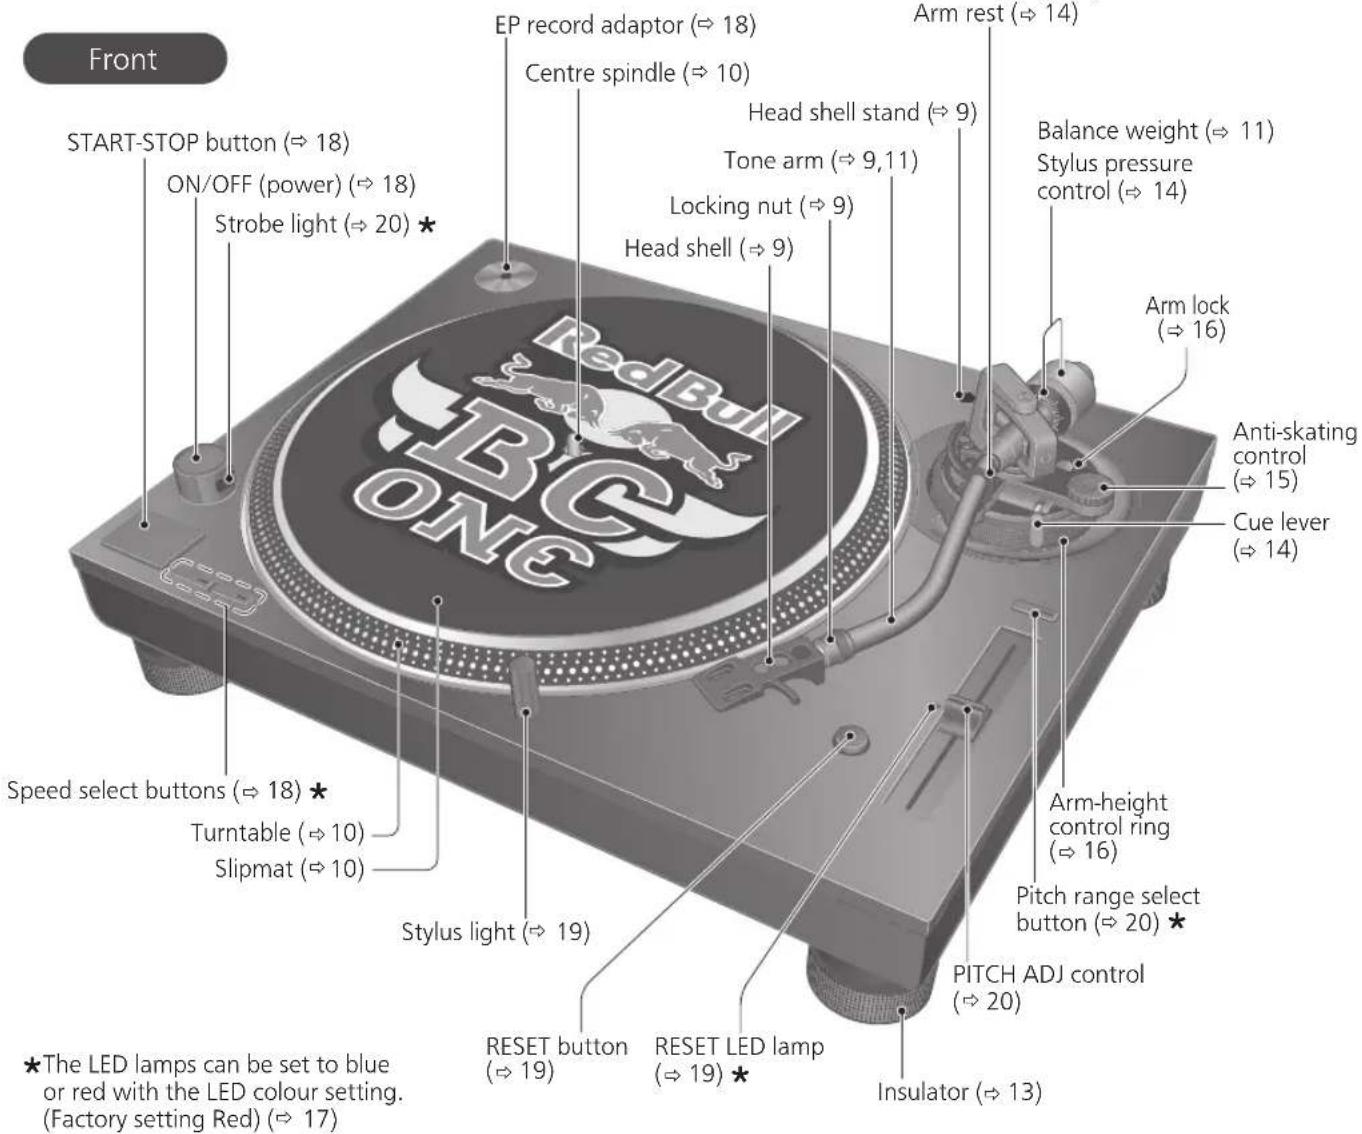
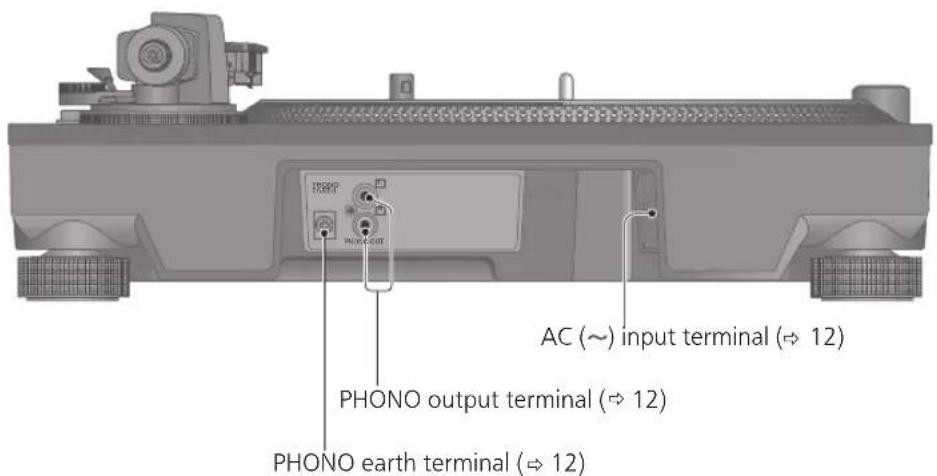
Back
Putting the player together
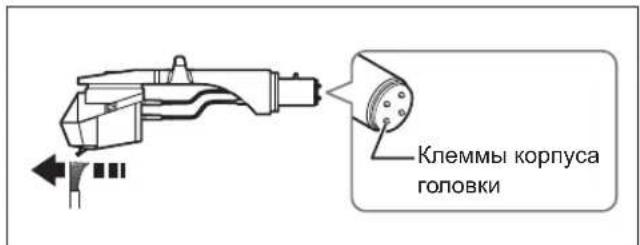
Attaching the cartridge
Attention
- When performing scratching (including reverse play), use a cartridge and stylus for DJs.
1 Attach a cartridge (store-bought) tentatively.
Follow the cartridge's instructions to correctly attach it to the head shell, and tighten the screws lightly.
- If the mounting screws are included in the cartridge, use them.
- When playing SP records, use a cartridge for SP records.
- Use a commercially available mini flat screwdriver (4 mm).
- Be careful not to touch the stylus tip.

(Lead wire) (Terminal)
Red R + (Red)
Green R-(Green)
White L+ (White)
Blue L-(Blue)
2 Adjust the overhang.
- Be careful not to touch the stylus tip.
① Move the cartridge to adjust the overhang in such a way that the stylus tip is at 52 mm from the head shell mounting end, as shown in the figure below.
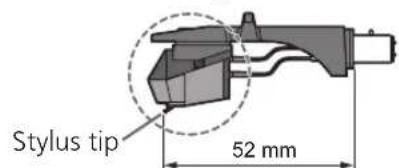
② The cartridge should be parallel on the shell head when viewed from the top and side (the illustration is the top view).
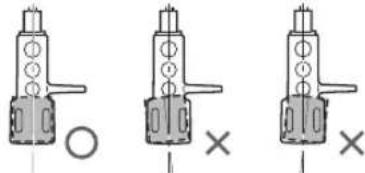
③ Tighten the screw for cartridge.
- Be careful not to allow the cartridge to slip out of place.

Note
- The head shell stand ( 8) can be used to store the head shell with the cartridge attached, or to store the head shell temporarily removed to replace the cartridge and the like. It allows you to prevent cartridge and/or stylus failure or trouble due to head shell overturning.
- Depending on the cartridge type, attaching the dust cover ( 13) when the head shell is stored in the head shell stand with the cartridge attached may cause the dust cover to touch and break the cartridge. Be sure the head shell is not stored in the head shell stand when attaching the dust cover.
Attaching the head shell
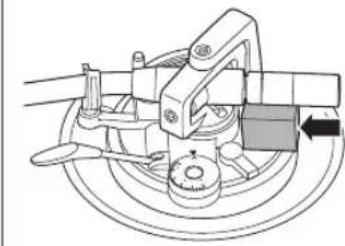
3 Fit the head shell with the cartridge into the tone arm. Keep the head shell horizontal and tighten the locking nut.
- Be careful not to touch the stylus tip.

Putting the player together (continued)
In order to prevent damage during shipping, some of the equipment has been disassembled. Put the player together in the following order.
Attention
- Before setting up, put on the stylus guard to protect the stylus tip, return the tone arm to the arm rest and fix it with the arm clamp.
- Do not connect the AC mains lead until set up is complete.
- When fitting the turntable, prevent foreign material from getting in between the main unit and turntable.
- Do not touch or scratch the board.
Before fitting the turntable
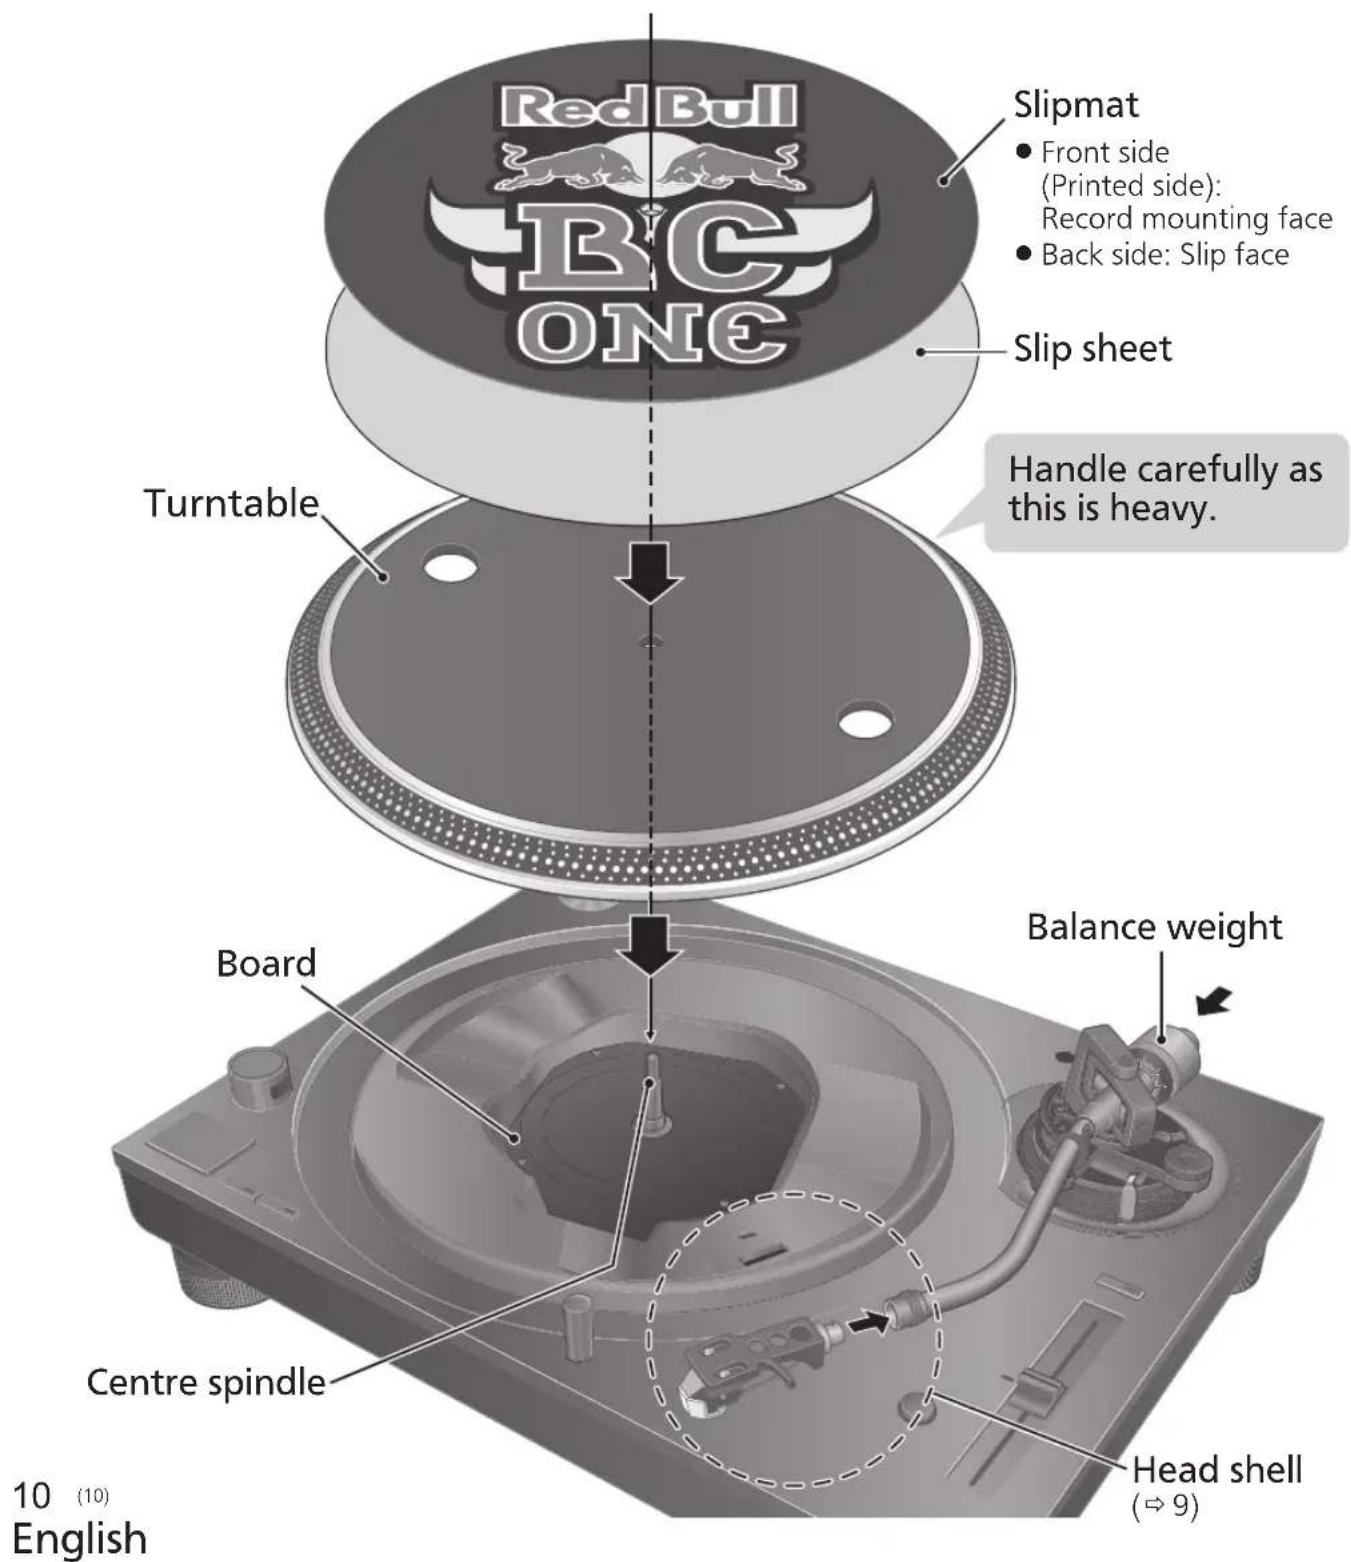
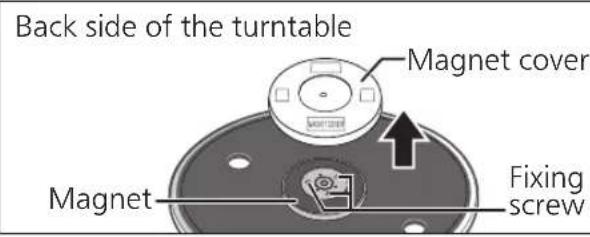
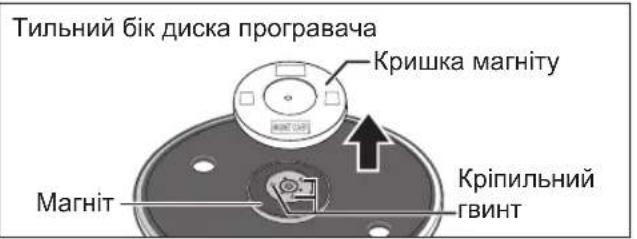
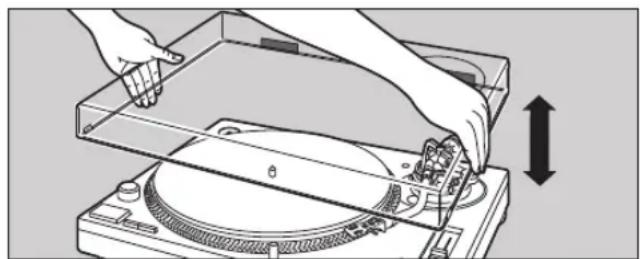
1 Remove the magnet cover from the turntable.
- There is a magnet and its cover on the back side of the turntable. Remove the magnet cover before fitting to the main unit.
Attention
- Keep any magnetic-sensitive object such as a magnetic card and watch away from the magnet.
- Prevent the turntable from hitting the main unit or falling off.
Prevent dust or iron powder from adhering to the magnet on the back side. - Do not touch the fixing screws (three locations) of the turntable. The rating performance cannot be guaranteed if they are out of position.
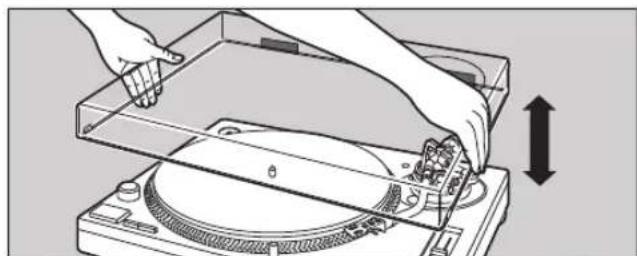
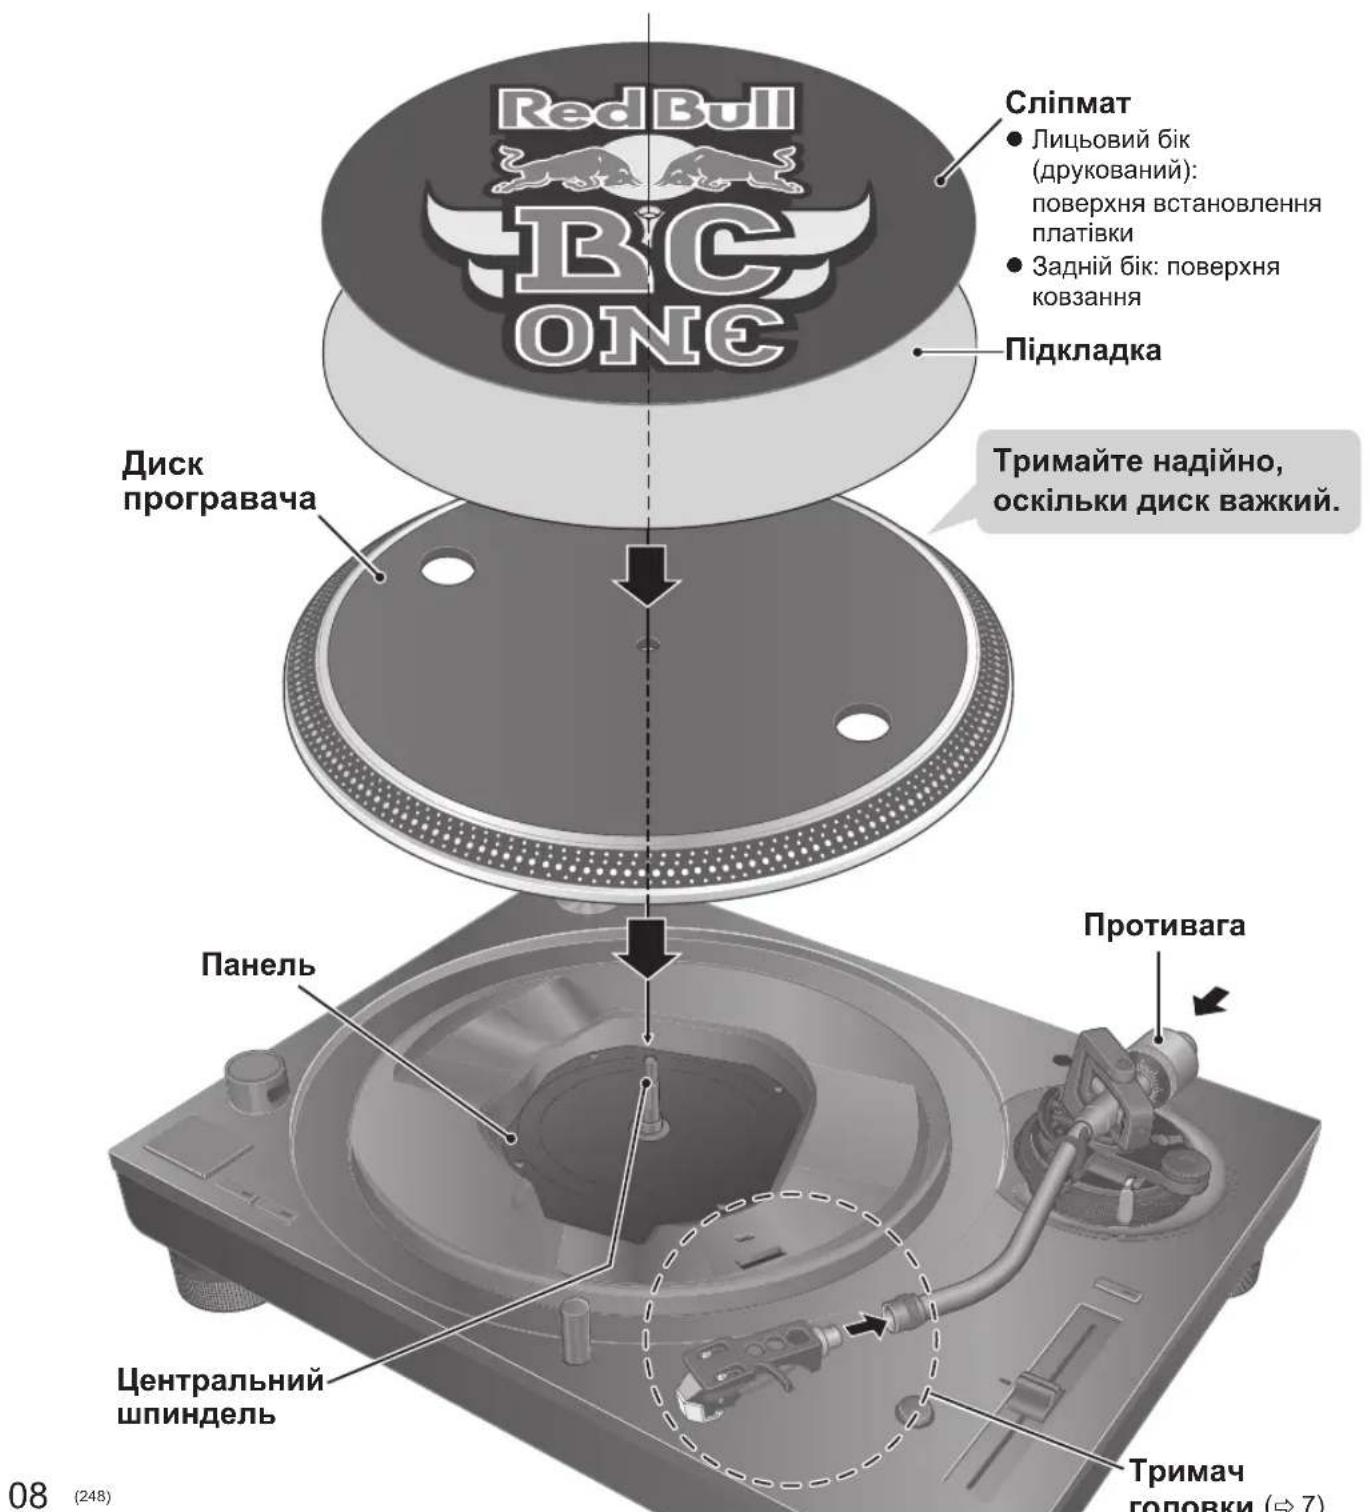
Fitting the turntable
2 Slowly set the turntable on the centre spindle.
Attention
- Be careful when handling the turntable, as it is heavy.
- Keep your fingers from being caught.
- Wipe off fingerprints or dirt with a soft cloth.
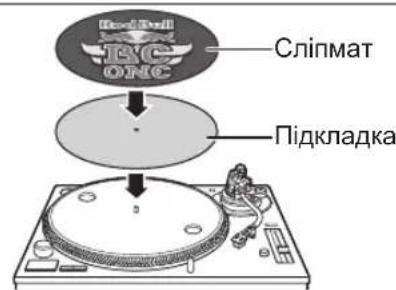
Fitting the slipmat
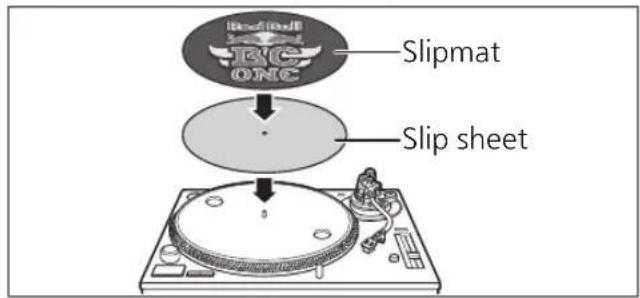
3 Lay the slipmat and slip sheet on the turntable.
- A record on the rotating turntable can be stopped manually as well as rotated in reverse.
- Laying a slip sheet on the turntable changes the slip-cueing feel.
Attention
- When performing scratching (including reverse play), use a cartridge and stylus for DJs.
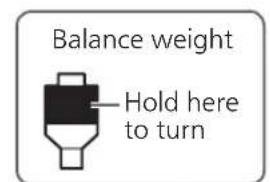
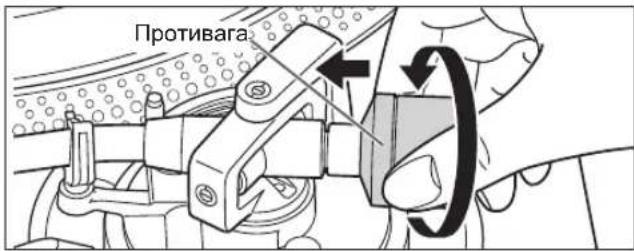
Attaching the balance weight
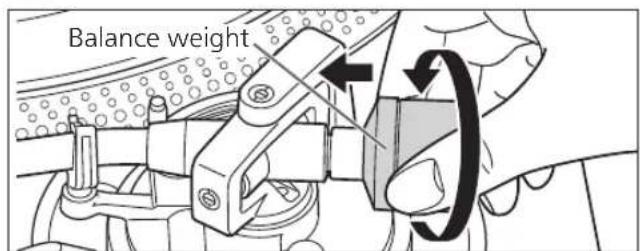
4 Attach the balance weight to the rear of the tone arm.
Note
The inside of the balance weight is greased.
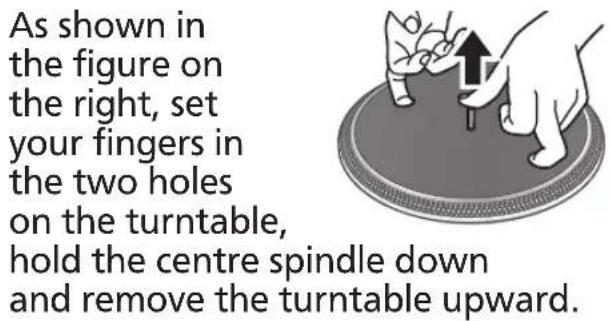
To remove the turntable
Connections and installation
- Turn off all units and disconnect the AC mains lead from the socket before making any connections.
- Connect the AC mains lead only after all other connections are completed.
- Be sure to connect the PHONO earth lead. Otherwise mains hum may occur.
Refer also to the instruction manual of the connected device.
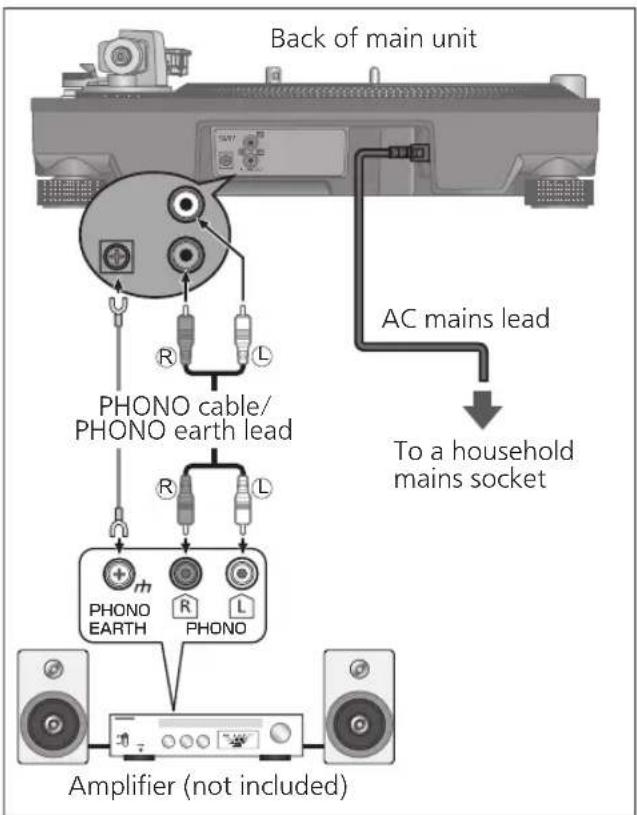
1 Connect the PHONO cable and PHONO earth lead to the PHONO input terminals of the connected equipment.
- You will not have adequate volume or sound quality if the connected amplifier has no PHONO input terminals.
2 Connect the AC mains lead.
- Confirm the wattage of the AC outlet on the connected equipment before using it for this unit.
For the power consumption of this unit, see the specifications. ( 23)
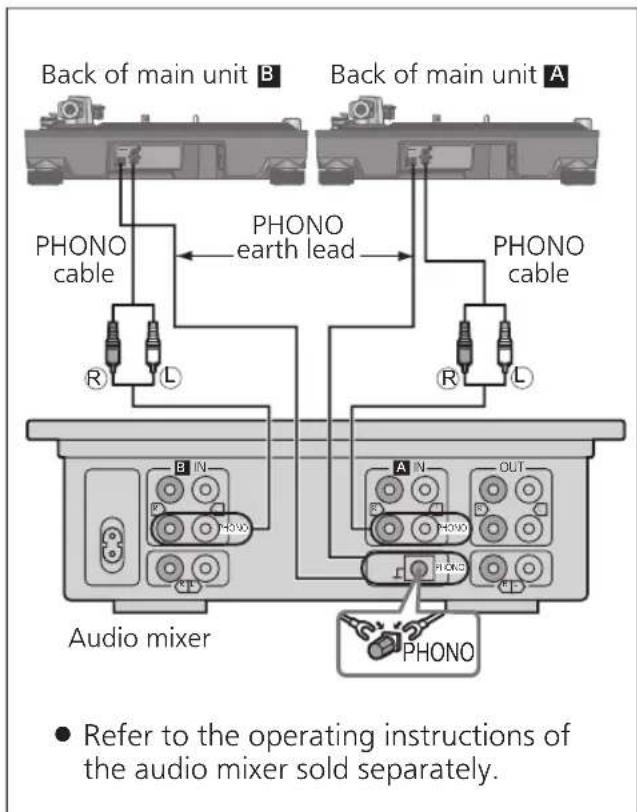
Connecting to a pre-main amplifier or component system / Connecting to a mixer
Attention
- Tighten the PHONO earth terminal using a Phillips head screwdriver.
Note
- The operation switch does not separate entire unit from mains even if in "OFF" position. Remove the plug from the mains socket if you will not be using the unit for an extended period of time. Place the unit so that the plug can be easily removed.
Installation
Install the unit on a horizontal surface protected from vibrations.
Keep this unit as far as possible from speakers.
Adjusting the height to make the unit horizontal
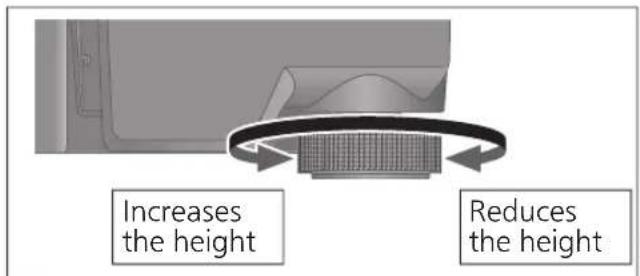
Raise the main unit to turn the insulators and adjust the height.
- Clockwise: Reduces the height.
- Anti-clockwise: Increases the height.
Attention
- Do not turn the insulators too far. Doing so may cause them to come off or damage them.
Fit the dust cover
1 While holding the dust cover from both sides, put it in place by aligning its four corners with the four corners of the unit.
- When removing, lift the dust cover straight up.
Attention
- Return the tone arm to the arm rest and fix it with the arm clamp before you attach or detach the dust cover.
- Remove the dust cover while playing.
- Be sure the stylus light ( 19) is pressed down when attaching the dust cover. If the dust cover is attached with the stylus light raised, it may touch the dust cover.
Notes for installation
- Before you move the unit, turn the unit off, pull out the power plug and disconnect all connected devices.
- Ensure the unit is not exposed to direct sunlight, dust, humidity, and heat from a heating appliance.
- This unit may pick up interference from a radio if there is one nearby. Keep the unit as far as possible from a radio.
- Do not install the unit on a heat source.
- Avoid a place with large temperature variations.
- Avoid a place with frequent condensation.
- Avoid an unstable place.
- Do not put an object on the unit.
- Do not install the unit in a confined space such as a book shelf.
- Install the unit at a position well away from walls or other devices to ensure effective heat radiation from the inside of the unit.
Make sure the installation location is sufficiently strong to withstand the total weight of the unit and system. ( 23)
Note that the unit may be damaged by cigarette smoke or moisture from an ultrasonic humidifier.
Condensation
Think of taking out a cold bottle from a refrigerator. If you leave it in a room for a while, dewdrops will form on the bottle surface. This phenomenon is called "condensation".
- Conditions causing condensation
Rapid temperature change (caused by moving from a warm place to a cold place or vice versa, rapid cooling or heating, or direct exposure to cooled air)
High humidity in a room with much steam, etc.
Rainy season - Condensation may damage the unit. If it has occurred, turn the unit off and leave it until it adapts to the ambient temperature (approximately 2 to 3 hours).
Adjustment
Horizontal balance Stylus pressure
Preparation
- Remove the stylus cover, taking care not to damage the stylus, then release the arm clamp.
- Lower the cue lever.
- Turn the anti-skating control to "0".
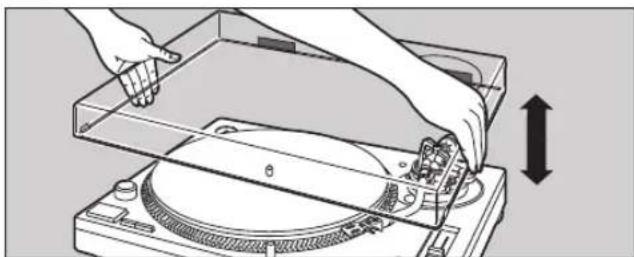
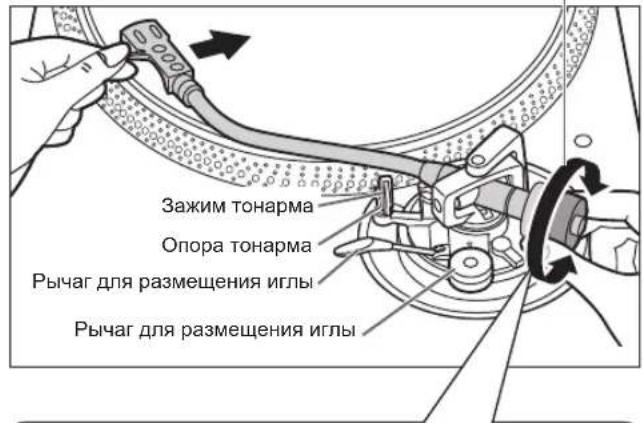
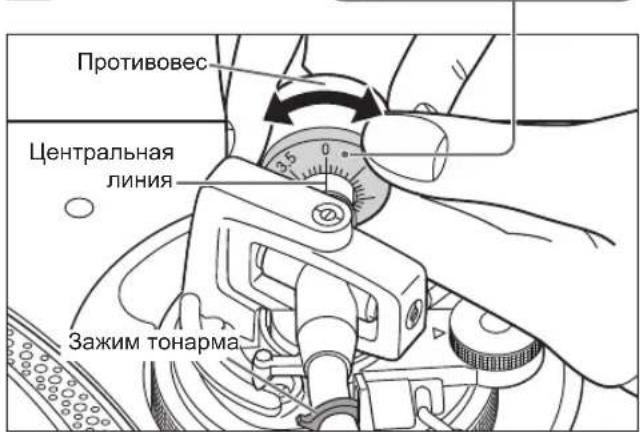
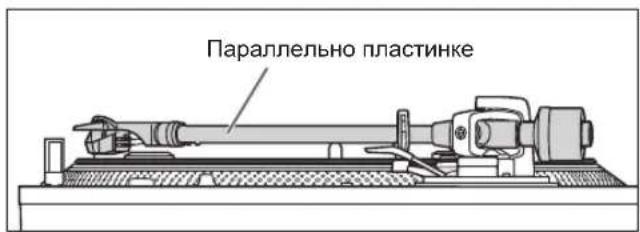
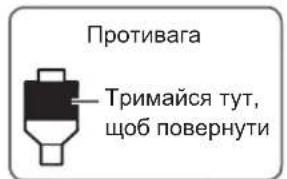
1 Free the tone arm from the arm rest and adjust horizontal balance by turning the balance weight.
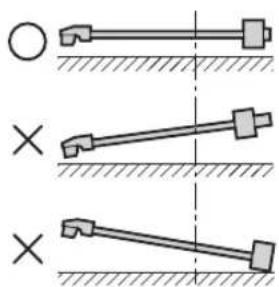
Hold the tone arm and turn the balance weight in the arrow direction to adjust the balance until the arm is approximately horizontal.
Take care not to allow the stylus tip to touch the turntable or main unit.
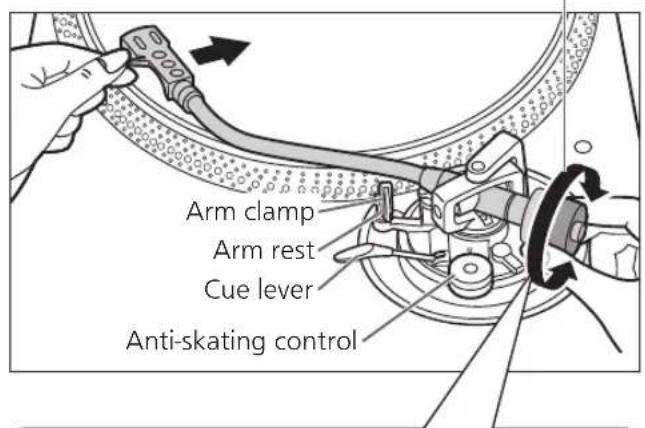
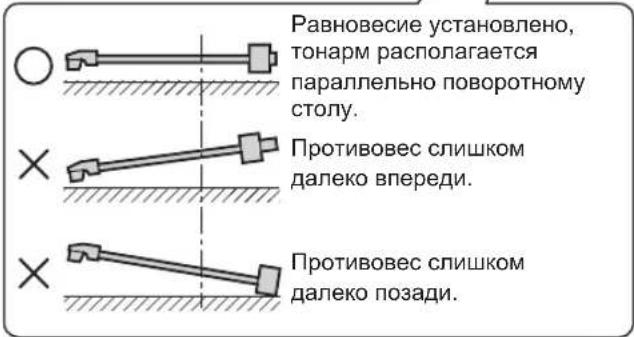
Balanced and the tone arm is parallel to the turntable.
The balance weight is too far forward.
The balance weight is too far back.
Preparation
- Return the tone arm to the arm rest and fix it with the arm clamp.
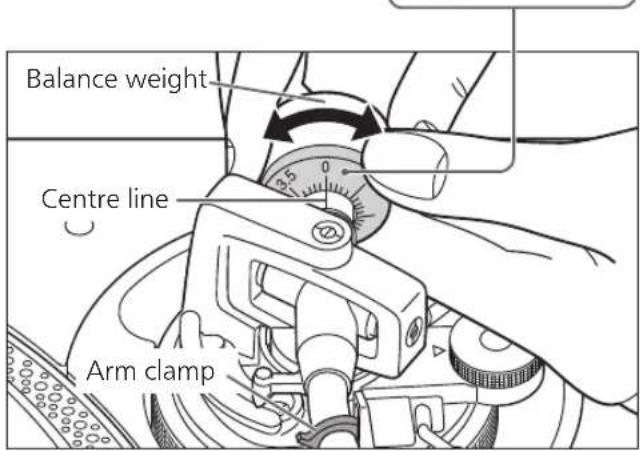
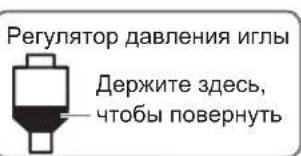
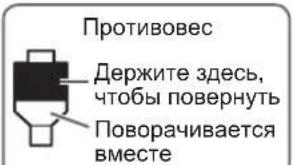
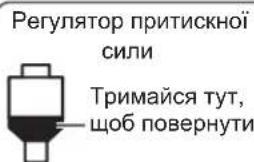
1 Turn the stylus pressure control until "0" comes to the centre line of the rear of the tone arm.
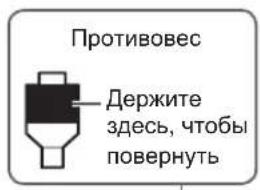
- Hold the balance weight still while doing this.
Stylus pressure control

Note
Refer to the user's guide for your stylus for the appropriate stylus pressure.
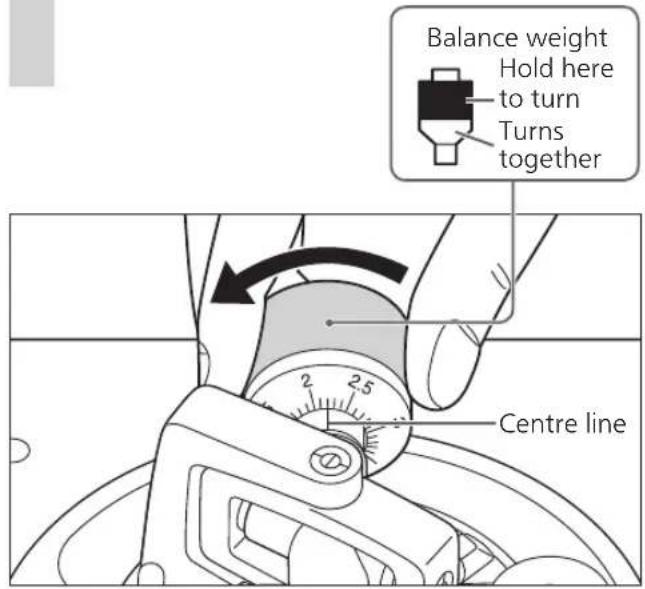
2 Turn the balance weight to adjust to the appropriate stylus pressure for the cartridge.
- The stylus pressure control will turn together with the balance weight.
- Turn until the centre line points to the appropriate stylus pressure.
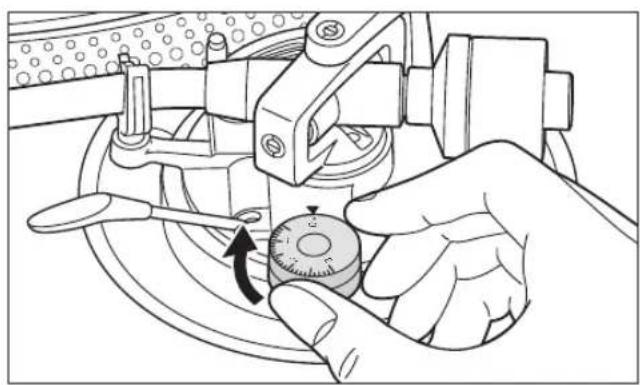
Anti-skating
1 Turn the anti-skating control to adjust it to the same value as the stylus pressure control.
Note
- For stylus pressures 3g and above, adjust anti-skating control to "3".
- When performing scratching (including reverse play), adjust the anti-skating control depending on the scratch movements to perform to reduce skating.
Adjustment (continued)
Tone arm height
Make this adjustment only if the cartridge you are using makes it necessary.
Preparation
- Put a record on the turntable.
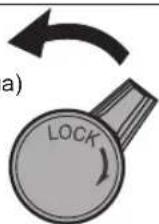
1 Release the arm lock.
Arm lock

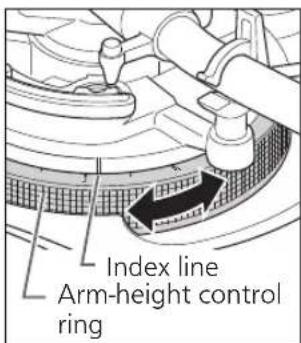
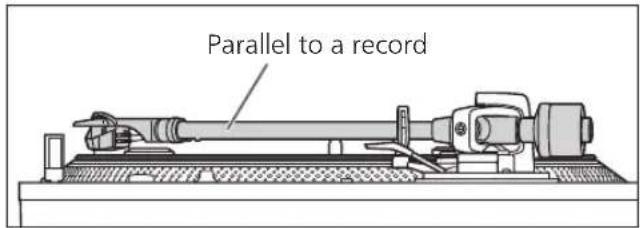
2 Adjust the height with the arm-height control ring.
Adjust the arm height until the tone arm becomes parallel to the record.
① Use the chart below as reference to find the appropriate position mark for the height of your cartridge.
(For supplied head shell)
| H H | Cartridge height (H) in millimeters | Height control position |
| 17 | 0 | |
| 18 | 1 | |
| 19 | 2 | |
| 20 | 3 | |
| 21 | 4 | |
| 22 | 5 | |
| 23 | 6 |
② Turn the arm-height control ring to align the position mark with the index line. 0 to 6mm are marked on the armheight control ring.
Note
- When performing scratching (including reverse play), adjust the arm-height control ring depending on the scratch movements to perform to reduce skating.
- When you don't know the cartridge height (H) or when you don't use the supplied head shell
Remove the stylus cover, taking care not to damage the stylus, then release the arm clamp. Lower the cue lever, rest the stylus on the record and adjust the height control until the tone arm and record are parallel.
- If the cartridge height (H) is too small to make them parallel to each other, add a "cartridge spacer" (not supplied).
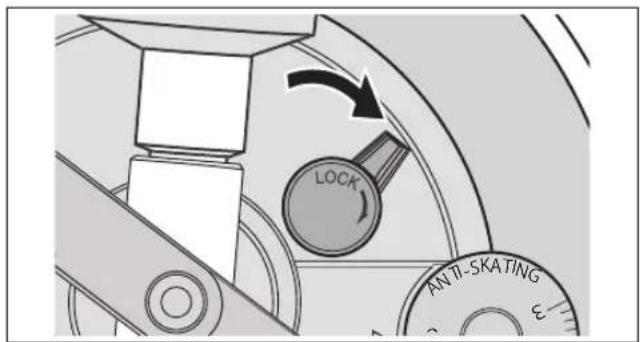
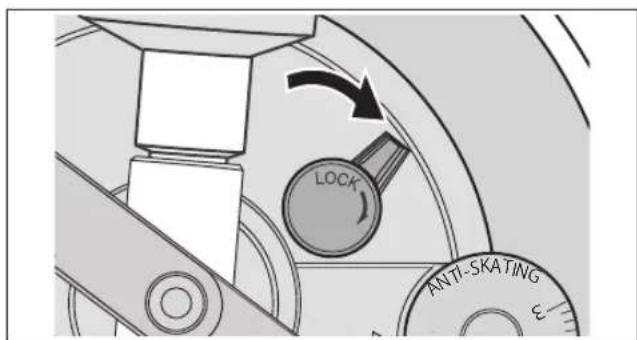
3 After arm height adjustment is finished, lock the tone arm by turning the arm lock knob.
- Be sure to turn the arm lock knob to the end as shown in the figure below. You may need to apply some force to do so.
Attention
- Be careful not to damage the stylus tip.
- Do not use the product with the arm lock released.
- For finer adjustment, use a level (not included) to adjust the arm height so that the cartridge becomes parallel to a record.
Armlift height
Make an adjustment according to your cartridge if necessary.
Preparation
- Put a record on the turntable.
- Remove the stylus cover, taking care not to damage the stylus, then release the arm clamp.
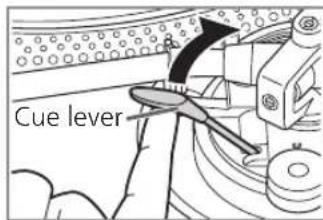
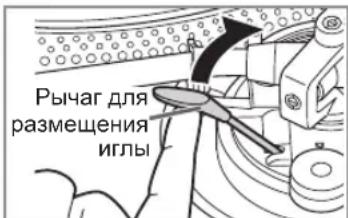
- Lift the cue lever and move the tone arm over the record.
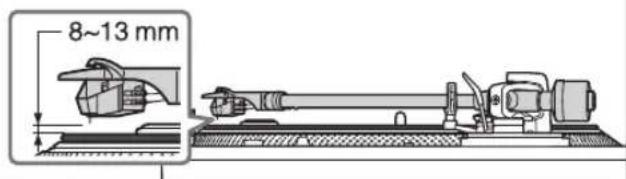
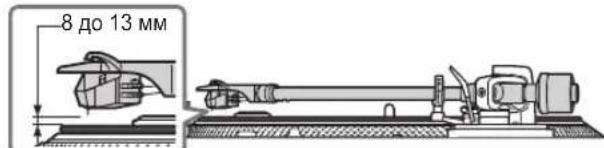
1 Check the armlift height (distance between the stylus tip and record surface). If adjustment is needed, go to step 2.
The armlift height is factory-adjusted to 8 to 13mm
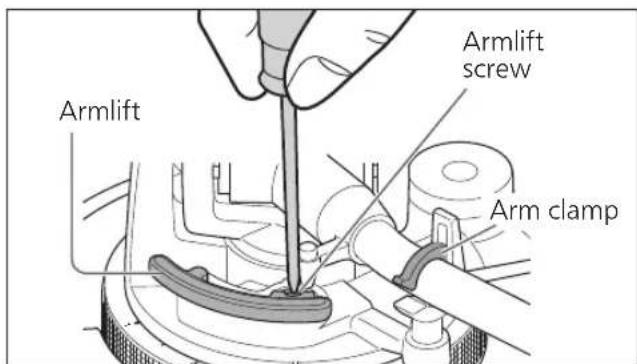
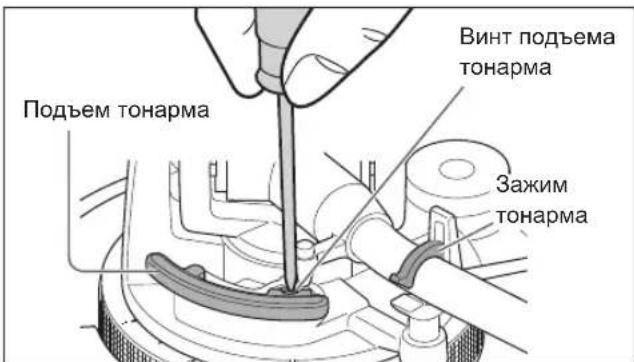
2 Return the tone arm to the arm rest and fix it with the arm clamp. Turn the adjustment screw.
- Turning the screw clockwise lowers the armlift.
- Turning the screw anti-clockwise raises the armlift.
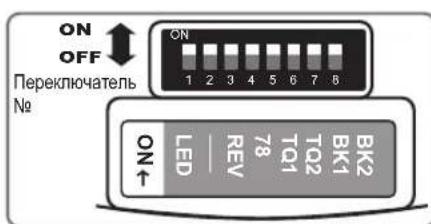
Operation settings
Allows for LED colour setting, reverse playback setting, 78 rpm setting, torque setting and brake setting.
①Turn the unit off and pull out the power plug.
②Adjust as desired by setting the switches with a fine Phillips head screwdriver and the like.
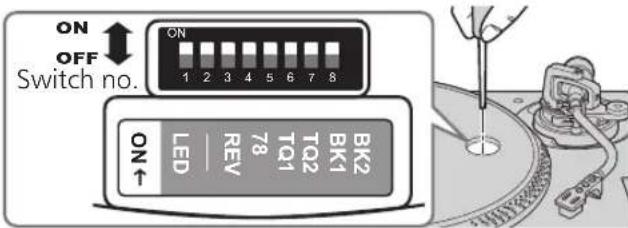
LED colour setting
Allows you to select red or blue for the colour of the strobe light, speed select buttons, pitch range select button and RESET LED lamp.
| Switch no.: 1 (LED) | |
| Red | OFF (Factory setting) |
| Blue | ON |
Reverse playback setting
Allows you to disable or enable reverse playback. ( 19)
| Switch no.: 3 (REV) | |
| REV disabled | OFF (Factory setting) |
| REV enabled | ON |
78 rpm setting
Allows you to disable or enable 78 rpm. ( 19)
| Switch no.: 4 (78) | |
| 78 rpm disabled | OFF (Factory setting) |
| 78 rpm enabled | ON |
Torque setting
Allows you to select from four levels of strength to adjust the torque.
| Switch no.: 5 (TQ1) Switch no.: 6 (TQ2) | |||
| High | ① | ON ON | |
| ② | OFF ON | ||
| Low | ③ | OFF (Factory setting) | OFF (Factory setting) |
| ④ | ON OFF | ||
Brake setting
Allows you to select from four levels of brake strength to stop the turntable after [START-STOP] is pressed.
| Switch no.: 7 (BK1) Switch no.: 8 (BK2) | |||
| High | ① | OFF ON | |
| ② | OFF (Factory setting) | OFF (Factory setting) | |
| ③ | ON OFF | ||
| ④ | ON ON | ||
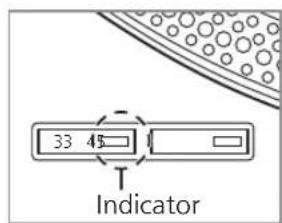
Playing records
Preparation
1 Put a record (not included) on the turntable.
2 Take off the stylus cover and release the arm clamp.
1 Turn [ON/OFF] to turn the unit on. The strobe light comes on. 33-1/3 rpm is automatically selected and the indicator [33] lights.
2 Press [START-STOP]. The turntable starts revolving.
Strobe light
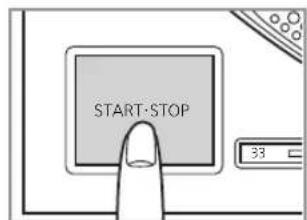
Attention
Do not press [START-STOP] when the turntable is removed.
If you have accidentally pressed [START-STOP]
- The indicator of the speed select button ([33] or [45]) starts blinking.
If it is blinking, turn [ON/OFF] to turn the unit off, fit the turntable and then turn [ON/OFF] to turn the unit on.
3 Press [RESET] to light the pitch control RESET LED lamp.
The unit plays at a preset pitch (33-1/3, 45 or 78 rpm) regardless of the [PITCH ADJ] position.
![TECHNICS EAHT700 - Press [RESET] to light the pitch control RESET LED lamp. - 1](/content/2026/03/477835/images/5af928516d2f9bbbc8649484fa5af1085a5b3ba74176c4e1ffe86d8f645fda43.jpg)
- Fine adjustment to pitch ( 20)
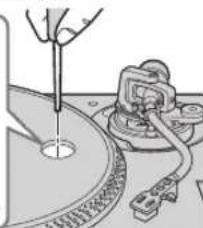
4 Lift the cue lever and move the tone arm over the record.
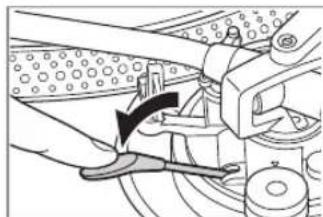
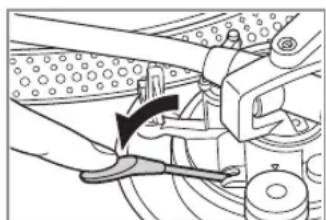
Lower the cue lever slowly. The tone arm moves down slowly.
Play starts.
To play in reverse
- Enable reverse playback with the Reverse playback setting ( 17) .
- Simultaneously press the turntable speed select button or buttons ([33], [45] or [33] and [45]) and [START-STOP] while the turntable is rotating.
- Reverse playback starts at the turntable speed selected by pressing the speed select button or buttons.
- To return to normal playback, press [START-STOP] again while pressing the turntable speed select button or buttons.
- Pressing [START-STOP] again after pressing [START-STOP] during reverse playback starts normal playback.
- Simultaneously pressing the turntable speed select button or buttons and [START-STOP] with the turntable stopped starts reverse playback.
To temporarily stop play
Lift the cue lever.
- The stylus lifts off the record.
- To start play again, lower the cue lever.
When play finishes
① Lift the cue lever, return the tone arm to the arm rest and lower the cue lever.
② Press [START-STOP]. The electronic brake gently stops the turntable.
③ Turn [ON/OFF] to turn the unit off.
④ Clamp the tone arm with the arm clamp.
Put the stylus cover back on (to protect the stylus tip).
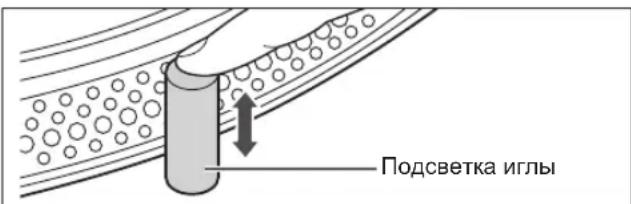
To light up the stylus
The stylus tip is illuminated during play.

Press the stylus light.
- The stylus light (white LED) rises up and illuminates the stylus.
- Press down the stylus light to turn off the light.
When playing EP records
- Press the speed select button [45] ([45] lights).
- Fit the EP record adaptor over the centre spindle.
When playing SP (78 rpm) records
- Enable 78 rpm with the 78 rpm setting ( 17) .
- Press the speed select buttons [33] and [45] at the same time (78 rpm: [33] and [45] light).
When using a record stabilizer (not included)
See the instruction manual of the record stabilizer.
Maximum weight: 1kg
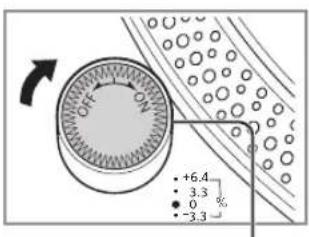
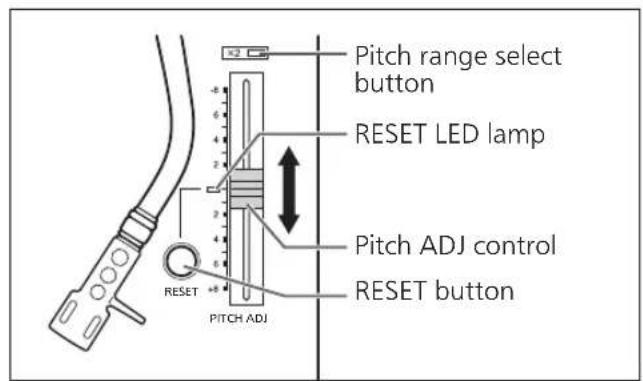
Pitch control (fine adjustment to pitch)
1 Press [RESET] to turn off the RESET LED lamp.
2 Press the pitch range select button to select the pitch range.
- [ × 2 ] light on: ±16%
- [ × 2 ] light off: ±8%
3 While the turntable is revolving
Slide [PITCH ADJ].
- Pitch can be adjusted between approx. -8% and +8% or approx. -16% and +16% according to your selection.
The numbers represent approximate percentages for your adjustment.
To reset pitch to the preset value Press [RESET].
The RESET LED lamp lights and the pitch immediately returns to a preset value regardless of the [PITCH ADJ] position. (33-1/3, 45 or 78 rpm)
- RESET LED on: Fixed to the preset value.
- RESET LED off: Can be adjusted with [PITCH ADJ].
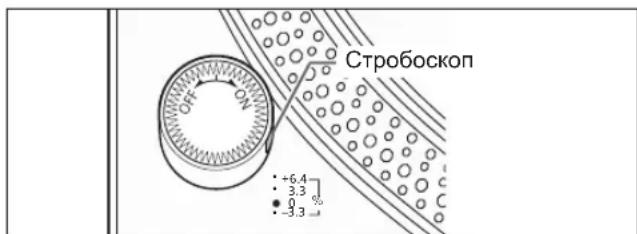
To measure pitch
The four rows of strobe mirrors around the edge of the turntable can assist you in measuring pitch.
Strobe mirrors
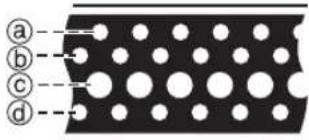
@+6.4% change in pitch when stationary
包 + 3.3% change in pitch when stationary
Normal turntable speed (33-1/3, 45 or 78 rpm) when stationary
-3.3% change in pitch when stationary
Attention
The strobe mirrors are lit by the strobe light (LED lighting) synchronized with the precise frequency of the digital control. Always use this LED lighting to measure the pitch.

Maintenance
Care of the parts
Thoroughly clean dust off the stylus and record.
- Take off the head shell with the cartridge and clean the stylus using a soft brush. Brush from the base to the tip.
- Use a record cleaner to keep your records clean.
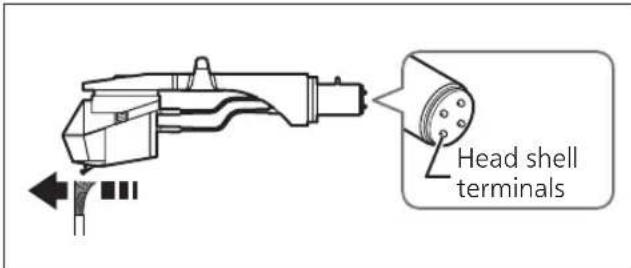
Wipe the head shell terminals occasionally. Wipe the head shell terminals with a soft cloth and fit the head shell to the tone arm.
Turn the amplifier volume down or turn the amplifier off before fitting or removing the head shell.
Damage to your speakers can occur if the head shell is moved while the volume is turned up.
Cleaning the dust cover and cabinet
Wipe the dust cover and cabinet with a soft cloth.
Do not touch the board while cleaning. Otherwise, the player may fail.
When dirt is heavy, wring a wet cloth tightly to wipe the dirt, and then wipe it with a soft cloth.
- Do not use solvents including benzene, thinner, alcohol, kitchen detergent, a chemical wiper, etc. This might cause the exterior case to be deformed or the coating to come off.
- Do not wipe the dust cover when it is in place. Doing so may cause the tone arm to be attracted towards the dust cover as a result of the generated static electricity. Be sure the dust cover is removed while playing a record.
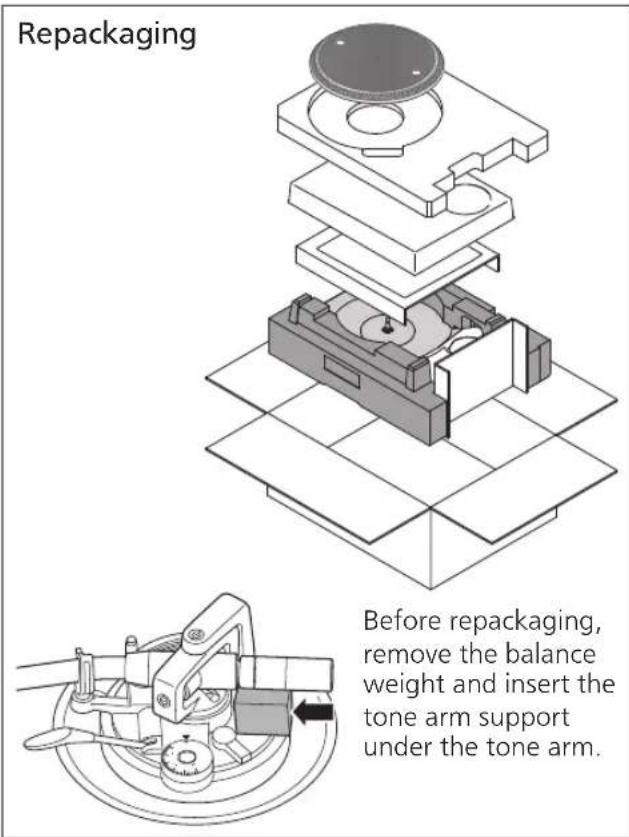
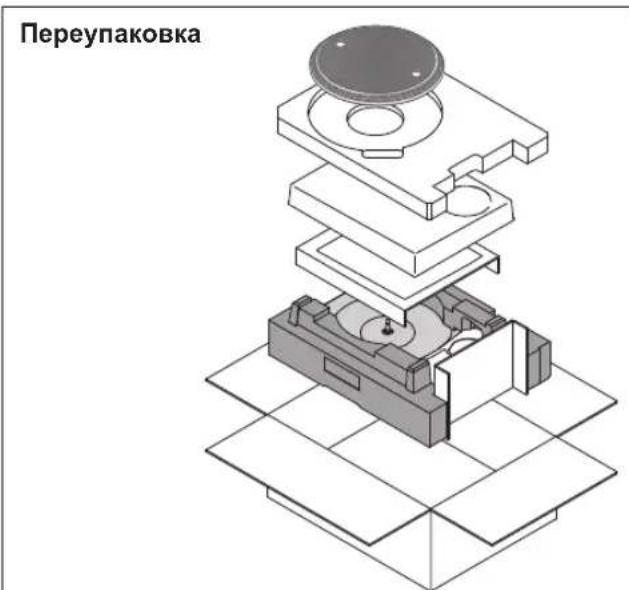
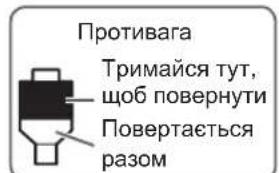
■ Moving the unit
Repackage the unit in the packaging it came in.
Keep the packaging materials after taking out the goods.
If you no longer have the packaging, do the following:
Take off the turntable and slipmat and carefully wrap them.
- Remove the head shell and balance weight from the tone arm and carefully wrap them.
- Clamp the tone arm with the arm clamp and tape it in place.
- Carefully wrap the main unit in a blanket or paper.
WEEE symbol
Disposal of the product outside the EU countries
This symbol is valid within the EU only.
Contact a local governmental office or your dealer to confirm a right manner of disposal.
Troubleshooting guide
Before requesting service, make the below checks. If you are in doubt about some of the check points, or if the remedies indicated in the chart do not solve the problem, contact your dealer.
No power.
Is the AC mains lead plugged in? Plug the mains lead in firmly. ( 12)
There is power but no sound. Sound is weak.
- Are connections to the amplifier/receiver's PHONO terminals correct? Connect the PHONO cables to the amplifier's PHONO input terminals. ( 12)
Left and right sounds are reversed.
- Are the stereo connection cable connections to the amplifier or receiver reversed? Double check all connections. ( 12)
- Are connections of the head shell's lead wires to the cartridge terminals correct? Double check all connections. ( 9)
Humming is heard during play.
- Are there other appliances or their AC mains lead near the stereo connection cable? Separate the appliances and their AC mains lead from this unit.
Is the earth lead connected? Make sure the earth lead is correctly connected. ( 12)
The indicator on the speed select button [33] or [45] blinks.
Perform the following operations when the indicator on the speed select button [33] or [45] blinks. The symptom may be improved.
① Turn [ON/OFF] to OFF.
② Pull out the power plug, wait for three seconds, and then insert the plug again.
③ Turn [ON/OFF] to ON and press [START-STOP] to rotate the turntable.
- If the indicator on the speed select button blinks again, check which one is blinking and contact our service representative.
Specifications
| General | |
| Power supply AC 1 | 10 - 240 V, 50/60 Hz |
| Power consumption | 8.0 W (Power ON) Approx. 0.2 W (Power OFF) |
| Dimensions (W×H×D) | 453 x 169 x 353 mm |
| Mass Approx. 9.6 | g |
| Operating temperature range | 0 °C to +40 °C |
| Operating humidity range | 35% to 80%RH (no condensation) |
| Turntable section | |
| Type Direct drive m manual turntable | |
| Drive method Direct drive | |
| Motor Brushless DC motor | |
| Turntable platter Aluminum diecast Diameter: 332 mm Weight: About 1.8 kg (Including slipmat and slip sheet) | |
| Turntable speeds 3-1/3 rpm, 45 rpm (with switch 78 rpm) | |
| Variable range pitch | ±8%, ±16% |
| Starting torque 1.8 k g-cm | |
| Build-up characteristics | 0.7 s. from standstill to 33-1/3 rpm |
| Braking system Elecronic brake | |
| Wow and flutter 0.025% WRMS | |
| Tone arm section | |
| Type Static Balance | |
| Effective length 230 mm | |
| Overhang 15 mm | |
| Tracking error angle | Within 2° 32' (at the outer groove of 30 cm (12") record) Within 0° 32' (at the inner groove of 30 cm (12") record) |
| Offset angle 22° | |
| Arm-height adjustment range | 0 - 6 mm |
| Stylus pressure adjustment range | 0 - 4 g (direct reading) |
| Head shell weight | Approx. 7.6 g |
| Applicable cartridge weight range | 5.6 - 12.0 g (without auxiliary weight) 14.3 - 20.7 g (including the head shell) |
| Shell terminalø1.2 | mm 4 pin terminal |
Specifications are subject to change without notice.
Red Bull® Marks and the Red Bull BC One Logo are licensed by Red Bull GmbH/Austria.
Einleitung
Raccordements et installation 12
Raccordements et installation
La lecture commence.
- RESET LED attenuator:
- [ × 2 ] lyser: ±16%
- [ × 2 ] slukket: ±8%
3 Mens pladetallerkenen roterer
Skub pà [PITCH ADJ].
(33-1/3, 45 ether 78 rpm)
LED-lampe for NULSTILLING slæt til: Fastsat til den forudindstillede værdi.
LED-lampe for NULSTILLING slaet fra: Kan justeres med [PITCH ADJ].
Vedligeholdelse
(33-1/3, 45 of 78 rpm)
③ Dra at pickupens skruv.
(33-1/3, 45 ether 78 rpm)
① Nacisnac [ON/OFF] aby WYL.
HHΦOPMAU O COOTBETCTBNI IPOJYKTA
PpOurpbBaTeIb C npAmbim npBODom TopROBoM MapK "Technics", MoeIb SL-1210MK7R, SL-1210MK7RE cooTBeCTBye Tpe6oBaHnAm TP TC 004/2011, TP TC 020/2011, TP EA3C 037/2016
BeckopnychbI DnBraTeJIb npMOrO npNBoDa IaI OeCneueHn BblcOKoro KpyTaeero MOMeHTa HAdexKHOCTn pa60TbI
HeaBHO p3pa6oTaHHb 6eckOpnycbI dBnraTeNb npMOrO npNBOda MoKeT yMeHbWntb He3HaHTeNbHyIO Bn6paunHO BO BpeMBApUeHnCoxpaHra Pn3OTOM BBICOKNI KpyTAAUMOMEHT.
- BbICOKOTOuaHaeTexHOONrueynpaBHeHnA DBuRATeJeM nepeKJIIOUaET pexIM npVBODa B 3aBucmOCTn OT pa6oHero COCToHnA DvIRateJIn, TaKIM o6pa3OM, o6ecneuBaet BbICOKn KpyTuaN MMeHT n CTa6nIbHoCTb.
LiofoBoM ToIgUpaBHeHn yIyUHaeT OTCNeXnBaHne DOpOxKn I TOHOCb, N03BOJra PnABo Hn KOppeKTHO peYnnpoBaTb BlicOTy ToHa.
BbICOKOTOHbIe NOdUnHnKn dIa BBICOKOyBCTBHTbHOro ToHaPMa
IcnoB3yeMbI B ToHApMe BbICOKOTOHbI npomblIeHHbI NOdwnHnK C KapdaHnO IoDBeCKo N03BOJraET ynyuHTb OTCJeKIBaHne DopoXKn, YTO CHNkaet BepoTHOCTb PocKaJIb3bIABaHNa Daxe npi OueHb INTEHCNBHO 3KcIIpyaTuIN.
Chnkaoui Bn6paunn BbICOKOBepdbi KOpnyc n H30JrTOp C BbICOKO DEMnpuyuue cnoc6HOCTbIO
3To yctpoictBO npedHa3HaueHo He ToIbKO nIg o6ecneHnB bICOKKaeeCTBeHHOrO 3ByKa N BbICOKoYcTOnuBOcTN K aKyCTnuecko O6paTHoN CBa3N, HO nDnEΦΦeKtNBHO rYCTpAHn BHeuHnx Bn6paun B OeHbUWMbIX YcNoBnX.
- Pered nCNoB3OBaHHem
Mepbl 6e3oapanocctn .04
Akceccyapbl 05
Ha3BaHne yacte.. 06
FepBbIe warn
CBeTa CBeToDnIOoB» CBeT CBeToDnIOHbIX
JAMMOXHOYCTAHOBNTHaCNHNI
HJI KpaChbI. (3aBoDcKa HaCtPoiKa
YcTaHaBnBaIte yCTpoiCTBO Ha rOpHOrTaHOBIOBepxHOCTN,3aunueHHoOT Bn6paun. YcTaHOBInTe yCTpoiCTBO KAK MOXHO DaIbwe OT DnHAMKOB.
PerynpoBka BbICOTblДЯ ropu3oHTaJIbHOrO paCNoIooKeHna yCTpoIcTba

IOnHmnte yctpOCTBO,TO6bIOBepHyTb H30JIaTObpI NOTpeYInpoBaT BbICOTy.
- No yacoboi cTpeKe (BnpaBO), ecn CMOTpeTB CHN3y: onyckahne
-ПрOTив уacOBоВ CTpeKN(BJIeBO),ecn CMOTpeTB CHN3Y:ПОДьEM
BhimaHne
He nobopaunBaIte n30JIaTOpbl cIIuKOM daJIeKO. 3TO MOKeT npBecTu K IN OTpbIBY IIN NOBpeKdHIO.
yctaHOBNTe nbIe3aunTHyIO KpbIshKy
1 Depxa nbIe3aunTHyU KpbIshky C obEnx cTOpOH, nOmeCTnTe ee Ha MeCTo, BbIPOBHRA YETbIpe yrna KpbIshKn C YETbIPbMra yrnaMn yCTpOJCTBa.
- Pn CHaTm NOdHMaTe nbIe3aUHTHyo KpbIuKy npraMo BBepx.
BHMaHne
BepnTe ToHApM Ha onOpny u 3aФnkCpyuTe erO 3axmOM Nepei TeM, KaK HaeTb NIN CHrTb NJIe3aUHTHYO KpbIuKy.
CHImaTe Nblne3aUHTHyIO KpbIuKy BO BpEmrNCNoB3OBAHn.
- Y6eIntecb, yTO NOcBETKa nIJIbI ( 17) Haxkata npu ycTaHOBKe nbIe3aUHTHOrO yExna. Ecnn nbIe3aUHTHaK pblIka KpenITcR c NoDnHrToN NOCBETKO INJIbI, OHa MoXeT KacaTbcra nbIe3aUHTHOK pblIkwKn.
PpimmeaHnO tHocnteIbHo yCTaHOBKn
- Ipeed nepemeeHmE yctpoNCTBa BbIKIOHTe erO, BbITaUNTE BNKy N3 PO3ETKN OTCOEINHNTBCE NOkNIQUEHNBIE yCTPOINCTBA.
- Y6eIntecb, yTo yCTpoiCTBO He NoDBepraetcB BO3dEICTBnIO pRmBIX cONHeuHbIX JyueN, PbJIN, BlaI IN TENJa OT HArpeBaTeNbHO npnbopa.
-Данhoe yctpoCTBO MOKET npHIMaTb NOMEXN OT paIIO, ecIIN OHO eCTb NO6JIIN3OCTN. YcTaHOBnTE yCTPOIeCTBO KaK MoXHO daJIbWe OT paIINOOBOpYDoBaHnI.
He yctaHaBnBaIte ycTPOINCTBO Ha nCTOuHKn Tenna. - N36eaiTe MeCT C 60JIbUIMN KOJIe6aHnMNI TEMIpepaTypbl.
- N36eRaTe MeC T CuaToN KOHdEHaCuJeI.
-ИзбeraиTe HeyctOuHbIX MeCT.
He KlaaTe HnKaKx npEdMeTOB Ha yCTpoNCTBO.
He yctaHaBnBaIte ycTpoNCTBO B ORpaHnueHHOM npoctpaHCTBe, HApnPmEp Ha KHNXHOI NONKe. - YctaHOBnTe yCTPOINCTBO Ha DOCTaTOHOMpacCTOHNOT CTeH INJIN DpyrNx yCTPOINCTB, YTO6bIobecneHTb OTBOID TENJa n3 yCTPOINCTBa.
- Y6eIntecb, yTo MeCTO yCTaHOBKn DOCTaTOHNO npouHoe, yTO6bl BbIDepXkaTb 06UIM BEc yCTpOINCTBa nCnCTEmbl. ( 21)
- 06paTnTe BHHMaHne, YTO yCTpOuCTBO MOKeT 6bITb NOBpeKdEHO CnRapeTHbIM DbIMOM NIN BnAaXHOCTbHO OT yIbTpTa3ByKOBo rYbnAaKHHTeJI.
KoHdEHaCaun
Boo6pa3nte, yTo Bbl DocTaete XOJOnHyU 6yTbInKy u3 XOJOnHbHnka. Ecnn octaBnTb 6yTbInKy Ha HEKOToPoe Bpemr B KOMHaTe, Ha ee NOBepxHOCTN NOBRTcKanJIPOcbI.
3To RaBHeHn Ha3bIbaeTcR KOnDeHcaunr.
YcnoBn, Bb3bBAHoune KOHeHcaHIO
Pe3kn nepenad TemnepaTp (Bbl3BaHHbI nepemeueHnEM n3 TeNlOBO XoNOdHOE MecTO HnHaobopOT, bIcTpbIM OxJaXDeHnEM nHn HarpeBOM INoI npAByM BO3deNCTBnEM OXJaXDeHHOrO BO3dyxa)
BbICOKa BnaxKHOCTb B NOMEueHn C 60JIbUHM KOINyCtBOM npa nT. d.
Ce3OHdoxdei
- KoHdEHCaUma MoKeT NOBpeDnTb yCTpoNCTBO. EcIn 3TO npOn3oUNo, BblKnIouHTe yCTpoNCTBO n OCTaBBte erO do Tex nop, noka OHO He aAnTnpyETcK TempePaType OkpyXaUSei cpebl (Pn6n3ntelbHo ot 2do 3 YacOB).
TOpn3oHTaJIbHbI 6aIaHc DaBHeHne nIblbI
PndroTobka
CHIMITE KpbIiKy IINbI, CJIeIa TEm, UTo6bl He NOBpeINtbe ee, a 3aTeM OTNcyTnte 3axkIM TOHapMa.
Onyctnte pbuarg na pa3MeueHn nIbl.
- ПовернITE орразиптель COCKaJIb3bIBAHЯВ
- поожжни «0».
1 CHHMMTe TOHaPm c OnOpbI n OTpeRyJnpyuTe rOpN3OHTaJIbHbI 6aJahc, NOBepHyB npOTnBOBeC.
Ydepxnbary TohApM, NOBepHnTe npotNBOBec B HanpaBHeHm CtpeIKn, YTO6bl OTpeRynpoBaTb 6aAnHC Do Tex nop, Noka TohApM He npImet np6bn3nteJbHo rOpn3OHTaNbHoe nOLOKeHne.
Cneinte3aTeM,HTO6bI KOHeuNJIbI He KacanrIOBepxHOCTn NOBOPOTHO CTOna Nm yctpoiCTBa.
Poirotobka
BepHnTe ToHApM Ha onOpy n 3aΦnKcpyuTe erO 3axmOM.
1 NOBOPaHbAitpe peryJrTOp daBHeHn HrIbI Do Tex nop, noka «0» He DOCTuRHeT ceHTpaJIbHOJ LInHn 3aDHeJ qactn ToHapMa.
- Ppi 3tOM ydepxnBaIte npOTNBBOEc HENOdBHXHO.
PpimMeaHne
-ДаВпЕнUEИПБI CM.BpyKOBOДСТBE NOUCNIOJIb3OBAHINUИПЛы.
2 NobeprHnTe npotnbOBec, YTo6bl OtperynpoBaTb daBJeHne nJIb B COOTBeTCTBnC KapTpndxKem.
- Perynnapdablenna nIbI nobopaunBaetcBMECTe CnpOTUBOBECOM.
- NobopaunBaIte, noka ceHTpaIbHaJnHnHa He ykaKeT Ha COOTBeTCTByIOUe DaJIeHne IITbl.

OrpaHnueHne coCKaJIb3bIbAHnA
1 NobepnTe orpaHnHTeIb cockaJIb3bIBaHnI, YTO6bl HaCTpOITb ero Ha To Xe 3HaueHne, YTO n peryJrTOp DaBJIeHnI rIbI.

Ppimechaine
Дядавлении 3и Вьшe,уctановiteorpaHHTeJb COCKaJIb3bIBaHnHa «3».
-Пи ВьлОнHeHn CkpTeuHra (ВКИQUaЯ OБpaTHoe BOCPOn3BedeHne) HAcTpoIe OrpaHnUHTeNb COCKaJIb3bIBaHnR B 3aBnCmOCTn OT BO3MOxHbIX CkpTeY-NepemeUeHn, YTObI yMeHbUHTb KOJIInueCTBO COCKaJIb3bIBaHn.
BbICota ToHapMa
BbnoHnraTe 3Ty peryInpOBky, TOnbKO ecnO hA Heo6xoJIMBa3aBNCIMOCrN OT NcNoJIb3yeMOrO KapTpndka.
PndroTobka
- YctaHOBnTe nlaCTnHKy Ha NOBOPoTHbI CToJ.
1 Otnyctnte 6noknpobky ToHapMa.
BnOKupOBKa ToHapMa
(3a6nokupoBaHa)
2 Otperynpyte BbICOTy c NOMOuTo KOJIbua perynpoBKn BbICOTbI ToHapMa.
Perynpyte BbICOTy ToHApMa, noka ToHapM yctaHOBITc npaJIeJIbHO NOBepxHOCtI pJAcTnHKN.
① NcnoJb3yIte npBBeHHyo HnKe Ta6Ncy IJa CnpaBKn, YTO6bl HaHTu COOTBeTCTByIOUyO MeTKy NOLOXeHnB 3aBNCIMOCtN OT BbICOTbl KapTpNDka.
EcnBbI He 3Haete BbICOTy KapTpndJa (H) nnn He nCnOJIb3yeTe npunaraembl KOpnyc rOJOBKn
CHIMITE KpbIshky Irlbl, cIeJa 3a TeM, YTO6bI He NOBpeDntb NITy, a 3aTeM OTNcyTHe 3axm ToHapMa. ONyCTne pblar dIpa3MeueHnry Irlbl, yCTaHOBIne NITy Ha IIpactnHKy INOBopauHBaIte peYJrTOp BbICOTbl, IOKa TOHaPm INIIaCTnHka He 6ydyT npapannelbHbl.
EcNn BbICota KapTpndka (H) CnNkOM Mana, T06bl oecneHT npaJIeIbHocTB,do6aBBte «npoknaDky dny Kaptpndka» (He npunaeraTc).
3 Pocne 3aBepseHnpeRyInpOBKn BbICOTbI ToHApMa 3a6NOKpyTe erO, NOBepHyB pyKy 6JOKnpOBKn ToHapMa.
- O6ra3aTeIbHO NOBepHInTe pyKy 6nOKnPOBKn ToHApMa Do KOHcA, KaK noka3aHo Ha pncyHke HnKe. Bo3MOxHOb, dIa 3TOrO npndetc npINoXHTb HeKOToOpoe ycnnne.
BHHMaHne
Bybte octopoxhbl,HTo6bI He nobpeintb HakoHeHHK nblbl.
He nCnoB3yIte npOnrpBbIaTeJIb c OTnyueHHoJ 6JIOKINPOBKO ToHApMa.
-ДяболгеToHOnpeRyInpoBnИcNoIb3yIte yPoBeHb(HeBXOINTB KOMNJIeKT NOCTaBKn),YTO6bl OTperyInpoBaTb BlicOTy ToHapMa TaK,YTO6bl KapTpIqxPacNoIarlanca npaIJIeIbHOIIaCTIHKe.
BbICota noDbema ToHapMa
Pn HeoXoDMOCTN BbINOJIHInTe HAcTPOky B COOTBETCTBm C BaWM KapTpNDxEM.
PndroTOBka
- YctaHOBnTE nIaCTnHKy Ha NOBOPoTHbI CTOnJ.
CHIMNTe KpbIuKy IuIbI, CneIa 3a TeM, YTO6bl He NOBpeIHTbe ee, a 3aTEM OTNcyTNe 3axm TOHaPma. - POnHmNITe pbIar IJRA pa3MeueHnI INbI pa3MeCTIte TOHaP M HaI NlaCTIHKO.
1 PpOBeBbTe BbICOTy NODbema ToHApMa (pacCToRHe MExdY KOHcOM IITbI NOBepxHOCTbIO pNactHHKn). EcIn Heo6XoDIma HacTpoiKa, nepeiDHTe K wary 2.
- BbICota ToHApMa OtperynIpObaHa Ha 3aBoJe Ha 3HaueHHe OT 8do 13 MM.
2 BepHnTe ToHaPm Ha onopy n 3aФнКсИpye erO 3axHMOM. NOBepHnTe peRyInpoBOUHbI BnHT.
- Пи NOBOPTe BnHTa no YacOBoi CTpeNke ToHapm ONyckaetc.
- Пп NOВОРОЕ BИNTA пOTиB YacOBON CTpeJIKN TOHApM NOHIMaETcR.
Hac tropon pa60tbl
I03BONaET HAcTPOuTB UBeT CBeToDnOoB, O6paTHoe BOCPOn3BeDeHne, CKOpocTb 78 06/MnH, KpyTuN MmEHT N TOPMOKeHne.
①BbIKIQUHTe yCTpoCTBO N BbITaIITe BnIKy n3 po3ETKn
②OtperynnpyIe No xenahNIO, yCTaHOVB NpeKKnOHTeTNI C NOMObTOHkON KpctTOo6pa3HOI OTBepTKU T.I.
HactpoJa CBeTa CBeToDnOIOB
No3BOJRAETBbIbpaTbKpachHbIMN CnHmUBeTdNPOCBETKn CTPOB6OcKoNa, KHOJOK BbIbopa CkOpocTN, KHOJKN BbIbopa DnAna3oHa BBICOTb ToHa nCBTeOtnoHOro HnDnKaTopa RESET.
HactpoynKa ckopocTu 7806/MnH
P03B0JnREOTKJIHOHTbNNN BKKIOHHTBCKOPoCTb78 06/MmH. ( 17)
P03B0JrEe Bb6paTb OIN H3 YcIbIeX yPoBHe Cnbl DnpeRyIuPobK KpyTaeo MOMeTa.
IodHnMnte pbUar dny pa3MeueHn Hnbl n pa3MeCTNTe TOHaPM HaI nnactnHKoI.
5
OctopoXHO onyCTnTe pbIur dJa pa3MeueHn IrIbI.
ToHapM MeDneHNO onyckaetc.
HaunhaetcBocpon3BeDeHne.
#
ДяВOCPON3BEdENBA6paTHOM HappaBHeHn
BkIouHTe 6paTHoe BocnpOn3BeDeHne c nOmoUbIO nepeKnOuataTnA «HaCTpoNka 6paTHoro BocnpOn3BeDeHnra ( 15)
- OДновременно HabKMITE KHONKY IIN KHONKIN BbIbopa ckopocTN IOBOPOTHO CToNA ([33], [45] nIN [33] n [45]) n [START-STOP] BO BpeMn BpaueHnIOBOPOTHO CTOnA.
- O6paTHoe BOCpOn3BedeHne HaunHaetc CoCKOpOCTn NOBOPOTHO CTOna, BbIbpaHHo KNOpKoNnn KhoNkamn BbIbopa CKOpOCTn.
- TTo6bI BepHyTbcr K HopMaJIbHOMy BocnpOn3BeDeHnIO, CHoBa HaxMnte [STARTSTOP], OJHOBpeMeHHo Haxmam KHOKNy NIN KHOKN BblOpa CKOpOCTN NOBOPOTHO CTOna.
- Nobtophoe HaxaTne [START-STOP], nocTe TORO KAK KHONKa [START-STOP] Haxmamacb BO BpeM o6paTHoro BOCnpon3BeDeHnra, 3anyckaet HopMaJIbHOe BOCnpon3BeDeHnne.
- OndHOBpeMeHHoe HaKaTne KHOKN INN KHOPOK BbIbopa CKopocTN NOBOPOTHO CToNA IN KHOKN [START-STOP] npn OCTaHOBJIeHHOM NOBOPOTHom CTone 3anyckaet BOCpOn3BeJeHne B O6paTHOM HAnpaBHeHN.
#
YTo6bl npnoctaHOBNTb BocnpoN3BeDeHne
IopHmnte pbuag Jpa3MeueHn IJIbI.
Vrna nOHaMaetcC nJaactHKn.
- TTo6bI BO3O6HOBnTB BOCPpon3BeJeHne, ONyCTnte pbIar dIpa3MeUeHnN IITbl.
#
Pocne 3aBepueHnBocpOu3BeeHn
① POnHnMnte pbUar dЯ pa3MeueHnY nJIbI, BepHnTe ToHaPm Ha onOpy n OnyCTnTe pbUar dЯ pa3MeueHnY nJIbI.
② Haxmnte [START-STOP]. ΘJIeKtpoHHbI TOpMo3 IITaBHO OCTaHOBNT IOBOPoTHbI CTOJ.
③ BbIKIOUHTe yCTPOIcTBO C NOMOUIBbIKIOUaTeIN [ON/OFF].
④ 3aФИКСИРУTe TOHApM 3aXIMOM.
⑤ YctaHOBnTe KpbIuKy IVJIbHa MeCTO (ДЯ 3auNTbI KOHua IVJIbI).
#
Для NOIDCBETKИгьI
KoHeuIgblIOcBcHbAeTcBO BpEm BOcPON3BeDEHH.
Haxmnte Ha noDCBtky nIbl.
- POnCBeTka nIrrbl (6enbl CBeToIOoD) NOHnMaETcra NOCBeUaETnRny.
HaXMMTe Ha noDCBETky nIbI, YTO6bl BbIKHouNTbee.
#
PnBocnpon3BeDenn nlaCTnHok EP
- Haxmnte KhoNky BbIbopa ckopoctn [45] (3aropaeTc [45]).
- YctaHOBnTe aanTep nIpaTnHOK EP Ha ceHTpaJIbHbI WINHDeIb.
#
При Воспpon3ВeDEни пл actинok SP (78 06/MnH)
BkHIOHTeCKOpOCTb7806/MnH C NOMOuIbIO nepeKIOUaTeJIg《HaCtpoNka CKOpOCTn 78 06/MnH》 ( 15)
- HaKMnte KhoIKN Bbl6opa ckopoCTn [33] n [45] OndHOBpeMeHHO (78 06/MnH: 3aTopaHTcra [33] n [45]).
#
Pn nCnoIb3OBAHn cTa6nIIN3aTopa nnactnHKn (He BXoIIT B KOMnJIeKT NOCTaBKn)
- CMOTPnTe INHCTpyKUHO NO 3KCNyatauNTNCTa6nN3aTopa NnactnKn.
MaKcMaJbHbI BEC:1KT
PerynTop BbICOTbl TOHa (TOHnHa HAcTpoNka BbICOTbl TOHa)
1 Haxmnte [RESET], YTo6bl BbIKJIOHTb CBeTOINOHDhI INHdIkatap RESET.
2 HaxmTe KhONky BbI6opa Dnana3OHa BBICOTb1 TOHa, YTO6b1 BBI6paTb Dnana3OH BBICOTb1 TOHa.
- [×2] zaropaetra: ±16%
- [× 2] rachat: ±8%
3 Bo vpeM bpaueHn noBopothoro cToJa
PepemecTne [PITCH ADJ].
- Bbl moKeTe Bb6paTb BbICOToHa MeJdy npn6n. -8% n +8% nJn npn6n. -16% n +16%.
3Tn 3NaueHnI npdctabnIOT co6o np6nnteBHy npoent perynipOBKn.

Для сбрoca ВьICOTbl ToHa Do npdeyctaHOBJIeHHORO 3NaueHnA
HaxmTe[RESET].
3aropaeTc CBeToIOoHbI INDkaTop RESET, I BBICota TOHa HeMeIeHNO BO3BpaaTeC K npEydCTaHOBHeHHOMy 3HaueHnIO He3aBnCMO OT noJooKeHn [PITCH ADJ]. (33 - 1 / 3 ,45 nnn 78 o6/MnH)
- CBeToIIOIoR ESET roPHT:ΦnKcnpoBaHO Ha 3aHaHHOM 3HaueHnn.
- CBeToIIOID RESET BbIKJIOHeH: MoXHo OtperyI npoBaTb c nOmoIbH [PITCH ADJ].
N3MepeHne BbICOTbl ToHa
YeIpe pIa cTpo6oCKOINuecknx 3epKaI IO KpaIO NOBOPOTHO CToJa IOMORAHT Bam N3MepNTb BblCOTy TOHa.
Ctro6ockonuueckne 3epkana
![TECHNICS EAHT700 - HaxmTe[RESET]. - 1](/content/2026/03/477835/images/8c58a98172d46d7cd3926d2496cb647038be7a9ba34490ddc6c6d4a2f8a0f58f.jpg)
a) N3MeHeHHe BbICOTbI TOHa Ha +6,4% B HeNoDnKHom COCTOARHH
b) 3MHeHHe BbICOTbI TOHa Ha +3,3% B HeNoDBeKHom COCTOHHN
HopMaIbHaNcKOpocTbBpaUeHnNoBOpOTHOcTOna (33-1/3,45nn78o6/MnH)BHeNOdBHXHOM COCTOAHN
d 3MeHeHHe BbICOTbI TOHa Ha -3,3% B HEnoDbXHOM COCTOHN
BHHMaHne
Ctpo60ckonuueckne 3epkana ocBeuauTcra
ctpo60ckonom (cBeToNDnHna NODCBeTKa),
CINHXPOHN3nPOBAHHbIM C TOHNO YAcTOTON UnpOBOrO
peryIaTopa.
Bcerda nCnONb3yInTe 3Tu cBeToNDnHyIO NODCBETKy
dI IN3MepeHnBbICOTbI TOHa.
Texnueckoe obcnyxnbHne
YxOa3aTeTajMn
TuaTeIbHO OunCTnTe oT nbIn nIy n IaCTnHky.
CHIMITE KOPNyc roJOBKn C KapTpndKem IN ONUCTNE Irry mKoIeTKo. OUnaTe B HAnpaBHeHn OT OCHOBaHnK KOHcy.
-ДяоунCTКПпactHOKИСОЛь3уTe CNEциаNBыоYNTeJIb.
Bpemr ot BpeMeHn npotnpaTe KneMMbHa Kopnyce roJOBKn.
IpoTpnte KJIemMbI KOpNyCa TOnOBKn MraKoN TKaHbIO N yctaHOBnTE KOpNc TOnOBKn Ha ToHapM.
YMeHbIHTe rPOMKoCTb yCnJIHTeJIy IIN BbIKHOHTe yCnJIHTeJIpeD yCTaHOBKOJ IIN CHrTHeM KOpNyca roJIOBKn.
IpepeeHne KOpnyca Bo Bpemy yBenueHnryrpoMKoCTN MoKeT npNBecT N IOBpeXdeHIOdINHAMKOB.
OuncTkA nbIe3aunTHoN KpbIuKn N Kopnyca npOnrpbBaTeJia
PpOtpnTe nbIe3aunTHyU KpbIuKy N Kopnyc MraKoN TkaHbHO.
He npikacaiTebc K OCHOBaHIO BO BpeM oUcTkn. B npotnBHom cnyuae npourpblbATEJb MOXET BbiHTN 3 CTPOJ.
PnCnIbHOM 3aRpa3HeHH N BbITpNTe rpa3b XopoWO OTKaTOn BnAaxHO TpAnKO, a 3aTeM npOTpNTe NOBepxHOCTb MRAKO TKaHbIO.
He nOpIb3yIte pactBopuTeH, B TOM qncIe 6eH30n, pa36abntel, cnpT, moIOUne cpeIcTba IJRA KxHN, XIMNUeCKNe YnCTaUne CpeIcTBA N T. D. 3TO MoKet npINBeCTN K DeΦOpMaUN BHeUHero Kopnyca INN K ydaJIeHNI NOKpbITNA.
He npotnpaIte nbIe3aunTHyIO KpbIuKy OT nbIIN, KOnda OHa yCTaHOBNeHa. 3TO MOKeT pNBEcTN K TOMy, YTO TOHApM 6yDet nptTnBaTbCk K nbIe3aunTHoN KpbIuK e B pe3yNbTaTe BbIpaBOTkn CTaTnueCKOrO 3JIeKTpUYeCTBa.
Y6eNTecb,TOIbJIne3aUNTHaKpbIkaCHrTaBO Bpem npOnrpBbAHnNlaCTnHKn.
IepeMeueHne ycTpoiCTBa
YnakyuTe yctpoiCTBO BOpurnHaJIbHyIO ynaKOBky.
CoxpaHnTe ynaKOBOuHbI MaTePnAbl nocne n3BLeueHn 13dJIiN.
Ecn opunhaJIbHa ynakobKa yTepeHa, cEnaTe cJeDyUoee:
- CHIMITE NOBOPOTHBI CTON IN CINNMAI N AKKypaTHO 3aBePHHTe ux.
- CHNMTe KOPNYC rOJOBKN IN pOToNBObEC C ToHApMa N aKKypaTHo 3aBepHnTe NX.
3aФИКСИРУТЕ TOHAPM 3aXIMOM N 3aKpeIITe erO KJIeIKoN JIHTOn. - AkkypaTHo 3aBepHnTe oCHOBHoi 6nok B OeJno nn 6yMaIy.

Ipeed nobtopho IyakOBKO CHMITE npotnbOBe n BCTaBTe onopy ToHapMa noT OHaPm.
PykoBODCTBO NO yCTpaHHeHNo HEnoJaDoK
Ipejde yem obpaatabca 3a o6cnykubahnem, BblonHte cneyuouane npOBepKn. Ecn y bac eCTb comHeHn no Nobody HeKOToBx NyKToB npOBepKn IIn ecnn yka3aHHbIe B Tabniue cnocobIyctpaHeHn He nomorPi peuHTb npOblemy, o6patntecb K npodabuy.
Het nHTaHn.
JaKyEmo 3a npd6aHn yb0r Bnp06y.
Ybaxho npoHTaTe 1i hctpykii neped BnKOpncTahHm daHoro Bnp6y Ta 36epiraTe ue nocihk dna POnaIbWoTO BnKOpncTahHra.
- Pio onnc B uix ihctpykui 3 ekcnnyataa
-CTopiHKn dny noCunHn no3HaTuBc ( 00)
- Haan iinoctpaui MoKyTB BiPi3HnTcB BiBnIpy BaIoo npncptpo.
Oco6JIINBOCTI
IbIyH i3 npMIM npBODom 6e3 cepdenuka, 30 3a6e3neue BCOKN KpyTHN MOMENT I HadiHicTb
HaHOBiwa KOHCTpyKJia DBNyHa 3 npMIM npIBoIOM 6e3 cepdeuHnka dae 3MOry 3HNxYBaTu Haimenwi Bi6paui niD yac oBeptaHHra, BODHOAC nIDTPMMyOuH BUCOKN KpyTHNI MOMHT.
BnCOKOTOHaTexHONrIgYnpaBNIHHNDBNHyHOM nepemkae peKm npBOy 3aJExKHO BIDpo6oHor cTaHy DBNryHa i, TaKIM YHOM, 3a6e3neUc BnCOKn KpyTHM MOMENT I CTA6iNbHICTb.
- Lcnpobn cnoc6 ynpabniHn noKpaUye BiDCTeXeHHN nToHicTb, 3a6e3neuyuHn TouHe Ta cTa6iBhe peryIIOBaHHB BUCOTn ToHy.
BucOKoToHni nIDunNHnKn dny BucOKOuyTJINBOrTOHaPMa
- Y TOHAPMI BHKOPNCTOByeTbcra O6pO6JIeHNMaUNHHM CnOCOBm BUCOKOTOHNIpiUINHNK 3KapdaHHM NiBICOM, IIO 3a6e3neye NOKpauneheBiDCTexKeHHra i 3MeHShy eIMOBiPHiCt bCKoyBaHHa HabITb y HauNToYxHiux pExmMax ekcnnyataii.
3axnuehen BiB Bi6paui Koprnyc Ta i3oJrTop 3 BNCOKO 3daTHicTIO do aMOpTN3aui
- KoHCTpyKzIy zBoI npNcTpo He InIe 3a6e3neUe BnCOky kICTb 3ByuAHn Ta CTiIKICTb DO 3BOpOTHO 3B'3Ky, a n epeKTINBHO BnKIIuOa 3OBHIuHi Bi6paJIi B yMOBX dyXe BnCOKOI rYHOCTI.
Функц,ио 3a6e3neuyOTb wHpOKn CneKtp ekcnnyatauHINx xapaKTepncTuk
MoxnBicTh HacTpoIOBaHH KpyTHOro MOMeHTy Ta WbNdkOci raIbMyBaHH.
- MoxJIuBicTb BiIDTBOpEHnB 3BOpOTHomy HapymKy.
MoxnBicTB B6opy KOpNCTyBaayem OndHOro 3 DBOX KOJIbOpIB CBIITNOJIOHOI JAMNI 3aJIeXHO BiD yNoO6aHb KOpNCTyBaHa YmOB EKcnnyataii.

Inopmaia nna nokyua
TOB "IAHACOHIK YKPAIHA JITD
IpoBvIok OXtIpcbKkN,6yDnHOK 7,MicTo KInB,03066,YkpaHa
3MiCT
RepeD BnKOpNCtAHHm
3axoDi 6e3neKn .04
Akkecyapn. 05
Ha3Bn deTanei 06
iDROTOBka do po60Tu
MOnTak nporpaBaua .07
- PpiKpInJIeHnKaTpIa. 07
- Ppikpinienn Tpimaua roJOBKn. 07
- Ppei yctaHOBJIeHHm nUcKa nporpaBaHa. 09
- YctaHOBJIeHHI DnCKa nporpaBaaya. 09
- YctaHOBJIeHHcCINMaTa 09
- PpiKpInJIeHnI npOTnBaI. 09
- Ⅲo63HrTn DnCK nporpaBaua. .09
PiiknueHHy uctaHOBHeHH. 10
-ПдкючehняdoIHTerpoBaHOro nIDcNIOBaua a60 KOMNoHEThHOi CnCTeMn /Пдкючehняdo Mkiuepa 10
- YcTaHOBJIeHHra 11
- YcTaHOBnHeHHnIIO3axnCHOKpnuKn. 11
HanautybaHHa 12
- Topn3oHTaJIbHn 6aIaHc. 12
- Pnntncna cnla. 12
-
PtoTnCKoUyBaHHa 13
Bucota Tohapma 14
Bucota nIDHnTToHapMa 15 -
Pobochi HanauTyBaHHa (HanauTyBaHHa konbopy cbitnoioi / HanauTyBaHHa 3BopOTHO BIDTBOpEHnHa HanauTyBaHHa WbUdkoCTi 78 06/xb / HanauTyBaHHa KpyTHoro MOMHTy / HanauTyBaHHa raIbMyBaHHa) .15
BIDTBOPENH
BiodbopeHnI IaTIBok. 16
PerylTop BucOTn ToHy (ToUHe HanaTsyBaHHa BucOTn ToHy) 18
TexHiNe 06cnyroByBaHHa
Texhuihe o6cnyrobyBaHHra 19
Pocibnk 3 nouyky u ycyhenh HecnpabHocTe 20
TexhihixapakTepcntu 21
3axoДn 6e3neKeN
PonepeJxehn
Pnpictpi
-Дязнжehн ри3нky BuHnKHeHH noxeki, ypaKeHH eNeKtpuHm cTpymom a60 noxkoJxehHH Bnpo6y,
-Bepexitb npicptiBid douy, BONr, kpanenb, 6pn3ok.
-He cTaBTe Ha npucTpii peci, HanOBHeHi piDnHOIO, HapnKnaD Ba3i.
-BnKOpNCToByTe npncTpii i3 peKoMeHDoBaHMM DoaTKOBIM ObaHaHHaM.
-He 3nImaIte KpnuKy.
-He pemohnty Te npucptpi camoctiHo.
3BepTaTecrdoKbaniifikOBaHuxpaxiBic
-3anobiraTe naHHIO metaIeBnx npedmetiYcepeDInHy cboRo npicTpoH.
-He po3TaioBnyTe BaxKi peHi Ha YbOmy npicTrooi.
Ka6eJb XnBJIeHHa 3MiHHoro cTpymy
- 3MeHnTHe6e3Neky BnHnKHeHHnnoXeki, ypaKeHH eNekTpHnM Ctpymom a0oNOKKoJKeHH npncToIO:
-ПepekoHaItecA, lo HAnpyra eNeKtpOxNBlenHnB iDnOBiJaX xapaKTepcntkam, kki 3a3HaueHo Ha npicTpoi.
BCTaBnTe MepeKeBy BnKy B WTeNceIbHO pO3eTKY NOBHicTHO.
-He TgHtB, He 3rHaIte Ka6enb i He KnaIitb Ha HboRo BaxkI npEmdTeN.
-He TopkaItecMepexeBOI BUNKIN BOIOMN pykami.
-KoNn BiD'6dHyeTe MepexeBy BnIky, TpMaIteCb 3a Kopnyc BnIKN.
-He KopnctuTecr NoKoJKeHO MepKeBOB BUNKOU YI WTeNCEbHO pO3eTKOIO.
-
MepexeBa BUNka e npucptpoem IaB iD'EnHaHH. YcTaHOBIOHte ue npucptpi TaKIM uNHOM, Uo6 MepexeBy BNky MoKHa 6yNo HeraHb iD'EdHATn BiJ WTeNCelbHOi po3ETKn.
-
PepekoHaTecb, 10 KOHTaKT 3a3eMnEHn Ha MepekeBIB BUNIpi NIKNHO HeHIO, 106 3anobir npaxKeHHIO eJIeKtpuHIM CTpyMOM.
-Ппсстрий конструкш КИСАУ I Tpe6a nДКнЮчатиdo StentceNBHOI po3ETKn i3 3axNCHM3a3eMЛeHHЯM.
3acTepeKeHH
Pnpucpii
He po3miuYte Ha npncptoi Dxepeena BiKpnTOro BOHIO, HApnKnaI, 3anaJIeHi CbiKn.
Ha poboty zuoro npuctroo MOxuybBnNBaTnpaiopeuKoDn, cnpuHHeHi Mo6iNbHMnTepeohAmn.
Y pa3i HaBHOCTI TaKx NpeuKOd 36iNbTe BIDCTaHb MIX CUM PnucTPOeM i MO6iNbHM TeNeFOHOM.
(244)
PnKpInJIeHnTpImaHa roJOBKn
3 YctaHOBIb TpIMaY rOIOBKn 3 KapTpIxJem y ToHapM. TpIMaTe TpIMaY rOIOBKn rOpN3OHTaJIbHo Ta 3aTyrHiTb cTOnOPHy raIKy.
- Bydte obepekhi, He TopkaTecs KINa torkn.

MOnTax nporpaBaay (npoDobXeHHa)
36epitb nporpaau, k yka3aHo dani.
Ybara!
- Nepu Hix nouHaTuHa aWbHaHnHa iHbTe 3axncn Ha KOHeHHK Ha KiHeCb rONKn, NOBepHiTb ToHapM do onopu ToHapMa n 3aipkcyte Noro 3atNcKaem ToHapMa.
He niknouaite Ka6eB KINBneHn 3mHHoro ctpymy, nOKn HajaTuBaHHn He 6yde BkoHaHO NOBHCIO. - Koni BCTaHOBJIIOe TnCK nporpaBaHa, He donyckaTte nonaHnA CTOpOHHX MaTepiJIIB MIX OCHOBHM npIcTpoE m I nDCKOM nporpaBaHa.
He TopkaTecra naHeni Ta He dpnaTe II.
Ipeed yctaHOBJeHHaM Dncka nporpaBaaya
1 3himitb kpiuky marHity 3 dincka nporpaBaaya.
Ha TnIbHomy 6oui IuCKa nporpaBaHa c MaHIT 3 KpNtKIOU.
Ipepe yctaHOBneHHa HOCHBN npncpti 3HIMtB KPNKy MarHity.
Ybaral!
- TpmaTe Bci yTnBi Do MarHITy pei, HapnKnaI, MarHITHy KapTy, noDani BiD MarHITy.
He donyckaIte yapib dncka nporpaBaayo6 OCHOBHn npictpi a60 naiHHa Dnca.
He onyckaTe npunnaHnny a6o 3an3Horo nopoKy do marHity Ha 3BOPOTHomy 6oCi.
He TopkaTecKpINnBnXrBnHTB(TpnMicra) ncka nporpaBaHa. EKnnyataui Hi noka3HnHi He MoKyTB 6yTu rapaHTOBaHmN, kUo rBnHTn 3HaxOJaTBcNo3a NoIOKeHHM.
YcTaHOBJIeHHa DnCKa nporpaBaay
2 NobinbHO BCTaHObitb DnCK nporpaBaHa Ha ceHTpaJIbHn nnHdJIb.
ybaral
Будte obepexHi, KOnI TprmaTe DnCK nporpaBaHa, OckInbKn BIn BaKKn.
- Bydte o6epeKhi, He 3aTnCHiT naIbci.
BntnpaTe Bi6ntkn nalbucib a6o 3a6pydHeHH M'koTO TKaHnHO.
YctahOBJIeHHcINMaTa
3 PoknaDiTb cInMat i niknadky Ha Anck nporpaBaay.
- Nnatibky Ha Dncky nporpaBaay, 0o o6epTaetbC, MoXHa 3ynHrtu BpyHy, a TAKoK o6epTaTn B 3BOpOTHomY HaprMky.
BukopncTaHHn iKnHa NCKy nporpabaHc 3MiHoe BiCyTTKOB3aHH Ta BCTAHOBHeHHr OIKn Ha NlaTbKy.
Ybara!
-ПдчacВИКОHAHHСКретч(BKЛIOHHO3I3BOPOTHM BIDTBOPeHHM)ВИКОРиCTOBуITE CNEцЯJIbHI KapTpДжICNTINyC DnAДIxEIB.
PpinkinJIeHH npotnbarn
4 PnpkiniTb npotBary Do 3aHboi YactHH ToHaPMa.
Ppimrka
BHytpiHHa YactnHa npoTbArn 3Maayetbcra.
3nTn nck nporpaBaay
Якпоказану pncyнку паворч, Встve пал bui y Два OTbopn Ha ДиCKY nporpaBaça, прпснchITь

eHTpaBn nnHdEnb Bn3 i nHIMtB Dnck nporpaBaay Bropy.
PeryIIOBaHHB BNCOTn DnB BCTaHOBJIeHH npncTpOIO rOpN3OHTaJIbHO

IiHIMITb OCHOBn npicTpri, 0o6 nobepHytn i3OJrTopu BiDpeRyIOBaTu BucOTy.
3a roHHNKOBIO ctpinkoIO (npabopyu), kkuO DnBNTNc 3Hn3y:OnyckaHH
- PpotrooHHNKOBoi ctpiKN (niBopyu), kkuO DnBuNTnc3Hn3y:PiHaHTT
ybaral
He BnkpuyuTe i3oJTopn 3aHaTo.
Yepe3 ue BOHMOKytb Bnnaactn a6o NOWKOJNTNCra.
YcTaHOBJIeHHI INIO3axnchoi Kpnskn
1 Tpmaoyn nno3axnchy kpnkky 3 o6ox 6okib, yctahOBiTB II ha Micce, cymictnbwn ii YOTnpn Kytn 3 YOTnpMa Kytamn npncTroIO.
KoHn 3HimaTe nHno3axnchy KpnuKy, NiHimaTe ii npraMo Bropy.
ybaral
-Поверпь TOHApM Do onopn ToHapMa Ta 3aФikcYte
-нoro 3aTnCKaYem TOHApMa, Napi HIX npKpINrTn YN
-3HIMATN NIILO3axNCHy KPNkKy.
3HimaTe NINO3axnchy KpniKu npiudac BiTbopeHHa.
- Koln npinkpinioe Tnnno3axnchny KpnuKy, nepekoHaItec, 10 naMny roNk ( 17) npntncHyto DoH3y. RaKIO npinkpInTu nnno3axnchny KpnuKy, KOIN naMny rONKn iDnHTo, NaMna MoKe TOPKHytncn nnno3axnchoi KpnuKn.
PpIMITKUOIOBCTaHOBJHNA
- Perw Hix nepemiuBaTu npucTpii, BmKHiTb Ioro, BuTARHITb BNKy 3 po3eTKu BiD'EDHaTe Bci niknHouehi npucTpoi.
- PepekoHaTecra, 10 npncpti He 3a3Hae BnNBy coHryHnx npomeHiB, Nny, BONorocTi N Tena BiD onaIIOBaIbHorO npnaNy.
- Lcien npncpti moke cnpiMaTn nepeuKoDn BiD paiaonpnaIady, kkuO BIn po3aUobAHN no6n3y. Po3aUOBYte npncpti kHaJdani BiD paiaionpnaIadIB.
He BCTaHOBNIIOte npictpiHa dxpeNo tenla. - YHnKaIe MlCb 3 BeNkMn nepenadaMn Tempepatypn.
- YHnKaIe Micu, De yAcTo yTBoPiEtbcr KOHdeHCat.
- YHnkaTe HeCtiKnx MicIb.
He cTaBTe npEaMeTn Ha npucTpI.
He BCTaHOBnHOte npncTpiy 3akpntomy npocToPi, HapnKnaHa KnXkOBi noJnCi. - YctaHOBJIIOIte npncptpi TaKIM qHHOM, 06 Bih 3HaxOINBCra Ha DOCTaTHi BIDCTAHi BiD CTIH Ta IHux npncptpoIB, 06 3a6e3neHTu epeKTNBHe BnDInEHnTENJa 3cepeDHH pncptpoI.
- IpekeHaTecb, 10 Micce BCTaHOBJIeHHA DOCTaTHbO Miue, 106 BNTpIMaTN 3araJbHy Bary npIcTpoIO Ta CnCTemN. ( 21)
3BepHITb yBary, 10 CnapeTHN dIM a6o BOJORA BID yIbTpA3ByKOBOrO 3BOJIOKyBaHa MOKyTb NOsKOJNTn npncpti.
KoHdEhcaia
YaBt b xOJOnHy pIyKky, kky dCTaN 3 XoIOuJIbHnka.
KaIoo 3aIIuWHTn II B KIMHati Ha deAkn Yac, Ha
NoBepxHi pIyKKn yTBOPaTbc KaPnI pocn.
Ue RaBnue Ha3NuBaetbcra (KOHdeHcaizr).
- YMOBn, IIO npN3BOJrTb Do KOHDeHcauii:
WBnKa 3MiHa TeMnepaTpyn (BnKlnkaHa nepemieHHaM 3 TeNlOro Micu B XoNoDHe a6o HABnKn, WbNdkm OxOnOxKeHHaM uHarpBaHHaM a6o npaMM BnNBom OxOnOxKeHOr oNbiTpra);
BnCoka BONorictb y npMiuueHHi 3 BeNkoHO KINbKICTHI napu Toio;
CEsH DoiB. - KondeHcaJMyoKe noWkoDHT npucTpi. RaKUO ce cTalocra, BmKHiTb npucTpi i 3aIuWte Ioro, NOKn Bin He oocrHe TeMnpaTpyn HABKOINHbOrO cepeoBua (pnp6nn3Ho 2-3 rOdnH).
Hanaштуваня
TOpn3oHTaJIbHm 6aIaHc PtntncKHa cIIa
PiIroTOBka
3HIMITb 3axnchy KpnKy roKn,6yIbTe oBepexHi,
IO6 He NOsKOJNTn RoKy,a NOTIM BiDnyCtItb
3aTnCKaTuHapMa.
Onycitb Baxinb MikponiipTa.
- Nobephitb peryraTOp npOTnCKOuBaHHa Ha «0».
1 3BiJbHiTb ToHApM 3 OnOpn ToHapMa Ta HaJaWtYuTe rOpN3OHTaJIbHn 6aIaHc, NOBepTaUOHy npOTuBary.
TpmaTe ToHapm i NobepTaIe npotnBary B HApPmky cTpiKn, 0o6 HanaStyBaTu pIBHObary, nOKu ToHapM He 3aMe np6n3Ho rOpN3OHTaJIbHe NOJoxKeHH.
CniikyuTe 3a Tm, 06 roIka He TopkanaCnCKa nporpaBaay OCHOBHOro npicToHO.
36aHaHcObaHo, iToHapM HanaTobAoH npapJeIbHO DnCKy nporpaBaHa.
IpoTnBaTa 3aHaATo dAJIeKo 3MiueHa Bnepei.
PpOtnBaTa3HaATo DaJIeKo 3MiueHa Ha3a.
PiIroTOBka
-Поверпь TOHApMdo ONOpn TOHapMa Ta 3aФIKcYnte NOrO 3aTnCKaChemTOHApMa.
1 Повертаpeуларop npntnckhoi cnH, nOKn «0» He notpanNTb Ha ceHTpaIbHy IiHiO 3aHbOi YacTnHi TOHaPMa.
- YtpmmyTe npotnBary HepyxOMOIO, NOKN ue po6nte.

PnMItka
- IInOpMaIIO ⅢOIO BIDINOIBHOI npITnCKHOI CINN DVB. y Noc6Hky KopucTyBaay.
2 NObepHitb npoTnBary, 0o6 BiDpeRyIIOBaTn BiDnOBiDny npITnCKHy cnNy dJa KapTpndJa.
- PeryJrTop npTnCKHoI cnn 6yde noBepTaTnc pa30m i3 npotnbaroIO.
-Поверта,поки центральна Линя He Bkaже BiДноВдну npNTNCKHy cnny.
Празнockerочьань.
1 NobephiB perynlTop npotnckoyBaHHa, 06HaJaStyBaTN noRo Ha Te came 3HaueHnA, 0o H perynlTop npntncKHOi cnll.

Ppumitka
-Дяпгntнckhoi сил 3r iбьше habaHTуnte perylaTOp npOTnCKOyBaHHHa «3».
Piud BnKoHaHHaCKpeTuy (BKNHcHo 3i 3BOpOTHM BiTbOpeHHaM) BiDperyIIOHTe NIOXKeHHa peryIaTopa npOTnCKOuyBaHHa 3aJIexHObiD Texhikn CKpeTu, 0o 3aCTOCOByBatImetbcra, dnn 3MeHueHHaKOB3aHHa.
Bucota Tohapma
PoibtbcHaJauTbAHH TaBKn B TOMy BnnaKy, Raio ce Heo6xIDHO dJa KapTpndka, KaN BnKOpNCTOByeTcR.
PiIroTOBka
- Yctahobitb nataBky Ha DnCK nporpaBaHa.
1 BnBInbHITb φikcatop TohapMa.
PhiCaTop ToHapMa
(BnBInbHeNo)

(3adipikcoBaHo)
2
Haatayte BnCOTy 3a Donomoroko kibpcpeyIbOBAHHBnCOTn ToHaPma.
HanaTobyTe BnCOTy ToHApMa, NOKI ToHApM He 6ynde npaenbHm nnatibci.
① BnKOpncToBvIe HabeDeHy HnXyTe Ta6nHIO k DoBiky, 3o6 3HaHTN BiDnOBiHy nO3NaKy NOLOKeHHA DnA BnCOTn KapTpndJa.
2 HaTnucHiTb KhoNky Bn6Opy dIana3OHy BnCOTn ToHy, 06 Bn6paTu dIana3OH BnCOTn ToHy.
- [×2] Cbitntbca: ±16%
- [×2] He cBITnTbCra: ±8%
3 Konn dnck nporpaBaay o6eptactbcra
3pywTe [PITCH ADJ].
Bucoty ToHy MoXHa perynobatn np6n. mix-8% i +8% a6o -16% i +16% BiinobiHDo Baworo B6opy.
- HanaHicuCna e np6n3HmBicotkamn DnBaWoro HanaTuBaHH.
![TECHNICS EAHT700 - 3pywTe [PITCH ADJ]. - 1](/content/2026/03/477835/images/fcb24d48d0ef6ec3cddba90a1f5db7d1f8d1bc716ea1de155e5bc9738e61d754.jpg)
I O6 cKHyTN BnCOTy ToHy Ha nonepedHbO 3aDaHe 3HaueHn
HaTnchItb [RESET].
RESET iHdikatop 3aropaetbcs, i Bucota ToHy HeraHNO nobepTaetbcn o nonepedhbo 3aHaHoro 3NaueHH He3aJIeXHO BiD noLoXeHH [PITCH ADJ]. (33 - 1%) 45 a6o 78 o6/xB
- CbitIOjOHa lamna RESET cbitTbcra: 3aφikcoBaHO nonepeHb0 3aDaHe 3haeHHA.
- CbITIOIOHa JAMna RESET He cBITnTbcr:MOxHa HacTpOITn 3a DonomoroHO [PITCH ADJ].
PpOtpPiB p03'EMN TpIMMa7a rOIOBKn M'AKIO TKaHINHO Ta npUNaSTyIe TpIMa7rOIOBKn Do ToHApMa.
BnMKHItb rychictb niicnIOBaHa a6o BnMKHItb nIcNIOBAu, nepw hix yctaHOBbATn a6o 3Himatn TpMaay roNoBkn.
KuO TpMaU TOnOBKn NepemiiuCybCn, KOnI rYuHicTb 36JIbSeHa, ue MoKe npN3BecTn Do NOsKOJKeHHa DnHaMikIB.
OuHsEHHa Hnlo3axnchoi KpnKn Ta Kopnycy
Ipoptiptb nno3axnchy Kpnuky Ta Kopnyc M'koHO TKAHNOHO.
He TopkaTecrdooka nIac OunuHnHaIhakwe nporpaBaay MoKe BnTu 3 naNy.
KpkiuKa dyke 3a6pydHeHa, iinbHo BiixMItb MOKpy TkaHHy, o6 BntepTn 3a6pydHeHHa, a Notim BHTpiTb II M'koTO TkaHHOIO.
He BnKOpncToByTe po3uHHNk, Taki JK 6eH3nH, po3piJxkyBauch, CnpT, KxyOHHi MIOUc3acO6n, XIMiHo 6oPo6NeHy TkaHNHy Toio. Lc MoKe np3BecTu Do DeΦopMyBaHHa 3OBHbHO 60ky KopnyCy a6o NOnKOJXeHHa NOKpTTT.
He npotnpaTe nno3axnchy kpiuky niq cac BiTbOpHnnaTibKn. Lc MoKe npn3Bectn do yTBOpBaHH cTaTuHoi eJeKtpkn. Lc cTaTuHa eNeKtpka MoKe npn3Bectn Do npntarHeHH ToHapMa do nno3axnchoi KpnkN.
TpaHcnpTyBaHH npncTpOIO
3HOBy 3anaKyTe npncptpi B ynaKOBky, B kii BIn noCTaYABc.
36epiraTe nakyBaIbHi MaTepiAIn nicnBnMaHnO6naHaHH.
Ky y Bac 6iNbwe Hema e ynaKOBKn, BnKOHaTe Taki II:
3HIMITb DNCK nporpaBaua n CInmat Ta akypatHO 3arOpHITb IX.
3HIMITb TpMaay roIOBkn I npOTnBary 3 ToHaPma Ta o6epexHo 3arOpHiTb ix.
3aφikcynte Tohapm 3aTnckayem Tohapma Ta 3akpinibnoo CTpiKHOHa Micui.
- AkypaTHo 3aropHiTb OCHOBHn npncTpii y TkaHHy a6o nanip.
Ipei
nepenakybaHHa
3HIMITb npOTnBary Ta
BCTaTE onopy TohapMa
niD TohAPM.
Poci6nK 3 nouky Ta ycHHeHHe HeCnpaBHOCTe
Iepu Hix 3BepTaTncb do pemOHTHoi cnyK6n, nepeBipTe yka3aHe HxKYe. KaIO BnHnKaIoTB cyMHIBN 0do deAKNX nyHKTIB nepeBipKn a6o kIoo 3axOdn, kI Bka3aHO B Ta6nCi, He donomaraIOB BnpiUnTN npo6IeMy, 3BepHiTbcrdo dnilepa.
Hemac XNBJIeHHJ.
- Yu niiKnioueHo Ka6eBb XnBneHn 3MiHHoro cTpyM?
→Piiknouitb Ka6ebnb KINBneHHa03eTKn HadiH. ( 10)
XnBneHHa e, a 3Byky Hemae.
3Byk Tnxn.
- Yu niKnHeyenHa o po3'emib PHONO niCcnHOBa/npnMaay 3po6neHo npabunbHo?
- Yu niKnHueHH Ka6enIb Ctepeo3Byky Do niDCNUObaa a6o npuMaHa He 3mHeHo He npotnJExHHe?
→Ipepebipte Bci niknueHHaDbii.(10)
- Yu npabunbHo nIDKnIouHeO eNEkTpOpoBODn TpMaayra roNobKn do po3'emib KapTpudka?
→IpepebiTe Bci niiKnHueHHaDbiHi. (7)
IydnHnIyHae nIac BiTbopeHHa.
- Yu e iHsi npnana a6o iXhi eNektpnpoBOn 3mHHoro cTpy My 6i7eHyBaIbHoro Ka6enu cTepeo3Byky?
→BiD'εДиТe npuanaTаixhi eNekTpOpoBOn 3mHOrO cTpyMBy BiD ζbOro pnpctpO.
- Yu niDknHoyeNo Ka6ebnb 3a3emJnHn?
→IpekeKaHTeCb, 0ka6en3a3emJehn npabunbHO. ( 10)
IHHKaTOp Ha KhoNci Bn6Opy SwuKocTi [33] a6o [45] 6JImMae.
IHKIO iHnKaTOp Ha KOnuCi Bn6Opy uBnKoCti [33] a60 [45] 6nMaec, BnKoHaTe Onncahi HnXue dii.
Lé moxé ycyhyn npo6nemy.
① NòBépHiTb [ON/OFF] y nònóxéHnǎ OFF.
② BntarHitb MepexeBy BNky, 3aueKaIte npTAROM Tpbox cekyHd, a NOTIM iKIOUHTb BNky 3HOBy.
③Повернithb[ON/OFF]у поожени ONiHaTnchithb[START-STOP],ибдпскпрогача noaB oseptatncra.
- Ykso iHnkaTOp Ha Khoi Cb6opy uBnKocTi 6nMae 3HOBy, nepeBiPe, KOtpn 6nMae, i 3BepHiBcra do npedctabnka Haworo cepBicHoro ceHTpy.
Texhichi xapaKtepncnkn
| 3aaraNBHI xapaKTepeNCTnKN | |
| Eneproxivchenny | 3mHnHn CTpym 110-240 B,50/60 Γι |
| CnoXIVbHa nOTyXHicTb | 8,0 BT (XIVBLeHnY BBiMKeHNo)ПриБЛ. 0,2 BT (XIVBLeHnY BIMKHeNo) |
| Pozmpi (LH × BV × Γ) | 453 x 169 x 353 MM |
| Maca Прибл. 9,6 K | r |
| Дiapan3OH po6oOi Tempepatуri | Вid 0 °C до +40 °C |
| Дiapan3OH po6oOi BOLORocti | 35-80 % BiDnocHOI BOLORocTI (6e3 kondeHcaZii) |
Manufactured by: Panasonic Corporation
Kadoma, Osaka, Japan
Authorized Representative in Europe : Panasonic Marketing Europe GmbH
Panasonic Testing Centre
Winsbergring 15, 22525 Hamburg, Germany
HΦopMaUHOHHbI ΚeHTp Panasonic
ДЯ 3BOHKB N3 MockBbl: +7 (495) 725-05-65
BecnnaTHbI 3BOHOK no Pocnn:8-800-200-21-00
INHapMaBbHbIHTpPanasonic
ДяфikcahabaCyBa3i 3BaHOK na T3ppbTOpbI BEnapyci 6cnnathb:8-820-007-1-21-00
BecnnaTbI 3BOHOK co cTaUNOHApHbIX TeNEFOHOB n3 BeJOpycuN: 8-820-007-1-21-00
IHΦopMauiHn ΚeHTp Panasonic
MxHapOdiDhi D3BiHKn Ta D3BiHKn i3 KneBa: +380-44-490-38-98
Be3koTuBnI 3BInK 3i cTaioHApHnx TeJefoHb y Mexa YkpaHn: 0-800-309-880
Centrul Informational Panasonic


- Delivering the Ultimate Emotive Musical Experience to All
- Introduction
- Features
- Table of contents
- Before use
- Getting started
- Playing back
- Maintenance
- Safety precautions
- Warning Caution
- Unit
- AC mains lead
- Placement
- Disposal of Old Equipment
- Only for European Union and countries with recycling systems
- Accessories
- Parts Name
- Putting the player together
- Attaching the cartridge
- Attention
- Attach a cartridge (store-bought) tentatively.
- Adjust the overhang.
- Note
- Attaching the head shell
- Fit the head shell with the cartridge into the tone arm. Keep the head shell horizontal and tighten the locking nut.
- Putting the player together (continued)
- Before fitting the turntable
- Remove the magnet cover from the turntable.
- Fitting the turntable
- Slowly set the turntable on the centre spindle.
- Fitting the slipmat
- Lay the slipmat and slip sheet on the turntable.
- Attaching the balance weight
- Attach the balance weight to the rear of the tone arm.
- To remove the turntable
- Connections and installation
- Connect the PHONO cable and PHONO earth lead to the PHONO input terminals of the connected equipment.
- Connect the AC mains lead.
- Connecting to a pre-main amplifier or component system / Connecting to a mixer
- Installation
- Fit the dust cover
- Condensation
- Adjustment
- Horizontal balance Stylus pressure
- Preparation
- Free the tone arm from the arm rest and adjust horizontal balance by turning the balance weight.
- Turn the stylus pressure control until "0" comes to the centre line of the rear of the tone arm.
- Turn the balance weight to adjust to the appropriate stylus pressure for the cartridge.
- Anti-skating
- Turn the anti-skating control to adjust it to the same value as the stylus pressure control.
- Adjustment (continued)
- Tone arm height
- Release the arm lock.
- Adjust the height with the arm-height control ring.
- - When you don't know the cartridge height (H) or when you don't use the supplied head shell
- After arm height adjustment is finished, lock the tone arm by turning the arm lock knob.
- Armlift height
- Operation settings
- LED colour setting
- Reverse playback setting
- rpm setting
- Torque setting
- Brake setting
- Playing records
- Press [RESET] to light the pitch control RESET LED lamp.
- Lift the cue lever and move the tone arm over the record.
- Lower the cue lever slowly. The tone arm moves down slowly.
- To play in reverse
- To temporarily stop play
- When play finishes
- To light up the stylus
- Press the stylus light.
- When playing EP records
- When playing SP (78 rpm) records
- When using a record stabilizer (not included)
- Pitch control (fine adjustment to pitch)
- To reset pitch to the preset value Press [RESET].
- To measure pitch
- Care of the parts
- Cleaning the dust cover and cabinet
- ■ Moving the unit
- WEEE symbol
- Disposal of the product outside the EU countries
- Troubleshooting guide
- No power.
- There is power but no sound. Sound is weak.
- Left and right sounds are reversed.
- Humming is heard during play.
- The indicator on the speed select button [33] or [45] blinks.
- Specifications
- Einleitung
- Raccordements et installation
- Vedligeholdelse
- HHΦOPMAU O COOTBETCTBNI IPOJYKTA
- BeckopnychbI DnBraTeJIb npMOrO npNBoDa IaI OeCneueHn BblcOKoro KpyTaeero MOMeHTa HAdexKHOCTn pa60TbI
- BbICOKOTOHbIe NOdUnHnKn dIa BBICOKOyBCTBHTbHOro ToHaPMa
- Chnkaoui Bn6paunn BbICOKOBepdbi KOpnyc n H30JrTOp C BbICOKO DEMnpuyuue cnoc6HOCTbIO
- - Pered nCNoB3OBaHHem
- FepBbIe warn
- BhimaHne
- yctaHOBNTe nbIe3aunTHyIO KpbIshKy
- BHMaHne
- KoHdEHaCaun
- TOpn3oHTaJIbHbI 6aIaHc DaBHeHne nIblbI
- PndroTobka
- CHHMMTe TOHaPm c OnOpbI n OTpeRyJnpyuTe rOpN3OHTaJIbHbI 6aJahc, NOBepHyB npOTnBOBeC.
- Poirotobka
- NOBOPaHbAitpe peryJrTOp daBHeHn HrIbI Do Tex nop, noka «0» He DOCTuRHeT ceHTpaJIbHOJ LInHn 3aDHeJ qactn ToHapMa.
- PpimMeaHne
- NobeprHnTe npotnbOBec, YTo6bl OtperynpoBaTb daBJeHne nJIb B COOTBeTCTBnC KapTpndxKem.
- OrpaHnueHne coCKaJIb3bIbAHnA
- Ppimechaine
- BbICota ToHapMa
- Otnyctnte 6noknpobky ToHapMa.
- Otperynpyte BbICOTy c NOMOuTo KOJIbua perynpoBKn BbICOTbI ToHapMa.
- EcnBbI He 3Haete BbICOTy KapTpndJa (H) nnn He nCnOJIb3yeTe npunaraembl KOpnyc rOJOBKn
- Pocne 3aBepseHnpeRyInpOBKn BbICOTbI ToHApMa 3a6NOKpyTe erO, NOBepHyB pyKy 6JOKnpOBKn ToHapMa.
- BHHMaHne
- BbICota noDbema ToHapMa
- PpOBeBbTe BbICOTy NODbema ToHApMa (pacCToRHe MExdY KOHcOM IITbI NOBepxHOCTbIO pNactHHKn). EcIn Heo6XoDIma HacTpoiKa, nepeiDHTe K wary 2.
- BepHnTe ToHaPm Ha onopy n 3aФнКсИpye erO 3axHMOM. NOBepHnTe peRyInpoBOUHbI BnHT.
- Hac tropon pa60tbl
- HactpoJa CBeTa CBeToDnOIOB
- HactpoynKa ckopocTu 7806/MnH
- IodHnMnte pbUar dny pa3MeueHn Hnbl n pa3MeCTNTe TOHaPM HaI nnactnHKoI.
- 5
- OctopoXHO onyCTnTe pbIur dJa pa3MeueHn IrIbI.
- #
- ДяВOCPON3BEdENBA6paTHOM HappaBHeHn
- YTo6bl npnoctaHOBNTb BocnpoN3BeDeHne
- Pocne 3aBepueHnBocpOu3BeeHn
- Для NOIDCBETKИгьI
- Haxmnte Ha noDCBtky nIbl.
- PnBocnpon3BeDenn nlaCTnHok EP
- При Воспpon3ВeDEни пл actинok SP (78 06/MnH)
- Pn nCnoIb3OBAHn cTa6nIIN3aTopa nnactnHKn (He BXoIIT B KOMnJIeKT NOCTaBKn)
- PerynTop BbICOTbl TOHa (TOHnHa HAcTpoNka BbICOTbl TOHa)
- HaxmTe[RESET].
- Texnueckoe obcnyxnbHne
- YxOa3aTeTajMn
- Bpemr ot BpeMeHn npotnpaTe KneMMbHa Kopnyce roJOBKn.
- YMeHbIHTe rPOMKoCTb yCnJIHTeJIy IIN BbIKHOHTe yCnJIHTeJIpeD yCTaHOBKOJ IIN CHrTHeM KOpNyca roJIOBKn.
- OuncTkA nbIe3aunTHoN KpbIuKn N Kopnyca npOnrpbBaTeJia
- PpOtpnTe nbIe3aunTHyU KpbIuKy N Kopnyc MraKoN TkaHbHO.
- IepeMeueHne ycTpoiCTBa
- YnakyuTe yctpoiCTBO BOpurnHaJIbHyIO ynaKOBky.
- PykoBODCTBO NO yCTpaHHeHNo HEnoJaDoK
- Het nHTaHn.
- Oco6JIINBOCTI
- BucOKoToHni nIDunNHnKn dny BucOKOuyTJINBOrTOHaPMa
- 3MiCT
- RepeD BnKOpNCtAHHm
- iDROTOBka do po60Tu
- BIDTBOPENH
- TexHiNe 06cnyroByBaHHa
- 3axoДn 6e3neKeN
- PonepeJxehn
- Pnpictpi
- Ka6eJb XnBJIeHHa 3MiHHoro cTpymy
- 3acTepeKeHH
- Pnpucpii
- PnKpInJIeHnTpImaHa roJOBKn
- YctaHOBIb TpIMaY rOIOBKn 3 KapTpIxJem y ToHapM. TpIMaTe TpIMaY rOIOBKn rOpN3OHTaJIbHo Ta 3aTyrHiTb cTOnOPHy raIKy.
- MOnTax nporpaBaay (npoDobXeHHa)
- Ybara!
- Ipeed yctaHOBJeHHaM Dncka nporpaBaaya
- 3himitb kpiuky marHity 3 dincka nporpaBaaya.
- Ybaral!
- YcTaHOBJIeHHa DnCKa nporpaBaay
- NobinbHO BCTaHObitb DnCK nporpaBaHa Ha ceHTpaJIbHn nnHdJIb.
- ybaral
- YctahOBJIeHHcINMaTa
- PoknaDiTb cInMat i niknadky Ha Anck nporpaBaay.
- PpinkinJIeHH npotnbarn
- PnpkiniTb npotBary Do 3aHboi YactHH ToHaPMa.
- Ppimrka
- 3nTn nck nporpaBaay
- YcTaHOBJIeHHI INIO3axnchoi Kpnskn
- PpIMITKUOIOBCTaHOBJHNA
- KoHdEhcaia
- Hanaштуваня
- TOpn3oHTaJIbHm 6aIaHc PtntncKHa cIIa
- PiIroTOBka
- 3BiJbHiTb ToHApM 3 OnOpn ToHapMa Ta HaJaWtYuTe rOpN3OHTaJIbHn 6aIaHc, NOBepTaUOHy npOTuBary.
- Повертаpeуларop npntnckhoi cnH, nOKn «0» He notpanNTb Ha ceHTpaIbHy IiHiO 3aHbOi YacTnHi TOHaPMa.
- PnMItka
- NObepHitb npoTnBary, 0o6 BiDpeRyIIOBaTn BiDnOBiDny npITnCKHy cnNy dJa KapTpndJa.
- Празнockerочьань.
- Ppumitka
- Bucota Tohapma
- BnBInbHITb φikcatop TohapMa.
- 2
- Haatayte BnCOTy 3a Donomoroko kibpcpeyIbOBAHHBnCOTn ToHaPma.
- 3pywTe [PITCH ADJ].
- I O6 cKHyTN BnCOTy ToHy Ha nonepedHbO 3aDaHe 3HaueHn
- BnMKHItb rychictb niicnIOBaHa a6o BnMKHItb nIcNIOBAu, nepw hix yctaHOBbATn a6o 3Himatn TpMaay roNoBkn.
- OuHsEHHa Hnlo3axnchoi KpnKn Ta Kopnycy
- TpaHcnpTyBaHH npncTpOIO
- Poci6nK 3 nouky Ta ycHHeHHe HeCnpaBHOCTe
- Hemac XNBJIeHHJ.
- XnBneHHa e, a 3Byky Hemae.
- 3Byk Tnxn.
- IydnHnIyHae nIac BiTbopeHHa.
- IHHKaTOp Ha KhoNci Bn6Opy SwuKocTi [33] a6o [45] 6JImMae.
- Texhichi xapaKtepncnkn
Brand : TECHNICS
Model : EAHT700
Category : Earphones