PDWS 125 A1 - Grinder PARKSIDE - Free user manual and instructions
Find the device manual for free PDWS 125 A1 PARKSIDE in PDF.
| Feature | Details |
|---|---|
| Product type | Grinder |
| Power | 1250 W |
| Cutting diameter | 125 mm |
| No-load speed | 0-12,000 rpm |
| Weight | 2.2 kg |
| Usage | Ideal for grinding, polishing, and cutting various materials |
| Safety system | Overload protection and safety switch |
| Included accessories | Grinding disc, service key |
| Maintenance | Regular cleaning, checking wear parts |
| Warranty | 3 years |
Frequently Asked Questions - PDWS 125 A1 PARKSIDE
User questions about PDWS 125 A1 PARKSIDE
0 question about this device. Answer the ones you know or ask your own.
Ask a new question about this device
Download the instructions for your Grinder in PDF format for free! Find your manual PDWS 125 A1 - PARKSIDE and take your electronic device back in hand. On this page are published all the documents necessary for the use of your device. PDWS 125 A1 by PARKSIDE.
USER MANUAL PDWS 125 A1 PARKSIDE
text_image
PDF online www.lidl-service.com III PARKSIDE PDWS 125 A1Translation of the original instructions
NL BE
PERSLUCHT-HAAKSE SLIJPER
Before reading, unfold the page containing the illustrations and familiarise yourself with all functions of the device.
FR BE
natural_image
Metal wrench tool with a circular head and labeled number 11 (no text or symbols on the tool itself)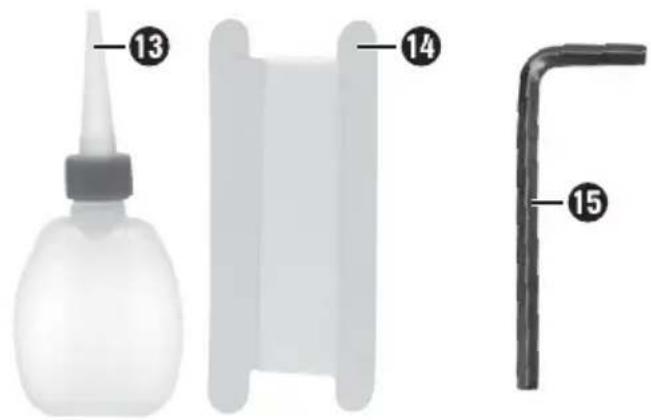
text_image
Diagram showing labeled parts of a spray bottle, a coiled spring, and a bent tube with numbered annotations.
natural_image
Metal mechanical component with a U-shaped end and two circular holes, labeled with number 12 (no text or symbols on the object itself)Inhaltsverzeichnis
Einleitung 2
text_image
Diagram showing two mechanical or electrical components with symbols and checkmark indicators, possibly indicating correct and incorrect states.natural_image
Illustration of hands using a tool to adjust or move a circular component, with arrows indicating motion direction (no text or symbols)Abb. 3
HINWEIS
KOMPERNASS HANDELS GMBH
BURGSTRASSE 21
DE-44867 BOCHUM
DEUTSCHLAND
www.kompernass.com
General safety rules 17
Hazards caused by flying parts 18
Hazards caused by entanglement 18
Hazards during operation 18
Risks due to repetitive movements.... 19
Hazards caused by accessories 19
Hazards in the workplace 20
Risks due to dust and vapours 20
Risks due to noise 20
Risks due to vibrations 21
Additional safety instructions for pneumatic machines 21
Special safety instructions for grinding and abrasive cutting 2 2
Additional special safety instructions for abrasive cutting 22
Kickback and corresponding safety instructions. 22
Operation 23
Attaching the auxiliary handle 23
Attaching the protective cover 23
Attaching the grinding disc 24
Fitting the connector nipple 24
Operation 25
Working procedures 25
Maintenance and cleaning 26
Disposal 26
Kompernass Handels GmbH warranty 26
Service 27
Importer 27
Translation of the original Conformity Declaration 28
AIR ANGLE GRINDER PDWS 125 A1
Introduction
Congratulations on the purchase of your new appliance. You have selected a high-quality product. The operating instructions are part of this product. They contain important information on safety, usage and disposal. Before using the product, please familiarise yourself with all operating and safety instructions. Use the product only as described and for the specified areas of application. Please also pass on these operating instructions to any future owner.
Intended use
The compressed air tool is intended for grinding and abrasive cutting metal and similar materials without the use of water. Any other use of or modification to the machine is deemed to be improper and carries the risk of serious personal injury.
Not for commercial use.
Explanation of the symbols
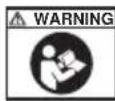
| Read the instruction manual before use. | |
 | Wear safety goggles! |
 | Rotation direction |
  | Oil daily! |
| P04/2017 P | Production date |
| V04/2020 Expiry date | |
 | Read the original operating instructions and safety instructions before initial operation. |
 | Wear ear protection! |
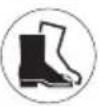 | Wear sturdy work boots! |
 | Wear protective gloves! |
 | Wear a dust mask! |
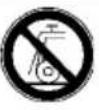 | Not approved for wet grinding |
 | Using damaged cutting or grin-ding discs is dangerous and may cause serious injury! |
 | Intended for metal grinding |
 | Diameter of the disc |
Features
1 Air connection with filter
② Plug nipple 1/4"
3 ON/OFF switch
4 Safety lock-out
5 Protective cover
6 Spindle
⑦ Auxiliary handle
8 Rear clamping flange
9 Grinding disc
10 Front flange
11 Open-ended spanner
12 Two-hole spanner
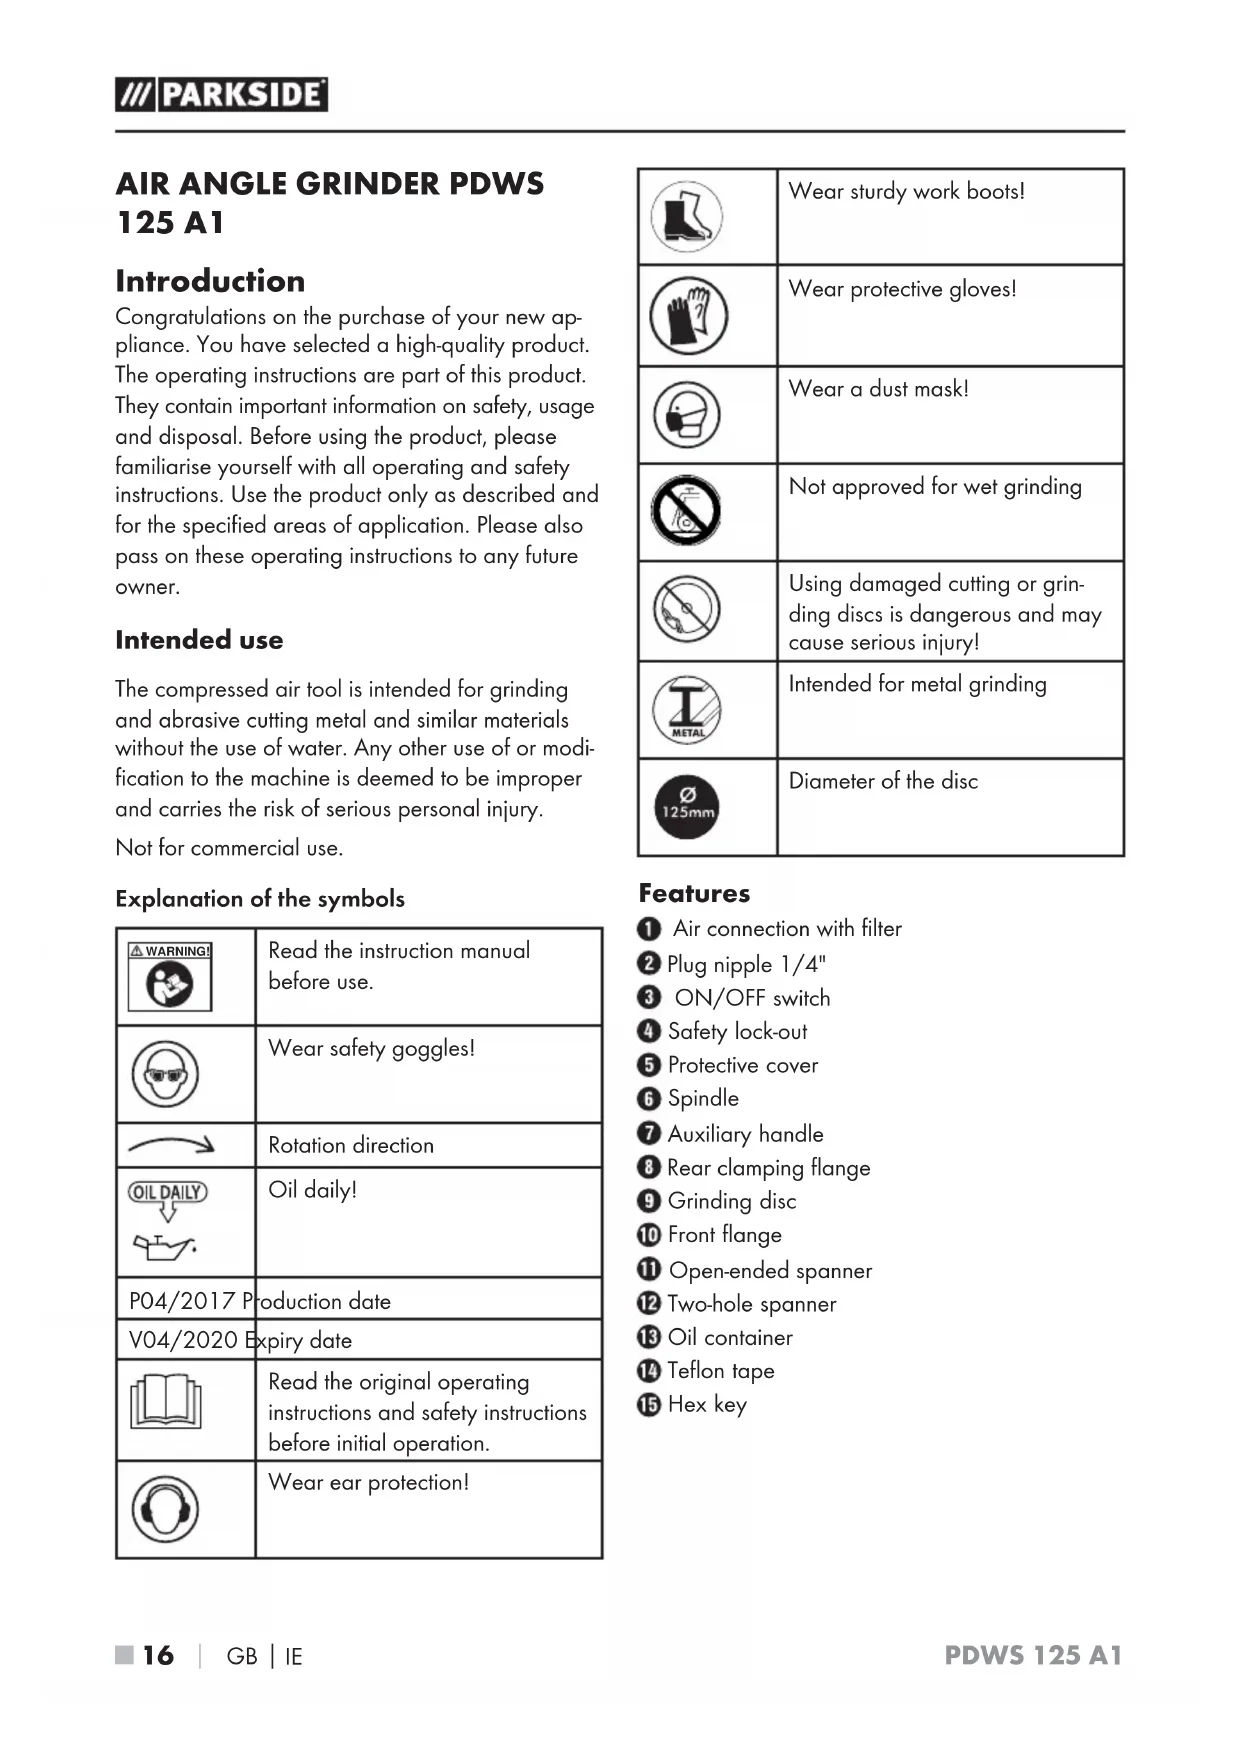
13 Oil container
14 Teflon tape
15 Hex key
Package contents
1 air angle grinder PDWS 125 A1
1 auxiliary handle
1 grinding disc (∅ 125 mm)
1 two-hole spanner
1 open-ended spanner
1 hex key
1 m PTFE tape
1 plug nipple (1/4")
1 oil container
1 operating manual
Technical data
Rated speed: 10000 rpm
Rated air pressure: max. 6.3 bar
Disc size: ∅ 125 mm
Threaded mounting: M14
Plug nipple: 1/4"
Weight (with auxiliary handle): approx. 1.72 kg
Noise emission values:
Noise measurement determined in accordance with ISO 15744.
Sound pressure level: L _pA = 90.2 dB(A)
Uncertainty: K_pA = 3 dB(A)
Sound power level: L_WA = 101.2 dB(A)
Uncertainty: _WA = 3 dB(A)K
Vibration emission value:
Vibration emission value determined in accordance with ISO 28927-1 and EN 12096:
$$ a _ {h} = 2. 4 4 \mathrm{m} / \mathrm{s} ^ {2} $$
Uncertainty K = 1.5 m/s²
General safety rules
WARNING!
For multiple hazards: Please ensure that you have read and understood the safety instructions before adjusting, operating, repairing, maintaining or replacing accessories on the angle grinder as well as before working in the vicinity of the machine. Failure to do this can result in serious bodily injury.
The grinding machine for abrasive media should only be adjusted, set or used by adequately qualified and trained operators.
This machine may not be modified. Modifications can reduce the effectiveness of the safety measures and increase the risks for the operator.
- Do not lose the safety instructions – hand them to the operator.
■ Never use damaged grinding machines for abrasive media.
Hazards caused by flying parts
If a workpiece or accessory or even part of the machine tool itself breaks, parts can be flung out at high speeds.
■ Always wear shock-resistant eye protection when operating the grinding machine for abrasive media. The degree of necessary protection must be evaluated separately for each individual task.
■ You must ensure that the workpiece has been securely fixed.
■ You must ensure that the abrasive media has been safely attached to the grinding machine for abrasive media.
■ You must ensure that the maximum operating rotational speed of the abrasive media calculated in revolutions per minute is the same as or higher than the rated spindle speed.
■ Ensure that the protective guard has been fitted, that it is in good condition and properly fixed, and that it is regularly checked.
It is possible that no protective guard is required during internal grinding under the condition that the workpiece encloses the abrasive media.
■ You must ensure that the clamping flange is being used in accordance with the manufacturer's instructions and that it is in good condition, i.e. without cracks and flaws, and that it is flat.
■ You must check to see whether the spindle and spindle thread have become damaged or worn.
■ You must ensure that any sparks or ashes produced during operation do not cause any hazards.
■ Always disconnect the grinding machine from the power supply before replacing the abrasive media or servicing it.
Hazards caused by entanglement
■ Suffocation, scalping and/or cut wounds can occur if loose clothing, jewellery, necklaces, hair or gloves are not kept away from the machine and its accessories.
Hazards during operation
■ Avoid contact with the rotating spindle and the fitted grinding disc in order to avoid cuts to the hands and other body parts.
When using the machine, the operator's hands can be subject to hazards such as cuts, grazing and heat. Wear suitable gloves to protect your hands.
The operator and maintenance personnel must be physically capable of handling the size, mass and power of the machine.
■ Hold the machine correctly:
Be ready to counteract any normal or suddenly occurring movements. Keep both hands ready for use.
■ Ensure that your body is balanced and that you have a secure standing position.
■ Release the start/stop control if there is a disruption to the power supply.
■ Use only the recommended lubricants.
■ Safety goggles must be worn; wearing of protective gloves and safety clothing is recommended.
■ Wear a safety helmet if working above head height.
■ Do not put the machine down after switching off until the disc has stopped rotating.
■ When abrasive cutting, the workpiece must be supported so that the cutting slot has a constant or increasing width during the entire cutting process.
If the abrasive media jams in the cutting slot, the grinding machine for abrasive media must be turned off and the grinding disc must be loosened. Before continuing operation, check that the abrasive media is still properly fixed and has not been damaged.
■ Grinding discs and abrasive cutting discs may not be used for side grinding (exception: grinding discs for side grinding). Grinding machines for abrasive media may only be operated at a rotation speed which is less than the abrasive media maximum speed;
■ ensure that no persons are standing in the immediate vicinity.
■ Personal safety equipment such as suitable gloves, aprons and protective helmets must be worn.
■ Sparks caused by grinding can ignite clothing and cause serious burns. You must ensure that sparks do not impact clothing. Wear fire-retardant clothing and ensure that there is a bucket of water in the vicinity.
Risks due to repetitive movements
When using a grinding machine for abrasive media to perform work-related activities, operators may experience uncomfortable sensations in their hands and arms, as well as in the neck and shoulders or other parts of the body.
When using a grinding machine for abrasive media, the operator should adopt a comfortable posture whilst ensuring a secure hold and avoiding awkward postures or positions in which it is difficult to maintain balance. The operator should change positions during the course of long-lasting tasks. This can be helpful in the prevention of discomfort and fatigue.
If the operator notices symptoms such as persistent or recurring illness, discomfort, throbbing, pain, tingling, burning or stiffness, these indications should not be ignored. In this case, the operator should inform his/her employer and consult a suitably qualified physician.
Hazards caused by accessories
■ Disconnect the grinding machine for abrasive media from the power supply before fitting or replacing the machine tools or accessories.
■ Use only accessories and supplies of the sizes and types recommended by the manufacturer of the grinding machine for abrasive media. Never use any other types or sizes of accessory parts and consumables.
■ Ensure that the dimensions of the abrasive media are compatible with those of the grinding machine for abrasive media and that the abrasive media fits onto the spindle.
■ Ensure that the thread type and size of the abrasive media exactly matches the thread type and size of the spindle thread.
■ Always inspect the abrasive media before use. Do not use any abrasive media which may have been dropped or which shows signs of splintering, cracking or other flaws.
■ Always ensure that the abrasive media has been properly fixed and tightened firmly enough before use; the grinding machine for abrasive media must be operated at idling speed for at least 1 minute in a safe location; switch off the machine immediately if you notice excessive vibration or any other damage; the cause of these malfunctions must be determined.
■ Ensure that the spindle end does not contact the bottom of the openings in cut wheels, grinding cones or whetstones with thread inserts which are intended for the attachment of machine spindles, by checking the dimensions and other important spindle data.
In the case of abrasive media which are supplied with reducers or reducing bushings, or which are intended for use with reducers or reducing bushings, the operator must ensure that the reducer or reducing bushing does not contact the face of the clamping flange and that the clamping force provides sufficient rotational drive to prevent slipping of the abrasive media.
In cases in which clamping flanges for different types and sizes of abrasive media have been provided, always fit the correct clamping flange for the abrasive media being used.
- Avoid direct contact before and after use of the machine tool since it can be hot or have sharp edges.
■ The abrasive media must be handled and stored in accordance with the manufacturer's instructions.
Hazards in the workplace
■ Slipping, tripping up and falling are the main causes of injuries at the workplace. Look out for surfaces which could have become slippery through use of the machine, and also any tripping hazards caused by air or hydraulic hoses.
■ Proceed with caution in unknown surroundings. Hidden hazards caused by power or other supply lines may be present.
■ The grinding machine for abrasive media is not intended for use in explosive atmospheres and is not insulated against contact with electrical power sources.
■ Ensure that no electrical service lines, gas pipes, etc., which could cause a hazard if damaged by use of the machine are present.
Risks due to dust and vapours
The dust and vapours produced by using the grinding machine for abrasive media and polishing can be hazardous to health (e.g. cause cancer, birth defects, asthma and/or dermatitis); it is essential to carry out a risk assessment in respect of these risks and to implement corresponding regulatory mechanisms.
The risk assessment should include all dust caused by the use of the machine and any existing dust that may be whirled up at the same time.
The winding machine for abrasive media must be operated and maintained in accordance with the recommendations contained in this manual to keep the release of dust and vapours to a minimum.
■ The exhaust air should be routed so that the raising of dust in already dusty environments is kept to a minimum.
If dusts or vapours are created, the main priority must be to control these at the site of their release.
All inserts or accessories of the machine intended for collecting, extracting or suppressing airborne dust or vapours or should be used and serviced in accordance with the manufacturer's instructions.
■ Consumables/machine tools should be selected, maintained and replaced in accordance with the recommendations in this guide in order to avoid unnecessary intensification of dust or vapour production.
■ Use breathing equipment as per the instructions provided by your employer or as required by health and safety regulations.
■ Processing certain materials can cause emission of dust and vapours which, in turn, can result in the formation of an explosive environment.
Risks due to noise
■ Exposure to high noise levels can result in permanent hearing damage, loss of hearing and other problems such as tinnitus (ringing, rushing, whistling or buzzing in the ear) if sufficient hearing protection is not being worn.
■ Suitable regulatory mechanisms include measures such as the use of insulation materials to avoid pinging occurring on the workpieces.
■ Use hearing protection.
The grinding machine for abrasive media is to be operated and maintained in accordance with the recommendations contained in this manual to reduce any unnecessary increase of the noise levels.
If the grinding machine for abrasive media is equipped with a silencer, always ensure that this in its place and is operational while the machine is in operation.
■ Consumables/machine tools should be selected, maintained and replaced in accordance with the recommendations in this guide in order to avoid unnecessary increase of the noise levels.
Risks due to vibrations
■ Vibrations can damage the nerves and cause problems with the blood circulation in the hands and arms.
■ When working in a cold environment, wear warm clothing and keep your hands warm and dry.
If you notice numbness, tingling or pain in your fingers or hands or notice that the skin of your fingers or hands has become pale, stop working with the grinding machine for abrasive media, inform your employer and consult a doctor.
The grinding machine for abrasive media must be operated and maintained in accordance with the recommendations contained in this manual to reduce any unnecessary increase of the vibrations.
■ Do not allow the machine tool to rattle against the workpiece since this would very probably result in a considerable increase in the vibrations.
■ Consumables/machine tools must be selected, maintained and replaced in accordance with the recommendations in this guide in order to avoid any unnecessary increase in vibration.
■ Always use a stand, a clamp or a compensation device to support the weight of the machine.
■ Hold the machine securely but not too firmly while maintaining the necessary hand-reaction force, as the vibration risk generally increases the harder the machine is held.
■ Use intermediate layers if these are intended for the bonded abrasive media.
Additional safety instructions for pneumatic machines
■ Compressed air can cause serious injuries.
- Ensure that the air supply is switched off, the hose is not under pressure and that the machine is disconnected from the air supply when not in use, and also before exchanging accessories or carrying out repairs.
—Never aim the airflow towards yourself or any other person.
■ Thrashing hoses can cause serious injury. Therefore, always check that the hoses and their fixings are not damaged or have not come loose.
If universal rotary joints (claw couplings) are used, locking pins must be used to provide protection; Whipchek® air hose restraints must be used to provide protection in case of a failure of the connection of the hose to the machine.
■ Ensure that the maximum permissible pressure stated on the machine is not exceeded.
■ Never carry compressed air-powered machines by the hose.
Special safety instructions for grinding and abrasive cutting
■ Use only the grinding accessories approved for your compressed air tool and the appropriate protective cover for these grinding tools. Grinding tools which are not designed for the compressed air tool can not be sufficiently shielded and are unsafe.
Cranked grinding discs must be fitted so that their grinding surfaces do not protrude above the level of the protective cover edge. An improperly mounted grinding disc which protrudes beyond the edge of the protective cover cannot be sufficiently screened.
The protective cover must be securely fixed to the compressed air tool and adjusted to ensure maximum safety so that the smallest possible amount of the grinding tool is exposed to the operator. The protective cover is designed to protect the operator from fragments and accidental contact with the grinding tool.
- Grinding tools should only be used for the recommended applications. For example: Never grind with the side surface of a cutting disc. Cutting discs are designed to remove material with the edge of the disc. Any lateral application of force on these grinding tools can lead to breakage.
■ Always use an undamaged clamping flange of the correct size and shape for the grinding disc you have selected. Suitable flanges support the grinding disc and reduce the risk of disc breakage. Flanges for cutting discs can be different to flanges for other grinding discs.
- Do not use worn grinding discs from larger compressed air tools. Grinding discs for larger compressed air tools are not designed for the higher rotational speeds of smaller compressed air tools and can break.
Additional special safety instructions for abrasive cutting
■ Avoid cutting disc jams or excessive contact pressure. Do not make any excessively deep cuts. Overloading the cutting disc increases the stress and likelihood of tilting or jamming and thus the possibility of kickback or breakage of the grinding tool.
- Avoid the area in front of and behind the rotating cutting disc. When you move the cutting disc away from yourself in the workpiece it is possible, in the event of a kickback, that the compressed air tool along with the rotating disc might be thrown out directly towards you.
If the cutting disc jams or you stop working, switch the tool off and hold it steady until the disc has come to a complete standstill. Never attempt to pull a rotating cutting disc out of a cut. This could lead to kickback. Identify and remove the cause of the jam.
Do not switch the compressed air tool back on while it is in the workpiece. Allow the cutting disc to reach its full speed before you carefully continue the cut. Otherwise, the disc can jam, jump out of the workpiece or cause kickback.
■ Support panels or large workpieces to reduce the risk of the cutting disc jamming and causing a kickback. Large workpieces can bend under their own weight. The workpiece must be supported on both sides of the disc: both in the vicinity of the cutting disc and also at the edge.
■ Be particularly careful when making "pocket cuts" into existing walls or other obscured areas. The inserted cutting disc may cut into gas or water pipes, electrical wiring or other objects that can cause kickback.
Kickback and corresponding safety instructions
■ Kickback is a sudden reaction caused when a rotating accessory tool catches or jams.
- Catching or jamming causes the rotating accessory tool to stop abruptly.
If this happens, an uncontrolled compressed air tool turns rapidly against the direction of rotation of the accessory tool caught in the blockage.
If, for example, a grinding disc catches or jams in a workpiece, the edge of the grinding disc that is projecting into the workpiece can get caught and break off the grinding disc or cause a kickback. The grinding disc can then fly in the direction of the operator or away from him, depending on the direction of rotation of the disc at the blockage.
This can also break grinding discs.
A kickback is caused by incorrect use or misuse of the compressed air tool. This can be avoided by taking proper precautions as given below.
a) Hold the compressed air tool firmly in both hands and position your body and arms so they can absorb the force of a kickback. Always use the auxiliary handle, if available, so you have maximum control over the kickback force or reaction torques at full speed. By taking adequate precautions, the operator can stay in control of the kickback and reaction torques.
b) Never hold your hand close to rotating accessory tools. The accessory tool could move across your hand in the event of a kickback.
c) Keep all parts of your body outside the region in which the compressed air tool is likely to move in event of a kickback. The kickback will force the compressed air tool in the opposite direction to the direction of rotation of the grinding disc at the blockage.
d) Take special care when working around corners, sharp edges, etc. Avoid allowing the accessory tool to bounce back from the workpiece, or jam. The rotating accessory tool is more likely to jam in corners or sharp edges or if it bounces. This can cause a loss of control or kickback.
e) Do not use chains or toothed saw blades. Such accessories often cause a kick-back or loss of control over the power tool.
Operation
NOTE
▶ Screw the plug nippl② on before first use.
Attaching the auxiliary handle

CAUTION!
▶ Do not work with the tool if the auxiliary handle ⑦ is not attached!
♦ Screw the auxiliary handl⑦ firmly onto the left-hand or right-hand side of the machine.
Attaching the protective cover

CAUTION!
▶ For safety reasons, always use the protective cover 5!
■ The protective cover ^5 is mounted on delivery with 2 screws on the device.
For rotation of the protective cover, you first remove all screws with the hex key 15
◆ Replace the protective cover at most by a hole added to the new position.
The closed side of the protective cover 5 must always be facing to the operator.
◆ Attach the protective cover ^5 with 3 screws on the device.
Screw the remaining screw into the threaded hole.
Check for secure seating: The protective cover must be securely attached.
text_image
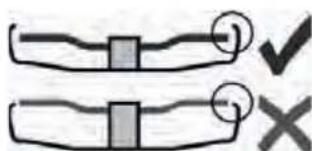
Diagram showing two labeled mechanical or electrical components with symbols and checkmark indicatorsOnly use accessory tools which the protective cover 5 rotrudes beyond by at least 2 mm.

WARNING!
▶ The supplied protective cover ^5 is for grinding disc use only.
Attaching the grinding disc
CAUTION!
▶ Disconnect the compressed air tool from the compressed air supply before replacing the accessory tool or accessories, or before carrying out adjustments or servicing. The spindle ⑥ must be at a standstill.
Lock the spindle
Place the rear clamping flange 8 on the spindle 6. This is correctly attached if the spindle 6 cannot be rotated.
Place the open-ended spanne ^11 supplied over the collar of the rear clamping flange ^8 to prevent it from turning.
Attaching the grinding disc
- Place the grinding disc 9 on the rear clamping flange 8 The grinding disc 9 must be evenly placed on the rear clamping flange 8
Fixing/loosening the front flange
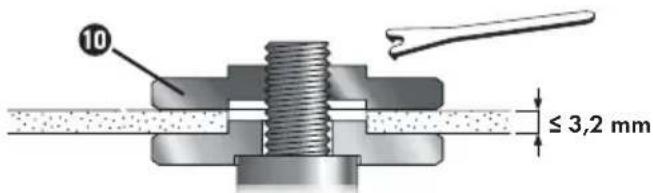
The 2 sides of the front flange 10 are different. Screw the front flange 10 into the spindle 6 follows:
For thin grinding discs (see figure 1):
◆ The collar on the front flange 10 faces upwards so that the thin grinding disc can be safely clamped.
text_image
10 ≤ 3,2 mmfig. 1
For thick grinding discs (see figure 2):

text_image
10 > 3,2 mmfig. 2
The collar on the front flange 10 faces downwards so that the front flange 16 can be safely attached to the spindle 6
♦ Locking the spindle ^6 .
♦ Tighten the front flange 10 in a clockwise direction using the two-hole spanner 12
Loosening the front flange:
♦ Lock the spindle ^6 .
- Undo the front flange in an anticlockwise direction using the two-hole spanner
Fitting the connector nipple
- Remove the plastic protective cap from the appliance's air inlet.
◆ Wrap the threads on the connector nippl ^2 with the teflon tape supplied.
♦ Screw the connector nippl② into the air inlet.
Operation
Operating a compressed air tool
NOTE
In order to achieve the full power available from your compressed air tool, always use compressed air hoses with an internal diameter of at least 9 mm. A lower internal diameter can considerably reduce the power.

CAUTION!
▶ Do not use a compressed air line that contains any water condensation.
The tool must be sufficiently supplied with pneumatic oil to ensure long service life. This can take place as follows:
- Use oiled compressed air by fitting a mist lubricator.
- Without a mist lubricator: add oil manually through the compressed air connection ① every day. Approx. 3-5 drops of pneumatic oil for every 15 operating minutes during continuous use.
▶ If the tool has been out of operation for several days, add around 5 drops of pneumatic oil manually through the compressed air connection ①.
▶ Allow the tool to run at idling speed for a short time.
▶ Always guide the machine using both hands.
▶ Switch on first, then apply the accessory tool to the workpiece.
▶ After switching off, only put the machine down once the motor has come to a standstill.
◆ 1.) Attach a suitable accessory tool.
2.) Adjust the operating pressure (measured at the air intake when the compressed air tool has been switched on). Please refer to the section entitled "Technical data" for the maximum permissible operating pressure
◆ 3.) Connect the compressed air tool to the compressed air supply.
4.) Switching on: Push the safety lock-off towards and press the ON/OFF switch 3
◆ 5.) Switching off: Release the ON/OFF switch ^3 .
Working procedures
Sanding:
- Press the machine against the workpiece moderately and move it backwards and forwards over the surface so that the workpiece surface does not become too hot.
Rough grinding:
◆ Work using an angle of incidence of between 30° and 40° for good working results.
NOTE
▶ Never use cutting discs for rough grinding.
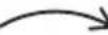
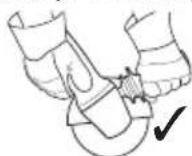
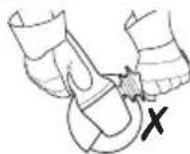
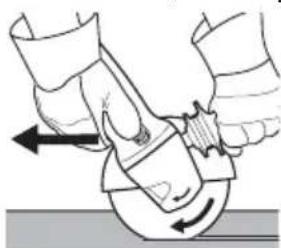
Abrasive cutting:
◆ Always work against abrasive cutting (see Figure 3). Otherwise there is a risk that the machine can jump out of the cut in an uncontrolled manner. Work using moderate forward speed appropriate to the material being processed. Do not tilt, do not press, do not oscillate.
natural_image
Illustration of a hand using a tool to lift a circular object, with arrows indicating motion (no text or symbols)Fig. 3
NOTE
▶ Never use rough grinding discs for cutting.
Maintenance and cleaning

NING! RISK OF INJURY!
Disconnect the appliance from the compressed air supply.

CAUTION!
▶ Any service or repair work over and above that described in this section may only be carried out by specialists.
- Maintain the compressor tool regularly to ensure safe operation.
◆ Check bolted connections for a tight fit, retighten if necessary.
- Clean the filter in the compressed air connection ① at least once a week.
We recommend fitting a pressure reducer with a water separator and an oiler in front of the compressed air tool.
If there is increased oil or air discharge, check the compressed air tool and have it serviced if necessary.
◆ Check the rotation speed regularly and after every use, and carry out a simple check of the vibration level.
♦ Regularly check the spindle⑥, threads and clamping devices for wear and tolerances for accommodating accessory tools.
Avoid contact with hazardous substances which have accumulated on the tool. Wear suitable personal safety equipment and remove any hazardous substances using suitable measures before servicing.

WARNING!
▶ Have your appliance repaired by the service centre or a qualified specialist and only using genuine replacement parts. This will ensure that the safety of the appliance is maintained.
Disposal

packaging consists of environmentally friendly material. It can be disposed of in the local recycling containers.
Do not dispose of the appliance in the normal domestic waste!
Your local community or municipal authorities can provide information on how to dispose of the worn-out appliance.
This appliance has a 3-year warranty valid from the date of purchase. If this product has any faults, you, the buyer, have certain statutory rights. Your statutory rights are not restricted in any way by the warranty described below.
Warranty conditions
The validity period of the warranty starts from the date of purchase. Please keep your original receipt in a safe place. This document will be required as proof of purchase.
If any material or production fault occurs within three years of the date of purchase of the product, we will either repair or replace the product for you at our discretion. This warranty service is dependent on you presenting the defective appliance and the proof of purchase (receipt) and a short written description of the fault and its time of occurrence.
If the defect is covered by the warranty, your product will either be repaired or replaced by us. The repair or replacement of a product does not signify the beginning of a new warranty period.
Warranty period and statutory claims for defects
The warranty period is not prolonged by repairs effected under the warranty. This also applies to replaced and repaired components. Any damage and defects present at the time of purchase must be reported immediately after unpacking. Repairs carried out after expiry of the warranty period shall be subject to a fee.
Scope of the warranty
This appliance has been manufactured in accordance with strict quality guidelines and inspected meticulously prior to delivery.
The warranty covers material faults or production faults. The warranty does not extend to product parts subject to normal wear and tear or fragile parts such as switches, batteries, baking moulds or parts made of glass.
The warranty does not apply if the product has been damaged, improperly used or improperly maintained. The directions in the operating instructions for the product regarding proper use of the product are to be strictly followed. Uses and actions that are discouraged in the operating instructions or which are warned against must be avoided.
This product is intended solely for private use and not for commercial purposes. The warranty shall be deemed void in cases of misuse or improper handling, use of force and modifications/repairs which have not been carried out by one of our authorised Service centres.
Warranty claim procedure
To ensure quick processing of your case, please observe the following instructions:
■ Please have the till receipt and the item number (e.g. IAN 12345) available as proof of purchase.
■ You will find the item number on the type plate, an engraving on the front page of the instructions (bottom left), or as a sticker on the rear or bottom of the appliance.
If functional or other defects occur, please contact the service department listed either by telephone or by e-mail.
■ You can return a defective product to us free of charge to the service address that will be provided to you. Ensure that you enclose the proof of purchase (till receipt) and information about what the defect is and when it occurred.
You can download these instructions along with many other manuals, product videos and software on www.lidl-service.com.
Service
GB Service Great Britain
Tel.: 0871 5000 720 (£ 0.10/Min.)
E-Mail: kompernass@lidl.co.uk
IE Service Ireland
Tel.: 1890 930 034
(0,08 EUR/Min., (peak))
(0,06 EUR/Min., (off peak))
E-Mail: kompernass@lidl.ie
IAN 285213
Importer
Please note that the following address is not the service address. Please use the service address provided in the operating instructions.
KOMPERNASS HANDELS GMBH
BURGSTRASSE 21
DE-44867 BOCHUM
GERMANY
www.kompernass.com
Translation of the original Conformity Declaration
We, KOMPERNASS HANDELS GMBH, documents officer: Mr. Semi Uguzlu, BURGSTR. 21, DE - 44867 BOCHUM, GERMANY, hereby declare that this product complies with the following standards, normative documents and EC directives:
Machinery Directive (2006/42/EC)
Applied harmonised standards:
EN ISO 11148-7: 2012
Type designation of machine:
Air angle grinder PDWS 125 A1
Year of manufacture: 01 - 2017
Serial number: IAN 285213
Bochum, 20.01.2017

text_image
Santy Forder CESemi Uguzlu
- Quality Manager -
The right to effect technical changes in the context of further development is reserved.
Table des matières
Introduction....30
text_image
Diagram showing two mechanical or electrical components with symbols and checkmark indicators, possibly indicating correct and incorrect states.natural_image
Illustration of a hand using a tool to adjust or install a mechanical component, with no visible text or symbols.Fig. 3
REMARQUE
KOMPERNASS HANDELS GMBH
BURGSTRASSE 21
DE-44867 BOCHUM
ALLEMAGNE
www.kompernass.com
Directive Machines (2006/42/CE)
text_image
Diagram showing two labeled cable or connector symbols with check and cross icons, likely indicating correct and incorrect states.natural_image
Illustration of hands using a tool to interact with a circular object, showing motion arrows (no text or symbols)Afb. 3
OPMERKING
KOMPERNASS HANDELS GMBH
BURGSTRASSE 21
DE-44867 BOCHUM
DUITSLAND
www.kompernass.com
text_image
Sofia Fynd CESemi Uguzlu
text_image
Diagram showing two mechanical or electrical components with labeled symbols and checkmark indicatorsnatural_image
Illustration of hands using a tool to interact with a circular object, showing motion arrows (no text or symbols)Obr. 3
UPOZORNĚNÍ
KOMPERNASS HANDELS GMBH
BURGSTRASSE 21
DE-44867 BOCHUM
NĚMECKO
www.kompernass.com
text_image
Diagram showing two mechanical or electrical components with checkmark and cross symbols indicating status or failure.natural_image
Illustration of hands using a tool to adjust or install a circular component, with no visible text or symbols.Fig. 3
INDICACIÓN
KOMPERNASS HANDELS GMBH
BURGSTRASSE 21
DE-44867 BOCHUM
ALEMANIA
www.kompernass.com
text_image
Diagram showing two labeled mechanical or electrical components with checkmark and cross symbols indicating status or failure.natural_image
Illustration of hands using a tool to adjust or install a circular component, with no visible text or symbols.Fig. 3
NOTA
KOMPERNASS HANDELS GMBH
BURGSTRASSE 21
DE-44867 BOCHUM
ALEMANHA
www.kompernass.com
text_image
Sofitzky CESemi Uguzlu
KOMPERNASS HANDELS GMBH
BURGSTRASSE 21
DE-44867 BOCHUM
GERMANY
www.kompernass.com
Stand der Informationen · Last Information Update · Version des informations
Stand van de informatie · Stav informací · Estado de las informaciones