
PBSG 55 A1 - Grinder PARKSIDE - Free user manual and instructions
Find the device manual for free PBSG 55 A1 PARKSIDE in PDF.


| Product Type | Drill Sharpener |
| Brand | Parkside |
| Model | PBSG 55 A1 |
| Power Supply | 230 V ~ 50 Hz |
| Power Consumption | 55 W |
| No-Load Speed | 1500 rpm |
| Drill Diameter Range | 3 - 10 mm |
| Sound Pressure Level | 75.30 dB(A) |
| Sound Power Level | 85.00 dB(A) |
| Protection Class | II (Double Insulated) |
| Sharpening Stone | Included, replaceable |
| Rotary Switch | Controls stone pressure (UP/DOWN) |
| ON/OFF Switch | Yes |
| Carrying Case | Included |
| Included Accessories | 16 titanium-coated HSS drills, 2 spare sharpening stones, manual |
| Proper Use | Sharpening steel drill bits (DIN 338, 340, 345, 1869, 1897 Type N) |
| Not Suitable For | Carbide drill bits |
| Maintenance | Clean with dry cloth; replace stone when worn |
| Safety Warning | Always unplug before cleaning; wear protective gear; risk of sparks |
| Warranty | 3 years |
| Service Contact (UK) | Tel: 0871 5000 720, email: kompernass@lidl.gb |
Frequently Asked Questions - PBSG 55 A1 PARKSIDE
User questions about PBSG 55 A1 PARKSIDE
0 question about this device. Answer the ones you know or ask your own.
Ask a new question about this device
Download the instructions for your Grinder in PDF format for free! Find your manual PBSG 55 A1 - PARKSIDE and take your electronic device back in hand. On this page are published all the documents necessary for the use of your device. PBSG 55 A1 by PARKSIDE.
USER MANUAL PBSG 55 A1 PARKSIDE
natural_image
Green electric drill press with red knob placed on wooden workbench, surrounded by metal drill bits and a tape measure (no text or symbols visible)GB
DRILL SHARPENER
Operation and Safety Notes
Translation of original operation manual
HU
FÚRÓÉLEZŐ GÉP
Before reading, unfold the page containing the illustrations and familiarise yourself with all functions of the device.
PL
GB Operation and Safety Notes Page 5
natural_image
Close-up of a wrench tool with a circular head and textured base, showing a mechanical component (no text or symbols visible)

natural_image
Close-up of a mechanical component with a coiled spring and labeled part '6' (no text or symbols beyond label)
natural_image
Group of metallic drill bit designs arranged in a diagonal row (no text or symbols visible)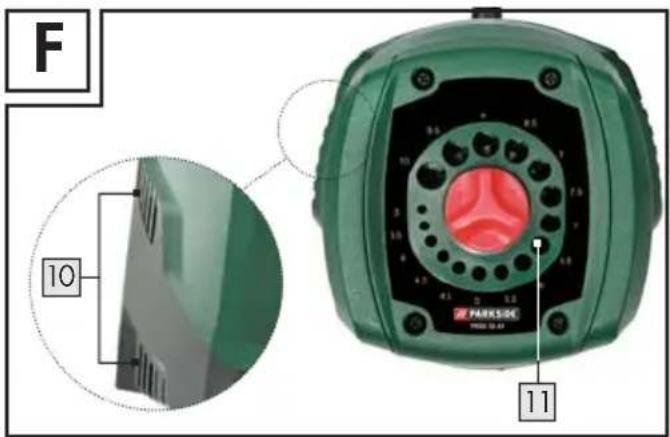
Introduction
Proper use....Page 6
Description of parts and features....Page 6
Scope of delivery....Page 6
Technical data......Page 6
General safety advice
Working safely....Page 7
Device-specific safety instructions for drill sharpeners ......Page 8
Original accessories / Attachments......Page 9
Use
Sharpening a drill....Page 9
Replacing the sharpening stone....Page 9
Maintenance and cleaning......Page 10
Service Page 10
Warranty Page 10
Disposal Page 11
Declaration of Conformity / Manufacturer......Page 11
| The following pictograms are used in these operating instructions / on the device: | |||
 | Read instruction manual! Risk of fire! |  | |
 | Observe caution and safety notes! |   | Wear hearing protection, dust protection mask, protective glasses and protective gloves. |
 | Caution - electric shock!Danger to life! |  | Risk of loss of life by electric shock from damaged mains lead or mains plug! |
 | Volt (AC) Risk of explosion! |  | |
 | Watts (effective power) |  | Keep children away from electrical power tools! |
 | Safety class II | Dispose packaging and appliance in an environmentally-friendly way! | |
Drill sharpener PBSG 55 A1
- Introduction

Please make sure you familiarise yourself fully with the way the device works before you use it for the first time and
that you understand how to handle electrical power tools correctly. To help you do this please read the accompanying operating instructions. Keep these instructions in a safe place. If you pass the device on to anyone else, please ensure that you also pass on all the documentation.
- Proper use
The device is designed to sharpen steel drill bits according to DIN 338, DIN 340, DIN 345, DIN 1869 and DIN 1897 (MODEL Type N). Carbide drill bits must not be milled with this device. Any other use or modification to the device shall be considered as improper use and could give rise to considerable dangers. The manufacturer will not accept liability for loss or damage arising from improper use. The device is not intended for commercial use.
● Description of parts and features
1 Rotary switch ("STONE" = Sharpening stone)
2 Sharpening stone cover
3 Sharpening stone cover screw
4 ON/OFF switch
5 Sharpening stone
6 Spring
7 Threaded connection
8 Metal washer
9 Sharpening stone holder
10 Ventilation slots
11 Drill guide
- Scope of delivery
1 drill sharpener PBSG 55 A1
1 carrying case
16 titanium-coated HSS drills (see Fig. E)
2 spare sharpening stones
1 set of operating instructions
- Technical data
Nominal voltage: 230 V \~ 50 Hz
Nominal output: 55 W
Nominal rotation speed: 1500 rpm
For drill bits of diameter: 3 - 10 mm
Protection class:
Noise data:
Refers to A-weighted sound level.
Sound pressure level: 75.30 dB (A)
Sound level: 85.00 dB (A)
Values determined in accordance with EN 61029.

General safety advice
■ CAUTION! In order to protect yourself from the danger of electric shock, injury or fire when using electrical power tools, please observe the following basic safety precautions. Read all these requirements before you use the electrical power tool, and keep the safety advice in a safe place.
- Working safely
- Keep your working area clean and tidy.
A disorderly working area can lead to accidents.
- Be aware of the effects of the environment.
- Do not leave electrical power tools out in the rain.
- Do not use electrical power tools in moist or wet surroundings.
■ Ensure that your working area is well lit.
Do not use electrical power tools in areas where there is risk of fire or explosion.
- Protect yourself from electric shock.
- Avoid touching earthed objects such as pipes, heating radiators, ovens or refrigerators with parts of your body.
- Keep other people at a safe distance.
Do not allow other people, in particular children, to touch the electrical power tool or the mains lead. Keep them away from your working area.
- Store currently unused electrical power tools in a safe place.
- When not being used electrical power tools should be stored in dry conditions in a high or enclosed place, out of reach of children.
- Do not overload your electrical power tool.
By keeping within the specified working range of the tool you will work more safely and achieve a better result.
- Use the right electrical power tool for the task.
- Do not use low-output devices for heavy tasks. - Do not use an electrical power tool for purposes for which it was not intended. For example, do not use a hand operated circular saw for trimming tree branches or cutting logs.
- Wear suitable clothing.
Do not wear loose-fitting clothing or jewellery. They could become caught on moving parts.
We recommend that you wear anti-slip footwear when working outdoors.
If you have long hair, wear a hair net.
- Use personal protective equipment.
- Wear protective glasses. - Wear a dust mask if your work generates dust.
- Attaching the vacuum dust extraction device.
■ Where there are connection points provided for vacuum dust extraction please ensure that the connections are made and used properly.
- Do not use the mains lead for purposes for which it was not intended.
Do not use the mains lead to pull the plug out of the mains socket. Protect the mains lead from heat, oil and sharp edges.
- Securely support the workpiece.
Use clamps or a vice to grip the workpiece firmly. This is much safer than holding it with your hand.
- Avoid placing your body in an unnatural position.
- Keep proper footing and balance at all times.
- Look after your tools carefully.
- Keep cutting tools sharp and clean. This way you will work more safely and achieve better results.
■ Follow the advice on tool lubrication and consumables replacement.
- Check the condition of the mains lead on your electrical power tool regularly and have any damage repaired by a competent specialist.
- Check the condition of extension leads regularly and replace them if they are damaged.
- Keep handles and hand grips clean, dry and free of oil and grease.
- Pull the mains plug out of the mains socket.
Do this if the electrical power tool is not being used, before carrying out maintenance tasks on the electrical power tool and whenever you are changing inserted tools, e.g. saw blades, drills or router bits.
- Make sure that no spanners, keys etc. are left attached.
- Check before switching on that all spanners, keys and setting tools have been removed.
- Avoid unintentionally starting up the device.
- Check that the switch is set to OFF on the device when the mains plug is inserted into the mains socket.
- Using an extension lead for working outdoors.
When working outside, always use an approved and appropriately labelled extension lead.
- Remain alert.
- Watch what you are doing. Proceed with caution. Do not use electrical power tools if you cannot concentrate.
- Check the electrical power tool for damage.
Before the electrical power tool is used, carefully check the safety equipment and any slightly damaged parts to see that they are still working properly.
- Check that all moving parts on the tool are working properly, can move freely and are not damaged. All parts must be correctly attached and fulfil all the requirements necessary to allow the electrical power tool to operate properly.
■ Damaged safety equipment and components must be properly repaired or replaced at a competent electrical equipment repair centre
unless otherwise indicated in the operating instructions.
■ Damaged switches must be replaced at a Customer Service Centre.
■ Never use an electrical power tool that cannot be switched on and off properly.
- CAUTION!
The use of inserted tools and accessories other than those recommended by the manufacturer could lead to you being injured.
- Have your electrical power tool repaired at an electrical equipment repair specialist.
This electrical power tool complies with the relevant safety regulations. Repairs may only be carried out by a specialist electrical repair centre using original spare parts, otherwise injury could occur to the user.

Device-specific safety instructions for drill sharpeners
■ Make sure that the device is switched off before inserting the mains plug into the socket.
■ Always pull the mains plug out before carry out cleaning or maintenance work. This is to prevent the device starting up by accident.
The ventilation openings of the motor unit must always be kept clear.
Otherwise there is a risk of the device overheating.
When carrying out work on the device as well as transporting or storing it, move the ON / OFF switch 4 to the "0" position (off) in order to prevent it switching itself on by accident.

FIRE HAZARD DUE TO FLYNG
SPARKS! Grinding metal will cause sparks to fly. That is why you
should always make sure that no-one is at risk from them and that no combustible materials are located in the proximity of the area of work.

WARNING!
RISK OF INJURY! Use the
ON/OFF switch in the event of
4 to switch the grinder off power failure or when pulling
out the mains plug. This prevents the grinder restarting by accident, which could cause injury to you.
■ Never operate the grinder if the power cable or mains plug is damaged.
Grinding stones must be carefully stored and handled according to the manufacturer's instructions.
■ Make sure that the grinding tools are appropriate in line with the instructions of the manufacturer.
- Check the grinding stone before using it; do not use any broken, cracked or otherwise damaged goods.
■ Make sure that a grinding tool is correctly fitted and fastened before using it.
Place the grinder in a safe place and allow it to run idly for 30 seconds. Stop it immediately if considerable oscillations occur or if defects are observed. If this occurs, check the machine to find out the cause.
● Original accessories/Attachments
■ Use only the accessories and attachments detailed in the operating instructions.
The use of inserted tools or accessories other than those recommended in the operating instructions could lead to you suffering an injury.
Use
● Sharpening a drill
NOTE: Badly damaged drills should first be coarsely sharpened on a sharpening block.
☐ Fully lower the sharpening stone. To do this turn the rotary switch 1 in the DOWN ▼direction as far as it will go.
☐ Insert the drill into the smallest suitable drill guide 11 on the drill sharpener. The exact size (∅) of each drill guide 11 is shown by the adjacent lettering (3 to 10).
☐ Press the ON / OFF switch into position "I" to switch on the device.
Turn the rotary switch in the UP direction until you hear a grinding noise.
NOTE: The rotary switch 1 controls the position of the sharpening stone in the sharpening head housing and therefore the pressure of the sharpening stone against the drill. The further you turn the rotary switch 1 in the UP direction, the greater the pressure. Ensure that you do not turn the sharpening stone too far up. Otherwise the sharpening stone could strike the housing.
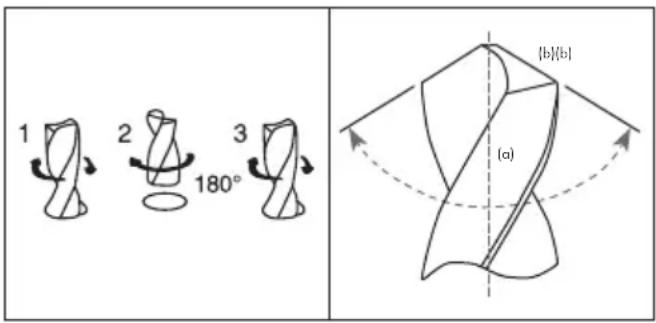
☐ Turn the drill under slight pressure loosely and quickly to and fro between the left and right stops about 10 times (with small drills about 5 times).
☐ Pull the drill out, turn it through 180^ (horizontally) and insert it again until it meets the sharpening stone.
☐ If necessary repeat whole process until both cutting edges of the drill are sharp. Control the grinding operation so that the angle between the main and transverse cutting edges for a standard drill is 130^ . Both cutting edges (b) must have the same angle to the drill axis (a) and be the same length so that the drill runs concentrically (see following figures).
☐ Press the ON / OFF switch into position "0" to switch off the device.
● Replacing the sharpening stone
WARNING! RISK OF INJURY! Before you carry out any work on the device, always pull the mains plug out of the mains socket. Replace the sharpening stone if it is worn out or damaged (deteriorating, irregular sharpening performance,
broken stone). A Phillips screwdriver is required for this step.
☐ Screw the four screw ^3 out of the sharpening head cover ^2 and remove the cover ^2 , refer to Fig. A.
Take out the sharpening stone.
☐ Clamp the sharpening stone 5 in a vice. Release the threaded connection 7, which holds the sharpening stone 5 on to the sharpening stone holder 9, using a 20 mm open spanner, see Fig. B.
NOTE! LEFT-HAND THREAD - TO RELEASE TURN IT CLOCKWISE!
Remove the metal washer 8.
Mount the new sharpening stone, with its flattened edge facing downwards, on to the sharpening holder 9 and reinsert the metal washer 8.
☐ Clamp the sharpening stone again in a vice and tighten the threaded connection using a 20 mm open spanner.
NOTE! LEFT-HAND THREAD - TO TIGHTEN TURN IT ANTICLOCKWISE!
☐ Ensure that the spring is inserted into the device in accordance with Fig. D and insert the sharpening stone back into the device. Turn the sharpening stone until it goes precisely back into place, as shown in Fig. A, otherwise the sharpening stone cover 2 cannot be fitted.
Place the sharpening stone cover back in position and screw it in place with the four screws 3.
● Maintenance and cleaning
Apart from replacing the sharpening stone, the drill sharpener is maintenance-free.
☐ Regularly clean the device straight after using it.
☐ To clean the casing, use a dry cloth; on no account should you use any petrol, solvents or cleaning agents.
WARNING! Never open the devices. Any repairs or replacements should only be carried out by the service centre or an electrician.
- Service
WARNING! Have your device repaired at the service centre or by qualified specialist personnel using original manufacturer parts only. This will ensure that your device remains safe to use.
WARNING! If the plug or lead needs to be replaced, always have the replacement carried out by the manufacturer or its service centre. This will ensure that your device remains safe to use.
- Warranty
The warranty for this appliance is for 3 years from the date of purchase. The appliance has been manufactured with care and meticulously examined before delivery. Please retain your receipt as proof of purchase. In the event of a warranty claim, please make contact by telephone with our Service Department. Only in this way can a post-free despatch for your goods be assured.
The warranty covers only claims for material and manufacturing defects, but not for transport damage, for wearing parts or for damage to fragile components, e.g. buttons or batteries. This product is for private use only and is not intended for commercial use.
The warranty is void in the case of abusive and improper handling, use of force and internal tampering not carried out by our authorized service branch. Your statutory rights are not restricted in any way by this warranty.
The warranty period will not be extended by repairs made unter warranty. This applies also to replaced and repaired parts. Any damage and defects extant on purchase must be reported immediately after unpacking the appliance, at the latest, two days after the purchase date. Repairs made after the expiration of the warranty period are subject to payment.
GB
Service Great Britain
Tel.: 0871 5000 720
(0,10 GBP / Min.)
e-mail: kompernass@lidl.gb
IAN 61094
- Disposal

The packaging is wholly composed of environmentally-friendly materials that can be disposed of at a local recycling centre.

Do not dispose of electrical power tools with the household rubbish!
In accordance with European Directive 2002 / 96 / € (covering waste electrical and electronic equipment) and its transposition into national legislation, worn out electrical power tools must be collected separately and taken for environmentally compatible recycling.
Contact your local refuse disposal authority for more details of how to dispose of your worn out electrical devices.
● Declaration of Conformity / Manufacturer CE
We, Kompernaß GmbH, the person responsible for documents: Mr Felix Becker, Burgstr. 21, D-44867 Bochum, Germany, hereby declare that this product complies with the following standards, normative documents and EU directives:
Machinery Directive (2006/42/EC)
EU Low Voltage Directive (2006/95/EC)
Electromagnetic Compatibility (2004/108/EC)
Applicable harmonized standards
EN 61029-1:2009
EN ISO 12100-2/A1:2009
EN 55014-1:2006
EN 55014-2/A2:2008
EN 61000-3-2:2006
EN 61000-3-3:2008
Type / Device description:
Drill sharpener PBSG 55 A1
Date of manufacture (DOM): 03 - 2011 Serial number: IAN 61094
Bochum, 31.03.2011
Hans Kompernaß
- Managing Director -
We reserve the right to make technical modifications in the course of further development.
Wstep
Date of manufacture (DOM): 03 - 2011
© by ORFGEN Marketing


- DRILL SHARPENER
- FÚRÓÉLEZŐ GÉP
- Introduction
- General safety advice
- Use
- Drill sharpener PBSG 55 A1
- - Introduction
- - Proper use
- ● Description of parts and features
- - Scope of delivery
- - Technical data
- - Working safely
- Device-specific safety instructions for drill sharpeners
- FIRE HAZARD DUE TO FLYNG
- WARNING!
- NOTE! LEFT-HAND THREAD - TO RELEASE TURN IT CLOCKWISE!
- NOTE! LEFT-HAND THREAD - TO TIGHTEN TURN IT ANTICLOCKWISE!
- ● Maintenance and cleaning
- - Service
- - Warranty
- - Disposal
- Do not dispose of electrical power tools with the household rubbish!
- ● Declaration of Conformity / Manufacturer CE
- Machinery Directive (2006/42/EC)
- EU Low Voltage Directive (2006/95/EC)
- Electromagnetic Compatibility (2004/108/EC)
- Applicable harmonized standards
- Type / Device description:
- Date of manufacture (DOM): 03 - 2011 Serial number: IAN 61094
- Wstep
- Date of manufacture (DOM): 03 - 2011
Brand : PARKSIDE
Model : PBSG 55 A1
Category : Grinder