
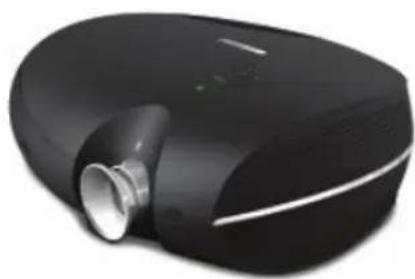
PD4010 - Projector Planar - Free user manual and instructions
Find the device manual for free PD4010 Planar in PDF.

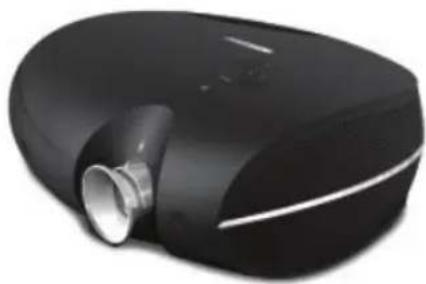
| Product type | DLP projector |
| Brand | Planar |
| Model | PD4010 |
| Display technology | DLP |
| Connectivity | HDMI, DVI-D (via adapter), Component, PC (VGA), Video/S-Video |
| Focus | Manual (focus ring) |
| Zoom | Yes (zoom ring) |
| Keystone correction | Yes, via remote control or projector |
| Remote control included | Yes, with AAA batteries |
| Included accessories | Remote control, DVI-HDMI adapter, power cable, component video cable, CD-ROM, user guide |
| Lamp type | Mercury lamp (replaceable) |
| Certifications | FCC Class B, UL, c-UL, CE, TUV-GS, CCC |
| Recycling | WEEE compliant, mandatory lamp recycling |
| Maintenance | Lens cleaning, lamp replacement |
| Safety | Compliance with FCC, CE regulations |
| Menu languages | French, English, German, Spanish, Italian, etc. |
| Compatibility | PC, Mac, DVD players, game consoles |
| Installation | Tabletop, ceiling mount (rear projection possible) |
| Remote control batteries | AAA alkaline (included) |
| Technical support | PlanarSupport@planar.com, +1 (503) 748-5799 |
Frequently Asked Questions - PD4010 Planar
User questions about PD4010 Planar
0 question about this device. Answer the ones you know or ask your own.
Ask a new question about this device
Download the instructions for your Projector in PDF format for free! Find your manual PD4010 - Planar and take your electronic device back in hand. On this page are published all the documents necessary for the use of your device. PD4010 by Planar.
USER MANUAL PD4010 Planar
Planar Systems, Inc.
Corporate Headquarters
1195 NW Compton Drive
Beaverton, OR 97006-1992
Planar Customer Support
Telephone: US: 1-866-PLANAR1 (866) 752-6271
Outside US: (503) 748-5799
E-mail: PlanarSupport@planar.com
Online Technical Library: http://www.planar.com/support
Hours: M-F, 8am - 8pm ET, 12pm - 12am GMT
Deutsch
Planar Systems, Inc.
Planar Systems, Inc.
Sede corporativo
1195 NW Compton Drive
Beaverton, OR 97006-1992, USA
Apoyo de cliente
TelEfo:EEUU:1-866-PLANAR1(866)752-6271
Outside US: (503) 748-5799
E-mail: PlanarSupport@planar.com
Biblioteca Técnica Online: http://www.planar.com/support
Horas: M-F, 8am - 8pm ET, 12pm - 12am GMT
简体中文
Planar Systems, Inc.
Cooperar Quartel-general
1195 NW Compton Drive
Beaverton, OR 97006-1992, USA
Planar Systems, Inc.
Maison mère
1195 NW Compton Drive
Beaverton, OR 97006-1992, USA
Support technique Planar
Telephone: en Anglais: 1-866-PLANAR1 (866) 752-6271
Planar Systems, Inc.
Sede
1195 NW Compton Drive
Beaverton, OR 97006-1992, USA
Planar Systems, Inc.
Huvudkontor
1195 NW Compton Drive
Beaverton, OR 97006-1992, USA
Planar Kundsupport
Telefon: US: 1-866-PLANAR1 (866) 752-6271
Internationell: +1 (503) 748-5799
E-post: PlanarSupport@planar.com
On-line tekniiska bibliotek: http://www.planar.com/support
Öppet: Man-fre 8.00-20.00 ET, 12.00-24.00 GMT
繁體中文
Planar Systems, Inc.
KopnopatNBbI 1Ta6
1195 NW Compton Drive, USA
Beaverton, OR 97006-1992
Planar PndepkKa KneHtA
Tenepon: CWA: 1-866-PLANAR1 (866) 752-6271
Bnytpn CIUA: +1 (503) 748-5799
E-mail: PlanarSupport@planar.com
Ohnaih Texnupecka EboMoteka: http://www.planar.com/support
Yacbl: M-F, 8am - 8pm ET, 12pm - 12am GMT
Copyright
This publication, including all photographs, illustrations and software, is protected under international copyright laws, with all rights reserved. Neither this manual, nor any of the material contained herein, may be reproduced without written consent of the author.
Copyright October, 2006
About this User's Guide
This User's Guide is intended for end users and describes how to quickly install and operate the DLP projector. For detailed information, refer to the User's Guide on the CD or on the manufacturer's website.
Trademark Recognition
Kensington is a U.S. registered trademark of ACCO Brand Corporation with issued registrations and pending applications in other countries throughout the world.
All other product names used in this guide are the properties of their respective owners and are acknowledged.
Important Recycle Instructions

Lamp(s) inside this product contain mercury. This product may contain other electronic waste that can be hazardous if not disposed of properly. Recycle or dispose in accordance with local, state, or federal Laws.
For more information, contact the Electronic Industries Alliance at www.EIAE.ORG.
For lamp specific disposal information check www.LAMPRECYCLE.ORG.
Disposal of old Electrical & Electronic Equipment (Applicable throughout the European Union and other European countries with separate collection programs).

This symbol found on your product or on its packaging, indicates that this product should not be treated as household waste when you wish to dispose of it. Instead, it should be handed over to an applicable collection point for the recycling of electrical and electronic equipment. By ensuring this product is disposed of correctly, you will help prevent potential negative consequences to the environment and human health, which could otherwise be caused by inappropriate disposal of this product. The recycling of materials will help to conserve natural resources. This symbol is only valid in the European Union. If you wish to discard this product, please contact your local authorities or dealer and ask for the correct method of disposal.
RegulatoryWarnings
Before installing and using the projector, read the regulatory notices in the "Regulatory Compliance" section on page 45 of the User's Manual.
Register Your Planar Product Today
Thank you for choosing Planar. To assure you receive all the benefits of your Planar product and services, register your Planar product today. Visit our website: http://www.planar.com/support/productregistration.html
Cables, Replacement Lamps and Accessories
To find cables, replacement lamps and accessories for your Planar projector, LCD monitor, touchscreen, or other Planar products, visit our online store: http://wwwPLANarOnlone.com or fi nd other stores that stock Planar products athttp://www.planar.com/howtobuy.
PACKING CHECKLIST
Carefully unpack the projector and check that the following items are included.
DLP Projector
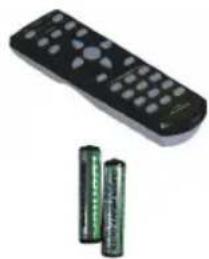
Remote Control (with two AAA batteries)

DVI to HDMI Adaptor (PD4010 only)

Power Cord (By country)
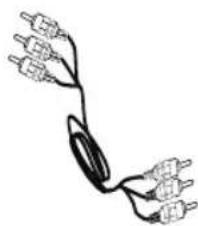
Component Video Cable
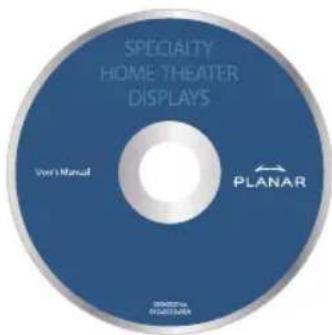
CD-ROM (This User's Manual)
User's Guide
Contact your dealer immediately if any items are missing, appear damaged, or if the unit does not work.
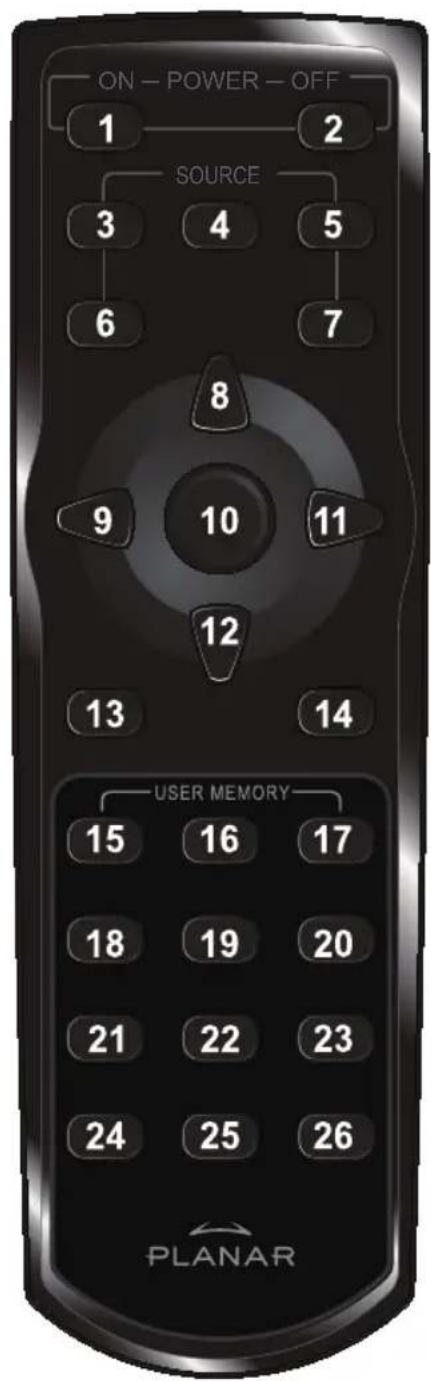
REMOTE CONTROL FUNCTIONS
| ITEM LABEL DESCRIPTION | |
| 1 Power On Turns | projector power on |
| 2 Power Off Turns | projector power off |
| 3 Source 1 User | confi gurable(Default: HDMI) |
| 4 Source 2 User | confi gurable(Default: Component) |
| 5 Source 3 User | confi gurable(Default: DVI-D) |
| 6 Source 4 User | confi gurable(Default: PC) |
| 7 Source 5 User | confi gurable(Default: Video) |
| 8 Up cursor | Navigates and changes settings in the OSD |
| 9 Left cursor | |
| 10 Enter Changes | settings in the OSD |
| 11 Right cursor | Navigates and changes settings in the OSD |
| 12 Down cursor | |
| 13 Exit Exits OSD | menus or menu selection fi elds |
| 14 Menu Opens the OSD | |
| 15 Hot Key 1 User memory setting 1 | |
| 16 Hot Key 2 User memory setting 2 | |
| 17 Hot Key 3 User memory setting 3 | |
| 18 Contrast Adjusts screen contrast | |
| 19 Brightness Adjusts screen brightness | |
| 20 Aspect ratio | Toggles aspect ratio: 16:9 → Letterbox → 4:3 → Native |
| 21 Gamma Toggles gamma: Film → Video → Cinema → PC → Photo | |
| 22 Overscan | Toggles overscan: Off → Crop → Zoom |
| 23 Keystone Adjusts Keystone | |
| 24 Auto Automatically synchronizes display settings in RGB mode | |
| 25 Blank Makes the screen blank | |
| 26 LED Turns back LED light on and off | |
INSERTING THE REMOTE CONTROL BATTERIES
- Remove the battery compartment cover by sliding the cover in the direction of the arrow.
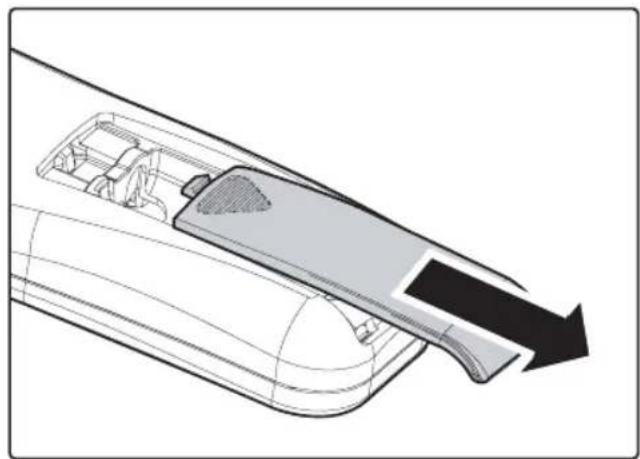
- Insert the supplied batteries taking note of the polarity (+/-) as shown here.

- Replace the cover.
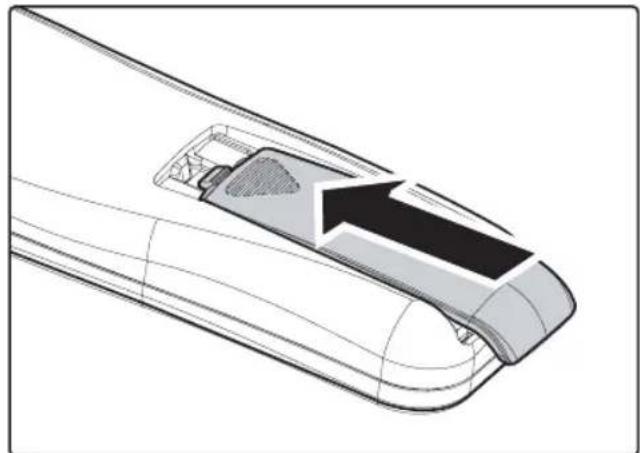

- Only use AAA alkaline batteries.
- Dispos of used batteries according to local ordinance regulations.
- Remove the batteries when not using the projector for prolonged periods.
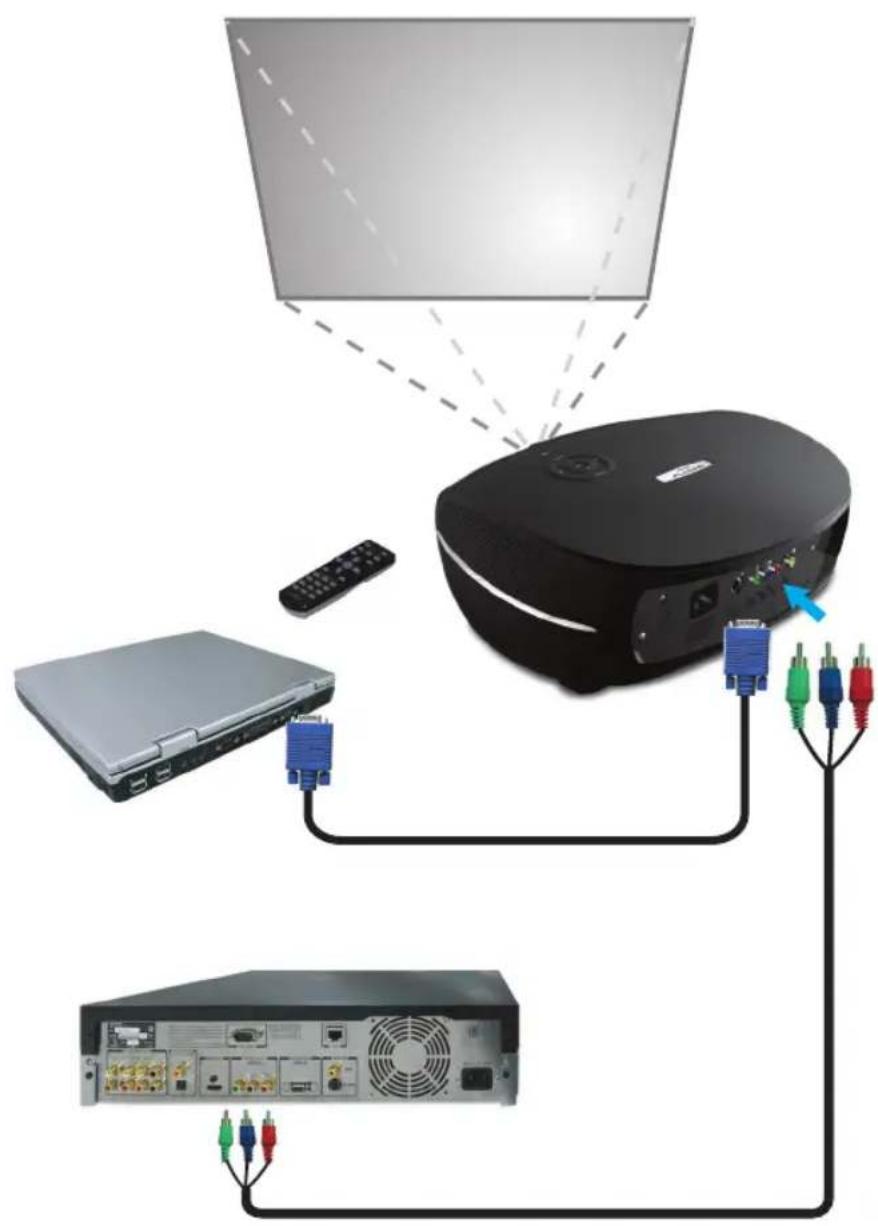
CONNECTING INPUT DEVICES
A PC or notebook computer as well as video devices can be connected to the projector at the same time. Video devices include DVD, VCD, and VHS players, as well as movie camcorders, digital still cameras and high definition sources. Check the User's Manual of the connecting device to confirm it has the appropriate output connector.
STARTING AND SHUTTING DOWN THE PROJECTOR
- Remove the lens cover.
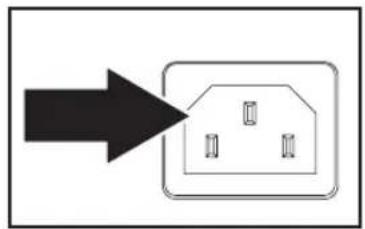
- Connect the power cord to the projector. Connect the other end to a wall outlet.
- Press the Power button. The Power LED on the projector turns on. Turn on the connected devices.
-
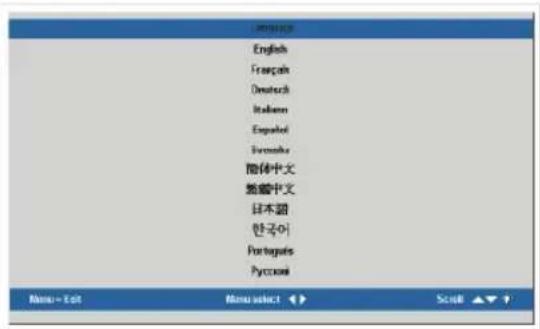
The language selection screen appears (Initial setup only). Select the desired language.
-
Press the cursor button until Language is highlighted.
-
Press the cursor or Menu button to confirm the language, and close the OSD.
-
If more than one input device is connected, press the source bottom to search.

- Press the Power button to turn off the projector. The Powering Down screen appears.
Note: Pressing the Power button again within five (5) seconds cancels powering down the projector.
- When the Power LED stops flashing, the projector goes on standby mode.


WARNING
Do not unplug the power cord until the Ready LED stops flashing, indicating the projector has cooled down.
ADJUSTING THE FOCUS AND ZOOM
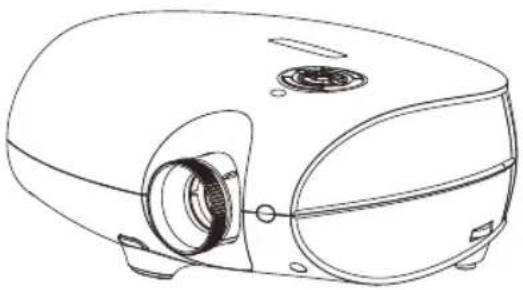
- Locate the image zoom and focus adjustment rings on the projector.

- Use the image zoom control to resize the projected image and screen size.

- Rotate the image focus control to sharpen the projected image.

TROUBLESHOOTING
These guidelines provide tips to deal with problems you may encounter while using the projector. If the problem remains unsolved, contact your dealer for assistance.
Often after time spent troubleshooting, the problem is traced to something as simple as a loose connection. Check the following before proceeding to the problem-specific solutions.
- Use some other electrical device to confirm that the electrical outlet is working.
- Ensure the projector is turned on.
- Ensure all connections are securely attached.
- Ensure the attached device is turned on.
- Ensure a connected PC is not in suspend mode.
- Ensure a connected notebook computer is config gured for an external display. (This is usually done by pressing an Fn-key combination on the notebook.)
Common Problems and Solutions
Image Problems
Problem: No image appears on the screen
- Verify the settings on your notebook or desktop PC.
- Turn off all equipment and power up again in the correct order.
Problem: The image is blurred
- Adjust the Focus on the projector.
- Press the Auto button on the remote control or projector.
- Ensure the projector-to-screen distance is within the 10-meter (33-feet) specified range.
- Check that the projector lens is clean.
Problem: The image is wider at the top or bottom (trapezoid effect)
- Position the projector so it is as perpendicular to the screen as possible.
- Use the Keystone button on the remote control or projector to correct the problem.
Problem: The image is reversed or upside down
Check the Projection setting on the Utility menu of the OSD.
Problem: The image is streaked
- Set the Frequency and Tracking settings on the Utility menu of the OSD to the default settings.
- To ensure the problem is not caused by a connected PC's video card, connect to another computer.
Problem: The image is fl at with no contrast
Adjust the Contrast setting on the Image menu of the OSD.
Problem: The color of the projected image does not match the source image.
Adjust the Color Temperature and Gamma settings on the Image menu of the OSD.
Lamp Problems
Problem: There is no light from the projector
- Check that the power cable is securely connected.
- Ensure the power source is good by testing with another electrical device.
- Restart the projector in the correct order and check that the Power LED is green.
- If you have replaced the lamp recently, try resetting the lamp connections.
- Replace the lamp module.
- Put the old lamp back in the projector and have the projector serviced.
Problem: The lamp goes off
- Power surges can cause the lamp to turn off. Press the power button twice to turn off the projector. When the Ready LED is on, press the power button.
- Replace the lamp module.
- Put the old lamp back in the projector and have the projector serviced.
Remote Control Problems
Problem: The projector does not respond to the remote control
- Direct the remote control towards remote sensor on the projector.
- Ensure the path between remote and sensor is not obstructed.
- Turn off any fluorescent lights in the room.
- Check the battery polarity.
- Replace the batteries.
- Turn off other Infrared-enabled devices in the vicinity.
- Have the remote control serviced.
REGULATORY COMPLIANCE
FCC Warning
This equipment has been tested and found to comply with the limits for a Class B digital device pursuant to Part 15 of the FCC Rules. These limits are designed to provide reasonable protection against harmful interference when the equipment is operated in a commercial environment.
This equipment generates, uses, and can radiate radio frequency energy and, if not installed and used in accordance with the instruction manual, may cause harmful interference to radio communications. Operation of this equipment in a residential area is likely to cause harmful interference in which case the user will be required to correct the interference at his own expense.
Changes or modifications not expressly approved by the parties responsible for compliance could void the user's authority to operate the equipment.
Canada
This class B digital apparatus complies with Canadian ICES-003.
Safety Certifications
FCC Class B, UL, c-UL, CE, TUV-GS, CCC, PCT, MIC/EK
EN 55022 Warning
This is a Class B product. In a domestic environment, it may cause radio interference, in which case the user may be required to take adequate measures. The typical use is in a conference room, meeting room, or auditorium.
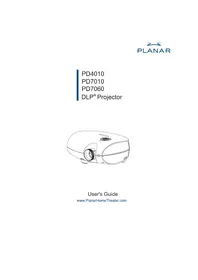
PLANAR
PD4010
PD7010
PD7060
DLP® Projecteur

Guide d'Utilisation
wwwPLANarHomeTheater.com
Copyright October, 2006
- Rotate the image fokus control to sharpen the projected image.

FEHLERBSEITIGUNG
Safety Certifications
FCC Class B, UL, c-UL, CE, TUV-GS, CCC, PCT, MIC/EK
EN 55022 Warning
Disposal of old Electrical & Electronic Equipment (Applicable throughout the European Union and other European countries with separate collection programs).

Spesso(after)do not know what to do.
FCC Class B, UL, c-UL, CE, TUV-GS, CCC, PCT, MIC/EK
EN 55022 Avvertenze
http://www.planar.com/support/productregistration.html
FCC Class B, UL, c-UL, CE, TUV-GS, CCC, PCT, MIC/EK
Aviso EN 55022
Planar Systems, Inc.
Sede corporativo
1195 NW Compton Drive
Beaverton, OR 97006-1992, USA
Apoyo de cliente
Telefono:
EEUU:1-866-PLANAR1(866)752-6271
Outside US: (503) 748-5799
E-mail: PlanarSupport@planar.com
Biblioteca Técnica Online: http://www.planar.com/support
Horas: M-F, 8am - 8pm ET, 12pm - 12am GMT
PLANAR
PD4010
PD7010
PD7060
DLP® Projektor
Anvandarhandbok www.PlanarHomeTheater.com
http://www.planar.com/support/productregistration.html
FCC Class B, UL, c-UL, CE, TUV-GS, CCC, PCT, MIC/EK
EN 55022 Varning
http://www.planar.com/support/productregistration.html
连接线、更换用灯泡与配件
FCC Class B, UL, c-UL, CE, TUV-GS, CCC, PCT, MIC/EK
EN55022 警告
FCC Class B, UL, c-UL, CE, TUV-GS, CCC, PCT, MIC/EK
EN 55022 聲明
FCC Class B, UL, c-UL, CE, TUV-GS, CCC, PCT, MIC/EK
EN55022警告
賊藥藻對藥藥藥藥藥藥藥藥藥藥藥藥藥藥藥藥藥藥藥藥藥藥藥藥藥藥藥藥藥藥藥藥藥藥藥藥藥藥藥藥藥藥藥藥藥藥藥藥藥藥藥藥藥藥藥藥藥藥藥藥藥藥藥藥藥藥藥藥藥藥藥藥藥藥藥藥藥藥藥藥藥藥藥藥藥藥藥藥藥藥藥藥藥藻藻藻藻藻藻藻藻藻藻藻藻藻藻藻藻藻藻藻藻藻藻藻藻藻藻藻藻藻藻藻藻藻藻藻藻藻藻藻藻藻藻藻藻藻藻藻藻藻藻藻藻藻藻藻藻藻藻藻藻藻藻藻藻藻藻藻藻藻藻藻藻藻藻藻藻
李杰 程宝明 任机生学联会
等是相承的。
WWW.LAMPRECYCLE.ORG 谷龍頭標名

OraeJnEiHnEeHnEeHnEeHnEeHnEeHnEeHnEeHnEeHnEeHnEeHnEeHnEeHnEeHnEeHnEeHnEeHnEeHnEeHnEeHnEeHnEeHnEeHnEeHnEeHnEeHnEaeHnEaeHnEaeHnEaeHnEaeHnEaeHnEaeHnEaeHnEaeHnEaeHnEaeHnEaeHnEaeHnEaeHnEaeHnEaeHnEaeHnEaeHnEaeHnEaeHnEaeHnEaeHnEaeHnEaeHnEaeHnEee
賊音藻自藥對在云贈藻記以皂棘藻默怎國造桑樂之,則者藻忘藻藥記,皆是哉音韵,而安國達子者呂日。如藻士,則者,則者,則者,則者,則者,則者,則者,則者,則者,則者,則者,則者,則者,則者,則者,則者,則者,則者,則者,則者,則者,則者,則者,則者,則者,則者,則者,則者,則者,則者,則者,則者,則者,則者,則者,則者,則者,則者,則者,則者,則者,則者,則者,則者,則者,則者,則者,則者,則者,則者,則者,則者,則者,則者,則者,則者,則者,則者,則者,
兹全权委托
http://www.planar.com/support/productregistration.html
Kaii
iJtJtJtJtJtJtJtJtJtJtJtJtJtJtJtJtJtJtJtJtJtJtJtJtJtJtJtJtJtJtJtJtJtJtJtJtJtJtJtJtJtJtJtJtJtJtJtJtJtJtJ t J t J t J t J t J t J t J t J t J t J t J t J t J t J t J t J t J t J t J t J t J t J t J t J t J t J t J t J t J t J t J t J t J t J t J t J t J t J t J t J t J t J t J t J t J t J t J t J t J t J t
FCC Class B, UL, c-UL, CE, TUV-GS, CCC, PCT, MIC/EK
EN 55022 程序
FCC Class B, UL, c-UL, CE, TUV-GS, CCC, PCT, MIC/EK
Copyright OkTЯбpb, 2006
O CnpaBoHnke PoiIb3oBaTeJIa
CnpabOHHK POnb3OBaTeJI npEHa3HaueH IJI KOneHbIX NOpb3OBaTeJI N OINcBIAET, KaK 6bICTpoYCTAHOBHTb UynpABTb IPOEKTOPOM DLP. IJI NOIpObHOINHOPMaUIN, ObaPATNTecb K CnpabOHHK POnb3OBaTeJI Ha KOMNaKT-DnCKe INN HA Be6CaIte N3ROTOBUTeJI.
Toprobamapka
Kensington - 3apernctpnpobHna ToproBa Mapka CUSA Kopnpaun Mapkn ACCO c BblnyeHHo peHcTpaUnei HaBnraUoUmncs 3aBHeHnA Mn B dpynx cTpaHax BO BCEM mpe.
Bce npyne Ha3BaHnI npOyKTA, nCIOJIb3yEmble B 3TOM pyKOBOJCTBE - CBOIcTBa INx COOTBeTCTByUOxN X BlaJeNbCeB I npn3HaHbl.
BaxnHa IHCtpyKzna NOBtophoro McnoIb3ObaHra:

JaMaNa(bI) B 3TOM npOdyKTe COpejXHT pTyTB. 3TOT npOdyKT MoXeT COepejXaTb DpyrHe 3JIeKTPoHHne OTXoDbI, KOTOpbIe MOryT 6bITb ONaCHbI ecHn He n36abNHeHHbI dONJxHbIM o6pa3Om. IpepeaBoTaIte HnI paCpNoIOXKeT B COOTBcTCTBnC MeCThBIMN, rOcydApCTBeHHbIMN, HnI fepaJIbHbIMN 3a KOHOHaMn. 3a DOOnHHTeNBHOH INΦopMaUeN, CBJXtEcB c 3JIeKTPoHHbIM CoO3OM OtpacNe IpnMbIuHHeHocTn WWW.EIAE.ORG.
http://www.planar.com/support/productregistration.html
KABEJI, JAMNBI 3AMEHBI IN PUNHAJLEXHOCTU
Carefully unpack the projector and check that the following items are included.
DLP Ppoektor


NylbT YnpaBneHnA
(C DByM AAA 3JemeHTaM NITaHna)

DVI B HDMI Перековник (PD4010)


UHyp nHTaHn (CTpaHo)
CD-ROM (pykoBoDCTBO noIb3OBATeJIa)

PykoBoDCTBO Nolb3ObaTeJia
CbXnTeCb C BaIIM DnIepOM HEmeIeHHO, ecN KaKne-H6yNb 3JemeHTbI OTCyTCTByOT, Kaxytcra NOBpeJdeHHbIMN, IIN He pa6oTaIOT.
COOTBETCTBNE CTAHДAPTAM
FCC PpeDynpexKdHne
3To o6OpudOBaHHe 6bIIO npOBepeHO I KaK haoDnIN BblONHraIO npedeJIb
IJa KnaCCa B uOcPpOBe yCTpoiCtBO B COOTBcTbN C YAcTbIO 15 PpaBNI
FeepaJIbHO KOMnCCnn CB3N. 3TN npdeJIb pa3pa6oTaHbI, UTO6bl
ObecneHTb pa3ymHyIO 3aUHTy IpOTNB BpeDHoro BMeWateJIbCTBa, KOrDa
6OpudOBaHHeM ynpabJrOT B KOMMepeCKo OKpyKaIoUeI cpeDe.
3TO o6OpUdoBaHne npOn3BOoNT, nCNoIb3yeT, n MoXe Tn3JnyuHTb 3HeprHIO paAnOuaCTOTbI N, ecNI He yCTaHOBNeHHbI IN cNOJIb3YeMbIB B COOTBeTCTBn C IHCTpyKcIeN, MoXeT Bbl3BaTb BpeDHOE BMeWaTeNbCTBO K paAnoKOMMyHnKaUmaM. Oepaunr 3TOrO o6OpUdoBaHnaB XnIoN o6NaCTN, BEPOrTHO, Bbl3OBET BpeDhBm BMeWaTeNbCTBO, KOrDa nOJIb3OBaTeNb 6yJeT 683AH nCnpaBnTb BMeWaTeNbCTBO 3a erO cHT.
I3MeHeHn IJIIM MoDnΦnKaUH, He YBHO ODo6peHHbIe CTOpOHAMN, OTBeTCTBeHHbIMN 3a COJlnacne MOJIIN NcTota NOnHOMOChne NOnb3OBaTeJIynpaBnTb O6OpydoBaHnEM.
Canada
3TOT KIaCC B uDpOBoAnnapat BbIOnHReT IbDbI KaHaDa 003.
CbndTeIbCTBa Be3oNaChOCTN
FCC Class B, UL, c-UL, CE, TUV-GS, CCC
EN 55022 Праздупждени.
3TO npodukT Knacc B.Bo BnytpenHei OkpykaHoue cpe, 3TO MoKeT Bbl3BaTb paIIO-BMeIaTeJIbCTBO,KoIgI IOJIb3OBATeJIb MOKeT 6blb O6raH npINHMaTb aDeKbATHbIe MepbI. TInuHoe IcNoJIb3OBAHne HaxOJNTcB 3aJe 3aceDaHn, KOMHaTy BCtpeU, INIy ayDITOpNIO.
Planar Systems, Inc.
Corporate Headquarters
1195 NW Compton Drive
Beaverton, OR 97006-1992
Planar Customer Support
Telephone:
US: 1-866-PLANAR1 (866) 752-6271
Outside US: (503) 748-5799
E-mail: PlanarSupport@planar.com
Online Technical Library: http://www.planar.com/support
Hours: M-F, 8am - 8pm ET, 12pm - 12am GMT
©2006 Planar Systems, Inc. Planar is a registered trademark of Planar System, Inc.
Other brands and names are the property of their respective owners.
Technical Information in this document is subject to change without notice.

- Deutsch
- 简体中文
- 繁體中文
- Copyright
- About this User's Guide
- Trademark Recognition
- Important Recycle Instructions
- RegulatoryWarnings
- Register Your Planar Product Today
- Cables, Replacement Lamps and Accessories
- PACKING CHECKLIST
- REMOTE CONTROL FUNCTIONS
- INSERTING THE REMOTE CONTROL BATTERIES
- CONNECTING INPUT DEVICES
- STARTING AND SHUTTING DOWN THE PROJECTOR
- WARNING
- ADJUSTING THE FOCUS AND ZOOM
- TROUBLESHOOTING
- Common Problems and Solutions
- Lamp Problems
- Problem: There is no light from the projector
- Problem: The lamp goes off
- Remote Control Problems
- Problem: The projector does not respond to the remote control
- REGULATORY COMPLIANCE
- FCC Warning
- Canada
- Safety Certifications
- EN 55022 Warning
- PLANAR
- FEHLERBSEITIGUNG
- EN 55022 Avvertenze
- Aviso EN 55022
- Planar Systems, Inc.
- Apoyo de cliente
- EN 55022 Varning
- 连接线、更换用灯泡与配件
- EN55022 警告
- EN 55022 聲明
- EN55022警告
- 兹全权委托
- Kaii
- EN 55022 程序
- O CnpaBoHnke PoiIb3oBaTeJIa
- Toprobamapka
- BaxnHa IHCtpyKzna NOBtophoro McnoIb3ObaHra:
- KABEJI, JAMNBI 3AMEHBI IN PUNHAJLEXHOCTU
- COOTBETCTBNE CTAHДAPTAM
- FCC PpeDynpexKdHne
- CbndTeIbCTBa Be3oNaChOCTN
- EN 55022 Праздупждени.
- Planar Customer Support
Brand : Planar
Model : PD4010
Category : Projector