Asado - Barbecue Outwell - Free user manual and instructions
Find the device manual for free Asado Outwell in PDF.
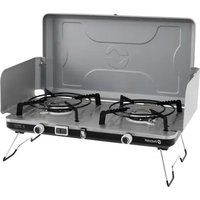
| Technical specifications | Portable barbecue, enamelled steel cooking surface, 2.5 kW power, dimensions 100 x 50 x 100 cm. |
|---|---|
| Usage | Ideal for picnics, camping and outdoor barbecues, easy to carry thanks to its compact design. |
| Maintenance and repair | Regular cleaning recommended after each use, check seals and burners to ensure optimal operation. |
| Safety | Use on a stable surface, keep away from flammable materials, do not leave unattended during use. |
| General information | 2-year warranty, compatible accessories available, user manual included for easy start-up. |
Frequently Asked Questions - Asado Outwell
User questions about Asado Outwell
0 question about this device. Answer the ones you know or ask your own.
Ask a new question about this device
Download the instructions for your Barbecue in PDF format for free! Find your manual Asado - Outwell and take your electronic device back in hand. On this page are published all the documents necessary for the use of your device. Asado by Outwell.
USER MANUAL Asado Outwell
UK:INSTRUCTION MANUAL
ASADO GAS GRILL

Instructions before using the appliance. Keep these instructions for future reference.
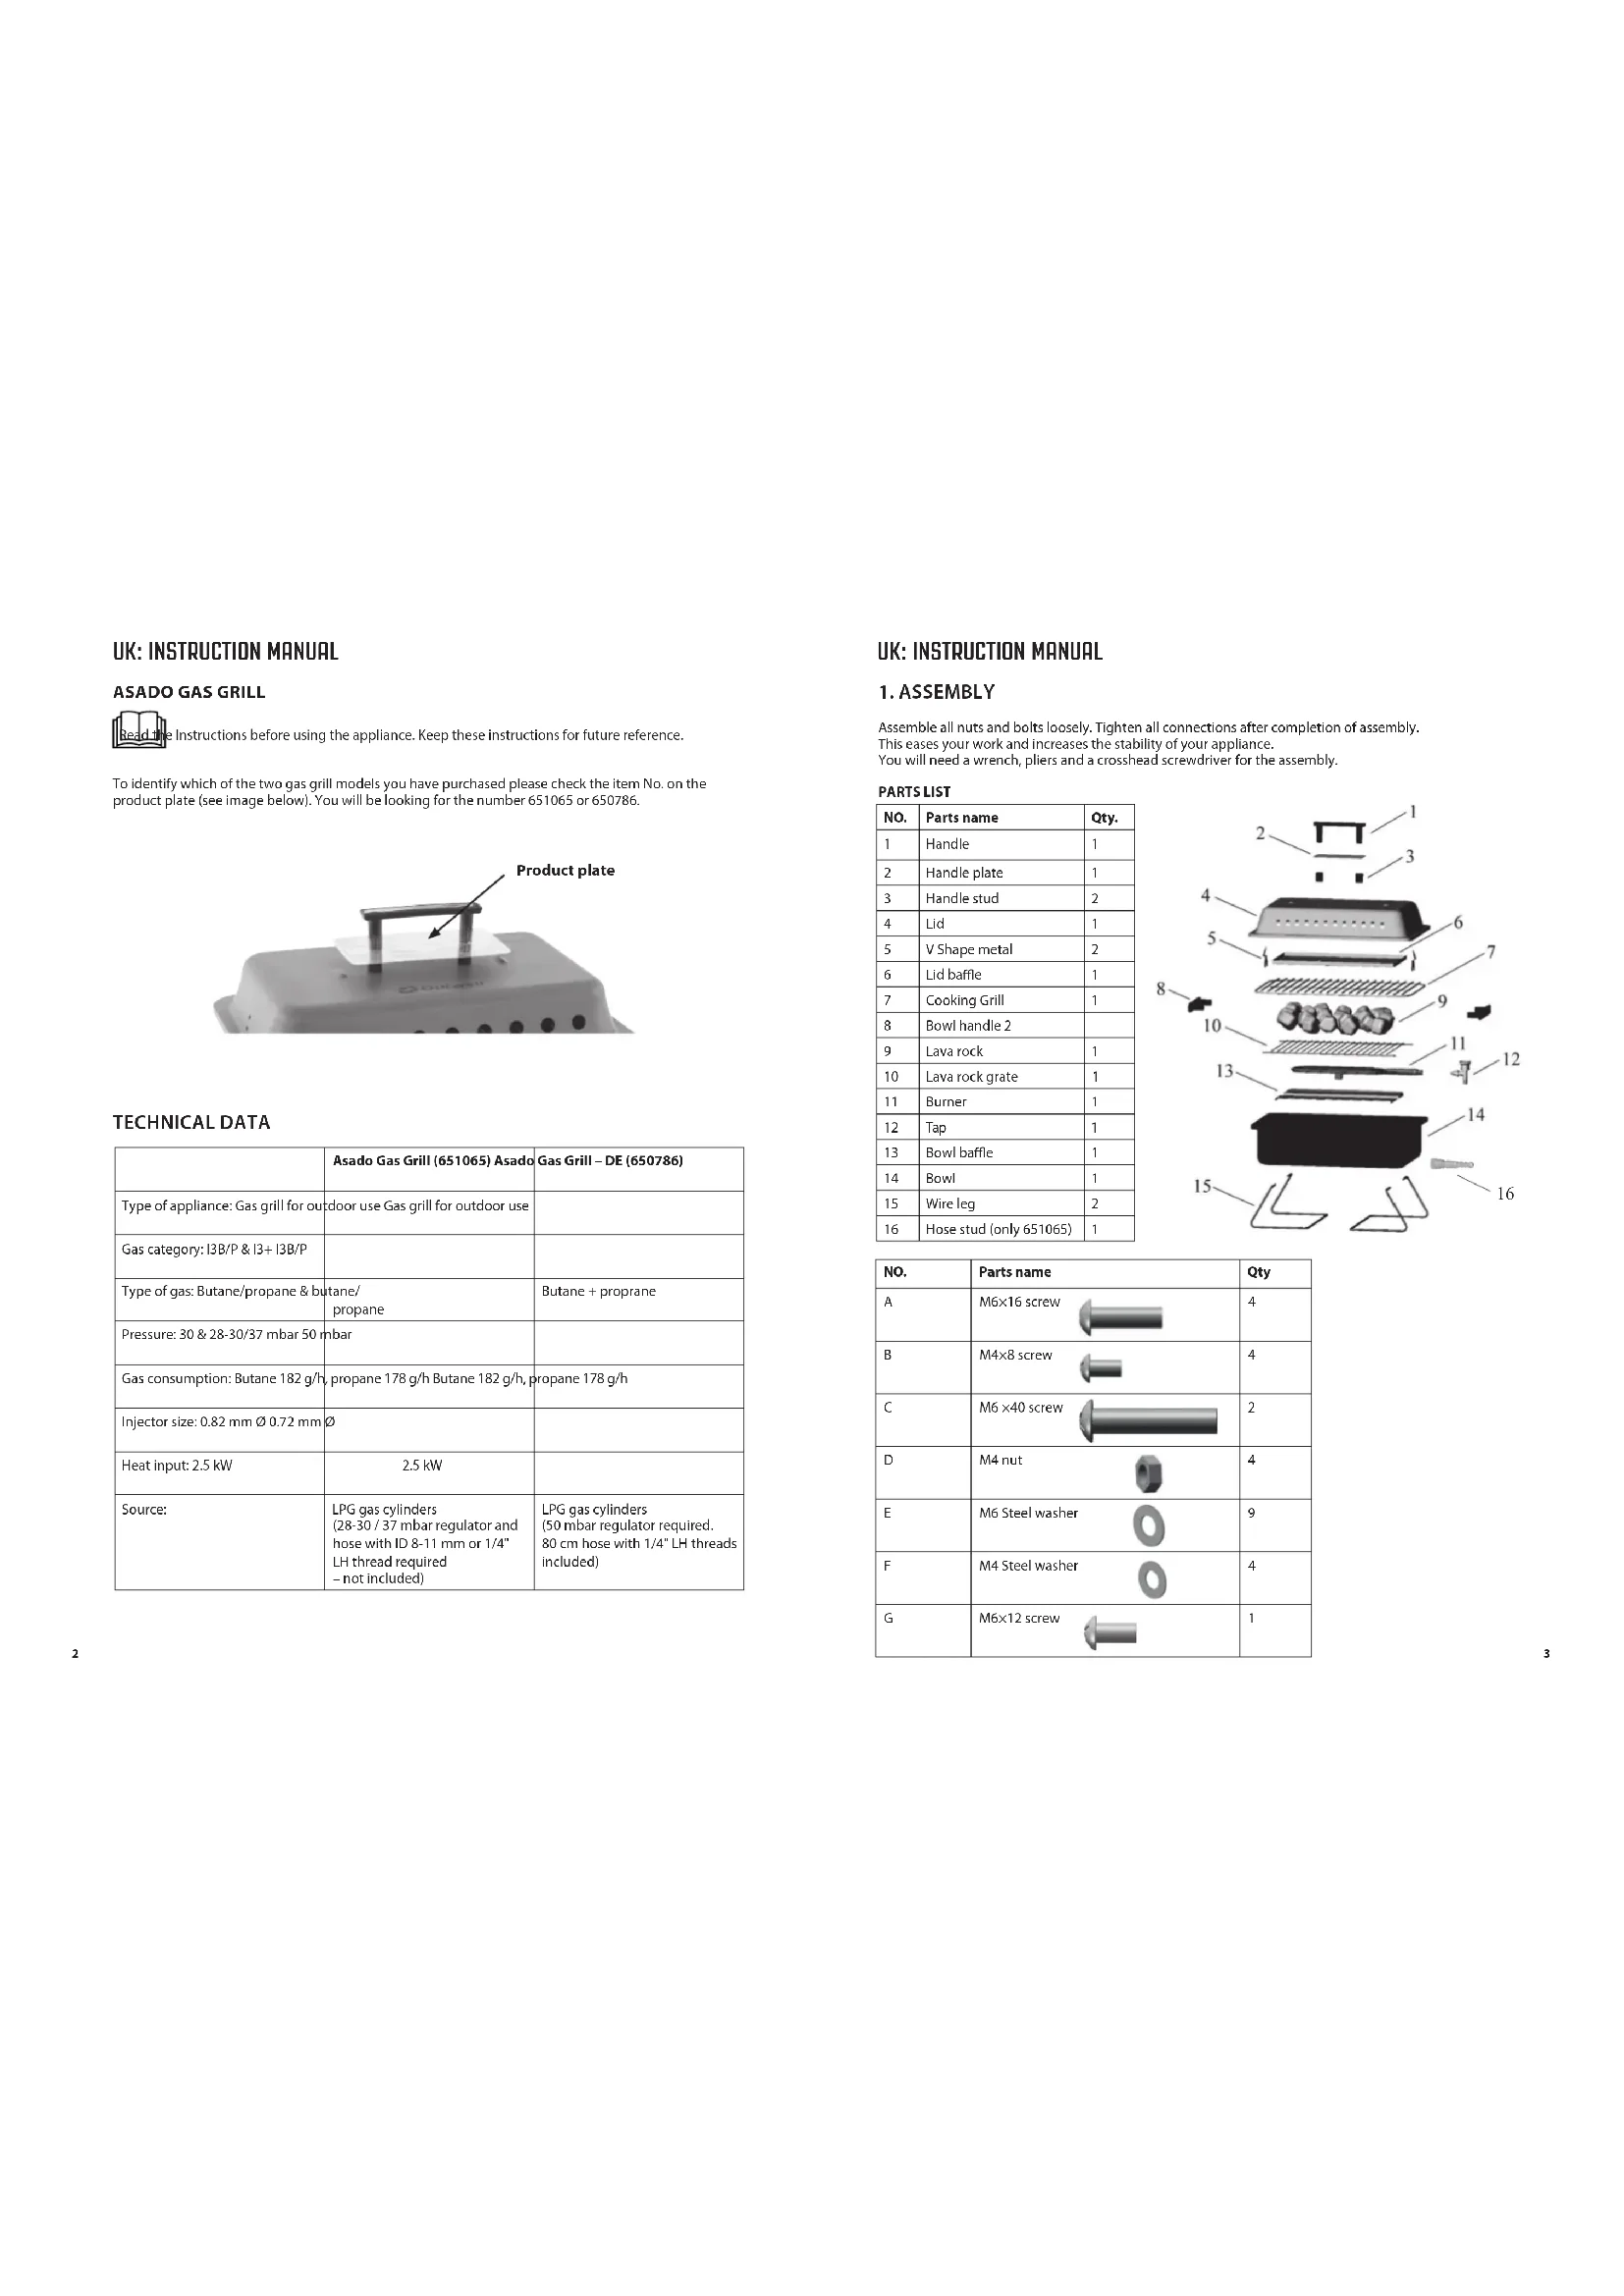
To identify which of the two gas grill models you have purchased please check the item No. on the product plate (see image below). You will be looking for the number 651065 or 650786.
TECHNICAL DATA
| Asado Gas Grill (651065) Asado | Gas Grill – DE (650786) | |
| Type of appliance: Gas grill for outdoor use Gas grill for outdoor use | ||
| Gas category: I3B/P & I3+ I3B/P | ||
| Type of gas: Butane/propane & butane/propane | Butane + propane | |
| Pressure: 30 & 28-30/37 mbar 50 mbar | ||
| Gas consumption: Butane 182 g/h, propane 178 g/h Butane 182 g/h, propane 178 g/h | ||
| Injector size: 0.82 mm Ø 0.72 mm Ø | ||
| Heat input: 2.5 kW | 2.5 kW | |
| Source: | LPG gas cylinders (28-30 / 37 mbar regulator and hose with ID 8-11 mm or 1/4" LH thread required - not included) | LPG gas cylinders (50 mbar regulator required, 80 cm hose with 1/4" LH threads included) |
UK:INSTRUCTIONMANUAL
1. ASSEMBLY
Assemble all nuts and bolts loosely. Tighten all connections after completion of assembly. This eases your work and increases the stability of your appliance. You will need a wrench, piers and a crosshead screwdriver for the assembly.
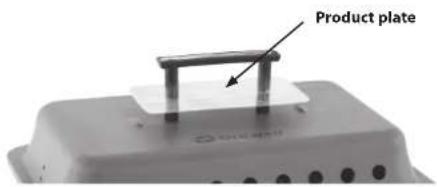
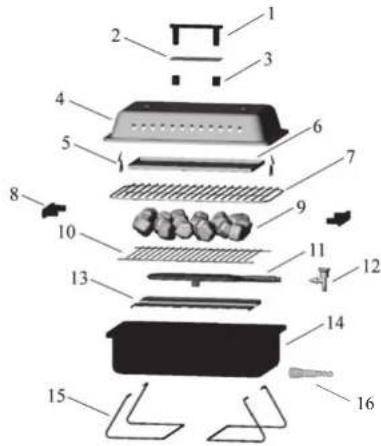
PARTS LIST
| NO. | Parts name | Qty. |
| 1 | Handle | 1 |
| 2 | Handle plate | 1 |
| 3 | Handle stud | 2 |
| 4 | Lid | 1 |
| 5 | V Shape metal | 2 |
| 6 | Lid baffle | 1 |
| 7 | Cooking Grill | 1 |
| 8 | Bowl handle 2 | |
| 9 | Lava rock | 1 |
| 10 | Lava rock grate | 1 |
| 11 | Burner | 1 |
| 12 | Tap | 1 |
| 13 | Bowl baffle | 1 |
| 14 | Bowl | 1 |
| 15 | Wire leg | 2 |
| 16 | Hose stud (only 651065) | 1 |
| NO. | Parts name | Qty | |
| A | M6×16 screw | 4 | |
| B | M4×8 screw | 4 | |
| C | M6×40 screw | 2 | |
| D | M4 nut | 4 | |
| E | M6 Steel washer | 9 | |
| F | M4 Steel washer | 4 | |
| G | M6×12 screw | 1 | |
UK:INSTRUCTION MANUAL UK:INSTRUCTION MANUAL
| ASSEMBLY INSTRUCTION: | 1 BX4 FX4 DX4 |
| 2 CX2 | 3 E G |
| 4 A×4 | 5 E×4 |
| 6 | 7 |
2.OPERATION
WARNING: Use only outdoors
- Do not misuse the appliance or use it for other purposes than what it is intended for.
- Do not modify the appliance.
- Never leave the appliance unattended when lit.
- Handle the appliance with care. Make sure not to drop it. WARNING: Do not move the appliance during use.
- Use gloves and sturdy long barbecue tools when cooking on the gas grill.
- Hot fat may drip out at the bottom of the fire bowl. Do not light your gas grill on a surface that may be damaged by the hot fat or heat generated by the gas grill.
- Do not use an appliance which is leaking, damaged or which does not operate properly.
WARNING: Accessible parts may be very hot. Keep young children away.
- WARNING: Turn off the gas supply at the gas cylinder after use
Always disconnect the gas cylinder from the appliance when not in use.
- Do not store or use gasoline or other flammable vapours and liquids in the vicinity of this or any other appliance.
- Any LPG cylinder not connected for use should not be stored in the vicinity of this or any other appliance.
The appliance shall be operated on a horizontal surface
non likely to Impair Its oper
- free from dry grass, sand etc.
-do not place it on any combustible materials.
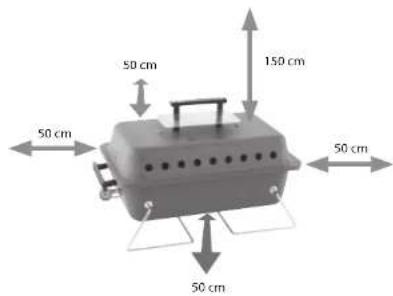
- The appliance shall be used away from flammable materials during use with minimum distances as shown below.
UK:INSTRUCTION MANUAL UK:INSTRUCTION MANUAL
Connecting your gas grill to a gas cylinder
Please see TECHNICAL DATA table for information regarding regulator and hose. Only use a regulator complying with EN16129 and a hose complying with EN16436. The length of the hose shall not exceed 150 cm. Both regulator and hose must also comply with national regulations. Replace the hose according to national regulations. Avoid twisting the hose.
Always read the manual regarding the regulator and hose.
Never leave the regulator attached to the gas cylinder if disconnected from the gas hose.
- How to connect your gas grill to a gas cylinder depends on which model you have purchased. Please read the instructions below for your Asado Gas Grill model.
Asado Gas Grill (651065):
To be able to use your gas grill you will need to purchase an LPG gas cylinder, a regulator and a hose. The type of gas can be butane or propane. The regulator needs to fit the chosen gas cylinder and deliver a supply pressure of 28-30mbar if the gas is butane. 30 or 37 mbar if the gas is propane. The hose needs to fit the regulator as well as the gas grill. The gas grill can be used with either 1/4^* LH thread, 8mm ID or 10/11mm ID.
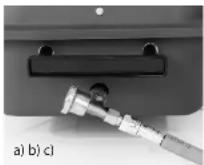
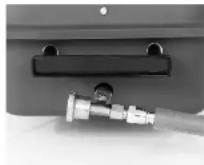
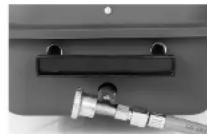
a) If your hose has an internal diameter of 8mm , push the hose over the first ribbed half of the removable hose stud (parts list, item16). Thread the hose and stud onto the gas inlet connection. b) If your hose has an internal diameter of 10 / 11mm , push the hose all the way over the ripped part of the removable hose stud (parts list, item 16). Thread the hose and stud onto the gas inlet connection.
c) If your hose is equipped with a 1/4^ left hand thread, thread the hose directly onto the gas inlet connection.
The hose should be threaded hand tight plus a 14 of a turn.
Asado Gas Grill - DE (650786):
To be able to use your gas grill you will need to purchase an LPG gas cylinder and regulator (the hose is supplied with your gas grill). The type of gas can be butane or propane. The regulator needs to fit the chosen gas cylinder and deliver a supply pressure of 50mbar. The hose needs to fit the regulator as well as the gas grill. The gas grill is equipped with a 14 LH thread.
The supplied 80~cm hose is equipped with a 1 / 4^ LH thread and can be threaded directly onto the gas inlet connection.
The hose should be threaded hand tight plus 1/4 of a turn.
- Once you have successfully connected your gas grill to a gas cylinder, position the gas cylinder at the side of your gas grill. Keep in mind that the cylinder must be kept away from heat and in a safe and upright position.
- Attach the regulator to the gas cylinder tap correctly (refer to the instruction manual provided with the regulator).
- Always Check for leaks at all joints using soapy water.
NEVER USE A NAKED FLAME TO CHECK FOR LEAKS.
Lighting Your Gas Grill
- Remove the lid from your gas grill.
- Close the tap by turning the gas tap (12) clockwise (in direction of the arrow next to the word 'CLOSED') until it stops (do not over tighten).
- Open the regulator on the gas cylinder.
- Use a long match or similar and place the lit match through the hole at the opposite end from the gas tap. Carefully turn the gas tap (12) to the halfway position (in the direction of the arrow next to the wording 'OPEN') and the burner should light.
- Use the tap to adjust the heat.
For Your Safety - If You Smell Gas
- If there is a leak on your appliance (smell of gas), turn off the gas supply and take it outside immediately into a well-ventilated flame free location where the leak may be detected and stopped. If you wish to check for leaks on your appliance, do it outside. Do not try to detect leaks using a flame, use soapy water.
- If odour persists, stop using the appliance immediately and contact your dealer or gas supplier.
3.CHANGING THE GAS CYLINDER
- Turn off the unit completely. Be careful the gas appliance could be hot.
- The gas cylinder shall be changed in a well-ventilated location, preferably outside, away from any sources of ignition, such as naked flames, pilots, electric fires and away from other people.
- Follow the instructions supplied with the gas cylinder and gas regulator.
- To ensure a safe connection of a new gas cylinder to your appliance please follow the instructions in the section 'Connecting your gas grill to a gas cylinder'.
- If gas pressure drops or the gas will not light, check if there is gas left in the cylinder. If there is gas left in the cylinder the injector on the appliance might be blocked.
4. CLEANING & MAINTENANCE
- Visually check the general condition of the appliance and clean it on a regular basis
- Ensure the appliance has cooled off completely before cleaning.
- Use a wire brush, steel wool or a scouring pad to clean the griddle.
- Interior surfaces of the gas grill housing cover should also be washed with hot soapy water.
- Periodically check the burner to see that it is free from insects and spiders which may block the gas system.
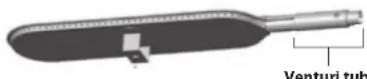
- Clean the venturi tube on the burner [11] very carefully, checking to see it is free from obstructions. We recommend that you use a pipe cleaner to clean the venturi tube area.
- Do not manipulate with any parts sealed by the manufacturer.
- WARNING: Any modification of the appliance may be dangerous.
UK:INSTRUCTION MANUAL
5. STORAGE
-
Ensure the appliance has completely cooled down.
-
Disconnect the gas cylinder before you store the appliance away. Keep both the appliance and cylinder in a dry and well-ventilated place, safe from dust and dirt, and away from heat and direct sunlight.
If you are not able to rectify any fault following the abovementioned instructions, contact the dealer or Outwell Customer Service.
Outwell Customer Service
e-mail:info@outwell.com Tel:+4789235500
Asado gassgrill-DE (650786):
E-post: info@outwell.com
TIf.: +45 70 22 85 00

Outwell is a reg. trademark of Oase Outdoors
EU: Kornvej 9, DK-7323 Give, Denmark
UK: One Glass Wharf, Bristol, BS2 0ZX


P.J.N. 2531/CT/0007