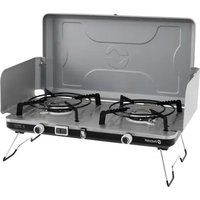
Merapi Pro Duo - Cooker Outwell - Free user manual and instructions
Find the device manual for free Merapi Pro Duo Outwell in PDF.


| Brand | Outwell |
| Model | Merapi Pro Duo (651269) / Merapi Pro Duo Deluxe (651270) |
| Product type | Camping gas stove |
| Gas type | Butane-propane mixture |
| Category | Direct vapor pressure |
| Compatible gas cartridge | OJC COMMERCE models MINT and LEMON (standard EN 417) |
| Nominal flow rate | 2 x 3.0 kW (2 x 218 g/h) |
| Injector size | 2 x ∅ 0.37 mm |
| Number of burners | 2 |
| Ignition | Individual automatic piezo for each burner |
| Windshield | 2 foldable panels included |
| Included accessories | Grill plate (Deluxe model), pot supports, drip tray |
| Legs | Foldable |
| Storage | Lid with lock, storage for hose and regulator |
| Use | Outdoor only, on a stable and non-flammable surface |
| Safety | Leak detection with soapy water, emergency stop in case of odor |
| Maintenance | Cleaning with warm soapy water, regular inspection of seals and burners |
| Customer service | Email: info@outwell.com |
Frequently Asked Questions - Merapi Pro Duo Outwell
User questions about Merapi Pro Duo Outwell
0 question about this device. Answer the ones you know or ask your own.
Ask a new question about this device
Download the instructions for your Cooker in PDF format for free! Find your manual Merapi Pro Duo - Outwell and take your electronic device back in hand. On this page are published all the documents necessary for the use of your device. Merapi Pro Duo by Outwell.
USER MANUAL Merapi Pro Duo Outwell
natural_image
Open camping stove with open lid and internal compartments (no text or symbols visible)MERAPI PRO DUO
Model: 651269 / SG-203-18
natural_image
Open camping stove with two gas burners and a flat roof, no visible text or symbolsUK - INSTRUCTION MANUAL 4
Read these instructions for use carefully so as to familiarize yourself with the appliance before connecting it to its gas cartridge. Keep these instructions for future reference.
TECHNICAL DATA:
| Appliance name: | Merapi Pro Duo (model: 651269 / SG-203-18) | Merapi Pro Duo Deluxe (model: 651270 / SG-203-18) |
| Type of gas: Butane-propane mixture | ||
| Category: Direct vapour pressure | ||
| Type of gas cartridge: | Both appliances should only be used with OJC COMMERCE BRAND gas cartridges MINT and LEMON, compliant with EN 417 | |
| Nominal rate in g/h and in kW (Hs): | Qn: 2 x 3.0 kW (2 x 218 g/h) | |
| Injector size: 2 x ∅ 0.37 mm | ||
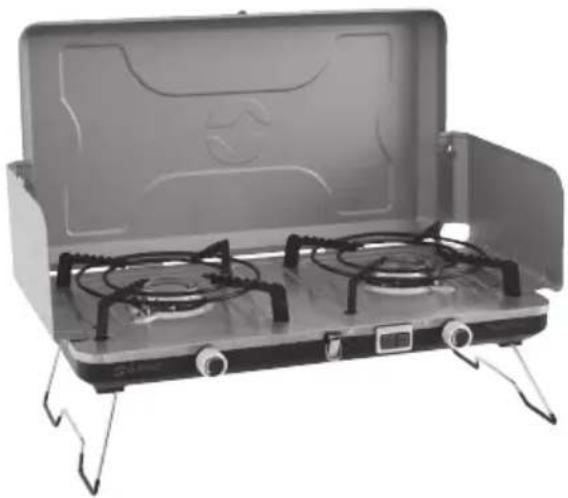
PART LIST
- Windshield protection left and right
- Grill plate
- Pot holders / grillplate supports
- Burners
- Drip tray
- Easy close latch
- Individually controlled auto piezo ignition for left and right burners
- Burner knob for left burner
- Burner knob for right burner
- Lid
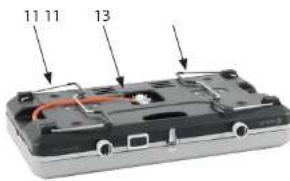
- Collapsible legs
- Hose and regulator (gas cartridge not included)
- Hose and regulator slot
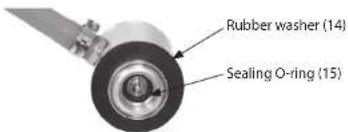
- Rubber washer
- Sealing O-ring
text_image
11 11 13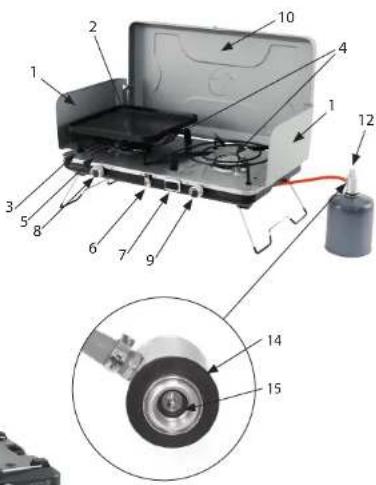
text_image
Labeled diagram of a portable gas stove with numbered components and internal components shown in a magnified inset.UK: INSTRUCTION MANUAL
ASSEMBLY INSTRUCTIONS
Ensure the appliance is correctly assembled before use. Failure to do so may pose a danger to the user and others nearby.
- Remove all packaging materials from around the appliance.
- Turn the appliance upside down to access the underside for assembly.
- Unfold the legs.
- Detach the regulator from its storage slot by gently pulling it out of its fixed position.
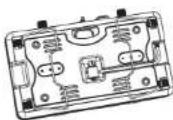
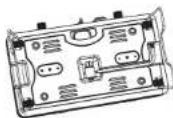
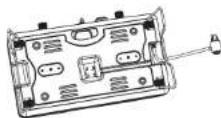
- Place the appliance upright on a flat surface with the legs fully extended (See Picture A).
- Open the lid (10) and attach both windshields (1) to the lid.
Ensure the two small hooks on the inside of the lid are properly connected to the small holes molded on each windshield (See Picture B)
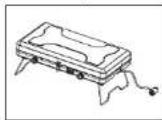
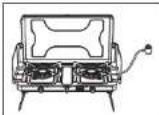
A
B
Applicable for Merapi Pro Duo Deluxe (651270 / SG-203-18), or if you purchased the Merapi Pro Grill Plate (651295)
- Only use the appliance with the included grill plate, or if you have purchased the Merapi Pro Grill Plate (651295).
- When using the grill plate, carefully place it on the pan support, ensuring it sits securely and evenly without wobbling.
The legs of the grill plate should be placed on the inner circle of the pot holder/grill plate support.
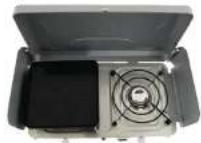
- Place meat or other food items on the grill plate. Do not heat the grill plate without food on it, as this can cause it to overheat and become deformed.
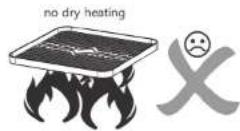

- Once the food is removed from the grill plate, immediately turn off the burner underneath.
UK: INSTRUCTION MANUAL
OPERATION
• CAUTION: Use outdoors only.
- When in use, the appliance should be placed in a well-ventilated location, protected from direct draughts.
- Accessible parts may be very hot. Use gloves and sturdy, long-handled barbecue tools when cooking.
- Keep young children away from the appliance.
- Do not misuse the appliance or use it for other purposes than those for which it is intended.
- Do not modify any parts of the appliance.
- Never leave the appliance unattended when lit.
- Do not attempt to repair the appliance. If you are not able to rectify any fault following these instructions, contact the dealer or Outwell Customer Service (contact details below).
- Do not use the appliance if it is leaking, damaged, or not functioning properly.
• The appliance must be operated on a stable, horizontal, and non-combustible surface.
- Handle the appliance with care. Ensure it is not dropped. Do not move the appliance during use.
- Check that seals are in place and in good condition before connecting to the gas cartridge. Do not use the appliance if a seal is damaged or worn.
text_image
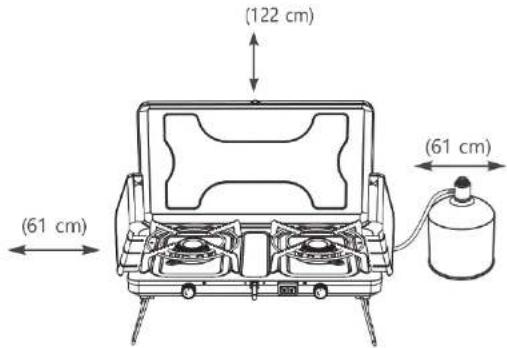
Rubber washer (14) Sealing O-ring (15)- The appliance must be used away from flammable materials, maintaining minimum distances from any adjacent surfaces (walls, ceiling) as shown below.
text_image
(122 cm) (61 cm) (61 cm)UK: INSTRUCTION MANUAL
CONNECTING YOUR APPLIANCE TO A GAS CARTRIDGE
- To use your appliance, you will need to purchase a gas cartridge that is suitable for this specific appliance. Please refer to the TECHNICAL DATA table for information regarding the gas cartridge
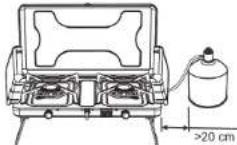
- Position the gas cartridge at the side of your appliance, at least 200 mm away from the appliance. Keep in mind that the cartridge must be kept away from heat and in a safe, upright position.
-
Ensure that both burner knobs (8 + 9) are closed by turning them fully clockwise towards the small "·" symbol.
-
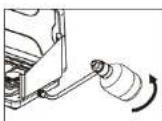
Firmly push the cartridge connector into the regulator socket. At the same time, twist the cartridge clockwise to securely fasten it into the regulator socket, as shown in Picture C. Take care not to cross-thread (hand-tight only).
-
Test for potential gas leaks by applying soapy water to the connection points. If bubbles form, there is a leak. Leaks may also produce a noticeable odor or a "hissing" sound. If a leak is detected, check all connections and fittings until the leak is resolved.
C
LIGHTING YOUR GAS APPLIANCE
- Ensure your gas appliance is assembled, and the gas cartridge is connected according to the instructions above.
- To light the appliance, decide which burner to ignite, and turn the knob (8) for the left burner or (9) for the right burner counterclockwise to release the gas (see Pictures D and E).
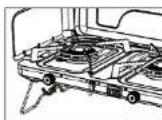
D
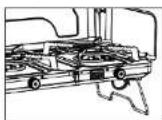
E
- Push and hold the auto piezo ignition button for the left or right burner (7) to ignite the burner.
- If it fails to ignite after pressing the button 3-5 times (within 5 seconds), immediately close the knob (turn it towards the small * symbol) and wait 5 minutes to allow the unburned gas to dissipate before making another attempt.
- When the burner is lit, turn the control knob(s) (8 + 9) clockwise to decrease the heat intensity or extinguish, and counterclockwise to increase the heat to achieve the desired level for cooking.
UK: INSTRUCTION MANUAL
- Do not open the valve beyond the point where maximum intensity is reached, as this may cause unnecessary flaring and waste gas.
- Do not move the appliance or gas cartridge once lit, as this may result in flaring. A warm-up period of about 1 minute is required to avoid flaring.
- Avoid twisting the flexible hose.
- If the gas pressure drops or the gas will not light, check whether there is gas left in the cartridge. If there is gas left in the cartridge, the gas temperature may be too low.
FOR YOUR SAFETY - IF YOU SMELL GAS
- If there is a leak on your appliance (smell of gas), take it outside immediately to a well-ventilated, flame-free location where the leak can be detected and stopped.
- If you need to check for leaks on your appliance, do so outside. Do not attempt to detect leaks using a flame; instead, use soapy water. See instructions under "HOW TO CHECK FOR LEAKS WITH SOAPY WATER."
- If the odour persists, stop using the appliance immediately and contact the dealer or Outwell Customer Service (contact details below).
AFTER USE AND STORAGE
- After cooking, turn the knobs clockwise to shut off the gas supply completely, as shown in Picture F.
- Always disconnect the gas cartridge from the regulator (12) when the appliance is not in use.
- To disconnect the gas cartridge, twist it counterclockwise with one hand while holding the regulator with the other, and remove the cartridge from the regulator, as shown in Picture G. Replace the cartridge cap and store the cartridge in a safe location.
- Let the appliance cool down completely. Fold down the windshields and close the lid, securing it with the latch. Place the regulator and hose assembly back into their designated slot at the bottom of the appliance. Fold the legs underneath, as shown in Picture H.
- Store the appliance in a clean, dry place, away from direct sunlight and temperatures above 50°C.
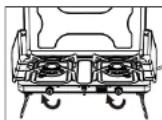
F
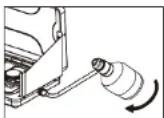
G
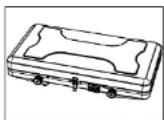
H
Applicable for Merapl Pro Duo Deluxe (651270 / SG-203-18), or if you purchased the Merapl Pro Grill Plate (651295)
- Ensure the grill plate (2) has completely cooled down before removing it.
- Remove the grill plate, follow the instructions under "CLEANING AND MAINTENANCE," and store it in a clean, dry place, away from direct sunlight.
CHANGING OR DISCONNECTING THE GAS CARTRIDGE
• Always disconnect the gas cartridge from the appliance when not in use.
- The cartridge can be disconnected or reconnected even if some gas remains.
- Ensure the appliance is completely turned off by screwing both knobs (8 + 9) fully clockwise towards the '*' symbol.
- Be cautious, as the appliance may still be hot.
- The gas cartridge should be changed in a well-ventilated location, preferably outdoors, away from any sources of ignition such as naked flames, pilot lights, electric fires, and away from other people.
- Carefully unscrew the gas cartridge from the adaptor (12).
- Check the contents of the cartridge by shaking it and listening for the sound of liquid gas.
- Dispose of the cartridge according to the instructions printed on it.
- To ensure a safe connection of a new gas cartridge to your appliance, please refer to the sections "ASSEMBLY INSTRUCTIONS" and "OPERATION."
UK: INSTRUCTION MANUAL
HOW TO CHECK FOR LEAKS WITH SOAPY WATER
- Use a soft cloth and soak it in soapy water.
- Apply a small amount of soapy water to all joints of the gas components.
- If there is a leak, bubbles will form in the soapy water.
- If you detect a leak, stop using the appliance immediately and contact the dealer or Outwell Customer Service (contact details below).
CLEANING AND MAINTENANCE
• Regularly inspect the overall condition of the appliance and clean it as needed.
- Ensure the appliance has completely cooled down before cleaning.
- Use hot soapy water and a cloth or sponge to clean the drip tray (5).
• The interior surfaces of the appliance housing and cover should also be washed with hot soapy water.
- Regularly check the burner to ensure it is free from insects and dust that may block the gas system.
- Inspect the seals regularly to ensure they are in good condition. If there are any signs of wear and tear, the seals must be replaced with new ones.
- For assistance, contact the dealer or Outwell Customer Service (contact details below).
Applicable for Merapi Pro Duo Deluxe (651270 / SG-203-18), or if you purchased the Merapi Pro Grill Plate (651295)
- Use a soft cloth with warm soapy water to clean the grill plate with ceramic coating (2) to avoid scratching the coating.
- Do not use metal utensils on the grill plate (2), as this will damage the coating.
- Discard the grill plate (2) if the coating is cracked or damaged.
TROUBLESHOOTING
| Causes | No gas supplied at MAX position | Smell gas at "OFF" | Low flame | Ignition fails | Flame extinction | Troubleshooting |
| Ignition knob is not turned to MAX position | ● | ● | Turn the knob fully to the MAX position | |||
| Ignition knob malfunction | ●●●● | Contact the dealer or Outwell Customer Service | ||||
| Clogged nozzle | ● | ●●● | Contact dealer or Outwell Customer Service | |||
| Cartridge incorrectly installed | ● | ● | ● | Reinstall the cartridge correctly (See "CONNECTING YOUR APPLIANCE TO A GAS CARTRIDGE") | ||
| Clogged burner holes | ● | ● | Use a metal brush to clean | |||
| Bent or rusty electrode on the auto piezo ignitor | ● | Clean the electrode on the auto piezo ignitor | ||||
| No gas | ● | ●●● | Replace the fuel cartridge | |||
Outwell Customer Service
e-mail: info@outwell.com
text_image
Labeled diagram of a portable gas stove with numbered components and an inset showing internal components.natural_image
Two technical line drawings of a portable electronic device with cables and connectors (no text or symbols)A
B
text_image
(122 cm) (61 cm) (61 cm)text_image
Labeled diagram of a portable gas stove with numbered components and an inset showing internal components.DK: BRUGERVEJLEDNING
SAMLEVEJLEDNING
text_image
(122 cm) (61 cm) (61 cm)DK: BRUGERVEJLEDNING
TILSLUTNING AF DIT APPARAT TIL EN GASPATRON
Outwell Kundeservice
e-mail: infog@outwell.com
text_image
Labeled diagram of a portable gas stove with numbered components and internal components shown in a close-up inset.FR: MODE D'EMPLOI
INSTRUCTIONS DE MONTAGE
natural_image
Technical line drawings of two electronic devices with connectors and wiring (no text or symbols)A
B
text_image
(122 cm) (61 cm) (61 cm) (61 cm)FR: MODE D'EMPLOI
RACCORDER VOTRE APPAREIL À UNE CARTOUCHE DE GAZ
text_image
Labeled diagram of a portable gas stove with numbered components and an inset showing internal components.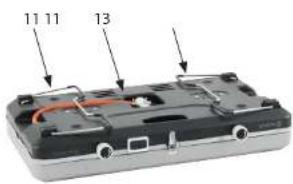
text_image
11 11 13MONTAGE-INSTRUCTIES
natural_image
Two technical line drawings of a portable electronic device with attached cables (no text or symbols)A
B
text_image
(122 cm) (61 cm) (61 cm)HOE LEKKEN TE CONTROLEREN MET ZEEPSOP
text_image
(122 cm) (61 cm) (61 cm) (61 cm)CZ: NÁVOD K POUŽITÍ
PRIPOJENÍ VAŠEHO SPOTŘEBIČE K PLYNOVÉ KARTUŠI
text_image
Labeled diagram of a portable gas stove with numbered components and an inset showing internal components.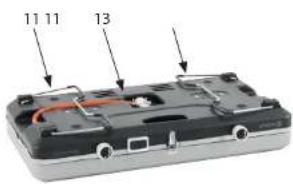
text_image
11 11 13NO: BRUKERVEILEDNING
MONTERINGSINSTRUKSJONER
text_image
(122 cm) (61 cm) (61 cm)NO: BRUKERVEILEDNING
TILKOBLING AV APPARATET TIL EN GASSBEHOLDER
Outwell Kundeservice
e-mail: infog@outwell.com
explore the outdoors
UK CA
CE
2806/DP/0274
Outwell Customer Service
e-mail: info@outwell.com
Outwell® is a reg. trademark of Oase Outdoors
EU: Kornvej 9, DK-7323 Give, Denmark
UK: One Glass Wharf, Bristol, BS2 0ZX
FRANCEITALY


E