RBFP 135 N - Freezer ROSIERES - Free user manual and instructions
Find the device manual for free RBFP 135 N ROSIERES in PDF.

| Technical specifications | Upright freezer, 135 liters capacity, energy class A+ |
|---|---|
| Dimensions | Height: 145 cm, Width: 55 cm, Depth: 60 cm |
| Weight | Net weight: 50 kg |
| Freezing temperature | -18�B0C |
| Usage | Ideal for frozen food storage, easy to use with an adjustable thermostat |
| Maintenance | Manual defrost recommended, regular interior cleaning |
| Safety | Door lock system, temperature alarm |
| General information | 2-year warranty, annual energy consumption: 250 kWh |
Frequently Asked Questions - RBFP 135 N ROSIERES
User questions about RBFP 135 N ROSIERES
0 question about this device. Answer the ones you know or ask your own.
Ask a new question about this device
Download the instructions for your Freezer in PDF format for free! Find your manual RBFP 135 N - ROSIERES and take your electronic device back in hand. On this page are published all the documents necessary for the use of your device. RBFP 135 N by ROSIERES.
USER MANUAL RBFP 135 N ROSIERES
Thank you for purchasing this product.
Before using your refrigerator, please carefully read this instruction manual in order to maximize its performance. Store all documentation for subsequent use or for other owners. This product is intended solely for household use or similar applications such as:
- the kitchen area for personnel in shops, offices and other working environments
- on farms, by clientele of hotels, motels and other environments of a residential type
- at bed and breakfasts (B & B)
- for catering services and similar applications not for retail sale.
This appliance must be used only for purposes of storage of food, any other use is considered dangerous and the manufacturer will not be responsible for any omissions. Also, it is recommended that you take note of the warranty conditions.
SAFETY INFORMATION
Please read the operating and installation instructions carefully!
They contain important information on how to install, use and maintain the appliance.
The manufacturer is not liable if you fail to comply with the instructions and warnings.
Retain all documents for subsequent use or for the next owner.
- Do not connect the appliance to the electricity supply until all packing and transit protectors have been removed. Keep children away from packaging and its parts.
Danger of suffocation from folding cartons and plastic film! - Leave to stand for at least 4 hours before switching on the product, to allow compressor oil to settle if transported horizontally.
- Make sure there is no transport damage.
- Do not damage the refrigerant circuit.
- Maintain the ventilation openings in the appliance enclosure or in the built-in structure, free of obstruction.
- Never use water to wash the compressor position, wipe it with a dry cloth thoroughly after cleaning to
prevent rust.
- Handle the appliance always with at least two persons because it is heavy.
- Install and level the appliance in an area suitable for its size and use.
- Make sure that the electrical information on the rating plate agrees with the power supply. If it does not, contact an electrician.
- The appliance is operated by a 220-240 VAC/50 Hz power supply. Abnormal voltage fluctuation may cause the appliance to fail to start, or damage to the temperature control or compressor, or there may be an abnormal noise when operating. In such case, an automatic regulator shall be mounted.
- Only for UK: The appliance's power cable is fitted with 3-cord (grounding) plug that fits a standard 3-cord (grounded) socket. Never cut off or dismount the third pin (grounding). After the appliance is installed, the plug should be accessible.
- Make sure that mains cable is not caught under the appliance during and after carrying/moving the appliance, to avoid the mains cable becoming cut or damaged. If the supply cord is damaged, it must be replaced by the manufacturer, its service agent or similarly qualified person in order to avoid a hazard.
- Do not install the appliance in humid, oily or dusty places, nor expose it to direct sunlight and to water.
- Do not install the appliance near heaters or inflammable materials.
FOR appliances with a freezer compartment: if there is a power failure do not open the lid. Frozen
food should not be affected if the failure lasts for less than the hours indicated on the rating label (Temperature rise time). If the failure is longer, then the food should be checked and eaten immediately or cooked and then refrozen.
If you find that the lid of the appliance is difficult to open just after you have closed it, don't worry. This is due to the pressure difference which will equalize and allow the lid to be opened normally after a few minutes.
- Do not store medicines, bacteria or chemical agents in the appliance. This appliance is a household appliance, it is not recommended to store materials that require strict temperatures.
- Do not excessively pull or fold the power cord or touch the plug with wet hands.
- Do not store products which contain flammable propellant (e.g. spray cans) or explosive substances in the appliance. Risk of explosion!
- Do not place unstable articles (heavy objects, containers filled with water) on top of the refrigerator, to ovoid personal injury caused by falling or electric shock caused by contact with water.
- Do not use electrical appliances inside the food storage compartments, unless they are of the type recommended by the manufacturer.
- Do not touch internal cooling elements, especially with wet hands, to avoid cracks or injuries.
- At risk here are children, people who have limited physical, mental or sensory abilities, as well as people
who have inadequate knowledge concerning safe operation of the appliance.
- Check that children and vulnerable people have understood the hazards. A person responsible for safety must supervise or instruct children and vulnerable people who are using the appliance. Only children aged 8 years and above may use the appliance.
Children should not play with the appliance.
Children aged from 3 to 8 years are allowed to load and unload this appliance.
FOR appliances with a freezer compartment: do not store bottled or canned liquids (especially carbonated drinks) in the freezer compartment. Bottles and cans may burst!
FOR appliances with a freezer compartment: never put frozen food straight from the freezer compartment in your mouth. Risk of low-temperature burns! - Keep plastic parts and the door seal free of oil and grease. Otherwise, plastic parts and the door seal will become porous.
- Before performing any operation, unplug the power cord from the power socket.
- Do not use mechanical devices or other means to accelerate the defrosting process, other than those recommended by the manufacturer.
- Do not use pointed or sharp-edged objects such as knives or forks to remove the frost.
- Never use hairdryers, electrical heaters or other such electrical appliances for defrosting.
It is recommended to keep the plug clean, any excessive dust residues on the plug can be the cause fire.
- Do not try to repair, disassemble or modify the appliance by yourself. In case of repair please contact always our customer service.
Supervise children while the appliance is being cleaned or maintained.
- Do not clean the cold glass shelves with hot water. Sudden temperature change may cause the glass to break.
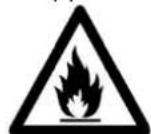
- WARNING: The tubes of the refrigeration circuit convey a small quantity of an environmentally friendly but flammable refrigerant (R600a) and insulating gas (cyclopentane). It does not damage the ozone layer and does not increase the greenhouse effect. If refrigerant escapes, it may injure your eyes or ignite.
- If the refrigerant circuit should be damaged:
- Switch off the appliance and pull out the mains plug,
- Keep naked flames and/or ignition sources away from the appliance,
- Thoroughly ventilate the room for several minutes,
-
Inform customer service.
-
WARNING: Do not damage the plug and/or the power cord; this could cause electrical shocks or fires.
- WARNING: Do not use multiple portable socket-outlets or portable power supplies. We do not recommend the use of extension leads and multi-way adapters.
- Do not attempt to sit or stand on the top of the appliance. You could injure
yourself or damage it. This appliance is not designed for stacking with any other ones.
The product is designed and built for domestic household use only.
- Only original parts supplied by the manufacturer may be used. The manufacturer guarantees that only these parts satisfy the safety requirements.
- Opening the door for long periods can cause a significant increase of the temperature in the compartments of the appliance.
Clean regularly surfaces that can come in contact with food and accessible drainage systems.
- Clean water tanks if they have not been used for 48h; flush the water system connected to a water supply if water has not been drawn for 5 days.
-Store raw meat and fish in suitable containers in the refrigerator, so that it is not in contact with or drip onto other food.
- Two-star frozen-food compartments (if they are presented in the appliance) are suitable for storing pre-frozen food, storing or making ice-cream and making ice cubes.
-One-, two- and three -star compartments, if present in the appliance, are not suitable for the freezing of fresh food.
-If the appliance is left empty for long periods, switch off, defrost, clean, dry and leave the door open to prevent mould developing within the appliance.
FOR Wine Coolers: this appliance is intended to be used exclusively for the storage of wine
FOR a free standing appliance: this refrigerating appliance is not intended to be used as a built-in appliance
Scrapping old appliances
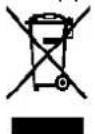
This appliance is marked according to the European directive 2012/19/EU on Waste Electrical and Electronic Equipment (WEEE).
WEEE contains both polluting substances (which can cause negative consequences for the environment) and basic components (which can be re-used). It is important to have WEEE subjected to specific treatments, in order to remove and dispose properly all pollutants, and recover and recycle all materials.
Individuals can play an important role in ensuring that WEEE does not become an environmental issue; it is essential to follow some basic rules:
- WEEE should not be treated as household waste;
- WEEE should be handed over to the relevant collection points managed by the municipality or by registered companies. In many countries, for large WEEE, home collection could be present.
In many countries, when you buy a new appliance, the old one may be returned to the retailer who has to collect it free of charge on a one-to-one basis, as long as the equipment is of equivalent type and has the same functions as the supplied equipment.
Conformity
By placing the C mark on this product, we are confirming compliance to all relevant European safety, health and environmental requirements which are applicable in legislation for this product.
Guarantee
Minimum guarantee is: 2 years for EU Countries, 3 years for Turkey, 1 year for UK, 1 year for Russia, 3 years for Sweden, 2 years for Serbia, 5 years for Norway, 1 year for Morocco, 6 months for Algeria, Tunisia no legal warranty required.
Energy Saving
For better energy saving we suggest :
- Installing the appliance away from heat sources and not exposed to direct sunlight and in a well ventilated room.
- Avoid putting hot food into the refrigerator to avoid increasing the internal temperature and therefore causing continuous functionalitng of the compressor.
- Do not excessively stuff foods so as to ensure proper air circulation.
Defrost the appliance in case there is ice to facilitate the transfer of cold.
In case of absence of electrical energy, it is advisable to keep the refrigerator door closed. - Open or keep the doors of the appliance open as little as possible
- Avoid adjusting the setting to temperatures too cold.
- Remove dust present on the rear of the appliance
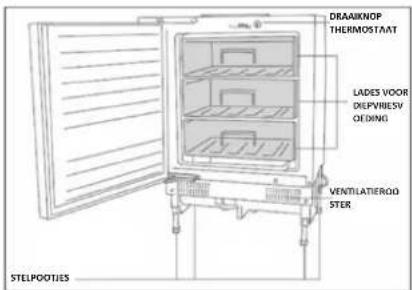
SPECIFICATIONS OF YOUR FREEZER
DESCRIPTION OF THE APPLIANCE
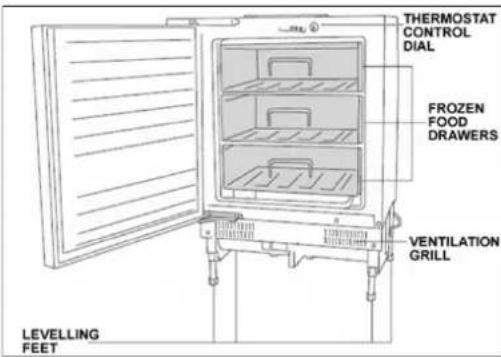
NOTE: Image is for reference only and may differ from your product. The most energy-saving configuration requires drawers, food box and shelves to be positioned in the product, please refer to the above pictures
USING YOUR FREEZER
Before switching on
o Make sure that it has been installed by a suitably qualified person, as per the information contained in installation instructions.
o After delivery, wait for eight hours before connecting the appliance to your mains supply. This will allow any refrigerant gasses that may have been disturbed during the transportation process to settle.
o The outside of the appliance and the removable accessories contained within it, should be cleaned with a solution of liquid detergent and water.
o The interior of the appliance should be cleaned with a solution of sodium bicarbonate dissolved in lukewarm water. The interior and accessories should be thoroughly dried, after the cleaning process has been completed.
o There can be an odour when you first switch on the appliance. It will lessen as the appliance starts to cool.
During first use
o You should set the thermostat dial to its maximum setting for 24 hours after switching on the appliance for the first time.
o When you first switch on the appliance, the compressor will run continuously for approximately 24 hours or until the fridge freezer reaches a cool enough temperature.
o During this period of time, you should try not to open the door frequently or place a large amount of food within the appliance. o You should then adjust the thermostat dial down to its normal operating position.
o If the unit is switched off or unplugged, you must allow at least 5 minutes before restarting the appliance on the thermostat or connecting it to your mains supply.
Switching on the appliance and setting the thermostat
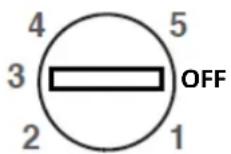
You switch on your appliance by connecting it to your mains supply and setting the thermostat. The thermostat control knob is located at the top of the appliance.
o The thermostat automatically regulates the temperature inside of the fridge, depending on what number you have turned the thermostat control knob to:-
o Position < 0> means that the appliance will not cool. However the light will still function.
o Position < 1> will give you a higher temperature inside of the freezer.
o Position < 6> will give you a lower temperature inside of the freezer.
o Ideally the thermostat should be set to a position of between < 3> to < 4> .
o The freezer can cool down to -18 degrees centigrade and lower.
IMPORTANT: The ambient temperature of the room, the temperature of the food and the amount of food that has been placed in the appliance and how often the door is opened, will all affect the temperature being maintained by the appliance.
O On the maximum setting (position < 5> ), your freezer will work harder to maintain a lower temperature and will increase the energy usage. There is no need to run your appliance on this setting for prolonged periods.
| Position | Conditions |
| 1-2 | Summer or ambient temperature between 25-35 °C |
| 3-4 | Spring, autumn or ambient temperature between 15-25 °C |
| 4-5 | Winter, or ambient temperature between 5-15 °C |
Control panel
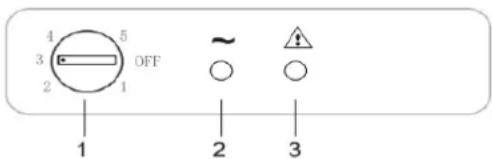
- Thermostat control dial.
2.. Power indicator light - Temperature warning light
o Power light (Green) - will light up as soon as the appliance is connected to your mains supply.
o Temperature rise warning light (Red) - will light up when the appliance detects a rise in temperature that could affect the contents of your freezer.
THE FREEZER COMPARTMENT
The freezer compartment temperature must have already reached - 18 degrees centigrade (or lower) before you attempt to store food that is already frozen or freezing fresh food.
The freezer compartment is only able to freeze a certain quantity of food at one time. You should not attempt to freeze more than 4.5 kilograms of fresh food within a 24 hour period.
Warm food should be allowed to cool down before you attempt to freeze it. If you place warm food in the freezer, then the increased humidity will cause quicker ice formation and increase the amount of power that the appliance uses.
The guidance of the food manufacturer should be followed, in regard to the maximum storage time.
Thawed foods must not be frozen for a second time.
Do not open the freezer door too often or leave the door open for long periods of time, as this will increase the temperature inside of the appliance and will increase the energy usage.
Tips on freezing
o Freezer bags, polythene wraps, aluminium foil (extra thick) and special cans for frozen foods are suitable packaging for storing frozen goods in.
o Tape, rubber bands or plastic clips are suitable for sealing bags and wrappings.
o Before sealing a suitable bag, you should compress the air out of it, as this will help the food to freeze more easily.
o Flat packages freeze more easily.
o If you are freezing liquid, then do not fill the container to the brim.
Liquids will expand when being frozen.
For frozen food, refer to the storage time written on the food packaging. This storage time is achieved whenever the setting respects the reference temperatures of the compartment (one-star - 6^ , two stars -12^ , three stars -18^
Do not place bottles (glass or tin) containing liquids (especially sparkling liquids) into the freezer as they could cause the bottle to burst during freezing.
Position different food in different compartments according to be below table
| Refrigerator compartment | Type of food |
| Freezer drawer(s)/tray | ·Foods for long-term storage ·Bottom drawer for raw meet, poultry, fish ·Middle drawer for frozen vegetables, chips. ·Top tray for ice cream, frozen fruit, frozen baked goods. |
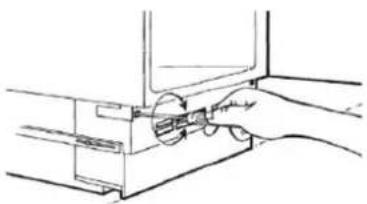
Making ice cubes
o Fill the ice cube tray with water and place it in the freezer compartment.
o After the water is completely frozen and turned to ice, you can twist the ice cube tray (as shown in the drawing below) to dispense the ice.
SAVING ENERGY WHEN USING YOUR FREEZER
Installing:
o Install the appliance in a cool position. If it is placed in direct sunlight or next to an oven or other heat source, the energy consumption can increase substantially.
o Ensure the appliance is installed with the correct ventilation requirements. Restricting ventilation can increase the energy consumption by 15% .
Cleaning and Maintenance:
Occasionally clean the condenser coils (if present) at the back of the appliance to maintain a high performance level.
- Defrost the appliance regularly. A build up of thick ice decreases the efficiency of the appliance. You should defrost whenever the frost reaches 5 mm thickness.
Clean the door gasket with warm water or a neutral detergent that leaves no residue. A tight-sealing door gasket is critical to the efficiency of your appliance.
Usage:
Do not open the door repeatedly or more frequently than you have to.
Do not set the thermostat too low. A change of just one degree can effect the energy consumption by 5% . Use a thermometer to check the temperature.
The freezer should operate at -15 to -18 degrees Celsius.
- Allow food to sufficiently cool before putting it in the appliance (but don't let it sit at room temperature for too long).
In the freezer, food packages should be scattered and never grouped or stacked together until they are completely frozen.
If you are going away for a long period of time, turn off the
appliance, empty and clean it and leave the door ajar.
If you have a second appliance that is not used, make sure that it is stored with the power off and the door left ajar until it is actually required.
Disposing:
o If you're going to throw out your old fridge, see if there's a chlorofluorocarbons (CFCs) recycler in your area. The government department which looks after the environment in your area may be able to help you.
CLEANING AND MAINTENANCE
WARNING: PLEASE ENSURE THAT YOUR APPLIANCE IS DISCONNECTED FROM YOUR MAINS SUPPLY BEFORE ATTEMPTING TO CLEAN IT.
o Do not clean the appliance by pouring water onto it or spraying water over it.
o The freezer should be cleaned periodically, using a solution of bicarbonate of soda and lukewarm water.
o Clean the accessories separately with soap and water. Do not clean them in a dishwasher.
o Do not use abrasive products, detergents or soaps.
o After washing the appliance, wipe over the area that you have cleaned with a damp cloth and then dry it thoroughly.
o When cleaning is complete, dry your hands and then reconnect the plug to your mains supply.
Defrosting the freezer compartment
The frost in the freezer compartment should be removed periodically. You can use a plastic scraper to keep down the amount of frost that builds.
IMPORTANT: The freezer should be defrosted at least twice a year. The number of times that you need to defrost it, will depend on the setting of your thermostat and how much food you freeze and store in the freezer.
The day before you defrost, turn the thermostat dial to position < 5> , this will make sure that the food contained in the freezer is frozen properly.
- Whilst defrosting the appliance, the food should be removed from the freezer and wrapped in several layers of paper and stored in a cool place. The foods rise in temperature will shorten its storage life and therefore the food should be used within a relatively short period of time.
DO NOT PLACE FOOD BACK IN THE FREEZER ONCE IT HAS STARTED TO THAW.
Set the thermostat knob to position <0> and disconnect the appliance from your mains supply.
Leave the door to the freezer open. You can place a bowl of warm water inside the freezer to speed up the defrost process.
- You can use a sponge to mop up the defrost water that will run into the bottom of the freezer.
IMPORTANT: You should place some old towels on the flooring that is immediately in front of the appliance. In case any defrost water comes out of the freezer and onto the floor.
Once all the ice that has built up has melted, then the inside of the freezer should be dried thoroughly. Failure to do this will result in immediate ice build when the appliance is switched back on.
With dry hands, reconnect your appliance to your mains supply. Set the thermostat knob to position < 5> for a 24 hour period, before returning it to the normal setting of < 3> .
- You should not attempt to freeze fresh food inside the freezer until this 24 hour time period has elapsed.
Do not defrost the appliance with other electrical devices (e.g. hair dryer). Do not use sharp metal objects to remove the ice on the freezer, as this could cause damage to the refrigerant system.
INSTALLATION
IMPORTANT: Before installation and usage read all the instructions and make sure that the voltage (V) and the frequency (Hz) indicated on the rating plate are exactly the same as the voltage and frequency in your home. The rating plate can be found on the front left edge of the
inside of the refrigerator.
The manufacturer declines all responsibility in the event of the installer failing to observe all the accident prevention regulations in force, which are necessary for normal use and the regular operation of the electric system.
Electrical connection
YOUR FREEZER IS INTENDED FOR Fitted AND PERMANENT INSTALLATION.
We recommend that the appliance is connected by a qualified electrician, who is a member of the N.I.C.E.I.C. and who will comply with the I.E.E. and local regulations.
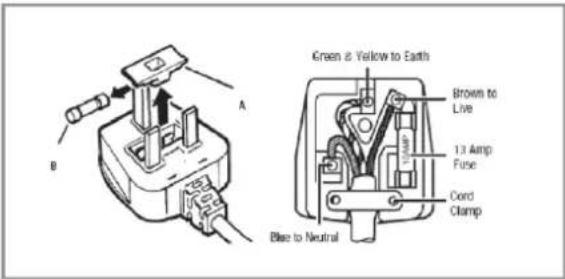
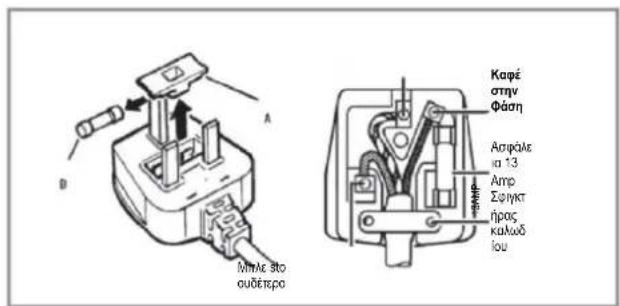
o Your freezer comes supplied with a 13 amp plug fitted. If in future you need to change the fuse in this plug, then a 13 amp ASTA approved (BS 1362) fuse must be used.
o The wiring in the mains lead is coloured as follows: Brown Live
Blue Neutral
Green and yellow Earth
o As the colours of the wires in the appliance's mains lead may not correspond with the coloured markings identifying the terminals in your spur box, please proceed as follows:
The brown wire must be connected to the terminal marked "L" (live), or coloured red.
The blue wire must be connected to the terminal marked "N" (neutral), or coloured black.
The green and yellow wire must be connected to the terminal marked "E" (earth), or by the earth symbol, or coloured green and yellow.
o When the connection is completed, no stray strands or cut wire should be present. The cord clamp must be secured over the outer sheath.
Positioning
o It is advisable that your appliance is only installed in a location where the ambient temperature of the room, corresponds with the climate classification that is stated on the rating plate of your appliance. Your appliance may not function correctly if the ambient temperature falls outside of the following ranges.
- Extended temperate (SN): 'this refrigerating appliance is intended to be used at ambient temperatures ranging from 10^ to 32^
- Temperate (N): 'this refrigerating appliance is intended to be used at ambient temperatures ranging from 16^ C to 32^ C'
-
Subtropical (ST): 'this refrigerating appliance is intended to be used at ambient temperatures ranging from 16^ C to 38^ C
-
Tropical (T): 'this refrigerating appliance is intended to be used at ambient temperatures ranging from 16^ C to 43^ C
o Your appliance should not be located in direct sunlight or exposed to continuous heat or extremes of temperature (e.g. next to a radiator or boiler).
o The door should be able to open completely and freely.
o The appliance should be situated so you can easily access the food that is stored in it.
o You should check whether there is an electrical socket available, which will be accessible after your appliance is installed.
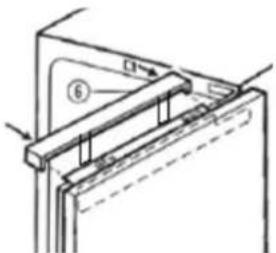
Reversing the door of your appliance
This procedure MUST be completed before the furniture door is attached.
Any parts that you remove from the appliance whilst reversing the door, should be retained for later use.
WARNING - Take care when opening the hinges, they are sprung loaded and there is the risk of injury if they close on your hand.
Tools required:
o Phillips screwdriver
o Flat bladed screwdriver
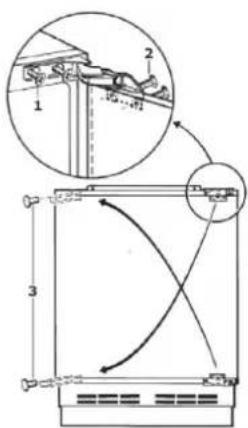
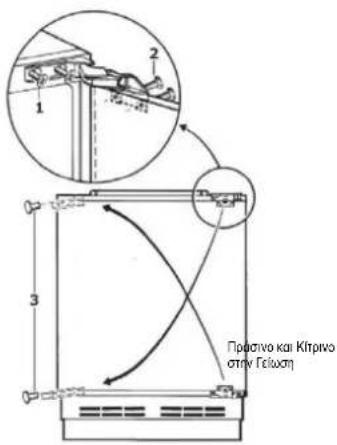
o Slacken the retaining screws (1) on the appliance and then carefully remove the appliance door.
o Place the appliance door on a cushioned surface, so that it does not get damaged.
o Lever off the cover caps (3).
o Insert the retaining screws (1) into the opposite side of the appliance from their original position. These screws should be partially tightened but not fully tightened.
o Remove the door retaining screws (2) and then reverse the position of the top and bottom hinge (as shown in the above diagram).
o Reattach the appliance door and then fully re-tighten the retaining screws (1) and the door retaining screws (2).
o Insert the cover caps (3) into the holes that are now exposed on the right hand side of the cabinet.
IMPORTANT: Check that the door opens and shuts correctly, without fouling, after you have completed the door reversal process.
After the door has been reversed, you should check the door seal of the appliance. The seal should not be creased or crushed; otherwise there will be a gap between it and the inside of the door.
o The seal must adhere properly all the way around the door. o If the seal is not adhering to the cabinet properly, then you should either:
- Use a warm damp cloth and manipulate the seal until it does adhere to the cabinet properly, all the way around the door.
Or
- Use a hair dryer on its lowest heat setting and lightly heat the areas of the door seal that are not adhering correctly. The heat will make the seal more pliable and this will allow you to manipulate the seal into the correct position.
IMPORTANT: DO NOT HEAT THE DOOR SEAL ON ANYTHING BUT THE LOWEST HEAT SETTING, OR HEAT THE SEAL FOR A LONG PERIOD OF TIME. OTHERWISE DAMAGE MAY BE CAUSED TO THE DOOR SEAL, WHICH WOULD NOT BE RECTIFIED UNDER THE GUARANTEE FREE OF CHARGE.
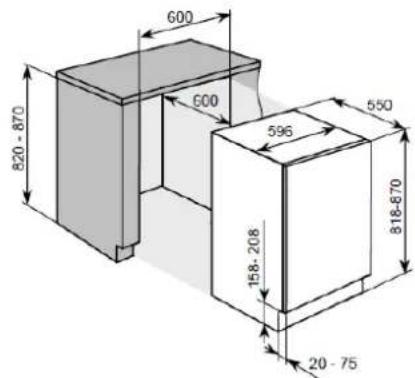
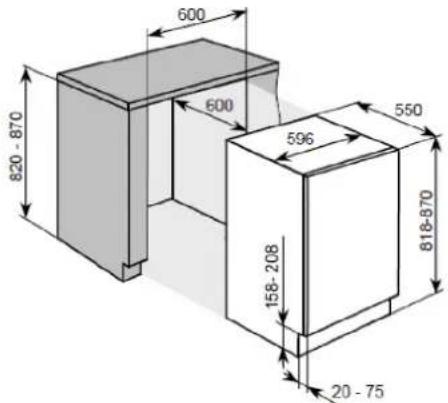
Aperture dimensions
The diagram below shows the aperture size that you will need to be able to install your appliance.
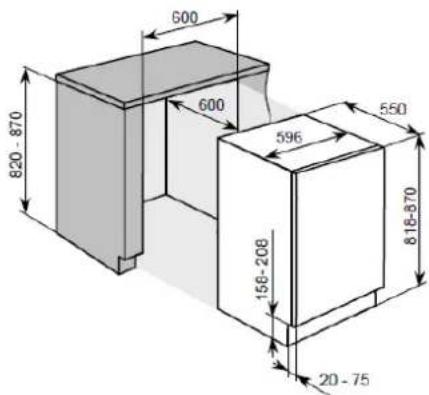
The appliance must be stood on a level floor. You can use the levelling feet to take into account any minor unevenness in the floor.
Adjusting the plinth/kickboard
When the appliance has been placed underneath the worktop, you may decide to attach a plinth or kickboard to match your existing kitchen units.
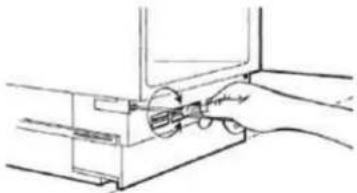
o Remove the grid on the base of the appliance by unscrewing the screws on each side of the grid and then pull the grid towards you.
o Use a spanner to adjust the height of the adjustable feet.
o If your aperture has a height of 820mm then the adjustable feet should be fully tightened.
o If your aperture has a height of 870mm then the adjustable feet should be set at a height of 50mm .
o The appliance should be flush with the underside of the worktop and be level.
IMPORTANT: If the appliance is not level, then the door and door seal may be affected.
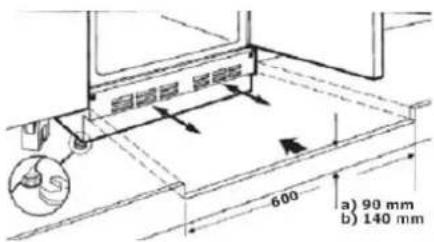
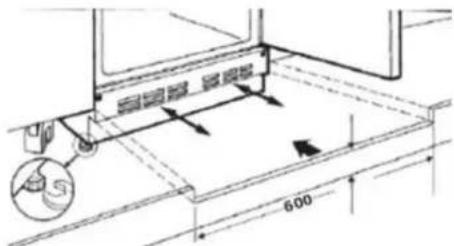
o A cut out must be made in the plinth/kickboard for ventilation. The cut out should measure 600mm in width, and between 140mm and 90mm in height, depending on the height that you have set your appliance.
o Insert the plinth/kickboard and then refit the grid in its original position to hold it in place.
IMPORTANT: Please note that as shown in the above drawing, an appropriately sized ventilation cut out MUST be made in the furniture plinth/kickboard.
Fitting the furniture door to the appliance
If you need the appliance door to open from the other side, then please reverse the door before commencing the installation process. (See "Reversing the door section").
Tools required:
o Tape measure
o Sharp pencil
o Small flat bladed screwdriver
o Spanner
IMPORTANT: We recommend that two people install this appliance.
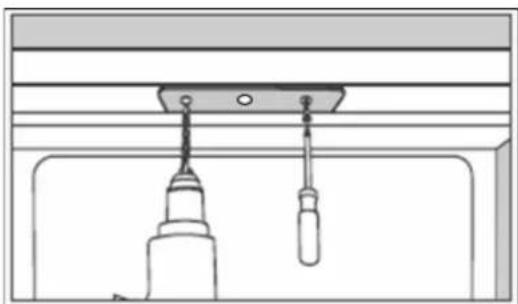
- Undo the screws from the two adjusting bolts that are located on the top of the appliance door and then remove the mounting bracket (1).
- Measure the width of the furniture door, at the halfway point mark a line vertically down the inner surface of the furniture door. You should draw the line from the top of the furniture door to approximately halfway down.
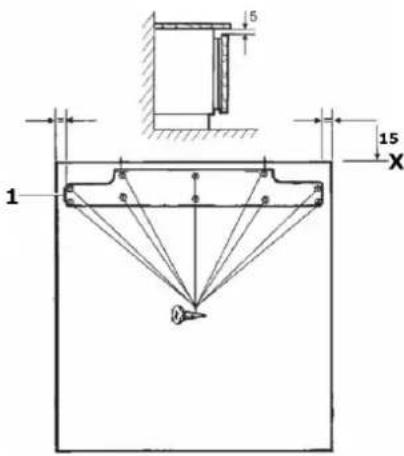
o Place the mounting bracket (1) on the reverse of the furniture door. o The middle of the mounting bracket should be positioned on the line that you have just drawn. Please note the position of the mounting bracket in the above drawing, to ensure that you have the mounting bracket the correct way up.
o The top of the mounting bracket should be positioned approximately 15mm from the top of the furniture door. This will allow you a 5mm gap from the top of the furniture door, to the underneath of your worktop.
o Fix the mounting bracket to the furniture door using the screws provided and a Phillips-head screwdriver. These screws should be fully tightened.
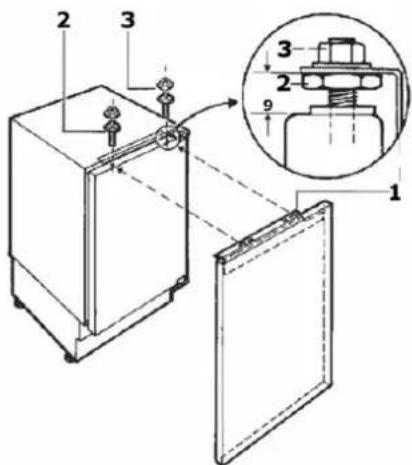
- Hang the furniture door onto the appliance door, making sure that the brackets on the mounting bracket locate over the adjusting bolts.
- Use a screwdriver to adjust the gap on the lower section of the adjusting bolts. The gap should be set to approximately 9 mm (as shown in the above drawing).
- Fix the lower bracket to the bottom of the furniture door and the underneath of the appliance door (as shown in the drawing on the previous page).
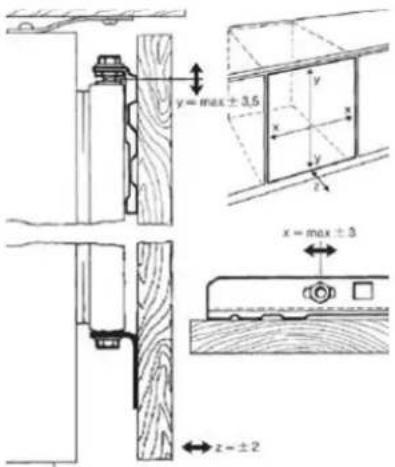
o It is possible to make minor adjustments to the position of the furniture door using the screws on the top and the bottom of the appliance door. You should make these adjustments so that the furniture door is level.
- Insert the cover plate to the top of the appliance, this will just clip into place.
- Open the appliance door.
o Use a suitably sized drill bit to drill through the holes in the bracket, into the work top.
IMPORTANT: The drill bit should be appropriate for the material that your work top is made from.
o Secure the bracket to the underside of the worktop, using the screws provided.
IMPORTANT: These screws should be fully tightened.
o If the appliance is being installed under a granite worktop, use the L shaped brackets provided to secure the fridge to the side of the cabinet. Use a suitably sized drill bit to drill through the three holes in the bracket into the cabinet side on the opposite side to the hinges.
o The oval holes rest over the hinge positions which are not being used on the front of the appliance. Use two screws to secure the bracket to the front of the appliance.
o Check that the door opens and shuts without snagging, as well as checking that the door is sealing correctly.
TROUBLESHOOTING
IMPORTANT: If your freezer appears not to be operating properly, before contacting the Customer Care Department, please refer to the checklist below.
My freezer does not appear to be working/there is no power to my appliance.
o Check that the plug is fully inserted into the power socket.
o Check that there is power to your mains supply (e.g. that there hasn't been a power cut or that the fuse hasn't blown).
o Check that the thermostat inside the appliance has not been turned to the < 0> position.
o Check that your mains supply voltage, corresponds to the voltage stated on the rating plate of your appliance.
My freezer appears to be performing poorly
o Check that the appliance isn't overloaded and that food hasn't been packed too tightly into it.
o The thermostat setting is too low; you should turn the thermostat up higher.
o Ensure that the door is closing properly and that the door has not been opened for a prolonged period in error.
o Ensure that there is adequate ventilation for your appliance.
My freezer is noisy
o The refrigerant gas that circulates the pipework of the appliance may make a slight noise, even if the compressor is not running.
o If the noise worsens or the appliance gets louder than normal; check that it is levelled off correctly, that nothing is touching the rear of the fridge and that nothing placed inside the appliance is rattling.
Ice has quickly formed on the inner back wall of my freezer
o Check that food has not been pushed too far back inside the appliance, so that it is in contact with the inner back wall.
DO NOT ATTEMPT TO REPAIR THE APPLIANCE YOURSELF.
Please note that if an engineer is asked to attend whilst the product is under guarantee and finds that the problem is not the result of an appliance fault, then you may be liable for the cost of the call out charge.
The appliance must be accessible for the engineer to perform any necessary repair. If your appliance is installed in such a way that an engineer is concerned that damage will be caused to the appliance or your kitchen, then they will not complete a repair.
This includes situations where appliances have been tiled in, sealed in with sealant, have wooden obstructions placed in front of the appliance, like plinths. Or any installation other than the one specified by Baumatic Ltd. has been completed.
Please refer to the conditions of guarantee that appear on the warranty card that you receive with the appliance.
AVAILABILITY OF SPARE PARTS
Thermostats, temperature sensors, printed circuit boards and light sources are available for a minimum period of seven years after placing the last unit of the model on the market.
Door handles, door hinges, trays and baskets for a minimum period of seven years and door gaskets for a minimum period of 10 year, after placing the last unit of the model on the market
TECHNICAL ASSISTANCE
To contact the technical assistance, visit our website: https://corporate.haier-europe.com/en/
Under the section "website", choose the brand of your product and your country. You will be redirected to the specific website where you can find the telephone number and form to contact the technical assistance
For further information about the product, please consult https://eprel.ec.europa.eu/ or scan the QR on the energy label supplied with the appliance
Français
BESCHRIJVING VAN HET APPARAAT
OPMERKING:
KAGAPIEMOESKAI\SYNTHPHESH
IPOEIOIOIH: IAPAKAOYME NA BEBAIOOEITE OTI H ZYEKEYH ZA ANENEPROIOIHKHE ANO THN KYPIA IAPOXH TPODOOIAZ PEYMATO IPIN ENIXEIPHEETE NA THN KAOAPIETE.
Mny kaopicete tn ouokun baovtac vepo enavw tnc n 9ekovtac vepo npaw anotuv.
O KatauKntnc npEne va kaOapicetai nepiodikx, xnoiouoovtac eva diauja dittavopakukn oodac kai xiaapo vepo.
KaBapite ta Eaaptnmuata Exwpiota a e anouvi kai vepo. Mny ta KaBapitee o nauvtipio niatw.
MnV npnoonoeite Aiavtka npovta, anoppunavtka n aouvua.
O Meta to nuauio tnc ouakeunc, oouniote naaw ano tvn nepiaoxn nou exete kaBapoei me eva upo navi kal otn ouvexia oteywoTe kaa.
O Tav ooknpoe i kaopuaoc,oteywoTe ta xepia aac kai, otn ouvexia enavaouvdeote to cio so nlektpiko biKtuo.
Anoueon tou katauoktn
O npoyoc tny katauyepnpei va aphipeiia nepioikka. Mnpoeite va xnpouonoe te y'auto ma naoitik onatoula wote va meiwote tnnootnta npou nou oxnatietai.
ZHMANTIko: O katauuknt npenei va anoohetau touaov duo opec to xpovo. O aipouc twv opownu npenei va eanaywote, 0eaptngei ano tn pubmuon tou epmuotn ack n noan trophi naywote Kai 0a anoNkeoote otny katuaen.
Tn npiv ano tn anouuyn, yupote tov enuoyea 0epnootatn ot n thec<5> wote va baiwte ite o ta tpoqnaou nepixovtal otov katauktn eival ka naaymuvea.
KaTaNtNcOuKeUNcTaTPOmu npEnIva aPaeBOUV ano TnV kaTuauuov Oe diapopa eineBaXaptoukai vAnoOnkeUov Oepoe Meoc H auGnon tnc 0epkoiaicTwpOmuwOuv ouvtoeoei tn diapkeia anoOnkeuONcKai ouvenuc Ta TPOmuOa npenIv XpnouonoiovtaOExetka ouvtOxpvikodiatnua.
MHN TOIOOETEITE TPOΦIMA ΣTHN KATAΨYEH OTAN EXEI EEKINHSEI H ΔIAIAKAEA I ANOΨYEH AYTHΣ.
Purojote to diaokontn theoouatn ot th eon <0> kai anouuvdeot n ouakeun ao to peuja.
AfoTe nnpa otny katauyn avouxtm. Mnpoeite va tonoethoete eva mlae zetovepo meoa otov katauxn yva enitaxuyete tn diaikacia anouuucns.
Mnpoeite va xpnoumonouoet eva oouyapi va va kaogapioe to vepo anouyngn nou 0tpee1 oto katw npoc tnc katauuync.
EHMANTIKO: Oa npenei va tonotheoete eepikec naiec netoetec oto danetoou eivai akpuwic nppoot a an to ouokeun. tny nepintwn nou onoiabhnot nooontata vepou anoyuec bye ano tvkatauugn kai staei oto natwa.
O MoIc AeWoeI O npoc nou exi 8nupynthei, toe To eowtepko Tou katauuktn npenei va oTeywoei ka. Av dev viveu auto, Ta npokuei aleoooc oxnatuooc npouoy aovavaapetheta ng ouakeur.
Me aeyva xepia, enavaouvdeote tn ouakeun oac oto nlektipokdelta. KIOu Pteiote to koumu tou eepooatn ot thoen < 5> yia uanepeio24 wovpivvntopeteeotnv kavovik np0uon3>
Ev npenei va enxieipnoete va naayoote pepoka tpoia ma o aotov katauuktn mexvi naapelaei auto to xpvikodiaotnma 24 wpuv.
Mny anojuxete n ouakeun me aalec nkeptpuke c ouokeuec (n.x. steyywntpa maaiuw).Mx npoumonoeite auxnpa metaalukavtukeiueva yia va aphiapeote tov nayo otuv katauyn, kauc auto mnopeiv npokalee i bnn oto yuktu ooutna.
EIGATAZTAZH
EHMANTIKO: npv ano tvn eykataaon kai tn xpn, diaaote oec tic obnyie kai beaawtheta ot n taon (V) kai n ouxvoTnta (Hz) nou avaypaovtai onnv nivakiba xaapaktipotikwv evai akptbisc iua me tvn kai tn ouxvoTnta oto oini oac. Mnopeite va
Bpeite tv nivakida xaapakntpiotikw otyn npootin apotepn akpn tou eawtepuou yueiou.
O kataokevaotnc anokkeiei kae euvn oe nepintwn nou o Ekykataatntc dev tnpoei olouc touc toxovtec kavovioouc npolnnc atuxnatw, o onoi eliva anapalttoia tvkavovkn xpnan kalny kavovnik aeitoupyia tou nektpkou ouotnatooc.
Haektpkn ouvdeon
OKATAYKTHZAIPPOOPIZETAIA TAgEPKHAI MONIMH EKATAZTAH.
Suvotata n ouvean tnc oukeunc ano Eeukuevno aeKptofo, o onoioc 0 eivau meo cnc N.I.C.E.I.C.(EthetaC Evwnc HaeKtoyow) kai o onoioc 0 aumuopovetai ue to I.E.E. (AieOveic Opoi kai Kavoviaoi Aofaaleiac) kai touc tonikouc kavoviaouc.
O kataaukntc aac napexetaue bua 13 amp.Eav oto eAov npenei va aalace tyn aofoaleia oe autn tvnpia, tote npenei va xpanoioneiia aofaoia 13 amp (BS 1362) eykepivn ano ASTA.
Hkaawdiogtodeltavkwivxmupeyn
wE:
Kafe Paon
MnAe OusTeepo
PpaovoKa kitpvO Feiwan
Ene1aXpWpaTawkawdiwOToSikTuOnKepiKuVkawdiWv Tcoukeunc evexetai va uNv avtioxouuve t cEvpwuec anavoeic nau avaywpiQov Tou akpoedektec tou koutouac, npoxphote w ec:
To kaé Kaawio npenei va ouvveei teov akpoektne to onuα "L" (daon) n e To xpuKko
To nke kawdo npenei va ouvdeei me to akpoedktn e to onu a "N" (oustepe), n e to xpuu maudo.
To npaoivo ka kipivo kaawio npenei va ouvdetheta i e tov akpoedektn e to onua "E" (yeiwan), n e to ouubolo tnc yeiwocn, n e to xpaia npaoivo ka kipivo.
O Tav ooknpoe i ouvdeon, dev npenei va unapxouv aedeana opimuata noupata. Ophiyknpac kalwiou npenei va aphiaiietai naov ano to egwepko nepiBna.
ToOno8TeTnO
Suviatatn oukeun oac va eival eykateotnev n mvo ae ma
Theon onou n thepokpaia nepiabalovtoc tnc aiouoc avitatoxei
Otv taivounon klapoac noavapepetai otnv ivakida
Xapaktnpitukw tvc oukeun oc. H ouokeun oac evdexetai va
mnu letoupyei owot aev n thepokpaia nepiabalovtoc dev
enapkeiy ta napakatw evpn tmuw.
Eketetaevn eukpatn (SN): H npouoaa uuktu k oukeun npoopizetai yxpn an aeepkpaiae nepiiaovtoc a10C 32C
Eukpatn (N): H npoboa ouktu npuoipetai via xpnan e θepuokpaoic πepiaalovtoc a 16°C ewc 32°C
YntpONIKn(ST):H npoUOa yukTkn ouokun npooipZeta ia xpon ae Oepuokpaiec nepiBaaovtoc ano 16°C ews 38°C
TpOaN(T):HnapouoApsiKtuOaukeun npooipetai vXpnoeEepuokpaieCneipalovtoc ano 16°C Ew43°C
H ouakeun oac dev npenei va bioketai oe aean nlaikn aktivaobia n va ektiogetal oe ouvex thepohtna akpae c eepokpaiec (x.x. sinaa o eva thepavtro o wma n eva lenta).
H npotra 0a npenei va nopoei va aoviey eveeawk eaeBepa.
Houakeun npenei va Bpioketai etoi wote va u npopeite ekoLa vexete npo0baon ota tpofmaou evai anothekeuvea oe autiy.
Pnpeneva eayeTe av unapxet iiaoyn nektpnpi, noioa 0ivai npooaoun mety evkataotaan tnc ouokeucac.
Avotpeyte nTv npTa tnc ouokuehc oac
Autn 8iaia PENEI va ookpwoei npiv ano tvntoetno tnc npotac eniaw. Ta eapntmuata nou aphipeite ano tn ouakeun evw avtupefete tvnpota gnene Iva diatnpovta yia eaovtkxphon.
NPOEIONOIHEN -Pooaete kata to avoivma twv mevtae6wv, ivat yemuace maoaia kai unapxei kivduvo cpaumatioou av klaioovnto xepiaac.
Anatouevaepaia:
KataaβiPhillips
Kataaβidiio kavovikó
XaIapowTe tic biEoc ouykpTnnc (1) otoukeun kal otouvexia aphipeote npooektu ktn oupa tnc oukeunc.
ToOnoTheote tn Upa Tn CuaokuehC e ma npootateupeyn eniapaevia, wote va mnu kataaortpaei.
ByaTe ta kaiaKa kauψηc (3).
ToOnoBtntote tic bideoc ouykpatnncs (1) otnv anevavrt naevopa tnc ouokeuancnoynv npxkn Touc the. Autec ol bidecn penei va eivaupepiwocphiyvees aaaa xni npwcphiyvees.
AopaeTe Tc BiEe ouypaTnO nC npotac (2) kai, otuouveia, avtortpeTe tne oon touw kai katw mevtote (onwc paivetai oto napanavw diaypaum).
E NaVatonoTeHnOaTnOupaTc ouakeunC kA OtnouveTea ophiTe EaVnPwCs Tc Biedes ouykpatnonc (1) KAtuC Biides ouykpatnonc nTns npotac (2).
ToOnoBtnta KaNakia kauuync (3) otic onec nou eKtiEvta twpa otn deia naeupa tou voulaanou.
SHMANTIKO: Beaiowte eti n npotra aoviei kal kkeive owoia, xwpic punavon, aou ooknpoet en diabkaia avtipoohc tnc npotac.
Aoavipetepte nnpa, npeneva eeyete tn
oteyavonoinnncpactcnsoukeuhc.To aotio oppayiopatoc
dev npeneia vtaalakwbei na onaei. dapopetukda 0 unapxel
eva kevoetautoau kai tou eowteikou nptac.
To aotxO ophiayioatoc npenei va kollaei owota oe oln tn diapoun yupw ano tvnpota.
A v to aotxO ophiyioaTOC dev eiv aOWOTa TOnoETnEvo OTo npiBAnu, 0n penei:
1. Xpouonoiote eva zeto uypo navi kaokouniote me to xepi to Aotio ophiayioataoc expi va kllnoei owota oto nepiBna, Ka K0'oN t biapounnepmuetpkyupw-pw an to npopra
H
m) 90 mm
2. Xpnoaonoinote evaoteywnpa aalwovtnnnepepnpuoan
OepoTntac kal Oepaivete eaoepoc tnc nepioxec tou aoatxou
oepayiaatoc nnc npotac nou dev pookoawvtaowot. H
OepoTnta okaive Ito aotixo oopayiaatoc nue eukajto kal
auto oaaeitpepsi va tonoetnoe te xeiipateite to aotixo
oepayiaatoc otn owotn thc
ZHMANTIKO: MHN OEPMAINETE TO AAZTIXO ΣΦPANIEMATO Θ Σ NOPTA ΜE OTIHOTE IAPA MONO Μ Σ NOY XAMHAH ΕPOMKPAIA'H MHN OEPMAINETE TO AAZTIXO ΣΦPANIEMATO Σ IIA METAO XPONIK ΣAIZTHMA. Ε Σ KAOE AAH ΠΕPIITΩEH ENEXETAI NA POKAHOEI ZHMIA ΣTO AAZTIXO ΣΦPANIEMATO Θ Σ NOPTA, H ONIOA ΔEN Σ KAAYTTETAI ME THN ΠAPEXOMNH ΣΩPAEN EITHYEH.
Aiaotaoicdiapaymuatos
To npakatw diaypaum deixye to meyoeoc tou aoivmuatoqou a xpeiaotei va npopoeetva eykataohtoe tno oukeun oac.
O h oukeun npenei va bioketae eninebo natau. Mnopeite va xpoumonoanaete ta nobia looneewns yva labetae unon onoeosnote noovoc onmaiaac awmuiaies oto natwa.
Pouon tou naiovou / konnlaosic
Otv n ouokeun exei tonoetnei katw ano tvn enuapeia epyaiaac, npopei va anopaoioete va tonoetnoe tia na iivto h kibtwio ia va taipiaete tic unapxouoec movadec kouzivaoc.
Aopoe to nayma otn baon tnc ouakeunc ebiowovtac tic BiDEC ano kabe napeupa tou naymuatoc kai tpaewvtac to neymu npoc to pepoc oac.
Xpnaonounote eva kleisi yia va putheta to uooc twpuuoueuvw nouw.
Avoiaaocexuoc820mmtoepuOmuoeva noid npenei va ophiyyovta npwoc.
Avoiaoacexuoc870mm,toteapuogoeva noid npenla puotouv e uoc 50 mm.
O houkeun 9a npenei va eivai oio idio enineo me tyn katoepa TNC Epiaveuc epyaiaac kai va eivai naov oe enineo thc. EHMANTIKO: Ea n ouokeun dev eivai oe enineo thc, toe mopei va ennpaeotei npota kai to laotixo ophiayipauatoc tn npotac.
Mia anokon npenei va vivei oTo nA / KIWTIOVA aepiaoH Toun npenei va exel nAtoc 600mm kal uio c metaU 140mm kal 90mm, avaloya me to uio cou exet puoiol ouokeur oc.
ToOnoEtnote to nA/ KtBwto kai otouvexia enavatoonOeHnote to naeyua oyn apxikn tou theon yia va to kpahtae tne thon.