RHG 5800 IN - Basket ROSIERES - Free user manual and instructions
Find the device manual for free RHG 5800 IN ROSIERES in PDF.
| Product Type | Extractor hood, recirculation or with external motor |
| Brand | Rosieres |
| Model | RHG 5800 IN |
| Installation | Built-in (IN model) |
| Dimensions (approx.) | Width 60 cm (standard), depth and height vary by model |
| Weight (approx.) | Approximately 15-20 kg |
| Power supply | 230 V / 50 Hz (standard version) or 120 V / 60 Hz depending on country |
| Motor speeds | 4 speeds (1 to 3 normal + 4th intensive speed with automatic return to 3rd after 5 min) |
| Lighting | Lamps (bulbs) to be replaced with identical models |
| Grease filters | Metal, washable by hand or in dishwasher |
| Charcoal filter | Optional (for recirculation version), replace every 6 months |
| Maintenance alarm | Indicator light: after 30 h for grease filter, after 120 h for charcoal filter |
| Timer | Automatic motor stop after 5 minutes (can be activated on each speed) |
| Automatic ICS system | Automatic detection of odors, vapors and gases, speed adjustment (depending on control panel) |
| Controls | Touch panels or buttons (multiple versions depending on model) |
| Remote control | Optional (depending on version) |
| Automatic safety shutdown | Hood goes into standby after 10 h of continuous operation (except 120 V) |
| External cleaning | Damp cloth + neutral detergent; for steel, copper or brass, specific products |
| Internal cleaning | Cloth soaked in denatured ethyl alcohol |
| Installation instructions | Installation by a professional; use the screws provided; observe safety distances |
Frequently Asked Questions - RHG 5800 IN ROSIERES
User questions about RHG 5800 IN ROSIERES
0 question about this device. Answer the ones you know or ask your own.
Ask a new question about this device
Download the instructions for your Basket in PDF format for free! Find your manual RHG 5800 IN - ROSIERES and take your electronic device back in hand. On this page are published all the documents necessary for the use of your device. RHG 5800 IN by ROSIERES.
USER MANUAL RHG 5800 IN ROSIERES
Fixing A (model with external motor and perimeter extraction).
Fixing C (depending on models).
Fixing C (je Nach modell).
Device disassembly (for models with mounting type C). During the following operations always support the device.
! The appliance must be installed by a qualified person in compliance with the instructions provided.
Wear gloves when carrying out installation and maintenance operations.
If the supply cord is damaged, it must be replaced by the manufacturer, its service agent or similarly qualified persons in order to avoid a hazard.
Warning: Failure to install the screws or fixing device in accordance with these instructions may result in electrical hazards.
IMPORTANT: So as not to damage your product, during installation use only the screws provided. Make sure these are used as shown in the following instructions.
Prepare the power supply (see "Warning" sheet).
For the ducting version and version with an external motor, prepare the pipe for air evacuation (see "Warnings" sheet).
FILTERINGORDUCTINGVERSION?
The hood may be in filtering version, in ducting version or in version with an external motor. Decide from the outset which type is to be installed.
For better efficiency, we recommend installing the hood in the ducting version or in version with an external motor (if possible).

Ducting version
The hood purifies the air and evacuates it to the outside through an exhaust duct.

Version with external motor
The hood purifies the air and evacuates it to the outside through an exhaust duct. The appliance must be connected to an ducting apparatus/motor which works on its own using the appliance as a union for the air to be scavenged

Filtering version
The hood purifies the air and recycles the clean air back into the room.
CONTROLS
Only for hoods equipped with electronic control:
(in models sold in Scandinavia, the following features are not present)
The 4th speed (intensive) is automatically lowered to 3rd speed after 5 minutes of operation to optimise energy consumption; in hoods with voltage 120V / 60Hz this function is not active and the 4th speed is indicated by the letter b (Booster).
-
If the hood is left on (lights and/or motor), after 10 hours in the absence of commands from the user, it will automatically switch to OFF condition with all services switched off. In hoods with voltage 120V / 60Hz this function is not active.
-
The Buzzer emits a "beep" each time that a command is set from the keyboard or remote control (optional).
-
In the event of interruption of power during the hood, if you restore the hood in the OFF state, then the engine must be reactivate manually.
Controls of Fig. 1:
A) ON/OFF - lamps. This button is also used for the alarm function of the anti-grease and charcoal filters.
Filter alarm: After 30h of motor operation, the L1 RED LED comes ON and remains ON for 30^ (the grease filters have to be cleaned). After 120h of motor operation, the L1 RED LED comes ON and flashes for 30^ (the charcoal filters have to be changed if the hood is so equipped). The Filter Alarm is ONLY given with the motor is OFF. The Filter Alarm is cancelled (HOUR meter reset) by holding down button A for 2^ .
B) Press button B to start the motor at Speed 1. The speed is shown by the L1 GREEN LED coming ON. When held down for 2^ , the motor switches off. A single pressure on the button when the LED is ON activates the timer function (motor ON for 5^ ), shown by the flashing LED. To cancel the timer function, press the button again ONCE.
C) Press button C to start the motor at Speed 2. The speed is shown by the L2 GREEN LED coming ON.
A single pressure on the button when the led is on activates the timer function (motor on for 5'), shown by the flashing led. To cancel the timer function, press
the button again ONCE.
D) Press button D to start the motor at Speed 3. The speed is shown by the L3 GREEN LED coming ON. A single pressure on the button when the led is on activates the timer function (motor on for 5' ), shown by the flashing led. To cancel the timer function, press the button again ONCE.
E) Press button E to start the il motor at Speed 4. The speed is shown by the L4 GREEN LED coming ON. A single pressure on the button when the led is on activates the timer function (motor on for 5' ), shown by the flashing led. To cancel the timer function, press the button again ONCE.
Controls of Fig. 2:
A) ON/OFF - lamps. This button is also used for the alarm function of the grease and charcoal filters.
Filter alarm: After 30h of motor operation, the L1 LED comes ON and remains ON (the grease filters have to be cleaned). After 120h of motor operation, the L1 LED comes ON and flashes (the charcoal filter have to be changed if the hood is so equipped). The Filter Alarm is ONLY given with the motor is OFF. The Filter Alarm is cancelled (HOUR meter reset) by holding down button A for 2^n .
B) Press button B to start the motor at Speed 1. The speed is shown by the L2 LED coming ON. When held down for 2^ , the motor switches off. A single pressure on the button when the LED is ON activates the timer function (motor ON for 5^ ), shown by the flashing LED. To cancel the timer function, press the button again ONCE.
C) Press button C to start the motor at Speed 2. The speed is shown by the L3 LED coming ON. A single pressure on the button when the led is on activates the timer function (motor on for 5' ), shown by the flashing led. To cancel the timer function, press the button again ONCE.
D) Press button D to start the motor at Speed 3. The speed is shown by the L4 LED coming ON. A single pressure on the button when the led is on activates the timer function (motor on for 5' ), shown by the flashing led. To cancel the timer function, press the button again ONCE.
E) Press button E to start the il motor at Speed 4. The speed is shown by the L5 LED coming ON. A single pressure on the button when the led is on activates the timer function (motor on for 5^ ), shown by the flashing led. To cancel the timer function, press the button again ONCE.
Controls of Fig. 3:
A) ON/OFF - lamps. This button is also used for the alarm function of the grease and charcoal filters.
Filter alarm: After 30h of motor operation, the L1 LED comes ON and remains ON for 30^ (the grease filters have to be cleaned). After 120h of motor operation, the L1 LED comes ON and flashes for 30^ (the charcoal filter have to be changed if the hood is so equipped). The Filter Alarm is ONLY given with the motor is OFF. The Filter Alarm is cancelled (HOUR meter reset) by holding down button A for 2^ .
B) The button B activates/deactivate sensor function (when activated the sensor is lit by the LED L2).
C) Press button C to start the motor at Speed 1. The speed is shown by the L3 LED coming ON. When held down for 2^ , the motor switches off.
D) Press button D to start the motor at Speed 2. The speed is shown by the L4 LED coming ON.
E) Press button E to start the motor at Speed 3. The speed is shown by the L5 LED coming ON.
F) Press button F to start the il motor at Speed 4. The speed is shown by the L6 LED coming ON.
SENSOR SENSITIVITY: sensitivity of the sensor may be modified in accordance with individual requirements. Modify the sensitivity by pressing simultaneously on the A and B buttons. The set sensitivity level will be displayed via the 4 flashing LEDs - L3, L4, L5, and L6. The desired sensitivity is set via the C, D, E, and F buttons (C being minimum, F being maximum). Set the sensitivity level to minimum for gas cook tops, medium for glass-ceramic cook tops and maximum for induction cook tops.
WARNING: when led L1lights up, this indicates that the grease or charcoal filters require cleaning.
FILTER SENSOR (activated via the B button): this device is equipped with a completely automatic system (Advanced Sensor Control) for management of all hood functions. Thanks to the Advanced sensor Control (ASC), air circulating in the kitchen is maintained clean and odour-free without requiring any user intervention. The sophisticated sensors are able to capture any type of odour, vapour, smoke or heat caused by cooking. The ASC also captures any possible irregular gases present in the environment.
When the sensor function is activated, the C, D, E and F buttons activate the speed temporarily, to then be overridden by the automatic speed setting.
Warning: in order to avoid damaging the sensor, never use silicone products near the hood!
Controls of Fig. 4:
This device is equipped with a completely automatic system (Advanced Sensor Control) for management of all hood functions. Thanks to the Advanced sensor Control (ASC), air circulating in the kitchen is maintained
clean and odour-free without requiring any user intervention. The sophisticated sensors are able to capture any type of odour, vapour, smoke or heat caused by cooking. The ASC also captures any possible irregular gases present in the environment.
A)Turns the lights off.
B)Turns the lights on.
C) Reduces the motor speed until reaching zero. If pressed for 2^ when the Filter Alarm is active, the HOUR counter is reset.
D) Drives the motor (calling the last speed used) and increases the speed until reaching maximum.
E) Activates/deactivates the sensor (AUTOMATIC or MANUAL mode). In Automatic mode the sensor is active and the letter "A" appears on the display (L).
L) Display:
-
signals the running speed
-
signals Automatic mode by displaying the letter "A". When the motor speed is changed, the running speed is displayed flashing 3 times, and then the letter "A" reappears.
-
signals the filter alarm (with motor off) by displaying the central segment for 30^ .
FILTER ALARM: Displayed for 30^ when the motor is off:
After 30h of operation the central segment lights up on the display; It indicates that the grease filters need to be cleaned.
After 120h of operation, the central segment flashes on the display; It indicates that the grease filters need to be cleaned and the charcoal filters replaced.
After cleaning the grease filters (and/or replacing the charcoal filters), restart the hour counter (RESET) by pressing the key C during display of the filter alarm.
Warning: in order to avoid damaging the sensor, never use silicone products near the hood!
GAS SENSOR SENSITIVITY: The sensitivity of the sensor can be modified to suit your requirements. To modify the sensitivity, the appliance must be in manual mode (i.e. the running speed and not the letter "A" must appear on the display); if not, press the key E.
Modify the sensitivity by simultaneously pressing the keys D and E. The set sensitivity is indicated on the display. By means of the buttons C(-) and D(+) the desired sensitivity is set Store the "new" sensitivity by pressing the key E.
Controls of Fig. 5:
Key A:Turns the LIGHTS off
Key B:Turns the LIGHTS on.
Key C: reduces the motor speed until reaching minimum. If pressed for about 2", it stops the motor and storse the speed.
KeyD : drives the motor (calling the last speed used) and increases the speed until reaching maximum.
L Display
-
signals the running speed.
-
signals the filter alarm (with motor off) by displaying the central segment for 30^ .
-
signals Timer activation with a flashing number.
Key E: activates the TIMER (when the motor is running), so that the hood stops automatically after 5'. Also Zero-sets hour metering when the Filter Alarm is active (motor OFF).
FILTER ALARM: Displayed for 30^ when the motor is off:
After 30h of operation, the central segment lights up on the display; It indicates that the grease filters need to be cleaned.
After 120h of operation, the central segment flashes on the display; It indicates that the grease filters need to be cleaned and the charcoal filters replaced.
After cleaning the grease filters (and/or replacing the charcoal filters), restart the hour counter (RESET) by pressing the key E during display of the filter alarm.
Controls of Fig. 6:
A) turns the lights on/off.
B): turns the TIMER on/off: press once to turn the timer on, therefore, after 5 minutes, the motor cuts out (at the same time the selected speed blinks on the display); the timer remains on if the motor speed is changed. Display C): - indicates the selected motor speed (from 1 to 4); - indicates Timer On when the number blinks; - indicates Filter Alarm when the central segments is on or blinking.
D): makes the motor work (at the last speed selected); pushing the button again, the speeds of the motor are sequentially selected from 1 to 4; keeping this button pressed for about 2 seconds shuts down the motor.
R): resets the grease filters or charcoal filters; when the filter alarm appears (i.e. when the central segment on the display goes on), the grease filters must be cleaned (30 hours of operation); when the central segment starts blinking, the grease filters must be cleaned and the charcoal filters replaced (120 hours of operation). Obviously, if the hood is not a filtering model and does not have a charcoal filter, clean the grease filters both when the central segment goes on and when it starts blinking. The filter alarm can be seen when the motor is off and for about 30 seconds. To reset the hour counter, keep the button pressed for 2 seconds while the alarm can be seen.
Controls of Fig. 7:
This device is equipped with a completely automatic system (Advanced Sensor Control) for management of all hood functions. Thanks to the Advanced sensor Control (ASC), air circulating in the kitchen is maintained clean and odour-free without requiring any user intervention. The sophisticated sensors are able to capture any type of odour, vapour, smoke or heat caused by cooking. The ASC also captures any possible irregular gases present in the environment.
A) : switches the lights on/off.
B) : enables/disables "Automatic" function. When this function is selected, an "A" appears on the display C, and the speed of the motor increases or decreases depending on the smoke, odours and gas present in the kitchen.
Display C): - indicates the automatic operation of the sensor (the letter "A" appears);- indicates the motor speed selected automatically by the sensor; indicates the filter alarm whenever the central segment is illuminated or flashing.
D) : decreases motor speed / Reset; decreases motor speed to zero (stopping); in any case however, after approximately 1 minute, the hood resumes automatic operation at the speed set by the sensor. Whenever the key is pressed during the display of filter alarms, a RESET occurs, and the counting of the hours resumes again.
E) : increases motor speed; in any case however, after approximately 1 minute, the hood resumes automatic operation at the speed set by the sensor.
This device is equipped with a completely automatic system (Advanced Sensor Control) for management of all hood functions. Thanks to the Advanced sensor Control (ASC), air circulating in the kitchen is maintained clean and odour-free without requiring any user intervention. The sophisticated sensors are able to capture any type of odour, vapour, smoke or heat caused by cooking. The ASC also captures any possible irregular gases present in the environment.
Modification of sensor sensitivity: sensor sensitivity can be modified by operating as follows:
- stop the hood by pressing key B. - Simultaneously press keys D and E (the sensor's sensitivity index will appear on the display) - Pressing keys D or E, the sensor's sensitivity will either increase or decrease (1: minimum sensitivity / 9: maximum sensitivity). - whenever the power supply is interrupted, the sensor will resume operation with a sensitivity index of 5.
Warning: in order to avoid damaging the sensor, never use silicone products near the hood!
Warning: in order to avoid damaging the sensor, never use silicone products near the hood!
Controls of Fig. 8:
Switch A: LIGHT; position 0: light off; position 1: light on.
Switch B: MOTOR SPEED: makes it possible to select the motor operating speed; position 0: motor off.
C:Motor on light.
Controls of Fig. 9:
A): turns the lights on/off; every 30 hours of operation the corresponding pilot lamp comes on to indicate that the grease filters must be cleaned; every 120 hours of operation the corresponding pilot lamp flashes to indicate that the grease filters must be cleaned and the charcoal filter replaced. To restart the hour counter (RESET), hold the button A pressed down for about 1^ (while the pilot lamp is on).
B) drives the motor in first speed (the corresponding pilot lamp comes on); when holding it down for about 1", the motor cuts out; when pressing the button a second time (while the pilot lamp is on), the TIMER is activated and thus the motor stops after 5^ (the pilot lamp flashes).
C): drives the motor in second speed (the corresponding pilot lamp comes on); when pressing the button a second time (while the pilot lamp is on), the TIMER is activated and thus the motor stops after 5^ (the pilot lamp flashes).
D): drives the motor in third speed (the corresponding pilot lamp comes on); when pressing the button a second time (while the pilot lamp is on), the TIMER is activated and thus the motor stops after 5' (the pilot lamp flashes).
E): drives the motor in fourth speed (the corresponding pilot lamp comes on); when pressing the button a second time (while the pilot lamp is on), the TIMER is activated and thus the motor stops after 5' (the pilot lamp flashes).
MAINTENANCE
Before cleaning or maintenance cut the power.
Cleaning the hood
WHEN TO CLEAN IT: clean in relation to use, at least every 2 months to prevent the risk of fire.
EXTERNAL CLEANING: use a cloth moistened in lukewarm water and neutral detergent (for painted hoods); use specific products for steel, copper or brass hoods.
INTERNAL CLEANING: use a cloth (or brush) soaked in denatured ethyl alcohol.
WHAT NOT TO DO: do not use abrasive or corrosive products (e.g. metal sponges, brushes, too hard brushes, very aggressive detergents, etc.)
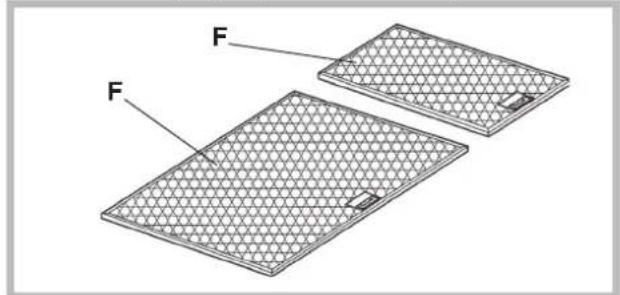
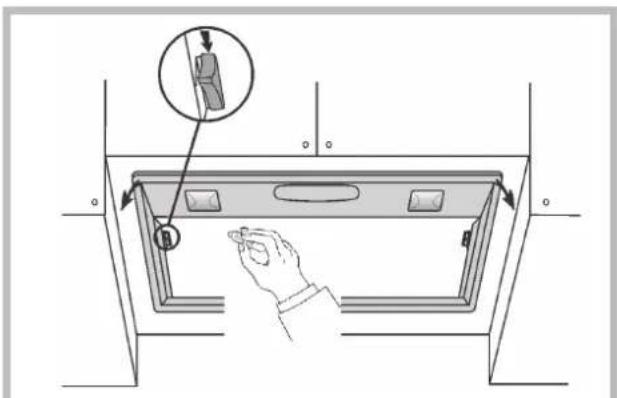
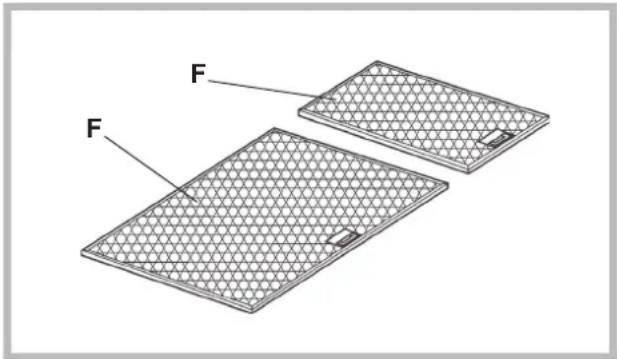
Cleaning the grease filters (F)
WHEN TO CLEAN IT: clean in relation to use, at least every 2 months to prevent the risk of fire.
HOW TO CLEAN THE FILTERS: hand wash or in the dishwasher using a neutral detergent. If washing in the dishwasher, possible discoloration of the filters does not in any way compromise their functioning.
Replacing the charcoal filter
(for filtering version only)
WHEN TO REPLACE IT: replace in relation to use, at least every 6 months.
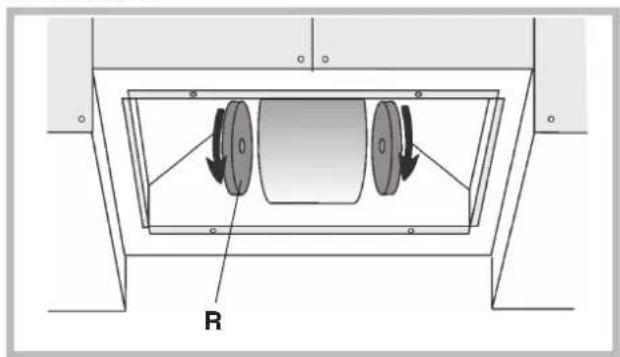
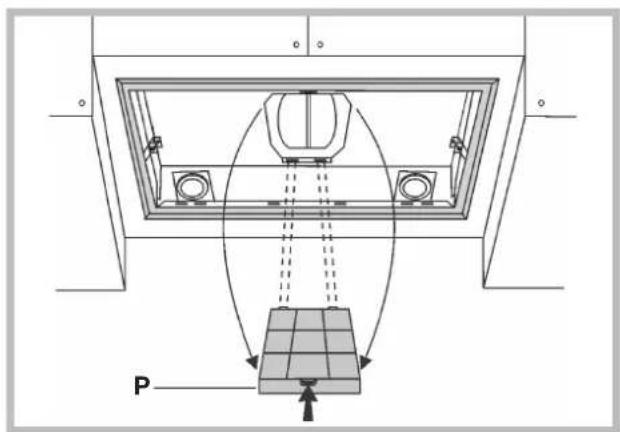
HOW TO REMOVE IT: depending on the model, the unit is equipped with the round charcoal filters or with the rectangular charcoal filter.
If the unit is equipped with the round charcoal filters (R), remove the charcoal filters with a twisting movement.
If the unit is equipped with the rectangular charcoal filter (P), press on the clamp and rotate the filter downward until the 2 tabs can be removed from the housing.
Lighting
Replace it with lamps of the same type; if a lamp is not listed in the table shown in the "Warning" worksheet, please contact the support center.

MALFUNCTIONS
If something appears not to be working properly, do the following simple checks before calling Technical Service:
The hood is not working
Possible cause (1): Power cord not securely plugged in.
Correction: The hood was never electrically connected by the installer.
Call the electrician/installer.
Possible cause (2): A speed has not been selected.
Correction: Select a speed in the control panel.
If the hood has turned off during normal functioning, check that the power has not been disconnected and that the omnipolar disconnection device has not tripped.
- The blower does not work but the lights do
Possible cause: The blower motor connector is not plugged.
Correction: Locate the blower motor connector and plug it. Check to see if the fan now works. If the problem persists, call Technical Service.
The hood is not operating effectively
Possible cause: Dirty filters/baffles.
Correction: Check to be sure the filter is clean.
For ducting hood and hood with an external motor
Possible cause (1). Ducting requirements inadequate. If your duct length
exceeds the manufacturer's requirements, hood performance will suffer
Air-flow will also be reduced if the house duct work is too small or there are too many elbows in the system.
Comply with the official instructions provided by the competent authorities in merit when installing the disposal duct (example, the air collected must not be conveyed into a duct already used to central heatings systems, thermosiphons, etc.). The room contains air taps.
Contact your installer.
Possible cause (2): Obstruction in duct work.
Correction: make sure nothing is blocking the vent (bird nests or kinks in the duct work).
Possible cause (3): Damper blade may not be opening.
Correction: Make sure the tape is removed from the damper blades and that it swings open freely.
For filtering hood
Possible cause: the charcoal filter/s is saturated.
Correction: replace the charcoal filter/s.
The lamp does not work
Light spot (LED):
If a lamp is not listed in the table shown in the "Warning" worksheet, please contact Technical Service.
Incandescent lamps:
Possible cause: The lamp or socket may be defective or a wire could be disconnected.
Correction: place the lamp in another socket; if the lamp is not working, replace with lamp of the same type; if the lamp works, the original socket may be defective or a wire may be disconnected. Call Technical Service.
Halogen lamps:
Possible cause: The lamp or socket may be defective or a wire could be disconnected.
Correction: replace with lamp of the same type. If the problem persists, call Technical Service.
- Remote control not working (where present)
Possible cause (1): Link lost between the remote control and the hood.
Correction: Check to see if the hood works with the control on the hood. Remove power from the hood at the circuit breaker then reapply power. Relink the remote control to the hood, following the instructions supplied with the remote control.
Possible cause (2): Remote battery dead.
Correction: Change the battery.
Vertical telescopic trolley is locked (where present)
If all LEDs flashing, the telescopic trolley is locked. Wait 30^ and press the Up/Down button to release the trolley.
If Up/down button flashing, the grease filter is not positioned correctly. Reposition properly.
If the trolley is locked, check that the cable connector is not disconnected. If the problem persists, call Technical Service.
Cause possible : Filtres / compartments sales
"Attention", contacter le service technique.
A):para ligar/desligar as luzes.
Oplossing: Controller of de filter schoon is.
BbITRAKKa OCHUaET BO3dyx N BbI6paCbIBaET erO HApKy Upe3 BbITKHyHO Tpy6y.

Bepn C Bhe Pmme
BbTtKaOOhuAaET Bo3dyN bbl6paCbIaEtero Hapkyepe3 BblrrkHyto Tpy6y.PnH6pDOnKHeBbItbNoKnHcyKOTcoca,KOTOpbIbSyet DeIECTBOBaTB TeueHMe OTeJIbHbI,NCIOJIb3yJcTpoIcTBO KaChteBc OCHBoI dY qTaHaOBKa Bo3dy 3BakyHpObaTb.

QnnLppnannm
BbTtKaOuHaaeTOB3dyxNBO3BpaaTeOuHHeHHbI BO3dyxB NOMueHne.
OPTAHbIyIpyPABJIeHnI
Tolko dnaBbTuuec c aeeepnnean Gnnnnnynnnne
(MoJeI, npOaBaembIX CKaHmHaBn, cIeDyUoiNe fHyHKmH HeT) B CEiXh OITOMMaIIu NpTe6JIeN 3HePrr 5MHyt PaobToI 4-AckOpOCTb (MHTEChNBHa) aOBATMAtueNcK IpeXoDHT Ha 3-Ho CKOpOCTb
-
EcIn B TeueHne 10 Yacob He MeHaeTcra ynpabJeHne BKIOUeHHo KyxOHHOB BbITRAKo (BKIOUeHo OcBeJeHne n/INn NOcCBetKa), To BCE cyHKmI aBOMATMueckn OTKIOUaHOTc n BbITRAKa IepExoHn T coCTOHRne OFF (BbIKI).
-
KaKbIpa3, KOrDa BbJaTecR KOMaHaC d KKnAbTpyb IIN NpIbTa JnDCTAHIOHOHOTynpAbeNHe (OniioHaBbIbBapNaHT), cpaBaIbIaBt eF yHkUd PoDTBepeXeHHeY bIPOITHEHrKOMaHbIb3BbIKoBbIM CnTHAnOM "6MHT".
-
EcIn B pexKHe pa6oTbI BblTJxKn HactyHnBhe3aHHe npeKpaueHne npaunB CteB 3eKtPO3HePnB, BblTJxKa AETOMATUeCKn BblTKOHTcE, a KHOJa IqTeB B noToXeHne OFF (BblKI.). Cledyet NOTOM NOBTOpHb BkIOHTb DbrAtelb BpyuHyIO.
Kreannnnn yippanneenn no Pnc.1:
A) BKJI/BlIKI nOcbETKn. KnabHnla Hcnonb3yetcN iDn c6poca abapHHoro coCToHnra fHbTPOB 3aepKKn Xnpa n yrOblbIX fHbTPOB.
AbaHnHoe cOToTHNK fNbTpOe NO nCTeEHm 30 cOaobTbMOTopa 3aHnRAeTCnHnDKaTOpL1KPACHbl, KOtOpB ocTa eCzKHeHBIM TceEHNe 3oCk (nopA 3aUuMaTb KfNbTpbl 3aedPkn Kna).
No ncteHn 120 yacob pa6oTb MOTopa 3aXnraetc HndkaTOp L1 KPACHbI, KOTOBIN PPODONKAEr MIRATb Ha 30 cek (napa 3ameHTb yOJbHbE fNtBpBc, eCNI BtRkKa CHa6KeHa HMI). ABapHHoe COCTHHe fNtBTOB OSHAUXBAETc TOIBKO KOrda MoTOp OCTAHOBIEH. C6poc abAPHHORO COCTOHn hNtBTOB (c5poc NODcTeHa cAcob) npOnxCODH HaxaTne KNabwn A Ha 2 cek.
B) Hakatne KnaBIMU B bI3bIbaeT BKIOHueHMe TOPOPA hA 1-OJ CKOpOCTN. CkOpocBy kya3BaEaTeMH INHnKATOpOM L1 3EJIeHBIM. PnH Hakatm KnaBIMu Na 2 cek MOTOP bIKTIQUoAeTc. HAKATne KnaBIMu OOnHM UeJIYKOM, KORda
C) Haxatne KnaBnwn C BbIbIbaeT BkNooyHne Motopa Ha 2-0cckopocTH. CkopocTb Yka3IbAeTc HnDnKATOpom L2 3EIEHbIM. Haxatne KnaBnwn OHNM UeJTHKOM, KOrDa INHnKATOp 3aXoKeH, BbIbIAeT AKTNBaUNO fHnHKUIN TaHMepa (MOTop npDoJnxAe paboTaB B TeueHne 5 MNH), O Yem Daet 3HtB MmAHane INHnKATOpA. Jyndaehn FyHKuIN TaHMepa HxKMITE ONrTB KNaBnWy ODNHM UeJIYKOM.
D) Haxatne KnaBnU D BbIbIaBcT BkNoHcHne MToP aHa 3-eckopocTH. Ckopoctb yka3bIaBcTe rHnKATOpOM L33ENEHbIM.Hakatne KnaBnU OHNM UeJYKom, KOrDa INdKaTOp 3aXoKeH, Bb3bIaBcT AKTNBaUNIO fHKnLm TaMHepa (MToP npDoJIxAeTa p6oTaB B TeueHene 5 MN), o Yem Daet 3HTb MIRAHNe INdKaTOp. dnyaIeHHyHKuIN TaMHepa hAXMNTe ONrTB KNaBnU OHNM UeNtKOM.
Hakatne KlaBnwn E Bb3bIaet BkNoeHne Motopaa H 4-0ckopoctn. CkopocTb yka3bIaetcnaHdNkataopom L4 3EHEhIM.Hakatne KlaBnwn OHNM uJHKOM, KORda HNdkaTOp 3axKeH, Bbl3bIaET AKTNBAuIOΦHHKUN Taimepa (MOTOP npoDOnJaet paOtaTB B TeueHne 5 MNH), o Yem daet 3HAT MIRAHNE INHKnApato. Jny DaJIeHnФyHKUN Taimepa HAKMNTe ONrTB KlaBnWU OHNM UeNKM.
ApaBnun ynpaBneHno Pmc.2:
A) NaMNoKn BKl/OTKl. 3a KaNabMa HCNoJIb-3eYcTaIOKe TaIOAbaHNOH ΦyHKUIN KpOpyNaBnBaHOuX IN yrOJIbHbIXΦmIbTPOB.
AbapnHbI CNHAN PnIbTpOB: Nocne 30 Yacob pa6oTb I DnRatena 3aIopaaetcN octaTeC rOpTeB CBeToND L (3to 03hauaet, TTO npa nCTNTb JxnpoynaBnBaHOuuee PnIbTpbl).Pnocne 120 Yacob pa6oTb IBnRatena 3aIopaaercN HnauHaMeMIRATb CBeToND L (3to 03hauaet, TTO npa MeHbTyOrNbHbe FInbTpbl,ecIN BtJHKHOH 3OHT NmM OCHaUeH) AbapnHbI CNHAN PnIbTpOB NOBnEETC TOJIbKO npn OCTAHOBJIeHHOM DnRatene. AbapnHbI CNrHan FInbTpOB aHHynpyOT (c6poc CteTuKApACOB),depKa hXaToN KlaBnUy A B TeHeHne 2 cekynd.
B) Pn HkataH N KnaBIMu B DnBATEb 3aNyCKaTcH NaepBoi ckopoCTN. CkopoCb 6o3HaAeTc 3aRopeBWMcC bTeToNDmO L2. Ecn JdpKaTb 3Ty KNaBIWu HAKATOB T CEYHeH 2 cekyH, To DnBATEb OTKnIOaETc. EcH BInOnHHTb OHO HkataH N KhoKN Pn rOpauMe CBeTONDoe, To nDkoHIOaETc FyHKUaTaiMePa (DnBATEb BKIOaETc Ha NTb MInHT), o cem CnHnIu3HypeT mIauOuIN CBeTOND.o IJIr OKtIOueHn PhyHKUu Taimepa HAKMTE KnABIWu NOBTOPO eE paa3.
G)PnHakatmKnabuunCdbrataeB3anyckaeTcHbTbopoNCKoocTH. CkopocTb 603hauaetc3aTepeBWMcBcetoMDomL3.ECNblnoHTb OHO HAKATNE KHONKnI nproTpoJeem CBtoNDIOe,TO NOKlnOaecTc FyHKUra Taimepa (DbraTeB BKIOVAeTcH NaTb MHyT),O cEM CnHAn3NpyETMgAuaDcBOToNDIOE,INr OTKIOUeHEnyFyHKUN Taimepa HaxMMTE KnaBwuy NOBtPOHo Eue pa3.
D)Пинхати Кларшд Дыгагаль Зануckaetс Ha Tpeьс корocst.СКорocь 6037aHaeTcZarpoeBWMNcBETOДMOM L4.EcIN BbIIOHHTb OdHO HAKATYE KONKпnproRgUeM CBETOMDOE,To NOKIIHOaETCФИKHJIYТаймета (Дыгагаль BKIOVAETcHЯ NITb MmHT),ОчсMuHn3PnyETMHaTOuWCBETOID.NДОТКIOUHeHMyHKnUNTaimepa HaxMMTe KlaBshy NOBtphO eIe pa3.
E) PnH haxaTHN KnaBnU E DbratEn 3anyckaetc Ha YeTbeptOn CkopocTN. Ckopocb o6o3haaTeC3 aropeBwnmCBetOIOOM L5.Ecm BInoONHTb ONo HaxaTne KNOKN pNr ropraem CBetOIOne, To nokKnIOuAeTCFyHKUa Taimepa (DbratEn BKNIOuaeTCHa NITb MHyT), O cEm CNHAn3HPyET MnRAHOUcIM CBetOIOHD. dIra OTKIOHeHH FyHKUa Taimepa HAKMHTe KnaBnUy NOBtOpHo eue pa3.
Knabnyn npabneHno Pnc.4:
DAnHHbI npHbOp ChabXeH NoHIOCTbIO ABToMaTHueCKO CnCTeMoH "ADS" (Advanced Sensor Control), o6eCneYBaIOUeY npApaBHeNc BEmc FyHKnHM BbITKKn. 5bnarOapr chtMe "ADS", Bo3dyx Bkyxhe octaetcBcerda NCTbM HIIuHEHbIM BC8KHX 3anaXOB, 663 KAKORoMBo BMEaTeJbCTBa CO CTOpHObl NOJIb3OBeTEn. DaTuKN NepeIoBOH KOHCTpyKUn CnOcoBbI yNaJIbNtB HauNHyE BC8KHX 3anaXOB, napOB, bIMOB ININ TenerNa BCNECTBne npOceCaKeHbI. CnCTema "ADS" o6hApyKbBaETaKke HauNHyE FA3AB NOMEUHMM.
A)BbIKIOyaeT IODCBETKY
B) BknoyaeT NOCBETKY
C)YMeHbIaET ckOpocTb MOTOPa Do Hynr. Haxatme KnabuHn Ha 2 cek npn AKBauN ABapuHoro COCTOHHA FmbltpOB Bb3bIbae TcPoc CchTuHa cAACOB.
D) Bknoaet MOTop (co ckopoctbH, KOtopa8 bHa H6paHa nocneHn pa3) n yBENuHBAe CKoPcTb DO MAKcHMaJIbHOH.
E) AKTNBpye/T de3akTnBpyeT DaTmIK (ABTONMATUHECKN mnn PYHOO pexHM). B ABOtMATUHECKOM pexMme DaTmIK AKTNBPOBAH n Ha DnCnIee (L) NOBJIETcR 6yKRA "A".
L) Ducnnei:
-
noka3bIBaET deIcTByIOUyIO ckopocTb
-
noka3bBAeT ABOMaTHueckn peXHM OTobpaXeHnEM 6yKbI “A”. PnpeKIOHcOcPOCT MToPOTA OTobpaXaET DeNCTBHyOuO CKoPoCTb TpEmMAHARIMM, 3ATEM HOBB
otobpaKaet6yKBy"A".
- OTo6paKaET ABaPmHoe CoCToRHe MfNbTPOB (npi BbIKHOueHHOM MOTOpE), npi 30m 3axKraTeC TcEHpAIBHcEMeHT Ha 30 cek.
ABAPINHOE COCTOHRHE FNbTPOB: NOKa3bIBaeTcPn BbIKIOHOM MOTope Ha 30 cek.
No ncteyen 30acobpa6bHa dncnnee NOBnRETC6yKBA"F";3o O3haaet,TTO Heo6xOIMO 3aHmuaTb fnhltpTa 3adePkKn Knpa.
No IcTeueHn 120 Yacob pa6oTbHa Daicnnee Mraet 6yKBa "F"; 3To o3Naaet, CTO HeoBxOIMO 3aHnIaTbФmblTpbI 3aepkKn Xnpa IaMeHrTB yOrlbHbIe FmblTbL.
Iocne 3aHCTK HnIbTPOB 3aepKnn Knpa (MnIIM 3aMeHbI yTOIbHbIX pNIIbTPOB),
dIIO nOBTOHOro 3aYcKa NIOcTeA Yacob (CEPOCA) HAKMITE KnaBNIy C,
NOKA OTo6PbKaaeTcA BApINHOe COctOHIe HnIbTPOB.
BHIMAHHE! UTo6bI He NoBpeXdaTb DaTcN, N36eKaJTe npImeHeHne CnIKHOBOBbIX CpeCTB B6IN3N OT BtTRK!
YBCTBNTELbHOCTb DATUHKA HANINHRA3A: Bbl MoKeTe N3MeHHTb YCBCTBNTELbHOCTb DATUHKA NO CBOEMY yCMOTPEHNO. DnI 3Toro Heo6XODIMO, T06bl npN6op HaxOuINcB COCTOHNpyHOROp EKIMa (t.e., Ha DCnPHe H DoJNKa OTO6paKaTbc 6yBaA"A,a DeNCTByUOaARCKOPoCTb; B pOnTINBHOM Cnyae, HAKMNIte KJIABNUW E.
NMeHHe YCbCTBnTeJIbHOCTb HkAaTHe KNaBnUd N d KNaBnUd E OndHOpeMeHHo. HaIcnne 6ydet NOka3bIbaTc bHa6paHann Ya CBCTBnTeJIbHOCTb. HApapTaHe NyKHyIOYCbCTBnTeJIbHOCTb KNaBnAMCa C(
)N D(+)。CoxpaHnTe“HOByo"yBCTBnTeJIbHOCTb HaKaTHeM KnaBnIe N E. KnabNnUynpAbneHnno Pnc.5KnabNnUynpAbneHnno Pnc.5
KnaBnuaA:BbIKNIOHae NODCBETky
KnaBnB:BKnIOaTeNoCDBeTky
Knabniuca C; CHPKAET CKOPCTB MOTO DA MMNIMAMBJHO. Haxatne KnaBNIH 2a 2 CEK Bb3IbBAET OCTAHOB MOTOPA C 3aONOMHAIHEM TEEUYI KCKOCTH.
KnaBnwaD:BkHouaet MOTOp (cNoCneHeH NcNoIb3ObaHHO CKOPoCTbHO) nYBEInuHBAETCKOPOCTbMOTOpAoMAKcMaJIbHOH.
DncnnL:
- NOKa3bIbAeT TeKUyUcKOpocTb
-OTO6pbaetaet aabapHIOE COCTOHNE HINbTPOB (PnIb BbIKHOEHHOM MOTOpe) 3aKmHmne UeHTpAIBo HOrO cerMeHTA
- NOKa3bIbAeT aKTHBaCIO TaIMepa MrrAIOUH M YNCJOM
KnaBnua E: AKTNBnpye TAIMEP (npn
BKIOUHEMHOM MOTOpe), BCNECTBNE YERO BbITRAKKa ABOTMATNueCKN BbIKIIOUaTeTcNo IcTeUeHHN 5MnHT. IpOn3BOuNT 3aHyNeHne CteTHKa YacOB B IIpNCyTCTBm ABAPMHORO COCTOHHN QINbTPOB (PnB BIKIOUHOM MOTOpe).
ABAPINHOOE COCTOHRHE ΦIJIb-TPOB: OTo6paKaTeCp npi BbIKIOHcHOM MOTOpe:
IIO nCTeueHnn 30 haoB pa6oTbHa dncnlee 3axnraetc ueHTpaIbHbI cerMeHT, yka3bIbaR Ha To, YTO Heo6xo-DnMo 3aHuaTaB fNlbTpbl 3aedePkn kxpa.
No IcTeeHn 120 cacobpa60bI hA dnCnlee MHaerT ceHtpaIbHbI cerMeHT, yka3bIba Ha To, qTo Heo6XoDmO 3aUnuTaB fNlbTpbl 3aepKKn Knpa I 3aMeHrbl yToIbHbIe DfNlbTPbl.
No 3aHCTKe ΦnLTbPO 3aDepKKa XHPa (N/NI 3aMeHE yrOJIbHbIX ΦnLTbPOB),
dC5POCA NOBtOpHoro 3aYcKa nOcYe TaocOB HaxMITE KnaBnJE
pnp OTo6paKeHNbAapmHOrO COctOHNAf ΦnLTbPOB.
Knabnyn npabneHn no Pnc.6KnaBnyn npabneHn no Pnc.6
Knabniua = BkIIOUHHeBbIKIOUHHeNIOoCBeTNI.KnAbuia B = BkIOUHHe/ BbIKIOUHHe Taimepa; haxmmae ee 1 pa3, Bbl BkIOHaeTe taimep; cneobateIbHO, noCTeHHN5 MmHyT JIeKtPOBnIATEb OCTaHABINBaETc (ODHOBPemEHcO C 3TNM, HAn DCnJIee Mnaer YCnO cKOpOCTN, KOTOPaBlaNaHaPbHa). Taimep OCTa-ETcR BkIOUHHeHHbIM, ecN cKOpOCTb 3JekTPOBnIATeTI NMeHReTc.
Ducnne C = -otobpaKaet BbIbpaHHyO CKopocTb 3NeKtpoBnraTeNa (c 1 no 4);
- OTobpaKaet cpa6aTbIbAHne TaHMePA, KOrJa Mnrae TcNcNo ckOpocTm; - OTobpa-KaET abapHHoe COCTOHaHE ΦIbTPOB, KOrJa 3aropaetcN NIMMnrae CEHTpAbHbI ceMeHT.
KnabHua D = BkHouaet 3eKtpoBn-rateIb (Ha nocJeHne Ha6paHno CkoPcO7N).Pi np NobTPOHM HaxATmH na KnaBmu MOHO HApOpTa CkoPcO7N 3eKtpuBnRatTe, c-1-n o 4-yHo, noocJeBOaTeIbHo. YdepXaHme KnabHn Ha 2 cekyHbI np6bnMntelHb BbIOBET octHAno 3eKtpoBnRaTeIa.
KnaBnHa R = c6poc yroIbIbx fHnbTpoB n fHnbTpoB 3aepkKn Jnpa. Ipn nOraBHeHH CnHana ABapmHOro coToTHRA fHnbTpoB (Ha dncnnee roPHTpAbHbIcERMeHT) Heo6xOdIMO 3aHIIaTb fHnbTpbl 3aepkKn Jnpa (Oh npopabotani 30 cacob). Ecnn Xe ZcHPTaHbIbCerMT mIrAet, To Heo6xOdIMO 3aHIIaTb fHnbTpbl dJIa 3aepkKn Jnpa I n3aMeHTb YrOlbHbIE fHnbTpbl (Oh npopabotani 120 cacob). EcTeBHeHO, ecnn BaHa MoJeB He NcOnb3yETcB PexKIMpeuNpUyIaMn BO3DxyI, cNeDObateIbHo, OHa He ChabKeHa yroIbHbIMN fHnbTpAmi, Bbl DIOJIKH b3aHIIaTb Odnf Hn fHnbTpbl 3aepkKn Jnpa, He3aBNCIMo oTO rTO, 3axKeH JIn ceHTpaHbIb
ceMTN MHaet. AbapnHoe coCTOHNHe FInbTPOB NOBnEeTcR np BkHIOHEHOM 3JeKTo-DBnATeTE N PpODoJIxAEt NOBILBaC B TeEHNE 30 cek np6bnntelho. TObbl BoCctAHOBIT NoDCET YAcOB HAKMITE n UyepKbNAte KlaBnU B TeEHNE 2 CekHyD Bo BpeMa NOBHeHn ABAPINHOrO cnHana.
KnaBnyn ynpabneHn no Pnc.7:Knabnnyn npabneHn no Pnc.7
DaHbI np6op Chabxen noHocBto AOBtAmTuuecko CnCTeMoI "ADS" (Advanced Sensor Control), o6ecneuBaOooey npraBHeNIE BcEMn FyHKnIMn BByTkKn. 5bnarOapr cmeote "ADS", Bo3dyx Bkyxhe OctaetcBcerda NCTbIM NmUWeHHbIM BCaKHX 3anaXOB, 6e3 KAKOrOIMBO BMeUaTeBCTBa CO CTOpOHbl NOIb3OBAteRn. DaTHKNipepeoBoN KOCHtpKyCm nCIOcoBbI YnaBnBAtb HAnuYMe BcKaXs 3anaXOB, napOB, bIMOB ININ TENNA BCJeCTBE npoucecca KaepHB. CnCTema "ADS" o6hApuykBaet Taioke HauNue I43A B NOMeHHM.
KnabuA:A:BkIIOaET/BbIKIOaET NOcBeTky.
Klabnha B: BKNHOaET /OTKNIHOaET FOHyKUNO "ABTomaTHueckn peKIM".
Pbn BVKNIOeHN 30T Of FyHKUN, Hn HNDNKATope C NOBBAHTc6yKBa"A,
pAHCNO 6OBoTOB 3NeKtPODBrHraTeY yBeYNuHBAeTCn Hn YMeHbJaeTCa ABOMaTHueCKN B COOTBeTCTBM N C HacblIeHHOCTbI KUxHN DbIMOM, 3aNaXAMn
rHa3OM.
HnDnkaTOp C: noka3bIaBcAET ABtOMaTHueckyIO paOby DaTUnKa (c OTObpaXeHEm 6yKbI "A"); - Noka3bIaBcET CKOpocTb BpaUeHn 3NEkTPOBnRATeN,ABtOMaTHueCKN 3aDaBAeMyo DAtTNKOM; - Noka3bIaBcET ABapnHoe COCTOAHne FmblTPOB, KOra CEHTpAbMbHcERMeHT 3axnraeTCR INMnMnaet. KlaBnuaD: yMehBaIaS cKOpocTb 3NEkTPOBnRATeN/ C6Poc: yMehBaIaET cKOpocTb Do Hnyr (CToI), OJNAKO No IcTeueHHN 1 MNHyTB Bo306HOBNTCAABOMaTHueckN AYHKUN PAoBObTI Co CKOpocTb, 3aDaBeMoN DaTnKOM.Hakatne KlaBnHIn npO tObpaXeHHN ABapnHoro COCTOHHN FInbTPOB bI3OBET CBPOC ChTnKA IN TEM CaMbIM NOBtOPbH IOdCHET YacOB.
KnaBnua E: yBeiNHyBaet ckOPOCTb 3JeKtPOdBnATeRJI; OndHako, NO HTeCeyHIN MHTybl Bo3o6BOHnTcA BToMATHeckNI peXIM paObTI bBtIaKKn CO CKOPOTbO, 3aDaBaEMoM DAthIKOM.
DaHbI np66op cah6eH NOHc6bHO aBToMaTHueckO cnCTeMoH "ADS" (Advanced Sensor Control), o6ceNHaBa0eU ynpabHeNHE BCMeMn fHyKIMn BByTkKn. BnArOpaH CNCTeME "ADS", Bo3dyx B KxHc OctaetcBA CERda NCTbIM N JInuHeHHbIM BCJXn 3anaXOB, 6E3 KAKORoDIO BMeUaTeNBCTBa CO CTOpOHbI NOnb3oBaTeJIa. DaTuHKN NepeDoBO KOnCtpyKmN CnOCo6bI yNaBnBbTb HAnuYMe BCJnx 3anaXOB, napOB, DbIMOB INN TennA BCJeCTBe npocecca KaepHb. CnCTMeA "ADS" obHapyKnBaet TaKeke HaINue HeA3AB NOMeEHMM.
HacpoKa DaTnKa: Bbl MoKeTe N3MeHnTB CyBCTBnTeBbHOCTb DaTnKa CneDyOuIM ObaZOM :
- octahobite BbITKkhy HaxatneM KNABNIH B. - HAKMTe ODHOBpeMeHHO KnaBnH D E (Ha nHnKaItope 6yJed oTo6paKeH noka3aTeB yCBCTBHeLbHOCTn DaTHka). - HaxatneK KNABNIH D INN E oTperynnpyte yBCCTBHeLbHOCTb DaTHya B nHOCBOHy IIN MnHycBOYIO CTOPHY (1: MNHmAlhHar / 9 : MakcImaJIbHAR yCBCTBHeLTbHOCTb). - B cnyae npebIbaHN 3NeKTPoHTaHH, DaTtIK 6yJed NOBTOpHO paObTaTc yCBCTBHeLbHOCTb LO.
BHMHNEI YTObIbe NOBpeIMtB DaTqHK, N36EkaTe PnIMeHHeN ECHIKOBHO BBeUCTB BOFNI3N OBTiJTKK.
Knabnyn npabneHn no Pnc. 8:Knabnuyn npabneHn no Pnc. 8:
BbIKIOHATeINbA=noCDBeTka;
noJoxeHne 0: BBkIIOUeHa; noJoxeHne 1: BkIOUeHa.
Bckopocb BpaewHn3neKtpDHTaTeI:no3BnHET perynpoBaTpaoyu ckopocb 3eKtpDHN-faTeN; nOxKeHMe O:OTKnUHe.
C=CnHaHnHa3aun o pa6oTe DnBraTeTae.
Knabnua ynpabrehno nPnc.9:Knabniu npabrehno nPnc.9: KnabnaA=BkIIOaHT/bkIIIOaHT noC-BetKy;Yepe3 KaKDbie 30 cacob pa6oTb 3aropaeTc COOTBETCTByOuHa NAMNOUCA, TTO daet 3HbTb 10Tom, YTO HeOBxODIMo 3aHmuaTb FInhTpbl 3adepKKn KIPA;Yepe3 KaKDbie 120 cacob pa6oTb 3aropaeTc COOTBETCTByOuHa NAMNOUCA, TTO daet 3HbTb O TOM, YTO HeOBxODIMo 3aHmuaTb FInhTpbl 3adepKKn KIPA n 3aMeHHTb YrOlbHbIe FInhTpbl. Dnra c5poca NoDCeta, HAKMITE Ha Knabnuy A B TeueHme I CekyHbI pN6bIm3ntE hNo (NOKA ROPIT CnHnBaHnA NaMOUCA). KnabNaB u = BkIIOuAe 3NeKTPOBdR-ateNB Ha 1-Oi CKOpocTn (3aropaeTc COOTBETCTByOuHa NAMNOUCA);ecnn ocTaBnB ee HaxKaToB TEueHne npimepHO 1 CekyHbI dBrnrATBeL BBkIOuAeTc.
KnaBnHa C = BkNIOuAeT 3NeKTOpOBNrAteIb Ha 2-01ckOpocTH (3aropaetc oOOTBECTBHyUOaJ IAMNOUKA); pR NOBTOPHOM HaxATNI (NOKa rOpNT cHnHaJIbHnai NAMNOUka) BKNIOuAeTc TaImep, BCJeCDTBHe Yero No hCTeEHIN 5 cekyHd 3NeKTOpOBNrAteIb OCTaHABINBa-ETCR (CINHaJIbHnai NaMNOVka mraAet).
KlaBnHa D= BkIIOuAeT 3NeKTPOBnRrTaTeNb Ha 3-0i ckOpocTH (3aropaeTc COOTBeCTByIOUaH JAMNOUka); Pn i NOBTOPHOM HaxaTmN (Noka rOpi T CINHAJIbHaj IAMNOUka) BKlIOuAeTc TaIMeP, BCNECTBHe Yero No HCTeEHM N 5 cekyHd 3NeKTPOBnRrTaTeNb OCTaHabn-Baetc (CINHLbHaj lamNoHka
Muraet).
KnaBnuaE = BkIIOuAeT3JIeKTPoDBnATenbHa4-0iCKOpOCTN (3aRpaETc COOTBeTc-TByIOUaIaAMNoOyka); npH NOBTOPHOM HaxaTHN (noka ropHT CNHbHnAa Nmno-4Ka) BkIOuAeTc TaIMep, BCNECTBne Yero No IcTeEHN 5ckyHd 3JIeKTPoDBnATenbOctaHABnBaETc (CINHLbHnAmnOvKa Mmraet).
TEXHNUECKOE OBCJYKINBAHNIETEXHNUECKOE OBCJYKINBAH
!PepedHCTKOHINPOBedeHEmTeXHueckoroO6cnykBaHnryOTKNIOUYHTNapJKeHne.
YnCTKa BBITAKKnYnCTKa BBITAKKn
KORII POM3BODHTb YIcTky: OIMCTNtB CCBM CNIOJb3OBAHHEM, NO KpaHHe Mepe, KaKdIbe 2 Mecra, YTO6eKaTb PNCKa BO3HNKHOBeHHa NoKopaKa.
HAPYKUHYCNTKA;MCNOLTB0BATbTPIKNY,CMOCHENHYB TENTNOI BODE C HETPbHbM MOOHUMC PCECTDBTN (DNIK OPAUEHNHbX BtTRIKEK)
NCN0JIb3OBaTb CneUmaJIbHbIe CpeDCTBa IJRA BbITRKeK IN CTALIN,MeDN HNII LATyHN.
BHTPEHHRA YNCTKA: HcnoIb3OaTb TpAky (HIN KNTOky), CMOeHHyOB B DeHATypPOBAHHOM 3TNIOBOM CnPTE.
YTO HENBJ3A DEIATb: He mCNOJb3OaBb 6abpa3INBHbIe NIN KOPPO3INHbIe CpeCTBA (HnPmIEp, MetaJIuMHeCKne ry6Kn, CJNIUkOM JecKTKe IeTkn, OUYeB arpeCCNBIB MOOJIe cpeCTBA, n T. d.).
Kornda NnpoynabnaBaoxMnbltpob(F)NCTka XnpoyanbaHbOxMx Phnbltpob(F) KpaiHe Mepe, KaKdIbe 2 Mecra, TObexKaTb PNCKa Bo3HKnHOBeHHaNoXkapa.
KAKYACTMTbΦMbTPbl;MbTbHeHnparltbHIMMOOHmcrepCTBOM Bpyuhyo HINB NOCYDOMOeouH MaunHe. B cIyae nCnIb3OBaHHN NOcYDMOeouH MaunHBo3MOxHO oecueeMHBaHne fHtPOB, KOTOPOE HE BNReT Ha IX ΦHyKUHOHaJIbHOctb.
3aMeHa yroIbHoro qHbTp3aMeHa yroIbHorO qHbTpTa (Tolbo dra qHbTpHyoue BbTgK)
KORDA IPOIN3BOIDNTb 3AMEHY: 3aMeHEnbI NO KpaHEn Mepe, KaKdIbe 6 MecaeB 3aBNCIMOCTH ON CTOJIb3OBAHn.
KAKBbHytbΦnltbTP: B COOTBetCTBm C Baalee MoedeIbHO, BblTnKa CHa6xeha yronbHIMn pnmTpamn npmoYrOBoH nIN Kpyrnof opmbJ.
EcnBbTnKKa CHabKeHa KpyTbHMM qHbTpAmn (R), pa36nOKpyTe yroIbHbI 1aBtp BpaatteJbHbIM DnBxkeHem npOTBNoONxHO HanpABneHIO.
EcnblTbKa CHaBKeHa nPIMOyIbHbIM yTOIbHbIM qHbTPOM(P), npKMMTE pKcATOP KHTPN INOBepHIte qHbTPK KH3Y TaTObbl BbHyb2 RaBka H3 CBOXN H3d.

PnDCBETKaPnDCBETKa
3aMeHnB ha naMbI TORo JTe TnA;ecnNa lamna He yka3aHa B Ta6nIe nCTa "PIMMEyAHNE",obpaTntEcB,noKaanyCTa,BuHTpNoDpeKKn.
ABAPHINHbIE CAPHANBYSIGN
Ecnn TTO He pa6oTaert npaBnIbHo, nepeB Bb3OBOM TeXHHueckoro 06cIyKnBaIOeTo nepcoHana npocm BblONHb npocTbe KOHTpObHbIE 德CTBN,OniCAnHbIe HIXe:
- BbITRAKKa He pa6oTaETBbITRAKKa He pa6oTaET
Bo3MOxHnA IIpUHnA (1):IpoBOa nITaHnE He IIOcOeDInHe HIN IOIDcoEIMHe HENpaBnIbHo.
PeueHHe:3neKtpnuecka HnCTaIIaIINBbTTKHe 6blna
COOTBETCTBEHLIM O6pa3OM NOCDOEINHE MOHTepOM. Bb:3OBITE 3NEKTPKIA/MOHTepa.
Bo3MOxHa npuHa (2): He BbI6paHa ckopoCTb.
PeueHHe: BbI6epHTe ckOpocTb Ha naHei ynpaBHeHa.
Ecnn BbTnKkA OTKHnOaTeCBO BpEm HOpMaBnHO pAb0tB,TO cNeyEt npOBepntB, He OTCoEOHeNHe Nn NTaHanHe N He BKIOnuNcRn OMHNnnpNbHn (MHOrOONIOHcHb) p3aBdNHITeJIb.
BeHTnIaTbHmBcCTbByrHeepeHne pa6oaepepa
Bo3MoXnHa npUHHa: Ka6eNb DnuraTeNa BeHTnIaTopa He NoDcoEINHeN.
PeueHne:OnpeDenite MeCtoHaxOxKeHne Ka6eIaRatTeI
BeHTnIaTopa NnoCoeHNHre erO. PpoBepbTe, pa6oTaETN BeHTnIaTOp
Tenepb. Ecnn npobnema He ycTaPaHeHa, Bbl3OBuTe TexHnueckn
obcnykBaOuI nepcohan.
- BbitykKa He pa6oTaet npabHbHOBbIaKa He pa6oTaet npabHbHo
Bo3MOXHn npuHa: 3arp3HeHbI fHnbTpbl/peperopdoK.
PeueHHe: PpOBePbTe, HcTbI Nn pNJIbTp.
B cnyuae BbITXeK C cHCTEmo KaHJIOB N BBITXeK C BHeuHM
DburaTeNem
Bo3MOxHn npuHn (1): Cntema KaHaoB He BbINOnHeHa
COOTBeTcTBeHHo Tpe6oBaHnM. Ecnn dInHa KaHana npeBbIaAet
Tpe6oBaHHn npOn3BODHTeN, BbITAXKa MoKet He pa6oTaTb ONTMaJIbHO.
EcHn ceHHe KaHaJa cHnKoM MaIO NIN B CnCTeMe CNHkoM MHOrO n3r6OB,TO TAKKe 6yJeT 3aMeDnE HNOT K0B3dyxa.
Bo Bpem MoHTaKa OTBODHOro KaHaJa CJIeDyET npIepKnBaTbcra
OfHnHaIbHbIX HNCTpyKuH, KOtOpblpe npedocTabHeHbI COOTBeTCTBYOUIMM
oprahamn (Hanpimep, BbITrnaBaeMbI BO3dyx He MoKeT 6bItb HappaBneH
B KaHaJ, KOToPbI yKe hCIOJIb3yETcR B paMkaX HCTaJIYrAe
UeHTpaJIbHOrO OToONHeHnRA,TePMocNFOHOB N.T.D.).B NoMeueHm
HAXOATCBAENTNAIIOHHbEOTBepCTNIA
CneJeT o6paHTbCRA KOHTepy.
Bo3MOxHnA npuHa (2): KaHAn 3aKpbI.
PeueHHe: npOBePHTb, HnHrO Hi e 6Nkpyet BeHTnIaHOHHb KaHaJI (The3da TTtU nI y3bl).
Bo3MoXHa npHHa (3): DpocceBHa 3acNoHa He OTKpbIbAeTcra.
PeueHHe: Heo6xoJMo npOBepuTb, 6bIa nn yctpaHeHa neHTa n3
DpocceIbHOJ3acNOHKn CBOBODHO Nn OHa DBNraTcR.
B cnyae bblaxek c fnhbtpom
Bo3MoXHa npuHHa: yOrnbHbI qnbltp nonHocTbIO npOniTah.
PeewHHe: 3aMeHNt b yronbHbI nTbTp.
- Namha he pa6oTaetNamha he pa6oTaet
PepneKTopbl(LED):
Ecnn lamnb 3TOro Tnna He HaxoTcB HNXePbBeDeHHoTabnue Ha
CTpaHnue c "PnpMeuahne", npocm o6paTbca K TexHnueckOMy
OcnyKnBaIOeMy nepcoHaNoy.
JaMbIc NaMnOuKaMaN:
Bo3MOXHaI npuHnHa:JaMnOuKa Hn CBeTnBnK HeNCpABhI n6o oCoEHHnc npBOoNtAHn.
PeueHHe: yctaHOBnTb lamnooykBy dpyroCBeTHnbHK;ecnn lamnoouka
He paOToaet, To 3aMeHHTb ee pyrO TaKOro Ke Tnna; ecnn paOToaet,
3HaHTb HeNCpabHbI CBeTINbHk IIN OTcoeHNHnIc PPOBd NITaHn.
BbIOteTexHueeCKM OcnyKmBaHOuNn nepcoHaI.
TanoreHHbIeNAmNbI:
B03MOKHOJI pIIMHINa IAMIOUcI INI CEBTINHbNK HEINCPBABHbI NIMoOTOEOIDINHCPOBODNITAHNN.
PeueHHe: 3aMeHHTb lamnoCy dpyroTakoro Kte Tna.Ecn npo6nema
He ycTaPaHa, BbIOBtE TexHnueckn 06cIyKBAIOuO npcoHaJ.
-Пульт диссговууразьнога He paobotabn6bIdoabnB KOMNNEKT)
Bo3MOxHnA npHnHa (1): OTCyTCTBHe coeDInHeHnMexKny nYbTOM N Bblrkkoi.
PeueHHe: PpOBepntb, npabInbHo n paobTaOT KhONKn ynpaBneHn, KOToPbIe ycTaHOBneHbHa BblTAAKke.
BbIKHouHTb NtAHHe BbTAAKKc c NOMoUbIO 3NeKtpnueckoro npedeoxpaHITeIa;
nocJe Yero ONrTb erO NOcEOHHTb. CHOBA BblNOJHHTb COeHNHeHne MEXy
IyJBtOM N BbTnKo, Co6JIOaH NcHTpyKUHO, npNIOKeHHyO K nyIbTy.
Bo3MoXnHa npuHnA (2): Otpa6oTaHHa 6aTapeKa B nyIbTe.
PeueHHe: 3aMeHHTb 6aTapeKy HOBOI.
- 5nokpoBaHne BepTnKaIbHoro TeJeckOnMueeCKoro IOTka (ecnn OH 6bI nO6aBHeN B KOMnJIeKt)
EcnBce CBeToDnOdbI (LED) MnraOT, To TeNeckOnNueeckn INotok
3a6nokpoBaH. NdooxdaTb 30 ckyHn HaxaTb KhONKy "Bepx" nnn "Hn3",
YTO6bIpa36nOKnpOBaTbNOTOK.
Ecnn KhoNka "Bepx/Hn3" MnaeT, To KnpoBoi Cmbltp He yctaHOBneH B
cooTBeTCTByHoueM NoIoxKeHH. Ero Heo6xoIMMo yCTaHOBHTb
HadnexkaumM 6pa3OM.
EcHn nToK 3a6bNOknpoBaH, HxH No npOBePHTb, He 6bl nn OTCoeHHe
npoobno nHTAHNA. EcnI pOboNEMA He yctpaHena, Bb3OBITE TexMHcckm ocbSybnBaouoenn PercoHaN.
Odyies xphoews aTnV EIK.6
A):avagaa/0BnoioTowlambdaipwv
B): avbeta/alpha/veo xpvoputhetai:Ev aTnma pPokaale Tnv evapEn
aetoupyiac toxovputhetai kai wc ek toutou to oatajna tnc nJnxavnc
eta atio 5 eTTA (tautoXpova avaabohei stny oovn to uqio ncs
eTIeXeIac taxtntac). Oxpvoputhetai Tnpauevei evepocakounkai
ae Tpeittwn anllaync tnc taxtntac.
C):
-δεiXVEI TIV TAXUTNTa TNC μnxavns (aTTO 1 EwS TO 4)
- - iyeT ov aua Tou xovopuoiot otav avoaoBnvei to nphiio. onaToTei ouvayepo qIATpwOT avTOeiaouaBnvei
TnV TEPiTTwON aToppoepntnpwUeipItpo
Piavnria:To piaItpo avpaka eivai eVTEAωs ooukepa.
Aua:avikataotntote to iatpo avpaka.
H I OUPyei
OtpoBoeic(LED):
AV auto tioic nTc lacmuac dev emuavici taotov tivakaooukou kouaoubei ato TnV tleupa Tuw "PooeboonoiEIC, Taopaaloue EIKIOIVWvNTe TTV TeVKrUmpeia
AajTecue AapTTnpes TupakTWOEC
Piavn aia: o aannpa n n ttooxn tou eivai eaattwpatikn n atouvdeBnke To kawdoTpooobocic.
Aua: baTe Tov laaTnpa o ae aann utdoxn, av o aauTTnpac 6ev Aetoupeye, AVTKATOAOTATE TOVEvav aLo Tou IDoi TUOTU. EAV AETOUPyOE1, n UTOXn eivai aattuataikn n atoosuvdeTheKTo Kaawio Tpoapooiaac. Kaote Tny TeYvkiN tnnpeoria.
Aaagcaayoyou:
IIhavnaiia: o aamtnnpa n n uttooxn tou eivai elattwmuatikn n atouvdeke TO kALWDIO TPOPOOOiac.
Aun:avtakataotne toe evav aaaa loaattnpa tou iou tou. Av to pObnua emuvei, kaleote nTv texvikn utnpoeia.
To tnaExepiopnpio dev aeitoupyei (evuupnepianpoei oto eT)
PiBavn aia (1): v unapxei ouvdean metau tou nlexepionpiou kai kai Tou atoppopnpntpa
Aun:BeaiWBeite eav taKouptiaeEyxou oTov aToppoPntpa aeitoupyouv
ATVEpyoTIOJote TOeUaTOAUOTAPPOPntnpxnpoiIooVtacTO DIAKOTTN,OTN OUVEXEIA VAETAVAOUVDETE.
Kavete Tn ouvdean avajeaa oTo TLxeiipntpio kai OTov aToppopqnepaek vou, akolouowtaCtObnyie TPO TAPexovtaeTO TLxeiipntpio.
Piavniia2:Paia μntatapia oTo nλexεipiotnpio.
Aua: Avikataohtane Tny matapia me iia kaiovupia.
Aosaiou kabetou naleokotikou Siokou(eav oumuTEpiAnpoei OTO 0E1
Eav olata LED avaBoaBnVouv, oTneAeKoTIKc6iokcexeiAtOKAEiotei.
NepieEvete 30 SeuteP6AETTA KAI, OTn OuvExia, TATnATE TO TAVW n TPoc Ta
kTu koumY iya v6ekAeiOwTe To DIOKO.Av ta maw/Katw TAnKTPO
avaBoaBnVE, to DIATPO YIA ta IITn DEiv Eiva otn Owtn Thean. PuBmuTe
OWOTa.
Eav o biokc eivai kleiowevoc, eleye av to kalwoio tropoosiaac dev exei atouvdsiei.
Av to pOpa aepvei, kaleote TIV TeVxvikn utnpedia.
Instalace musi byt provedena podle uvedenych pouyn odborne kvalifikovanym personale.