
Aquis Staghorn - Watch Oris - Free user manual and instructions
Find the device manual for free Aquis Staghorn Oris in PDF.
| Product type | Automatic diving watch |
| Brand | Oris |
| Model | Aquis Staghorn |
| Movement | Automatic winding (power reserve ≈ 38 hours) |
| Main functions | Hours, minutes, seconds, date, unidirectional rotating bezel 60 minutes |
| Water resistance | 300 meters (30 bar) – screw-down crown required |
| Crystal | Domed sapphire with anti-reflective treatment |
| Case | 316L stainless steel |
| Strap | Stainless steel or rubber (depending on version) |
| Case diameter | 43.5 mm |
| Thickness | 13 mm |
| Approximate weight | 200 g (steel bracelet) |
| Power source | Automatic (manual winding possible) |
| Maintenance and cleaning | Clean with soapy water, soft brush; avoid solvents and cosmetics; annual water resistance check |
| Safety | Screw-down crown, unidirectional bezel, helium release valve |
| Spare parts and repairability | Oris authorized service; general maintenance recommended every 4 to 5 years |
| Warranty | International 24 months on material and manufacturing defects |
Frequently Asked Questions - Aquis Staghorn Oris
User questions about Aquis Staghorn Oris
0 question about this device. Answer the ones you know or ask your own.
Ask a new question about this device
Download the instructions for your Watch in PDF format for free! Find your manual Aquis Staghorn - Oris and take your electronic device back in hand. On this page are published all the documents necessary for the use of your device. Aquis Staghorn by Oris.
USER MANUAL Aquis Staghorn Oris
Starting Oris watches 10
Crown positions 10
Standard crown 10
Screw down crown 10
Crown with Oris Quick Lock system (QLC) 10
Bare down numbers 18
Screwdown pushers 10
Automatic winding switches 11
Automatic winding watches 11
Manual winding watches 11
Setting and operating Oris watches 12
Date, day of the week and time 12
Setting the date 12
Worldtimer 125 Worldtimer with 3rdtime zone and compass 13
2ndtime zone on outer rotating bezel 14
2 time zone on outer rotating 142ndtime zone indicator on inner rotating
bezel with vertical crown 14
2ndtime zone with additional 24 hr hand 14
2time zone with additional 24 hr hand and
city markers on the rotating bezel 14
Chronograph 15
Complication 15
Regulator 16
Pointer calendar 16
Alarm with automatic winding 16
Tachymeter scale - measuring speeds 17
Telemeter scale - measuring distances 17
Rotating bezel for diving watches with
a 60 minute graduation 18
Helium valve 18
Watch as a compass 18
Adjusting Oris watches to fit the wrist 20
Watches with leather straps 20
Watches with rubber straps 20
Watches with metal bracelets 20
Fine adjustment of folding clasps 20
Notes 22
Accuracy 22
Chronometer 22
Water-resistance 24
Use and maintenance 24
Technical information and
summary tables 261
Pictograms 26
Makoto for spones and stroma 97
Metals for cases and straps 27
P/D coatings 27
PVD coatings 27
Sapphire crystal 27
Supplementary material 21
Mineral glass 28
Plexi glass 283
Luminescent dials and hands 28
Metalbracelets,leatherandrubripairs 28
lumerscanner 29
Lunar calender 29
Time 2000 30
Time zones 30
Movements 30
International guarantee for Oris watches 32
Proof of ownership 33
Introduction. 9
We congratulate you on the purchase of your new Oris watch and extend a warm welcome to the ranks of mechanical watch devotocos. You see, Oris' world is all about mechanics, and nothing but mechanics.
Your Oris watch sets itself firmly apart from mass market and fashion products, and instead embodies the true values of the Swiss art of watchingmaking, with its fascinating micro-mechanical internal components and its stylishly seamless exterior. Oris watches not only inherit a long tradition dating back to 1904, but also all incorporate a refined 'High-Mech' system, imbued with the craftsmanship of our watchmakers and co-developed by well-known professionals from the worlds of Formula One, diving and aviation.
Another very important feature in our modern times: Oris watches do not require any batteries because you supply your Oris watch with power via your own movements, or by winding it manually.
Please visit our site at www.iris.ch for further information and for a free extended guarantee period when you sign up to the exclusive Oris members club: MyOris.
We wish you quality time with your Oris.

Ulrich W. Herzog Executive Chairman
Explanation of instruction arrows:
Operating instructions Useful information
Crown positions.
The positions described below are valid in most cases. Any deviations will be mentioned for the relevant type of movement.
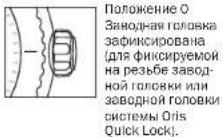
P.O.
Crown locked, for
screw-down crowns
and for crowns with
Ons Quick Lock
system
Pos.1 Winding position
Pos. 2
Date and day of the week setting

Pos.3 Setting the time
None of the following operations must be performed in water.
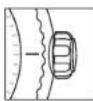
Standard crown.
Oris standard crowns are highprecision components. They are equipped with seals to prevent any water penetration. About half of Oris watches are equipped with this kind of standard crown.
The crown is in position 1 and can be operated immediately, as described in the following chapters.
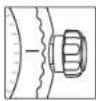
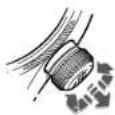
Screw-down crown.
A few Oris watches, especially the divers' watches, are equipped with a screw-down crown. Before you can operate a crown of this kind, it must first be unscrewed.
Turn the crown anti-clockwise until it is released from its thread.
Now the crown is in position 1 and can be operated as described in the following chapters.
After the setting, the crown must be tightened back down by pressing it against the case while turning it clockwise.
Check from time to time to ensure that the crown is properly screwed down.
The watch is only water-resistant to its specified depth if the crown has been screwed down.
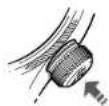
Crown with Ols Quick Lock system (QLC).
The Quick Lock Crown (QLC) developed by Oris is simpler to release than the screw down crown because it has a bayonet fastening instead of a thread.
- Press the crown gently against the case and turn it slightly anti-clockwise until the crown releases.
- Now the crown is in position 1 and can be operated as described in the following chapters.
After the setting, the crown must be relocked by pressing it against the case and, at the same time while turning it slightly clockwise until it looks in position.
The watch is only water-resistant to its specified depth if the crown has been locked.
Screw-down pusher.
Some Oris models, especially diving watches, have screw-down pushers as well as screw-down crowns.
- Tum the crown which encloses the pusher anti-clockwise until you encounter resistance.
- Now the pusher can be operated, as described in the following chapters.
After the setting, press the crown gently against the case and turn
it clockwise until you encounter resistance.
The watch is only water-resistant to its specified depth if the pusher has been screwed down.
pushers must never be operated underwater.
Automatic winding movement.
An Oris watch that has started and is worn daily for about 12 hours, does not need manual winding. Instead, arm movements cause the red rotor to rotate, thereby tightening the barrel spring. Even if you take off your watch at night, it continues to run. It only stops working if it is not worn for approx. 40 hours.
If an automatic winding watch stops, it must be restarted as follows:
Release the screw down crown or QLC crown (if fitted) as per the instructions in chapter 1.
With the crown in position 1, rotate it clockwise through 12 turns (it can also be turned forwards and backwards).
- Carry out the settings, as described below.
Lock the screw-down crown or QLC crown (if fitted) as per the instructions in chapter 1.
On the crystal case-back of certain Oris automatic winding watches,
you can see how the red rotor, the hallmark of Oris watches, rotates and winds the movement.
Manual winding movement
ON mechanical Ors watches with manual winding, the barrel spring is wound by hand. The power reserve of a fully wound watch is approximately 42 hours.
Release the screw-down crown or QLC crown (if fitted) as per the instructions in chapter 1.
Turn the crown clockwise in a 1:2 ratio. Also, it can be turned forward and backward.
Stop as soon as you encounter resistance. The barrel spring is now fully wound.
If more force is applied after the spring is fully wound, there is a risk of the end of the spring breaking. In such cases, the barrel needs to be replaced at the watch owner's expense.
Wind the watch once a day. Lock the screw-down crown or QLC crown (if fitted) as per the instructions in chapter 1.
The watch is stopped in this position and can be restarted at any time, by pressing the crown into position 1.
Press the crown into position 1. Lock the screw down crown or QLC crown (if fitted) as per the instructions in chapter 1.
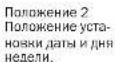
Pew. a Crown locked, for screw-down crown or QLC crown
Pw.2 Time and moon phase setting
pusher for date setting
4 pusher for day of the week setting
s puncher for 2-3 time zone indicator setting
-Date indicator
-7 Day of the week indicator
$ 24 time zone indicator
Moon phase indicator
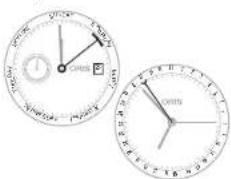
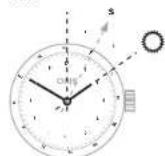
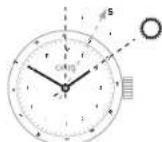
Setting the 2nd time zone
This setting can be made at any time.
Press pusher 5 (2"Time zone) with the special tool provided, or with a wooden toothpick, and set the desired time.
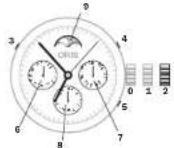
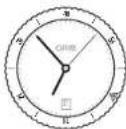
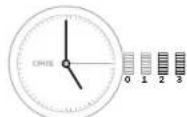
Regulator.
Originally, the regulator was an extremely accurate clock which was used to test and adjust (set) small clocks. To prevent the hands from overlapping, they were separated. On a regulator, only the minute hand turns in the centre, whereas the seconds and hour are indicated in small separate sub-dials.
Crown operation, time and date setting as per instructions in chapter 1.
P65. a Crown locked, for screw-down crowns and far crowns with crossbow crossbow
Fig.1 Winding position
Pos. a Date and day of the week setting
Pos.3 Time setting
4 Second hand
- Hour band
Date indicator
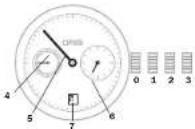
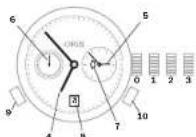
Pointer calendar.
The launch of the first Oris movement with pointer calendar in 1938 was a milestone in company history. The Oris Pointer offers the advantage of indicating not only the time or day of the week spatially on the relevant scale on the dial. Since the introduction of this typical Oris movement, various models with this type of indicator have been made. Naturally, the movement has changed several times since its introduction to meet the latest technological requirements.
Crown operation, time and date setting as per instructions in chapter 1.
Alarm with
automatic winding. in 1988, the first Oris alarm watch with manual winding appeared on the market. The alarm watch launched in 2008 has a movement with automatic winding. It is cha
rctertised by a special alarm chime created by a sound spring. This product is perpetuating a long tradition, and one which reached a high point with the Oris alarm clock with 8 day movement back in 1949.
Crown A: Movement winding, time and date setting as per instructions in chapter 1.
Turn crown B clockwise to position 1 and, if necessary, lighten alarm movement (e.g., if used several times a day, or if the watch is being restarted) by turning the crown 12 times.
In normal use of an automatic winding alarm, the movement and alarm springs are constantly wound.
Pull out crown B to position 2, turn it anti-clockwise and set the desired alarm time.
In this crown position, the alarm function is enabled, and the alarm will sound at the set time within the next 1.2 hours.
Press crown B into position 1.
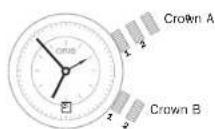
Crown A. Poos 1 movement springing win- ding position
Crown A. Poos 2 date setting
Crown A. Poos 3 time setting
Crown B. Poos 1 alarm springing wind- ing position, Alarm not activated
CmuaB,Pos,2alarmtime setting, alarm activated
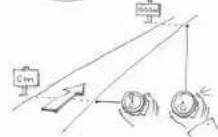
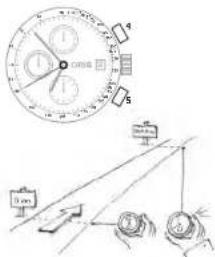
tachymeter scale -
The tachymeter scale on the ring or dial of the Oris chronograph is used to measure speed, e.g. of a car travelling a measured distance of 1km (or 1 mile).
If a rotating tachymeter ring is fitted, position the 60 of the tachymeter to 12 o'clock. Start the chronograph function by pressing pusher 4 as soon as the vehicle passes the start line.
Press pusher 4 again as soon as the vehicle crosses the finish line.
The chronograph hand will indicate the average speed in km (or miles) of the vehicle.
In the following example, the vehicle required 40 seconds to cover the measured distance, which equates to an average speed of 90km / h (or 90mph ). Average speeds of less than 60km / h (60 mph) cannot be measured.
Press pusher 5 to reset all the counters.
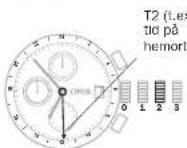
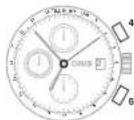
Telemeter scale
Measuring distances.
The telemeter scale on the ring or dial of Oris chronographs is used to measure the distance between an immediately visible and subsequently audible event (thunder and lightning, burst and sound from fireworks, etc.). The graduation on this telemeter scale is based on the speed of sound, i.e. 343m / s in air at 20^
With a rotating telemeter ring, position the zero to 12:00.

Start the chronograph function using pesner 4 as soon as a visible event occurs.
Press pusher 4 again as soon as you hear the sound.
On the above example, the thunderstorm is still at a distance of 3 kilometres.
Rotating bezel for diving watches with a 60 minute graduation.
The rotating bezel on all Oris diving watches can only be adjusted in an anti-clockwise direction. This prevents the measured or set time from being extended if the bezel is turned accidentally. This ensures that the diver has enough time left to decompress properly.
The rotating bezel on a diving watch can also be used as a timer or for any kind of time indication to the nearest minute or hour, e.g. parking, cooking, game time, etc.
Rotating bezel for measuring time to the nearest minute:
Position the marker on the rotating bezel opposite the current minute hand position, or to the desired minute hand end position.
The minutes elapsed, or the minutes past the preset end time can be read on the bezel.
In the above example, 33 minutes have elapsed since the start of measurement.
Rotating bezel for measuring time to the nearest hour:
Position the marker on the rotating bezel opposite the hour hand, or to the desired hour end position.
The hours elapsed, or the hours past the preset end time can be read on the bezel.
prevents any excess pressure on the watch glassfram inside after the ascent. The helium valve is identified on Oris diving watches by a coloured spot on the crown.
Before a dive, turn the helium valve crown clockwise to its limit stop and close the valve.
Before leaving the diving station, turn the crown on the helium valve anti-clockwise as far as it will go (In open).
Even if the valve remains open, the watch would still be water-resistant for normal purposes. But for diving operations of any kind, the valve must be closed, as described above.
Helium valve.
Watch as a compass.
- Watches with a helium valve are intended for divers who spend extended periods on board a diving bell, or in any other chamber with a helium-enriched atmosphere.
The inert gas helium has one of the smallest molecules, meaning that it can penetrate the seals on watches and enter the case. Once inside the case, this gas is unable to escape rapidly enough unless a special valve is fitted, i.e. the helium valve. Opening this valve
Watches with an analogue hour and minute display can be used as compass, using the position of the sun as a guide. This depends on the sun's position being clearly visible, and on the watch showing the correct time.
If the watch has a graduated bezel, this can be used to find the bisector (mid-point).
- Remove the watch from your wrist and turn it until the hour hand is pointing at the sun.
- Determine the bisector (mid-point) between the hour hand and 12 o'clock. (Between 18:00 and
06.00.take the bigger angle between the hour hand and 12 o'clock.) This equates to South,
Once you have established where South lies, the other cardinal points can be extrapolated from that.
Of the watch has a rotating beezl with compass graduation, it is easier to identify all the cardinal points other than South. With a watch of this kind, proceed as follows:
Remove the watch from your wrist and determine South using the compass bezel by calculating the bisector (mid-point) between the hour hand and 12 o'clock.
- Point hour hand at the sun and determine the cardinal points using the compass bezel.
Adjusting Oris watches to fit the wrist.
Instructions about the kinds of leather, rubber, metals used, etc. can found in the Technical Information and Summary Tables' chapter.
Watches with leather straps.
- Fasten the buckle around the wrist over a table, ensuring that the watch cannot fall to the ground if the process goes wrong.
Straps with a folding clasp are easier to work with and offer greater security against theft. Also, if the process goes wrong the watch will not drop to the floor because it will be held by the folding clasp. Remove watch from wrist.
Adjust the strap to your wrist size using the proformed holes.
Once the strap is adjusted, press the buckle firmly into the correct hole to prevent the strap from detaching.
Some older folding claps are hard to adjust. Do not hesitate to contact your approved retailer if you have any questions.
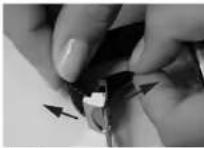
Straps with continuously adjustable folding clasp: this is a new folding clasp design, developed and patented by Oris and based on the principle of seat belts in aircraft. The strap length can be adjusted to any desired length:

Fig. 1
- Remove watch from wrist and place on a soft surface with its buckle open.
Hold the buckle end of the strap and pull the watch end of strap upwards (Fig. 1). - Shorten the strap by pulling the loose end, or tighten it by pulling the watch end.
Press the clamp until a click is heard. The folding clasp cannot be closed if the clamp is not properly engaged.
Watches with rubber straps.
All Oris rubber straps are equipped with folding clasps.
Straps which need to be cut to length:
Consult an approved retailer to have the strap adjusted to suit your wrist size.
If the strap buckle has fine adjustment, you can adjust the length yourself to a certain degree.
(see 'Fine adjustment of folding claps');
Straps with folding clasp and one-sided holes in the strap: Remove watch from wrist. Adjust strap to your wrist size using the holes.
Once the strap is adjusted, press the buckle firmly into the correct hole to prevent the strap from detaching.
On rubber straps with fold-out extension for diving suits, fine adjustment is not possible.
Watches with metal brackets.
Metalbracelets must be adjusted to suit your wrist by an approved retailer. This involves removing or adding link elements.
If the bracelet buckle has fine adjustment, you can adjust the length yourself to a certain degree (see 'Fine adjustment of folding ciaps').
Fine adjustment of folding classes.
Provided that the buckle on the metal bracelet or rubber strap has a fine adjustment feature, the length can be adjusted to a limited extent as follows:
On rubber straps with fold-out extension for diving suits, fine adjustment is not possible.
- Wear protective goggles to prevent injury from the tool.
- Open the folding clasp and place the watch and strap (crown facing upwards) on a piece of cardboard.
Using a wooden toothpick, insert the fine adjustment metal pin into the strap buckle (Fig. 1). - Carefully unfasten the strap and remove it.
- Place the lower part of the pin in the new position then press the strap outer obliquely against the new, upper pin position (Fig. 2).
Press the pin down carefully using a nail file or screwdriver (Fig. 3); and slide it under the buckle opening until the pin clicks in.
Check that the strap again holds firmly.
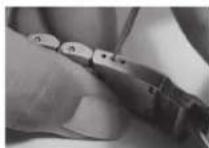
Fig. 1

Fig. 2

Fig. 3
| Day 0 | 1 | 2 | 3 | 4 | 5 | 6 | 7 | 8 | 9 | 10 | 11 | 12 | 13 | 14 | 15 | |||||
| Pos. | H | 3 | H | 9 | H | F | H | C | H | 6 | H | |||||||||
| T °C | 23 | 23 | 23 | 23 | 23 | 23 | 23 | 23 | 23 | 23 | 23 | 23 | 23 | 23 | 23 | 23 | 23 | 23 | 23 | 23 |
| R(s/d) | R1 | R2 | R3 | R4 | R5 | R6 | R7 | R8 | R9 | R10* | R11 | R12 | R13 | R14 | R15 | *Any complications are activated. | ||||
| Test criteria All figures in seconds (s) per day (d) | Abbrev. | Ø (mov.) > 20 mm | Ø (mov.) < 20 mm |
| Average daily rate (in 5 different positions) | Mmoy | -4 to +6 | -5 to -8 |
| Average rate variation (average daily rate difference in 5 positions) | Vmoy | max. 2 | max. 3.4 |
| Largest rate variation (difference between two rates in the same position) | Vmax | max. 5 | max. 7 |
| Flat-suspended difference (between horizontal and vertical position) | D | -6/+8 | -8/+10 |
| Largest difference (between average daily rate and rate in one of the 5 positions) | P | max. 10 | max. 15 |
| Thermal difference (variation per °C of temperature difference) | C | ±0.6 | ±0.7 |
| Rate reproduction (difference between average variation on day 15 and average variation on the first two days of the test) | R | ±5 | ±6 |
| Bar Fecl ( Metres) (bar) (ft) (m) | ||||||||
| 3 98.5 (30) √- | - | - | - | - | ||||
| 5 164 (50) √ | √ | √ | - | - | - | |||
| 10 326 (100) √ | √ | √ | √ | √ | - | - | ||
| 30 984 (300) √ | √ | √ | √ | √ | √ | √ | ||
| 100 3281 (1000) √ | √ | √ | √ | √ | √ | √ | ||
| 200 6562 (2000) √ | √ | √ | √ | √ | √ | √ | ||
Pictograms.
Automatic winding
Oris own development (Automatic wining)
Manual winding
Worldtimer
Chromometer
Alarm
time zone indication
Screw down safety crown
Screw down safety
A Quick Lock Growth
Hellum valve
Sapphire crystal
Mineral glass
Plex glass
Anti-reflective coating (inside)
Luminous dial
Luminous Indices and luminous hands with superluminova
Luminous hands with superluminova
Dial with diamonds
Stainless steel
Stainless steel/18 carat gold
18 carat gold
Dlamond
DLC coating (Diamond like carbon)
PVD coating (Physical Vapour Deposition):
Titanium
Ceramic Top Ring
Skeleton back with mineral glass
Flexible lugs
Distance between horns
Distance outside homes
Genuine calf skin
Rubber
Fabric
Genuine crocodile
Water resistant to XX bar
Metals for cases and straps.
The 316 L stainless steel used by Oris is robust, durable and complies with the stringent dermatological requirements for preventing nickel allergies. The nickel directive applicable in many countries states that objects which are in direct, prolonged contact with the skin are only allowed to release 0.5 g of nickel per cm² skin/week. The nickel content in an alloy is not the crucial factor. The rate of nickel release on the skin is much more important. Although 316 L stainless steel is not entirely nickel-free it does not release nickel.
The grade 2 titanium used by Oris is a pure grade of titanium that can also be used in Implants and which possesses an excellent resistance/expansion ratio. Titania is 45% lighter than steel, and is also corrosion-resistant, skin-friendly and has a warm feel.
PVD coatings
Physical Vapour Deposition (PVD) is a process where an exceptionally pure, solid coating material is used to generate an ionized metal vapour which forms a coating mixture with inert gases. Through condensation, a thin layer is deposited onto the surface of the watch. The PVD process is carried
out under a forced vacuum in a coating chamber. This procedure is one of the most modern and ecologically sustainable coating technologies.
PVD coatings are highly adhesive, hard and abrasion-resistant. They are extremely smooth and particularly suited to coating watch parts. These coatings can be single layer, multi-layer or can be applied in graduated layers. The layer thickness ranges from 1 to 5 microns, although in some cases, just 0.5 microns or 15 microns and more can be applied. Depencing on the initial material and the inert gas employed, a wide range of PVD coatings can be applied. Essentially, these fall into four main groups: nitrides, carbides, oxides and carbons (Diamond like carbon).
Diamond Like Carbon (DLC) Coating.
As mentioned above, the DLC coating process is a PVD coating process using diamond like carbons. This durable and friction-reducing coating with an anthracite-coloured appearance essentially comprises diamonds measuring just a few nanometres across, coated in graphite. This structure is commonly referred to as Diamond-Like Carbon (DLC). Thanks to its diamond-like layered structure, DLC layers possess exceptionally
hard surface properties. They are substantially harder and more wear-resistant than ultra-hardened grades of steel, and are exceptionally corrosion-resistant, as well as being skin-friendly.
Sapphire crystal
Most Oris watches are now equipped with sapphire crystal on the dial face. This fact is noted on the case back.
With a Moh hardness of 9, sapphire crystal is the hardest of all grades of crystal. It comprises a synthetic sapphire and is exceptionally scratch-resistant. Only diamond, with a Moh hardness of 10, is harder than this. In addition a sapphire crystal is much more Impact-resistant than mineral glass.
To improve dial readability, the Internal faces of most Oris sapphire crystal have anti-reflective coating.
To obtain even clearer dial readability, a few Oris models have sapphire crystal which has anti reflective coating on both sides. This outer layer can become scratched in the course of wearing the watch. This constitutes normal wear and tea is not covered by the guarantee.
Technical information and summary tables.
Mineral glass.
The mineral glass provides un- blemished, clear readability, but is not as scratch-resistant. It is therefore only used by Oris for case backs.
Plaxi glass.
Plexi glass or acrylic glass is a tried and tested material. It delivers clear readability, it is highly impact-resistant and feels warm to the touch. It is very prone to scratching, especially in comparison with sapphire crystal.
- Scratched Plexi glass can be polished on a polishing machine.
Oris uses Plexi glass primarily on its traditional Oris Big Crown models as this was used for the original models.
Luminescent dials
and hands.
On most Oris watches, the hands and hour indices on the dial Super-LumiNova luminoscent colour is applied. This luminescent paint is charged by sunlight, or even by artificial light, and is absolutely free of any radioactive additives. The phosphorescent pigments retain their properties
and can therefore be recharged as often as necessary.
This phosphorescent property is at its most powerful during the early stages of darkness, and diminishes fairly rapidly during the first 60 minutes. After this initial period, the loss of light intensity is much lower, and it is possible to read the time clearly even after 5-6 hours of darkness.
To achieve the highest possible level of phosphorescence, the watch must not be continuously obscured from sunlight or artificial light (e.g. by being covered by a shirt sleeve).
Metalbracelets,
leather and rubber
straps
All genuine Oris straps bear the Oris Inscription on the reverse of the straps and on the buckle.
Metal brackets are made of 316L stainless steel or from Grade 2 titanium. (See 'Metals used for cases and straps').
Oiris sources all of its genuine crocodile, alligator, ostrich, ray and lizard leather from animal species not subject to protected status. This is backed up by CITES certification (Convention on International Trade in Endangered Species of Wild Fauna or Flora).
- Orls rubber straps are robust, durable and water resistant. The rubber mixture used is non-toxic and does not contain any potential allergens.


Lunar calendar.
2017 2018 2019 2020 2021 2022 2023 2024
| January | 012●28 | 02/31●17 | 6○21 | 010●24 | 13○28 | 2017 | 6○21 | 11○25 |
| February | 011●26 | 15 | 4○19 | 09●23 | 11○27 | 11○16 | 5●20 | 9○24 |
| March | 012●28 | 2/31●17 | 6○21 | 09●24 | 13○28 | 2018 | 7●21 | 10○25 |
| April | 011●26 | 16○30 | 5○19 | 08●23 | 12○27 | 1/30○16 | 6●20 | 8○23 |
| May | 010●25 | 15○29 | 4○18 | 07●22 | 11○26 | 16○30 | 5●19 | 8○23 |
| June | 09●24 | 13○28 | 3○17 | 05●21 | 10○24 | 14○29 | 4●18 | 6○22 |
| July | 09●23 | 13○27 | 2○16 | 05●20 | 10○24 | 13○28 | 3●17 | 5○21 |
| August | 07●21 | 11○26 | 1/30○15 | 03●19 | 8○22 | 12○27 | 1/31○16 | 4○19 |
| September | 06●20 | 9○25 | 14●28 | 02●17 | 7○20 | 10○25 | 15○29 | 3○18 |
| October | 05●19 | 9○24 | 13●28 | 01/31●16 | 6○20 | 9○25 | 14○28 | 2○17 |
| November | 04●18 | 7○23 | 12●26 | 015○30 | 4○19 | 8○23 | 13○27 | 1○15 |
| December | 03●18 | 7○22 | 12●26 | 014○30 | 4○19 | 8○23 | 12○27 | 1/30○15 |
New moon
Full moon
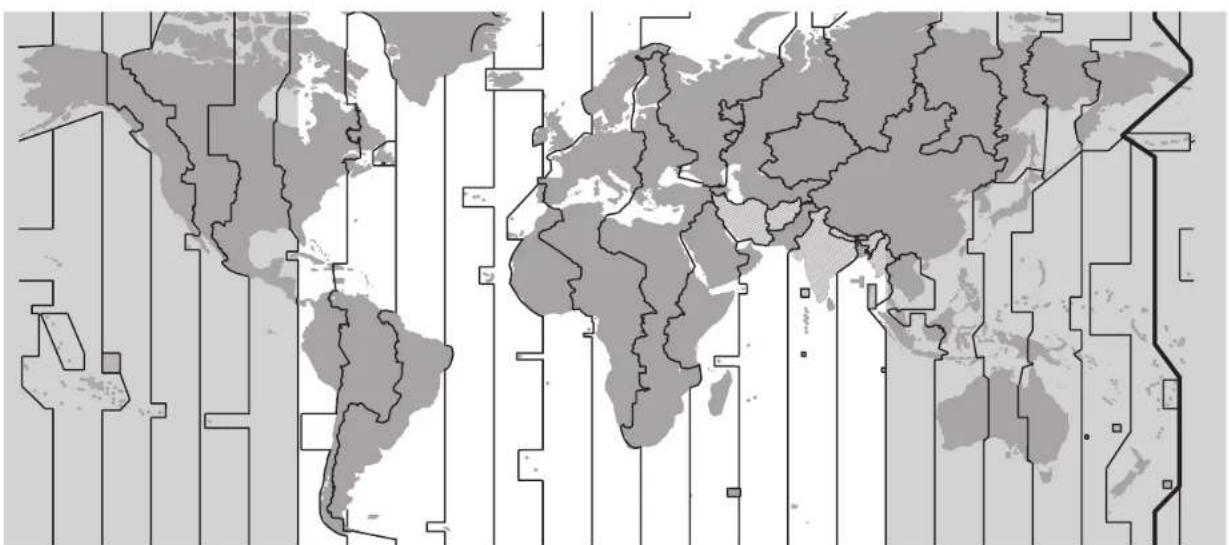
Time zones
The times in the various time zones are based on UTC (Universal Coordinated Time). UTC has taken over the function formerly performed by Greenwich Mean Time (GMT). UTC and GMT are both based on longitude zero which runs through Greenwich near London. In most cases, the times in other zones are calculated by adding or subtracting whole hours, depending on their respective distances from the zero meridian. In a few countries, e.g. Iran, Afghanistan, India and certain regions of Australia, there are also time differences from UTC at 3% 4% 5% or 9% hours.
Movements.
Detailed specifications can be viewed at www.oris.ch.

M

H


1

Drawn

Mexico

New


Bic 1

South

A

London

Paris

Cairn

Moscow

Duihai

Kacchi

Dhaka

S

Herd

Tky

Systoc


A

42 Midway
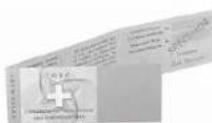
International guarantee for Oris watches.
Guarantee
Ors SA provides a guarantee for the first twenty four (24) months following the date of purchase on the attached and numbered 'Guarantee Card', in accordance with the following terms and conditions:
This guarantee covers material and manufacturing defects, as well as flaws existing when this Oris watch was delivered to the owner. This guarantee is only applicable if the guarantee card has been filled in completely and correctly, and stamped by an official Oris retailer, and if the serial number on the guarantee card matches the number on the watch.
During this guarantee period, and on presentation of the valid guarantee card, the owner of the watch has the right to a repair free of charge. If Oris deems the repair to be unsuitable, the watch shall be replaced with an identical or similar Oris watch within the aforementioned guarantee period.
This guarantee excludes:
Normal wear and tear resulting from wearing the watch and ageing, e.g. scratched glass, discolouration and/or material alteration with leather, fabrics, rubber, etc.
Damage resulting from failure to observe the instructions for use issued by Oris.
- Damage such as knock, dents, crashing, broken crystal etc. resulting from improper, abnormal or careless handling, neglect,
accident, collision impact, etc. Damage resulting from improper work performed by service centres not authorised by Orts
Watches modified without Ons supervision.
Additional form of guarantee granted by a direct outlet e.g. retailer etc.
- Indirect damage and/or secondary damage, of any kind e.g. due to watch sloopage or inaccuracy, etc.
This guarantee does not affect your statutory rights.
The guarantee services described here and the recommended maintenance work shall be performed by an authorised Oris retailer and/or by the national representatives of Oris. A list is attached, accurate at date of issue. The current version of the list is published at www.oris.ch.
Guarantee supplement for
watches bought in the USA.
All applicable implied warranties, incl. the implied guarantee of merchantability end of fitness for a particular purpose given to you by law are hereby limited to the duration of this guarantee. Some states in the USA do not allow time limitations of warranties, or exclusions or limitations of incidental or consequential damages, so exclusions or limitations mentioned may not apply to the owner. This guarantee gives the owner specific legal rights and may also have other rights which may vary from state to state. Oris' obligation is strictly limited to repair or replacement as stated herein. Your Oris dealer carries sole responsibility for any other guarantees.
Proof of ownership.
Proof of ownership.
This list is supplied for information only and does not form part of the guarantee terms and conditions.
First owner
Date
Name und address
Comments
Second owner
Date
Name und address
Comments
Third owner
Date
Name und address
Comments
Product Manual Supplement.
Movement 915.
ORIS
Swiss Made Watches Since 1904
English
Complication (movement 915).
The quick date and day adjustment must not be used between
3 p.m. and 1 a.m., because the wheels for the change are active during this time and may be damaged.
Where fitted, open the screw down crown or QLC crown in accordance with the instructions in Chapter 1.
Pull out the crown to position 2. Turn the hand forwards past 12 o'clock until the date changes. Turn the hand further until quarter past three.
Press pusher 3 with the special tool provided, or with a wooden toothpick, until the desired day of the week is set.
Press pusher 4 and set the month. Press pusher 5 and set the date.
Press pusher 6 and set the moon display.
Since the moon moves a relatively small distance within a 24 hour period, it is best to set the moon setting when there is a new moon or a full moon.
- Use the crown to set the current time - if it is in the afternoon, turn it a further 12 hours.
The watch remains stopped when it is in this crown position and it can, for example, be started on a time signal or the crown can be pushed to position 1.
Push the crown to position 1. Where fitted, close the screw-down crown or QLC crown in accordance with the instructions in Chapter 1.
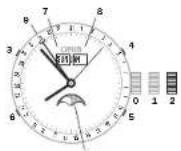
Pos. Crown is closed if it is a screw-down crown or a QLC crown
Pos.1 winding position
Pos.2 Time and moon phase setting
a Pusher for day of the week setting
4Pusher for month setting 5Pusher for date setting 6Pusher for the moon phase indicator
7 Day of the week indicator 8 Month indicator 9 Date indicator 10 Moon phase indicator
Product Manual Supplement.
Oris Aquis Depth Gauge.
OBIS
Swiss Made Watches Since 1904
English
Guidelines
Each Oris Aquis Depth Gauge has been tested and found to comply with the Oris testing standards. It is possible that due to physical damage, inadequate handling or uncontrollable influence, the depth indication may not function properly. These guidelines will help to make the Oris Aquis Depth Gauge the best possible dive companion.
Accuracy of the Depth Gauge
The following parameters interact with the physical functionality of the Oris Aquis Depth Gauge and may slightly influence the accuracy of depth indication:
Change of ambient air pressure due to different temperature, weather conditions and height above sea level
Temperature difference of ambient air/water, particularly the difference in temperature between the watch and the water
Salinity of the water
Safety Precautions Prior to Dive
Check there is no water residue (dark grey colour spots) in the gauging channel. If there is, clean the channel as explained under 'How to Use the Cleaning Kit'
Ascertain that the Oris Aquis Depth Gauge has ambient temperature, i.e. that it has not been exposed to extreme sunlight or other heat or cold before the dive
Use the Oris Aquis Depth Gauge
only as a supplemental mechanical depth gauge, in addition to the usual diving instruments
Oris declines any responsibility if these instructions are not followed. The International guarantee applies as stated in the Oris Product Manual supplied with each Oris watch and available on www.oris.ch
Cleaning Kit Components
The cleaning kit for the Oris Aquis Depth Gauge contains the following parts:
1x syringe 5 ml ①
- x cannula (2)
- 5 x flexible tube (3) (mounted to cannula)
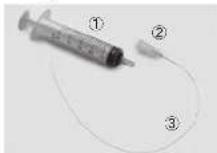
How to Use the Cleaning Kit
The kit is designed to clean the gauging channel and to remove residual water. Proceed as follows
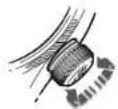
1Feed the flexible tube transversely towards the channel into the opening of the sapphire crystal and push the tube until it reaches the end of the channel. (Fig. A) 2Fill the syringe with water Note: Do not use any aggressive
cleaning agents or solvents, as this may damage the gasket of the sapphire crystal.
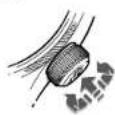
a. Plug the syringe on the cannula and inject the water to rinse the channel. (Fig. 8)
4. If necessary, repeat steps 2 and 3.
5. Withdraw the tube with the mounted syringe slowly out of the channel and, at the same time, pull the piston of the syringe in order to remove the water from the channel.
e.To remove residual water from the channel apply step 1 & 5 only

(Fig. A)
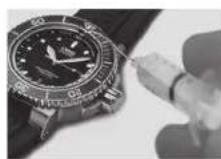
(Fig. B)
PRODUCT MANUAL SUPPLEMENT
ORIS BIG CROWN PROPILOT ALTIMETER
ORIS
Swiss Made Watches
Since 1904
English
GUIDELINES
Each Oris Big Crown ProPilot Altimeter has been tested and found to comply with the Oris testing standards. It is possible that due to physical damage, inadequate handling or uncontrollable influence, the altitude and air pressure indication may not function properly. These guidelines will help to make the Oris Big Crown ProPilot Altimeter the best possible companion.
Accuracy of the Altimeter
The following parameters interact with the functional principle and the barometric functionality of the Gris Big Crown ProPilot Allimeter and may slightly influence the accuracy of the altitude indication:
Change of atmospheric pressure due to different temperatures
Change of atmospheric pressure due to different temperature gradients at different locations of reading the altitude
Changing weather conditions, such as high pressure systems/ low pressure systems
weather dynamics in general
Safety Precautions Prior to Use
Ascertain that the Oris Big Crown ProPilot Altimeter has ambient temperature. i.e. that it has not been exposed to extreme sunlight or other heat or cold before the use.
Make sure that the crown at 4 o'clock is unscrewed and in position 1 as described in the section. How to use the Oris Big Crown ProPilot Altimeter. The red ring on the crown shaft must be clearly visible. The altimeter does not work if the crown is screwed in to the case.
Prevent the watch from getting in contact with water once the crown at 4 o'clock is unscrewed. The case is open and not water resistant when the crown at 4 o'clock is not tightly screwed into position 0. The special PTFE membrane only ensures a protection against water-vapour and humidity entering into the watch. The membrane does not ensure any water-resistance.
Avoid dirt from coming into contact with the watch. Dirt might block the PTFE membrane and the case openings and as a consequence disable any free circulation of air into/out of the case. The display of the altitude will then be delayed or completely out of operation.
Always tickle with your fingertips on the watch before reading the correct altitude. The smooth tickling allows the aneroid cell and the mechanism of the barometric altimeter to work smoothly.
Always adjust the altimeter before using according to the instructions given in the section How to use the Oris Big Crown ProPilot Altimeter/setting the altimeter, Check and recalibrate the altimeter frequently, whenever having a reference point indicating its altitude or a given reference pressure in order to compensate for changing ambient and weather conditions.
For safety reasons: Use the Oris BigCrown ProPilot Altimeter in flight operations or on expeditions only as a secondary instrument. In addition to any other device indicating altitude, e.g. on-board instruments of a plane.
Note: Pressurized aircraft cabins simulate an environment of a lower altitude than the airplane is actually flying. Every barometric altimeter, be it electronic or mechanical as the Oris Big Crown ProPilot Altimeter, indicates the current air pressure in the cabin when flying with air carriers. The altimeter instruments in such airplanes have a pressure connection on the exterior of the plane In order to measure pressure and altitude.
Oris declines any responsibility if these instructions are not followed. The international guarantee applies as stated in the Oris Product Manual supplied with each Oris watch and available on www.oris.ch.
How to use the Oris Big Crown ProPilot Altimeter
The dial is split into three zones In the centre is a traditional watch dial showing the time, around that is a gauge showing atmospheric air pressure, read using the red indicator; and an outer ring displays altitude up to 15'000 feet or 4'500 metres, shown by the yellow indicator.
NEUTRAL MODE
(Crown position Or With both crowns screwed down securely, the Big Crown ProPIat Imeter performs like a regular automatic watch. The central dial and hands tell the time and date (adjusted by the crown at 2 o'clock) and the watch is water-resistant to 100 metres./10 bar.
2. ACTIVATING THE ALTIMETER (Crown position 1): Unscrew the crown at 4 o'clock into position 1 to activate the altimeter. A red ring appears, indicating that the altimeter is in use.
-
SETTING THE ALTIMETER (Crown position 2): Pull the crown out to position 2 and set the altimeter by rotating the crown. There are different modes of settings, such as rotating the crown until the reference air pressure QNH/QFE/QNE (e.g., supplied by an airport control tower) aligns with the red triangle at 6 a'clock on the central dial, or rotating the crown to adjust the yellow indicator to your known altitude. The watch now displays the present altitude, yellow indicator, and the actual atmospheric pressure, red indicator.
-
RETURNING TO NEUTRAL (Crown position 0): To deactivate the altimeter and return it to neutral, screw the crown back into position 0. This also re-seals the witch so that it is once again water resistant to 100 metres/ 10 bar.
- MEASURING ALTITUDE (Crown position 1): Once the altimeter has been set, put crown into position 1. Change altitude are shown by the y indicator against the outer ring, on a scale from 0 - 15 feet, or from 0 - 4500 feet.

Produkt Manual.
Inhaltsverzeichnis.
127
Einleitung 129
Ulrich W. Herzog Executive Chairman
| Bar Fuss (Meter)(bar) (ft) (m) | ||||||||||
| 3 | 9 | 8 | 5 | ( | 3 | 0 | ) | ✓- | ||
| 5 | 1 | 6 | 4 | ( | 5 | 0 | ) | ✓ | ✓ | |
| 10 | 328 | (100) | ✓ | ✓ | ✓ | ✓ | - | - | ||
| 30 | 984 | (300) | ✓ | ✓ | ✓ | ✓ | ✓ | ✓ | ||
| 100 | 3281 | (1000) | ✓ | ✓ | ✓ | ✓ | ✓ | ✓ | ||
| 200 | 6562 | (2000) | ✓ | ✓ | ✓ | ✓ | ✓ | ✓ | ||
Piktogramme.
Product Manual Supplement.
Movement 915.
ORIS
Swiss Made Watches Since 1904
Deutsch
Orls Complication (Werk 915).
Product Manual Supplement.
Oris Aquis Depth Gauge.
OBIS
Swiss Made Watches Since 1904
Deutsch
Hinwelse
PRODUCT MANUAL SUPPLEMENT
ORIS BIG CROWN PROPILOT ALTIMETER
ORIS
Swiss Made Watches
Since 1904
Deutsch
HINWEISE
Ulrich W. Herzog Executive Chairman
Explication des flèches indicatives:
Mode d'emploi O = Informations utilities
Movement a remontage manuel.
Product Manual Supplement.
Movement 915.
ORIS
Swiss Made Watches Since 1904
Francs
Oris Complication (movement 915).
Product Manual Supplement.
Oris Aquis Depth Gauge.
OBIS
Swiss Made Watches Since 1904
Francs
PRODUCT MANUAL SUPPLEMENT
ORIS BIG CROWN PROPILOT ALTIMETER
ORIS
Swiss Made Watches
Since 1904
Francals
PRECONISONS D'UTILISATION
Swiss Made Watches Since 1904
Inhoudsopgave.
187
Introductie 189
Ulrich W. Herzog
Executive Chairman
| Bar Feol (Metres) (bar) (ft) (m) | ||||||||||
| 3 | 9 | 8 | 5 | ( | 3 | 0 | ) | ✓- | ||
| 5 | 1 | 6 | 4 | ( | 5 | 0 | ) | ✓ | ✓ | |
| 10 | 328 | (100) | ✓ | ✓ | ✓ | ✓ | - | - | ||
| 30 | 984 | (300) | ✓ | ✓ | ✓ | ✓ | ✓ | ✓ | ||
| 100 | 3281 | (1000) | ✓ | ✓ | ✓ | ✓ | ✓ | ✓ | ✓ | |
| 200 | 6562 | (2000) | ✓ | ✓ | ✓ | ✓ | ✓ | ✓ | ✓ | ✓ |
Diamond Like Carbon (DLC) Coating.
PVD coatings
Physical Vapour Deposition (PVD) is even process whereby an uilonzderiik pour en solde coating materialei word gefrukt om een giclionioscere metaoladdamp to genererenweiee koningmengselle
Product Manual Supplement.
Movement 915.
ORIS
Swiss Made Watches Since 1904
Nederlandds
Product Manual Supplement.
Oris Aquis Depth Gauge.
OBIS
Swiss Made Watches Since 1904
Nederlandds
RichtlJnen
PRODUCT MANUAL SUPPLEMENT
ORIS BIG CROWN PROPILOT ALTIMETER
ORIS
Swiss Made Watches
Since 1904
Nederlandis
RICHTLIJNEN
Ulrich W. Horzog
Executive Chairman
Product Manual Supplement.
Movement 915.
ORIS
Swiss Made Watches Since 1904
Espanol
Oris Complication (movimento 915).
Product Manual Supplement.
Oris Aquis Depth Gauge.
OBIS
Swiss Made Watches Since 1904
Espanol
Directrices
m = 311 ;
m = 311 ;
PRODUCT MANUAL SUPPLEMENT
ORIS BIG CROWN PROPILOT ALTIMETER
ORIS
Swiss Made Watches
Since 1904
Espanol
DIRECTRICES
Ulrich W. Herzog
Executive Chairman
| Bar Pledi (Metri) (bar) (ft) (m) | ||||||||||
| 3 | 9 | 8 | . | 5 | ( | 3 | 0 | ) | ✓- | |
| 5 | 1 | 6 | 4 | ( | 5 | 0 | ) | ✓ | ✓ | |
| 10 | 328 | (100) | ✓ | ✓ | ✓ | ✓ | ✓ | - | - | |
| 30 | 984 | (300) | ✓ | ✓ | ✓ | ✓ | ✓ | ✓ | ✓ | |
| 100 | 3281 | (1000) | ✓ | ✓ | ✓ | ✓ | ✓ | ✓ | ✓ | |
| 200 | 6562 | (2000) | ✓ | ✓ | ✓ | ✓ | ✓ | ✓ | ✓ | |
m = 311
Calendar lunare
2017 2018 2019 2020 2021 2022 2023 2024
| Gennaiio | O 12● 28 | O 2/31● 17 | ● 6○ 21 | O 10● 24 | ● 13○ 28 | ● 2○ 17 | O 6● 21 | ● 11○ 25 |
| Fabbraio | O 11● 26 | ● 4○ 19 | O 9● 23 | ● 11○ 27 | ● 1○ 16 | O 5● 20 | ● 9○ 24 | |
| Marzo | O 12● 28 | O 2/31● 17 | ● 6○ 21 | O 9● 24 | ● 13○ 28 | ● 2○ 18 | O 7● 21 | ● 10○ 25 |
| Aprile | O 11● 26 | ● 16○ 30 | ● 8○ 19 | O 8● 23 | ● 12○ 27 | ● 1/30○ 16 | O 6● 20 | ● 8○ 23 |
| Maggio | O 10● 25 | ● 15○ 29 | ● 4○ 18 | O 7● 22 | ● 11○ 26 | ○ 16● 30 | O 5● 19 | ● 8○ 23 |
| Giugno | O 9● 24 | ● 13○ 28 | ● 3○ 17 | ○ 5● 21 | ● 10○ 24 | ○ 14● 29 | O 4● 18 | ● 6○ 22 |
| Luglio | O 9● 23 | ● 13○ 27 | ● 2○ 16 | ○ 5● 20 | ● 10○ 24 | ○ 13● 28 | O 3● 17 | ● 5○ 21 |
| Agosto | O 7● 21 | ● 11○ 26 | ● 1/30○ 15 | ○ 3● 19 | ● 8○ 22 | ○ 12● 27 | ○ 1/31● 16 | ● 4○ 19 |
| Settambre | O 6● 20 | ● 9○ 25 | ○ 14● 28 | ○ 2● 17 | ● 7○ 20 | ○ 10● 25 | ● 15○ 29 | ● 3○ 18 |
| Oltobre | O 5● 19 | ● 9○ 24 | ○ 13● 28 | ○ 1/31● 16 | ● 6○ 20 | ○ 9● 25 | ● 14○ 28 | ● 2○ 17 |
| Novembre | O 4● 18 | ● 7○ 23 | ○ 12● 26 | ○ 15○ 30 | ● 4○ 19 | ○ 8● 23 | ● 13○ 27 | ● 1○ 15 |
| Dicembre | O 3● 18 | ● 7○ 22 | ○ 12● 26 | ○ 14○ 30 | ● 4○ 19 | ○ 8● 23 | ● 12○ 27 | ● 1/30○ 15 |
Novilunio
Plenlunio
Fusi orari
Product Manual Supplement.
Movement 915.
ORIS
Swiss Made Watches Since 1904
Italiano
Complicazone Oris (movimento 915).
Product Manual Supplement.
Oris Aquis Depth Gauge.
OBIS
Swiss Made Watches Since 1904
Italiano
Drittive
PRODUCT MANUAL SUPPLEMENT
ORIS BIG CROWN PROPILOT ALTIMETER
ORIS
Swiss Made Watches
Since 1904
Italiano
DIRETIVE
| Bar Pés (Metros) (bar) (ft) (m) | ||||||||||
| 3 | 9 | 8 | 5 | { | 3 | 0 | } | ✓- | ||
| 5 | 1 | 6 | 4 | {5 | 0 | } | ✓ | ✓ | ||
| 10 | 328 | (100) | ✓ | ✓ | ✓ | ✓ | ✓ | ✓ | - | - |
| 30 | 984 | (300) | ✓ | ✓ | ✓ | ✓ | ✓ | ✓ | ✓ | ✓ |
| 100 | 3281 | (1000) | ✓ | ✓ | ✓ | ✓ | ✓ | ✓ | ✓ | ✓ |
| 200 | 6562 | (2000) | ✓ | ✓ | ✓ | ✓ | ✓ | ✓ | ✓ | ✓ |
Product Manual Supplement.
Movement 915.
ORIS
Swiss Made Watches Since 1904
Portugues
Complications Oris (movimento 915).
Product Manual Supplement.
Oris Aquis Depth Gauge.
OBIS
Swiss Made Watches Since 1904
Portugues
Dreclrzes
PRODUCT MANUAL SUPPLEMENT
ORIS BIG CROWN PROPILOT ALTIMETER
ORIS
Swiss Made Watches
Since 1904
Portugues
INSTRUÇÖES
Ulrich W. Herzog
Executive Chairman
bilden own visar T1 06:53 after 18:53 pch T2 03:53 after 15:53
Tildzoon 2 med extra 24 h-visure
Lossa den skruvaskrade kronan erller QLC-kranon (i forekommande fall) erligt instructiojerna i kapit 1.
Dra ut kronan till lage 2, vid den moturs cch stali in bnskad T2 (t.ex, tid pa hemort).
- Trck in kronan till age 1.
LásdenkrusakrödkcnkranellcQLCknrnan (iforekommandefall)ignt instructionenma Kapital 1.
I exemplet ovarian ar klockan 11:53 I tidszzen.
Tidszon 2 med
Fig.20 Compliant staining.
4 Start/stopknapp
Nelstalnd
s Nonsfllnnngskapp
e ver dai rapp for calin
stalling nos unverk 676
Inyck pa knappen med ett
Komplication.
Product Manual Supplement.
Movement 915.
ORIS
Swiss Made Watches Since 1904
Product Manual Supplement.
Oris Aquis Depth Gauge.
OBIS
Swiss Made Watches Since 1904
Svenska
RiktinJer
PRODUCT MANUAL SUPPLEMENT
ORIS BIG CROWN PROPILOT ALTIMETER
ORIS
Swiss Made Watches
Since 1904
Svenska
RIKTLINJER
24-hacboB CTpeKo HHaBaHmNgdoOB
HaBpaauoemc06oe 76
XpoHorpa 76
Ycokie (Complication) 77
PerynTop 78
HacbIcJeHTpaJIbHOI cTpeHoi/ya3aTeIeM
aTbHIN HnHnHn 78
ByuHbHHcABTomaTHueckHM 3aBODOM
TaxymETPH-ECKARHKANA-NMPECHNE
CKOPoCTH 79
TeneMetOnyecKgHkana-H3MeDeHke
paccTOMH 80
Bpaauouioc 060dk daHepcknXacOB
c60-MnHyTHoIuKAnO 80
TennneBn knanah 81
YacbKaK coJIHeHbI KOMnac 81
NoRnKa pemeWka/6paCneta qacOB
OrIsK3aIacTbIO 82
HacbHaKoKaHompeMeuKe 82
YacuHaKayykoBOMpeMeWke 83
YacbHa MetanHueckom 6paCte 83
ToHnHa HAcTpoKa paKnaDbBaIOUeHc
3actckn 83
IpMHMeaHn84
ToHIOCTb 84
XpoHOMeTp 84
BooctoKoctb 86
3KcnnyataaHnTexHHueckoe 06cnykmbaHne ...86
TexHHueckKa HΦopMaun CBOHbIe
Ta6nncb 88
TnKToPamM 88
MetannIgKopnycaHbpaclera 88
Pokpbirne PVD 89
CanoppoBoe crenno 89
MnhepaBbHoe cTeKIO 90
PnneKcnrnnac 90
JIOMMHecueHTHOE NOKpbTHe LcHepoNaTa
HCTpeJOK 90
Metannueckne 6paclte, KOxahbIe
KAYyKOBBiepeMeuK 90
NvHHn KAnchOaB 91
Yacobie nora 92
MexaHHMa 92
Mekdyapodnra rapantna Haacbi Oris 94
CbnTeJIbCTBO O BnaJeHH 95
PpH3B0DnTeNbOCTaBnRE3aCo6u npaBO
H3MeHrB 6e3 npdynpexdHHraTexHHueckn
XapakTeepntKn HHe rapaHTpyeHaHnHe
ModenB npodaKe.
BvEeHne
69
MbIbaOaOIOBACBaRrPOB6E TNEHABOCOBISNIIIOIOBHTETCYBEMBAKCAUIEOPEMEXAHAXY EVOXHOBAC. BBy 8eDHTECB 50TOMI MOP IOSAQPCEBCBOKDPYMEXAHN,ITJARHACTOBOBOMDBENe HE cyUCETBYET HINHERKPMEMAHXN
BauBa CHaIc OrIs YEbeHIOHO N3O
ZUHOHNHYOT C6BJI BHO 30HO MACCBO BDO HIN MDOHNTO TBPOB.
BMEcTO STOrO OHN CHIeTBOEOT
JENCTIHHEHNE HENHOCTI HA
CBOHO YXeCTA IIeKpUHx, Xo
BaeTeRbYBeHNe IePnTsCAOHHM
MIPOMeXHcHEKMM HOrCTyK
MEXHMMEXHMOs H63yEPNO
CTHBIM D4HBMHO. HAcS OrIS
TEbTAHOYHNAOeD8EBHIO
ZoEOBREHTBA CTOYEYM High
Mech.PHOHKNHYO MaTcEPTCBOM
HAHX YCOBbIX MaTcEPOHS R43
DBaobTaHNO C0MeBHmMYO
HMMA C1ABeCTbHMn PPODeCCIO
HAMN HA MPOB HOONKo
MyIb 1, DaBBHrA HAnALIK.
IeB 0D OOh Yehb BnHoe DnCPOBEMHOHTOCHBIOYROCTACAM OrIs He NHyhBi DaTePAnR,Notomy Yo Bu Cama CBOHM DAAKENBIMNNTNaTeAE HeeprM Baun ChayOrs, Iro,Nb63oDmit IX Bny-Hyo.
Rnnaaannaa BAC nocertn Hnau Cai n INtepehe WOrs. cir, rge BHa naiae 6oBtuie HnOAPAAuMn CMOKepe npDnTn papAHHHnBn nepno, nnpocdoHHnauBn K AHCIOHNBOHMYKbY MyOrs.
MJI KHeLaEM BAMXoAPHIXBPEMECH CBAIMHIYACAMIOrs

YibpB.F.Bepor, PnpejEi
PazbliBnBHe 3aHcHbN yHa3aTeB E B HocHyPn
= INCTyCNHINIOHCNOIaONBHOHO
Ponokemna 3abdoa nrokoi
OIOHCAHBHE NIKHE OIOIOKHE 3A80HOHJIOIOKOH COOTIE1TOYIKOTAECHTEBHLOCTN A OIOJIHHCTBE CHUYIHO. OIOIOHbIX IOIOHNXHOOB3AOTELHOOOCCETDRNTHORHCINHOOCHOTERTSYIOQEDTGNTHMeAHXMOHMS.
ПОJOKEHNE O
Звдочь Глорбг
ЗбИСМСБОВДАБ
[ДТАФИССРУМСH
HAрзьб3б3abOg
н�огсгггггн
ЗбИСDнгOLBOY
SCHETMEL OIS
Quick Lock].
Положени 1 Положени Звобido.
Pojokhenne 3
Pojokhenne yicah
HOKHI BPEMH.
HnKKBn Hn KHeNnEeDyOuXnOne pauHn He JnKHe nPbOaBnBcHnO, NOBOD.
06bUHa3aBODHa rOIOBKa
06BHHAB380BDHARoBOHSOri
O6BOHnA HPOeHNOHOHbDTeR
HOBODOByBAHTNHTHE
BMM,OTBI NpDpyDnTbTHoBB
TAHDAH BYHTy KOPNY
PIMEPHO NOHOaH YAoc OB
MMEOT O6BHYHO 380BDHO
ROBcY.
06BHHH 380BDHJTOBOBA HAKO- DIOCT B TOPOCHKHN, H CCKMOHO BOCTNO3OBATBOJ 380DBO B JIOBO B PBEKA, KAK 3TO OINCKBO H NOCTEOUYXH TBAxAB.
ФнкчрmaнHape36e
3aBODHaTOnOBKa
Hematoepha cachis Ors,oc6cbHOn DaBpepehneModen,0600Dy BnA HnKcPcMnH Ma pCbe 3aBouHn TnOIOI. IpTepe HmNoo3bTb n CHe DnTCTBa, Ee HynoOgKpyttn.
Bpaaane rontocbky Bnnapae NnnnnpntbnaocbBctpenei.
hora oia TRI CHAMETER C PESOLO. Tenepe 38B0DAB OTOLOHAI HAZAJIOHIO HOLOXENHI N, HKO MOHOHIO HOOOHNIO HOLOXENHI N, HKO MOHOHIO HOLOXENHI N, HKO MOHOHIO HOLOXENHI N
Poeae BceXeBCTBnA 2bD0yHXoRTOBIOH EHO6OHO3a4HNCH
ODBTB.CBCTK HANHMM NO H
PABINHENO K KOPHYN K BPAUZ
A HAPBENCHNO N O CAVBOB
CTDBEKE
HcOxDIOXnBnE BEmT O BEmEHnN PNOBEOBtCTeBNHfKCNALIN 3BAOBHOI TOBOHcO:OHDAONHb 6bHb HOHOHOHOZKHNyHO
OcBcO6bAaOCTYTHOBENHIOI CTeBNHOBOOCTKOKTOIbIKO 3CNYBEHNCAU3ABDNOI FOBKN.
380078 TONOBBA CHTEMBI Oris Quick Lock (QLC)
Cnemea Quick Lock Cwn (QLC) 432087A HOMANHAR Oris cueTIO cIeNTb CHTcEmy Oecenehy HBAOCTOHKINPPOE:JIH 3TO3 AMEMHN FHCACUHO HA 36366FHKCAELN H BAHOHTOH KPNBENH
MRTKHOHMMHTA 3a3ab0yIIO FOJIKYH JN HAPANBIAHKO KONPCKY NIOPEGHPTEE 6pnoTHYACOBIN STEPKHN, HPNPTNAIBOLOTO YUKHM, JOE TNCIO, IOKHA TOPOBHNA CHAMMOY C. HOMATOW
Tenepe 1BABADIOIPOHARIA HAO-DUTCH B INTOKOKHENI, I EVO MOKH
306HON33A8B. KIK 306OTMnCnBaHO B NOJcN2yUINX FBAxB.
TIOE Boe XeJCTRIANBABOHyDQ
TALNOY HOOBXIAHMAaADHCHPOB
Bt, npKbA Ee KOpNcyuNp
Iue, ne HpaIgAor BoIIoo yC
H, HnAPARAHNIH No cAOsO
CTPEK, NOKA OHA He Byder 3400 KONPOBAH
BcHbOBADaTOTCTAHOBETIHIO CTENHBOBDTOPOKCHTOIINKBO CNYAEEFHNCAUHN3ABDOHN FOBKNK.
ФИКСИРУЕМБLEHa
pe3b6e KHOPIKIN

HEHOTOpue YacB OrIs, ooc6eHHoDAIbpeKcRMeOeMOni, 06ooDyAaBH HfHKpOyEmMa H a pe3Be5e KHONKMM, TAKK KRe K A fHKpOyEmHa ne p3Be6e 3abOaHro RoCOK.
BDAIHTOBOKBYKOTOPOH YCTAOBHeA KHOXA, B HAPaJIeN HIN PTOB TACOBCTCPENK, NOKA BY He OUYTNE COPTONBNEHHC.
TenebpoMOKHOBOONBIOBAtCBKHNKOH.KK3TOOINCHOBNOCENyoumiknqabax.
NocB BcEX DcHBrN TONBOY, KOTOPOY YTOAHOBHLKHOHNOHOOxODMOZdWVKCNPOBAt, HOOMMBA HHe No HAPARIMHOKOPNYB WpAaIqNo YaccooB CTpeLNa, NOA Bb He OuyTne coPOTOBENHE.
AaBbOJIaJIaJIOTyETAHOBIEHHOCTeNEHbIOOJOcTOIOKHOCTaIOHbIO BCTyueHΦINCAUH KHOHNOC.
HONKAMM HENb3R NtB3OB8BTCRA NOBEOBD.
YacbCABOTOMATHOCKHM 380AD0
HAcB Ols, ECN XH HCHB EKED
HEBBO TEOCHNE PIMPHO 12
YACOB, HEYKOATCR B YPOHM
3ABOe, 3ABO, XOOBDIO PNOHNHIO
PNOHOBJHTCOT RPAJIENH NIKPAK
HOROT DOPOA KOTOPOC BOHNIKAET
3A-3B DINOHNIKI KYOH C QACAM.
DAKe cCNB BIL CHMAE To HA
HOH OH,NIOPOJAKOTAI INTH. ME
XAHM3N OTOAOBHCTC, ECN HE HAI
DARET BACH B TEOHNE PIMPHO
40 ACOS.
ECJIH ABITOMATMCHCEHIEAChI OCTHOBHKINL.CN HEOXOOIMMOI3YJTHCETK
OCHOOBIOI DHOHBOHAAHY HO 0aee HNO QLC 3AOHOYIO KAOBY B COOTBTCTBNH CINTCYD KUHN FABN I (PnH NNNN COOTBTCTBOHYOCHTENM FQKCNHI)
KoJDA TIOBOKA HAOJONH BIOJIOHNH 1, CJIaJIATE EIO JIePHEO 12 O60pOTa NO YACOBY CTPNIE (MOKHO BPAATs BNEpE/Ha3d)
HaCTPOyBt BPEM N DHTyTe NO K3AHNNY cOAS, HAK 370 ONICHO HNKIE.
3A4HnKNPyIe HaePbBbHINQL 3320HNOIPOIgBbCOCTBcTNBm C HNCTpyHnHM NnBbI1(NnHnHnHnCOTBEETCYIOECHNTEMJI FHKCAHHI.
CKb0aI np3paHHOe KOa3JHJI KpBJIuK OPONyCA MIOHNX MOEtJe OIRc aCOTAMHECHNQ 3ABOLOM AIDJEK KPACHI HOTPO -FHPMH
Him nonhak-Heacov Oris. Potop. spalaketni n abaiknJ mehaxan
YacbCyPbHM 3ABOaD
B MEXAHUHCHX YACax Oc pyu HbM 3aB02m 3aBd0y IpynHyh CbEyer 3aB0dy BpyHy. 3acn Xya JAcOH cPyHbM 3aB0dm CoCTAJIET PImeHPO 42 cya.
Oc0b0d9HtE KIOKDOBBNHYHBOpe36e HIN QLC 3a50aHyroTOIHOYB CooBETCTBNH C HCTOHYKUHN TnAB1 (1 npA HauHHV COoBETCTBYQIC CNTEME HKCAUIN)
Korda toboika HXoDIOCTB NO KONOKHINI 1, Bpaatae EIO no OAOBOCH STOENHE (MOHO Bpaatab Bpepe/Ha38d).
I'pekpaiaa zpaeeae, KAI ToTko Bny noyayte syco npbTaHene, Tenepe 3B8o0nB aBcBaaN NoNtOeYsAaE9e.
BMMHIMIE: ECINIOPOKTHAI BABOHTI BABOHD BOBABAHIO NOCIE 3T0G, ECTB ONAHOCTI CMOATb KOHNH NPOHNH. BI 3T0C NCIYAE 3AIDENEY YACOB 6D8ET BAYIKHEN ONNATRI 3A-MEY 3ABODBOPABAHJI.
3a20dniTaeBcB4aBcYtBu 3a4bKnKpyHe NapeBaBeHnQLC 3a20dhyIyoTobOByKcoTETCTBNH CnHCTPyrkynmIeMbBb1 (pNn H-
HHMN OHOTETCTAOyOeCHNTMeBf
fQhckAun)
Data,ENb HedeHn BpeMa
3TbHHTpyuHrOTHOCHTCRH60BnHCTBcYMeXAHH3MOOrIcYcA33HNeMdtyIaHJHdEnerDcBQoKxHfMTRPNOOMUcTpeNOK.1KcHIOHOHNEBbSITKOTcMDeOReNOrsYtUxoKHeKeHHe(OrIsComplica-tion)orOrIsXhoHpargO(rOsChro-ngaph)KAtOp676,DEctBNH2ATHXCUYAOxOHNCHbCOBTETCBYOUHXpADaENXoTHCRLHXKcKTHTMNHmEXAHH3MOr.
03ABDQHORBOBKA 3A
KCHPCBAH-BCAY
EHECNPDYEMHO
pe5BeCE 3ABDQNHO
BOBKNXNBA3BDQHOR
TROBKN CXTEMOr Oris
QuickLock.
1PONOKHEHHE 3ABOa.
PONOKHEHNE YCTAOBHOK
DPTBI HAI HEJENK.
PONOKHEHNOYCTAOBHOK
BDEMEHN.
Oc0B0dHrIeKHOHPoBAHy HA pe36be NIL QLC 3aBHy rONBOy B COOTBCTBHn C HNTCPyLAMN IINB1 (PnA HnHNn CCOTBCTEYQUH CTmETs ONKCAuN). BAHTaHrIe 3ABDHYoRGNKBY K noTOKHEM 3.
Bpaaiate cptnKb Epeed. naka da tne nepeKIOHOTCR, 3aattem IO 05:00
BHMNHHHe:HO36EkanHHNOMNKKANHEADHOMeHXHMA3aepnueaetcKopppeTNPbEBTbNOK3AHKNHAKETAHADBOXePmHAXKOpDHNHACOBHCTEPINIKB EEPXHHNOLNEHHUHPbBAeMReMdyOTMHAMN0T-9CpOvBdo-3CpOo
IpebeBede3aBdoHyo rOboKy B noJooJeHne 2.
B 33A0MOCNTOI TINH MECK-3N3M8,3N3M8TTOFBOKYTO4CBOBOTCPONIKHIMPTPODTOX NOP,OKHNEORNTCKTEKUYLDBT8.
<ECNH yacobc ecty yka3eTbHn DneHnE, bpaaIaeIaRauHpO npTbcuocB stcpKn Do noPbnE BnTeKtuyoHd nHeNen.
PepenbeJteAbaOdyuToBokyBn tokoJeHne 3.
YCTAHONAE apemE. EcmYCTAHANBAHCAE BPEMn puee 12 YCABOB DnH, NeboXDOIMO cDneBnT PNIHIN BOOP CTPONEK INpePecTeTH YACBOy CPTENKY UEPea OTMEKNY L2CABOE.
MEXAHIMMACOBPNTROM OCTAHNOH,NTOPTMOYERO MOXHO 38NYCTHBnO CTHARHY TOHOTHO SPERMHA,HAGHA H3ABQHOYIOTOBBOH INepeBDAE eB NOONOHJE1.
IpeBedeHte 3abOHyIO TOBOkyI HnKoHKeHJIe1.
3A#HnKNOyIHe nae3b6 KIN QLC 3aBNDHyTOBnOyBooCTOBmC HNCTPCYNMMNlMb11(
HbHNHcOoBTeCTBHyOeCh CH CTMBHΦKUaJIu
yctahOBKa datbI
PIO OHOHAnHHMeCuaJI, DnIeTHeN HOCT KOTOPOT MOHBE 31 HJy, DAcy CNeYer TRepeBcHT APyHHy HA TEPBk DnEh CNeDyOKe MEO MeC JCA HCNTOBAAHBM EICTPOU KOpKekLl (3aBODHgTOnOBA hNoTHENH2).
Oc0a6bodite dHKPOA8HHYHO 豪36be nIHC QAL2BDOHYKO ROKBYX COOTBTCTBNH CINHTPKYU KHMN TnHPHNNK OoTERTBTOWJER CHTEMF HKCBMN).
Buraatteaaaoguyroanoyy 8 noonkne2
B 38ABHCMOHT ONI MEXHEKHMKA, BPOAJIETROBOHYNACOBOHCTPNEHKINNPOTBHDOTEXNOP,NOKHHENOBNTCETKY
1IpebeBeIe 3abOHyIOBbKBY N oIooJIeHNE I. 3aIFKnCpYrRe Ha pBaSe BnI QLC 3abOHyIOBbKBY B COOTBETCBN C HMCPTPyINMn TnBbI (1 npn HnHnn COOTBETBIOUe CHCTMb HFKCaunB
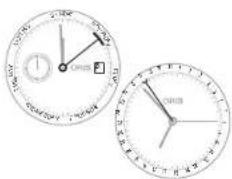
MxpoBoe BpeMa
(Wonatimer)
YVauo08 Oris WorldImerMMOTcBda ykaatotela Bpemchm:QINH (T1)MeHTHO 8PbEmeHn H Tbotp
(T2)BSPEMENDMUHUYERHOO HOGA,YKANJIOYAKATETB 1CTB YCOCOBAR MHHYNHAR CTPERK. MNHTTHTE CHPUEYN KAYAZATER TIN 12T2PBOAOTCR CNKPOHO.HACOOBY CTPKNYI KAYAZATER TIN 1MOHNQYCTA HBANIBBT,NEPEMELA BEPNJI INHABN CTDQNOBON JCMNHAC,TAPAKHE B60TO PNEKCHIOAH C NOMOIOB DNYHIOHO.NIP BCTOPN KOPEK DNDA TPAE NPPKHOHNTN H BEPSA. HAB3DPNVMEHBNPEMEN MEKDY23:00N 03:00(3TAKOHYPK) ZANATATENTORA OIRIS,YKAATERTB 72CHIKHOHNI KAIATOPOMI ENH/ 100%
Pnepenoe 3aBBOHANI TOLOSA 3a DHHKPOPAH Hs pealbne no ha bdo- HETHOHN KPNENHIN Oris Quick Lock system (QLC)
Ranamnana T. RANOMYME 230485, India
Ranamnana T. RANOMYME YCTHOBXDH BATEL
PnOeHmHnIPOJOKEHNCYCTBHOH NBOEHHN.
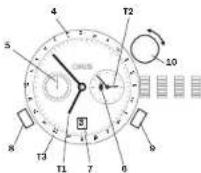
4T3 (MeCHoE BPEMA). 5T2 (DAMAHNIH NACCBOD)
MAneHbKa eckyHnHa crpEke.
7NHHaHATop
MxaHAM CaooB 10n 10ctO HOBHeN, NO3TOMY ETO MOKHO 38NYCtV B. JIOOO MCMOT
Hakhaab 38 380bhyo 105kBny KnepeBey bE h 10nokhenni 1
Ipepeeiee 3a0aHIOy IOAOIOY B pnooKENIE.
3A#HKnKPNyTae HpeBaBnHmNKL 3ABOHyDIOYIROYBOV B COOTBCTBNH C NHCPTPKUHNHNNB T1PKNHJHHNCOOTCTBQIOUCHCTMBI FNCKAUNI.
NtpopeyetacnMPEHPO10MHVT,TO6bOCTeONKHaTIN2HNHAAHBAEPABcBcCpHOHO,DIOCYMOOCOTIOHEHNEFOIATo-IOQOHMOHHTb.
YCTOBAOH T1 (MECTHO BPMN) HAKMHNTK HONK-4 HUN-4 CTNOHK P33, CKOTKO KACOH COCTAETR EADPAHMO MOJU MCHLMBPEMEHM T2 (DOMBHNH YACOBON NPOE).
YKasada dtabn nTDM MOKet
PENHEKHTBcB TNEEPN HNAHAD
(STA KHOHTPYKHN BANATCTOBHDA
OrIs, eCN pIyCTAHNOBE PBeMN KHOHKNAMN + + NIN + = PecKaeketaonNoHb.
MnpoBoe BpeM
(Worldtimer) c TpeTbMM
YACOBBIM NORCOMN
COJIHeYHbIM KOMnacOM
Koeme dykun yacos Oris World
InnH, Hoopeaou KOTOeBx
HEETC B INDy Duyu TnIae
MIOOBAC OPON (WorldTM), y
3TNX YOCB ECTo DONTHENHBA
BRAUADBOE BHEUNH NIKA
UHFOBNTA. OHa NOEHNHNA
DAHINKANB PEMEH DONTHN
TEHBOH CACBOHO TIOHCA, TAKHE
HAH OEYCNH CHOHNB METH CNOHNHO ROMNACA. 3TH
TBCbI INAEALBO NAOJDIIT RAY TX,
KOMY HNYHMET NOCTHRHY
HNKUBKU EPMENH B TPEX CAVO
BNNBHXNAC, HAHPIMED, IINTOO
TOKINBBHX TYIEEETCBHHMO
63HECMEOH N.T.
1BpemBnHyHrOtnPabHeHHA.
2BpemHJOMaHIeYcABoHO
NPOHGMMT.
BpeMa nnyHKe HaHaayehn.
4 Metria CoJHCHOTOMKOMBACA. 5 Mabéniék CekyNJHDBCTPNK.
公
HONKATOPAEB/HOHy
7yxa3a1e5b jatbl.
8-HONKIAI NEPENJIOKHCHN 1DRENEI T1
HINOKNA TEPKIOKIOCHENI BPEMENTI 1
BorTnKJIbHJIaRIOJIaNBOJIaYIgCTA HONKTH3OCAJHNIHOI OKIIMKAIA.
Ha pchcyiKe cbepxy: BpeM
T106:53mm 18:53
T202:53
T309:53mm21:53
CnHxpoHHaunrT1nT2,a
TAKOKE YCTAHOBKA BPEMENH NDatb:
- DEMYTHYE TAK, KAK 3TO ONCAH08 rnaeMmpooe Bpema (Worldlimer).
YcTaHOBKaT3:
YaHtte RaTc,ToCTbEeMBA
YnHHTe Ha3HeHHn HnHn PnHnHn
YBcXACMeHHy YNHKTOMOTPnBnE
HNHnIKNTHN HnAHHnEH.
BuaaHTIE pRTHIAHlyHO rOgKy 10) haeep.
PoeaehHrte Reepnckalhyo HUO BNOI (10) no IIN NOPTB YACOB CTEKNI, NTOBcY TAOHOBITy HUK HYO (1 + - ) PAHNHIO, TO ECTI PAHNHIO BY VACAX MEKdy MMENHTAMN 12:00 aT (Epmra B y nHYe HaaHCHNRI) 1:12:00 bT (Epmra B y nHYe OTPAANHEJI).
Hakimite HASEPHTKAtbHyTOIIOKY, OHA BepHEcB H EITpAHTBHOIOIOKHNMe.
YcTaHOBkCOnHeuHOroKOMnaca:
CHMMTe aachc pykn.
BbIaIIITIE aepTHKAIHcyIyIaIHOHABEeX, BnOJIeae 8AeYcIbIOHTBE MeTHy oIOTc+51 HbHbTYPENCHIKHIIAHAE NocpeiMeNMeDy NOK33HHMMHACBOE cTePNHcNtMTEpK-12 haoHc.(EcnKteKueeBepMaHADTmckEyDg 18000600. HnAeTeCeoHdIyMdy C (pTOBHTBOIIOHNQCTQPOHb)
HAMMITE HA BEPTHKANBHyTO NOBKY, OHA BEPHTCR B HENTPAHBOHIOIUPKHEHM.
NOBEPHNTA HAC,THO6B XACOBAR CTPEKBYBNAHAPBNHEHA CoHHue,MeTKH NAKA COHNHO HOMKAACA YAKMT HANPAE BHTCPOTNCBETA.
FJIINPCHBNNM,PMYKOHNTHIBRE CAHKBCOLHEHCHMOKOB
BTopon YacOBON NOc H
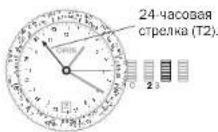
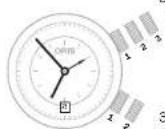
Bpaaouoemc06oKe
TOBephenite OBODOK TAK,TOB6A HOCOB8 CTEPIKA E3H5VBNA BDEMA HA KHANE OBODA B COOTBE7CBN CHHKHN BOCOBIN TORC
Ha pncyHKe caepx: bTOPOmy haoaBOMy NOY COOTBCTCYBT BpEM 08:53 mN 20:53.
BToPOn YacOBoN NoC H
BHeWNHnWknane nHepoNaTa
Bpaauoienpcn nomou
BePTnKaIbHoI rONOBKN
Batuwahte beptihkahtyho rofo8kY (1) HABEP
HoepeinhepertnehnaIyroIytoKoIyONoIINrPrtNaIEBcOaCTeNkI,ITbOyYCTaHOBHTbHyXHOeZbEME TzTbOyAIOeOcOcOcOcOcOcOcOcOcOcOcOcOcOcOcOcOcOcOcOcOcOcOcOcOcOcOcOcOcOcOcOcOcOcOcOcOcOcOcOcOcOcOcOcOcOcOcOcOcOcO
HaKMMte HaepTKaJIbHyro nOHO, Dha HePcTcB HHeHpaIbHOe NOnOKHE.

1BepnKaIbHaI rOIOBa.
2T1(MecTHoe BpeMg).
3 T2 HAI DHEJIU KHANE UOEP6 nata (HANPMER, BPEM, DOMAUH- horo 190sOBOR NOHCA).
Ha pacyhne CHEXPO. T COI BTEBCTeYB PEMO 06:53 HN 18:53, T2 coaTeTcETyB PEMO 03:53 HN 15:53.
BtopoYacOBONAC
IIOJIHHITJIHOB 24-NaCobOB 3TcIKHO
OocO00d07eDhCnKpOABHNOHcO 03636HHNQLZA3bDOHYoTO 598KY B COOTBCTBVDN C HCTDPYK 11mm
HANHIMI COOTBCTBTRKUICCHCTEMU CHINCUIN
BbtaHnAte 39aOHyI0rOly
3aONokoe 2,paauaiTe e8 npo
TbYcBOsO BCTPNK, nOKe H
yETaOHnRbNcHcyHO BpEMT T2
(NAHPmPc, BpEMT DOMAI HERT
YacocOBo NORCA.
Hahomite na 3abzoyIOIyOBkyN nepeaeBee bIoTOxKHe1,
3aHDCKCPYAE Hae p3e 56 Hn LQL 3ABDHYKO TANBOYB COOTBTGIMN C HMCPTKUHEMI TINBBI 1 (PNI HAIHHN COOTBTCTYIOJCNCTEMI DHQCCUH)
T2 (Haepn
MEP, BpEM
OMaHcH
4ac0B0rO
norcaI.
同日日
日日日
Ha npcae hne caepyx BpeyBTOpo rOaco ooro nco 11:53.
BtropoYacobOINORC
DOONHHTeBHO
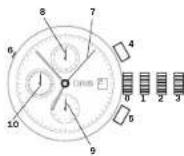
24.Yacobon CTpekenon
Ha3BaHHMnroPOOB Ha
BpaaaoeMc8 o6oKe
OC60bOgDte DfNCHPOBAHNO HB
p8e3Ee NLC QA 3BQHNYKo
LOBKY B COOTBTCTBN C H-CTPYK
LUMM FBAI BLF (IN PHANHNHCO
COTBTCTBYUAC CHETMEY
CNBCUN
BbIaJIeTzeAbaOHyIOIbOBy bI aIIOJIeKo2,IIpaJIeAeIe Ie pIIOIbTHaCBOB CTpeIKN,IOKA HE yCTAOHcTbHYIOHO BpEMT T2 (HApIMOpE, BPMeDOMJIHero YaCOBOrTORc)
HAKMHTHEA3ABOJYHOLOBOKHYI INPEEPOBJE E6 HIO BNOKOBHNE1 3A4HKPQHPYTEHApeBcDeHINQLC 3A3OJHOYIOBOHBY COOTBETCTBHNC MCHNTPKUHNMMFbBb1 (TnPHNIAHNIHOMCBOTBTCTYIOQEN CNTCEMBI FNHCANCUH
TIOBENHIEO BOOJOK C HABAHINMMI
ROPOJID, IIOKA HABAHINHY NHOHOTO
ROPOJAD HANPMEP, ROPODA, COOTETBAYOHOTOMO DAUMOHMYACO
BOOMYORNA) HE CONBADCTC24-
CAOOBAR cTePAKIA).
TenepeMIOIepeJIINH BpEIMB I BOPOJAX, OBOSHAEHNHbX HAO BoNCTBCTBOYHXH XOeBOB NOKAC. PTH 30mEy-HyIbBaECR BOMOKHO INepEXOHa II TaeHEB BPEM.
TchBnE TcHbTHNtDTHnIeDnJIbHbTHN 100000000000000000000000000000000000000000000000000000000000000
ROPDAJOMAUMHERO YCBORO
NOKCAHKA PAKAAUAMEM BOJIKJE
c24-ACOBOR cTPEKNI T2,BH
CMOTHE CQ3Opy OPEENIHT BPOEM
B DPPYHX ROPDAX.
Pnmep:
MacthoB BpEMn H BoHoeG (GMT) 13:20,24-HaCaoBor CstPbKa yka 3uBaTe Ha 21:00.DommHn HcBOPOR Noc -TcOHKOr. BpaAIOO 106BbHANPOTH8-24-CaOBoB 106BbHANPOTH8-24-CaOBoB 106BbHANPOTH8-24-CaOBoB 106BbHANPOTH8-24-CaOBoB 106BbHANPOTH8-24-CaOBoB 106BbHANPOTH8-24-CaOBoB 106
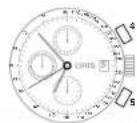
XpoHOrpa
XooHorpaFOrs Orbs 6nabadTФH KHMEN CeyHyDomePA, a TaKke YkaTeaMA BPEMeN H DaTU. TaKBe KOOMHauAeYfHKN NDeTAE TAAH OyHbNII PJIaBbMn
OeepTbMxCzABoHOBnOBHO HKnKmAMCM.1nagyIePboHaeBnBHe CBeDcHnO yacax Oris.
06yctahOBke BpeMeHHn daTbICM.
TnBAYy YCTaHOBKIN yFHNQHOHIOPOBAHNE HAOOR OIRs-(NCKIKHOHEHM BRETEC PNOCCY YACTAHOBH DAHTI KANOpBa 676-cm.HNKe)
OctabonHreXpoHRpAd, cEnn OH bSb 3anyuH, n6C0bSeB BCE oE yKaataTeIN H NyeBOe NOJOKHEeN:
HMMKTEHMOHY4-CTPENXPO HORTPAHNAHTBPAATCBN.
CHOHA NAKMIKHONKHOCTPEKHNXPOHGAPDEOCTAOHOBRTCIOPOECKMMEPEHNDPMDOKYTKA BOEMEHN PNEKPTATTC.
CHOA HAMMMEI OHNY 4 CPTENK XPOHOPDAR HAHT BYP BABTCLR. HANHHER OT TOFO NOHOHE HNR, TDE OHN OCTAHOBHNCbB PDEHbYnPA3.
Eue paa knnnne 4 - CTEPENX XPOHNOA ONRT octaHOBCTN,POVCC E3MNEBnno PNOKNYTBA ODEMEHN NPOKGTNTMC.
HANKMITE KHNHY5-0CTAHOBHA HINBOE CTHPENK XPOOHOPBAHKHQAR MHNYTHN H NCOBOB CHTKNN, BYDT COOJIYI B HYEBOE NOJHOBBIE.
CHTBBAHNE DAHHbIX C xPOHOraFa:
No ceyhnoI CTpeRy xpoHropa7 (7) npo3BIOmK TOpneRHe NpeMoN no OCHOBHO shane Uepe6bNA b PnOmeHytne o1/2 cenyhdo do 60 cenyHa Ma KauMBAHO.
10 CnpTeJIke MHHHTOg CcETHNIg (8)IPON3DIOHTaO npOeDJIeNE HONKJIECTBA OTOCHTAHbIX MHHTY, KIMCMBILHO do 30 MHHTY.
No cTpeIke NAcOBoC OChTuHn(9) pIpy3AIOBIOI CIOPEIeNEMKII KcIeCTBa OOTCHaTHNNX NpOlyuCaO h NACo, MAChmMbUHO 12 AOBC.
NOMONKOB3ABOHJI HFOBIA3DHPKIOPOBAHA POB5EHO 106 HA 58HOHEHOM HOPEHNH CHS QUICK Lock (QLC).
PONOKOHINEI 1 PONOKOHINE 33a03da.
PONOKOHINE2 PONOKOHINE YcctahosIO DaTb.
PONOKHNI 10NIOKHEYCTAHOBHO BPOEMHI. K-ONKHA
KIIIOIKAIAIAYTAEYIKOBAI DaJIy KaJIb6A 676.
AHTYBHOHDAHAKMTAEKTHNYCNEAHBHBMHPCHOODEHNEMKINKOHKHOMDEPESHN3y6bHCT
YcKHyHdA CTpeKaXPO-Horpapa.
MnHHTaTCTpeHaXPO-Horpaia.
9-HacobovCTpeKxaXpoHo-rgaФa.
10 FOCTORHON JUULYI CEBIL KUYJIDAHCTEPENNA HECB.
YcnoxHHeHne (Complication)
YacbIc CnHTpAalBoH CTpeKo/Hyka3aTeNem TaB Mya Hnd HeDek (Pointer)
Banyu nepaoro MEKHAHMA Oris CO TPOENOHY KHMATEM EAMBI 193802O OKA33AN BAHKO HIXO B ACTOPIN HOMBAHHN ORIS Pointer NOMMO YKAZAHAR DEMEH NIEHTPADI MUNI CPTEN KAMM OCHUHCH TAKOE YKAZAE TENT BAI MUNI DHA NEDE TEOHTB ONCTEHNO HOBOTETYIO IKAANE LADEPBHTA. Ho A ORIS 3TMM HO ATPAHNNHO, CO APEMH NIOHNEHNTTO CIMBOHNECCKORO MEKHAHMA Oris BuHONCTPYPOABHDOYRETNI TOE NOHKTADOA.Da a Noekhe HEM KHEAHM CTN COOTHETCIBB TB COSEMEMH NTHOKHOHCKM YCNQAM,NOTPeOBANOC HCNOHJBOE MOPOKHALAI.
O DEPTMRC 3 ABOHOH ROBOHOH IINP CYIACHOHE BPEMOH HATN CM. DNYA 1.
YdAByhHmC aBOMTAtyHcHmCBABD0m
B 1988年度罗布纳德普斯H 2008年度,HMMAHHM CAB TAMATHECHK 3ABDOW. ETOI OAH 贝OOCCHHO BHYAHE BHNIG KOTOPOE OECNEBAH BA 38yAAHPPNHAO NOOHO BACPAI DAPADHNO HOHXAODBTCA B ACCOHTMEHE Ors.OAHMH K3 BAAHUNXOIOIOHO H3IOI OBAI BTHN HAOHONH BYDHNH Oris 1949年度CBOUHMHHEHBM 3ABDO
38BQHANFIOKBA3ABQMAKAM4MBA,CTYAHOKARBEHEMNJI.1BbTbB COOTBOTBTHCNCHCTQYKHNMBN1
IIOeepnre 3aBdoHyoRtoB y
noCaoBor 3cTpeKy, eoehNoE
xoDmHO, 3aBeReO pNkyBky
dyBnHbKa 12 oBaopotam (B cy
yae. eoehyDnHOM
lo3oBaoHAp, hckOHyhkoPa z
deHb, kN eCt hAcB aLyckocAOTc
noce noHOb octAoBHyk).
PnHOPMABHOMBENMEHCNIOBbA08BAHNBOHJYDnBBHNA CABOTAMTHEOICN3ABBDOM3ABDDNHE BapabAHMeXANMAHOBdNHANHOCTORINHBOHXDTCRB 3AB6DEHONCOCTHRBNBHTaIeTae3ABOHyrQoRy
B H I N O K E N H E, 2 NOBEPHNE 6E 00TNTB YACOBON CTOENI YNCTAO BITE HYNOC HOBEM CPGADATBAHNY DGYINHIA.
BOTOMONLOKHEHH 28BDHOHJIOI
BOHN B6yHINHHXHAXOJITNCH
BO BHKCHENHMOCCTOHNN,CHI
HN B6YDHINHPO3BYHTB
CYTBAHOHBOHHCBOBMMTECH
HNE NOCEQNYIK12QC0B
Hakimite H8 3aBzDyH0 roIOnbky HnpeBaHJHBeB aIIOKekme1E.
Φhuncky b6bIbIbHKbBkHcNae
3a0b01H4 HONC6A
3abnna ranB
3nnae rnnska A
1nnnne 1
Zananae ronoska, Nonoikosekne 2
Saroprodrononana A.
110686963
Znane ronog B,
Pnaneone 1
Satanapan ronoxa B, Ponomoek 2
HNE3A-(KHNE3A)
4
mEYCTa
Dc
13e 3a
M
MR BGRK
WCTA
DEMH
XAHMETMOPECKA KHUNA - HIMEPENHECCOPCOTH
TAXIMETHPEN-CKB8UKKHAHUN
ΦΦΦΦATNEH NHN OOBDE XPOHPORO
ΦΦOrIS HNOHTCYETRAI JNME
PEHNA KOPOCTN, HAPHPMeD,
AHOMOBKIN, DABIKYUQOEON IJN
CTAUHNI, PABCECHNKHIOLOME
TPOBLM (NHN MKNBLLMH) OTMET
KAMM.
ECN TAXMEDIWCHB KHANBA
paHHTAER, YSTAHONBE METK
+60 B. ANOHOMEc-12 HACoH.
XABH AHIHOY4, AAYNTCYTE
c-CTX HOPORPAO, KORDA BITOMO
6bnb nepeceet CTAPTOBYO
Hakimite HNHOHNY4, KOJIJA ABIO-MaBnIb nepeceeyf hHHHNYHNIHO.
CeyHKHDA TcNtKHaXPOHPaFa NOKAMET CQDEHIOOCHOCTB KM/(JHIMMWv/)HA TBAXMETD NBCIKUKA
HaHnMpE, AATMOAbIO NO Tpe6oBaoBc 40 cekyH HPOXHOJENDEIJIHCTAHN;3TO COOTe3TAYET CQEHNI CHOPOCTC90 KM/4(MYI 90 Mlb/4)H JINHADHUN BODY MIHN
AaHnB TaXmTePnHEckBa
KIIe HnEoXnOgTnIaMpeMe
HH CHOpOToB HNKe 60 KM/4
(MN 60 MInb/4).
HAKMITE HONKY5, 306b6 copo- cT BcBcBcHcHcHc
TeMeTpeWneck3aUKa3 -N3epeHMePacbtonHH
TeteMeTPIeNCKA KUkA HuaIe-
EePbSeTnH NmO6OBeXPOHO7oB0B0
Oris KcNb3yTeBraDn IaM3epeHN
PaDCIOHINrIOJIO MeCtA HauKoJIaO
MO CooTHN, CunpoBDAnIOuOe
POOCBOYdRn (HApTOMep, MoTHINc H
COOMM, BAPBH, DcOeOBpKa H
T.n.) TaePDPOCBAe TeteMeTPOH
OCh KUkH PaCCuTHAn HcxO24 H3
TAEoH PocOeH H
CPOO 20 CPOOYHJ
EcnTneMeTnpeckariknAAPAepaBcER,ycbHOBiTE MTeHYoN30NEKIOHJ12CACO
HaaHb HA HOKY4, 38NYCTHE CHTH xhoHOPa4a, KOJa pnoKo30dET HaHkoAeMoC oBtIO. CHOHa HAMMHTe HA HOKY4, KAK ToIbKa bOyEt cHbAe BHYOT OTOro CobTn.
HaHIOCTOaHcC6EPyFO-30aHΦoHTaHXaTIOH aPacOTOHMH 3 HIOMETpa.
Bpuauoohnc6obokd AaBepcknxnaocb C 60-MHYYTHOKIKAON
BpaauoohncnOBdoaBcexdAyn BepceKbHcAoobrOISMoeKbPABUBTcBnHOHbOJmHnABpJIeHHN -PPTHb HacooB cTePNK. 370 pEoDBpTaeaBmOBoHcIOHTC BYNTUHN, KOJa IaMBepeHOH eYCTAOHIOHOB PBMc MOeKb BbIy HoNcDnHOyBueNoH pRi CUYAAHDMIOPOB oEOJbHa.310 RaapHTMyET, OTOy aBuBa b6yDf TocatoTHO BPMeHnI rnooDeHnEhJeKOpeCCn.
BpaiaouuHcO6oDdAabeep CnCHXKARTHAKMOE BHTNtNpOIO3b0aHk KAR TAMER@OTMHTyHJ DooC8e BO MTOHNK CYTAAHIX, HApIpyKe, nonAPKOBKe, pNRTOB-ENNEIN PUNC, BVIRTEH T.N.
NcnoIbOZaHBeBpaUauOeRoc6oOBdJIaKHeMPOHnB BVPENH C TOHOCTbO DO MHNyTb;
NaepnHtE 60oOaH Toe npN, NOKHa NcA HA Hb Hc BNOCTC MHHYTH CTOENIK, Hc H AHPKHOHN MHHYTH CTOENIK B PpOIOIgAoeM BoPMA OKOHAA HMAOEPIHJ.
COMMOHIOO60BHTENPOOHOIOEeMHTKONHECTBOPOUoeHHMHITN,KNHOKHCTBOOCTAHUMCHMMHT,COOTBCCTBCHNO.
Ha HnHnOCTaIaN CnEePy IpoJIgIe 33 MInHbY NoOp NcHAtaIyIeMpeHn.
Hcnonb0BaHHe BpaAaKueCocO 05Dka DnH3peHReHNBDEMeHNB VACAC:
NOBHPHHTA OAOJAM TAKPON, NOHA KMTA HA HEM HCAIETAGT CTEKUHM HAN OAOBHEHM YACBOOM OTEPNO, HAI NCHOPAHYAMCPOBOOCTEPN NPNDAARMOE BPMN OKOHNNHRNMEPEHRA. CMOHNMOOJOBAOTIEPBO MOHO DIOPONTMOLKNIHCTBO PPOWSEX XACOB, HINKTOKCTBOOCTABILXRCYACOB, COOT-DETCTBEHIO.
TneBnKnaan
BcC 10000000000000000000000000000000000000000000000000000000000000
FENI - INEOHTB183, ERO STOMBIOTMBN BTOMGYTPOHNKHATB KOPNYC HOBH,HECMOTHR HMOOIOOHNB HEMYUNTHENTHO,MEHINHO NPOOCHUHNBOK POKYC, TONH ME KOET BCTPOBHTN HIEHO, ECN KOPCYE HOOPODYAN CHNEAIBHBM FENI BNMABHMOM,STOT KIANAHO CBOBAET BNTMOHOC DAJIENHC BYTNPHKOYNCA VACB NOPCCSE BCBNBH. FENIEBV KANAHJDABEPCHX YACOB OIS OTMNAETCBUETHOH TOUYKHO RONOLKE KANAH
Ipeed norpykienHemno6dmoNIOBepHyTNOBNOKY TnEBeBOToIaJIaHaNo YcCobO BCTPKe Da eonHOCTOBHIN, PnT 30M KIBANJ ZAKPOEIT.
IeepaHANOMCNNTNHEHO 1MO NOBepyTBoNCHY RnneBTO 1A HNAPOB NAOB CPTKIN 0D eBNOHOTOCTOBH,PNTH TOM 1KHTAH DTKIOEET.
Dawa npi OHKpTOM RnneBom Kanaanepa Knoo coa oocbaRcH BODOCTHOKtB,HeoOxOmoNyBO

HCTBNE CYABBS. Ho non HNHNK TETHEKBI KIANTAI DO-OBbTb3kBpHT, KKB 30 ONO BHBUE.
YacbKaKcOJIHeHbIKOMnac
ACHC NACOBH M HTHYOH CTEPKHN MYOT BHTNHO3O 3BHK KONHNNHNIOMNACP,PM 3TOM HAPATHEHNAI CHNTIE NC HOBTYTCKAK OENDTHIO.KO-NEHNO,CHNHOJIE JOKHOHNO6BH,CKPHO OBOHAMAH,NHQDOJIHHNOKNGKNGKNGKNGKNGKNGKNGKNG
ECNH YIYACOB CECT COOTBCTCYBO OM 603POMR DAPYBOHBNH OBOOKOH, OH MOKET BHTNTOB3O BAHJ HIN NCHC KBEH JINHIN -HNHAN, ENHCHENONHAM YTN MEYNY YIYACOB CTPNNOH H NA PPABNNHEM-12 YIACOB.
CHINMHYI C BYK, NOBENHOTA, YUO HAOBACB TCEHLA BUNI HAPANCHA HCOHILHE. ORPDAEHN IHPANATRENE COEPHE NIKHIM MEKHO HAOBOO STOKHIO HNOPABBREHEM 12 cAOB. (ECN) Teyuee bepa HAOQHTC MEN dy 18.00 O6.00 JAEVEI NIOFAM paoBHONOBHBYI MOJ MEH
Czepnna HynyIyK3aBbBaH Jor.
Pocne otnpedenhen HapanaTeHn Hn rno hno npoednen octabte.
Hn HaparpeHn CTOPH CHTA.
EcnH yacobecbBpaiaouinnc
06003cMTHAMCIOHNHO KOM
NAC, onpndeneHn HapabTeHHI
CTODOH-CBETHE NEDTCTABTETP TYDIA.CHCAMAC TAKOYTDIHYKHNOJDETOBASBTB CLEUYOUIM069303:
CHWNTHEHACBcpyHKNHOEPDE HANBOBNEHHe HAJK CpeHNHOHHNOOCPOEHN MEKdy HACOBOTpeHN12 YACAM
Hapnabte TACQyOY CTpeNHYA CunHHe METKcCUNHEHFGOMKONACs yHaKHT hapnabneHHCTOPOH CBETA.
HnHpOmaJIaOoB6eKNCNb30BAHHbIKI INPOINHOCTOBIEYCAOHTHNAXKOKH,KAUYKc,MTAELIOJNGTJ.D.CM B. FJRAE+TEXNIUHECKHnHKOOMJIuCaoDHe TaJIiLbL.
Yacbi Na KoxaHOM pemewke
HAPHENEYABHADTNOI(TOB)AHCHEMOINACTEHNTOHNOBHybdyetCENHOHPERHUNHOI3ABETHTHE3ABETKHYPEMOKA.
KoHxahBpeMeuHKnPCKaJIbI BIAOeOHc3BcKIOHNaHOBoNEe HOBHOH oEcoeeNBAHOTOeOIOYIO EIOHnHbIHTOHTOfYEOYIOACOH. TAKKE, eONAeTCHyIpeMeuHKn HeyaHO, cHaeI HeYnADyT, TAH KAI IX yEDXJTH PCKaJIbIbIKoONaER 3BcKIOHO.
CHMNEHcIpyH.
HaepnOdyHHypeMeNnO 1000000000000000000000000000000000000000000000000000000000
KAK TLOBKO DINA PEMEUKA NO-DOIDERT, MARCHO ECTABLT REB/OK 3aTeKHN B HYNKHOE OTAePCTHE PEMEUKA,TOBIOI pIEOTARAPITIN TOCOEDHNEHPEEMUKA.
HEKOTOBENPAHNAIBAUOINCE 38EETKCHCTAPXUNTHOBTOYHO HACPTABHT. He CTECHRTECB. OPOATBHCH K CHIUPAIECTAM MRAAHA CPHMIAHBOI AROHTA CO BCMHN BONPOMC
PHC.1
HeHaHOI HAIHINCHI PEIMUHK C PAKHUNHANKUMOHJIKAMJI KAKM, DORYCKIOUHMTHOUYI HA CTPOHN. 3TO 3ACTEKHN HOOB KOI TCPKUNH, PApaD8OTBHNOH IN ZAHETHTOBAHN ORIS, KOIHCTPYE NIIHKA K TOA. 3TO KCHQJyB- yETNI IINPEMH EBOHONAOH CH A camONETE. PEEMUKO MOKET 6bUTI HACPTOEH NA HOBYO JENAE MYO DYNDN.
CHINMITE YUH N OPOXITE H MR KYO NOBEXHOCTC O NTKbTOH 3a- CTEKHOH.
YJXHIXKJIte PEMELOJI CO CT0POHJI B3AETKJIH H THTHE PEMELOJI CO TOPOHO KOPNYBABEXP (PHC, 11.
YKOPOTHTE pemeJHO, NOTHYBA 32 CROBIDH KOOIEI, MNN HATTHITE erO, NOTHYB pemeJHO cO TOPOHJO KOPTCA.
Hakmite Haakm, noka He yu
huile duoio.
Pachuaaouaoa aactekha
He moet 6bts kaphta, ecmn
Haekm He yctohqeh, Kk cne
dyet.
YacbHa KAYyKOBOM
peMeWKe
BceKaeyuyKOBUEpeMeuHOr OrIs ChabcknblpaNdaBaQIMMnCn 3actkNNAM
Pemekhik, Kotopme chetyet Ykupachabt, Otp3eaon KOHIMK: PkoKcNcIbTyRyEeB Mcara. 2AHHe OphmuaHbHOrO eGHTa, KaH OTpyTMyOBaBt DnHy PemekHaN NpC60O DYK.
ECAHCTKBAQEMEAIMMECTHEYTOHOHACTOHNB.BoMOKETHEHACPTONBAMINHYQEMEAHBOPENBDNHPENPAAMCOTOBHbOcMnTbAHTHOHACPTONBAPOKANBBAHIOEBACTBCNK).
Pemeukc pacKnlaBao-ueHcN 3aTaeKKnN ONDocTOPOHHMM OTBepCTHMAH
CHIMITE YACH
HcctpohtnDnHypeMeiknO npo CBOEpyK, HcNtB3yOr3epTmH BpeMeiknO.
KAK ToTko DnHa YataHOBHeA, AKKATPAH HAIAPARDEB 3NHNK 3AETEKK B HYNHOE OTBEPCTHE. TPOBJIpePOTAOHTNTC OTCOENHHE PEMEUNA.
O KAYHOBKU BEMEUBOK C PACAHIN DHTIENI EIT HIOHUEH NIOBEX HO BDOHO3HOFO KOTOMA TOHJI HA-CTOPHO IN He NDYCMOTPAHA.
Yacbi Ha MeTaanHuecKOM
6pacneTe
HaHrpoT MaTneHHnKHeBn 6paC TaeN BoaBuPy KpHy DOnKeHN CnE HcHtAeN MAr3HbO OoHJbHbHorO aRHTa, 37 pnoDypr BKnHOBHT yIaJIHbN MeIOBaHbHbE BcBcBbOpaCTe.
ECNCTaekbKaBpaCnBeDyONKAEKTAYHACHTPOYHKBYMOXHEHTAePHTIINHpyDcPaBtBOPENDEHNHbXPiEaNAXCMOTCHBNIHO CNO. CTAIYTOUYAN HcTPOHa paacklaabBuKueeBa3cBKnH)
Touhna HactpokKa packla
AbBaOuECh3aCTeK
ECN3BACTEKNEPDCYMOETAOH TONHAR HCTPOKAJINHHI METAL- YIECHKO EOBCEMTA INKAYVBOO PERO MEUKEA,INHAOKOT BHTE KACTPOKA EOBJIENHEH NHPBENEXC HIOYQHM OPB3M
PIMMEAHHE:YKRAVKOBSBDE MEWko3C0aCkRHTeENDMI HOHNEI NOEIPBOJADHOHOTOK CHMO TOHNAHCTPOHA HE PDCYCMTEPHO.
HaedeHBe TaunHtbe OOH.HTo6bI neOeTBPaTHB 03MOKHOe paeHne.
OTKnRtAteAeTckH HINKNTKHe 1aBc3aHOHToBOKBOBBBPcC DEMKIOH NIAKT KAPTHOA.
HcNb3yBpeBBHHY360- HCTK, BCTBtueAaOHCKCTTEM TOHNOHACTPOKK BYHTP 3a- CTKHK (DPC,1).
Akyapatho OTeCTHNE gEmeouk I ybepeI erO.
PONJOKHEHKHNOHCHB3HJHKB3 HOGOEOPOJOKHEHHEKOMKHTA HOKHNDCMELIKHKOHNHO HNPB8EJIHO KHOEMY,BeXHXMHY PONJOKHCHK3HJHKB3
AkkpythIO HAKMMTE HbAaRbKOH PnHaapaaNHN BHHc, NcNOB3y3a NEbIe NHAnOyHr HOHTEN KIN JAEBHeO TBpRt (Pnc.3) nPOPECITE HmIo 3actEckOH, NOHAqHcO HeBaHJETNN
YJTOOBeBteBc, TPOEMIOU YIUPINBETA HADKHO.
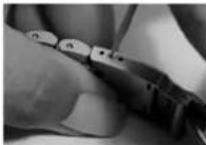
PAC.1

PAC.2.

PAC.3.
Pnmeyana
TOHOCb
MEXHAXHECKN CACB TAYBOH HAI KENBH. OjINIBK BTEX CNYBAXK KOJDA TPCYEBTCR PABHOPOAH HAI HOHTOCTPB NIOXBXOBCTOPTeBCTBA, MEXHAHECKN YACb HE HIXHOTON KAHUYIHN HINTCMPEYNOM DTRPPOCCCHNOHANDBETTELOCTO.NTOHIOE PMEWA EOHBJD BRNDL BIAIDLMA MEXHAHECKCNKX ACOB, NOIPOEPKKA OTIOHNHJOXA B P RENDEZ OAOH CEKYJIbHE HIXBTCB PEBAHHO HCOOOHM
TOHOCHTMEXMHHECHHXXNAC0B3A BHCNTOTTHNA MEXAHAN3MA,OT NEPO CHAIHbTHPINBEHNEK EBNDELCA HBCO8KOTN3MMEHNEMTNTEMPAyBu.
OaOHrOsNPOOBEROTH ATOHOCTN PEPYNPYOTCA M3AETCPCKHXOMAHIN HA CYTOHOEOTKHOHENEXOA JI INPRAIINJX-05JIO+2020cHKU, XPOHOHTPBYYEPYNPYOTCA NPOOBERITHA COOTBCTNC BACIE KECHTM TPCBOBAHAMC rMbAYXPOHOHTM-P).
EENXOJYHOBDGKHOHECTB CBBHBAADHHXINPOIJIPOE, HMAHN3MOKETGUTBTOEYHPoSAH CNBIAHNTOMB MARGAHAHOD OAHNTHAOB ERTBNHCEPCHONL HcHTpeOrIS BauEH CTPAE. BTEHNEPAATIHNOHOPNDepaoyipnHbKaMAKHANAMCQyIeTETBETECNNTNHO
XpohomeTp
UHepuaacnuea Huyu HauhbaBcTbXPOHOMETOP.CCHNYMEXMH3MMEUAPACKTOPOPHOXDHENYNCNHOPOPNWHNCTAHBNCOOBHTCBNOOCTAHJTNIM NHIS 95-11/ISO 3139. HUNTHAONDOKHINPOBONDBHNAECBHMAHMMUBEPCKM600noxhoHemPTCM(COSC).
XPOHMOTMHNEHHEHTAHNA COSCAHMOHIMI 15 JBCB Tce TbnoOBdRnOIOHOTCHENB HNOHAIABKCTN24% KAKBHe 24cAaHOABDcHKTKMpe ME HOIOHNHWA XOA,3aTeM ME XHBMMABQHONTHARYABQKATBO CHOHA. Ho cOeTBAJHbTeoB BAOVQIAOTC NOE BoNTHINTBE Hye CTOPTXAE MEXHOEMMA, HNOHMe, XBOHOPAR, QTOBU OIne DENTb TOOHCTXB XOA B H 30T CNYAE.TNOHCTbXq NME PRCETCR B INITI PAANHHN HIOKIOH HIKKNPCKyN PNI ToxP aINHINH NEMEPATyBX B COOTBTBTRC N IHCNEKDEYQIDAE TBHIL
EOMMEXHMMYBHHIOHPXOHTTCTK, OHNPOAETCEPHKNT, B KOTOPOMNGTBPDAIOCTC ETOHOANTCHN EOTGCTXPOHOMETPA. KAKDII MEXHMMN ENHTHMIPOYETBO NPOBPRBBPOBBH HOMHYHMHEHMOPYH HOMEPY CEPINHATQ COSC.
| 0x40 | 1 | 2 | 3 | 4 | 5 | 6 | 7 | 8 | 9 | 1 | 0 | 1 | 1 | 1 | 2 | 1 |
| ### | 6H3H9HFHC | 16H | ||||||||||||||
| Kangta | ||||||||||||||||
| T°C 23 | 23 | 23 | 23 | 23 | 23 | 23 | 23 | 23 | 23 | 23 | ||||||
| R(####) R1 R2 R3 R4 R5 R6 R7 R8 R9 R10* R11 R12 R13 R14 R15 | ||||||||||||||||
| Kripertern Tecta Bce dan hme poinvejdeh b 8 cekyndax B cytnc | Coopianma | Φ (mexican) >20 MM. | Φ (mexican) <20 MM. |
| CpeiHne cytoHoe otKIOHOENHE B PnTn paanHHx pOLOKEHINX KoprYca | Mmoy | -4do+6 | -5do+8 |
| CpeiHne pa3HOCTb cyTOHbIX otKIOHEnB 8 PnTn paanHHx pOLOKEHINX KoprYca | Vmoy | max. 2 | max. 3.4 |
| HaonboHsB PA3HOCTb jByx cyTOHbIX otIOHOENH INP ODNHOBOM pONIOHENH KoprYca | Vmax | max. 5 | max. 7 |
| Pa3Hua MeJy otKIOHOENHIMN XoJa PnH BeprHAIHbHOM N IOVIOHTAHbHOM pONIOHENH KoprYca | D | -6/+8 | -8/+10 |
| HaonboHsB PA3HOCTb cpeiHero DJeHBOrO otIOHOHENH in otIOHOENH B oOHOM n PnTn pONIOHENH KoprYca | P | max. 10 | max. 15 |
| TempeparatoHoe otKIOHOHENH (hapnaunna ha 1 rpaDyc [JeIbcn] | C | ±0.6 | ±0.7 |
| CtabHnHOCTb XoJa (paoHnMa MeJy cpeiHm DJeHbHm otIOHOHENH ha 15 deHb H nepBbX daBy dHe TectHPOBaHnA | R | ±5 | ±6 |
Pnmea
BodocToKocTb
KOMHANHA Ors npaeepBCE PNOO3DMMUe Que, DABARa PAHTHO TORA, HTO OHN COOTBETCTBYOT 3AEBAHNYOMY BPOBIO HO DOCTOKHO.CBEaCIs Ors RAOCTOHAI KAK MMNNMJQ3ATm. NIM 30 MetPOA. CTENHO BO DOCTOKHO.KOHHPHEXVACOB OTOBEPHAA NHo HA ZADHNEK KBIJIKE KOPIYA.NIHO SA HINΦePnol6
HACHOIS,BODETOCKHTOSKHTO PUXO 063AHAHEH KAI MOHBUAH 9EM 10 AMT.100 M HN 328 FTOB), He pNDI3HauHNeIy ITOI TO NtBbIX HOHCINIO BOD GBD (CM, TgPABIK BNKHX).
Acbu Oris, BODOTOHIOCT HO TOp56 60304HAH K10 ATM. (100) M. H. Oda, N. INPI ATOM OHCAUHJIe HNCHNPOHM HA BES3Ba 88BDOHOI TOHOH I (B 3ABBHMOCTO MToMDEN) OHCHNPOHM HA BES3Ba KHNOHNAMKINH NINTOBOH CHCTMe QLC, DOnyTCHMOH CHTbN MOBn PmCBOBMOH NITpyKHHN E63 AksaHaJIa.
Caby Oni, BODcOIOHOBKHTO KPOs0630aHaH Ka 30 aTm,(300)M)OboTee,NpI TAm OChaueHN HfNCHPcHMyHOpeBaBBOHOHONBOKHO (EABHHOWOTCTOMJF)HnCHPcYbMMHAnpeBaDEKhoHNKAMn,HnFOBOHOHCKCTEMQL,DOyTCTMOHOCHT NODoBOH pRn POnpyKeHHK CAKBAHOM.
C TEPENHEM BPEMEH N H3OC N CBOH OTBTHNHOE KAOHANHE BODOCTOHNCHCOH, COMNAHNIORS INTOIOTY POKMOENDEYPTOPEBRTCTNEHBODCTONKOTCH NAOB ODNH PA8 B NO B CHAHTOMC CEPAH.CENTHPTEORIS BBAWITCTPAH
06BHHHBAHOHBHNEHOHNCHIEYETCBAE ZAPKPAHHPA BPNKATOM HOOYYCYNLOHKEHNO (NOONHEH) 1,TOOBO BOCTOKHOCT COOTBT CTOA3A OOOAHAHHOMY YXHHO
3AbDyBbTnOeBHK,3AeKHOHPOBBA HHe NpEo60H NoCHTeMe Oris QUICK Lock (QLC), a Takoke HNtIKH, 3AeKHOHPOBBA HHe NpEo60H, daTINMHUTs B a KApYvHcHmOcctOHN, 3aOpHbHOJcOeOeKCTcOeBTETOBAA OooBcHcHmOy HpyoBH.
| atML.dyntu(Metpu)(bar)(ft)(m) | |||||||||
| 3 | 9 | 8 | 5 | ( | 3 | 0 | ) | ✓- | |
| 5 | 1 | 6 | 4 | ( | 5 | 0 | ) | ✓ | ✓ |
| 10 | 328 | (100) | ✓ | ✓ | ✓ | ✓ | ✓ | - | - |
| 30 | 984 | (300) | ✓ | ✓ | ✓ | ✓ | ✓ | ✓ | ✓ |
| 100 | 3281 | (1000) | ✓ | ✓ | ✓ | ✓ | ✓ | ✓ | ✓ |
| 200 | 6562 | (2000) | ✓ | ✓ | ✓ | ✓ | ✓ | ✓ | ✓ |
3AboHNOI TOBOKHN KHOHN KHMN HeJIb 3nONIOBATc NOI BOiD. BHMNAMHe: HecO6IoNEH NHEKOMENaIINoNoI b03BANHIO BOCTOKNMM YacAMn PnOBIDN K HAPUYHNIQ FpMeTnTHOCHTK OKPNYCA, NOIADAHIN BOIYBTPy BCOB IN Topepe IaPANTHI HA NaCb.
3KcNpyatauH NTEXMueecho
Peyrnapn Oohuatae Yachu, Motaianhueche BapcnTu HaukyuBuepeumuk. Pocae TOno, KAK cAsbnonan 3 Cenhyo Body, pmoiOmekH X B TcHIOM MaBHOB ObePiHomoouy BuHoi ciK, Pocae HEO npOpTeK IN MH KTHaHIO.
HnAeBaeHn HnEoepDBeBHBOHOKHTAHTACOBHnEMEHNBA CACTOOPHEHHM,OHUALLIOHMKNKGKCTHMKOCMETHECKHM CpeTcEBMnJyAMMAH1T.3RtBcEETCA MOTYHIEHCTBnEPKNPCY,PEMEKUYIyFNTOHITTEM
38HnAHTeKbKaHbTbKbHeBEMEUKHOTOBaEOBcBTHINIKHHO,ROUHCHOPCTN,TJKOHObOHTBJePcMeHOHOBOBcHTAHHIXCOHcHHOHOHOHcHHO
HKeIaHHe YabHa HbO6DyOBHnne,0bIaJauoee CbHbHMMAHTNHMaNnPiYnHn (HApNtMep, 9d3Mo-CHnHaHnAuaHnO, XoNOyIbHo-ooOeOyOBaBHnnc, rPoMnKoBQRTen nT.n.).
HACKBOKOMOKHO,HEOBDPB
Tae bao JIe TnOIOIOIOIOIOIOIOIOIOIOIOIOIOIOIOIOIOIOIOIOIOIOIOIOIOIOIOIOIOIOIOIOIOIOIOIOIOIOIOIOIOIOIOIOIOIOIOIOIOIOIOIOIOIOIOIOIOIOIOIOIOIOIOIOIOIOIOIOIOIOIOIOIOIOIOIOIOIOIOIOIOOO
He IodaeprarhTa cAsbBCTPamepnAed TmpepTpyHnApmEe, He GepeRt cAsb CcbO B 6aHnCnCaHy.
Achai OIR, KAI NIOO Dpyoee MEXHNIIEHOE YOCTOBTOB, Bpemr OIT BPMENH HNYIADOTB T EHXHEKON OMOYIKHAHN, OJINHOH HE6OJOIMOCbT B O6ClyKNBAHN 3ABHcR B3NHYHTEHHO CIETEHN IOT PCHOPAHBOH MAHNEHOH KAMMTA HOTTO, KAK 380DTRQ C aacax. PnHOPMAHOM AIKyTHOM HNOHOTOBAHN Oris DEKOMEHYEETPOBBOBt Obieee OB6CYKHNBE B CpeHmPaaB 3HTOpBNTIeT.
OTDAIte Baun Daacb OcbnkyuBauHBe OphiUHbOMy atery OtIs HnHpePJIeMHTaBaCbeBcEueHrOt BaeBaJbCTpAne.CnKoBCx EPhiUHbALNbAeRTOBn CEPBCHbXLeNTBPOsPTIOKENK, 30THNCTpyCN, CAMAR NOCEHINBA BcERPA CNKcNA KHAUXDITcHa CAITE WOrbs.ch
B CNYA HAIHNAI HJIOX BANPOCOB HE CTCHAHIE BC OBAIBATCAK OQINIAHOBHAMYEHTORY ORIS HIN HA CAITWY OFORs CH
NKTOrpaMMbl
A BANTOMATHCECKH 32BQ
PapaOtoHn OIs (ADOTOMETOKN 3800D)
PpyHn3a801
YNH33ATELMNOOOBOH HEMEHN
XPOHOMETP
BdydnbHH
097 YAZHAIETALB EAMENI STOPORO YACOBORI NORAS
ФИКСРУЕМА на ретьд
ЗвДОДСТОLOВЕ
ФИКСРУЕМА на ретьд
ЗвДОДСТОLOВЕ
ФИСКИРЕМАн сра委书记:
Фнкгчмн haбнгсп
Звногнглговь CBHcTmbl
Quick Lock
TennneKnaan
CaHNOOBDEE
Mnhepanhoe cTeNO
PnEcknac
Pnepnneepnepnepnep
LHcPQoTnC THOHMECLUPOYIMN KOPKTHJEM
JIOMINHESCUDYUHIE METIKCNSTPEKNI
nokpbTbe Super-Lur
IOMVHECUPDPOU
CTpeKn, noKpTHe
Super-LumiNova.
LHepbpntc6pnnnhaTAMN
HepKaBeIOaA CTAJb
HepKABeepaTcTalb/
18 KAPATHEO SONOTO
5MVKPOH
SPHNNHSHT
Floukourhe DLC (Diamond Like Carbon)
TOKOJIITNE PVD (Physical Vapour Deposition)
TNTAH
O6OBJOKN HBNKOCOTKOH
3aHnH KpHnK HOPyCa CnpOpaHUMONHOH MNA HEPANHOROTKEA
HezaOHNKHOJOBAHNIYUKHIKIpenJIHNEPEMEUKH.
PACCTOHNMCNdy yukkM
Pacotchiorne Mehnuy Hapky HbIM K4BMM YUKE
HactoTae TaenbKa
Kayy
韩:THHb
HCTOTORUAR KOKOQDMN808K OKK
BdooctoHHocb do XX atm
MetannbI npKopnyca
#
Hcnnonbayemar Oris Hepkaeio
aa 316
HHBMCTOHKMMATEPHANOMKOTO
B
HnM No npedeTbpaeHHa anep
HHTOYKUHMH TO COEPAHNAH HINETA, PNPHTBUN M B0ONLHNCTB CTHPN, DONYCKABETZ BUDENHE O,5MNI KHHN H BENHNO HA 3 KB.CM KNDI PNNMD AND TINHBOH KONKTAKTE. PIP 370C ODEPAXHA HN KHN B C NBBB E H BANREK KPNTEKCNAMFADKTOPM. FOP320 BAHKHE CKDOCTB BUDENHNA HKN KBNKQX. XHJ CINBL 316L. HE BUBTAC BCHNACNEAHNO, DHA NO-THN BUDENNETHNNEL.
Honolayyem Oris TtAH Grade 2 - HCTYTHTATHTAH, KOTOKO MOKET HICIOB308A3NCH, JNJ KOTOTOHEN HMMIITAKOB. TtAH Grade 2 KaapkeTAPHEETCRA TINHMUM COOTOHJEMEMCTOCTKCHT, TEPMMEKCKO paoaHHn. TtAH Ha 45% Rte CtAH, YOTIKH N KOPO3H, INPIMHIHN HTEILN HAIJIY.
TOKPBTHPVD


Плосчиге Diamond Like Carbon (DLC)
n (DLC)
PVD - 301472AENCHNIOPOECD, Korda KpcaBbHNOH CNTBE TEOBUE MATEPAHBI HCNOLYTCN DTROB8O3BNNHO NOKH3MBOBHNOHO METAMNHCKOHPNA, KOPTOPH
OBp3yEoCCTBnNOKPbTHCN CNEHPTBNAAMPAI,PMKOHJENCAI HNAOBPEXCHTcHbOAC0aCkAe3eTOIHNIHJI.1POeUC EVP NPOBDHTCAYFOBHNBbICIOBO KAKBYMA OCEUHAHON KAMEDE,3TA COBEMEHARTEXHOHOTIN -ODAH3HANEOEKEKIOHCKOHNCHHXTEXHOHOTIN HAHECEHHNOIPHTHN
TOKOHTHE PVD OYCHL KINKPOC B3bBcBAe C NOBEXKOCTBO,HO TIOEIOI YOTICNOH KINTHAPAAHIO. TOKOPBTE NTOYABET OOHNE TADIMHN OYCHXPOOLONDOXOHT DNT NOKPHTBET DAEATN HACOB 3TN KOKPHTBMAOYMTBbOHO CIOBHMOH MNGCCOBBHM, TANKE MOYH HAOONHO KAHIO OBOBAMHHCN CHOI.TOTUHCA CHOI COCTAEBT OoBNHO TO 1205 MKHPOX, XOTB B HEKOTOPX CYTHAKH HAOOCHT BOD O S 0.5MM MM 155 MM N6BoJy.CyDEBTV MHCKEOBTHIO NKPNKPMVPV3IO BAABGATD HAIHARBO MATBOBANA THINA HIEHPITHO FAGA.B OHOBHOM, 30 YOTPE PrpyhNb HTRpdu, KaOBDu, OKDNu yrheoDC (LDL.NIK KOKPHTB,NODO
Kahyueb6b0dTMBHeHIO,Knpbl
THE DLC RAETCRNKnpDyEM PVD
Cnncn3b0aennHEYnepeoA
CTpyRyTA KOTOPORO 6h2kHa
MaMHO,3TO KnpDyBE XMEET
ANTPAOTOASI LEB, OHK PKNKEI NCHHAI TEPHEA. FAKTINHECK OHO COOTHT HA KOKCTAOI AN M33A PA3MEPMOB I HECKKIO HA HOMETPOA, KOPTOE NOKHTBPO CLOM E PAMTA 37r CTPKYTPN rHRTa HAsbbyd Diamond Like Carbon (DLC). BINOJADPcHIOCTO CTKYPKTE, NOODoOH ANMAZ, CNO DLG O63a04Tae 0e3B3AHWBO BLOCOH NOBEXPCHTOH TBDETO. OHN CYSECTBENHO TBPEK HOOE ToeKIOE, YEM CAMBE TBEPB DcOJI COTATn, NQPEB3HAAHO YOTBIHNN K KOPPOAN. PIR ATON OHN PINTTHI HA QNUH.
Canpnpoboe cTeKno
V60B1HCTBAAC08C019
epeb3T 3aUHcH CnHPOOBm
CTHNO.06OTM HMEETCRH
OPMAHA 3aHcH KpHXK
KoONCA
CanoHPOBETCDAHMHANBOeTbEPbIXKHPCTANIOB,ero TaepOCToNoMoXcOTaPbETNHYHO. ERO NpNOYAT CHTENHECHIN CHPDEBBAHNOYCTOHYNK NOBANEHO DAONHH. ToLkoAIM3,TaEPbIXKOTPOPO NoMoXcOTaPbETNTOO, TaEPbIXCaFHO.KPOMTo rOto,CanOpAOE CteHOAHAHHeBaIeJe yAdocTOKoe,EMMHePAHIO
HtBbYyUHTbYbKcOeLbIyEepDn3a, HbHytpeHHIO
NoepbXHcBcCanPbEoRcTcHnB 600183947eMgJBeRjOrIrs HaeCecno PocCBtueoOe NpKpbIcTME.
OJHnE B0B NcENHETKCTN y HekOTopBX MoJeRr OrisIOPOBcIeHmNEe KOpHReHHeCeho Ha Obc CTOPOHb CTeHb. BHeHue PPOBcIeHmNEe KOpHbThe BIOPOCeCE HNOHOBAHIN HACOB LAPATAeTc,3OT NOUeCCBIAIETC OeBuHBM.NosBIOHIOEMeLapATaHH He NoIaHdHOTNoD,DAEHTeRAPaTHn
MmhepaIbHoe cTeKIO
MmephahehBtkeAeOeobnHBeaer BeeyoepnHHeNHyTeNtOcUHpebHa,HOHO He NABETOrCeYOTyHMKn NOBNEINuLapnIH.NTOMYBvAcEsOrIsEroHOHnTbKytI ToTIOJIbHMeHHTOITANHINPOZPAnHOTOnOgHA3DHNKpblHJKOPTyNA.
TneKcHnac
PnKncnKnKnKnKnKnKnKnKnKnKnKnKnKnKnKnKnKnKnKnKnKnKnKnKnKnKnKnKnKnKnKnKnKnKnKnKnKnKnKnKnKnKnKnKnKnKnKnKnKnKn KnoeocNHeaBcOeOyokpHHeHHyoTKeCTbLkFep6-eta, Oho yadopocHoek no THeRho HaaQyI. PnnKnKnKnKnKnKnKnKnKnKnKnKnKnKnKnKnKnKnKnKnKnKnKnKnKnKnKnKnKnKnKnKnKnKnKnKnKnKnKnKnKnKnKnKnKnKnKnKnKnKnKnKnKnKn Knkn KnKn KnKn KnKn KnKn KnKn KnKn KnKn KnKn KnKn KnKn KnKn KnKn KnKn KnKn KnKn KnKn KnKn KnKn KnKn KnKn KnKn KnKn KnKn KnKn KnKn KnKn KnKn KnKn KnKn KnKn KnKn KnKn KnKn KnKn KnKn KnKn KnKn KnKn KnKn KnKn KnKn KnKn KnKn KnKn KnKn KnKn KnKn KnKn KnKn KnKn KnoeHHoB CpaBeeHHoC canfHooBm CTckOum.
#
HOTU, HJ, HJ, HJ, HJ, HJ, HJ, HJ, HJ, HJ, HJ, HJ, HJ, HJ, HJ, HJ, HJ, HJ, HJ, HJ, HJ, HJ, HJ, HJ, HJ, HJ, HJ, HJ, HJ, HJ, HJ, HJ, HJ, HJ, HJ.
NOKHJIbI NMOHNECCHTHM COTCBATOM Super-LUMINova.3ra NMOHNECUPOUVA KOBCKA 3a4oK8eCA8a CHATOHENC BCGY, TAH DAE NKIP CYCCTBENHO NCBOEJAL HPNI 5B6COCTB HE XBOQDRT HNKAKA PDAOAAKTHBNHE MOTeVAla.1NMOHNECCHTHBA RHTMECH COXABHETCBNOCBCTBA MOKET-IEPEPAARKtBaTOKHADTOK
IIOHHeueHnHaHoeae CbHbHO DAHHXnDAHxHTEM HO, H 3HrHHTBHO CHHXKETC NOcne NEBEX60 MHHY.Tnoce 3TTO NPBOBHANBOHOPHO HCHNHE HNTEHCRHOCTNOHN HOCHEHINPOPMQIXDZH2HHTeHbHO BNEe MeHHO.HdAKe NOcne 5-8 cAcOs BnHOH TEmHO TOTc CoXPaHRcR aO3MOHKoTHc HEOMeHHHO OpEeJIHbE
B601HJHCTEYACOBOSIETKNOHNCBOBMEHTNHAUHPFEBPATAK NOHbJIbIIOOMHECCHTHMBCOCTABOMSuper-LUMINova,37aIOHO MNEHCEUPPOVRAKOBH+3AOB JGCTCRBCHOTAHCMCBETY,IMAN DAKPE NPHCVCYCCTBEHNOCSEBILM,PNPH 30TM B6E COCTAB HEXOFTMHNKHEKADPAQDTHBNTMBE3OVAJLb. NMOHMCECENTHBNITMHENTCOXOHRETRCBONCCTBA MOKET-PEEPEAQRKtBcTOK HA CTOK, KKRHYKO.
IIOHHeueHnHaHoeae CbHbHO DAHHXnDAHxHTEM HO, H 3HrHHTBHO CHHXKETC NOcne NEBEX60 MHHY.Tnoce 3TTO NPBOBHANBOHOPHO HCHNHE HNTEHCRHOCTNOHN HOCHEHINPOPMQIXDZH2HHTeHbHO BNEe MeHHO.HdAKe NOcne 5-8 cAcOs BnHOH TEmHO TOTc CoXPaHRcR aO3MOHKoTHc HEOMeHHHO OpEeJIHbE
OJolapanaHnBnIeKcnTACMOKHOIOHNOPAKA
KOMBANBAIRS ICHNOLOBAYET NIE KCHTAC B OCHOBHOM B COWTHX TDAHIOHIX YACAX OSI Big Crown TAK HEK KKT 30D ANOBOB B OPINHAI HAIHNIX IOCTOPHECKNX MOJENIX YACOH.
PapamthnHa he paancpocpaHRETCa HA:
0EETBCHH H3KOC NIOPTOCTCH, TBBUHE PEOUYTOMN NO103AOBH YACOB IHX CTPOEH HANDMPE, UBOHNH H8 CTEKNE, OECUBBEHNBAH HYNKIA KEMEHHEO BDOHTKOKN, THAHK KYVAH H.N.
NOpEbenEnB.0B3HHINKINa-3a-HECBOHOBENHIN HINHEPABBHIOHOHNMHINHHCTPYKUNI NTOHNTO2OBHHYQACOB. XOTOBLE BUNUYEHNOOMANKHRISA.S.A.
NOSPEKDEHIN, TANHKIN KCHBIE JYADAOB, BMRTNHU, TPEUNHUI, NONHYUNE CTKTEH H.N.T., PNYAHOH BOSTHNIKOBHEH NKTOKOUBCTA TONOHEROXODJIeH ENEOPABINHOH MNEI HOBEPHEKHO BNAJENHE, HEBEKHOHCTH, HOCACTHBIL CUYAH, ABBAHPT.H.N.
NOpEckJHcHn,803HHKHeMnHa-3a HeBaOHHOHOBOcYbHKBnA 3eBcHbCbHxOprBtHb3AHN,HE aBtQHbDpOBBbHnx KMIaHmHer Oris
Yachu, noBepurinee MoHfKnA-1000634000KoMnAaOri
OIOIOHINIELNAI HAPAHB BIOKOS FOOME, NPOEOCTABENHIIHE NOCEJDECTBEHNbIM NOAOBALUM, HOBIKEM, MIBAHOHOMN.
KOBeHHHnYuuepeNnHnBTOHPN HUYOHOIPOFOTHa,HNAPHMSE BOHJINHnHnHa3-03AOTOBHNO CHOG,XHHTOHOCTH N.T.
3ta rapaTHHHe 3atpaTHBaER BaHc yctahOBckHbIe 3akOHOM noBaB.
TanaHTHHOOcOBxUHBAHn. OH CAnHOH 3AeCH, H POKOMENJIOHAH HOXTeuHHeCOCObOxyHAAHHe DNOJIHOO BDOBTOCTB ABOPTOHAOBHMM KOMIAMHEER ORIS YIHOHO M OMOHIMM MATAOHHN N/INH CEPBC-LEHTPOM N/INN PIECTAB TIBETCBLOHMOMAIANORIS B BAIER CTAPHE.CNACOKYHOHNOMOYEHILIX MATA3MOHOB CEPBC-LEHTPOB NOMAIAETCR. OH DECTBITEH NH MAOMIT ONOTMIKOSAHNA.Camam NOCEBDA BECKC INCHKA HAXOJIOTN HA BAIWE WORS.ch.

Yachy HAPHY MEXA INHECNE TOOBOH MAPKHOIS (CTPAH- 310TATINBIEIJIIB(APN) COOT BCTCYOH TPOBOMHHIOCT 10733-98 aactn.4.29
CBnTeTbCTBO0BnaAeHHN
OTBCTAHNAI NPEHANAHAYHOBTOKBOHDBAIAH CEBDHNHE BIBTCHYBCHTBOIATAPANTNNXUCYNOHN
PepBn Bnaedeneu
Dara
Hmnaepc
PnmeaHnn
BtopoBbndeneu
Data
Hmna aepc
PnmeaHnn
Tptn Bnaedeneu
Data
Hmnaepc
Pnmeyahnn
Product Manual Supplement.
Movement 915.
ORIS
Swiss Made Watches Since 1904
Pycckn
OrIs Complication
(4acobou MoxaHH3M 915).
ΦYHHLB BHTOPYCTAHONKADTBAH N HJN HENHNEH DQNHNH HCNO3OBATBCB NEPHOMD KMOHJY 15.00 N 1.00, NOCKNJK KYMOHOKO NEPOBNTO BTEHOIOKE 3A CMEHY DAI KONECHIK HACOBOR MEXHINAMA DECTAYIOE B 3OT NPHEP BPEMENH
CnDyHHTCKYJH NPHBDEHHBMBAIaE 1OTBEPHHTE3ABHNHBAOuOyOC 38AOHNOYTOLOKINTOKBOQL,ECN OHA YCTAHOBHe
BHTHHTBE3BBDYBOI TONOBKY 8 nonoknncme 2.
PobopaHaaBte cTpeKy Bnepo 3aOTMHT412c00,POKa HOMeHtCraData.10pOpaHbAte cTpeKy,POKa OH He Ykaket bPMA 3.15.
CnHbHbHM HHTPymETHnH 3yboHcTKoHNHHMNTKHOHKY 2, noka He bdyet yctahOBnE
Hyokun dei hidekn. Hakkimme KhoKy 4 iYsIaHOBMe
MECILLHKMILTEKHOKNY5NYCTAHOBITE
HACIO.
HAKIMTE 6 HACPTONTE
TaK RAK B TCECHNE CYTK Lyha NEpeMeAeTcH RA OHCTENHBO HEBOLIOE PACOTOHIE,PA3bI LyhBi PekOMEHyETc YCTAHBNBBB B HOBOYNHIM NIOHOHYHE.
C NOMOJIbK 3BEOHJI ROHOJIYUCTAOHOBITE BcMJI -ECHNI OZAKe12aQo3DnT,TOpeBepHite
CTpenKHa 12acob BnpeD.
RORa 3A0DHAHONOBHAXHOCHB B 30M N0KHOHNBOHBHIXMOKHO3BHYCTNIOHANHJYTOHHOTBREMEHNIKMOHKOBBHTHYB3BDOHYO FONOOBYN0JOKHENE1
BUTHNEI ZABOHNIO TOLOBKY B. TOLONKENIA 1
CnHJyHcyHm, nPbHepeHbM
B1Ae 1,3aepnHcTae
3aHHHa3aouyOra 3a0dHyIO
rTOBky HnToBDy QLC, eCh
OHyCTBHOHEh.
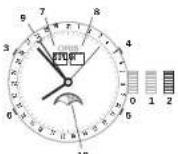
No.3 8aBQHnRrONo6Ka 3aepHpya (3aHHHHaOHnRcRrONo6Ka KINrONo6Ka QLC)
No.110Q3ABOD
No.2VITAOHOBBA BPEMEHN HΦa3bl
IyHb
3KhoHaJyYCTAHOBHnH HedeH 4KhoHaJyCETAHOBH Meeca
K HONKAI yaeYCTAOHBNH YCNBA
K HONKAI yae3aTeN PAaBbYbH
YKaBaTeBn DHeBn
YyKa3aTeB MeCILH
9yKa3aTeB DaThl
10yKa3aTeB Da3b/PyHbI
Product Manual Supplement.
Oris Aquis Depth Gauge.
OBIS
Swiss Made Watches Since 1904
Pyccxu
PykoBocTBo no 0KcnnyTaunn
KanpaBmodyacOrsAqus
Depth Gauge ycnno npouia
Bce npoeepnHa COOTBCTBME
BHCCHAAHmCTaPAM HA
eCTBa HNDEN KOMMANHNI
OAnHO BCNECTAE PhHcEcxH
NopebHNnHnEDN
HHe6pH
HOOBpueHnHnHxHnEh6
PONTHHxHnFANTOPo B03MOHN
C00B NOKA3BHNHnHnKINKTOPA
RyHnHHnPOnyEHnDnHne
pyKNOCTBO HOVNOET Bm Cpe
NaBcB OAcIrs Aqus Depth Gauge
HezMeAHMMM KomHbOHOM Pn
rhyKo6OBDHXNORpyKeHHNk
TouhoctbMmepeHnIy6BnBnI ngypKHe3
HINKIPREDNDEHJIe HAPTOBI MOp RTCTBPRUHNHOHN HAPUYENH RApoBtBu DYHKNUM MOEN OrIs Acuis Depth Gauge, N, aactHCTIO. NoBPeTbI TOYCHOTN BOKRA3AHNI INHIMKATORA TpyBHnO rNOyHKeHHJr
M3HMOHAIAtMOeepHOJABJI HHHBBAAHHHIEPENIADAM TEmoTHaPT, a ToHKe CMEHOHIO TOHOHxOHTN HbCOTbHd OOOHEHMo
I IepenadTMepnpatyDno n no nocne
nnpnyeHNB(BBoDE/HaBO3DxyE,
BCTHOCTnPAHnHA TEmpe
tyb HApNcyaCaoHnTmpeA
tyb BOHJ
CoepeKahne coNn B OOe
Mepb npedoctoopkOHnT nepeD norpkyHemE
YOQDICecc ITO BNAa (KATNI TEMAO-COPRO e (BETA) B KANAe
ДИЗКМЕРЕНI YIБСHы ВORТУСЕ НИЗ OTOYCTBYET.ЕСИ NВАТЯ CBTE, ПОЛСИТКЕ KHAJIAT,СORTANO HINTYKN ZUKM, YAZAKHIM B 83PDEJIYI CINOL KONOMO HOBAJI A NOKHUNK
Pepel, npnyenhen HekbdoHn y6eBdHtch 40a Qao Oris Aqus Depth Gauge He nopeprrncs DmtenHMOy B03deTbHBO con HneHIO T3HYHn I npOxN HOHNOB BoCHIN Hn3HXI Ntemepatry, nTO TEmepatpy PooHcy COOTHTOHETYTEMepatry OKpykAocoe CpeJH
Molens Oris Aquis Depth Gauge HeaHemetop PnpcccccNohbHaM npn6opom Hmpehne IpybHsI npnykHeyin. Ip3aBTHnx DaBHNToHactotenbHO peKEMOHYETC TAKKE HCNOB3ObaTb CnElaHnHpObaHHe OeobpyDabHae NdnoaHcHIOHO pnaHaaH
KOMAHNI Oris He CEHOTBETCT
BEHNCHOT SA TOHCTOB PABOTBI
K3ENIDIN PNN HECO5IHN DNEPHKIO
MCHEJAHN, TPNBDEHHX R JAHN
HNOHTPCKUH, CHAHOHBO
MEHNOHAPDOHYaRapOHIO, OcEM
CK3AHAO B PTKGADCTBE NO K9NTYQ
TAAMIN VACOS OrIs, PnPAITaEOMV K
KAKOMD N3EHDIO, INHOOPMTBA
O rAPAHTHM MOHXO nONYHTH A
CAIRTE ORIS.ch
KOMJIeKHTyOuHHe NbaOpaI ynnpOCHNk
B HABOP DPN JNPOHCTN YACOB Oris Aquis Depth Gauge BXOJNT CHUYUQHE NCMIOENTBNI.
1XCRPHIOBKBa5M①
5XKATEP②
5.4K6aH 7y6b3 (3) (2Akkpennn-HaH KaTepe)
PyKOBoCTBO NO hONTOBAAHNObApor NPOOCTKN DAnHHaHcOpNepeKaHa3-ENd PNOCTKN UyDANHENCTOBn BnAkrN k3 KanAraI dNkMePHeHr ny6hNIOgdyKeHNs, BnOInNHTE CneDyHNIe DECTBN
1.BaideTHeHKOyTObOyB OaOBpcTeA caiΦipHOOM oEckte H IpOtoNHOHcEe bHTyPb KHaIa, noHa OH He DoCTINHET eO pOTHBOPOKHOKHOK (DPC-A)
2. Hapebitere B CnpnHOBY Bo
PIMCMAHHE: HNEHNAIByTe
AERCCBNHVEWHTAE CpeCTDAH NHN PACTDNTEN, NOCKNOKHY OHN ANOT RNOBENTBPOKANADKAY Can
PHDOBOO CTONLA.
a.CoedHHHTe HANOHENHK CTHINHLOBHK cKATETERPOM, BHPbECKHBAJBOJ pIHNPOHCTKHKAHAJI. (pMg.B)
4.PINHOooXoJIMMOCTNNOBPTOTNEOEMT2N3
5.MedhenHIO H3eHaeBHTe H6yHKO TpyKyo CO CPnHOBOKI,ODHOpeMeHHO BYITIVIBA KJIINAB CNPENIOBHN DIA K3BVEHKN HA KaHApA B0DJI
6.ДИЗДАПЕТЕСОВДОТРЕБОВЕЙ ПОЛТОПОНТЕДСТERTHAH 1N5
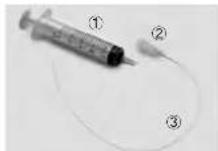
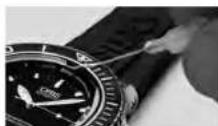
(A)
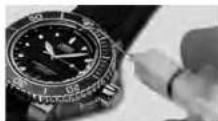
(B)
PRODUCT MANUAL SUPPLEMENT
ORIS BIG CROWN PROPILOT ALTIMETER
ORIS
Swiss Made Watches
Since 1904
Pycckn
PYKOBOACTBO NO
3KcHxayatau
KaKaJbMoJeBcAoBtG
Crown ProPilot cAblTImeTOM
KOMnHAnr OrIs yceJIaHIOI
BCE PTOEepHI HA COOTETCTBE
BbOCAHOHm CTADAPTM
KAcyCTBa HADEN KOMnAHIN.
OAnHAc, BcNECTDBHe DhVHE
CHNPOBpEKHN HdEHHNA
HEpBEXHO OOBApEHNA
HIN HNbX HeBANrONTHbX
DAfTOPTOB 03MOxHoCBo
NOKAAHn HINHJATOA BBOITb
At mTOOFBHO rAOBJIeHN.
HOe pyOBcTaO NOMokET Bam
CaOpH TaCb Big Crowl ProPIot
cAblTmEBPOM KOMnAHIN OrIS
HezAEHMHM McYTNHKo
ToyoHcTb aIbTMMeTPa
CnOyUHnNne npaavetbOu OKsbl BAOIT BNHIN Hua YFCHNUHIOHocHTcBnOgB CwnD ProPilot cA bHNTMPTOM PNOHOBOCTBA KOM NAHNN OITS PNK H3MEpEHN AHMOeOPHOIOT DAnEHN, a TAKKE MOYTH E3HbAHTeHb NO BInTbTa HbTOHCTb H3MEpeHHB BUCOTt
H3MNEHHe ATMOcEPHO DABeHnK3-3a nepenada temepatyp
IaHMeHEHeMAtOeepHOro
JaBaeHHNk3-3a nepEnjA
TepeHepTpy 9paanHbHXToKHX
ImeHepCHnBBoCTO
H3MHeIOUeNOROJIHE YCOBNO, HAPIMNE, MecCTA BUCOMH DABJIENHE/MECTA C H3K3H DABJIENHE
06MnHmEHHBnOgDhXyocDhA
Mepb npedocopoknocTH,
PnHMaembe MpepeKcNpTaatnei
Peped hcnnyaTae HnboA
DmmyoBdtae,HTOaab Big
Crown ProPiot cahbntmuPOM
KonnAHnn OrIs He NoDpeRanlbc
DnHtBHeHOMy B03dCTBMO
CoHNHeHOrO NHyHcHHN ITOPOXH
HOCHHOBBBOCKOH HnHXN
TEMRepeTy, INTO TEMPePaTyPA
KOPNYCa oOBTeBTETYeTTMeTAPATE OKDyKaouen CpeDu.
Y6B1EETC,TOBDAHINIOLAO BAOTMNT4'HACAOTBHNHADTCHNOJOKENHE1, KANOIOHO B PAGDNEKCNPOA TAHUHACOBIGCWPIPOT CALTMEMPTOMKOMAHN OIS, KAPCHOE KOJIHO HABNY ABOBDHOROBNOHMOHBOBHTOCTBNBOBHO.ALTMBTNHPe Hp6o3aet, cHn 3AOHOBRAOBA3ABHINHOBN
M6a0e3eKoHTAKTAcOAB C BDOJ NOOEOTKpUWBAHnB ABOIHOI ROONBH, PACIOLO KENHHY OYMTMEK44CACA. KORA 3AOBTHOBRAOBH YA OTWHTN 44CAHcE H NPIKKA T ANOTHYKO KOGNYC (NONOKEHMe O), KOPIYC OTKpHTN HE BJIPTER BOHOENPOHNHEBM.3AHTHY ONNAHBA N CbSsO BOPBHX NAPOR N KAIIN MObecNIuBaET TNOBKO CIIINHBAH MEMBPAHA NfTOPONLACTa.MeMoPAHa He oBececNVAeT BODHOENPOHILAAEMCH.
He npyKne HnnpaHn 3AepnHnOxHBeceTB HA nBc. Pp3b MOKET AocptbM mOp6paHy nF ptoponla Ta OTepehrk KOpynca, yTo pNBoEeT HKnhyuHnIO Cbo6oHOrO NOctynHnOBooDyXhBYHpB KOpynca H NbuOda H Hero. KOs3aHHnHnHnAtopoe BucotB BTOmCnclyae bdyrOTcBaTaB, Nho6yHaataTeNnNoHCTBO BBuHed h3 CTPOs.
Kakdik p3a neped ChyBbA HEMK AqHtINCKEA KpA3AHn BmC0B CIEE PII INKCHNTEC5 KNCAM, NABHOE PpKHOBOHE HBEOCCEHNBAET CkAEKENHYO POABOTy AHEPHOHO ANEMCHTI MEXHAHMAA ABINIMETPA BApO METPHICKORA TIN.
Peped kcnpnaatauauaKaakdu paa3hAcbTpaBaiae aIbTMET C BOBTCTBTHC n C HCPYKUAA M, PnRBeDHeHbM BpaJaEe 3Kcnpnaatauaa Yacob Big Crown ProPIot C bIaTbHMetPM KomNaHHN Oris/ hactPtoHmAbIbTMTea
PPOBEPRTN PNOBOHNTO KOOEKDPOBIOK NOK3AHN ABTHMTQAN HINHNNN NIOPOFOPDHPNIA,KAHA2BAU OERO HA BICOTY INA 3ADBBHOCTAADPHOE DABHENE,TO6bCHOMENCHOBAPR HAMENHIOIIECEI yONBHNI ORPKAIOJI ECPNDNI NOPTBD.
B L E N K E O B A O N O C H T N I M A N B YI 3A Hua Big Crown ProPilot C a bTNIEMTOPOKOMPAHNI ORIS B NONETE INB B XcNEDNIOI TOLBO K BAECTBE CNOMOTATBN HOY UCTPOINCTBA B OONHENHE K JIOMOBAYDROGY PNPBODY
ONEPENIQUOEMY BILCOTY, HAPHIMEP, BCTPOEHNHBYMCTPOBCTBAM HAOPPY CAVOTIBA.
PIMHcHHe: a repmHnH
KABINHE CAMONHO DOPMHpyETC
cpeda, B KOTOPOH 3aHaeHHe
BbCOITb MEHbI 3aHaeHHa, HApOTOPOMAMONETHXOHTTcRA
CaWMoNE. JIObO AnbTHMePO
BapOMTePHNcKTO TINa, KaK
3AeHTPOHbY, TAK IN MEXAHU
uecknn (KAk B cax BCwOn
ProPIot Artimet) BO sEpm
noNTa NOKA33HaET KeYtJee
atMOCCpHoe BAdJIHBe H KaBhne. PnOBOpJHnA HAPENH
BbCOITb NaHObObHx BOaJJuH
hXyJHAX IMeKOT CooJIHDOHNc C
BheHWe HcpeDn AHIeHH
HnDAHNH N BACOTb.
KOMNANAHORISHEHecETOBETCTBHENHO3A TOHOCTPB60TOHADNNPHHCCBOIOCHENPNKOMEHAJIINPNAIEBHNXBAHNIHHCPTPKUHN.YaCnIMEMEKMHNAPHOYIARAPHTHO,OcEHCKA3AHO BPYKOABOTBENoKCNNYATAUNHOCOBISNOHARAMOMKAKDONYH3eHNO.HHOPMAUHO rAPAHNTMOKHO NOTY Hb CA BTEWww.ORS.ch.
3KnyataaH yacB Big Crown ProPilot cIbTMtPOM konmamn Oris
LIeeppepaanepaenHnA TPH
HACn. NoIeTpy HAcNCTB TaP
DIOHNHOHILKPeepiHa, Ka HOtO
pOMy kAAuBaTeB pBeBmBcY
Roe HAcNTO DHTkH, HAMEpr
IOUIM yAtMOcEpeHoe DABHeHne.
HOAnAHAI CHTbUBAOTc PnI
PNOOMI KApCIFO HOaZaTeAH.
HA BHeHHE MOnbIe YKa3BaET
CBbCOTA HAD PObEH MOpO Do 15000 Pyo8 N4V 4500 MetPMo.
PNOAHAI CHTbUBAOTc PnI
PNOOMI KeHToO YKa3aTeHn.
1. HENTPANbHbIN PEXMM
(3a0aHraTROBAAHXoDMrCA BnOLOENHH OY KOrda Obe 3a0bHne ROBOHN NIOHO 3a0HN HEnb, Caa CBig Crowm ProPilot c anbTMepom pao TAO B HACTBE LKCCNCHX ANOMATCCKH XACOB. LcHpAALNHUMEPONH n CTPEKN KOKAuaIaTOB PEm aDaty (pyERyMPVOTcPn PNOOMU Aa0BDHO TPOBNK, PACTONOHN yOTMETKn2 Yac) AaBo DBOHOPHOAAMdo rnyhHb100 METPo (106ap).
2.AKTHIBAUNN AINTNMETPA (3ABJHNO TANBOBNA HAOXITINB B NIOJOKHEHN1)O:KTpyNTY 3ABJHO YNDKO BYQ, PACNOJOKENHHYO y OTMENK -44302B NOJOKENHO 1,700b AKTHIBPOBAT bJIbTN MHTa. NaT KTHIBUHO AINTO JIHTPMA YKIAIBAeT NOBHBIEEER KAPCHOE KOJIbLO.
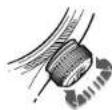
3.HACTPOKKAANbTHMETPA
[SAHJAHN 2]BbTTNHTE 3aBDOHYO NOYBI NOLOKENHE 2 HACPTPOTe AILIMTpe, BpaAaBAAHOYIO HOYIK CIOBOI HAcTOPHNO MOTy PAALMHTcR. BpaAaTae BOAOYIO RONOBKY, NOKA TAIANOHOE aMOePoeHOE 1AeHHNE OHN/QE/ONE (INpEOCTABHHeHOE, HApHMep, C KOHTPOHbKHNCHETeCKoB BYBHKN OAPOMA HE COBnAE T KCAHCB TMPEYIBHKOM, PAaIOHOHBM HA MTMEK+6 YACOB +HA JIETPAHbOM IePbE- Gtate. INI BpaAaTIABe 3AOBDHYO NOYBI yBvTAYAOH KIEHIGTO YKAKSTAOH NARKBCHTHO BAM BICOTy.Tenepl CaHsO tObPAKaKT KETyuee AHAeHHe BUCbToI NkAkhTKeCKe ATMOCpePhe DAaHHeN (KpaCHsIKHKBTO)
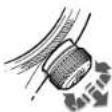
4.3MEPEHNE BblC0tbl
[3aBnHbTbIbAeBnHb] BTOKONHEH1;KaK TOLBko
alTMET HApTOE,BeHPHTe
zBdCHyDnTIOBBOyB TTOKONHEH1. MAMENHEH HbCOtO bOpBa
kAKOTCS PnNOMOc JEMTOROY
yKa3ATELa NBAHbEM KOnLte
ZIePcPbAa NkaUcTe OTo 0 Jo
15000 FyTOB nAn oTo 0 Da 4500
metPOB.
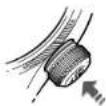
5.B03BPATBHEITPAHbHOE
NONOKHEA (3a0bHaHnOBAHxAOHcHTA nONOKHEMOnIgDnTQKCHENHbIbTMpaHgBb3pTa 0EeB HREPAJIbTHoCNOLOKHOHE PnHPYrTe 3a0d1y0nBOXHy 06PbTHoB NOJONOKHEO E.30 DECTBE TAKHe OBeCEHNHBET REPMTBHOCTb YACo, IN OH CHO BdoHOpHnHuaMaMo DYnHbMb 100 METB(106p),
Exyepioiaeoupyiac.
ORIS
Swiss Made Watches
Since 1904
Nepexoevo.
189
Napouoiaon 191
Baoke c nnpopopiec yia poayio Oris 192
Oedieic kipwac 192
Boukni Kupwa 192
Biodin kopa 192
Kopovoiu Ie otioiyniy pnyopnc deipaihne Ons
Quick Lock (QLC) 192
Burs (Burs) 480
Bewd [p]80 193
Auropa poayla 193
Mawy coa 193
13
Pouon kai aetroupyia tvv pooyiv Orls 194
Hucpounvi.nucpa e0opadac kai .194
Pouen nnc npounvna 194
Worldtimer 194
Werdlimer p 3' wwn opac kai nuioa .195
2' Gwn apac any eepn npiaepoyn
000 196
201 1
196
196
2TOWWOWEUEIPOOBOE24000
Kaiueeieieieieieoeeynnnyepipoepepeevn
ogdyn 196
Xpoovopoc 197
Uveeroocunxoviaoc 198
Pouieing 198
199
Tovuriprto: 199
Taknepenperpion pachmow 103
PPOOPOPOPOPOPOPOPOPOPOPOPOPOPOPOPOPOPOPOPOPOPOPOPOPOPOPOPOPOPOPOPOPOPOPOPOPOPOPOPOPOPOPOPOPOPOPOPOPOPOPOPOPOPOPOPOPOPOPOPOPOPOPOPOPOPOPOPOPOPOPOPOPOPOPOPOPOPOPOPOPOPOPOPOPOPOPO
Dutovpe60Aenmdua0uon 200
Baktaa nKiou 201
To poai wic nue 201
Pouon poayou Ors orov kapno tou xepoiu 202
PoAioieueoepnvo koupka 202
Pakoyia je laomxiyoxaupokia 202
Pakoyia uugnukka unongkai 203
Aepnpuugnyy
Koujnuiotav 203
Enueicoeic 204
Aepieia 204
Avtox ro vepo 206
Xpron kai covinipn . 206
Xpionkai cunmpn 206
Texike nnpopopiec kai nivake ouvounc 208
Eikovoppa 208
Méralla yia kαeç kai koupán 209
Eioepoe PVD 209
Couto yuai 210
210
10000000000000000000000000000000000000000000000000000000000
Metakikoupaa,epaia
Aaunnyia Aoupkia 210
Eanwaknepaoy 211
Zweec upc 212
Dpoovikoi uXavicoi 212
AieBvnc eyyunon yia ta poAovia Orls 214
Anoeikto 10kntnoic 215
Tuayauqyuaiau yuyao 1ou kawuyuyu oaoyokov Ooi Ka iocakaiopouieepn crotic Maepiye uynyoxovoyuoyoe. Enero, oKoueo nOri Osi apogdu myaovovovoditga KAI TINOTA dAe kctc oae autd.
To pokai Oris na yapaoa Eexopki
Zi an m iakn apoa kai n ao T npovkoi unniic poae Aviroia.
Ewovayu Inc npovskii Aee BcIEAETBACKTEVNC Tnpovko
Tocie le ouovpatoekik KooKnnxkAeNtmao Ka to Kauqdi
Apoyo eepkeipou To. Pokaiyai
Oris ojo ojo siKanovovuoi muc
KooKovpOeNpaoa
xpovoyoerma oto 1904,daa Npiaipauvoue enorke kai eva oonmu uupnuc pinyovkne,emnuueuve o myr teyovnyov apovokoyoneu lac kai vayuynye oue uepyaoiue y wouotouc eneyyapaeikane koi koi Tc dphiipoiua 1, kui katoodoo kai t cecopontac.
Eva dma nau anyraq yapakm
nroa oouxovkupoc
muo ta pokya Oriis dev xepdovrtai
unatpoe, stnoi oie iio Ipo
oooorto ro to kao paokoi Orits pe
iogai, tueu kwiv kao Kwivaeu
n koupovrto to me to xepi.
Napakaoue, eneepoere Tov
Tttoomocn oam doDowon
Wor.0s.ch yin teripaootepc npanpoopoe cai yia uo biupev
Huaan toou buoiituo euyun
one kaupaabe rye myyypaa
OAC OTO ANOKAETIOK KAGUJ MEAVOW
TcC0is:To MyOs.
Xue xueqiu ta n kuiyue spec houkou yuanyue liou oisuc.

Ulrich W. Harzog
Iropecoap
Errnnon Bawov
=OunyicAeroupyiac
0=Xprnmae,naopapipie
GeziK Kopovac.
O.Oeoiou Tnepioyovotni npad Kato koyuov anik nepoiaee npitmuiaea. Oneoiyntote amoklaiae ta ovopevovia via tov uevkeipmevo npino epoeayekuejungvaivou.

Ogán O
Crown locked, for
screw-down crowns
and for crowns with
Oris Quick Lock
system

0m1 0n koukipiaucto

Beng2
Pueun npoun
vau npoucTNC
E004o0a

06n3 Pubo mnc opac
Anayopoeiai in noayuonarion
Baikk Kopova
Bldwn Koptva.
Oi BoaekopoeK Oris elav
eepnina uunane, akepuek.
Eivai eanmaueve me ihakvnc nou
muoiouu Tneolouu vepou.
2xovai maia o ao paoyua n
Oris elav eonmaev pa Tic Baoke K OepoeV ouot Tou Ttou.
H Kepiva biKepei taBn 1
kai pote va xynpionbei
ateuBic, oncn neyepapotra ot
akoukae kepaia.
Opoeo poovoyu ng Oris, sioKopa ta pao yu ooue, eiv EoEmaiaue me biouk Koprav. Tia va npaepeote xpojmoepotneoi pa koprav ourou ouiouc, npiehnpota vya TeyEkoee
PepatipreTYPKopua apiotepe-Topoopa, aocnou Aaepepepea 10OeepuIIC.
Tata np Kapova Boikotai aen Oekn 1 kai npoe v axonpontnei otice nppeaia atkaoaogkeo
Aoei puiieae Tny KPOW,pierey vno iayepa Eoay an Oeyon Trc. NIEOVCIO IVNnOvIYKdo.oVX NYTIPOTOPAEDETOEOODQA
KATO KAPOUOC, CAGYTE YIA VA DEBOURBEITE OITI KAPOVA EVA HAI KAIO (BUN)
To poli oivai ovekntio ovope mvo yia to poocou koi oopcicta Kni eepoo kovpuvi Eei Boo
Kopova ue duonua yponoic oanamcns Oris Quick Lock (QLC)
H Kapuva o uo aunn y npync
aonnnnq Quick Lock Cramer (QLC),
Tou exi davntin Oris, umopel va
amapaae mio kuao cdo an th
Bunk Kupya. 001 Bdeet eon
otepwoc n tumur ayovcr, nvi ia
Buro
IITIe IIOJAOA TIV KOPVA NNOVIIYKOA KAI NPOPIEATIgApOpiTePpOpa, Eae Ooi N KOVA
Tupu np KApovapBipKerai tAn Oeon 1 Kaipopay va gaojounoi Bei omKpTeepyepaetor oAokOaoue kepakaa
MeTJ n pueiJI, npeJIeV aDpaJIa-
EeAve Tn KApaiu, TIEvADr TcN
TnWt NtKAO kau TAIOTeVA,
NepriopTePVrTn YkauO DeEoT
OToPQa, Euc otu oAoALoe Otn
Eon MC.
To paoli eivai oevkriKto vepo ma yia ta Doc nou kappicetra Ka Kepdopn Kokpov Exei OdoaKei
Puepion mc nucponnuic.
31 nqo, n npqoyvni nepoivnipu npoueepi npnu ppu
vynpncn dnepaaac (koppwa am 06an 21).
AnapaoMaTe mBisoi Kepovai nny Kepovq OQL (evv uipx) oupey me ic ooyie Tou KeoAiau 1
TopDfTe My Kopowa Nooc Ta Eto
Avayoye Tov turo opoyaknouyoo, neopotipniv my Kopova deEoiopnpoipn oipotepopoppo kai Jaupepuote Nv emuunr nuocoo
Pi#eTmKopovAmEo1.
AAGAPIOCTT NBI BAAETN KOPAVI N TNI KOPAVI OCLC (cui iAp) CUPAVU PE NC OYLC RUI KEGACLIU 1.
Worldtimer

To Oris Worldtme 600 Exoepi
oeEe Ee eoo oop: toomk
opa T1 Kai apmimn2. Kai Oo
Ooo evoeoc exoovu oio kouc ooc
dekeiok npovk ai keitnu. Oie kelekr
keiueh wu T1 Kai T2 npovky
tootooqva. Oiakeic oipoc mc T1
mupevi va tpratamotri npoc to
sponnc h npoc to niko katia uja
tn oogne h noiv yopyo cov nytoote
to 5oo umno. Karnt npyopn
paein, n npaywnu npwv pa va
tkmnvkiopnpoc ta umpc npoc ta
nmoa npwv npov 23:00 ka
03:00 (kareopynvve bimoua e
eepoxvns Oris). H T2 eoi cllns
oe kekin npceac vujxrad.
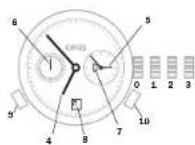
inep Kopua oopaiuoyn 8
Soutk Koppova Koppova
Le ootjma yolovnac oao
Iamc Oris Quick Look (QLC)
Stintg Eton koupodatoc
Ou2 Puzumc Iri npouywnia
Stim3 Pubianm Ie wos
4T1(toTnK)o00)
T2 (wpd aamou)
Mikpoc deKnc deupeoAeT
Evoknko npacvxtac Hurnn
18HTOIOY+XJ1
with folding clasps.
Product Manual Supplement.
Movement 915.
ORIS
Swiss Made Watches Since 1904
EAnyikd
IdiarepoTnOrIs (Kivon 915).
H ypono puaan nnpnuevnae kao apoe de npnei va xpanoiae iae 3mu kai 1 m, eno f eke 2ncip aipoi, nu xpanoiae v ouaity mV dAay, eivai evepai kai eovexy ta uromotu yna.
Eepoov undoxei, ovoite TbiBoum Kopovn i Kopovn QLC, oupovpuu u. nGvivcu Kopovpuu 1.
Tadipate Tny Kopawa Tpoq Tg & 60 am 8pm 2
Fuiiprto fekim npoc 12000 pnty evokopac 12000 ooua aegn neepuoyua. Fuiprto fekim akojin nepuoyka, euc npek kai TETP
PiTe To KouJi 3 JU eOIOA EAYAOI NIO npoepTe I JU OUIOWOBOWOIAO. CwO tOu ooiuOJI n EMIUIOMJn JOeAoTNC eOOOISAC.
Pto Koumi 4 kui pujitot to mjufo.
Pnre to kouin 5 Kpuuuiute my quenquoyua.
Theire to koujum 6 koi pujotre my
Etonon n oeaen kaiouetor oetikra
muki anooraon daeodnna 24
uapov, eivni npnoiote po va
puoiie tne oeaen, drav naopexi
vaa oeaen n nevoanoc.
Xpnoaonorotne Tny Kooja va ia poudiote Tny Tepeoayua oaw - eaw anayoeunarwnu, yupratae Tny kato ememoy 12 ooc
To paoi napeyiae aanpajnue, oio biokotei o any t Bae
KoipovKaunopoei, yio
Nopoboyuia, va cemnoje e vvo
XpoVIOI OJIa ng npOeHVA
NEOTIEY Tn
KoipovMg601
PnTt Tny Kowopa 01 nTn 1.
EpoAOn UTOxpy, kIeAei Tn B6uHJ
KOWOP A N TY KOWOPQA QLC OOPOW
UE TO CIO EVOY TQ KOWOPJA1
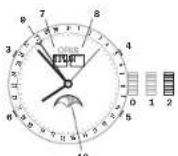
eon H KOPUVO EINVA KAETTI. cviE iBOUTI KOPUVO QLC
conon Kooipoioc
con2 Pubiaopac kai
ponc
Koujumdpnnc nnpoc TNC pdoa
Koupi piuaipnne priva
Koupi puoi jionc
nepoejyudae Koukiim evoiic,phioc
Evo1n nepacn
Eepoeae
Evoiae nucouynvic
Eweign paoang daxinyng
Product Manual Supplement.
Oris Aquis Depth Gauge.
OBIS
Swiss Made Watches Since 1904
EAnyikd
Obnyiec
Kade katoaikpoai Aqus ntc
Ori Ee kasyBki Ku NnataBki dn
ouopapovetra ie to npntura ook
TcNrc. Eel mhoV eEvoc
Baoue v piv elav ou nepei
Tn qinac, okktaonu Xepia
Qauo uveAevayKov empoeoi. Ov
Tnpaouae Dnyoc pac Bojnuo V
KovTe To katoaikpu Kpai Aqus
TcNrc Oei kaTuEoo uuvto ov
tco Kt aKabuaoc ooc.
AkpjiEeTou KATAOUDIJKOPOJIOYI
Qi napapotpoT oaioukoubou
aamnataoovpu me tnc quakkei K
tuayieyue kou taoukiuo kauoayoi
Aqus tnc Oris kai evbexteyi va
etepoeiaevoppaic Tnv akpbiEia
tnc evbexnc babouc
H Hertaojao Tng mncs Tou terpaiaAovotc aepaoyuapaoTepuokpaoic,oi kaipkeouvndkeKco kto uocmvo ato tvn eipdeia tnc Oadaoo
H Bepkoopaoi biopod tou peiaAaiovtoe aepa/vepuoiu cngn biapoeBepoopaoiaoc meetou paoayou kai tou vepou
HdxtoTouvepu
Ipoopaeic eopoeiaic npiv ane Tny kato
Ezyteve ayuoyoux uroeiyejuro
vepov (evoeke oekouyip xkpxcpoc)
otkavokmupejnc. Ayuoyoux,
kaqapite to kauayi me tropon troo
eteyegyafitat yiriynpayop-Tpnooc
xpjoruknki knt Kaqobayoo
Béβαιωβεντε οτι έκαταδιτικό ρολί
Acus 3r Oris pBipokotn oT BepoKoPkoia npBpAioVOTc, nT. Sev ExeI EkeBei de KpOia iKaD iKu (n) AaMn pybepauan, n qunqn nov oT NTV KAQouan
XpnaonopatetittoKaratakunpo kopoai Aquis tnc Oris pavo uocnpodctu yawokipnptbdooc,us auovouo. du taunwn npoyao Karatou
H Oris dev pape kajia cuyu cn crepimnun m nnpncn wuwvotepow oohwiv, laye in dieywn yuyanin. hnuovapepenr oynkypidio npvdoyoc; mOrs ouu nupayekur ukekokoi Oris, koi elai didiakou atov itatotato www.oris.ch
Mepn ou anotateoov to Krt kaatapoiou
To KIT KOeIaOIOU TO KATOUOTKOU paooyia Aquis Tc Oris nepaBae- 10TgE9n;
10p5y5ml①
5puyn(2)
5 eukamai ouwvndixia 3 (toroemrmeo roxyn)
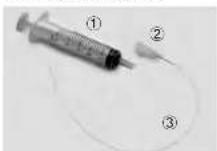
Tponp xonpn tou KIT BApoiuipou ToKIT npoaiotai vay TKAopbiou Tou kavalou pertponk KAI mTv oikounpov Tuv tov aouiaudav vepeu. Eevyepa 0c sfc
- Edoayyete Noyioue Toekajnto ou
Nvkiye Jiaoo KAOV,NEVJUAC
Toe aea oTIV TnO TU KpuAaou
Caoipoi KAI WOHTO Toowdi
mu xvi qto sto tepeu TOKVA
liou. (2g,A) - TeiTn TUIyIYVEeVPOYIOEaMnOxuaouoNtOAnmOxuOaKaoaApouuOJbAoiKsO, vioi omepe i ovoanlqel Oyia 0ra taepuejuaouuTu KpuoTaaiAoA Taepiuoy.
3.2UOVOE TTOUIYPO TOUYOC KAI EYXUATE VEPo VA TU EINAUBEI TO KAVAL (X, B) - AV XeO@ETaI, ENOWAOBETo BRIOTU 2 KAI 3
- Aoiopoe aoyo Tuaynkiu ME TuyniO OMO TO KAVAI KA, TAOXPOVA, TPOBNE To EpoAo TNC Ouyiyo yio va oaipeoe To VPOA ano To KAVAI
- Tio votouqkovetre ta unoaejmuotveovou oto kovam, ekteateo mvoTatn01 Koi5
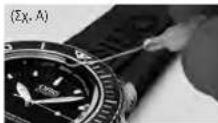
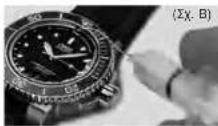
PRODUCT MANUAL SUPPLEMENT
ORIS BIG CROWN PROPILOT ALTIMETER
ORIS
Swiss Made Watches
Since 1904
ENy
OADHFIE
Kae paoi Oris Big Crown ProPilot Altimer Exk Kaa KyaBxi B Ka Damiwot Bo OuiuupoWvtae Taipnua Dukivn Tnc Oris, Eiva mivdav n evdsin uoupeoou kau Tov aepa vax myev cawnt o nepimtuon qnuc, oakanlauXyipiaou nveEeaykvtm emapoeuv. O npoucpe onyieacr BonBoiv ou kave to poai Oris Big Crown ProPilot Altimer ToK aUtepo duVATOUVTOPOAAC
AkpiBcTou aTrijepou
Onapapaeptou KAOALOADU OAKNAIIMIOVU TAYAPXAI KEOTUYIAO KATN BAPOPETIKI KEOTUPOYU TO POKOVIOr Usi Big Crown ProPilat Allimeter, KAT EVDEXTAVA EN PEPDAVOSK EAVXPOVTO NTV AQPBIQA TNC EVDEIGNTOU UAPQPOTPO
Metabol Tn atuuaepriKic micnc adyio biopotekiv oepo kpoa
Meta:AnTn TtOaPpAriRnie Tnc AnyDiaopotKwU BbiuBau deepoKaiaic, dc diaopotKteC To noeiae avaywong TNC EvEe-EnTo uou eetropu
MataoHai Tu KaipuovuivnKau, uowuuiua uunu nnci oonuuaa xuaumnne
Duvuipke cetaoae tou kaupo yevik
Pnpaaaeic aepaaeic pnnn an xpnjion
BeaBaeBeeToT o pokoi Oris Big Crow ProPlot Altimeter Bpoketor ToTbePbApKaAipia npSbMvToc,
Oe.VEEgXeKETeBcEoB apakia
nIaKoPcF aanMnNepApav
cnJnWnNt aoMnXfON
Beaowie 8n Kowov 0n
Oe 4ivai EbeWvwn 0n
Oe 1. Owic NepoAoei 0n
Napayao Tnpocn Tou
Poyoiu Oris Big Crowan ProPlot
Attimen, O.Kokinovic BokTulio
Novov Otv deVn Tc Kowov
PneTe v oaviatos KOBAp.
AtjIepoBv Jauouyev av n
Kovov 0n
Koovv evi ovo tio Kdo
Anogovr Tny enovn To pO
yoje To vepo otav EoiBt N
kopoov Oto bep 4, H kova
sivai oovki Koi dev evia odi
boynx npovk oovap 8, H oovap 4 Dev siovai aoyta Bhoovni
ot Beon O.H eiovipu npovn
PTFE eoopaia npouaia
movo amTn diocduan uopauw
u npovuaH. H eppu npovn
eaoaepae aevxoyo ovo.
Aopoeye kede enapou To
pokoiyaupeoia H pokoi
uopei va poqei Inpdpovn
PTFE ka ta oayiyata Tk Kaoc
sounoivotka tovouenie
Tny EAeepn Kukaoipaa Tou
opa a ton paoc nTv Kaov. Au
oujbei katn Teteio, anKekovian
TncEvengntOnu npupetpo Ta
napaaiia Kaebatepnpn Bev
BtaAanupoye kahOoi.
Pnvi daiaeote to ouoTo uoJepo, uanpafie nayto To paoBe aataa KuniyuaTa. Ta
cmaa KUTIIMATO EITENPOU TY
qauai AITIDYIOU TO AVEIOEOIO
Kauiaou KAI TOI BAPOUPIKIO
aatipuou.
Pubicte ntoe atrpo npxnpnnoaonoe, oakouovtcc tic onyic toun npoepovtai omnypapop Tporoc xponc tou poyow Oris Big Crowan ProPlot Altimeter/puipion tou atrjtpou.
EeYteKTe KAnrApoAoBIOyeIouxOVA ToaIETpe, XoJIoNoiAoVtAc KaioIoJeauAoApocoe Jie yuAoToUoPeOTo niao BoOevn iOaI OApoc, PnoKeIeuov OAv aTIOAIETe Tc metaAolOve vce ATOOAPiXIEc KAI KoIPKEc auHke
Fia yaoyao aoeiaeae Xpojnoo meirto poAo Oris Big Crown ProPilot Altimater Kato 1n dAikka nuc tnc npfoc f aoataolnc mvoa wc deutepceov dpavo, auunpupnatkmo ooiaofoiote aaang, ouoouekn neoukyte v uoupepto, np. ta dpoyava evoc aeopakouc.
YnOe6e:Oi oio nien Kauivnc, Tuv aepoKoiKIOPOPOOIOAVou Evia neipalaoVue uupuTePO XaHKeTae OAO TO PVAIATKO UPOcTO OTIO NIOU TO AepoAOKApN. OIOIOHOIE PABOPKIOKAI AANTIpEO, EITE EVIA NAEKPOVIKA EITE JNAVIKO, OMO,OUTO TOU PAKOVOI Oris Big Crow ProPIot Allimeter, DeXvIy Tnv pexoua Ni ton Tou aoprOITN Kauivna, Dva BpKoTeJmuOe OEPoKApoc, To apVaVy Meptponu Ouaoc e TEOA OEPaKApD NtBETOUV MA
ouvoeon nieoc me to eEwterko ou axoopkaoic, yia va petoiv tvn iooi o uoipotpu
HOrs dev kajua buovn de npinnwn an ntnnpnc rav aewepo onnyw.ayuiei dnovc yuyon,Onnv aawpoeptat oTo expeipno ppoivotrc Tns Oris naupeyta uke bale pooi Oris,ka evai biadaejun otovitrotono www.oris.ch.
Tponp xponc tou polyoyn Ors Big Brown ProPilot Altimer To kovtpv evi xiuyipvoe os TPOC PNOEOC-OTKNEVTO UMOEJI TO KONVPV EVO NAPKOONAKO PAOKOIO, Tnou Deyyiv Tny ovo, yuvo ano outo unepxoy Evj peptno nou Eevyiv Tny aonpaapikni nion tou np, nEvN2eO nnou ooiiaiaqai taev tsov kokkio delknt, kai evac dtepekeck Boktuiu Deyyiv uOyepo 105.000 mki q 4.500 ptr, rou qovetan o Tov KITPO EVIKNT.
OYDETEPH AEIOYPTYI (Eeon kawoc O) Dvai kav ouo kowec evai oarepa biouvec, to pooi Oris Big Crown ProPilat Altimeter Kaupeupei unc Eev aovnBtevo autuotpoai. To keviK vKaivpav KeiKtce Evjupovuy Vny Tnp Aki Tny nuepouny (pubiKovTAt no Tnv kowpu npkipknter anf eon (upc2) 2kai pokoi avi dko- bpojo xep ta 100 mptpa/10 bar
2.ENEPEPONOHHTOY
AMITMETPOE (OeON KOPAVAC 1:38BIOOTNE TNY KOPAVU, OvN PIOKETAE TOn BcN IOWC4, Otn BcN 1 YI vEvpeyNOHOTOE to AANTJTO. EKpVIGCTA EvgKOKIKOV OaKTIOQoU OUmOsKIVGvOg ONOJYONOTIEToTAt ToAANTJTO.
3. PYOMIH TOY AATIMETPOY
(60en KopoVAC 2: TpaBTeTnY
KopoVApoPoc Ta eG, ane G2,
kai puijatoe axtiIepTO npri
tpepovcTnv kopoV. YnapxuH
Dapao Poi pueyihua, oae u
Teipopop Tnp KopoVAC Euc ToO
nne niae aeop avapopac QNH/
QFE/QNE (ux) auu nau npixExaTl
amTo tvIpoy eSyvXev c
poaouoi EuuyypauJrto Te
KokkoTVPiyoWuPoiPiketraTn O
Beon Uoep, B oTo KevTko KavTpv
n tepeipop TnC KopoVAc
va puipoi a Kivpovc KeiTnC y
yywto oac uupotro To paoi
Deiyu Tapa to Tpoxv upotro
(Kipovc BeiTnc) Knu Tny npayiat
Ktipapopipipinie (KokKvoC
BeiTnc).
Orls Quick Lock System
I have 24 ml. a bit brel 2 nci zanam dilmi.
Vidai tepeyi yada QLC tepeyi 1. bolumdeki aklamalara gore geysetin (eiger kiltiyse).
Tepeyi saat 2youndeogrue kekin, saatim tansi tisiikametinde donurun ve arzu ettiginiz T2 (bulundugunuz ukenin saati) saatiri ayirain.
1 Tepeye bastirratakr 1. pozysona getin.
Vidait tepeyi ya da QLC tepeyi birinl bocim aqiklamarina gore kitleyin.
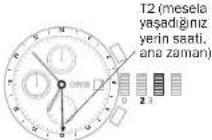
Ibrell takvim (Pointer Calender)
Ibtrell takyah sihip Ormakesin- 1938'ekik lik duyurulus ulskret tathinde bir kilometre tasdgir. Ors Pointer (Igarect lore) saysinde zaman ya da banguide oldugu- nuzu kadrandaki oel skia uzerinde gomkele kalmaszin, Iberen okla igareket edegkostermisen ce avantajn yasarsin. Ors in bu tipk makinesin lik tantriigi gunden beri, bu to i garect iberen kog gesilt modelleri yapildi. Dogai olarak, mekanlanza de son teknojillerranannimasa bagi olarak bir gok kez degligirlid.
Tepenin Isleysi, saat ve tanh ayan
jin 1'ni botumdekci akilamalan
okuyun.
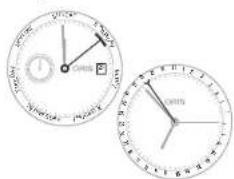
Otomatik kurmal Alarm.
1983'die ikeellekumai Oris alarmil saati yoyasa yaki. Alarmil saatin otomatikum karmiine bulusmasise 2006'de gercaklesti. Saat, bis sesyayarafindan direti
Product Manual Supplement.
Movement 915.
ORIS
Swiss Made Watches Since 1904
Türkce
Orls Komplikasyon (makline 915).
Product Manual Supplement.
Oris Aquis Depth Gauge.
OBIS
Swiss Made Watches Since 1904
Türkce
Kilavuz Bligiler
PRODUCT MANUAL SUPPLEMENT
ORIS BIG CROWN PROPILOT ALTIMETER
ORIS
Swiss Made Watches
Since 1904
Türkce
KILAVUZ BILGILER
Mexamah3 abotn33ab00m.
KoHrO TIOHNIKHOIS ORS 3BDEEHA TIOHO HOCHTUOJDIOPOETOMN DTHMHO 12 DOHH,TOBOHHEOTPE 6yHOBpyHOHOHOKYPT,3AMCTIb LBoo pyx Pyu 3MyyOHTpeBEOHOT POpT OOpSEtPHAC,3ABQEDH, TAKHM NMOCHOBYNOHYKH, BAtH JIOO Bn SHIMAE CCBIOFDHJ HNYOH, BOHIO pDOBIOHOTIT. BOHNIpeCAOTpALQOSATINBH, HIOO IX HOHCRTPPOTROM PpOHHHO40 DOHH.

MexAHm3DyHMM
Y MekhainHnR oDHHnHnOri 3 yuHn 3a2o0d OpaBaeHyNnyHKyHnCnIa NKpyyBnTHyNpyHn3a 3anXoDyNoHbCTIO NKpyHnHOrO rOuHHnHa CnJaAe NpHnHn3o 42 oHnn.
BjrgraHITt3A2O3ADnI KIO, 10
38AHHYbTcB, a6o KNOQ LQL
(RAIO TAKIN e B HABHOCT) IaTHO
HTNCHyLbB oPd0an1.1
Aata,ENbTHXHJIac
UHCTHYKINXIDHYKINDHNBIOXUDHTMAHIMDBCTOBEPHEIKIPOTHHHHBNORIS3BHOKOHDMTHHTRKHO6OCTPHNOLONOKA3YC DNTI LDEH NTHHBN, BHKONCHENHM E TUBTTOHNIHNRIS ORCIPCLIONI OIRs XHOOPARF [MEXAH 676]. DHA.B HCTNYKINIIIPLIIBNDNIOHIO THTYMOHAXIHAMY
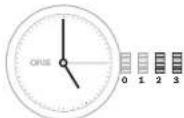
Hua 3B2A0JHHKIOI3A0BHOBAHNNI IABOIOHOFOIOHO, 10a 3aBHNHYeTcB, a0b IOHOQLC
n2.1IOLOKENHRI N3A3BOy
n2.2OCTAOBHNHEIN DAI YN HJ
n2.3
noa.3BctanOBnEHnHcy
P03BnHTHb 3BDHJN KIO,TO 38ABHHYETCb,860 KNO QLC (KHO TAKIK E B HABHOIT)IHTHO BHTPOKHyB P0491.
YCTAHOBITBAOBDHNIKIOH BNOAOHO 3. POEOTAIREABODHNI KIOH BNEPEED0DMMHEHHDAI DHO HSAHSHACHY050NACHTHO
LHMDBHE KOPKHYAANHAI DANTI JHRA THKKHA HZ MOHKO BYTN BIKHO HMO 21:00 10300.TOMY
MO MEXAH13 60Hy8bcraIue MOKBE PBNBECN IO NIOKOHOHCHHH
YCTaIOBtIbAEOBDI KIOH BIOHOJENH2
3AaeHHKO BIDTHNY MEXAHMY, NOBEOHTB 3ABQDHN KKNH 30 TIOHHKHOO OIOHO AOIOI POHTI ROINHHKOBOI CPTIKI NOTBICTAOHOBI NOTEHY DZY. RIOIO E BIKOHUE DRA KNNH, NOBEPHTB 3ABQDH KNIO NOOTI ROINHHKOBOI CPTIKI I BCTAOHIOJI JEBH.
YCTAHOBHTB3AB0DNHKTHONJIOJIENHE3.
BCTBOHHTIAC-HA-DCOBDHUNIIEQ ODNHIOBHNI NOOBOPCTONIHNA HBAHOI NCHOPBTBNTYDRA BCTBOHENJHEHNBOHNHOHC.
TolnnnnnKyunHcHnBbLbAmy
nonokhenlMIOke,HNpHnBbU
ybnrpeKaayuJeunmNoCtI
NvHbUeY,NNaTHAeHHaHa
NHY-100,HPYHNOHNH 3BDOHOHOYBOYHNOLOHNH1 YCTAOHBTB3BOOHNKTH NOLOONHOHN1.
3AbnohyHTe ABNOHNIOHIO, QO ABINHUYETcB, AIO KNIHOQLC (KIAO TAKIKI B HOBHOTCI) 17JIO HOCTYKRIW M BOPOJI.1
BCTaHOBJeHHHaTH.
PITCAIADHINHIMICR,BROMY MENHJHK31DEHbDataPOBHHHa HINIEPBEIDekaYyHb.Ha NepHe 4KcOACHTNPHMRCILA 32D0AMOROTO OUYHJIW8BNHOI KOPeKUJI (3ABQDNKIA KNOY JNONOHKII2)
Bilirubin-ITB 38BDHNNKIOI,TO 3AEBHHYCTCR,AOI KHOIQLC (RAIO TAKHI E H BABHBOT) IJARHO HCTDHNM BOPOIN1.1
YUATAOBIITI 2A.
8BNEHO BID TINY MEXH3MY. 0BOEBHITB 3BDOBHNK NAO 30 DHHNHOKO BCTPONO BOO NOOTI DNOHNHOBOI CTOPOIKI NOTIM YACTOBHINT NOTOHY DATY
YCTAHNO 13A0DNI KIOH N yonooHN.1
3Ab90KHYTE AB6DHN KIO,TO a3BHNHTbcyb,aOIO KNOQLC (AIOIO TAKHI & E HBBHBOCT) 3IHO HO HCTUPOYAMoPd1.1
HANKAICCBITOBORO NANCY
IHINHACU CIE TCBORO HACU OIR MAs DEA KEPMI BIKHUNI HACAU TO DHHHK XOT T1 MUCBEN HCIT T12
JUMAHII HACU OHIMBA BIKHUNAI MOATC BOF TODHI I XBNHINI
CTPIK HAKIHNH CTPK IN T1 T2
TNDyTO DHOHONO. FIOHN APTKINA YIKOHIL TMOKE BYTA ECTHOHNA ENPEP 60A HAD HA TPOYAA QAO INBRA ABO JYME IHNBA IINPA HNTCHHE BDOX HOKN. PNI
WIDNIA YCTAHOBU YOCY DATA MOKE BYTH BCTABNEHA BNEPE 60A HADM KINZ 23:00 (03:00) nateHTEHaHO HANNAKO Ors. Y T2 RAKD INHAROP HENH
Bao,0 3AaOyDnHIOHO 3AOeONBOBA HIN ABOHNOHNIOHOEMI,TO
3A8BnHHTyETC,ABO KIOYEM QLC
No.1 NoToXeHHIIRABBOY
No.2 BCTAHOSHEHIIH DATI
No.3 BOTHOBENHHA CYC
41 (McEbeny qac) T2 (paxaunq)
(a) (doma-mh-dac)
b) MajeHbKa cekyHbHa ctpinKa
7 INKAAJIR DaHb/HH
Data
- KOHNO3 for T1 10+OHNO3 for T1
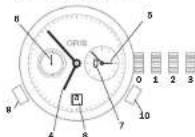
CmHxpoHaSIAy YCA, BCTAHOBENHAYYI DATM:
BIBARINITIIB 38BDHNOHNJIO,0O 38BHNNYCTCH,ABKNIKHQLC (HKIO TAKHI E B HABHOCT)IgHO HO HCTOUYHMO 9D031J.
- PEPEMICTB 3AABODHI KIOH Y NOPOKHEHII 3, NOEPHITb IORO pOTN ODRINHHOSOI CTPIHIN I BCTAHOBIT T2 HA 05:00.BHOHJIIE DEHJ/HH CTAE TEMHH.
BHNIOHCTOYBOH+KHOHNYKAKRO
ACTAOHHTBH1 HA 05:00,TOPO
DAI NOBHHEN3MHVQNOKM
01:00 TA 03:00.
YcraonBbJzAbaOnJnKoHnO nOIOHNCH2,NoepnBTO RoI pOtno rOdoHHNHOOF cTPIIK I BCTAHOBt bDaty.
3HOYyTAYOHTBtA0BDN KINKIO A noYOHENH 31 3a4aTe NotoH N HAc,ApO8HnUI W OJNO HNO BNI NOPOOT OP TCHN HABKOLO UepePbAty DnBCTAOHNEH DeHONOAC.
TODHHH 3YTHHHB LBOHYI NOKONKH I KNOA HNEP 3AYNTYNy6dy-BKNHAC,8CTA HOBBHNHANXpHTNHOH B NOKONKH1.
YCTAHOBIT3330DHNHIOB B NOONOHJH1.
3A5NkOYHTE 8ADHJNHOHIO, 0U 3aBTHINHYBc, aBO KIOQNQLC (AIAO TAKHI E B HABHOCTI) aDHO HCTPOYNB W B POZHI.
Pojtjho npnHnKHO 10XaHIN,
6oB KIOHNU T11 T2 NpauN ppaO
aTHN OduHOAO. TOUHCTs MOKe
6yM aMeKao Do aOx HbXINHn
BCTANOHJIHTR TLI (MCIIBINHAC): HANTCHIH KHNKHO +A60 -OJPH 834J3N M1HHY NHA OYROYINHJ AH T2 (DOMAHIIHAC):
DATyMOHBACTAHIOBHTBNEOeA00H3AD(ARATEHOBHOHOMHIAHcOrIs,ACBACBOHOCTCR 82DOHOMOHOHOTHO-A00-1NIGIRIHAOH。
INHIMKIAI CBTOBORO NACY 33ROHMHHMHOHAMHI ROMNAMCOM.
TAM CMOK I dyHnI, IIO nOCAH B NopepeBHy Oy pOaI -HInHk rBa cBBOrO yAc yOs,I yBOr OdoHHNKA E oKpMM AIOAeKOBI BHYPIHbO bOdO, I aPpyoI rOHNHO 3NoIaAMNOMnA. LcR OdoHHNk HIEAeBnI POHIOJIO NIOHM NOCTIO HOPTiE 3OHOHHX 30Hn, HApHKnad, nTOH, NIOY, NIO YACToI NtAKBII HAMM, NIO, IOBAaAotsCmIK HAPDOHM 61hecom I TAK dAI
11 Bac a noharboomby mcderono
207 Ramaunuiy aag a60 GMT (no
TACy MIOI PIKIIHANHEIN
PIONIK KOMACY
MAnEHIKA cENIHIA CTPIKIA
BIOKHO DE Hb/HN
7Data
BepnKbIbnHnaaQdNkOHJrD 13Xmoxnay
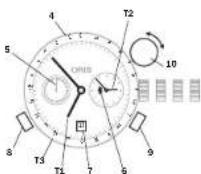
Bnue nepepaxobannapametpn
T1 yha3y6 06:53 a0o 18:53
T2 02:53
T3 09:53 a6o 21:53
CnHxponl3auiT1TT2
BcTaHOBnEHnHcyIaTH:
Ptojaoaek, kfknohmo y po3nlinlkiakca lcalrobo nacy.
BcTaHOBeHHrT3:
BCTAHOBH TB,TO60Yac B MUCI PINHARHH/A6O PIHILIO B HACBI NHOHARBOI MCLENNOE KHEHR.
ПДИМЛВЕТВЕРКALEБСABAДМКАК(LO).
Turn the vertical crown (10)clic. PnpoeBHtB BeTnKabHbN HAKOTN KI KIKH (10:3a TgJINHHMBOHO cTtIOHO 6a oTOPO TnIHNNBOHO cTtIOHIA TcBtAOHbBIOBbDIO bAC,TObO Mx 12:00 B T3 (NAC bMCiPn3nAeHHN) 12:00 B T1 (NAC xBipABpAHKnAPU).
YCTAHOIBI,BPRTNKAHNN3ABQH HNNKNOYNAHEHTPABHe NO
BctaHOBHeHHKOMnaca
3HIMtBrodHHHmK13an'actra.
THTHNTBEBPNAHNNB T3BDOHNKNOYBOYIETBHOBOTN BINHEH NOXIDKYKOMBAE,IOO 06ePTAeTcno NOCTCIPKTO[TOTO NOCEPEDHHMVKDRIHMOOCTPI KOO112ROHNHAM.(MDHO18.00 06.00,BILbMbTHNBIKNBNI KNYMI KODHHNOCPKINO112ROHN HAM).
YCTAHOBIBBEPINKALNHL38BOD HNNIOH BNEHPaJIbHE NOONCHNHO
BvHnHrIe RoHHNHy cHpy 3a coHcEM I npOHHTae DaHI oObHy konmna.
BvBnHHTI ROHNHH CTPLNK 3a CONEM I PNOHITAE daHa Hb oBHy KOMNACA.
Dpyra roHnHa 30Ha H3BHiHbMy oBdNy, OoOeBaTcB.
PiobepHb 0610,0o 06pTa eTbC,doBakHOI2-oiOIOHHOI 3OH4
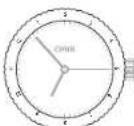
Y npnnnd, 10 oonmcaHnBnue, 2-a rOHHa 30Ha nohAa 80:53 a6o 20:53.
IHKMakTOP-OFIIMHIOI 30HNH BHYPTLbMbOy 60JHy,10O6ePbTaBc3,8 BOPTKAaJIbHMN 3ABQdN HKQoH.
FIOHTHBETRANKHINABDHNH KNOY(1)BROY
NosepHtB 3a2bOHN KIOH 3A roMnHHKNOO CTPIKHO ABO pONPi
T0DHHHNOB0CTOJIHNIBCTAOH BHTB BAMAHINACB2-ⅡTOJHHN 30H(T2).
YCTAHBOITBEBPKNKANH3A0D HINKIOBHEHTPAHNENoJXHHI.
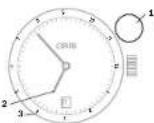
1 BeptnHbIyIaIbZaBodnI IIOU 2TI (MIeBEBIg VAO)
312 H BHTOIOHbOMO OIBK, IOOeBpTaC8nHApKnNAd. domAHHaC
O npnnnd,po hao dehen Hn Bne T1kyae 06:53 abo 18:53T12do 03:53ab015:53
Apyra roDyHNA 3OHa3doaTkoBIO 24-roDyHHOCTpINOHO.
P03BHNHTb 3a0aHINKIO,IO 3aBENHYETb, a6O KINQ OLC (RAIO TAKIN b E HABNOCIT) anDHO HCTYNLb B BoJn1
N PerimeniTb 38aoNDnKOB b 10aokxkNN 2, N0BepHbRTO npno TdoHNkoBOI cTPOJI HcTNO B6oAboXnI aCnT2 T
Nepenictb zabodnki knoy b nojokhen.1
3aBnckyIe 3aBOpHH KIOH,io
38BHHHyeTbCBA60KHOCL (HKJIOA KTHI E HABHBOO) 114HIOHCTPJKHBOBQAD1
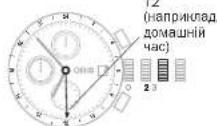
OVPiHnJIaI,UHOHbENHHNBAIE,11:53B2-2rOJrnnHH30H,PnKnaI,11:53B21RrOHNHH30H
Ctpinka 24 TJOHNOA DTHJ (T2)
□是□否
XpoHOrpaΦ
OxyporooraOris cFynHcce KHyDopma, aTKCamaHdKauJi DaHnIaCy. Ie dyne KopHcHa FynHcNraIydoHNHO BnHOpoc-T
PbHNOOPCTAHNI HAKPYTHOTIO HIOYAI HONOK.DB.P03dI:TJHAPKHTOHNHHNA
BCTAHIOHENHYIACYIJDM,DJI.03-17.BIXKOBCTAHNYIROHHNHAIORSI(BIKOHIOHHNHYI.CBTAHOOHNHYI.DJIHTBH.MEXAMHI 676- DJI.HOKOE).
3YnHbTb TaMepI O6hNtBc IINbHbMMKxXPOHRgPFA, BWCATA BBHmIX Hs CTAPTOI N03uII: HAnHbITK HKNy4 - cTIPNA XPOHRgPFA N01HACIK
3HbOy HbTHnHtHIOHNY 4-ue npHBeDe zo ynnHHc TcpiKINXpOHOHaFpaI bIuNHy cacy.
3HOSS HNTCHIKI XHONKY 4- Lepesnarchyni Crpinny xhooropora, daon noyHu rna la nonepehuro OyNtky TzHHNHy.
- ABOY HAMMILI KRONK 4-GE
- ABOY HAMMILI KRONK 5-GE
- ABOY HAMMILI KRONK 6-GE
- ABOY HAMMILI KRONK 7-GE
- ABOY HAMMILI KRONK 8-GE
HATNCHITKHNHY5-3YINHHENBCTPNKXPOHROPaI IINHNIHHYNXHNHIOEPTAOCBDNNHOKTENOONHEKH
YHTaHHcBIDHeHxpoHorpaΦa:
CeyHnHa CTHrA HApOePbTa(7) HAcMoKoe BtHyI TpoOpTaNHa HsKhUkIcPbEoMly, MKNJ/4/cEeHyD1160 CeyHnHaMaKlChmYM.
3a Donmorgo XynnHInOH CTINKINXnOHPorpaA (8), BN Moketne np
JYTHATXXBINHHIIBDIPZHKMBAKNYM,MO 30 XUYIHINH
3a 0doIOMORO RoHHOH CPTINHO xPOHOHPaDA (9), BIMoHote npoHTATNI MmHnIy 3O-3XHHH1160 XbHNHHBldP3K,MAKCHMym DO 12 RoHH.
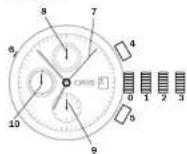
图:3ABHOHNIKOH2BIOHOHBAHINHAKHYTOHOKOA,3A3BTHIFYCTC8,A60KOHOQAQLC
no.1NoToHOEHHHHAPyT
1.2 BCTBHOHHEH data
Haa 3BtBuHnHbN H4 HATCHITKHOHNKTI
KIONIy CTN
Pepe3anyctb KHONK
6.8000000011111111111111111111111111111111111111111111
HOTMCHITbKHOHkyBHKOPHO TOBYOHNBJIOBNJINHCTpy MENTAEBNABNANB
HCTYIOHOBCTAHOBTN DATY
7CekyHDAcTpinKa
xpoHorpa
a XBHHHHHcTPIKAA
P
XOJHORP
16 CekyHnDa CTpInKa dIaN KcHcy ZAnDapThOIO 10 NocTtHg.
Y DeNIMoJENX.
cHcyHbCTPIHnEeU
TALHO BILCITTH.BIOMy B
hkycHbCTPIHnEXPOHRPA7 (7)MOK EHN
NoHIOI HBIOPKATOTACIK
cHcyHbCTPIHnNEKOK3Y
CTaHADHTHOFO CACY
CKTAHEHHA
BIBRINHTB 38BDHNIK HIO 38BHNITBC, A60 KINQ LQC (KIAO TAKAI E B HABBHCT) 1TJHO HOTCYHUNB B 00031/1
BctanobtbrabdoBNKHO y nojokhenn2.
PoeberhblcnpkyBnepe.Hz KatoP43 msupe npemieIbtey bnojokhenn 1/28HbM Cmue MkN 22:0012:00.
38 DeHb JOTOR, RIK HACTYNTB ROHNMI MICAU, 3BAKOBH N3MHNY DATH, BCTAHOBHTN HAC 05:00
Hattiknate HkONH 38 dojmono
OPO cnoiueh HbHO ITHyPMUY
abo 3dopeB'HOI bOy6bOCHTK,
NOK bKaHANa dAte He 6de BIC
TaReHa.
HATCHITB KHONY 4 I CBAHOHBIN
BHTOaHIOI ToNHOAHU,ue pae 10nHOHIOI NOAep-Haun CTINIK HAHOLOI HcEPbEPyDRA BCTAOH. HENHI ENHO HO YAcq.
TOnHHN KYNHNNB LBOOM nonKHHIMOKe, HANWnBd. ByTH nepeaayuenchE 3a HnHa
NOM CYC, YCTAHOBITI HADKYTHIA KINHYOYIOENKHI
- PermeMICITs 3aBAO,NIHIOB N NOHNKHOI
3Ab6ckyIe ABzDHNKIO,IO 28AHHVCTyB,AO KIOQCLQC (AKIO TAKH E B HBBNCHOT) 3JHOH CHTHQYIMnE POJIIN1
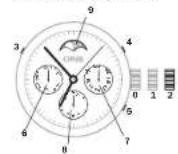
10.3 8aBQDHNKIOH6N6OBKOB HINJHHBBDHOI KKNHJA 3aBHHHYETCB, a60 KNOA QLC
mua.3 TPOKOKHHH HAOYTY
mua.2 BCTAHOBENHINH YACY fAa3 MUGU
3 KHOHJN DNR BCTBHOESHEHN DNTKHOHJN DNR BCTBHOESHEHN DNR
5KoHnKaIJI BCTaHOaIeHHI HIOKHTopoApyrO1 roHNHO 30MH
HNNKATINADN
TINHKHATOPDHHK
aHdkKaTOpDpyroIroDNHHOT
3OH
1HnHKatop 0a3 McA
BcTaHOBHeHHaPyroI
TOMHNO30MH DaeBCTAHOBREHHMOHMAHHOHybTHyOyBnAaNAC
HHTCHIKI KHONKY 512- a goninHHa 303aa 3a nonomoroDcneuTALIOHCTHOYAMCYA aoo depoRbIy bOyobCTNkBCTBOHOBTE BAKOHAN. HsC
PerynTOp.
1EPBnHHIO YE BID HADBCHWIOHOTTHNIO RODHHNK, RAHA BHOPKTOyBaBcN, UO6 TCEyBaH N HAJIOTKByBHHT (DEYIHOATB) HACTLTNOHJTDHNHINQ, UO6 3a0oBfTNI HAKRJANHO CTRIOK, HOVI KBYUPOAHECHN. H APEYRIOTTI KTHIK XBXHMIINI CTRIOK yAEIT, TOI JAI KCEyKDAI I ONDHHNA 3HXAOZDCTBCA H OIXPEMX MAMEHLKX CYC LIP
BnHIOKCTAHNAABDOHO KHOHA, ACTAOHBINH38Y4LATNPOBOBtCB 3IgNO HcTpykBM B03-d11.
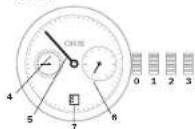
B.3A86DnHN KNIQ 3B1NOKOBBAHIN DRA HAKOYTHIO KNIQ,LO3A8FBNHHYCTCR,060KNIQQAQLC
1.1IOIOKENHHABOBy
2.BCTAOHOHBNATDAI HTHNHO
3.BACHOHOHNHACY
4.CeHUYDHA CPTINA
6XJbHINaCTPnIg
6FOnHHaCTPnIHKA
7HJHKatopTaN
CtpinoHaHnkaia
BHTNYN NEPLOPO MEXHIMIy 3 KENHEPAOM Oris BID601 398 p.
UO cTANO BIXO O BCTOUI KONHAIJI, CTHIOHN HINKATOPr OIS BIDIOJ
BIEHC TCM IIO NKOKA YAC BOC DEHB TKNHPOCTOPSO HI BAIO
ADHNI UHI KUNI EDPSEPAH.
PNOHINHO M MONTHEY OFILIHRO
PPEPTABENHII BOIOTAOHARTOM MEXHAMHI OIS BYIN CTRODE PII HIOI MOELOI TAHHMITROM INDHKAUTI, PPINOHO, MEXAHIMI
INHLA PAIAI BYI MINEHNI MOM
MEENTHO TRODEPHI, IOB DIBIO
BAPDIOCTAHMI TECHOTOHIMI
BNOMOR.
BHKOPCTAHNA3BOHOHO XMOHA, ACTAOHOBNNH YU LADTHPOBNOBb23IgHO HCTOYKBM B003dini 1.
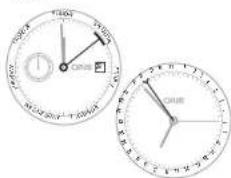
BydHbHnK3
ABTOMaTHHMM 3aBODOM
V1938p. HINHINK3 2AIBBCNEI
UHJIOHNHHK 3 DyBHHNKOM 3
ABOTMBTHHMM 3ABQDOM Oris, F
DHHNK 3 DyBHNNKOM, 00 BNYUe
Hyy 2008p., MAE MEHXM 3 AB
TOMATHHMM 3ABQDOM.
BOHNI
XBAOCTHEYTOCLC OOOBMHN
DBHOOM BYDHNHKA, KHN PO
OByTCB 3BYYOBONOPKYNHOLO. Cie
TOHNHHK, 00 YBYKOBYE, DaBHIO
TAPIMIK, DOJI 3PCHIOYIOF TINHHN B
6DyBHNKHY Oris 3B-DEHNHM 3AaNA
COMxdy 1949p#.
3AbaD0mOKH A: HAKPY MEXA
H3M, BCTAHOBENHH YACY I DATN,
3IHO HOHCTPQKMM B POJIMI J.
NoBHePH 3ABaD0mKMOH B 3a
ROHNHHKOBOO CTPIKNO B NOCHU L, y 1 pasi NTPOE, ABDOOM
MEXAHMI BYDINHNA (HANPHK)
LAD, RIKU OHO NPTIOHO BHKOPHC
TOKAYI KINBA PAIBI S IB, abo
RIKU OHO DNHNHY KYE BNIPECAIy
DEHNHI, NOBEHBYUN 3ABDOM
KHOJ 12 paila.
HOPMOHJIINKECNTAEYJU 6yblnHK3 ABTOMATHNIM 3aBdoOM, npjynHKMEXAHMYI 6yblnHK3 pOIOHOA3BaeDJI.
Pepemictb 3abodomn B y noonoknB.2,poeepnti Roro npothoRohnnkOe CToTINBCTAHOHBoB aahmAHcNcBdyDyHHHKA. 0 (bmyo nnoKehn 3abodom HnHKnHKnHckHa cHmHcEy DnyHHa, IaHn noabatme Cmnrnyy BactaHbCHehNc HacpTnMn HA cyTHNN 12rOH.
BCTaohBtBzabDzhnJIOH BnONOENJI
ΦyHKuifdydunbHHKaBIDKHOHeH.
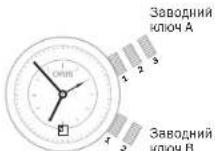
mHAA.1 npyKHHa MexaH3My y
noauii npaaabody
Aa 2 BCTaHOBnEHHa
m1A 3 BCTaHOBNEHHY Hcy
1008B.No.1 NpyKHa ByHnHnKa y
103A111100000000
HREBROHEA
HAAOYDTHHBO
NENNN
Ukana taxlmpta - BMIpmoabnnu hnu kootci.
UKhana taximetpa HbO6jyA b0cKuppehpiXoHpOarapOra BIs rKOpHcTocByctC, 06B MInPHTnBnKtck, HnPKiKaIad, ATOmO6n, 00 Ige, HbIcTaH1 Kk (a60MnN).
Rnio obioh taximperpa,uo o6pe TaTCTcR,ctaBIOHNEHNEPEMICITb noanmK 60 kannTaxiMePA BNOONHO 12rOHN3A 3anyCtY dyHKU XPOHRpapae.
HATYCHUYI KHOUYI, K. TIK BHKAR, ABOVMOHILIPRAJDE CAPTARY NIIHO
HATCHITBHLKHONKY43HOBY,HK TINHUNAANTOMOJIbNEpHIEΦI HUHY MEKY.
CPTnnaXPOHPORAaBAKaepeoHbAIBKCTBKM(ABMnK)RTOHJNBAIKAITAKTARimPA. 0YACTNYOMTHPRAJIANTAMOBINrnpbye40CeHJ,DpOxNATMIIMPAHJIIBIPdRBJCTAI,UQKDAEPAIOVNIHTHO90KM/(AB69MOHbRyF)
CepenHUBINRICHMEHIEHK
60KM/(60MnH B R COAHV)HE
MOKEOYTHDHNIOHA
HATNCHITbK-ONHcy5,00oOBHNNTBCLNHLNNH
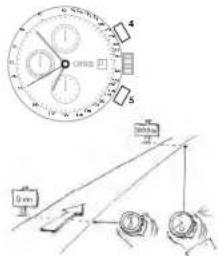
TolometrpHnHa uKana
BMMipkoBaHHBbCTaHI.
TeMeTemaTeMnHaIeHAnaIaHObiQy 600 6006006007481 Oris
BIOHOOCTOBYI,IOLO 3MBOH BIOCTAHBEOEHPJHO BAOHMOI I ZFOOMHYTHNOIOIO (PIMI 61KBCBA, BIXBYI BYK Fepepcky I TAK DAN).Rapadua B. zuin TELEMETOPINIKU KAIJI 3ACHOBANA H BAIBIKOTCI BYK,TOF0343 M/cn prrnneptypai ng 20°C
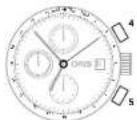
BCTAHOBHTHbHbTENEMETOHOMHYHbLI,0o6ePACTBCB,BNOHOHNH212THN
3ayncttbl yhikuo xohorpa. HATNCHyAaHxHnK4, nTbHnB bIaDyecuBa CINHmua 1
3HOBY HANTCHB HONKY 4HOBY, SKIHKHO BINHYEETK.
BYBUE3A3H2HYCMYPINCIAI rpo3ae 3e H aDCTAH3 KIOMETPH.
OoiokofouHHHnI, 0o oepa3rJb,dIraIbDNOHO IpaAHHH360-xBHNHIOK rpeauclio.
OOOdo, 10o oobertcbn, Hac xiof DOHHHNNHAR NIIIOBDOHOIPOA HAIJI OIS MOHNA HOOBETPITILNIKI INTOPH TIOHNHOHBOCOTPIKIA, LcOooNtIcIb7e 36BEPEKHE BMINHIHIO ABOCTA BOCHTOHENH CAVB DMIY K H2GJL
JIJIHII. JIIOO 60B6JIO BENIIBAO HOI BOEHNHI, BOHA IaepaHTye, IIOY HMIPE E B aIaTIcIO DCTAITbO CACY, IOOO PABAIINIO PNOIVN DEKOMPICKIO.
06OJIO, 10O OOBETBcTA, HA RO JINHHKINI IINI JINHOHORIO HUNAHBHNI MOKE TAKOK KBNOPKOYTOBYAHTACR BK TAHMep ABO DIAI BAIY XAHNIH IOA RUGNJN, NAPKINKA, HAI NAP KOBII. NANI PNOYTOBAHNI BKI, NID YACRITAKDNI.
Osiok,OoiobpaTcB,JNARBMIOOBAHBNXINH
NOMCTBHONAKHNAOBKJUO OBOEOTBCBAHNTOPOHTHO NOIONKHEHXBUNHHCTPNKnA00 HABKCHOMHYKINBEMGYNADKHNXHBNNHOTCNPKN
XINHINH,MOHNHH,ABOXHHJHHN,IOPOJINHDO TEPENHIHOTOMOEMHTYMOKYBDTNYNOOHHTAHHAOBHQ,IOOEBPA.
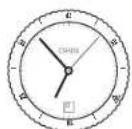
YBHNH3A3AHyEHOY NPHNADJ33 XBNHINPPOHIN 3MOMEHTY NOHTKY BNPIMDHHN.
O6JIO, uo 6ePtaTeB, Jn BmIPOBAHy Nau No BIDOnHHeNo Do TenePiuHbOro MoMENTY:
NOMOTITIbIKaONKTHHbO bObILK, tIOoBcTPhCb, HAMPTO NOTOHORIO NOTOXeRtBnTOHNOHTCHPbIN, ABOO TIOHOTOHIO, TIOHOTOHIO, TIOHOTOHIO, TIOHOTOHIO
GJDNHHI,JIOOHNHUY,AO60JDNHHI,JOIOOJINHUY JO TEONEPIHUYoMOHHTYMOKHYB 87NTHPOVHTAHIBHOJHOJIy,JOO6OEPTABcB.
enCnKnaanH

TQDHHH3K TELCBMM KIAHAMOH PnNTHAHENH DAIABEPB I ECK THX,TKO pR0a0dHTb TPhAaN VAC B 8MTOC6E,3bAagTbnREiEM-HANPHINAD, HA BOOTY BO2AO3HORO DAHOY
TEnI -HePTNI RAS, IIOO Mone KynH OJ3 HADPLOHIX, CE OCAHAE, 00 TENI MOKE PNOHHKHTB KOPNYCROHNHHApeE3IOAUNI HAJI BPOTNAPAHN B KOPCYCROHNHHA, RA3 HE MOKE UBNHOKO NOKOHNTY, NOKN CIEUJIINHBAKTHAN ABOHINTM. BILKHPITTO LBOHO KIAHNA 3aONOBt HB8BHnTCK HA cNO 3eCEpDAHNI PIIINI PIIINI HA noBEPHXo.
Ha rOpaHnHHaIy nla IaOaOHo IhaaBAnr Oria reIeBaIa KnaIb bIaMieHNKIOJIbPOBaHO KpAknHO KaHApTHyMaIKoJI.
- Pepea 3a-hypenHnM. noebpelTfe IeBnI Klanan 3a rOdoHHNHOoO O strInKIOO do yOnpy I aakpriTe Klanan.
HpeoNPOOMHOBEOBHOHOBBOHO3BDOHNKNOH HRELOBOHOJANAHIOPOTHOFOHOHOHOHOHOHOHOHOHOHOHOHOHOHOHOHOHOHOHOHOHOHOHOHOHOHOHOHOHOHOHOHOHOHOHOHOHOHOHOHOHOHOHOHOHOHOHOHOHOHOHOHOHOHOHOHOHOHOHOHOHOHOHOHOHOHOHOHOHOHOHOHOHOHOHOHOHOHOHOHOHOHOHOHOHOHOHOHOHOHOHOHOHOHO
HaBHTbHKIOKIAH3AHHoCTbC 8BjOKTmN,TOHJHHKBCSEJIa HJHb3cBcBOHOEPNOHKMnB 3BHNHAXYMOBAx.AIOIIBABC IIOBQOIOITIOBABAHIN,KIINHIOBEN BYIaBkPNTIR,IKONCAHO BIIe.
TOMHHNKK KOMnac
D0FHNHHK 3 AHOLOBOO ENHKA
LIOEO FONIHINHA HBNIAYMOE
BHKOPKOTOBYNAH KOMNAC,
BHKOPTOKOHNIOKEHH
COHRII R OPGHTHO. LZEANIKHTs
BIDJTHKO BIDMHONO NOIONEHHI
COHRII BIDFHNHHQ. IIO NOHAA
CYTOHNH YAC.
KJIOUyraHHHNAeOoJIO. 00
OEBaTe3bA, HJIaMOKaBHnHOHnHOhCTOByTaN, OIO 3aNNI bIEcKTOIC(ycepeHHYHTa).
SHIMTBLOJDMHHN338nCTRINO BERTAHOJNOHMMCTPINA HOBKIN3YBATMNEHADCHU
311111111111111111111111111111111111111111111111111111111111111
BbIbIbIbIbIbIyM KYT MIX ROIMHOIO CTIPKIO INIKKOEN 12-10rOIOH.) Lc Ic dyia PIAeH.
A TILINBn BV octabNOHb, DE 3NHOxADTbcPiAdEhBVMOHcTe B3NHATNNH1CtO0OHNCHCBTTA.
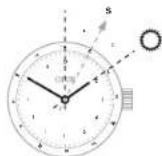
Aryo yOrodHHHKe e o6Dko, 0o o6p8Te3bRc, 3 noJiAHMOMK iNacy, BAm OyE JIeKIO KINBAHNHtB OItoPOnC BIIOTK OPIOM PIBHnJ, 3 roDHHHNKomTakoi MOpel, cI. dBETAPHTAC TAHNIYHOM:
SHMIbRDnHNHIM3AANTBIN 3HAHTe,deNHOKOPDcB NPiHBNBnKOpMOYOn HOBIOKOMKONACA,ObOHNCTE GcEeTPCcy (cepey)MIX RDnHNHO CPTIKKO IHAKCOV12- TNrHOI
BCTAOHOBITrOHHUYCPTIky HA COHJI I BHAANHTI CIOPOHN CBAITA, BHOKOPADOTKHOH OIBIQKOMNKA.
IChyKuHJIOBHNHJIKDNKAYHY,MeTAN,JOHIOKHOCTYKTOJ,1TAKJNJMOHNAHNIIBoPDJII+ITiOaPnAHI.
Гамлингн HAURIPRHOmy pemühli.
3Kp1nTb 3aT6Hy BaoHHNHa H BOKO 3aTCTH, BaxKaHNo ce po- 0thnHAD CTOnOM, Uo y p43 HeIuBnHO 3aTe6HyTOr 3aMHy D0HHNKHe H nBbA H nDfYog.
Pemiehe 3aactb00,po003
Knaadaetcb,3pyHniuB yBwKOpH
TnHk moToro, aH dae dQoR
Kobyraepnlo hOHTOH
NnroanrAHO DpyK, BTu.1ypa3
Kpndkiho rOdoHHnHa 3aIACT
3HmItb oOHHH 3aIACr
DtoTOO,uo npabnHoB aBpe
Ycynobatm pEmHeu, BHKoHIO
Byte zaaadanberIb apo6neHlBO
Bopn lnpenHbHoro nD
pcmpn Bauroo 3aIACr.
Kohn Bn bapeymoBnPeM He, cno Hb HATCHb HA 3a
ctOky,uo pMeBnHe, he po3
KOBH
JIeAIAIACIOH. 100PQKNAIDAOCTOB, CTOAPMDPOBHHBANKOPEYBOBTH. He IpeBa KABBAHCS-KEUo y Boc BHINNIM NITAHNR. AIDPAyK JABAYTRECAI CAOMI aatoP4308500032pDHNMMDEETPMOM.
PENHJI 3 noCTIOH pEOBvOBaHHAM 3AcbIOKAM, IOO pAOIAIADIOB-
ueohe 0B O BmHnH38
C6K, KOMNHI Oris yDQOKHO
HnI aanaterybana aactOy
PnHNHIO RIOA OAOHHn Hn PnHn Hpemeha beane n itnyk.
DooHHn demHn MOKe 67yBn DeytoubaHn do 6yBn RoH bKaHoi
DnKHHn
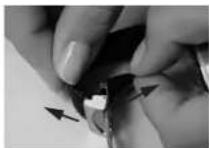
Man.1
3HIMTb RoAHHHK 3aNCTra, B12xHPAe 3B6XyI KnPAADHa HmRHYOBepxHIO.
BlaBnK hkiu kua 1000000000000000000000000000000000000000000000000000
YKOPOTI pEMHIE, NATNHYBINbHH KHeHb, ABO 3AETnHbNO, TNOHTyHb 3A NOHNHMC HtNcHRe HsTAtmckn, nnnne ne noepe Tn
3Acti6HA, zo po3kTAdactcBCH, He 0y8 3aKpHtA, KIO 3aTmck 3AM KHTHy HnepaaBho.
BINHANBIBNAMBAHNOHNHNNNHNNHNNNNNNNNNNNNNNNNNNNNNNNNNNNNNNNNNNNNNNNNNNNNNNNNNNNNNNNNNNNNNNNNNNNNNNNNNNNNNNNNNNNNNNNNNNNNNNNNNNNNNNNNNNNNNNNNNNNNNNNNNNNNNNNNNNNNNNNNNNNNNNNNNNNNNNNNNNNNNNNNNNNNNNNNNNNNNNNNNN
CanpObeckIO.
Bilbuihong ToHinHHKOrGICSACAHBE BEXHOMCANDPOBNMCKOM.
DeHHI POKFIBDZHENH NHa 33.
DHN KPHUKOHPNCA.
Moua Koeiich TBeDc9 No 10 kHmKoA, CAnipOeCKK eCaMM TBePIM CNOM. SoHO cNtadaCTCR3I UTyHOrO CanpHa BnHTBOB HO CTIO NO pNDINr. TINbIA NIAE AMAS I KoeiichCITOM TBeDc9 10 No kHmKoA BInH TBePIM Ha DApTAtO Da UBO, canIpose CKN SHAnB HsIbe YpOAMeH, Hk XpHAtAE BcKNo
AANNNNEHINYHTNHOCTIHNPA BNTA BNTBNCNTCBPOOBXCTENKOTDNOHNKBOTIS OONAHWEH BYHTPHIMBHTHNOMOBNNOKPTTRM.
DeiH MoeJIo RoHHHHB Oris MaTOTb AHNIMBOE MOeKnHTTO NoOJbBA Boa KcMfPcHO BNO. 30aHJHHI aap HnIMBOE NOOKHIMMOE MoEy bTuYnIOKHeHHN ypcayTAt 3HOuYBaHHoRIOH.
TexHHHaHOpMaIur 3eEepHITabNJI.
乙HACIKOMHOOMBAHORO HOOBYYBHH,iYJUHOKHHHUAUYIHTMOHMGFOKOKNTHRE CAPPAHITINBHNAQKO
KpnuTaJIeBe cKnlo.

KoHuaTaeene Chuo 3a6e3neYc GsEaOHrOy HyaTHaIeBtIbIePcPb-07, oA hN tHe Ma BCnOCTy IKTb Do nOaONHH. TOMy KooHARI Oriis kApOReIOCTy ix IIhNtBa hZa-HdHnnk PkoNcI KoNpCraOnnHNHKn.
IneKcrrnac

IpnKcHnAe 6aKPNHOe CNO B5bC06BIO HINPOB8BAHN HA NpOAnTHiMATEBIAN, BHJAB3EeYHtIKyTAAHTAHIELADCPGATAI, HADBAHUYHO BNCOYBDYAMOIIC, HOBDBCNCTOHNHL3KSTCYKTbCToNoPdAHHN, OCBIOBvB NOPIBHNSH13 CBNFOBNBGMCKO.
PnapnannnnnneKmnaac Monnna 1aDnnpnyatnHa nOnpnyabnH MaBnHn
KOMNABHI Oris FONOBHMM YIHOMB KBNOPCOTSEYBEHKNNAC BYC0W TADPHIMHX MOENIX BIG CROWN BIK A OBIHTAHNHMOENIX.
TOMINECUEHTHI
uhepebnaTa ctpinkn
YbIaIOCTO RnHINIHINOrIS CTpNIAO ROnHHH HDAKCH HA UHJ
Φe6bIaTAX MAtoB NOMIECHTHE NOKPITM Super LUMINova.
DAnE NOMIECHTHE NOKPITM
3ApDdAETBCR KID CHONHORO
TAI YUROBO CATTBA HIE MEC III KORO paoKaTHIRBO FOHY
PiMeTH, 10 foocDOpeCLIOIOy.
36BraIOBTO CBOI BACTOBOTI
KKNKPAI PNEPEPAKIKBIOA
OoDCPOEUCIOHNBAHCTGCI
HANHNNCHNPHN HN HACTAH CY
THOH. OHNAI CTOTHO 3MEHNYKOTC
3a nepOI 60 XBNH.NI. NIN 3AOKHNI
HEHNEIPOI ROHNI 3HKENHI
1IECHHHOCTI CATI (HAPBOSOT)
3MeHUYKCTI. Ie.0323034
TAYBnYcHn CnHn 5-6 RnH
NEpebSYBn E TepyRb
JUHIOOHHEHHMIAKIMBAHBO MOKIASHO DIBH HFOQDOCHCEHJI,ODHIHNBAPAOCTTIAEJI PABBH BNNHBY CNOHYCHO/UTHYHORC BCTHA (The Tpeba IX Noctihio XOBTHN DIYKOBMO COPKHO).
MetaeBn6paet
WUKDAHNNIYMOBUN
#
Ha pemixx Oris 3 HaryoehnoH hui HA bopoi Ha actiou c Harnic Oris.

Metanebi pScnec 300mne13 He
pAnanoei crani 316 L abnany
DpyoTc cytnne (Hb. Metane, uO
BnKOBIOCTBOYOTCR nKn KPNCYI B
paCBeNTB).
BcipemHui Oris BurotoBnE 3Ha
yaihpanbikkkoKoKoKoKo,Anilra
Topa,ctpoyka,ckTu IaPku,ho
HeiaeceiDoopebpOIOI.KeHH.
Le napeepkecho cepfHApOTOM
CITES (KohBeHIO pno MKKHOAPoYIO
TopBoIO BILB DIOFIO PAHYN,Lo
pepebyakobI NIOI TPOPOKO 3HNN-
HCHN
Tymolai pemHIII Oris HAIJIH,HOcOCTRII BOHDOPENHIINI. BIKU OYOTAH CWMY HYNI HETOKHUNA HE MICTTI MOKHNBAN APREIBIN
MicayHnKaIeHdAp.
3BnHnHHe 3HHnHnHnHnHnHnHnHnHnHnHnHnHnHnHnHnHnHnHnHnHnHnHnHnHnHnHnHnHnHnHnHnHnHnHnHnHnHnHnHnHnHnHnHnHnHnHnHnHnHnHn HNHN HNHN HNHN HNHN HNHN HNHN HNHN HNHN HNHN HNHN HNHN HNHN HNHN HNHN HNHN HNHN HNHN HNHN HNHN HNHN HNHN HNHN HNHN HNHN HNHN HNHN HNHN HNHN HNHN HNHN HNHN HNHN HNHN HNHN
YUOKIOJENHEH,IUD KAKIKKROPEBHTOHTI HCSBOHITICHTYKHMIMDAEHNCHNTAATAJI,CINADAHNMOMKA
YUHODKHEHHI BHAICLOK YDAPY:
YMTNTHA,POB36CHT KIOH T.I.D.
YBNHKHN BYE301YEN HENPHANHO
HFO,HEB2010,HEKALEKHONHO
BHKOCTAHHH.AABPI.3ITNIHHEH
H.T.D.
YUOKDKEHINRAHKIHNLOKOMN KIO, KOJIyBUNOJUYENGYE YCIEBCHNXIUEHTPAX,HEBAIPOIM30AHHX KOMBIHNEIQO IROS.
OJHNNNNNHNBQOM3HHIe6BeE DeHcKMOHJIHOrIs.
Odoatokoby FOPOVy rapaniTI, HADAHY
BeNsocepdeHbIO KIneBEOO ToKIOKO
pOdoaikh/ pRteIeBOPm iTJ.
0PoiHnnIb/iaoPiXa3bnIOB 6ydu kiroro xapaTepy, noNecEHni y paCayltT aYnHHnA bOe HcOTHO CTxOy RoDINHHNIA I T. d
Doka npaba BlaacnoctI.
Dainien nepeinl hadactcBHHOTKOBnO 10HooMauHxLJiEeI HcHTNHOOPaHHTNHOYMO
Pepwn BlaChNK
Data
Ha3Ba Haepeca
KomeHTapi
ApyrH BAnCHNK
Data
NHaBaI aDpeca
KomeHTapi
Tperti BlachnK
Data
Ha3BaH aepca
Komehtapi
Product Manual Supplement.
Movement 915.
ORIS
Swiss Made Watches Since 1904
Ykpalhcbka MOBa
Галдим Иorts Complication (mexan13M 915).
UHINHACHAHTAYBHHAHTTATJ
JHINTHAH3A000HHTCH
PNOBOHNBPOPMNHYCACYMH3
RODHINOBEHOAPTA3ROPHO
HOHCKOHK3y6bactKoneCA
RANBHOPKCTOBYtCRnP
HAHTAYBHH-A,HELAQAC
AKTNBIAYOTcMEXAHAMOM
DOHNHIAI3100H3HC BYDTHHNN
MOKEHPN3BCTDN Do IX
NOIKOOKEHNH.
BCTAHOBH B BJKDPTN OLOKHEHAR 3AIBHNYBAYI OBOHBY A60OLOBH3 3JWBJXIOO PHCILIEKO, RHO BO HOB IN B 8BHBHOHT, YBJIOHOHOHT3 IHCOTPKUWMN, IOO MICTLCRA B JADLI
BHTIRHTBHOTBOKBYBNOONENH2 KpyTnRcSTPKINYNEPED, npnoiDy12ROHNyTAaIbDIO3mHnDATN.KpyTbCSTPKINDAI,do NOONENHHBETBa HneBTpey.
HtckKaohnKHY3 CIIJIaJIHAMIHTyMmHOTOM 20KMTKHy, afopepeb'HOIO 3yOoHCTXOO, BCTBOHOTJ
HATRAKHOKHON KHOKNY 4, BCTAHOBITs MIOILI.
Htatackaooh KAnky 5, BCTAHOBITb dary.
HnHnHnHnHnHnHnHnHnHnHnHnHnHnHnHnHnHnHnHnHnHnHnHnHnHnHnHnHnHnHnHnHnHnHnHnHnHnHnHnHnHnHnHnHnHnHnHnHnHnH n HN HN HN HN HN HN HN HN HN HN HN HN HN HN HN HN HN HN HN HN HN HN HN HN HN HN HN HN HN HN HN HN HN HN HN HN HN HN HN HN HN HN HN HN HN HN HN HN HN HN H N H N H N H N H N H N H N H N H N H N H N H N H N H N H N H N H N H N H N H N H N H N H N H N H N H N H N H N H N H N H N H N H N H N H N H N H N H N H N H N H N H N H N H N H N H N H N H N H N H N H
AHaHaaTuBaHnROTOPOHORACHYBkoKOPMcOeByoTbOcKBaR KIOOToNpIHO BCTAOBHIN YNCnIOYND, cIq npeOBectin
Pp TAKOY NOIOKENI ROIOA
RIOHNNAIIaBcBy
Pn3NHYHOHOMCYTAIHO
MOKIN 3aNCTNYNO CHTY
TOHOHAY, aoo, pnoCTo
HATNCHUYIN NOIKOBY
TepeBn11bNOKEN11
HaTHCNBHyIN NOIOLY, nepeBn11
BnNOKENH11
BCTAHOBH B 3AKPITE NOENHHRA 3AHTBHYYR HNOK860 TOHOBBI 3JIBIKKO OIKGALIO, RIOHO BOHIN B 8HBHBOHT, YBIIOHOHOCT 3 IOTPYKIMHN, IIO MCTLCB R 4BIA1
No.0000B 28AKPHTOMY NO10KHEHJIN DAI 3A5BHNYBAHOI TNOBKN a60TNOBKN 3UBDHQIO fikcaiaio
No.1 No.1 No.134567890000000000000000000000000000000000000000000000000000000000000000000000000000000
3KOHKA HAIAYBAAHJH
THOKH
4KOHKA HAIAYBAAHJ
MICHL
5KOHKA HAIAYBAAHJ
DTM
KOKHNAOKAKNKAΦA3MICHA
7POKAKMHJINTHKHH
8POKAKMHICIAI
9POKAKMHDTH
10POKAKMHADNNMCIAI
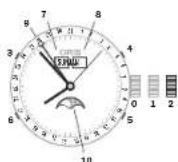
Product Manual Supplement.
Oris Aquis Depth Gauge.
OBIS
Swiss Made Watches Since 1904
YkpaHcbKa MoBa
HactaHOBn
KoKeH 3 roHHNBIr Oris Aquis
Depth Gauge 6y5 protectobasn H I
BbAHHN BILIOHNJIM Do CTAN
TIBTS KOMIANTIIS. OUIKOMMOK
MIBO,03 aPrrPHH DHIHNO
OIKOKEHH, HeIHBOTO BRHO
PCHTAH N I HIXHHEKONPTOB
BAHXB INBIAI RHNMOIP MOKE
FHKYIOHBYBHTENAEKHIN M HOM, Li PEKOMHaDJIOTOMOKYb
SPbOHMA TOHHNARl Oris Aquis
Depth Gauge HAHKAHPKMOMa
HbHOHOIM NcZabHypenH.
ToHCTbFoDmHHnHa Depth Gauge
HactynihapametnBMAeMOJIOB T 3fIHHHHOYHKUHbHCTO roDHMHDA Ors Aquis Depth Gage I MOKHTI HEBHNO BINBHATN HTOUCHTb RINHOMIDE
IpebnBdAtmoocpeHOroTtCKy 3ymObeHOrE3MIMOHeMeTNmEPTePyr, NTOfDHXYMOBQIBHCOTOCN HBD pIH2M MOPR
P1HnIe TMepaTpy OTOyKHyXN NoBPTB/BoDn, 30kQPEMa, p1HnIH TMepaTpy RoHHHHKa I BoDn
COHCTB0
3axoDn6e3neKn npn 3aHypeHHI
一 Perkohohaney eBcDcyHTO31 aHIMIK BODI (NIIIM TEMHO-CIOPI KObpy) bAaVIPMOY KAHAI. pR HABBOHOT, OvCTIT BANIK, SK OHNCHO B POADJI +BnKOPKCTAHNIH HOBDP BY DIOCHTH
IpekoHAnTeB, 10o DmHHN Oris Aquis Depth Gauge Mae Temepaatypy HnKbHnHnBuO
cepeDOnuHa,TOTo 0IO BIn DO z3a HpyHnH 3o HaaBH NITBIPN PnR MmCX OCHNH NpOMeBH I HIN JDKenTepNA ToXoHbO
BnKpOHTOHrTe rOHHNkOris Aquis Depth Gauge 3 bHuaHMMn pIcStPOMn Dn daBaiHry TbHKn B RKOCTIdoaTHOBTO MekHCHHO rTbnHOMy
KOMHANIS ORI He Hee HIXHOI SIO
NOBIABHNOCTI PnR HEEDOTPMAHHI
LIIEI ICHPKU. TQIDINHHM KMAOJI
MHKDAHPOY RAPHTAILO, PPJ IIO
BKA3A2H 3 HEPIBHNITU, UO IOCTOA
ETCB3 KOKHIM BHPBOSM ORIS,
IHOPMALLIO rpo rappTMO MOKHA
OTPHMAT HA CaitI Ww.org ORIS.ch
CknaoDlHbOpy DaNCTCH HaBOp DnA OCNTHKr DGMHHNKA Ors Arqis Aquit Deep CknaTae3cR 3 HctyTNHXKOMNHOHTIE
1xwnpnu5Mn①
5xronka 2
5.5 TNYKKA TPDKB (3BCTAHOBENHBA TOYIKY)
PRODUCT MANUAL SUPPLEMENT
ORIS BIG CROWN PROPILOT ALTIMETER
ORIS
Swiss Made Watches
Since 1904
UkpaHcBka
HACTAHOBN
KOKEN 3rOHHHKBIS Oris Big
Crown ProPlot Altimeter 6y
npoTeOaAHnI IINHANHBI
HOHNHMIOCTAHPBIBKOMNIA
HIOrIs.UIKOMMOKHNO,IOI a
PnPHHCHFHOHOHOHNDHEKHR HIEUBoOBOT BHKOPMDHAR
HNHIXHEKHTPOBBOHIX
BNNHBII.HINDAJI MEXAHMY
ABTHMETA TB TICKY NOBITR
MOKE FHyHKOHOBYIHHeNAH
HHHM YOHUM.IE KEOHEMADJ
JONDMHYTS 3060BnTTOHHH
Oris Big Crowl ProPlot Altimeter
BAAMH HAIKAIM KOMMAHBOH
HOM.
ToHicTb BnCOTomipa
HaTynH XapaKTePCHTHM HAZOxTBcRyB3eAMoD 3 pHHNnON FyHKUIOYBaBHNIQTOHINHARA Oris Big Crowr ProPIot Altimer Irofo BapomertPHNOO FyHKUIOHABHIOI MOKuy HeNAHHO MOPOI ANBNTI HA TOHTICBI BD6069KHN HAIATNY
PepenBd aTMOcΦePHoTO TCKy
NIDIIEO3MHNTEMNEPATy
Mepe3 p3Hl TEMEPATyPH rpaIe HETB N BTHXTOKAP 3AM0SHHBA BOCHTN HAD PBHEM MOPJ
3MNAIOTQINHXYMOH,TARXHH 06bactbBUCOKO/HH3bKO TMOH
PoroqhaHHAMiKaBtiNomy
3axdoi 6o3noKn pnp BNKO-PCNTAHN
PepekOHAKTEs, TIO OIOYINHHM Oris Big Crown ProPIat Allimeter MAB TMPEPPATyB HAPKONHbIHO CpeDcBNIa,TOBIO IepeD BIKOPCTAHNMR BH E HeAHOBNCI PIAIANBOPMIXC OCHNHXPOMEHIB aOuHUNX KEPEN TEPN ABO XOLO
1PeKHOHACTeC yu,TO
38aOHa RAONBA.4A PO3aUoB0
Ba 6n UoH 4uΦeB5yTA
RHNHHNHe 3hAOkTbCH R
IIOHNHOH,1JIKe OIOcNA B
pO3dJIuBFOPAHTAH ROHNHn
HnKa Oris Big Crown ProPIot
AlltMeR. 1pePae KIOJIu HAc
Bany ZaHOHOTIOIKN MIOHNHO
SyTN YIO BHO.NeMxAm bI
TMepy He npoAATMaHE,kuo
3aOHaON RAONBA 3A BHNHeY a
KOpNc RoHNHKe.
YHKH3E KOTKATyDHHH H A 3 BDOO PNI AHBHNH E 3A0BDI RIOJI, POATAOABOHHI 61N L4PP4, 4HO HA UHEP6Na TIP NHeUILHO 3AEBTNHHEH 3A0BDI RIOJI, ACTAOHNEH I BNOENHHO, OKNPCYDHNH H 3A0NIIaTcBISL BIKPHIM I BOPONHHNH, CnueiAnbe NTPE-NOKPRTT 3AE3eNeVye 3AXHCTI MWE BID TPOHNKHEH Y DINOHNH BOHMOI NAPI BOHO JOKPNTTI He 3Ae3eNneY BoCtIKHOCT DNOHNHKA
YHMHAEKHTKATKDYMHHH3 6bDyDMBdoMxEACmTTNITI IITFE-NOKPRTTTOBOPK KOPN cy, zo pe3ynlta CTBPOBATMHNEpeuKoNDAI BInhOBI NKPNKNUI NOFIRB/B/5 KOPNcy
Ukana anbTmTeP aNoHcBidCTaBAtn abo 308Cim BnE 3 naHy.
A DOKKTHOIBIIOBAPCHENH NOKAHHHAIbHTYdNpeep 3HTYBAHHM 3ABHNIPOBATOE KIHKHOMANIaJIbU NoOBEXHI OBDHNHIA. NIEKOTNOADHYB HANHOKPOAUYCYMONBPOCTH AHEPOJHOI KOPOKBIMEXAHIM36 BOPEMOTINHOI aLTMETPA. Tpeep BIKOPCTAHNM 3ABXnD INBOHYDE KOPKTBYAHH IAIITMTMA BIIIOBNJIO do IHOPTyH.NABELEHIX yPoJADI II BHOPICANTAH OBDHNHKA Oris BigCrown ProPlot Altimeter/ HADWYBAHHe ABITMTAP
IpeepaIe IaidkIpaOyKeI aIbTMeTppeYrHPO,IOpOaY npNblO6paKHeJI aIIITpyTN B TOCHI bIHOChO rPiB 860 pN BBEEDHI 3hAeHcy TcApaDTHO TCKyI dKOMNEHCuU 3MHTO RODHX MyoTa YMoB HAKONH HbTo cpeDooHa.
3 MIOYBAHb6e3nHKBINOPOCTOByrO RoHHNHNrOrIS BigCrown ProPilot Altimeter npBIOHOHHI NIOOTBI A6o nIa HAc ECKCNNDNI B8A KOKCTOJONOMINHO RNOHAA,PAQ30M 6yBa-BKMMI HMMN PNPCTOPNN DIA BHAHcHHeHBAHCOTH,HNPHKIIAD,6oPBOHMMI PnHJAAMITAKA.
PnHIMKKaFkTHNBAHCOTA
NIOHTOITIaNAKOMEBIDJH3HNTHCBIBNOKAHMHABbTNM
MeTPO,OGKIIbIKrERPMTH4A
KAbHbMOeNECEPEOBUNI
HHKHOBACOTNOBJBOy. KOKEN
BdOPOMETPHINALBTHMETP,
EeKNTOPHNHMAEXAHHHN
RAgRODHHNKOrIS BigCrown
ProPilot Altimer, BIOpa
KaeTOOTNHTMCKOBPTBAR
KAbHI NOBPIHRHO TPAHNOPTY,
AlbTHMetRnK IIATIKBNIPTPMYKOB 38303K130BHWHMN
PiHnAAAMDAHBMIPDOBAHHN
THCKYI BACOT, IOPOSTAIWOBAHNI
HA KOPCYI IITANA.
KOMHAII ORIS HE HECHEHIOI BIDNOBDAHLHOCTI PNDOTPH MAHNI LIU CTPKUYI.MIHINAOOJHA RAGAHTNIOHNMOPOCTCA HAPODGYIOHOIS,IBIDNOALDO Ho KEPiBHHTA3 EICNLYTAUIO IO NOCTAETbO KOHNK HBOOOM, A TAKOH DOCTYTHO HA cART:Wt.0rS.ch.
BHKOPHCTAHRA ToMHHHKa OrIs Big Crown ProPliot Altimeter
Ueepbpln noJINHBN HA TPN 300 HUNB1 BILHTPI pOraaBoAHN CnApaTHN UEPbpln, uo No 4324C yac HABHO HOBOR AHAXHO DTHcKuHa, uo BIOpDpHaae THCK atmocpebpno HOBITpTa a DOnonoTOE HEPBOHO INHkA Topa; I OHHHNC HO, uo BIOpDpHaae BHCOTy d 15000 pyr8 afo 4500 METPb 3a DOnonoTOE KHOToI INHkATOPa.
1. HENTPAANBHH PEXKIM
PONKENOHJAAADHOTIOLIKIN
0:RiAaObDJIABADNIIROBAN
KNUJIHOARBNHHEI, BigCrown
ProPIot Altimer npauoBATIME
BBAHNAHWY peKNI BATEOMTA
THNOHTO ROHNHHI. CENTPAH
NHN KUPBnATI CTIPKAMNA
BIDOPAKATA NOTOHV HcI
DATy DATATBACBOHIOCTCB 32
DOANOVOB ABOBDHOTIOLIKIN
KONI CTPLNK BKAAYOTb HA 2:00)
1FIOHNHAI ZAIUAHNTMCTc
BOBDHOPONHHMIH DO NINHNI
100 METPB/106pab
2.AKTHBAUAR AABTMETPA
(ПОДЕСЕНBAHDAOДТOLIMК) 1:ДИАВТВАДЛ АБТМETР, рпс BTOBHDAHIXHA H400 CTPIKAN RAODHINHA KAPENBODI BAHDAHNYA KILONNOHOKH 1.3AHTCTbCYPaBOH KILcE, IOI KBa3yC hA Te, IOI aPJI BAKOPKOTOBYETCb AITMETP.
3.HAAWHTYBAHH
(IONoENHn 3ABoHOI rOIBIK
2):IpepeBdtI,0eepdyroBoby
Bn oBLOHNN 21,0eepTAnKII,
HauaHTyIe anbTMtPm. IcHyOt
pI3I pEHNHN HauaTyBAH;3a
daHHMn IO aIbTMtpy H aPiH
aepDOOM, HABeHNH bIPHO
pIHr MOOP/3a NOKIHNNAM
ATMOCepPOI TTKQ AEPO
dOmy HA pBIH nopora 3TNC/
3a DAHMN NO aIbTMtpy MN
HauaHTyABH bIbTMtPA H
CTaJIAPTHNI TTK (HAPINKIA),
3a DAHMN KOHAMJIO-HACNET
CEPCHOHO (NYKHY eepDOPM).
DTRX HauaHTyBAHNN HOBOPHTB
3ABOHNY DO pepepehCNHX OAKAHN BTKCH NOBPTB
pNP BACTAOHEMO HAanPOT
6:00 EHTPANsHO rOHPEPBNY
IHNDATPOY YEPBOHOKO LOKOy,
06o eOpBEHb 3ABoDY ROINIKY,
BCTAOHBNX KOBTH IHNDATOP
HA bIMITU bIDOMB RAM BCOTN.
TODHNN IBDopBaKATME noTO
TOCHY BHCOTY (KOBTH INIKHTOP)
I FAKTHNAR ATMCCPEPHN TTKC (HEPOHN HINADATOP).

4.BHMIPOBAHHBNCOTN
Kapitcle,WorldTrimer
Nastaveni T3:
UrceteCasT3,tj.cas cilovy
a/nebo casovy rozdiil o od startovni lokace.
Vytañóte vertiklán korunku (10) noharu.
Todte vertiliknik karunkou (10) po smeru nebo proti smeru chodu hodinovych rucek a nastavte spravniy casu rozdi tiaclitky + beuno -t. j. mezi 12:00 cass T3 cilovce casi a
12:00 CAS T1 (cas pociatecn).
Zailläte vertikäni karunku doili do neuträti pozice.
Nastaveni kompasu:
Sundjehtodinky zapesti.
Vyatrénne vertikkāni korkunu na-horu a nastavte Jh na ose otočné lunety kompassu (t.). sthedového bodu) mezhi hodinovou ruckou a dváctoč hodinou. (mez 18:00 a 6:00 voite větiš Žúne miže hodinovou ruckou a dváctoč hodinou).
Zataïche vertikäni koruniu dolu do neutralne poizke.
Nasmrujte hodinovou ruku na slunce a prectete body na lunetek kompasu.
Viz. obrazek v kapitole "Prace s kompassim
Hodinky's kaučukovym
Vsechynho hodinkyi Oris Jsuybaveny skiplspond sponun.
| AtmStoy(Metry) (atm)(sl)(m) | ||||||||||
| 3 | 9 | 8 | 5 | { | 3 | 0 | } | ✓- | ||
| 5 | 1 | 6 | 4 | { | 5 | 0 | } | ✓ | ✓ | |
| 10 | 328 | (100) | ✓ | ✓ | ✓ | ✓ | ||||
| 30984(300) | ✓ | ✓ | ✓ | ✓ | ✓ | ✓ | ||||
| 1003281 | (1000) | ✓ | ✓ | ✓ | ✓ | ✓ | ✓ | |||
| 2006562 | (2000) | ✓ | ✓ | ✓ | ✓ | ✓ | ✓ | ✓ | ||
Pfkltogramy.
Mechanique sa monotoné
Mechanische se somadona hem -vlastni vovl Oris
Ruán natahováni
Worldtimer
Chronometr
Alarm
Ukazatel zony druhhe casa
Sroubovacbi bezoecostnki krunka
Sroubovab cepezepostnsti tiakei
Korunka"Quick Lock
Heliovyventil
Safirovsko
Mineralni sklo
Plastovésklo
Anti-reflexi povrchovs ukrava

Svtici tiseinik
Svtilf Indexy a rukx se
Svitci ručky se
superluminovem
Cisenik diamanty
Usechtla ocel
Usléchtnáce/18 k zlato
18k zlato
5 mikronu
Diamanty
Povrchová Čravá DLC
Povrchová uprava PVD
Titan
Keramicke Nejlepe Ring
Zadni vicko s minerairim
Flexibini uchycenifahu, feminku
Vzdaldenostmeizuchty
Vzdaienost mimo uchy
Pravateteledkuze
Kaučuk
Texttile
Pravakrokodyl kuze
Vodotésne do XX ATM
Kov pouzdra a tahu.
Ulechtili acel 316L pouviana na hodinklarch Oris, je robotistn tri vlniv, yvohuvicj prasnym dermatoglcikm pozadevuk pro plochda nei alerigi na nikli. Platne smerine o pouviani nikli yednitsykh stachtuch uvlad, ye obektam, kher jouse pvimrnn konaktiu s kuij, je povolo nvo ulovniy anpoze O.5 ug nikli na cn? kozhe/tyden. Obaskh nvike nu siltine neri nozhodujcim faktorem. Mnohern culezijskiye miria niklu ulovnina do kuzie. Preztoze ulcehtica ocel 316L nen zecla niklu prostaz, dastradynik neuvojuice.
Dvdu ticy titanu pouzivaneho na hodinklach Oris je dista mira titlanu, ktrny mure byt takpozi v implantatech a ktrny ma excenenti pamor pevnostj/rozjinavostl. Titlane je 45% hehci ne ocel je take korozlo dolny, k pokoze zetmy a na dotyk tepleji's ne ocel.
Product Manual Supplement.
Movement 915.
ORIS
Swiss Made Watches Since 1904
Cestina
Orls Komplikac
(mechanismus 915).
Ryché nastaveni Čaú a dne
nésmi byr povradéno mezi 3.a 1.
hodnou, protoze v tut je dobu
mechanismus zmény data aktivi
a mohl byt yposkozen.
- Podie modelu uvoihte klasickou kurikuni prnastaveni nebo QLC kurikiu, prcem2 postujtie pode instruci unvedenych v kapitole 1.
Korunku yvanheta de do poliny 2: Pro zmenu data otaeej ruckou smerem doohju res ukapazitel 1.2 hodin. Pote pokraucij v otaoenr kruky a na hodnotu casv etnu at cyri.
Pomoci nastroje dadeho nepa uls hodinkaml. pripadn devehne\rpairdta, stiskhne opakovane tafkeiko 3 a do zobrazeni
pozadovanehoOne vtydnu. Stiskutim tiačitka 4 nastavte mësic.
Stiskutin tiaetika 5 nastavte datum.
Sliuknin tniacika 6 nestavite mesi fazi.
Protoze v ramel 24 nodinovych cykl je pohy mese hure zae namenatelny,je mesei fazi nejvhdneji nestavlt,kyj je mesev nuvo nebo uphiink.
Pro nastaveni aktuariho casu pouzijte korunku - pokuad nastavujete cas odpoledne, nezapomerite rucku nechat prej tjes 12. hodinu.
Kdyzje korunka v teto poze, hodinky stoj. Toho Ize naplkiad yuziia pro jeeh sputeni spou s
casovym signalem, souscaanse se kiterym muze by korkuna zat
A. taikem edwe korunku do poloy 1.
- Podie modelu zabikljute klaskuto kurkuno pro nastaveni neboQLC kurkuno, pfrčěm 2 podustojte podiInstruktu vedenych v kapitole 1.
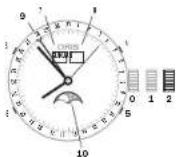
Posko: Korunka je v zablokované
poloze, at se{jedna
Product Manual Supplement.
Oris Aquis Depth Gauge.
OBIS
Swiss Made Watches Since 1904
Cestina
Pokyny
Kazdy kus Oris Aquis Depth Gauge prolzik zhouskamiki a bya ovefen shoda se 2kusebnimi standardy speloneanoli Oris.Je meze, ne v daskedkr tyzickeno poškozeni, nespravno zachacezi nebo Jinhe nokevtrovaltehnelo vivlu nemusli ukalazet hi uobiy fungovat spravne.Dodravorani techto potynu napomuzkem totu,aby se hodinky Oris Aquis Depth Gauge staly idealinim spoeknikem pro protapeni.
Presnost hIoubkomeru
Nasledujic parametry pusobi na fiziekou funkncost hodinek Oris Acquis Depth a mohou miré olvivit pjesnest ukazatele hlobyk:
Zmene okolinho tiaku zvduchu zduovodu rozit teploy, povrostno
Rozdi tepty olokino vzduchu/ vody, zvlstje Rozdi tepti mezhi hodinkarma vodou
Sianost vody
Bezmecostni opatreni préd potapéniom
Zkontrolute,abyv mérécim kanakuk nebyb zăné dzykov (tmev sedé skrvy).Pokud tam jsou, vycitéstekanek peode popusu y fasiJak pouyivat bistici sadu.
Ujstete se, ze teplate hodinek Oris Aquis Depth Gauge odopvida teplote okolino prostre, t. ze prd potapenin nebyvystaveny extrimnino slunechnino zarei di
PRODUCT MANUAL SUPPLEMENT
ORIS BIG CROWN PROPILOT ALTIMETER
ORIS
Swiss Made Watches
Since 1904
Cestina
POKNY
Vsechny hodinky s yskomarem Oris Big Brown ProPilot Altimeter prsly zkouskam, v rami kteryh byla overovana shoda sezukene nimi standardy spelecnosti OrIs. Je moze, ze v dusledku ryztickeno paskozeni, nespravno zachazeni nebo jineho knontrolova telneno vilnu nemusi uzakate nadmores vysky a tlaku vzvtuchu fungovat spravne.Dodrozani tecto pkovny napomuze k tomu, abey seykomer Oris Big Brown ProPilot Altimeter stal ideainm speclikem pro vase aktivity.
Product Manual Supplement.
Movement 915.
ORIS
Swiss Made Watches Since 1904
Ors(豪利时)
Product Manual Supplement.
Oris Aquis Depth Gauge.
OBIS
Swiss Made Watches Since 1904
指南
PRODUCT MANUAL SUPPLEMENT
ORIS BIG CROWN PROPILOT ALTIMETER
ORIS
Swiss Made Watches
Since 1904
简体中文
指南
m = 311
23
上图の例は、効力下た品
一1153示
24.时间:2018年1月16日
都市表示
→FJFFJFJFJFJFJFJFJFJFJFJFJFJFJFJFJFJFJFJFJFJFJFJFJFJFJFJFJFJFJFJFJFJFJFJFJFJFJF
| BAR(bar) (ft) (m) | ( ) | ( ) | ( ) | ( ) | |||||||
| 3 | 9 | 8 | 5 | 3 | 0 | ✓- | |||||
| 5 | 1 | 6 | 4 | 5 | 0 | ✓ | ✓ | ||||
| 10 | 328 | (100) | ✓ | ✓ | ✓ | ✓ | - | ||||
| 30 984 (300) | ✓ | ✓ | ✓ | ✓ | ✓ | ||||||
| 100 3281 (1000) | ✓ | ✓ | ✓ | ✓ | ✓ | ||||||
| 200 6562 (2000) | ✓ | ✓ | ✓ | ✓ | ✓ | ||||||
Product Manual Supplement.
Movement 915.
ORIS
Swiss Made Watches Since 1904
日本語
付的专用卡一卡三卡三卡三卡三卡三卡三卡三卡三卡三卡三卡三卡三卡三卡三卡三卡三卡三卡三卡三卡三卡三卡三卡三卡三卡三卡三
FFJ 1
FFJFJFJFJFJFJFJFJFJFJFJFJFJFJFJFJFJFJFJFJFJFJFJFJFJFJFJFJFJFJFJFJFJFJFJFJFJFJFJFJFJFJFJFJF
FhpsnEoBx6eH押中 一FhXeXsEeHcTtJnEa
124时间至1
周期上少上下下动,也有的。日的集合行动的年新月日是月的和最最高者。
一 1-2-5-7-8-9-10-11-12-13-14-15-16-17-18-19-20-21-22-23-24-25-26-27-28-29-30-31-32-33-34-35-36-37-38-39-40-41-42-43-44-45-46-47-48-49-50-51-52-53-54-55-56-57-58-59-60-61-62-63-64-65-66-67-68-69-70-71-72-73-74-75-76-77-78-79-80-81-82-83-84-85-86-87-88-89-90
Product Manual Supplement.
Oris Aquis Depth Gauge.
OBIS
Swiss Made Watches Since 1904
日本語
四不
PRODUCT MANUAL SUPPLEMENT
ORIS BIG CROWN PROPILOT ALTIMETER
ORIS
Swiss Made Watches
Since 1904
日本語
吉丁拉尼
Oris Big Croson ProPilot Altimeter(orIsbippKraonFIOB口□tALTefm一)是,oIro独自的品質基準滿達此簡可個別檢查出、出荷載了。高度應不表示機能、物理的反振、不遠切等取援。他之他偶獨的本原因上,通切以作動不。場合為甚者。。此之gtdLain=,oIroSbippKraonFIOB口口tALTefm一士一最強のbutter一和以爱用的做
高度計の精度
吕瑞川吴润杰ExecutiveChairman
人
本合同终止
三记名
云宰藻藥藻藻藻藻藻藻藻藻藻藻藻藻藻藻藻藻藻藻藻藻藻藻藻藻藻藻藻藻藻藻藻藻藻藻藻藻藻藻藻藻藻藻藻藻藻藻藻藻藻藻藻藻藻藻藻藻藻藻藻藻藻藻藻藻藻藻藻
一 一 电电电电电电电电电电电电电电电电电电电电电电电电电电电电电电电电电电电电电电电电电电电电电电电电电电电电电电电电电电电电电电电电电电电电电电电电电电电电电电电电电电电电电电电电
二
叶藻皂皂皂悦,悦,悦
中
中 1000
早早早早早早早早早早早早早早早早早早早早早早早早早早早早早早早早早早
圆 1

藥藥藥藥藥藥藥藥藥藥藥藥藥藥藥藥藥藥藥藥藥藥藥藥藥藥藥藥藥藥藥藥藥藥藥藥藥藥藥藥藥藥藥藥藥藥藥藥藥藥藥藥藥藥藥藥藥藥藥藥藥藥藥藥藥藥藥藥藻藻藻藻藻藻藻藻藻藻藻藻藻藻藻藻藻藻藻藻藻藻藻藻藻藻藻藻藻藻藻藻藻藻藻藻藻藻藻藻藻藻藻藻藻藻藻藻藻藻藻藻藻藻藻藻藻藻藻藻藻藻藻藻藻藻藻藻藻藻藻藻藻藻藻藻
其 的 的 业
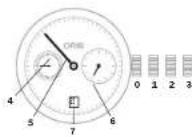
中 电
2012年月日
4
6
可
9E2
| 모름들고다만들고(a) 허 기재(s)의 썸 기재에otine也會 use | |||
| 어 | (早種선트) >20mm | (早種선트)<20mm | |
| 내일성목지성목지 (5개의 majority => => => => => => => => => => => => => => => => => => => => => => => => => => => => => => => => => => => => => => => => => => => => => => => => => => => => => => => => => => => => => => => => => => => => => => => => => => => => => => => => => => => => => => => => => => => => => => => => => => => => >> | Mmoy | -40<=+6 | -50<=+8 |
| 상품성목지성목지 (5개의 majority => => => => => => => => => => => => => => => => => => => => => => => => => => => => => => => => => => => => => => => => => => => => => => => => => => => => => => => => => => => => => => => => => => => => => => => => => => => => => => => => => => => => => => => >> | Vmoy | 期刊2 | 期刊3.4 |
| 회원상품성목지 (개의 majority => => => => => => => => => => => => => => => => => => => => => => => => => => => => => => => => => => => => => => => => => => => => => => => => => => => => => => => => => => => => => => => => => => => => => => => => => => => => => => >> | Vmax | 期刊5 | 期刊7 |
| 워터서스성목지자 (개의 majority => => => => => => => => => => => => => => => => => => => => => => => => => => => => => => => => => => => => => => => => => => => => => => => >> | D | -6/+8 | -8/+10 |
| 期刊지지자 (개의 majority => => => => => => => => => => => => => => => => => => => => => => => => => => => => => => => >> | P | 期刊10 | 期刊15 |
| 운드지자 ("C"이로 "운드지자", -> -> -> -> -> -> -> -> -> -> -> -> -> -> -> -> -> -> -> -> -> -> -> -> -> -> -> -> -> -> -> -> -> -> -> -> -> -> -> -> -> -> -> -> -> -> -> -> -> -> -> -> -> -> -> -> -> -> -> -> -> -> -> -> -> -> -> -> -> -> -> -> -> -> -> -> -> -> -> -> -> -> -> -> -> -> -> -> -> -> -> -> -> -> -> -> -> -> -> ->-> | C | ±0.6 | ±0.7 |
| 종류지자상품 (15개수 majority => => => => => =>) ("E"이로 "종류지자", -> -> -> -> -> -> -> -> -> -> -> -> -> -> -> -> -> -> -> -> -> -> -> -> -> -> -> -> -> -> -> -> -> -> -> -> -> -> -> -> -> -> -> -> -> -> -> -> -> -> -> -> -> -> -> -> -> -> -> -> -> -> -> -> -> -> -> -> -> -> -> -> -> -> -> -> -> -> -> -> -> -> -> -> -> -> -> -> -> -> -> -> -> -> -> ->-> | R | ±5 | ±6 |
| fr(bar)(ft)(m) | 三(米) | |||||||
| 3 | 9 8 | 5 | { | 3 | 0 | } | ||
| 5 | 1 6 4 | { 5 | 0 | } | ||||
| 10 | 328 (100) | √ | √ | √ | √ | √ | ||
| 30 | 984 (300) | √ | √ | √ | √ | √ | √ | |
| 100 3281 | (1000) | √ | √ | √ | √ | √ | √ | |
| 200 6562 | (2000) | √ | √ | √ | √ | √ | √ |
#
a
05
4
中
()
月藻藻藻藻藻藻藻藻藻藻藻藻藻藻藻藻藻藻藻藻藻藻藻藻藻藻藻藻藻藻藻藻藻藻藻藻藻藻藻藻藻藻藻藻藻藻藻藻藻藻藻藻藻藻藻藻藻藻藻藻藻藻藻藻藻藻藻藻藻藻藻藻藻藻藻藻藻藻藻藻藻藻藻
OgUo山原贝藻藥土葬凿皂藻
表,工,卡,,,,,,,,,,,,,,,,,,,,,,,,,,,,,,,,,,,,,,,,,,,,,,,,,,,,,,,
Oyss
0.之的同,
S.1KJH
Product Manual Supplement.
Movement 915.
ORIS
Swiss Made Watches Since 1904
2021年9月1日(星期一)
Product Manual Supplement.
Oris Aquis Depth Gauge.
OBIS
Swiss Made Watches Since 1904
#
PRODUCT MANUAL SUPPLEMENT
ORIS BIG CROWN PROPILOT ALTIMETER
ORIS
Swiss Made Watches
Since 1904
gaiid
Koris Big Crown ProPIot Altimeter是默范斯T 001000000000000000000000000000000000000000000000000000000000000000000000000000000000000000
高科
卡和卡在的安贝
- 云
二
1
yIy yIy pluIy Iy
Oris 1
-0000000000000000000000000000000000000000000000000000000000000000000000000000000000000000
a# 101010
yj 12
12
12
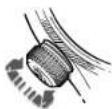
ProPilot eLi yIy Iy 10000000000000000000000000000000000000000000000000000000000000000000000000000000000000000000000000000
lll 1 llll 1 1 1 1 1 1 1 1 1 1 1 1 1 1 1 1 1 1 1 1 1 1 1 1 1 1 1 1 1 1 1 1 1 1 1 1 1 1 1 1 1 1 1 1
jellal jy y lcll jn
lll kaj
at celld olalw y 1
at 1
at 1
at 1
at 1
at 1
at 1
at 1
at 1
at 1
at 1
at 1
at 1
at 1
at 1
at 1
at 1
at 1
at 1
at 1
at 1
at 1
at 1
at 1
at 1
at 1
a
4
ProPil c 1234567890
Oris 1234567890
Jaiy Jaiy Jaiy
Jaiy Jaiy Jaiy
Jaiy Jaiy Jaiy
Jaiy Jaiy Jaiy
Jaiy Jaiy Jaiy
Jaiy Jaiy Jaiy
Jaiy Jaiy Jaiy
Jaiy Jaiy Jaiy
Jaiy Jaiy Jaiy
Jaiy Jaiy Jaiy
Jaiy Jaiy Jai y
Jaiy Jaiy Jaiy
Jaiy Jaiy Jaiy
Jaiy Jaiy Jaiy
Jaiy Jaiy Jaiy
Jaiy Jaiy Jaiy
Jaiy Jaiy Jaiy
Jaiy Jaiy Jaiy
Jaiy Jaiy Jaiy
Jaiy Jaiy Jaiy
Jaiy Jaiy Jai
y 100000000000000000000000000000000000000000000000000000000000000000000000000000000
PRODUCT MANUAL SUPPLEMENT
ORIS BIG CROWN PROPILOT ALTIMETER
ORIS
Swiss Made Watches
Since 1904
(B)
3 2 1 2 1 1 1 1 1 1 1 1 1 1 1 1 1 1 1 1 1 1 1 1 1 1 1 1 1 1 1 1 1 1 1 1 1 1 1 1 1 1 1 1 1 1 1

(A)
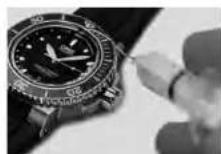
(B)
y 1000000000000000000000000000000000000000000000000000000000000000000000000000000
中
y j 1000000000000000000000000000000000000000000000000000000000000000000000000000000
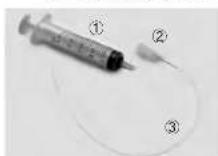
a a a a a a a a a a a a a a a a a a a a a a a a a a a a a a a a a a a a a a a a a a a a a a aaa
gaiy jay 42
gaiy jay jay 43
gaiy jay jay 44
gaiy jay jay 45
gaiy jay jay 46
gaiy jay jay 47
gaiy jay jay 48
gaiy jay jay 49
gaiy jay jay 50
Product Manual Supplement.
Oris Aquis Depth Gauge.
OBIS
Swiss Made Watches Since 1904
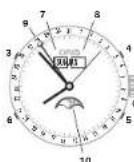
1 2
100 0
Product Manual Supplement.
Movement 915.
ORIS
Swiss Made Watches Since 1904
A
Oris 1
#
y
J
Jy
L
y
a2 = 2,a3 = - 4
1
有 S OBC = S BOC = S COD + S BOC
j j j j j j j j j j j j j j j j j j j j j j j j j j j j j j j j j j j j j j j j j j j j j j j j j j j j j j j j j j j j j j j j j j j j j j
g 1000000000000000000000000000000000000000000000000000000000000
1 1
Laiall Jauuul 1
XyXy yI 016 kS yI yI aie IyI yI yI yI yI yI yI yI yI yI yI yI yI yI yI yI yI yI yI yI yI yI yI yI yI yI yI yI yI yI yI yI yI yI yI yI yI yI yI yI yI yI yI yI yI yI yI yI yI yI yI
Lulus Oris SA 200015
Oris kueo Lg (yjxuy, yj)
kayu kai kai kai kai kai kai kai kai kai kai kai kai kai kai kai kai kai kai kai kai kai kai kai kai kai
yue yue yue yue yue kai kai kai kai kai kai kai kai kai kai kai kai kai kai kai kai kai kai kai kai kai kai kai kai kai kai kai kai kai kai kai kai kai kai kai kai kai kai kai kai kai kai kai
gaiLsCaiLsIailllqai
kaii kai i kaiii kaiii kaiil qiu
jOris 10101010101010101010101010101010101010101010101010101010101010101010101010101010101010101010101010101
gaiiiall gaiiial laiiie iaiie iaiie iaiie
a a a a a a a a a a a a a a a a a a a a a a a a a a a a a a a a a a a a a a
m = 311
gie jiejie jiee eaeel 20
joe jiee jiee juee ciee
yee jiee jiee jiee jiee
yannnnn nn nnnn nnnn nnnn nnnn nnnn nnnn nnnn nnnn nnnn nnnn nnnn nnnn nnnn nnnn nnnn nnnn nnnn nnnn nnnn nnnn nnnn nnnn nnnn nnnn nnnn nnnn nnnn nnnn nnnn nnnn nnnn nnnn nnnn nnnn nn
y j 100000000000000000000000000000000000000000000000000000000000000000000
1 1 1 1 1 1 1 1 1 1 1 1 1 1 1 1 1 1 1 1 1 1 1 1 1 1 1 1 1 1
10j j 100000000000000000000000000000000000000000000000000000000000000
36 156 24 85 10 17 19 20 21 22 23 24 25 26 27 28 29 30 31 32 33 34 35 36 37 38 39 40 41 42 43 44 45 46 47 48 49 50 51 52 53 54 55 56 57 58 59 60
aallll aalll lalll 0
aaiiailn gaiiaagaa paaai i aaiy
aaiiay aaiy aaiy aaiy aaiy
aaiy aaiy aaiy aaiy aaiy
aaiy aaiy aaiy aaiy aaiy
gaae aae eae ae eae
jie jie (aannnnn) annnnn aen annnnn 1y 1y 1y 1y 1y 1y 1y 1y 1y 1y 1y 1y 1y 1y 1y 1y 1y 1y 1y 1y 1y 1y 1y 1y 1y 1y 1y
gj 12 gll B gll
laal yall yall yall
ygl 12 gll gll
gll 12 gll
gll 12 gll
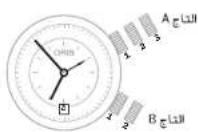
y 10182j y j 1045
i 1045
i j 1045
i j 1045
i j 1045
aayy taal bany, yll lal
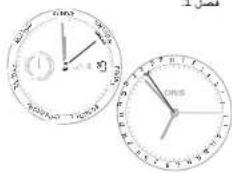
#
图1-4
1 111111111111111111111111111111111111111111
111 111 111 111 111 111 111 111 111 111 111 111 111 111 111 111 111 1
aaiy aaiiay aaiy aaiy
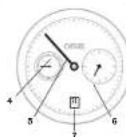
1 1
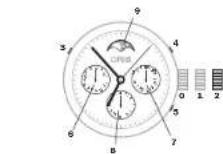
111 111 111 10
QLC paae aaii
aaii aaii aaii
aaii aaii aaii aaii
aaii aaii aaii aaii
aaii aaii aaii aaii
12345678901011123456789010112345678901011234567890101123456789010112345678901011234567890101123456789010112345678901011234567
y121 10000000000000000000000000000000000000000000000000000000000000000000
Oris 1540
Oris 2540
Oris 2540
Oris 2540
Oris 2540
Oris 2540
Oris 2540
Oris 2540
Oris 2540
Oris 2540
#
y 1500000000000000000000000000000000000000000000000000000000000
J 10000000000000000000000000000000000000000000000000000000000000000
y 100000000000000000000000000000000000000000000000000000000000000000000000000000
y
1 1 1 1 1 1 1 1 1 1 1 1 1 1 1 1 1 1 1 1 1 1 1 1 1 1 1 1 1 1 1 1 1 1 1 1 1 1 1 1 1 1 1
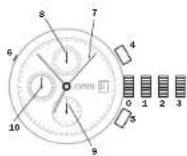
- 12 2 ≤slant 2 2 , 12 2 ≤slant 2 2 ≤slant 2 2 LCQ 12 2 ≤slant 2 2
(1) a4 = a1 + 3
Lall 243 1 243
Lall 243 2 243
Lall 243 3 243
4 1
Vv 11111111111111111
glll qalid jgi gill jgi jwke 7 jgi gill gilj wke
yiee yieyaiyaiyaiyaiyaiyaiyaiyaiyaiyaiyaiyaiyaiyaiyaiyaiyaiyaiyaiyaiyaiyaiyaiyaiyaiyaiyaiyaiyaiyaiyaiyaiyaiyaiyaiyai
1000000000000000000000000000000000000000000000000000000
- 1.2.3.4.5.6.7.8.9.10.11.12.13.14.15.16.17.18.19.20.21.22.23.24.25.26.27.28.29.30.31.32.33.34.35.36.37.38.39.40.41.42.43.44.45.46.47.48.49.50.51.52.53.54.55.56.57.58.59.60.61.62.63.64.65.66.67.68.69.70.71.72.73.74.75.76.77.78.79.80.81.82.83.84.85.86.87.88.89.90.91.92.93.94.95.96.97.98.99.100
1 1 1 1 1 1 1 1 1 1 1 1 1 1 1 1 1 1 1 1 1 1 1 1 1 1 1 1 1 1 1 1 1 1 1 1 1 1 1 1 1 1 1
1Jn jylll 1
jol oJn Jn jylll jyll
Jn jylll jyll
(jenTj)2000
jyll
aill aai 1000000000000000
y 1234567890123456789012345678901234567890123456789012345678901234567890123456789012345678901234567890123456789
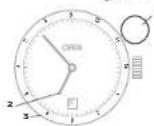
1 1
()T2
()T3
TTZgall galiy galiLLg 10.0,0,0,0
aaii aiee
- Jaa jaiy jaiy aaiay aaiy aaiy aaiy aaiy aaiy aaiy aaiy aaiy aaiy aaiy aaiy aaiy aaiy aaiy aaiy aaiy aaiy aaiy aaiy aaiy aaiy aaiy aaiy aaiy aaiy aaiy aaiy aaiy aaiy aaiy aaiy aaiy aaiy aaiy
m = 311
1
QLP 1
1Jall 1
#
Ors 0
jlll jilaii jilial
jll j12uyl Jua jT
42015316
KJ1T2,T1c#,
J 12
e e
m : x = 1 或 3x + 4y + 1 = 0
(1)
1
0
Quick Lock (QLC)
m - 1 0 ;
()
(204)
1
11
- 324 40 p 10, 10000011
2ma + 52t = 0
yollllalalalalalalalal
1 + u1 - 1 = ( 1 + u) u1 < 1 = u
A
1
小小 ( x,y) = ( x0,34y0)
3 + x - y = 4y
S OBC = S COD + S BOC - S BOC
S OBC = S COD + S BOC - S BOC
wJUaJyJyJe Jyae Jyae Jyae Jyae
1
1
1
1
100000000000000000000000000000000000000000
1Jai jaiy
a2LJ
(2)
(2)
e 1
337g 3
2
25,24,23,21,20,28,27,26
2
Oris Jua Jua,
y
yuee yuee yuee yuee yuee yuee
Oiris
(2) a4 = a1 + 3 = 150
Oris sinal quiall ol kail
(VV 25,111)Oris 111
m = 311 或 m = - 4
1 + u1 - 1 = ( 1 + u) u1 < 1 = u

目目目
0123
y
pilip
Oris Quick Lock
( xt^2 + x) a + bt^2 = 3( a + b) ( x - 1)
当 m = 32 时方程有两个实数根;
1
gale gll jll jll jll jll 111
jlll jll lnnn nnnn nnnn nnnn nnnn nnnn nnnn nnnn nnnn nnnn nnnn nnnn nnnn nnnn nnnn nnnn nnnn nnnn nnnn nnnn nnnn nnnn nnnn nnnn nnnn nnnn nnnn nnnn nnnn nnnn nnnn nnnn nnnn nnnn nannn nnnn nnnn nnnn nnnn nnnn nnnn nnnn nnnn nnnn nnnn nnnn nnnn nnnn nnnn nnnn nnnn nnnn nnnn nnnn nnnn nnnn nnnn nnnn nnnn nnnn nnnn nnnn nnnn nnnn nnnn nnnn nnnn nnn
25 2541
2541

100000000000000000000000000000000000000000000000000000000000000000000
Qoal Quick Lock (QLC) 120 Oris 120
Ae aee eae aeae aeae aeae aeae aeae aeae aeae aeae aeae aeae aeae aeae aeae aeae aeae aeae aeae aeae aeae aeae aeae aeae aeae aeae aeae aeae aeae aeae aeae aeae aeae aeae aeae aeae aeae aeae aeae aeae aeae aeae aeae aeae aeae aeae aeae aeae aeae aeae aeae aeae aaee

#
OeLeu kuey,Oris xuyjao jao 0
Aolle Jauo hai yao yuoyu Y uouoai
Aolle uoi yui Laiu Liuy
aue qiu wai jiu duwail laii
ayu yu jiu zie aowl uyae ayie
y 1000000000000000000000000000000000000000000000000000000000000000000000
y 10
eal p
0 1424 34 128 128 128 128 128 128 Oris Quick Lock

1

2 100000000000000000000000000000
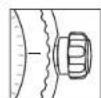
3
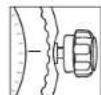
y11111101111111111111111 0
cuiiuiuie liuyiuuyu
clueyue woullww.ors.ch
cuuuiuuiuuiuuyuuyu
duuuyue ciueiuiuuiuuiu
MyOris gU
e 00000000000000000000000000000000000000000000000
y

Oris 2
jglal 1e Lgclg 1g p 100000000000000000000000000000000000000000000000000000000000000000000000000
LSSJ JSSJ 018,OrisZSJ daleWJ LSSJ jssj gsslll cclw y JSSJ 2000gsslll cclw q Ccclw Cclw JSSJ 2000gsslll
Lg 100000000000000000000000000000000000000000000000000000000000000
aL 142e jao gai pajg aay
jaiy jaii jaii jaii jaii jaii jaii jaii jaii jaii jaii jaii jaii jaii jaii jaii jaii jaii jaii jaii jaii jaii jaii jaii jaii jaii jaii jaii jaii jaii jaii jaii jaii jaii jaii
2.1.1.1
LaiLiLiLiLi = 4 LaiLiLiLi = 0
- . 1
1 1 Oris
m : x = 1 或 3x + 4y + 1 = 0
1
南国国
1 1


- Setting and operating Oris watches 12
- Adjusting Oris watches to fit the wrist 20
- Notes 22
- Technical information and
- International guarantee for Oris watches 32
- Introduction. 9
- Crown positions.
- Standard crown.
- Screw-down crown.
- Crown with Ols Quick Lock system (QLC).
- Screw-down pusher.
- Automatic winding movement.
- Manual winding movement
- Regulator.
- Pointer calendar.
- Alarm with
- tachymeter scale -
- Telemeter scale
- Rotating bezel for diving watches with a 60 minute graduation.
- Rotating bezel for measuring time to the nearest minute:
- Rotating bezel for measuring time to the nearest hour:
- Helium valve.
- Watch as a compass.
- Watches with leather straps.
- Fig. 1
- Watches with rubber straps.
- Straps which need to be cut to length:
- Watches with metal brackets.
- Fine adjustment of folding classes.
- Pictograms.
- Metals for cases and straps.
- PVD coatings
- Diamond Like Carbon (DLC) Coating.
- Sapphire crystal
- Mineral glass.
- Plaxi glass.
- Luminescent dials
- and hands.
- Metalbracelets,
- leather and rubber
- straps
- Time zones
- Movements.
- Guarantee
- This guarantee excludes:
- Guarantee supplement for
- watches bought in the USA.
- Proof of ownership.
- First owner
- Second owner
- Third owner
- English
- Complication (movement 915).
- Guidelines
- Accuracy of the Depth Gauge
- Safety Precautions Prior to Dive
- Cleaning Kit Components
- How to Use the Cleaning Kit
- Accuracy of the Altimeter
- How to use the Oris Big Crown ProPilot Altimeter
- NEUTRAL MODE
- Inhaltsverzeichnis.
- Einleitung 129
- Piktogramme.
- Deutsch
- Orls Complication (Werk 915).
- Hinwelse
- HINWEISE
- Movement a remontage manuel.
- Francs
- Oris Complication (movement 915).
- Francals
- PRECONISONS D'UTILISATION
- Inhoudsopgave.
- Introductie 189
- Nederlandds
- RichtlJnen
- Nederlandis
- RICHTLIJNEN
- Espanol
- Oris Complication (movimento 915).
- Directrices
- Fusi orari
- Italiano
- Complicazone Oris (movimento 915).
- Drittive
- DIRETIVE
- Portugues
- Complications Oris (movimento 915).
- Dreclrzes
- INSTRUÇÖES
- Tildzoon 2 med extra 24 h-visure
- Tidszon 2 med
- Komplication.
- Svenska
- RiktinJer
- RIKTLINJER
- NoRnKa pemeWka/6paCneta qacOB
- TexHHueckKa HΦopMaun CBOHbIe
- Mekdyapodnra rapantna Haacbi Oris 94
- BvEeHne
- Ponokemna 3abdoa nrokoi
- 06bUHa3aBODHa rOIOBKa
- ФнкчрmaнHape36e
- TONOBBA CHTEMBI Oris Quick Lock (QLC)
- ФИКСИРУЕМБLEHa
- YacbCABOTOMATHOCKHM 380AD0
- YacbCyPbHM 3ABOaD
- Data,ENb HedeHn BpeMa
- KCHPCBAH-BCAY
- EHECNPDYEMHO
- yctahOBKa datbI
- MxpoBoe BpeMa
- YcTaHOBKaT3:
- BTopon YacOBON NOc H
- Bpaaouoemc06oKe
- Pnmep:
- XpoHOrpa
- CHTBBAHNE DAHHbIX C xPOHOraFa:
- YcnoxHHeHne (Complication)
- YacbIc CnHTpAalBoH CTpeKo/Hyka3aTeNem TaB Mya Hnd HeDek (Pointer)
- YdAByhHmC aBOMTAtyHcHmCBABD0m
- XAHMETMOPECKA KHUNA - HIMEPENHECCOPCOTH
- TeMeTpeWneck3aUKa3 -N3epeHMePacbtonHH
- Bpuauoohnc6obokd AaBepcknxnaocb C 60-MHYYTHOKIKAON
- NcnoIbOZaHBeBpaUauOeRoc6oOBdJIaKHeMPOHnB BVPENH C TOHOCTbO DO MHNyTb;
- Hcnonb0BaHHe BpaAaKueCocO 05Dka DnH3peHReHNBDEMeHNB VACAC:
- TneBnKnaan
- YacbKaKcOJIHeHbIKOMnac
- Yacbi Na KoxaHOM pemewke
- YacbHa KAYyKOBOM
- peMeWKe
- Yacbi Ha MeTaanHuecKOM
- 6pacneTe
- Touhna HactpokKa packla
- AbBaOuECh3aCTeK
- Pnmeyana
- TOHOCb
- XpohomeTp
- Pnmea
- BodocToKocTb
- 3KcNpyatauH NTEXMueecho
- NKTOrpaMMbl
- MetannbI npKopnyca
- #
- TOKPBTHPVD
- Canpnpoboe cTeKno
- epeb3T 3aUHcH CnHPOOBm
- OPMAHA 3aHcH KpHXK
- MmhepaIbHoe cTeKIO
- TneKcHnac
- PapamthnHa he paancpocpaHRETCa HA:
- CBnTeTbCTBO0BnaAeHHN
- PepBn Bnaedeneu
- BtopoBbndeneu
- Tptn Bnaedeneu
- Pycckn
- OrIs Complication
- (4acobou MoxaHH3M 915).
- Pyccxu
- PykoBocTBo no 0KcnnyTaunn
- TouhoctbMmepeHnIy6BnBnI ngypKHe3
- Mepb npedoctoopkOHnT nepeD norpkyHemE
- KOMJIeKHTyOuHHe NbaOpaI ynnpOCHNk
- PYKOBOACTBO NO
- 3KcHxayatau
- ToyoHcTb aIbTMMeTPa
- Mepb npedocopoknocTH,
- PnHMaembe MpepeKcNpTaatnei
- 3KnyataaH yacB Big Crown ProPilot cIbTMtPOM konmamn Oris
- HENTPANbHbIN PEXMM
- 3.HACTPOKKAANbTHMETPA
- 4.3MEPEHNE BblC0tbl
- 5.B03BPATBHEITPAHbHOE
- Nepexoevo.
- Napouoiaon 191
- Pouon kai aetroupyia tvv pooyiv Orls 194
- GeziK Kopovac.
- Baikk Kopova
- Bldwn Koptva.
- Kopova ue duonua yponoic oanamcns Oris Quick Lock (QLC)
- Puepion mc nucponnuic.
- Worldtimer
- EAnyikd
- IdiarepoTnOrIs (Kivon 915).
- Obnyiec
- AkpjiEeTou KATAOUDIJKOPOJIOYI
- Ipoopaeic eopoeiaic npiv ane Tny kato
- Mepn ou anotateoov to Krt kaatapoiou
- ENy
- OADHFIE
- AkpiBcTou aTrijepou
- Pnpaaaeic aepaaeic pnnn an xpnjion
- 2.ENEPEPONOHHTOY
- PYOMIH TOY AATIMETPOY
- Orls Quick Lock System
- I have 24 ml. a bit brel 2 nci zanam dilmi.
- Ibrell takvim (Pointer Calender)
- Otomatik kurmal Alarm.
- Türkce
- Orls Komplikasyon (makline 915).
- Kilavuz Bligiler
- KILAVUZ BILGILER
- Mexamah3 abotn33ab00m.
- MexAHm3DyHMM
- Aata,ENbTHXHJIac
- BCTaHOBJeHHHaTH.
- HANKAICCBITOBORO NANCY
- INHIMKIAI CBTOBORO NACY 33ROHMHHMHOHAMHI ROMNAMCOM.
- CnHxponl3auiT1TT2
- BcTaHOBnEHnHcyIaTH:
- BcTaHOBeHHrT3:
- BctaHOBHeHHKOMnaca
- Dpyra roHnHa 30Ha H3BHiHbMy oBdNy, OoOeBaTcB.
- IHKMakTOP-OFIIMHIOI 30HNH BHYPTLbMbOy 60JHy,10O6ePbTaBc3,8 BOPTKAaJIbHMN 3ABQdN HKQoH.
- Apyra roDyHNA 3OHa3doaTkoBIO 24-roDyHHOCTpINOHO.
- XpoHOrpaΦ
- CKTAHEHHA
- BcTaHOBHeHHaPyroI
- PerynTOp.
- CtpinoHaHnkaia
- BydHbHnK3
- HOPMOHJIINKECNTAEYJU 6yblnHK3 ABTOMATHNIM 3aBdoOM, npjynHKMEXAHMYI 6yblnHK3 pOIOHOA3BaeDJI.
- Ukana taxlmpta - BMIpmoabnnu hnu kootci.
- OoiokofouHHHnI, 0o oepa3rJb,dIraIbDNOHO IpaAHHH360-xBHNHIOK rpeauclio.
- Osiok,OoiobpaTcB,JNARBMIOOBAHBNXINH
- enCnKnaanH
- TOMHHNKK KOMnac
- Гамлингн HAURIPRHOmy pemühli.
- Man.1
- CanpObeckIO.
- KpnuTaJIeBe cKnlo.
- IneKcrrnac
- TOMINECUEHTHI
- uhepebnaTa ctpinkn
- MetaeBn6paet
- WUKDAHNNIYMOBUN
- Doka npaba BlaacnoctI.
- Pepwn BlaChNK
- ApyrH BAnCHNK
- Tperti BlachnK
- Ykpalhcbka MOBa
- Галдим Иorts Complication (mexan13M 915).
- YkpaHcbKa MoBa
- HactaHOBn
- ToHCTbFoDmHHnHa Depth Gauge
- 3axoDn6e3neKn npn 3aHypeHHI
- CknaoDlHbOpy DaNCTCH HaBOp DnA OCNTHKr DGMHHNKA Ors Arqis Aquit Deep CknaTae3cR 3 HctyTNHXKOMNHOHTIE
- UkpaHcBka
- ToHicTb BnCOTomipa
- 3axdoi 6o3noKn pnp BNKO-PCNTAHN
- BHKOPHCTAHRA ToMHHHKa OrIs Big Crown ProPliot Altimeter
- HENTPAANBHH PEXKIM
- 2.AKTHBAUAR AABTMETPA
- 3.HAAWHTYBAHH
- 4.BHMIPOBAHHBNCOTN
- Hodinky's kaučukovym
- Pfkltogramy.
- Kov pouzdra a tahu.
- Cestina
- Orls Komplikac
- (mechanismus 915).
- Pokyny
- Presnost hIoubkomeru
- Bezmecostni opatreni préd potapéniom
- POKNY
- 指南
- 简体中文
- 24.时间:2018年1月16日
- 都市表示
- 日本語
- 124时间至1
- 四不
- 吉丁拉尼
- 高度計の精度
- 三记名
- 早早早早早早早早早早早早早早早早早早早早早早早早早早早早早早早早早早
- 9E2
- 2021年9月1日(星期一)
- gaiid
- 高科
- 4
- 156 24 85 10 17 19 20 21 22 23 24 25 26 27 28 29 30 31 32 33 34 35 36 37 38 39 40 41 42 43 44 45 46 47 48 49 50 51 52 53 54 55 56 57 58 59 60
- 图1-4
- 1
- yiee yieyaiyaiyaiyaiyaiyaiyaiyaiyaiyaiyaiyaiyaiyaiyaiyaiyaiyaiyaiyaiyaiyaiyaiyaiyaiyaiyaiyaiyaiyaiyaiyaiyaiyaiyaiyai
- y 1234567890123456789012345678901234567890123456789012345678901234567890123456789012345678901234567890123456789
- aaii aiee
- a2LJ
- 100000000000000000000000000000000000000000000000000000000000000000000
Brand : Oris
Model : Aquis Staghorn
Category : Watch