
Hot Spot Crystal IR - Heating Klarstein - Free user manual and instructions
Find the device manual for free Hot Spot Crystal IR Klarstein in PDF.

| Product type | Infrared heater |
| Brand | Klarstein |
| Model | Hot Spot Crystal IR |
| Nominal power | 850 W |
| Power supply | 220-240 V~, 50/60 Hz |
| Adjustable temperature | 5 to 40 °C |
| Protection rating | IP24 |
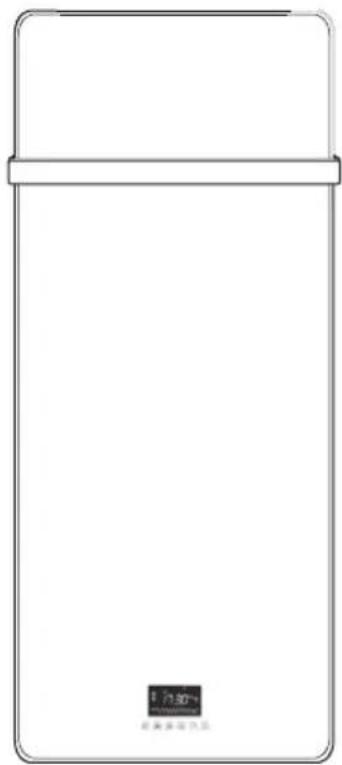
| Dimensions (HxWxD) | 122 x 47 x 2.8 cm |
| Approximate weight | 10 kg |
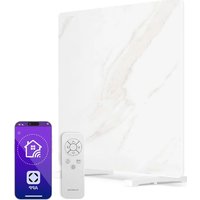
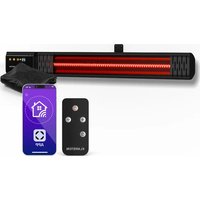
| Material | Crystal glass (radiant panel) |
| Installation type | Wall-mounted |
| Heating modes | Low power, high power, weekly programming, thermostat |
| Functions | Shutdown timer, child lock, remote control |
| Display | LED screen with day, time, temperature |
| Maintenance | Cleaning with damp cloth, vacuuming the grilles |
| Safety | Overheat protection, automatic shut-off, do not cover |
| Repairability | Repair by qualified electrician |
| Remote control batteries | Button cell (remove insulation) |
| Usage | Indoors only, not as main heating source |
| Safety distances | 50 cm from ceiling, 15 cm from floor, 10 cm from sides |
Frequently Asked Questions - Hot Spot Crystal IR Klarstein
User questions about Hot Spot Crystal IR Klarstein
0 question about this device. Answer the ones you know or ask your own.
Ask a new question about this device
Download the instructions for your Heating in PDF format for free! Find your manual Hot Spot Crystal IR - Klarstein and take your electronic device back in hand. On this page are published all the documents necessary for the use of your device. Hot Spot Crystal IR by Klarstein.
USER MANUAL Hot Spot Crystal IR Klarstein
HOT SPOT CRYSTAL IR
ONNNNNNNNNNNNNNNNNNNNNNNNNNNNNNNNNNNNNNNNNNNNNNNNNNNNNNNNNNNNNNNNNNNNNNNNNNNNNNNNNNNNNNNNNNNNNNNNNNNNNNNNNNNNNNNNNNNNNNNNNNNNNN
KLARSTEIN
www.klarstein.com
Note: The device is not suitable for use as a primary heat source.
Berlin Brands Group UK Limited
PO Box 42
272 Kensington High Street
London, W8 6ND
United Kingdom
Dear Customer,
Congratulations on purchasing this device. Please read the following instructions carefully and follow them to prevent possible damages. We assume no liability for damage caused by disregard of the instructions and improper use. Scan the QR code to get access to the latest user manual and more product information.

CONTENTS
Safety Instructions 20
Scope of Supply 22
Installation 24
Operation 26
Remote Control 29
Cleaning and Care 30
Technical Parameters 31
Disposal Considerations 32
Manufacturer & Importer (UK) 32
CONTENTS
| Item number 10032942, 10032943 | |
| Power 850 W | |
| Power supply 220-240 V~ 50/60 Hz | |
| Adjustable temperature 5 bis 40 °C | |
| Protection class IP 24 | |
| Measurements (HxWxD) 122x47x2.8 cm |
SAFETY INSTRUCTIONS
Read and follow all the instructions in this manual, even if you feel familiar with the unit. Keep the instruction manual for future reference. When using an electrical device, the safety instructions must be followed, including the following:
- Only use the voltage indicated on the nameplate of the heater.
- Do not obstruct the airflow at the air inlet or outlet in any way as the unit may overheat and become a fire hazard.
- Do not cover the ventilation slots or the air inlets and outlets by placing the unit against a surface. All objects must be at least 1 meter away from the front, sides, and rear.
- Do not place the appliance near a heat source.
- Do not operate the unit in an environment where petrol, paint or other easily flammable substances are stored.
- This equipment will become hot during use. Do not allow bare skin to touch the hot surface.
- Switch off and allow to cool before moving.
- Do not use the appliance to dry laundry.
- Do not insert foreign objects or metal objects into the interior of the appliance or the ventilation slots as this may result in electric shock, fire or damage to the appliance.
- Do not immerse the appliance in liquid or allow water to run inside as this may result in electric shock.
- Do not operate the equipment with a damaged power cord, plug, or socket after the equipment has malfunctioned, been dropped, or is damaged in any way. Refer the product to an authorized electrician for inspection, electrical or mechanical adjustment, maintenance, or repair.
- Do not operate the equipment with wet hands.
- The most common cause of overheating is the buildup of dust and lint on the product. Ensure that these deposits are regularly removed by pulling the power plug and vacuuming the air vents and grill.
- Always unplug the appliance before cleaning. Do not use abrasive cleaners for cleaning. Clean with a damp (not wet) cloth that has only been dipped in soapy water.
- Do not connect the appliance to the power supply until it has been fully assembled.
- The unit is not intended for outdoor use.
- Do not use the unit in the immediate vicinity of a bath, shower, swimming pool or other liquid.
- Always operate in an upright position.
- Switch off and allow to cool before moving.
- Do not operate with a coiled cable as heat is highly likely to form and is sufficient to constitute a hazard.
- The use of an extension cord is not recommended for this unit.
-
Do not unplug the power cord until the power is turned off.
-
Do not unplug the power cord from the outlet by pulling on the power cord. Always touch the plug.
- Disconnect the power plug when the unit is not in use.
- This appliance is not suitable for use on long hair carpets or flocative rugs.
- Do not allow the power cord to come into contact with hot surfaces during operation.
- Do not install the power cord under carpets, rugs, runners, etc. Place the power cord outside walking areas so that no one can trip over it.
- Do not twist, bend, or wrap the power cord around the product as this may cause the cord insulation to weaken and break. Always ensure that the entire power cord is unwound from the cable winder.
- Do not use outdoors or on a wet surface.
- Do not store while the unit is still warm.
- This device may only be used by children from the age of 8 and up and by persons with reduced physical, sensory and mental capabilities or a lack of experience and / or knowledge if they are supervised or have been instructed in the safe use of the device and have understood the resulting dangers.
- Cleaning and user maintenance should not be done by children unless they are 8 years of age or older and are supervised.
Children must not play with the device. - This equipment is not intended for use by small children or infirm persons without care. Young children must be supervised so that they do not play with the device.
- The unit must not be operated under wall outlets.
- Do not use the appliance with any programming, timer or other device that switches the heater on or off. There is a risk of fire if the heater is covered or incorrectly installed.
- Do not cover the heater! Danger of overload!
- To avoid the risk of electric shock, do not immerse the appliance and power cord in water, rain, moisture or liquids other than those required to operate the appliance.
- The safety guard does not provide complete protection for small children and infirm persons.
- If the power cord is damaged, it must be replaced by a qualified electrician to prevent hazards.
- Use the device only for the intended purpose as described in the operating instructions.
- Any other use is not recommended and may result in fire, electric shock, or other personal injury.
- This equipment is intended for domestic use only and not for commercial or industrial use.
SCOPE OF SUPPLY
Heater body
Remote control
Mounting material
| Name Illustration Quantity | ||
| Wall bracket 2 | ||
| Washer | 2 | |
| Nut | 2 | |
| Spacer | 2 | |
| Dowel | 4 | |
| Screw | 4 |
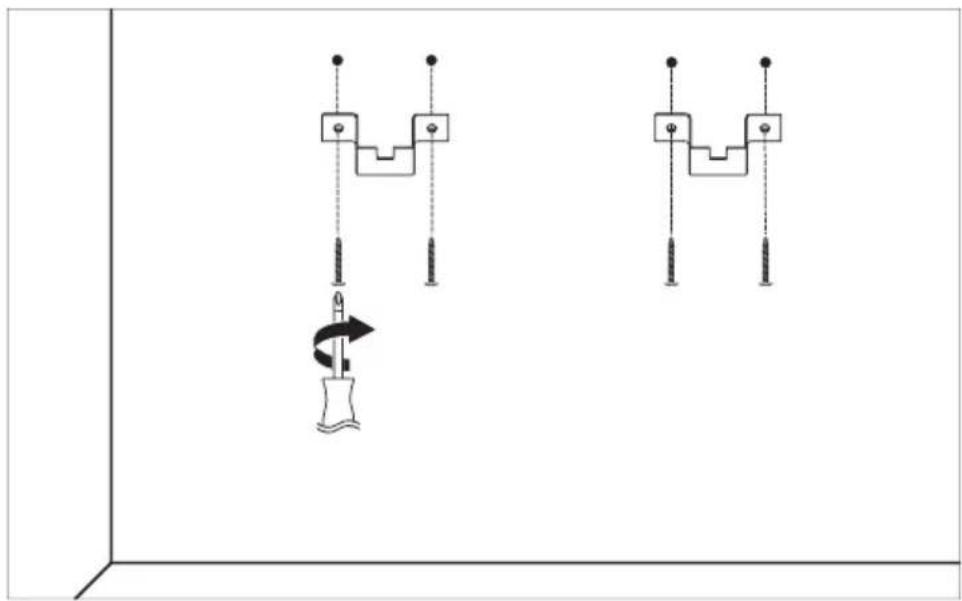
INSTALLATION
Mark the drill holes on the wall. The following minimum distances must be observed:
To the ceiling 50~cm
To the floor 15 cm
To the sides 10cm

WARNING
Risk of electric shock! The horizontal distance to showers, bathtubs, washbasins etc. must be at least 60~cm
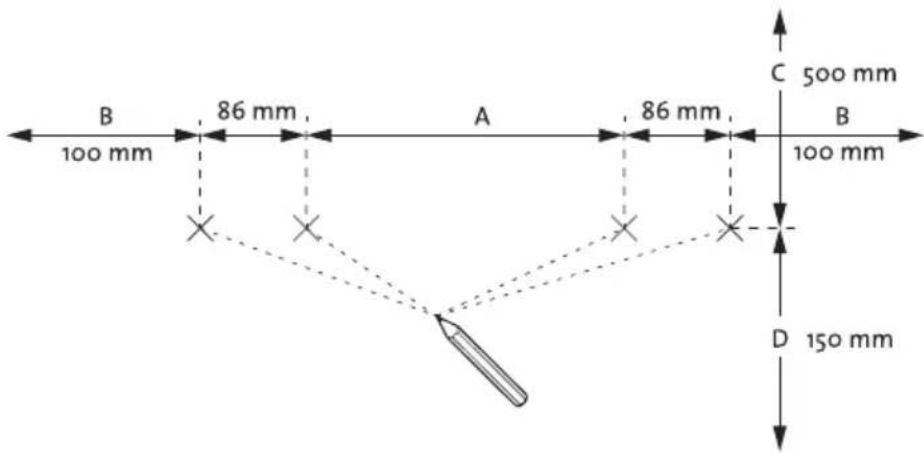
| A (mm) B (mm) C (mm) D (mm) | |||
| 282 250 650 | 300 | ||
Drill the holes. The drill must have a diameter of 8mm . The drilling depth is 50mm . Insert the supplied dowels.
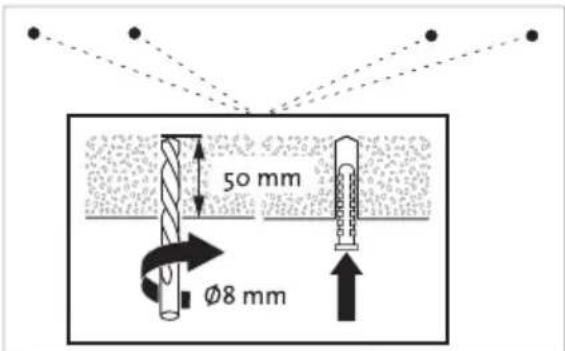
Screw the wall brackets to the wall as shown. Use the supplied screws.
- Place the washers on the upper thread.
- Screw the spacers onto the lower threads.
- Hang the product with the upper threads on the wall brackets. The washers must be located on the inside of the wall brackets.
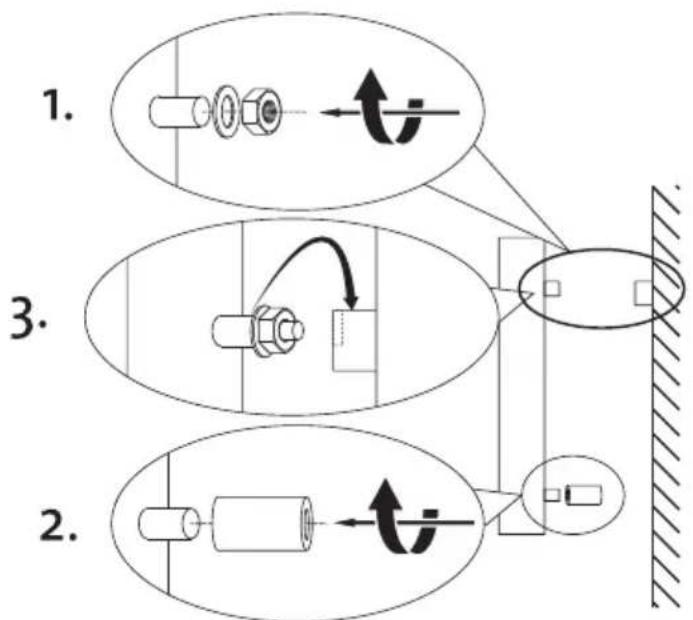
- Tighten the nut with a 12-mm spanner.
- Adjust the wall contact by turning the spacers on or off. The spacers of the lower fastening must lie securely against the wall.
- Connect the mains plug to a suitable socket.
The installation is finished!
OPERATION
Control panel
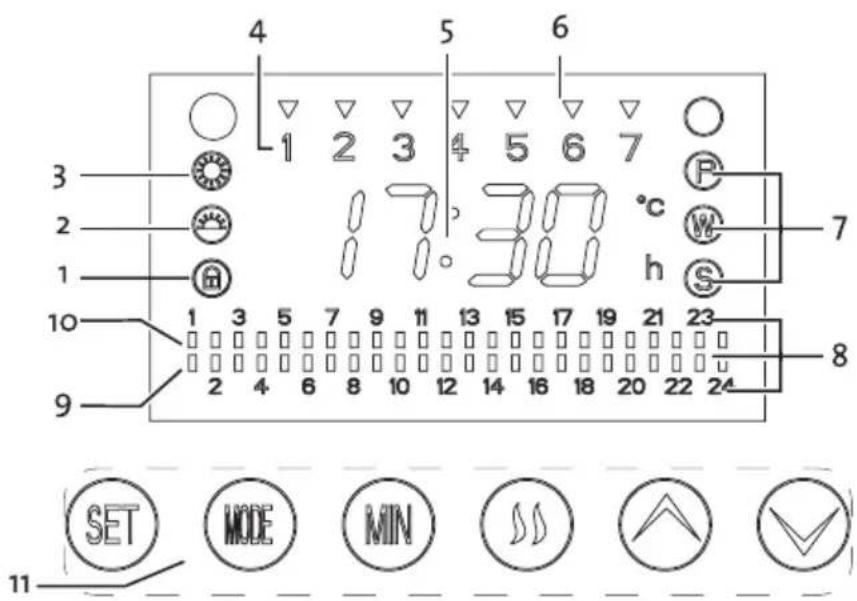
1 Child lock indicator
2 Low heating level indicator
3 High heating level" indicator
4 Current day of the week
5 Main display
6 Active weekdays
7 Mode display (P, W or S mode)
8 Hour display
9 Displaying: inactive hours
10 Displaying: active hours"
11 Operating buttons
Setting the current day of the week and time
When you turn on the unit, P mode is activated. In P mode, you can set the day of the week and the time. In P mode there is no heating operation instead.
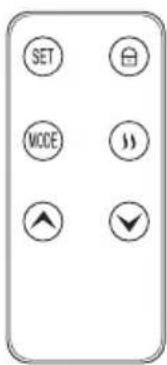
- Change the day of the week by pressing and holding the SET button for 5 seconds. Let go of the button when the correct day of the week lights up.
The day of the week is indicated by the numbers in the upper line.
1 Monday
2 Tuesday
3 Wednesday
Thursday
5 Friday
6 Saturday
7 Sunday
- Change the set hour by pressing and holding the MODE button for 5 seconds. A run of the hours begins. Release the button when the correct hour is displayed.
- Change the set minute by pressing and holding the MIN button for 5 seconds. A run of minutes begins. Release the button when the correct minute is displayed.
Setting the weekly program
In W mode, you can set the weekly program. On the set days of the week and set hours of the day, the full heating capacity is shaded.
- Press the SET button to enter W mode (W mode indicator lights up).
- Select the days of the week on which the heating program is to be activated by pressing the MODE button. You can choose between a single day, all days, or a combination of days set at the factory. The days of the week on which the heating program is activated are marked with the indicator for active weekdays (4). The following combinations can be set. (1), (2), (3), (4), (5), (6), (1, 3, 5), (2, 4, 6), (6, 1). (1, 2, 3), (4, 5, 6), (1, 2, 3, 4, 5, 6, 7), (1, 2, 3, 4, 5), (1, 2, 3, 4, 5, 6), (7).
- Press the keys and to select the hours of the day when you want to heat. You can choose from various factory-set combinations of hours (from 0-24 hours).
Note: You can select the hours for 10 seconds after activating the W mode. If you then want to set the hours, briefly exit W mode by pressing the SET key. Return to W mode immediately afterwards by pressing the SET button again.
- On each hour indicator (6) there is an indicator whether heating is in this hour (8/up) or whether heating is not in this hour (9/down).
Note: The weekly program is only activated if the product is in the W mode.
Automatic mode/setpoint temperature maintenance
In S mode, a preset target temperature is maintained.
- Press the SET button to enter the S mode. (Mode indicator S lights up).
The current room temperature is displayed on the left of the main display. The set target temperature is shown on the right of the display.
-
Set the target literature using the keys and .
-
If the room temperature is equal to the setpoint temperature, the heating mode switches off.
- If the room temperature drops below 2-c of the setpoint temperature, the weak heating mode is switched on (low heat indicator (9) lights up).
- If the room temperature drops below 4-c of the setpoint temperature, the strong heating operation is switched on (indicator for strong heating power (10) lights up).
Starting heating operation manually
If required, you can start heating operation manually with low or high heating power.
- Press the SET button to enter the S mode. (Mode indicator S lights up).
- Start the heating mode by pressing the key . Press the button again to switch between low and high heating power. The current heating capacity can be seen from the indicators for low heating capacity (9) and high heating capacity (10).
- To end the manually started heating process, press the SET key to exit P mode.
Start switch-off timer
In S mode, you can set a countdown after which the heating process is automatically switched off.
- Press the MODE button to display the current countdown (right in the main display).
Note: After 10 seconds without input, the main display returns to the display of room and setpoint temperature.
- Press the MODE button to extend the countdown by one hour.
Child lock
To prevent accidental operation by children, you can activate a child lock. When child lock is activated, the product does not respond at the touch of a button.
- Press and hold the button for 5 seconds to turn the child lock on or off.
- When the child lock is activated, the child lock indicator (11) lights up.
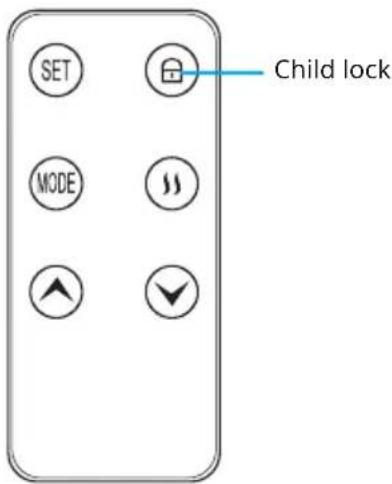
REMOTE CONTROL
Operation by remote control
Before using the remote control for the first time, remove the insulating foil from the battery compartment. The remote control has an additional key to switch the child lock on or off.
The remote control cannot be used to set the current day of the week and the time.
CLEANING AND CARE
WARNING
Risk of electric shock! Disconnect the mains plug before cleaning the dust container.
- Before cleaning, wait until the device has cooled down and unplug it from the mains.
- Do not use abrasives or solvents. Wipe the product with a soft, damp cloth.
- It is necessary to remove dust from the surface regularly.
- Washing and immersing the device in water is prohibited!
- If you do not use the heater for a longer period of time, wipe it off and store the device in its packaging.
- The device should be placed in a dry, ventilated room. Avoid high humidity and mechanical impact on the device.
TECHNICAL PARAMETERS
| Model identifier(s): 10032942, 10032943 | ||||||
| Item Symbol Value Unit Item Unit | ||||||
| Heat output Type of heat input, for electric storage local space heaters only | ||||||
| Nominal heat output P | nom | 0.85 kW manual heat | heat control, with integrated thermostat | NO | ||
| Minimum heat output (indicative) | Pmin | 0.85 kW manual heat | heat control with room and/or outdoor temperature feedback | NO | ||
| Maximum continuous heat output | Pmax | 0.85 kW electronic heat | heat control with room and/or outdoor temperature feedback | NO | ||
| Auxiliary electricity consumption fan assisted heat output | NO | |||||
| At nominal heat output (fan motor) | eImax | N/A kW Type of heat | heat output/room temperature control | |||
| At minimum heat output (fan motor) | eImin | N/A kW single stage | heat output and no room temperature control | NO | ||
| In standby mode el | SB | 0.0008 kW Two or more manual stages, no room temperature control | NO | |||
| with mechanic thermostat room temperature control | NO | |||||
| with electronic room temperature control NO | ||||||
| electronic room temperature control plus day timer | NO | |||||
| electronic room temperature control plus week timer | YES | |||||
| Other control options (multiple selections possible) | ||||||
| room temperature control, with presence detection | NO | |||||
| room temperature control, with open window detection | NO | |||||
| with distance control option NO | ||||||
| with adaptive start control | YES | |||||
| with working time limitation | NO | |||||
| with black bulb sensor | NO | |||||
| Contact details | Chal-Tec GmbH, Wallstraße 16, 10179, Berlin, Germany | |||||
DISPOSAL CONSIDERATIONS
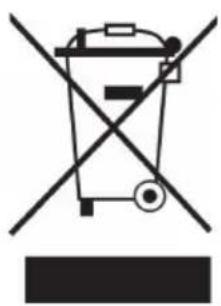
If there is a legal regulation for the disposal of electrical and electronic devices in your country, this symbol on the product or on the packaging indicates that this product must not be disposed of with household waste. Instead, it must be taken to a collection point for the recycling of electrical and electronic equipment. By disposing of it in accordance with the rules, you are protecting the environment and the health of your fellow human beings from negative consequences. For information about the recycling and disposal of this product, please contact your local authority or your household waste disposal service.
This product contains batteries. If there is a legal regulation for the disposal of batteries in your country, the batteries must not be disposed of with household waste. Find out about local regulations for disposing of batteries. By disposing of them in accordance with the rules, you are protecting the environment and the health of your fellow human beings from negative consequences.
MANUFACTURER & IMPORTER (UK)
Manufacturer:
Chal-Tec GmbH, Wallstrasse 16, 10179 Berlin, Germany.
Importer for Great Britain:
Berlin Brands Group UK Limited
PO Box 42
272 Kensington High Street
London, W8 6ND
United Kingdom
Chere cliente, cher client,
FICHE DE DONNÉES PRODUIT
Berlin Brands Group UK Limited
PO Box 42
272 Kensington High Street
London, W8 6ND
United Kingdom
Estimado cliente:
Berlin Brands Group UK Limited
PO Box 42
272 Kensington High Street
London, W8 6ND
United Kingdom
Gentile clientele,
PRODUTTORE IMPORTATORE (UK)
Produttore:
Chal-Tec GmbH, Wallstraße 16, 10179 Berlin, Germania.
Berlin Brands Group UK Limited
PO Box 42
272 Kensington High Street
London, W8 6ND
United Kingdom
Geachte klant,
INSTRUCTIES VOOR AFVOER

Berlin Brands Group UK Limited
PO Box 42
272 Kensington High Street
London, W8 6ND
United Kingdom


KLARSTEIN
- HOT SPOT CRYSTAL IR
- KLARSTEIN
- Dear Customer,
- CONTENTS
- SAFETY INSTRUCTIONS
- SCOPE OF SUPPLY
- Mounting material
- INSTALLATION
- WARNING
- OPERATION
- Control panel
- Setting the current day of the week and time
- Setting the weekly program
- Automatic mode/setpoint temperature maintenance
- Starting heating operation manually
- Start switch-off timer
- Child lock
- REMOTE CONTROL
- Operation by remote control
- CLEANING AND CARE
- TECHNICAL PARAMETERS
- DISPOSAL CONSIDERATIONS
- MANUFACTURER & IMPORTER (UK)
- Manufacturer:
- Importer for Great Britain:
- FICHE DE DONNÉES PRODUIT
- Estimado cliente:
- Gentile clientele,
- PRODUTTORE IMPORTATORE (UK)
- Geachte klant,
- INSTRUCTIES VOOR AFVOER
Brand : Klarstein
Model : Hot Spot Crystal IR
Category : Heating