USER MANUAL BA 9679 SEVERIN
Before using the appliance, please read the following instructions carefully and keep this manual for future reference. The appliance must only be used by persons familiar with these instructions.
Connection to the mains supply
The appliance should only be connected to an earthed socket installed in accordance with the regulations. Make sure that the supply voltage corresponds with the voltage marked on the rating label. Th is product complies with all binding CE labelling directives.
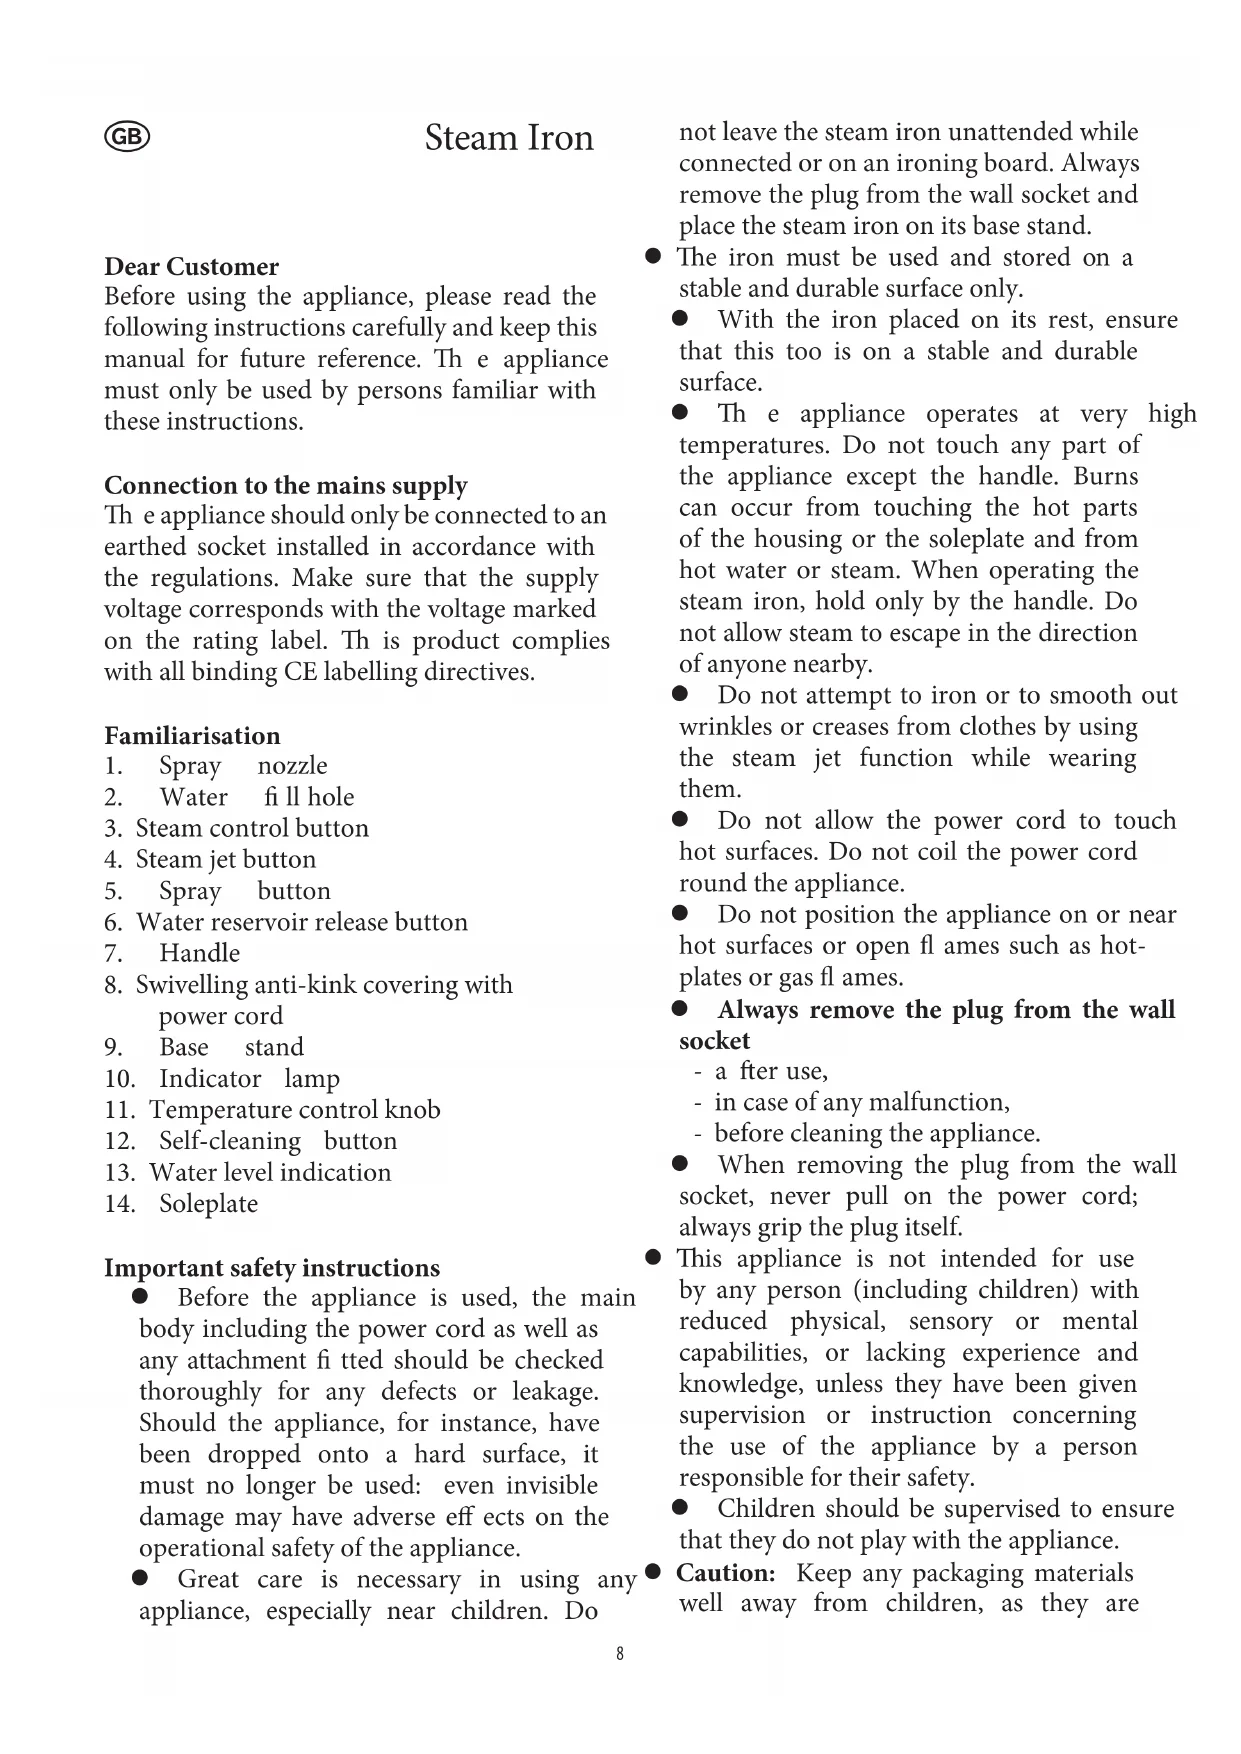
Familiarisation
- Spray nozzle
- Water fill hole
- Steam control button
- Steam jet button
- Spray button
- Water reservoir release button
- Handle
- Swivelling anti-kink covering with power cord
- Base stand
- Indicator lamp
- Temperature control knob
- Self-cleaning button
- Water level indication
- Soleplate
Important safety instructions
Before the appliance is used, the main body including the power cord as well as any attachment fitted should be checked thoroughly for any defects or leakage. Should the appliance, for instance, have been dropped onto a hard surface, it must no longer be used: even invisible damage may have adverse effects on the operational safety of the appliance.
- Great care is necessary in using any appliance, especially near children. Do
not leave the steam iron unattended while connected or on an ironing board. Always remove the plug from the wall socket and place the steam iron on its base stand.
-
The iron must be used and stored on a stable and durable surface only.
-
With the iron placed on its rest, ensure that this too is on a stable and durable surface.
-
The appliance operates at very high temperatures. Do not touch any part of the appliance except the handle. Burns can occur from touching the hot parts of the housing or the soleplate and from hot water or steam. When operating the steam iron, hold only by the handle. Do not allow steam to escape in the direction of anyone nearby.
-
Do not attempt to iron or to smooth out wrinkles or creases from clothes by using the steam jet function while wearing them.
- Do not allow the power cord to touch hot surfaces. Do not coil the power cord round the appliance.
-
Do not position the appliance on or near hot surfaces or open fl ames such as hot-plates or gas fl ames.
Always remove the plug from the wall socket
-
a fter use,
- in case of any malfunction,
-
before cleaning the appliance.
-
When removing the plug from the wall socket, never pull on the power cord; always grip the plug itself.
-
This appliance is not intended for use by any person (including children) with reduced physical, sensory or mental capabilities, or lacking experience and knowledge, unless they have been given supervision or instruction concerning the use of the appliance by a person responsible for their safety.
Children should be supervised to ensure that they do not play with the appliance.
- Caution: Keep any packaging materials well away from children, as they are
a potential source of danger e.g. from suffocation.
-
Do not operate the appliance if excessive force has been used to pull the power cord. Damage cannot always be detected from the outside; the entire unit should therefore be checked by a qualified technician before it is used again.
-
Before refilling or emptying the water reservoir, remove the plug from the wall socket.
-
Do not fill any liquid other than water into the reservoir.
-
No responsibility is accepted if damage results from improper use, or if these instructions are not complied with.
-
This appliance is intended for domestic or similar applications, such as in - shops, offices and other similar working environments,
-
agricultural areas,
-
hotels, motels etc. and similar establishments,
-
bed-and breakfast type environments.
-
In order to comply with safety regulations and to avoid hazards, repairs of electrical appliances must be carried out by qualified personnel, including the replacement of the power cord. If repairs are needed, please send the appliance to one of our customer service departments. The e addresses can be found in the appendix to this manual.
Anti-scale fi Iter
A special filter in the generator reservoir softens the water and reduces the build-up of lime deposits in the sole plate.
Filling with water
Fill the water reservoir before using the steam function or the spray nozzle.
Remove the plug from the wall socket before filling the reservoir.
- Th is steam iron is to a large extent resistant to hard water (up to 15^ ). Although normal tap water may be used, it is advisable to use distilled, demineralised
or decalcified water. Should you be unsure about the hardness of the water in your area, please enquire of the relevant local authority department.
- To prevent water from dripping from the sole plate, ensure that the steam control button is closed. It should be opened only once the temperature level required for steam ironing [as indicated on the temperature control knob] has been reached.
- Push the water reservoir release button and remove the reservoir by pulling it out from the front.
- Open the cover of the water fi ll hole.
- Fill the empty water reservoir using the measuring cup provided. Fill the reservoir to the indicated "Max" level only.
- Close the water fill hole.
- Fit the water reservoir to the iron from the front and make sure that it locks properly into place.
Always check first whether a label with ironing instructions is attached to the article to be ironed.
- The meaning of the ironing symbols is as follows:
synthetics (low temperature)
- silk and wool (medium temperature)
cotton and linen (high temperature)
-
These markings can also be found on the temperature control knob of the steam iron in form of dot symbols.
-
Laundry to be ironed should be sorted according to the fabric ironing temperature. Follow the ironing symbols and start with the lowest temperature.
- When ironing highly sensitive fabrics, or if you are not sure about the fabrics, you may carefully test-iron at a non-visible point, e.g. inside of seam. Start with the lowest temperature.
- If the laundry is being dried in a dryer
before ironing, the temperature should be adjusted to "iron dry". Very dry fabrics are difficult to iron.
Start up
Clean the steam iron before using for the first time, according to the instructions given in the paragraph "General Care and Cleaning - Self-cleaning system". This will result in the removal of possible dust particles from the soleplate and subsequently lessen the smell typically encountered when first switching on.
Please ensure sufficient ventilation.
stand after use and remove the plug from the wall socket.
Automatic switch-off
If the appliance is switched on but not being used for a certain period of time, it will automatically switch off. The automatic switch-off is indicated by the flashing main indicator lamp. As soon as the appliance is moved, it will switch on again.
Horizontal position:
With the iron standing on its sole plate, it will switch off after approx 30 seconds of inactivity.
Ironing
Always use the iron on a heat-resistant Vertical position:
surface.
-
Steam ironing requires high temperatures. will switch off after approx. 8 minutes of The temperature level for steam ironing inactivity. is indicated on the temperature control knob. Steam Jet
-
After filling the reservoir with water, place the steam iron upright on its base stand and insert the plug into the wall socket; the main indicator lamp lights up.
-
Set the temperature control knob to the required ironing temperature as indicated by the ironing symbols.
During the heating-up process indicator lamp will be on. The lamp will go out once the required ironing temperature is reached.
-
Before ironing any fabrics, the soleplate should be cleaned by passing it over an old, clean cotton cloth, while using the steam jet function; this helps to fl ush out any dirt residues or lint particles trapped inside the openings in the soleplate.
-
The steam output can be adjusted with the steam control button or completely switched off for dry ironing.
-
For dry ironing, the water reservoir may be empty. Should there be water left in the reservoir, the steam jet function may also be used when dry-ironing at higher temperature settings.
-
Place the steam iron upright on its base
Steam Jet
When the steam jet button is depressed, an additional hot steam jet is emitted from the soleplate. Th is function can be very useful when the regular amount of steam emitted is not sufficient to remove stubborn creases or when ironing diffi cult or thick fabrics. The steam jet function may also be used with
the iron held vertically, to remove creases or wrinkles from fabrics.
Using the Spray Nozzle
The laundry can be dampened by pressing the spray button. This will help to smooth out difficult areas. The spray nozzle may be used at any temperature level during dry or steam ironing.
General Care and Cleaning
Before cleaning the appliance, ensure it is disconnected from the power supply and has cooled down completely.
-
To avoid the risk of electric shock, do not clean the appliance with water and do not immerse it in water.
-
If necessary, the unit may be wiped with a dry fuzz-free cloth.
-
Starch, fat and other deposits on the soleplate may be removed with a damp woollen cloth.
-
In order to protect the clean soleplate, you may occasionally apply a small amount of paraffin to the warm plate, wiping it off with a woollen cloth.
-
Do not use abrasives or harsh cleaning solutions.
- Do not put vinegar or other descalers into the water reservoir.
Self-cleaning system
The self-cleaning system fl ushes out loose mineral deposits and keeps the appliance free of lime and dust particles. Self-cleaning should be performed if the iron has not been used for an extended period of time, or otherwise every 10-15 days. Proceed as follows:
- Fill the water reservoir up to the maximum level mark with water.
- Place the iron on its base stand and insert the plug into the wall socket.
- Set the temperature control to its maximum.
- Wait until the indicator light goes out.
- Remove the plug from the wall socket.
- Hold the iron horizontally over a sink.
- With the self-cleaning button depressed, swing the iron lightly to and fro until no more steam or hot water is emitted.
- Pour out any remaining water from the reservoir.
- Allow the sole plate to cool down before cleaning it with a damp, lint-free cloth.
Storage
-
Turn off the steam iron, remove the plug from the wall socket and let the unit cool down completely.
-
Pour any remaining water out of the reservoir through the water fi ll hole.
-
To avoid damage to the soleplate, store the steam iron in upright position on its base stand.
Disposal

Do not dispose of old or defective appliances in domestic garbage; this should only be done through public collection points.
Guarantee
Th is product is guaranteed against defects in materials and workmanship for a period of two years from the date of purchase. Under this guarantee the manufacturer undertakes to repair or replace any parts found to be defective, providing the product is returned to one of our authorised service centres. Th is guarantee is only valid if the appliance has been used in accordance with the instructions, and provided that it has not been modified, repaired or interfered with by any unauthorised person, or damaged through misuse.
Th is guarantee naturally does not cover wear and tear, nor breakables such as glass and ceramic items, bulbs etc. Th is guarantee does not affect your statutory rights, nor any legal rights you may have as a consumer under applicable national legislation governing the purchase of goods. If the product fails to operate and needs to be returned, pack it carefully, enclosing your name and address and the reason for return. If within the guarantee period, please also provide the guarantee card and proof of purchase.
Chere cliente, Cher client,
Position horizontal:
Tevikc nI npoopoiεγia to oIdεpωμa
EeYxTe npwTa av vnapxEt EtiKa odnyiec yia to oidepwa oTo poXo nov
Poketai va oidepwoe i.
Ipei HaayaIOM IaaKeHbI cIIpaBbTeCb B 3TtKeTke Ha H3dJIIN, KOtOpoe Bbl co6npaTeCb IaINTb, O peKOMeHdaunx IIO IaXeHbIO.
- O6o3HaueHn, IcIIOJIb3YeMbIe IJIaJxKeHbI:
CnHTeTnKa (Hn3KaTeMIIepaTypa)
IIeIK N IepCTb (cpeHnra TeMnepaTypa)
XIIIOK nJIeH (BbICOKaTeMIIepaTypa)
-
TakaJKe MapKInpOBKa HaHeceHa HApyuKe peryIInpOBAHn TaMIIepaTpybHa IapOBOM yTIOre.
-
Ipepe TlaKeHbem paccopTppyTe BeiPi peKOMeHnyEm O HnX TemepaType rJaKeHb. CJeIyTe Yka3aHnM IO TlaKeHbIO N HaUNHaTe C Hn3KO TeMIIepaTpybl.
- Ipn rIaJKeHbe TOHKx TkaHei nnecn BbI He 3HaTe, KaKaJ 3TO TkaHb, IIIOpOByIe rIaIITb B He3aMeTHOM MeCTe, HApPmEp Ha BHyTpEHHem IIBe. NaHaiTe c Hn3KoT empeAtypbl.
EcII6eIb6bIOBbICyIIEHOBCyIINbHOM 6apa6aHe,TeMIIepaTpyaYCTaHaBInBaETcHa "iron dry".IpecyIeHHoe 6JIbE OueHb TpyIHO rIaIITb.
IepBoe BkIIOueHne
Ipei IepBbIM HcIOJIb3OBaHnEM IapOBOrO yTOra OUHCTHTe eRO B COOTBEcTBnC yKa3aHnAMN B pa3JeIe "Obuui yxod u uucmka-Cucmema camooucmku".TaKIM 6pa3OM Bbl YdaJInte Cma3KY C IOIOIIIBI N yMeHbIInTe 3aIIax, KOtOpBI IIpNCyTCTByET IIpi IepBOM BKIOUHeHn yTOra.
06ecIeBte Heo6xOIMyIO BeHTnIaIIO.
TlaJKeHbe
BcerIa nCIOJIb3yITe yTIOr Ha TeIIIOCTOIKoI IOBepXHOCTN.
-Дя Глжehь Tpe6yeTcB BbICOKa TeMIIepaTypa. YpoBeHb TemIepaTypbI pa6OtBi NapOBoro yTHoRa yKa3aH Ha peryIaTope TemIepaTypbI.
-После 3aIOJIHeHnpe3epByapa BOIOI NOCTaBbTe IapOBOy yTIOr BepTUKaJIbHO Ha OIIOPy IN IOIKJIIOHTe BNIKY K PO3ETKe IINTaHn; IIpN 3aTOM 3aRopaETcOCHOBHa INHINKaTOPHaJaAMIOUka.
- YcTaHOBnte pyKy Ha HUxKHyIO IJIraIgKeHbTeMIIepaTpy, COOTBeTCTBeHHO 0603HaueHnM Ha Hei.
-BoBpemHaRpeBa yTIOra HNIMKaTOPHaJIaMIOUka IPOJOJIkae TROPb.IpnIOCTNKeHn 3aJaHHoI TeMIIepaTypbIHNIMKaTOPHaJIaMIOUka IIOrachHeT.
- IIpeKJde Yem IIpNCTYINTB K IJaKeHbIO IIO60n TKAHN, Heo6XODIMO IOUNCNTB IIOIOIBy yTIOra, IIPOBeIaHm HeCKOJIbKO pa3 IIO YNCTOxIOIIaTO6yMaJHOI KAIHN. IIpIMHeHne dyHKIIN Bbl6pocac Tpyu Iapa cIOOC6CTByeT OYNCTKe OTBepCTn B IIOIOIBe yTIOra OT Ha6NBIIINXC B HNX BOJOKOH, a TaKKe HAKNII.
- Ionoauy napa MoxHOperyu npoBaTb c HOMOIOKHOIIKN, aIJIaCyXOrToJaXeHbEe MOxHObIOJIHOCTbIO OTKIOUHTb.
- IIpn cyxom rIaJKeHbe pe3epByap MOKet 6bITb IyCTbIM. IIpn HAIINuBODI B EMKoCTn IIpn BBICOKNX TeMIIepaTpyax MOXHO NcIOJIb3OBaTB peKIM BBI6poca Iapa n IIpn cyxom rIaJKeHbe.
IocJe NcIOJIb3OBAHnI IOCTaBBTe yTOrBepTKaJIbHO Ha OIIOPy N BbIHbTe BUNIKYn3 PO3eTKN IITaHnI.
ABTomatUeCKoe BKJIIOueHHe-BbIKIIOUeHne
Ecn np6op 6bl BkIIOueH, Ho He IcIOJIb3OBAJcB TeUeHne OIIpeJeEHORo IepNoJa BpeMeHN, OH aBTOMaTnueCKN BBIKIOuHTc. Pn aBTOMaTnueCKOM OTKIOUyeHn HaUNHaET MIRaTb OCHOBHaj HINKaTOPHaJ lamIOUka. Ecn np6op
CINBHyTb C MeCTa, TO OH BKIIIOUHTcHOBa.
Ipu HaxoKdeHu 8 20pu3ohmaJIbHOM noIOKeHu
Ecni yTIOCTOHT Ha IOIOIIBE, OH OTKIIOHTcA Ype3 30 ceKyHn IpoCToJ.
Ipu haxoJdeHu u 6 bepmukalbHOM noIOKeHu
EcIn yTIOCTOHT Ha OCHOBaHN B BePTIKaJIbHOM IOIOJKeHN, OH OTKJIIOHTcYepe3 8 MmHyT IpocToI.
KhoIIka BbI6pOca IapOBoi CTpyu
IIpn HaKaTHN KHOJIKN BbI6pOca IapoBOI cTpyn n3 IIOIOIBBly yTIOra BbI6paCbIBaETcraIIOJIHNHTeNBHaa cTpyn npa. 3Ta yHKIIIN MOKeT 6bITb OyeHB IIOJIe3HO, KOrJa 06bEm BbIXOJIIeTO Inpa HeIOCTaTOUeH IIpa3rIaXKBaHHy UCTOINBBIX CKIAIDOK, KOrJa BeIb IPOIaXKNaBaETc C TpydOM NIN KOrJa TKaHb OyeHb TOIcTaJ. YHKIIIN OTIIapNBAHMy MOKeT IcIOJIb3OBaTbcraIg OTIIapNBaHHy BeIeB B BVcRAeM BepTKaJIbHOM IOIOJKeHHN.
Pa36pbI3rmbaTeJIb
BeIbE MoKHO cIpyHytB, HaxKaB KHOIIKy pa36pbI3rNBaTeJI. 3To o6JIeHT rJaXKeHbe TpyINbIXyAcTkoB. Pa36pbI3rNBaTeJIb MoKet IpiMHeYtbcra IIpN IIO6oT TeMIIepaType KaI IIpN cyXOM, TaK II IIpN IapOBOM rJaXKeHbe.
O6nynxodnYnCTka
- Ipeq TeM KaK PnCTyNTb K YnCTKe IIp6opa, OTKnIOHTe erO OT ceTn IaIte EMy IIOHOCTbIO OCTbITb.
Bo n36ekhaHne IopaxKeHHa 3JIeKTPnuecknM TOKOM He MoITe yCTpoIcTBo H He IOrpykaIte erO B BOy.
- EcIIH Heo6xOJIMo, eIOMoKHO IIpoTepeTb 6e3BOPCOBOI TKAHbIO.
- KpaxMaI, Jnnp N pyTne BnIbI 3aIrp3HeHn IIOIOIBbI yTIOra MOxHO yJaIITb C IOMOIIbIO yBlaJXHeHHo IIepCTaHO TKAHN.
-ДЯ 3aIHTbI IIOIOIBbI yTIOrMAoKHO HaHeCTn He6OJIbIIOe KOJIuYeCTBO
IapaaHa Ha TeIIyIO IOIOIBY, a 3aTeM BbITepeTb eRO IIEpCTaHOJ TkaHbIO.
He nCIOJIb3yIte a6pa3nBOB nIN CNJIbHbIX pactBOpHTeIeN.
He 3aIINBaIte yKcyc nIi npyrne aHTnHaKnIIINHbIBpe3epByap IIA BOIDI.
CnCTema camoouNCTKN
CnCTema cAMOOUncTKu o6ecIeunBaet ydaJIeHne CBO6OJHBIX MNHepaJIbHbIX OTIOXKeHn I IpeIoTbPaIIaET OcaKJeHne H3BeCTKOBOrO HaIeTa N YAcTNUeK IIbIIN. FyHKIINo cAMOOUncTKn CJIeIyET 3aIeIcTBOBaTb, eCIn BbI He IIOJIb3OBaIINcB IIpIb6OpOM B TeueHne IJIITeJIbHOrO IepNoJa BpeMeHN IIN uepe3 KaJbIe 10-15 IHe.IIra 3TOFO BbIIOHNTe CJIeIyUOIIne JeIcTBNIA:
- HaioHnTe pe3epByap BOIOJ IO OTMeTKMaKcImaJIbHOrO yPOBHa.
- IocTaBbTe yTOr Ha IOCTaBky n BkIIOUHTe BNILKY B pO3eTKy.
- YcTaHOBnTe peRyIaTOp TeMIIepaTpybHa MaKcImaJIbHoe 3HaueHHe.
- IIOJOKIHTe, IOKa NHINKAToPHaJ IaMIOUChKa He IORacHeT.
- BbHbTe BnIKy n3 po3eTKN.
Bo3bMnte yTIOI n IepKNTe erO TOpN3OHTaJIbHO HaI paKOBnHOJ.
- YIepKINBaJ KHOIIky CaMOOuNCTKN B HaKaTOM IIOLOKeHm, IOBOUInTe yTIOrOM B3aI-BIpePeI Do Tex IOp, IOKa N3 OTBepCTn He IIepeCTaHET BbIXoINtB Iap IINI RopyaB OIDA.
BbIeIe OCTaBIIyIOcB IOy I3 pe3epByapa.
-ДаHTe IOIOIIBe IOCTaTOUHO OCTbITb IpeTe TEM, KaK IpoTepeTb ee yBlaJxHHeHOn 6e3BOPcBOr TkaHbIO.
XpaHeHne
BbIKIOHTe yTO, BbIHbTe BNJKy N3 pO3eTKN IIOJIHOCTbIO OCTyIITe eRO.
- BbIeITe BCIO OCTaBIIyIOcB OBy I3 pe3epByapaYepe3 OTBepCTne.
- IJIpyeIOITBpaIeHnI IOBpeKJeHnI IOIOIBbIXpaHHTyTIOB B BEPTNKaJIbHOM IOIOJKeHN Ha OIIope.
YTNIm3aun
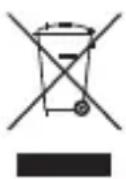
He BbI6paCbIBaIe CTapBIE NIN HeNCIIpaBHbIe 3JIeKTPoIIpN6OpbI BMecTe C 6bITOBbIM MycOpOM. OTHOCHTe INx Ha IYHKtBI c6opa cIeIuaJIbHOrO Mycopa.
TapaHTN
TapaHTnHbI cPOK Ha IIpN6Opbl npMbI,Severin" - 2 roJa co IINx IpoJAAKn. B TeueHne 3TOrO BpeMeHN Mbl 6ecIIaTHo UcTpaHIM BCE IeΦeKtB1, BO3HNIuNE B pe3yJIbTaTe IPOUN3BOIDCTBeHHORO 6paKa IIN IIPmHeHnHa HeKAueCTBeHHbIX MaTePnaIOB. TapaHTn HpePiPoCtpaHaeTcra Ha IeΦeKtB1, BO3HNIuNE I3-3a HecO6JIIOJeHNpyKOBoIDCTBa IIO 3KcIIyAtaUIn, rpy6Oro 6paIeHNc C IprNoBopOM, a TaKKe Ha 6bIOUncsca (CTeKJIaHHbIE N KepaMNUeCKne) Yactn. DaHHa rapaHTn He HapYuaet BaIiX 3aKOHbIX IpaB, a TaKKe IIO6bIX IpyTNX IpaB IOTpe6ntEIn, yCTaHOBJIeHHbIX HAIOHJIbHbIM 3aKOOHaTeJIbCTBOM, perUYnpUoiUM OTHOWeHN, BO3HNaIOUme MeKJy IOTppe6nteJMy IN IPOJauCaMn Ipr INpOJaXe TOBapOB. TapaHTn AHHUInPyETcR, ecnn IprNoBop PemOnTupOBaIC He BVka3aHHbIX HAMN IIyHKtax cepBnCHOrO 06cIyKnBaHn. Bbl MoKeTe IIOIOUte OTIIpaBNTb IIprNoBop C IIpeqHem HeNCIIpaBHOCTei N IIpiIOJKeHHbIM KaCCOBbIM YeKom Ha HAI 6IINKaIIuIN IIyHKT cepBnCHOrO 06cIyKnBaHn. KaKneIIN6O IOIOJIHnTEhBHe rapaHTn IIPOJABua 3aBOIDOM-N3ROTOBtEm He IIpNHMaIOTcR.
Kuressaare: Toomas Teder FIE, Pikk 1B,
tel:4555978
Philippines Business Center
Agias Anastasias & Laertou, Pilea
Service Post of Thermi
570 01 Thessaloniki, Greece
Tel.: 0030-2310954020
Iran
IRAN-SEVERIN KISH CO. LTD.
No.668,7th.Floor
Bahar Tower
Ave. South Bahar
TEHRAN - IRAN
Tel.:009821-77616767
Fax:009821-77616534
Info@iranseverin.com
www.iranseverin.com
Israel
Eatay Agencies
109 Herzel St.
Haifa
Phone: 050-5358648
Email: service@severin.co.il
Italia
via Dino Col 52r-54r-56r,
I-16149 Genova
Green Number: 800240279
Tel.: 010/6451102-010418609
Fax: 010/6425009
e-mail: videoelettronica@panet.it
Jordan
F.A. Kettaneh
P.O.Box 485
Amman, 11118, Jordan
Tel: 00962-6-4398642
e-mail: app@kettaneh.com.jo
Korea
Jung Shin Electronics co., Ltd.
501, Megaventuretower 77-9,
Moonrae-Dong 3ga, Yongdeungpo-Gu
Seoul, Korea
Tel: +82-22-637 3245~7
Fax: +82-22-637 3244
Service Hotline: 080-001-0190
Latvia
SERVO Ltd.
Mr. Janis Pivovarenoks
Tel: +371 7279892
servo@apollo.lv
Lebanon
Khoury Home
7th Floor, Cité Dora 3 Building, Dora
P.O.Box 70611
Antelias, Lebanon
Telephone 01 244200, Fax 01 253535
eMail: info@khouryhome.com
Internet: www.khouryhome.com
Luxembourg
Ser-Tec
Serbia and Montenegro
tel: +381-21-524-638
tel: +381-21-553-594
fax: +381-21-522-096
Slowak Republic
PREMT,s.r.o.
Skladova 1
917 01 Tmava
Tel: 033/544 7177
Finland
Oy Harry Marcell Ab
Rälssitie 6, PL 63
01511 Vantaa
Tel.: 00358 / 2 07 599 860
Fax: 00358 / 207599803
Svenska
Rakspecialisten HS
Mollevangsgatan 34
214 20 Malmö
Tel.: 040/12 07 70
Fax: 040/6 11 03 35
Slovenia
SEVTIS d.o.o.
Smartinska 130
1000 Ljubljana
Tel: 00386 1542 1927
Fax: 00386 1542 1926
Stand:03.2010