Thermo Whip - Whipped cream dispenser ISI - Free user manual and instructions
Find the device manual for free Thermo Whip ISI in PDF.
| Product type | Thermo-insulated cream whipper |
| Brand | iSi |
| Model | Thermo Whip |
| Available capacities | 0.25 L, 0.5 L, 1 L |
| Maximum operating pressure | 20 bar (0.25 L), 24 bar (0.5 L), 30 bar (1 L) |
| Minimum operating temperature | 1 °C |
| Maximum operating temperature | 95 °C |
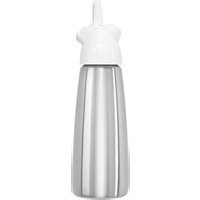
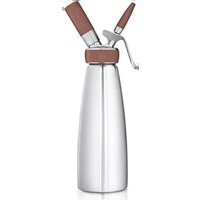
| Bottle material | Thermo-insulated stainless steel (double wall) |
| Head materials | POM, silicone, stainless steel, NBR, nickel-plated brass, PU |
| Head gasket material | Silicone |
| Filling tube material | Polypropylene, stainless steel |
| Capsule holder material | Silicone, stainless steel |
| Recommended capsules | Original iSi Crème Chantilly capsules (1 for 0.25-0.5 L, 2 for 1 L) |
| Usage | Professional and domestic |
| Types of preparations | Whipped cream, espumas, mousses, hot/cold sauces, veloutés, desserts |
| Standard warranty | 2 years |
| Extended warranty (registration) | 3 years on manufacturing defects, 5 years on thermal insulation |
| Cleaning | Full disassembly, hand or dishwasher wash (without abrasives) |
| Safety | Do not heat externally, do not use in a bain-marie, keep out of reach of children |
| Spare parts | Head gasket, filling tube, capsule holder, etc. available via retailer or iSi |
| Repairability | Send entire unit to iSi or after-sales service for repair |
Frequently Asked Questions - Thermo Whip ISI
User questions about Thermo Whip ISI
0 question about this device. Answer the ones you know or ask your own.
Ask a new question about this device
Download the instructions for your Whipped cream dispenser in PDF format for free! Find your manual Thermo Whip - ISI and take your electronic device back in hand. On this page are published all the documents necessary for the use of your device. Thermo Whip by ISI.
USER MANUAL Thermo Whip ISI
Instructions for Use
Gebrauchsanleitung / Notice d'utilisation / Istruzione per L'uso / Modo de empleo / Handlelding / Bruksanuising / Instruções de uso / Œnyieç xphong / Иструкши no Бкнлуатун / Instruktura uzytkowania / Návod K použiti / Hasznalati utmutató / Upute za uporabu / Naudila za uporabo / Kullanma talimati / Œyjli / 使用说明书 /

1.

2.
3.
4.
5.
6.
7.8.
1L

0,5 L
0,25 L
1x
5.-8.

2 ×
5.-8.
9.
11.10.
Cleaning
Reinigung / Nettoyage / Pulizia / Limpieza / Reiniging / Rengöring / Limpeza / Kaθαρισμός / Μουκτκα / Czyszczenia / Čišěnéi / Tiszitás / Čišćenje / Čišćenje/ Temizluk / Čižnī / ⓷rč/ 清洁 / ἀπηνίŋa/

1.
2.

3.


4.
5.6.
Interim Cleaning
Zwischenreinigung / Nattoyage intermediae / Pulizia intermedia / Limpleza intermedia / Tussenreinliging / Enkel rengoring / Limpeza intermedia iA/Ev6iueooc Kaopiooc / Pomexytohna Ounchka / Czyszczenie pobiezne / Prubezne ciestni / Kozbensotisztitas / Ciicenje u meduuremenu / Ciicenje med delom / Ara temizlik / / 中途清洁 / msnlaa
Expanded Drawing
Explosionszeichnung / Vucéclatec / Esploso / Vista detallada / Opengewerkt tekening / Sprängskiss / Vista explodida / Avantuyévo δidyaρμa / NOKOMNOHETHOe n3o6paexeHne / Rysunek roztozeniowy / Rozlozeny uykres / Robbantott abra / Znak za opasnost od eksplozijo / Eksptojskarisba / Parca semasi / / / 分解图 / insd Jusu


inspiring food.
Create. New. Taste.
EN English 2
DE Deutsch 18
FR Francais 34
IT Italiano 52
ES Espanol 60
Nederlands 68
SE Suenska 76
PT Portuguese 84
EL EAnvika 92
RU Pycckn 100
PL Polski 108
CZ Ceistina 116
HU Magyar 124
HR Hrvatski 132
Sl Slovenski 140
TR
Türkce
148
AR 156
KO
韓国"韓国"164
ZH 中文 172
TH 180
Thank you for choosing an iSi product.
Please read the Whipper instructions carefully before first-time use.
Discover the world of iSi:
Visit the iSi website and learn more about our extensive range of products: Our comprehensive collection of recipes from simply yummy to creatively sophisticated combinations offers you access to the entire culinary world of iSi. Let yourself be inspired!
The iSi website provides detailed product information about all iSi Whippers/Siphons and iSi Accessories.
The detailed online instructions provide information about first-time use, cleaning, and troubleshooting iSi Whippers and Siphons.
www.isi.com/culinary
www.isi.com/us/culinary
If you have any further questions please contact info@isi.com For the US: isinorthamerica@isi.com
Guaranteed quality:
Every iSi Whipper and Siphon is thoroughly inspected before leaving the factory. iSi offers a two-year warranty for materials and machining, as long as faults are not determined to be the result of improper use. The warranty is effective from the date on the purchase receipt.
Register online now and we will extend your warranty!
Enjoy the benefits of a three-year warranty for materials and machining; five-year warranty for the insulation performance of the Thermo bottle.
The warranty is only valid when original whipper parts from iSi are used, as given in the list of product components. The perfect function of your Whipper/Siphon can only be guaranteed if you exclusively use iSi chargers with it. No warranty or liability claim will be upheld for faults, damage, or consequential damage particularly determined to be the result of non-compliance and/or ignorance of the user instructions and the safety information therein.
FOR U.S. ONLY:
Limited warranty, Limitations and Warning: iSi products are thoroughly tested before they leave the factory, and iSi warrants for a period of two years that its products are free from defects in materials and workmanship and, if used only with other iSi products, will function as intended. iSi's liability in the event of a product's failure to meet this warranty is limited to repair or replacement of the product or, at iSi's option or if iSi is unable to deliver a replacement product, to refund the purchase price. In no event, however, shall iSi be liable for incidental or consequential damages. Any implied warranties are limited to the terms of the express warranties, including the two-year duration. iSi cream whipping systems, bottles and chargers are designed and engineered to function together as a system and involue gas under pressure. All iSi products and parts bear the iSi logo; iSi
EN
recommend that only iSi parts and products be used with iSi products, including that only iSi chargers be used with iSi Whippers/Siphons and that iSi chargers be used only in iSi Whippers/Siphons. Failure to follow this recommendation or any failure to follow the instructions for use and care of the products invalidates this warranty and all implied warranties in their entirety as to any consequences of such failure.
WARNING: In addition, failure to follow this recommendation or any of the instructions for use and care constitutes misuse of iSi products and could result in malfunction of the system and possible personal injury and/or property damage. In the event of any personal injury, you should promptly seek appropriate medical attention.

Simply register online and take advantage of the extended benefits: www.isi.com/warranty
Whipper Data.
| Max. service pressure PS | 20 bar / 290 psig (0.25 L / half US pint) |
| 24 bar / 348 psig (0.5 L / 1 US pint) | |
| 30 bar / 435 psig (1 L / 1 US quart) | |
| Min. operating temperature | 1°C / 34°F |
| Max. operating temperature | Gourmet Whip 75°C / 165°F |
| Thermo Whip 95°C / 203°F | |
| Max. filling volume 0.25 L | / half US pint |
| 0.5 L / 1 US pint | |
| 1 L / 1 US quart | |
| Max. number of chargers to be used | 1 iSi cream charger (0.25 L / half US pint) |
| 1 iSi cream charger (0.5 L / 1 US pint) | |
| 2 iSi cream chargers (1 L / 1 US quart) | |
| Usage Approved for | commercial use. Espumas, finger food, hot and cold sauces, and whipped creamy soups as well as whipped cream and desserts. Suitable for hot and cold preparations. |
EN
Material List.
| Description Material | |
| Bottle Stainless steel | |
| Head POM, silicone, stain- less steel, NBR, nickel-plated brass, PU | |
| Head gasket Silicone | |
| Decorator tip PP, stainless steel | |
| Charger holder Stainless steel, silicone |
Technical data is subject to change without prior notice.

Safety Information.
Failure to follow this safety instructions or any recommendation for use and care constitutes misuse of iSi products and could result in malfunction of the system and possible personal injury and/or property damage.
Do not exceed minimum or maximum pressure, minimum or maximum temperature, maximum filling volume, number of chargers or usage of the iSi Whipper shown in the Whipper Data! Do not use for any purposes not indicated in these instructions!
Please read the instructions for use carefully to avoid operating errors and keep a copy on hand!
Do not use force when screwing on or off the head, using the whipper and during any operation described in these instructions!
Store the iSi Whipper out of the reach of children!
Never store or use the iSi Whipper outside of the min. and max. operating temperatures. Do not store in a freezer!
Only charge a whipper that is filled!
Cryogenic applications (with liquid nitrogen, for example) are not permitted!
Only use a head and bottle of the same ISI Whipper model together!
- Never combine iSi components with components from another brand or manufacturer!
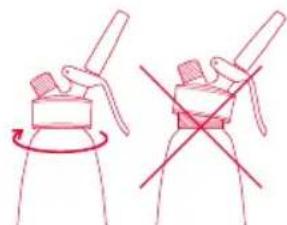
The head should always be screwed on straight and completely tight, never crooked or incompletely tightened!
Only use original iSi cream chargers.
- When screwing on the charger, do so away from others and keep face away from the whimper; do not bend over the whimper!
EN
The whipper is a pressure equipment. If it is dropped or damaged (e.g., cracked or dented), do not use again because it poses a risk of injury. Please have the whipper checked by the iSi service center!
- Never unscrew the head when the whipper is pressurized!
Neuer use the lever as a carrying handle!
Proper cleaning is a mandatory requirement in order to avoid the whipper becoming blocked. Check that the iSi Whipper has been properly cleaned before use!
Only dismantle the iSi Whipper for cleaning in accordance with the illustration!
Before cleaning, check the material compatibility of the cleaning solution and disinfectant solution used!
Do not make any modifications to the ISI Whipper. This will void the warranty and exempt the company from any liability!
Neuer use more chargers than specified and never overfill the whipper. This will ensure that the specified maximum operating pressure is not exceeded!
If the pressure will not release, please contact iSi or your service center!
NOTE: Before using the iSi Whipper for the first time, remove the transportation lock from the piston thread. Carry out thorough cleaning as shown in the Cleaning illustration.
NOTE: To avoid the formation of lumps, you should completely dissolve powdered ingredients such as sugar, etc., in some liquid before filling. Do not use any ingredients with fruit pulp or seeds.
NOTE FOR iSi GOURMET WHIP: The whipper will become hot when used for hot preparations. It can be kept warm in a bain-marie (75^ / 165^)
NOTE FOR ISI THERMO WHIP: The whipper must not be heated externally (e.g., in a bain-marie, microwave, oven, or in the stove). Never place the whipper in a bain-marie or water bath.
Whipper Instructions.
NOTE: Please observe the illustrations in the whipper instructions!
NOTE: The following instructions apply to the iSi Gourmet Whip and iSi Thermo Whip. Depending on the whimper, some specific information may require special attention.
General Instructions for Use.
Cold preparations: The cream/preparation should be cold when the whipper is filled.
Hot preparations: The preparation should be hot when the whipper is filled.
If a hot or slightly warmed mixture has to be cooled quickly to room temperature after filling, the filled Si Whipper can be left open in the refrigerator to cool. Then use it later (see "Equipment Setup").
Allow gelatin preparations to cool down to room temperature before filling, and then operate the whipper. Place filled iSi Gourmet Whip in the refrigerator for at least 4-6 hours and filled iSi Thermo Whip for at least 12 hours.
Dispense the preparation from the whipper shortly before serving.
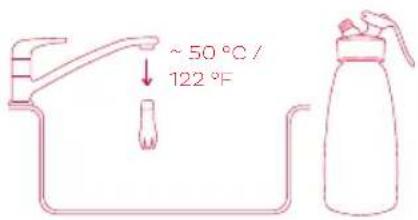
NOTE FOR iSI THERMO WHIP: To achieve optimal thermal performance, rinse out the stainless steel bottle with cold water for cold preparations and with hot water for hot preparations.
NOTE FOR iSi THERMO WHIP: Closed whipper can be recooled: keep the whipper on its side in the refrigerator for at least 12 hours.
Preparation
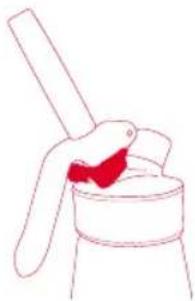
- Insert the head gasket into the head.
- Screw the decorator tip onto the dispensing value, not too tight but enough to be secure.
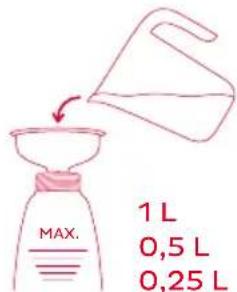
- Fill bottle with the prepared mixture.
EN
NOTE: Please note the fill line and marking on the bottom of the bottle. Do not overfill! The remaining empty space is required for optimal whipping results. Use a measuring cup.
Equipment Setup
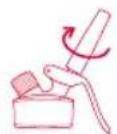
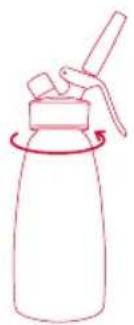
- Screw the head onto the bottle so that it is straight and tighten by hand.
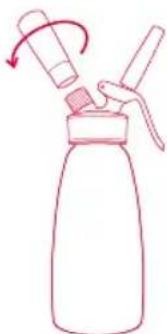
- Insert the original iSi cream charger into the charger holder.
NOTE: Never screw on the charger if no decorator tip is attached to the dispensing value.
6. Screw the charger holder with the inserted charger onto the head until you can hear that all of the charger contents have flowed into the whipper.
WARNING: The whipper is now pressurized!
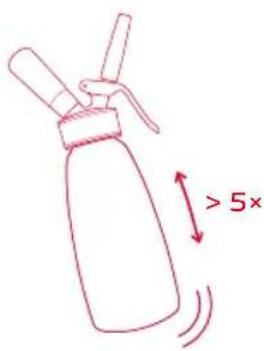
- Shake the whipper vigorously 6 times.
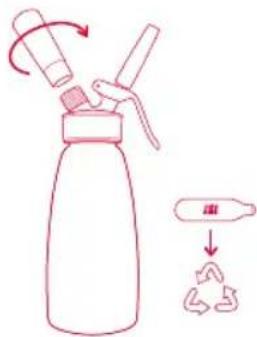
- Unscrew the charger holder and recycle the empty charger.
NOTE: A slight hissing noise may be heard when removing the charger holder. This is normal.
- If using a 1 LiSi Whipper, repeat steps 5-8.
- Screw the cap onto the threads.
Operation
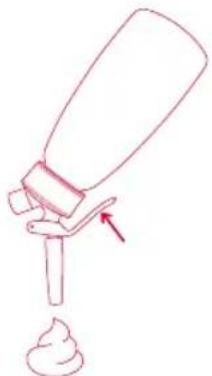
- For dispensing, the whipper must be held "headfirst" (with the decorator tip facing vertically downwards!) and the lever must be operated gently.
NOTE: Test the consistency of the contents when the whipper is first used. Shake the whipper again if the consistency is still too runny.
Cleaning.
Main Cleaning
NOTE: Please observe the illustrations on cleaning!
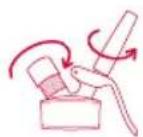
- Press the lever until the whipper is completely empty and there is no pressure left. Remove the head from the bottle.
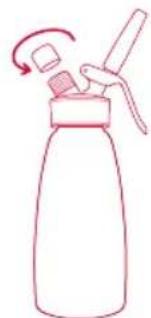
- Unscrew the decorator tip.
- Remove the head gasket for basic cleaning.
- Rinse product components by hand using warm potable water along with a standard cleaning agent and clean the dispensing value and decorator tip using the cleaning brush. Completely remove any traces of fat or egg white.
- From above, press the dispensing value into the head as far as it will go and push up the o-ring of the dispensing value with the curved end of the cleaning brush.
- Then clean all individual parts, in the dishwasher as needed.
NOTE: Do not use special cleaning agents for stainless steel, scouring agents, or abrasive sponges/brushes.
NOTE: For mechanical or manual cleaning, make sure that you use the correct amount of cleaning solution or combined disinfectant and cleaning solution. The exposure time and the selected temperature will determine the cleaning results.
Interim Cleaning
Clean the decorator tip at regular intervals (every 1-2 hours) during use. Remove the decorator tip or rinse it with running warm, potable water directly on the whimper.
Quick Cleaning
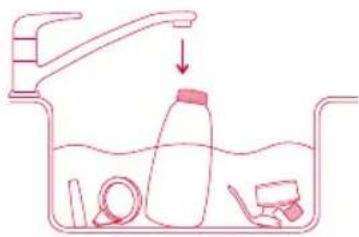
- Press the lever until the whipper is completely empty and there is no pressure left. Remove the head from the bottle.
- Fill the whipper with 0.25, 0.5, or 1 liter of warm water, depending on the filling volume.
EN
- Set up the whipper with 1 iSi cream charger according to "Equipment Setup" steps 5-8.
- Press the leuer as far as possible and completely empty the iSi Whipper (hold "head-first") until the whipper is free of pressure.
- Then carry out "Main Cleaning."
NOTE: Quick cleaning should not be used as a substitute for basic cleaning.
Disinfection
All product parts that come into contact with the filling liquid can be cleaned as usual and then disinfected. The applicable instructions regarding the use of standard cleaning agents and disinfectants must be observed.
Storage.
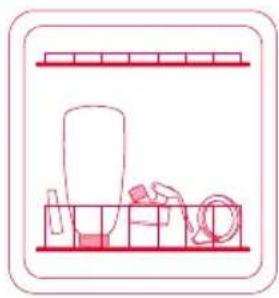
If the iSi Whipper is not going to be filled again immediately, leave the components to air dry in a clean place and store the iSi Whipper in a dismantled condition. Neer store the whipper with the head screwed on!
NOTE: Observe the applicable food hygiene regulations.
Troubleshooting.
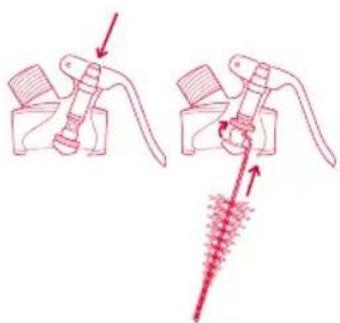
Release the pressure
Place the whipper upright, place a towel over the decorator tip and gently operate the lever until the pressure is gone from the iSi Whipper. Now the head can be removed from the bottle.
If the pressure will not release, please contact iSi or your service center.
I cannot remove the content and/or the iSi Whipper sprays.
- There is a blockage due to undissolved ingredients such as sugar.
"Release the pressure" and then carry out "Main Cleaning."
Make sure that powdered ingredients are dissolved completely.
- The cream or cream-filled preparation has become too stiff.
Next time decrease the intensity and frequency of the shaking cycles.
For information on the frequency of the shaking cycles, refer to www.isi.com/faq
-
The content is too firm due to too much binder or too much cooling.
-
Recipe and/or technique is not suitable or must be adapted.
Leave the whipper to stand at room temperature for around 5-10 minutes.
Pay attention to the operating temperature of the iSi Whipper. -
Incorrect pressure ratios in whipper.
Only use original ISI cream chargers.
Do not reuse empty chargers. They should be recycled.
Pay attention to the maximum number of chargers to be used indicated in the Whipper Data.
Only operate the whipper "headfirst" with a vertical decorator tip because otherwise there could be a loss of pressure.
The head was not firmly screwed onto the bottle by hand until it was secure. "Release the pressure" and then set-up again.
The head gasket was not inserted. "Release the pressure" and then set-up again.
The decorator tip was not screwed on. "Release the pressure" and then set-up again.
The bottle neck has been damaged. "Release the pressure." Send the whipper to iSi or to a service center.
The content being dispensed is too runny.
- The whipper was overfilled.
"Release the pressure," pour out the excess liquid and then set-up the whipper again.
Observe the maximum filling amounts.
EN
-
The whipper was not shaken or not shaken enough. For information on the frequency of the shaking cycles, refer to www.isi.com/faq
-
The content is not cold enough. Gourmet Whip: Place filled iSi Gourmet Whip in the refrigerator for 1-2 hours. Keep filled Gourmet Whip cold between uses.
Thermo Whip: Place filled iSi Thermo Whip in the refrigerator for at least 12 hours.
- Too few chargers were used or an unsuitable charger was used.
Pay attention to the maximum number of chargers to be used indicated in the Whipper Data.
Only use original lSi cream chargers.
- Not enough gelatin or other binder has been used. "Release the pressure." Add more gelatin or other binder to the preparation, following the binder instructions, and refill.
- The binder (e.g., gelatin) has not been used correctly.
— Please follow the binder instructions for use.
The charger is difficult to screw on.
- The charger being used is not suitable. Only use original ISI cream chargers.
The charger will not puncture.
- The charger being used is not suitable. Only use original iSi cream chargers.
- The charger was inserted backwards.. Insert the charger correctly (see illustrations: Instructions for Use).
- The puncturing unit has been damaged.
— Send the whipper to iSi or a service center.
EN
The decorator tip will not unscrew.
- The decorator tip was attached too tightly.
Screw on the decorator tip so that it is not too tight, but tight enough to be secure.
"Release the pressure." If the decorator tip still does not screw on, contact iSi or a service center.
- Interim cleaning has not been carried out regularly.
Interim cleaning needs to be carried out every 1-2 hours.
During operation, gas is leaking through the value or decorator tip.
- The whipper was used without an attached tip. Before screwing on the charger, make sure that the decorator tip is attached to the dispensing piston.
"Release the pressure" and then set-up the whipper again. - The o-ring of the dispensing value is dirty.
"Release the pressure" carry out "Main Cleaning" and then set-up the whimper again. - The o-ring of the dispensing value has been damaged.
"Release the pressure" and send the whipper to iSi or a service center.
During operation, gas is leaking between the bottle and the head.
- The head gasket is missing.
"Release the pressure" and insert the head gasket into the head. - The head gasket has been damaged.
"Release the pressure." The head gasket needs to be replaced and is available as an original Si spare part. - The head was not tightened securely.
"Release the pressure." Tighten the head on to the bottle by hand as per the instructions. - The bottle has been damaged on the upper edge.
"Release the pressure" and send the whipper to ISI or a service center.
More Information about Troubleshooting for the Thermo Whip
The decal base is bending outward or coming off.
- The whipper has been heated externally. "Release the pressure." The whipper must not be heated in a bain-marie, microwave, oven, or on the stove. Send the whipper to SI or a service center.
The contents do not stay cool or warm, or the stainless steel bottle becomes warm or cold.
- The insulating chamber has been damaged leading to a loss of the thermo effect.
"Release the pressure." Send the whipper to iSi or a service center.
Service.
Replacement parts are available individually and at an affordable price.
See your specialist dealer for the availability of replacement parts. In Austria, you can also get in contact via info@isi.com. In the US contact isinorthamerica@isi.com
Only send in the complete whipper for repairs.
Replacement parts can be seen in greater detail on the expanded drawing.
aaii iia jaii 1 jao aie (cua gill g gail
11Si 22 jai jai jai jai jai
1
- lai: lai: lai xiè 1èi jì nián yī
isi jia jia jia jia jia jia jia jia jia jia jia jia jia jia jia jia jia jia jia jia jia jia jia jia jia jia jia jia jia jia jia jia
J 1
iδδ δδδδ
aBil 1 gel Cldall Jan jia aill
a3 = 32a2,a4 = 32a3.
gaoe eell ell 50
jialial jiali jial
a) b) c)
111 1
si Si Si
1
1 1
Sall, aagssall cll sall aolal lal ygaaal jla: abgala
aall iie gaii ciia 1y. Jilll blll gaii la Js,
!la
alssilie jglj:isi Gourmet Whip jgaaa aalpao Bain Marie gablll 1 jglj alpssi sagaiiae alge
JiSiThermoWhip Jgaaa aalagao
Bain Marie 10000000000000000000000000000000000000000000000000000000000000000000000
AR
KO
isi 썸과운선腑해 죽서자자화다.
秋韵歌,自静如风,尽到城门,将此诗,
isi
iSi 啦 saiitBtBnDh A 1
J
T
A
iSi
isi waii iSi
iSi
www.isi.com/culinary
国国汇社
吾尅 原:
iSi iSi n. 1000
江青毛澤東定華寧諸林山。工中性要到才青
aannnnnnaeaaeaananaananaananaananaananaananaananaananaananaananaananaananaananaananaananaananaananaananaananaananaananaananaananaananaananaananaananaananaananaananaananaananaananaananaananaananaananaananaananaananaananaananaananaananaananaananaananaananaananaananaanara an

nuiuunwnwuaanv.
nwnu aanun uwwu u nanaaunauuauuauuauuauuuuauuuuuuuuuuuuuuuuuuuuuuuuuuuuuuuuuuuuuuuuuuuuuuuuuuuuuuuuuuuuuuuuuuuuuuuuuuuuuuuuuuuuuuuuuuuuuuuuuuuuuuuuuuuuuuuuuuuuuuuuuuuuuuuuuuuuuuuuuuuuuuuuuuuuuuuuuuuuuuuuuuuuuuuuuuuuuuuuuuuuuuuuuuuuuuuuuUU
AnuUaTnUsGOURMET nIeTuunuaesau-nnnnnaouuusn nnuusauueBaurn Marie (wnu 75oC)
TnTuTuTa TtTuTuTa TuTuTu Ta TuTu Ta TuTu Ta TuTu Ta TuTu Ta TuTu Ta TuTu Ta TuTu Ta TuTu Ta TuTu Ta TuTu Ta TuTu Ta TuTu Ta TuTu Ta TuTu Ta TuTu Ta TuTu Ta TuTu Ta TuTu Ta TuTu Ta TuTu Ta TuTu Ta TuTu Ta TuTu Ta TuTu Ta TuTu Ta TuTu Ta TuTu Ta TuTu Ta TuTu Ta TuTu Ta TuTu Ta TuTu Ta TuTu Ta TuMu
Blocking Device.
EN: iSi Blocking Device
To prevent unintended actuation of the lever of the ISI Gourmet Whip & ISI Thermo Whip.
DE: iSi Transportschutz
Imported and distributed by
iSi North America, Inc.
Fairfield, NJ 07004
Phone +1 (973) 227-2426
Phone +1 (800) 447-2426
isinorthamerica@isi.com
www.isi.com/us/culinary