CY 7087 - Vacuum Cleaner SEVERIN - Free user manual and instructions
Find the device manual for free CY 7087 SEVERIN in PDF.
User questions about CY 7087 SEVERIN
0 question about this device. Answer the ones you know or ask your own.
Ask a new question about this device
Download the instructions for your Vacuum Cleaner in PDF format for free! Find your manual CY 7087 - SEVERIN and take your electronic device back in hand. On this page are published all the documents necessary for the use of your device. CY 7087 by SEVERIN.
USER MANUAL CY 7087 SEVERIN
We hope you will enjoy your high-quality SEVERIN product and thank you for placing your trust in us.
The SEVERIN brand has stood for durability, German quality and development power for more than 120 years. Each appliance is manufactured and tested with care.
With the proverbial thoroughness, precision and honesty of the Sauerland, this family-owned company in Sundern has been winning over customers around the world since its establishment in 1892.
With more than 250 products in the eight product groups coffee, breakfast, kitchen, grilling, household, floor care, personal care, and cooling & freezing, SEVERIN offers a comprehensive line of small electrical appliances. The right product for every occasion!
Get to know SEVERIN's wide product range and visit us at www.severin.com.
From the Management and Staff of SEVERIN Elektrogeräte GmbH
About this instruction manual
This instruction manual includes important tips for your safety and the use of the appliance. Failure to observe the instruction manual can result in personal injuries or damage to the appliance. Keep the instruction manual in a safe place. When passing the appliance on to a third party, also include the instruction manual. Read the instruction manual completely before initial use of the appliance.
Illustrated Quick Start Guide included
This instruction manual comes with an illustrated Quick Start Guide that provides you with additional tips for the use and care of the appliance.
If needed, this instruction manual and the Quick Start Guide can be downloaded online free of charge at www.severin.com.
Contents
1 Technical data. 16
2 Safety guidelines. 17
3 Operation 20
4 Maintaining and cleaning the appliance 22
5 Spare parts/accessories. 23
6 Troubleshooting 24
7 Disposal 25
8 Warranty 25
1 Technical data
| Item number: CY7087 |
| Model name: S>POWER extrem comfort Single cyclone vacuum cleaner |
| Sound power level: 76 dB(A) |
| Power input: 750 W |
| Voltage/Frequency: 220 - 240 V~; 50 Hz |
| Protection class: II |
| Length of connection cable: approx. 6 m |
| Dust container capacity: approx. 1.5 L |
Marking on the appliance:

The appliance conforms with all EU directives that are binding for CE certification.

The appliance has protection class II/ protection through double insulation.
Appliance must be disposed of separately from household waste at a proper disposal site.
Scope of delivery
Vacuum cleaner
Handle with suction hose
Telescopic tube
Switchable floor nozzle
Hard floor nozzle
Crevice nozzle, upholstery nozzle, furniture brush
Storage bag
2 Safety guidelines
Certain groups of people
This appliance may only be operated by children over the age of 8 and by persons with reduced physical, sensory or mental capacities or a lack of experience and/or knowledge if they are supervised or have been instructed about the safe use of the appliance and are aware of the risks associated with its use.
Children are not allowed to play with the appliance or stand or sit on it. Cleaning and user maintenance may not be performed by children without supervision.
- Keep children under the age of 8 away from the appliance and the connection cable.
The packaging material must not be used for playing. It presents a suffocation risk.
Power supply
The appliance is charged with electrical current. Thus, there is a risk of electric shock.
Therefore:
- Connect and start up vacuum cleaner only in accordance with the information on the type plate (underside of the appliance).
Check the appliance and connection cable for possible damage before use. Never operate a defective appliance or an appliance with a defective connection cable.
SAFETY GUIDELINES
- Never try to repair the appliance or its connection cable yourself. To prevent hazards, repairs to the appliance and the connection cable may only be performed by our customer service. Arrange repair of a defective appliance with a specialist dealer or contact SEVERIN customer service (see contact information in appendix to this instruction manual or at www.severin.com).
- Do not immerse appliance in water or other liquids or treat it with liquids.
- Do not operate the appliance outdoors or in rooms with high humidity. Do not handle the plug with wet hands.
Make sure that the connection cable is not kinked, pinched or run over and does not come in contact with sources of heat, humidity and sharp edges. Make sure that the connection cable does not become a trip hazard. - Do not pull or transport the appliance using the connection cable. When disconnecting the plug from the socket, always pull directly on the plug.
- Do not use extension cables. If this is unavoidable, use only GS-tested, simple extension cables (no multiple sockets) designed for the appliance's power consumption.
Before cleaning or maintaining the appliance, as well as before changing accessories, switch off the appliance and disconnect plug from the socket.
Intended use
The appliance must only be used domestically. Use only to vacuum dry, normally soiled floors or, depending on the accessories, furniture and upholstery. Any other use is deemed improper and is forbidden.
In order to prevent injuries, fires and damage, the appliance must not be used to vacuum:
People, animals and plants. Always keep nozzles and suction openings away from all body parts, hair and clothing. Do not vacuum near the head.
Glowing, burning or smouldering particles (such as ash, coal, charcoal, cigarettes, matches).
Explosive or highly flammable substances or toners.
Water and other liquids, e.g. wet carpet cleaning agents.
Sharp objects, such as glass splinters, nails or construction waste.
If the appliance is defective
Have a defective appliance repaired by a specialist dealer or customer service (see contact information in appendix to this instruction manual or at www.severin.com).
OPERATION
3 Operation
Assembly or replacement of accessories
Only assemble appliance parts when the power plug has been disconnected from the socket.
Only use undamaged nozzles. Damaged nozzles can scratch surfaces.
For additional assembly tips, see > illustrated Quick Start Guide.
When vacuuming
Make sure that you are always above the appliance, especially when vacuuming stairs. Otherwise the appliance may fall down and cause injuries.
Only use the appliance with filters in place.
Follow the cleaning and maintenance instructions of the floor covering, carpet or furniture manufacturer!
Never pull out connection cable beyond yellow marking. If the blue marking is visible, press the cable rewind button to retract the cable to the yellow marking. Otherwise, the connection cable may be overstained and damaged.
Light on ON/OFF switch is green: Appliance is switched on and filters are clean.
When retracting the connection cable, hold the power plug in your hand and guide it in the winding direction. Otherwise the connection cable can fling about, injure persons nearby, become a trip hazard or pull over objects.
Always ensure that the nozzle suitable for the surface is in place and the correct suction power is set.
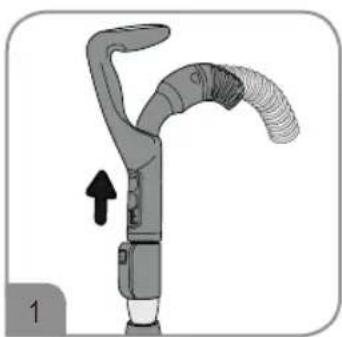
If an object has accidentally been suctioned up, quickly actuate the bypass vent on the handle (Fig. 1) to reduce the suction power.
For additional tips on operation, see > Illustrated Quick Start Guide.
Emptying the dust container
Before emptying the dust container, switch off the appliance and disconnect the power plug from the socket.

Empty dust container at the latest:
when the MAX marking has been reached,
when the light on the ON/OFF switch is blue (Fig. 2),
before longer storage or
before shipping.
- Push the release button (see Quick Start Guide P. 2: "PUSH") and remove dust container from the appliance.
- Place dust container above a waste bin, then push emptying button to open and empty it.
- Close and reinsert dust container. Dust container clicks into place.
The content of the dust container can be disposed of in normal household waste provided that it does not contain dirt prohibited in household waste.
It is recommended to also service the filters on this occasion ("4 Maintaining and cleaning the appliance" on page 22).
For additional tips on emptying the dust container, see > Illustrated Quick Start Guide.
Storing the appliance
Store the appliance and accessories in a cool, dry place out of the reach of children.
MAINTAINING AND CLEANING THE APPLIANCE
4 Maintaining and cleaning the appliance
Before changing or cleaning the filters, switch the appliance off and disconnect the power plug from the socket.
Clean filters latest when the light on the ON/OFF switch is blue (Fig. 2).
Cleaning the dual motor filter
- Remove and empty dust container ("Emptying the dust container" on page 21)
- Remove dual motor filter.
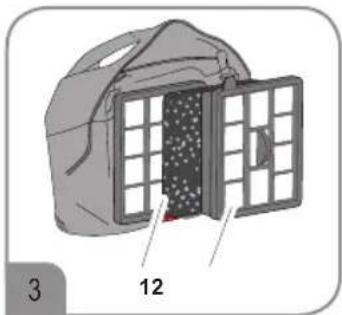
- Detach foam filter (Fig. 3/1) from dual motor filter.
- Remove foam from the foam filter frame.
- Rinse foam and frame thoroughly under running water (maximum 40^ ) and allow to dry for at least 24 hours at room temperature.
The foam and frame of the dual motor filter are washable, but neither dishwasher-safe nor washing machine-safe.
- Rinse motor protection filter (Fig. 3/2) thoroughly under running water and allow to dry for at least 24 hours at room temperature.
The motor protection filter is washable, but neither dishwasher-safe nor washing machine-safe.
Wait until all parts are completely dry before reassembling and reinserting the dual motor filter into the appliance.
7. Reinsert foam into frame of foam filter.
8. Press foam filter to motor protection filter again.
9. Reinsert complete dual motor filter into dust container.
10. Reinsert dust container into the appliance. Dust container clicks into place.
Cleaning the filter screen
- Remove and empty dust container ("Emptying the dust container" on page 21).
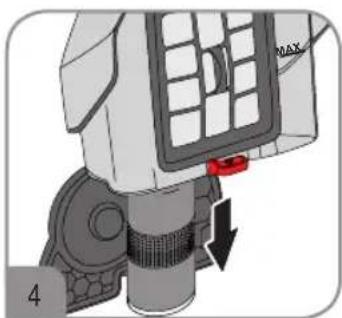
- Pull out round filter screen (Fig. 4).
- Rinse filter screen thoroughly under running water (maximum 40^ ) and allow to dry for at least 24 hours at room temperature.
The filter screen is washable, but neither dishwasher-safe nor washing machine-safe.
Wait until filter screen is completely dry before pushing it back into dust container.
- Push filter screen back into the dust container.
- Close dust container and reinsert into the appliance. Dust container clicks into place.
Cleaning the exhaust filter
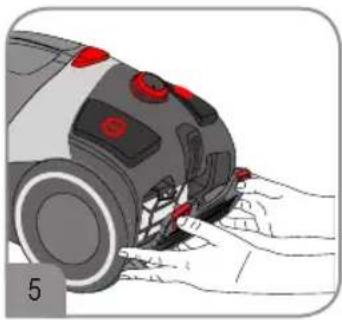
- Push both locks on the back of the appliance downward and remove cover (Fig. 5).
2.Pull out exhaust filter by the tab. - Rinse exhaust filter thoroughly under running water (maximum 40^ ) and allow to dry for at least 48 hours at room temperature.
The exhaust filter is washable, but neither dishwasher-safe nor washing machine-safe.
-
Reinsert exhaust filter
-
Reattach cover to appliance.
Wait until exhaust filter is completely dry before reinserting it. Otherwise germs and mould may form.
Cleaning the appliance
Before cleaning, switch off the appliance and disconnect the power plug from the socket.
The housing and connection cable may not be handled with liquids or immersed in liquids for reasons of electrical safety. Wipe housing with a slightly damp cloth and then rub dry.
Do not use any sharp, scouring cleaners or hard brushes for cleaning.
For additional cleaning tips, see > illustrated Quick Start Guide.
5 Spare parts/accessories
You can easily order spare parts or accessories online at www.severin.de in the "Service > Ersatzteil-Shop" (Spare Parts Shop) menu.
| Order number Accessory/spare part | |
| 0684048 Dual motor filter | |
| 5161048 Filter screen | |
| 4217048 Filter set, 3 parts | |
TROUBLESHOOTING
6 Troubleshooting
To prevent potential problems it is important to empty the dust container in a timely manner and to use this opportunity to check the filters and clean them according to level of contamination. However, if you have a problem with the appliance, use the following table to see whether you can solve the problem yourself.
Before troubleshooting, switch off the appliance and disconnect the power plug from the socket.
| Problem Cause/Solution | |
| Light on ON/OFF switch is blue The | filters are contaminated or the air way is clogged. Empty dust container ("Emptying the dust container" on page 21) and clean filters ("Cleaning the dual motor filter" on page 22, "Cleaning the filter screen" on page 22, "Cleaning the exhaust filter" on page 23). |
| The dust container has come loose while being carried | It is likely that the release button was accidentally pushed during carrying (see Quick Start Guide: "PUSH"). Make sure not to push this button during carrying. |
| An odour develops or dust escapes from the appliance during vacuuming | It is likely that parts removed for cleaning of filters or changing of accessories were not correctly reinstalled or closed. Check all parts for correct assembly. |
| The appliance suddenly stops vacuuming | The integrated overheating protection has responded (possibly due to an overfilled dust container or filter). In this case, proceed as follows: 1. Switch off appliance. 2. Disconnect plug from the socket. 3. Eliminate the cause of overheating, either by emptying the dust container ("Emptying the dust container" on page 21) or cleaning the filter ("Cleaning the dual motor filter" on page 22, "Cleaning the filter screen" on page 22, "Cleaning the exhaust filter" on page 23); it is also possible that there is a clog, which must be removed. 4. Be sure to include the hose, nozzle and telescopic tube when searching for the cause of overheating. 5. Close the appliance again and reattach all accessories. 6. Wait about 45 minutes. After the appliance has cooled down it can be switched on again. |
| The appliance hardly picks up any dirt and/or the suction power drops noticeably | Attached nozzle may be unsuitable for the floor to be cleaned. Select and attach correct nozzle. |
| When the floor nozzle is attached, the “carpet/hard floor” selector is in the wrong position for the particular type of floor. Select correct switch position. | |
| The appliance hardly picks up any dirt and/or the suction power drops noticeably | Suction power setting may not be appropriate for the type of floor. Set correct suction power. |
| The dust container must be emptied (“Emptying the dust container” on page 21). It is recommended to use this opportunity to also clean the filters (“Cleaning the dual motor filter” on page 22, “Cleaning the filter screen” on page 22, “Cleaning the exhaust filter” on page 23). | |
If this table does not help, please contact our customer service.
The contact information can be found in the appendix to this instruction manual or at www.severin.com.
7 Disposal
Appliances marked with this symbol must be disposed of separately from household waste. These appliances contain valuable raw materials that can be recycled. Proper disposal protects the environment and the health of your fellow men. Your local authorities or dealer can provide information regarding proper disposal.
8 Warranty
The legal warranty rights with respect to the seller and any seller warranties are unaffected by the following warranty conditions.
If repair should be necessary, contact our customer service via telephone or e-mail. The contact information can be found in the appendix to this instruction manual.
In case of warranty claim, you can also contact the dealer directly.
In addition, SEVERIN grants a manufacturer's warranty of two years from the date of purchase. During this period, we will eliminate all defects caused by material or production faults that significantly compromise the function free of charge. Other claims are excluded.
Excepted from the warranty are: Damage that is due to non-observation of the instruction manual, improper handling or normal wear; also easily-breakable parts such as glass, plastic or light bulbs. If the appliance is tampered with by persons not authorised by SEVERIN, this will render the warranty null and void.
Remerciements
Chere cliente, cher client,
1 Angel Kanchev, 5th floor
1000 Sofia, Bulgaria
Tel.: +359 2 973 11 31, 973 55 33
Fax: +359 2 944 96 49
E-Mail: vihra.ko leva@pirita.bg
Czech Republic
BVZ Commerce s.r.o.
Parkerova 618
CZ 25067 Klecany
Tel.: +420 233 55 94 74
Fax: +420 233 55 81 59
Danmark
F&H of Scandinavia A/S
Gl. Skivevej 70
DK-8800 Viborg
Tel.: +45 8928 1300
Fax: +45 8928 1301