FS 3600 - Food Processor SEVERIN - Free user manual and instructions
Find the device manual for free FS 3600 SEVERIN in PDF.
| Product Type | Portable vacuum sealer |
| Brand | Severin |
| Model | FS 3600 |
| Power Supply | 2 AA 1.5V batteries or USB cable (smartphone charger) |
| Main Functions | Vacuum sealing in bags with valve, compatible containers, and wine bottle stoppers |
| Included Accessories | 3 bags 19.3 × 22.3 cm, 2 bags 27 × 29.2 cm, 1 wine bottle stopper, 1 USB cable |
| Optional Accessories | 0.75 l container, bags of different sizes, additional stoppers (ref. ZB 3620-3624) |
| Operation Indicator | Indicator light for air extraction process |
| Care and Cleaning | Clean the exterior with a damp cloth; do not immerse; bags and containers washable in soapy water (not dishwasher safe) |
| Safety | Automatic shut-off if liquid is sucked; do not use with liquids |
| Warranty | 2 years against material and manufacturing defects |
| Country of Manufacture | Made in China (not specified, common estimate) |
| Dimensions (L × W × H) | Approximately 35 × 6 × 6 cm (reasonable estimate) |
| Weight | Approximately 200 g (reasonable estimate) |
| Exterior Material | ABS plastic |
Frequently Asked Questions - FS 3600 SEVERIN
User questions about FS 3600 SEVERIN
0 question about this device. Answer the ones you know or ask your own.
Ask a new question about this device
Download the instructions for your Food Processor in PDF format for free! Find your manual FS 3600 - SEVERIN and take your electronic device back in hand. On this page are published all the documents necessary for the use of your device. FS 3600 by SEVERIN.
USER MANUAL FS 3600 SEVERIN
natural_image
Black and white photo of a modern black and silver handheld device with a loop handle (no visible text or symbols)ART.-NR. FS 3600
GB Instructions for use
FR Mode d'emploi
Cordless hand-held vacuum sealer 10
natural_image
Line drawing of a cylindrical device with a handle and spout, no text or symbols presentHand-Vakuumiergerät
natural_image
Illustration of hands using a tool to press or adjust a component (no text or symbols visible)Vakuumieren
natural_image
Abstract grayscale illustration of fish-like shapes with no text or symbolsnatural_image
Simple line drawing of a person pouring liquid into a container (no text or symbols)natural_image
Line drawing of a rectangular container with internal compartments (no text or symbols)natural_image
Simple line drawing of a windmill (no text or symbols)natural_image
Hand holding a black cylindrical object with a handle, partially stacked on a bottle (no visible text or symbols)Weinstopper öffnen
Cordless hand-held vacuum sealer
Dear Customer,
Before using the appliance, read the following instructions carefully and keep this manual for future reference. The appliance must only be used by persons familiar with these instructions.
Power supply
This appliance operates either with 2 x 1.5V batteries (type AA, not included) or via a USB connection. This product complies with all binding CE labelling directives.
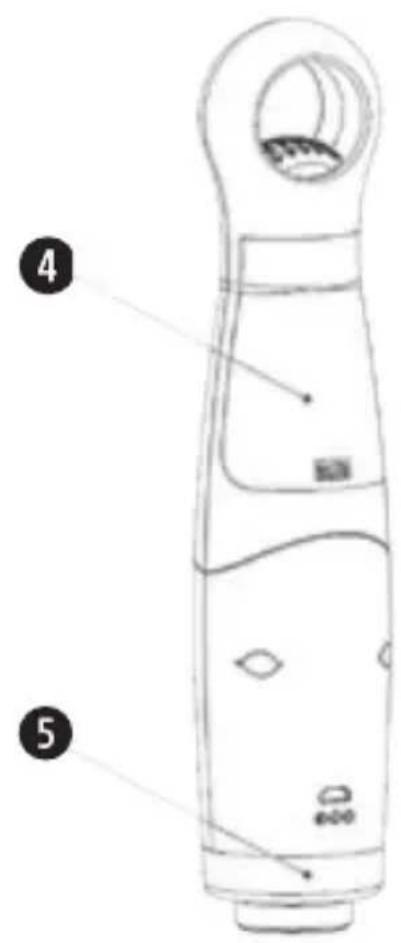
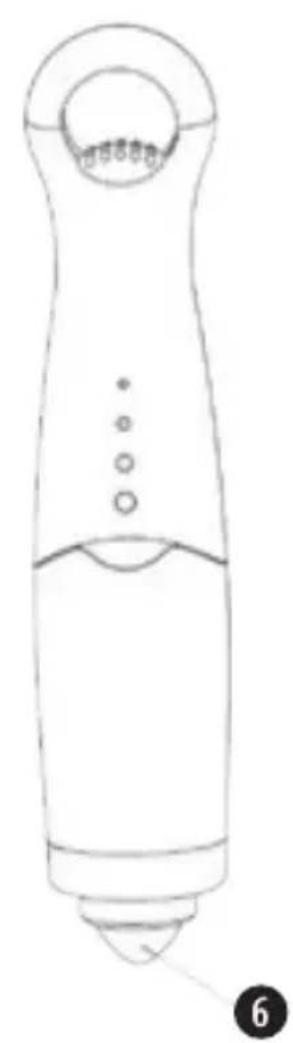
Familiarisation
- On/Off button
- Vacuum status indicator
- Silicone ring, for attachment inserts
- Battery compartment cover
- Vacuum chamber closing cap
- Silicone suction cone (fitted)
Accessories included
3 × Zip bags with valve 19.3 × 22.3 cm
2 × Zip bags with valve 27 × 29.2 cm
1 × Wine bottle stopper
1 × USB cable for a suitable USB power supply / charger unit
Optional accessories
Vacuum container 0.75 l: 1 pc / set, art. no. ZB 3620
Zip bags 19 x 22 cm: 25 pc / set, art. no. ZB 3621
Zip bags 27 x 29 cm: 25 pc / set, art. no. ZB 3622
Zip bags 25 x 39 cm: 25 pc / set, art. no. ZB 3623
Wine bottle stopper: 6 pc / set, art. no. ZB 3624
Important safety instructions
- In order to avoid hazards, repairs to this electrical appliance or its power cord must be carried out by our customer service. If repairs are needed, please send the appliance to our customer service department (see appendix).
• Always disconnect the USB cable and/or remove the batteries before cleaning the appliance. - To avoid the risk of electric shock, do not clean the appliance with liquids or immerse it.
- This appliance may be used by children (at least 8 years of age) and by persons with reduced physical, sensory or mental capabilities, or lacking experience and knowledge, provided they have
been given supervision or instruction concerning the use of the appliance and fully understand all dangers and safety precautions involved.
• Children must not be permitted to play with the appliance.
- Children must not be permitted to carry out any cleaning or maintenance work on the appliance unless they are supervised.
- The appliance and its power cord must be kept well away from children under 8 at all times.
- Caution: Keep any packaging materials well away from children – such materials are a potential source of danger, e.g. of suffocation.
- Every time the appliance is used, the main body including the USB cable as well as any attachment fitted should be checked thoroughly for any defects. Should the appliance, for instance, have been dropped onto a hard surface, or if excessive force has been used to pull the power cord, it must no longer be
used: even invisible damage may have adverse effects on the operational safety of the appliance.
- Do not attempt to remove liquid of any kind by means of the suction function. Should this occur, release the On/Off button immediately, unscrew the vacuum chamber closing cap, clean it dry and replace it.
- When removing the USB cable, never pull it; always grip the USB connector.
- Do not allow the housing or the USB cable to touch hot surfaces such as hotplates, or come into contact with any open heat sources.
- No responsibility is accepted if damage results from improper use, or if these instructions are not complied with.
-
This appliance is intended for domestic or similar applications, such as
-
in shops, offices and other similar working environments,
- in agricultural working environments,
- by customers in hotels, motels etc. and similar establishments,
- in bed-and breakfast type environments.
Preparing the unit
- This appliance operates either via a suitable USB power supply/smart-phone charger, or with 2 x 1.5V batteries. USB operation is also possible with the batteries inserted; however, there will be no charging process. For battery operation, proceed as described below.
-
Push the locking tab on the battery compartment cover towards the On/Off switch while at the same time lifting up and removing the cover.
-
Insert 2 × 1.5 V AA-type batteries, observing correct polarity, as indicated inside the compartment.
- Replace the cover; ensure it locks into place.
- If the power decreases during battery operation, replace the batteries with new ones of the same type.
Use with zip bags
Preparing the bags
- Put the prepared food into a bag, ensuring that its opening and the closure strip remains absolutely clean and dry.
Hint: For easy, clean filling of the bags, turn down the rim around the opening a few cm. After filling, unroll the rim again.
- Caution: Do not vacuum-pack any liquid foods in the zip bags.
- Fill the bags only up to max. 5 cm below the opening.
- If necessary, the food may be dabbed with a kitchen towel first to remove any residual liquid from the outside.
- Close the bag and use your fingers to press the two sides of the closure strip firmly together.
natural_image
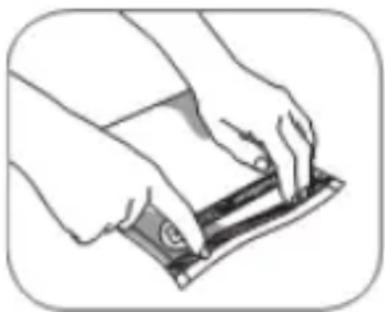
Illustration of hands holding a rectangular object with a circular button, no text or symbols presentVacuum process
- Open the valve opening of the filled and tightly closed bag.
natural_image
Abstract grayscale illustration of a stylized fish or aquatic creature with no visible text or symbols- Fit the silicone suction cone into the silicone ring on the appliance.
- Fit the unit vertically onto the valve opening, so that the opening of the silicone suction cone fits precisely into the valve opening.
natural_image
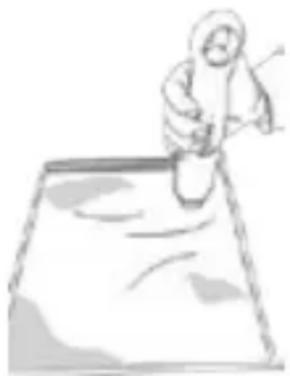
Simple line drawing of a person standing on a surface with abstract patterns (no text or symbols)- Press and hold the On/Off button, while pushing the unit lightly against the valve opening.
- Ensure that the vacuum pump does not suck in any liquid matter. Should this occur, release the On/Off button immediately.
- Once the vacuum status indicator lights up, the vacuum has been achieved. Release the On/Off button. The vacuum status indicator goes out.
- Separate the unit from the bag.
- Close the valve opening.
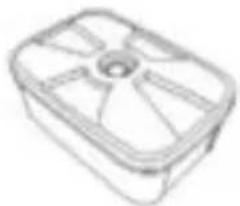
For use with a vacuum container (not included)
Preparing the container
- Place the prepared food in a vacuum container.
- Replace the lid on the container.
natural_image
Line drawing of a rectangular container with internal compartments (no text or symbols)- Caution: The rim of the container (seals, gaskets etc.) must be absolutely clean, dry and free of fat or oil!
Vacuum process
- Fit the unit without the silicone suction cone to the container lid in such a way that the silicone ring for attachment inserts fits exactly in the round recessed opening on the container lid.
- Press and hold the On/Off button, while pushing the unit lightly against the valve opening of the container lid.
- Once the vacuum status indicator lights up, the vacuum has been achieved. Release the On/Off button. The vacuum status indicator goes out.
- Separate the unit from the container lid.
Opening the vacuum container
- To open the vacuum container, carefully pull the tab on the valve closing cap. Air is admitted, and the container lid can be taken off.

natural_image
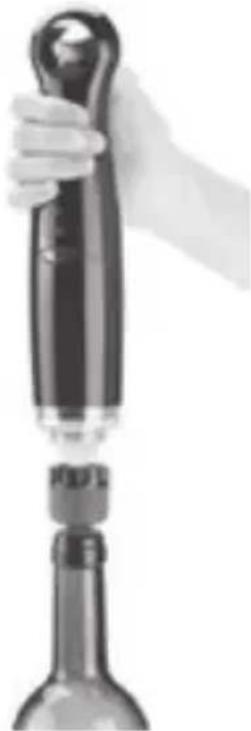
Simple line drawing of a windmill (no text or symbols)Use with a wine bottle stopper
- Insert the stopper provided into the opened wine bottle.
- Fit the unit with the silicone suction cone to the stopper in such a way that the opening of the suction cone fits exactly in the stopper opening.
- Press and hold the On/Off button, while pushing the unit lightly against the stopper opening.
- Once the vacuum status indicator lights up, the vacuum has been achieved. Release the On/Off button. The vacuum status indicator goes out.
natural_image
Hand holding a black cylindrical object with a handle, partially submerged in a bottle (no visible text or symbols)Opening the bottle stopper
• To open the stopper, hold the bottle and push the stopper lightly sideways. Air is admitted, and the stopper can be taken out.
Cleaning and care
• Always disconnect the USB cable from the unit before cleaning.
- To avoid the risk of electric shock, do not clean the appliance with liquids or immerse it.
• The exterior of the housing may be cleaned with a damp, lint-free cloth.
- If any food residues are found on the silicone ring, let the unit cool down and then wipe them off carefully with a moist cloth.
- The vacuum container and bags should be cleaned after each use with warm, soapy water; dry thoroughly afterwards. Do not use a dish-washer.
Disposal
Old appliances
Devices marked with this symbol must be disposed of separately from your household waste, as they contain valuable materials
which can be recycled. Proper disposal protects the environment and human health. Your local authority or retailer can provide information on the matter.
Batteries
Never dispose of old batteries in domestic garbage. Old batteries must be disposed of through the proper local special garbage collection points. During extended periods of non-use, the batteries should be removed.
Guarantee
This product is guaranteed against defects in materials and workmanship for a period of two years from the date of purchase. Under this guarantee the manufacturer undertakes to repair or replace any parts found to be defective, providing the product is returned to one of our authorised service centres. This guarantee is only valid if the appliance has been used in accordance with the instructions, and provided that it has not been modified, repaired or interfered with by any unauthorized person, or damaged through misuse.
This guarantee naturally does not cover wear and tear, nor breakables such as glass and ceramic items, bulbs etc. This guarantee does not affect your statutory rights, nor any legal rights you may have as a consumer under applicable national legislation governing the purchase of goods. If the product fails to operate and needs to be returned, pack it carefully, enclosing your name and address and the reason for return. If within the guarantee period, please also provide the guarantee card and proof of purchase.
Chère cliente, Cher client,
natural_image
Illustration of hands holding a rectangular object with a circular button, no text or symbols presentMise sous vide :
natural_image
Abstract grayscale illustration of a fish-like shape with a small dark circular mark (no text or symbols)natural_image
Simple line drawing of a person sitting on a surface with a cup (no text or symbols)natural_image
Simple line drawing of a rectangular container with internal compartments (no text or symbols)natural_image
Pure line drawing of a fan or impeller without any text, numbers, or symbolsnatural_image
Hand holding a black cylindrical object with a handle, partially stacked on a glass bottle (no text or symbols visible)Retrait du bouchon
natural_image
Illustration of hands holding a mechanical component (no text or symbols visible)Vacumeren
natural_image
Abstract grayscale illustration of fish-like shapes with a small black dot (no text or symbols)natural_image
Simple line drawing of a person pouring liquid into a container (no text or symbols)natural_image
Line drawing of a rectangular container with internal compartments (no text or symbols)De vacuum container openen
natural_image
Simple line drawing of a fan or impeller (no text or symbols)natural_image
Hand holding a black cylindrical object with a handle, mounted on a glass bottle (no visible text or symbols)natural_image
Illustration of hands holding a small object with a ruler, no text or symbols presentEnvasado al vacío
natural_image
Abstract grayscale illustration of a stylized fish or creature (no text or symbols)natural_image
Simple line drawing of a person sitting on a surface with a tool, no text or symbols presentnatural_image
Simple line drawing of a rectangular container with internal compartments (no text or symbols)natural_image
Simple line drawing of a windmill (no text or symbols)natural_image
Hand holding a black cylindrical object with a handle, partially stacked on a glass bottle (no text or symbols visible)natural_image
Illustration of hands holding a rectangular object with a circular mark, no text or symbols presentAspirazione
natural_image
Abstract grayscale illustration of a hand holding a small object (no text or symbols)natural_image
Simple line drawing of a person standing on a surface with a cup (no text or symbols)natural_image
Line drawing of a rectangular box with internal blades and a central hole (no text or symbols)natural_image
Simple line drawing of a windmill (no text or symbols)natural_image
Hand holding a bottle with a lit fuse, no visible text or symbolsnatural_image
Illustration of hands holding a device with a ruler, no text or symbols presentVakuumdannelse
natural_image
Abstract grayscale illustration of a stylized fish or wave with a small black dot and arrow (no text or symbols)natural_image
Simple line drawing of a person standing on a large surface, possibly a tray or bench, with no text or symbols present.natural_image
Line drawing of a rectangular container with internal compartments (no text or symbols)natural_image
Simple line drawing of a windmill (no text or symbols)natural_image
Hand holding a black cylindrical object with a handle, partially stacked on a bottle (no visible text or symbols)natural_image
Illustration of hands holding a mechanical component (no text or symbols visible)Vakuumförsegling
natural_image
Abstract grayscale illustration of a stylized fish or aquatic creature with a small black dot (no text or symbols)natural_image
Simple line drawing of a person standing on a surface with motion lines (no text or symbols)natural_image
Simple line drawing of a rectangular container with internal compartments (no text or symbols)natural_image
Simple line drawing of a windmill (no text or symbols)natural_image
Hand holding a black cylindrical object with a handle, partially stacked on a bottle (no visible text or symbols)natural_image
Illustration of hands holding a small object with a ruler, no text or symbols presentTyhjiöpakkaus
natural_image
Abstract grayscale illustration of a fish-like shape with a small black dot above it (no text or symbols)natural_image
Simple line drawing of a person standing on a surface with abstract patterns (no text or symbols)natural_image
Simple line drawing of a rectangular container with internal compartments (no text or symbols)natural_image
Simple line drawing of a windmill (no text or symbols)natural_image
Hand holding a black cylindrical object with a handle, partially stacked on a bottle (no visible text or symbols)natural_image
Illustration of hands holding a flatbed object with a circular mark (no text or symbols)Próżniowanie
natural_image
Abstract grayscale illustration of a fish-like shape with a small dark circular mark (no text or symbols)natural_image
Simple line drawing of a person standing on a large surface, no text or symbols presentnatural_image
Simple line drawing of a rectangular container with internal compartments (no text or symbols)natural_image
Simple line drawing of a windmill (no text or symbols)natural_image
Close-up of a hand holding a bottle with a glass cap, partially open to reveal liquid (no text or symbols visible)natural_image
Illustration of hands holding a rectangular object with a circular button, no text or symbols presentΔημιουργία κενού
natural_image
Abstract grayscale illustration of a stylized fish or creature with a small dark object on its head (no text or symbols)natural_image
Simple line drawing of a person standing on a surface with a cup (no text or symbols)natural_image
Line drawing of a rectangular container with internal compartments (no text or symbols)natural_image
Simple line drawing of a fan or impeller (no text or symbols)natural_image
Hand holding a bottle with a lit barrel, partially open to reveal liquid (no text or symbols visible)natural_image
Illustration of hands holding a small electronic device (no text or symbols visible)Вакуумирование
natural_image
Abstract grayscale illustration of a fish-like shape with a small black mark (no text or symbols)natural_image
Simple line drawing of a person pouring liquid from a container into a tray (no text or symbols)natural_image
Line drawing of a rectangular container with internal compartments and a central hole (no text or symbols)natural_image
Simple line drawing of a windmill (no text or symbols)natural_image
Hand holding a cylindrical object with a handle, partially submerged in a bottle (no visible text or symbols)B4-061/062 NO,181 Exhibition Road,
Jiangdong District, Ningbo
Tel.: +86 400 166 0336
Fax.: +86 0574 55331669
Web: www.nbautin.com.cn
Web: www.autin.com.cn
Tel.: 925 51 34 05
Fax: 925 54 19 40
E-Mail: severin@severin.es
Web: http://www.severin.es
26 Oaktree Business Park
Trim Co., Meath
Tel.: 046 94 83100
Fax: 046 94 83663
Web: www.bluestone.ie
Italia
ASSISTENZA POST-VENDITA
NUMERO VERDE 800224155
E-Mail: assistenza@severinitalia.it
Indonesia
PT. Setai Modern Elektronik
Email.: info@severin.co.id
Web.: www.severin.co.id
Jakarta
Komp. Glodok Plaza Blok F No. 9, Jl.
Al Bahar Building P.O. Box 148
Safat 13002 Kuwait
Tel.: +965 4810855
Latvia
SIA GTCL BALTIC
Piedrujas iela 7
LV - Riga 1073
Tel.: +371 29119989
Fax: +371 67297769
Lebanon
Khoury Home
7th Floor, Cité Dora 3 Building, Dora
P.O.Box 70611
Antelias, Lebanon
Tel.: +961 1 244200
Fax:+966 1 253535
E-Mail: info@khouryhome.com
Internet: www.khouryhome.com
Luxembourg
Ser-Tec
A.A.K & Partners L.L.C.
P.O Box:-1650, Muttrah
Postal Code - 114
Sultanate of Oman
Tel.: +968 24834470
Fax.: +968 24835186
E-Mail: aakpllc@gmail.com
Philippines
COLOMBO MERCHANT PHILIPPINES, INC.
Mezzanine 1, South Center Tower
2206 Venture Street, Madrigal Business Park
Alabang, Muntinlupa City
Tel.: 809 34 41
E-Mail: severinconsumercare@
colombophils.com.ph
Polska
Severin Polska Sp.z o.o.
Al.Jerozolimskie 56 C
00-803 Warszawa
Tel.: +48 882 000 370
6 Tagore Drive, #03-04
Singapore 787623
Tel.: +65 6455 0005
Fax: +65 6455 4010
Web: www.beste.com.sg
E-Mail: info@beste.com.sg
Slovenia
SEVTIS d.o.o.
Smartinska 130
1000 Ljubljana
Tel.: +386 1 542 1927
Fax: +386 1 542 1926
Slowak Republic
BVZ Commerce s.r.o.
Parkerova 618
CZ 25067 Klecany
Tel.: +420 233 55 94 74
Fax: +420 233 55 81 59
South Africa
AL&CD Ashley (PTY) Ltd.
3rd Floor, Grove Exchange
9 Grove Avenue
Claremont
South Africa
7708
Tel: +27 21 674 0294
Fax: +27 21 674 0295
Web: http://www.alcdashley.co.za
Mail: service@alcdashley.co.za
Svenska
Rakspecialisten HS
Möllevångsgatan 34
214 20 Malmö
Tel.: +46 40 12 07 70
Fax: +46 40 6 11 03 35
E-Mail: info@rakspecialisten.se
Switzerland
BLUEPOINT Service Sagl
Via Cantonale 14
CH-6917 Barbengo
Tel.: +41 91 980 49 72
Fax: +41 91 605 37 55
E-Mail: info@bluepoint-service.ch
Thailand
Verasu Ltd. part.
83/7 Wireless Rd., Lumpini,
Patumwan, Bangkok 10330
Tel.: +662 254 81 008
E-Mail: askverasu@verasu.com
United Kingdom
Homespares Centres Limited
Firwood Industrial Estate
Thicketford Road
Bolton, BL2 3TR
Tel.: 01204 558160
Fax: 01204 558169
HO CHI MINH CITY, VIETNAM
Tel.: +84 862 899 648
Fax: +84 862 899 649
E-Mail: info@brandpartner.vn
Stand: 12.2017