
SAFJ3001W - Juicer SHARP - Free user manual and instructions
Find the device manual for free SAFJ3001W SHARP in PDF.

| Product Type | Slow Juicer |
| Brand | Sharp |
| Model | SAFJ3001W |
| Power Supply | 220-240 V ~ 50/60 Hz |
| Power | 150 W |
| Juice Container Capacity | 400 ml |
| Main Functions | Juicing, sauce making, frozen desserts (sorbet, ice cream), smoothies |
| Included Filters | Juice filter (fine mesh), sauce filter (coarse mesh), frozen dessert filter |
| Extraction System | Slow rotation pressing to preserve nutrients and vitamins |
| Safety | Safety lock, reset switch, automatic stop if unlocked, reverse (REV) for unclogging, overload protection |
| Care and Cleaning | Rinse under running water, brush filter, do not wash in dishwasher, do not immerse motor unit |
| Spare Parts and Repairability | No user-serviceable parts; repair by approved service center only |
| General Information | Warranty upon presentation of receipt; household use only; maximum operating time 15 min then 30 min rest |
Frequently Asked Questions - SAFJ3001W SHARP
User questions about SAFJ3001W SHARP
0 question about this device. Answer the ones you know or ask your own.
Ask a new question about this device
Download the instructions for your Juicer in PDF format for free! Find your manual SAFJ3001W - SHARP and take your electronic device back in hand. On this page are published all the documents necessary for the use of your device. SAFJ3001W by SHARP.
USER MANUAL SAFJ3001W SHARP
natural_image
Line drawing of a Sharp blender with no text or symbols on the device itselfREAD THIS USER MANUAL CAREFULLY BEFORE YOU USE THE APPLIANCE AND SAVE IT FOR FUTURE REFERENCE
Important Safeguards
When using electrical appliances, basic safety precautions should always be followed, including the below:
-
To protect against fire, electric shock and injury to persons do not immerse cord, plug, or in water or other liquid.
-
Unplug from outlet when not in use and before cleaning. Allow to cool before putting on or taking off parts, and before cleaning the appliance.
-
Do not operate appliance with a damaged cord or plug or after the appliance malfunctions, or has been damaged in any manner. Return appliance to an authorized service facility for examination, repair or adjustment.
-
The use of accessories not recommended by the appliance manufacturer as it may result in fire, electric shock or injury to persons.
-
Do not use outdoors. This appliance is intended for household use only.
-
Do not let cord hang over edge of table or counter, or touch hot surface.
-
Do not place on or near a hot gas or electric burner, or in a heated oven.
-
Do not clean container with cleansers, steel wool pads, or other abrasive material.
-
To disconnect, turn/press any control to "Off", remove plug from the power socket. Always hold the plug. But never pull the cord.
-
Some parts of appliance are hot when operated, so do not touch with your hand. Use handles or buttons, dial controls only.
-
Close supervision is necessary when any appliance is used by or near children
-
Children should not to play with the appliance.
-
Appliances can be used by persons with reduced physical, sensory or mental capabilities or lack of experience and knowledge if they have been given supervision or instruction concerning use of the appliance in a safe way and if they understand the hazards involved.
-
To reduce the risk of fire or electric user shock, do not attempt to disassemble the main body of the product. There are no user-serviceable parts inside. Repair should be done only by authorized service personnel.
-
Switch off the appliance and disconnect from supply before changing accessories or approaching parts that move in use.
-
Avoid contact with moving parts. Keep hands, hair, clothing, as well as spatulas and other utensils, away from beater, whisk or dough hooks during operation to prevent injury and / or damage to the mixer.
-
Mixing flammable non-food substances can be harmful.
Electrical Cord
a) A short power-supply cord {or detachable power-supply cord} is to be provided to reduce the risk resulting from becoming entangled in or tripping over a longer cord.
b) Longer detachable power-supply cords or extension cords are available and may be used if care is exercised in their use.
c) If a long detachable power-supply cord or extension cord is used:
-
The marked electrical rating of the detachable power-supply cord or extension cord should be at least as great as the electrical rating of the appliance.
-
The longer cord should be arranged so that it will not drape over the countertop or table top where it can be pulled on by children or tripped over.
Information on Disposal for Users (private households)
1. In the European Union
Attention: If you want to dispose of this equipment, please do not use the ordinary dust bin!
Used electrical and electronic equipment must be treated separately and in accordance with legislation that requires proper treatment, recovery and recycling of used electrical and electronic equipment.
Following the implementation by members states private households within the EU states may return their used electrical and electronic equipment to designated collection facilities free of charge*. In some countries* your local retailer may also take back your old product free of charge if you purchase a similar new one.
*Please contact your local authority for further details.
2. In other Countries outside the EU
If you wish to discard this product, please contact your local authorities and ask for the correct method of disposal. For Switzerland: Used electrical or electronic equipment can be returned
free of charge to the dealer, even if you don't purchase a new product. Further collection facilities are listed on the homepage of www.swico.ch or www.sens.ch.
Know Your Juicer
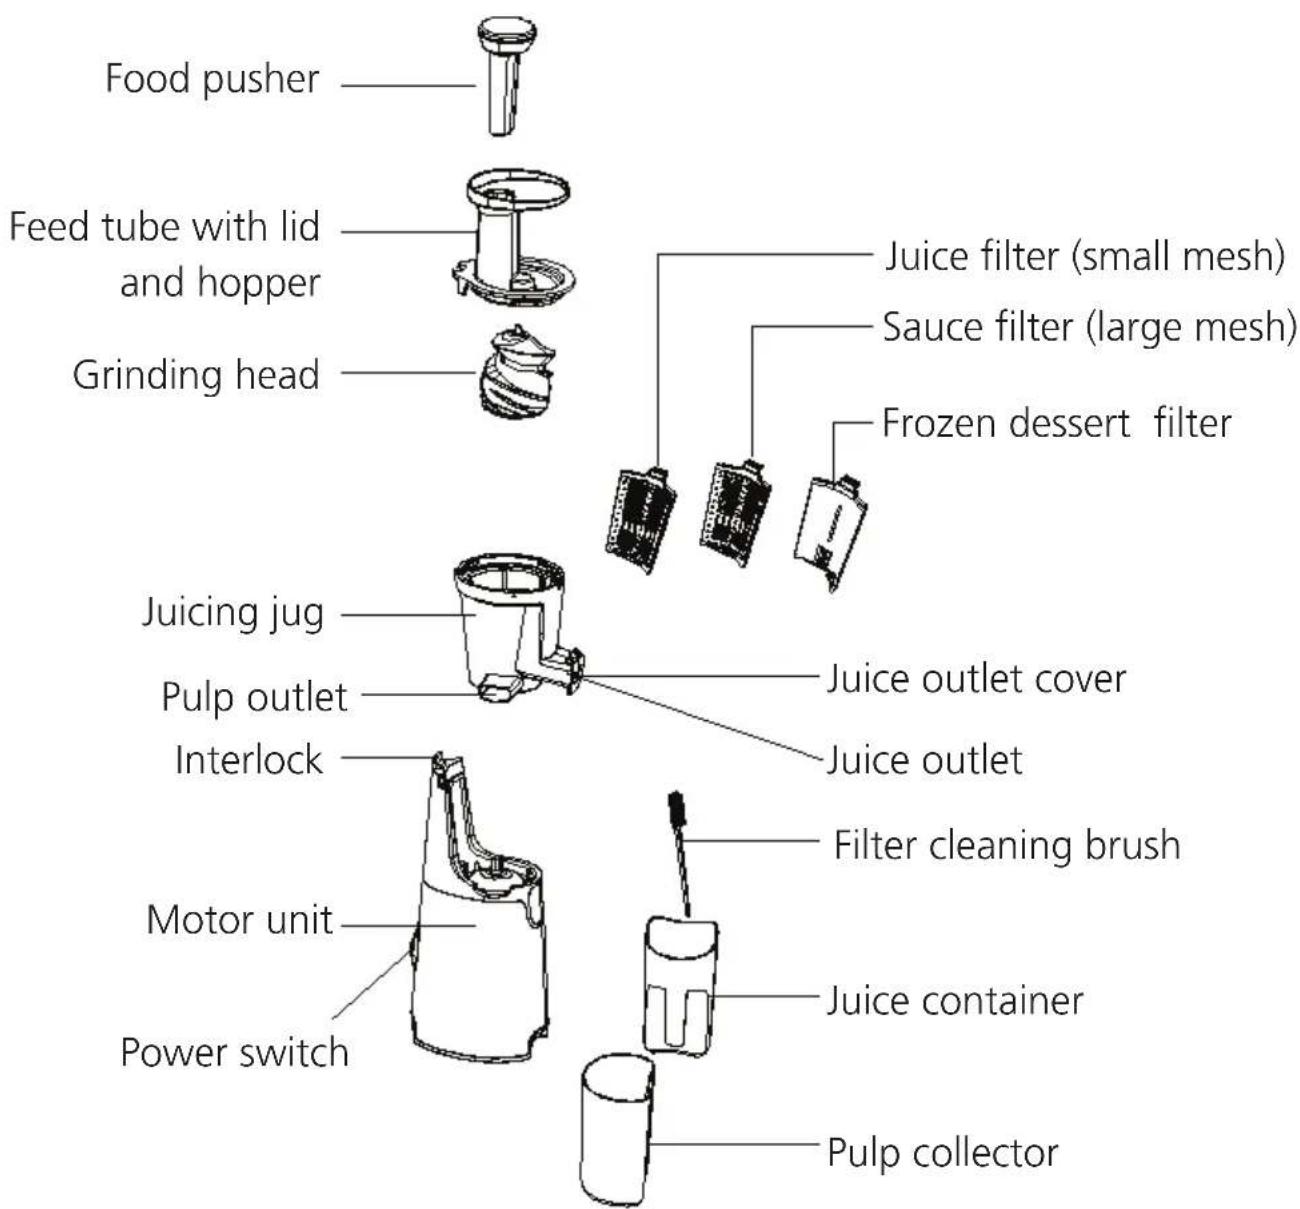
Function Description
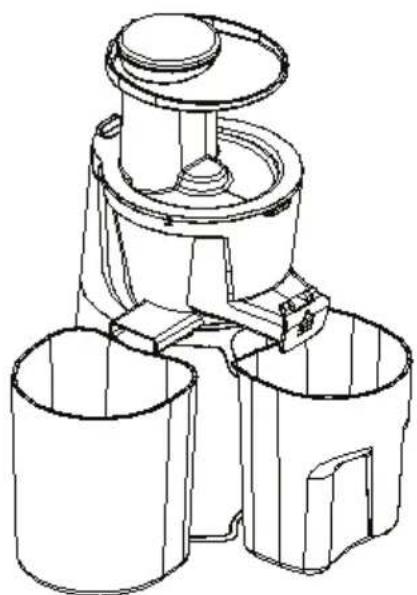
The low speed juicing juicer is a unique system where fresh juice comes from squeezing rather than grinding. The slow juicer squeezes instead of grinding which allows the juice to maintain its pure color, natural taste, nutrients and vitamins. The juice will flow in your juice cup from the juice spout, and the pulp will be ejected from pulp ejection spout
and be collected by pulp container. When using the juicer, the pulp container and juice container must be assembled in position. The details will be described in the following:
Before First Time Use
- Remove all packaging.
- Wash all the detachable parts and accessories in warm soapy water and rinse them and dry. But never wash motor unit in water to prevent the risk of electric shock.
- To assembly see "Slow Juicer assembly".
Before assembling, make sure to unplug and switch off the slow juicer (the power switch is on the "O" position.
Notes Before Use
-
Make sure to cut food into pieces no larger than 5 cm /2 inches for optimal extraction.
-
Remove stones (plums, peaches, mango, apricot, cherries etc.)
- Peel off though skins (melons, pineapples, cucumbers, potatoes etc.)
- Soft-skinned and other foods just need washing (apples, pears, carrots, radishes, lettuce, cabbage, parsley, spinach, grapes, strawberries, celery etc.
- Don't put in the juicer frozen fruits nor ice.
- When juicing leafy greens, mix it with fruits for optimal result.
- Don't put in the juicer the vegetable of animal oil to avoid damage of the grinding head.
-
Citrus fruits should be peeled and the white pith removed, otherwise the juice may taster bitter.
-
Always soak sugarcane, coconut, kudzu or cereal (e.g. bean, rice) in water, prior to putting them in the juicier.
- Drop the food into feeding tube. Don't push or force down. The pusher provided is only to use if food stuck.
- Insert food at a slow pace, to allow all the pulp to extract. For the best results don't overfill or rush.
Product Assembly
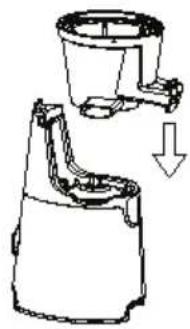
- Assemble the juicing jar onto the base. Once the jar is put on the base, twist until it locks in the place. The juicer will not work if the jar and lid are unlocked (See Fig.2).
natural_image
Line drawing of a mechanical device with an arrow indicating downward motion (no text or symbols)Fig.1

natural_image
Mechanical component diagram showing a rotating arm and housing (no text or symbols)
natural_image
Technical line drawing of a mechanical component with no visible text or symbolsFig.2
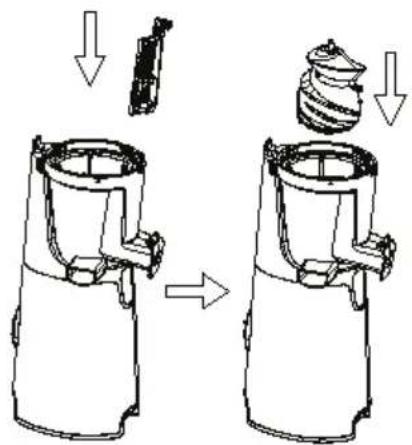
- Select required filter and fit the filter inside the filter holder in the juicing jar (see Fig.3a). Once required filter is fitted, put the grinding head inside the juicing jar (see Fig. 3b).
natural_image
Diagram of a hand-painted manual shaver mechanism showing blade, spring, and handle (no text or labels)Fig.3a Fig.3b
NOTE: The slow juicer comes with 3 different types of the filters:
- Juice filter. Dedicated mainly for juice extraction.
- Sauce filter. Can be used for making a jam, ketchup, tomato sauce, pesto, tofu, syrup, some smoothies etc.
- Frozen desserts filter. Suitable for making sorbet, ice cream, jelly, milkshake etc.
Note: Never use the ice or deeply frozen food when prepare frozen desserts. Prior to the pressing the frozen food should be defrosted to the level allows to insert the fork in the food. It's recommended to clean the juicer after pressing every 500g of the food.
None of the filter can be exchanged with each other when operates.
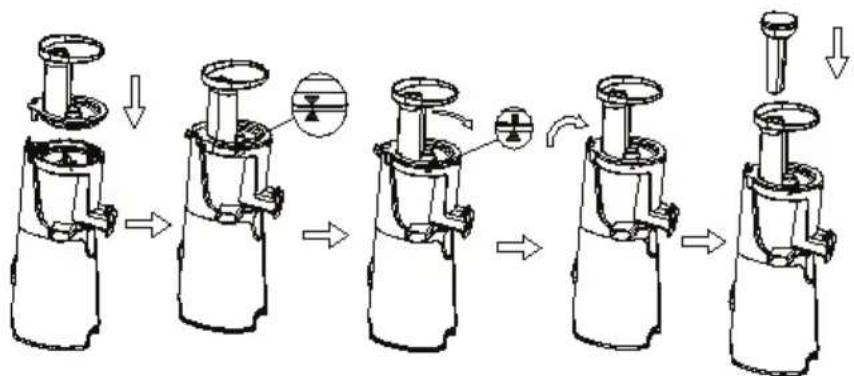
- Assemble the jar lid on the juicing jar (see Fig. 4a). First align the arrows “” on the lid and jar (see Fig. 4b), then twist clockwise to align “” symbols (see Fig. 4c). Make sure to lock the jar and lid by interlock (see fig. 4d). The juicier won’t work if unlocked and all parts fully aligned. Food pusher can be stored inside the jar lid (see Fig. 4e).
flowchart
graph TD
    A["Top Component"] --> B["Step 1"]
    B --> C["Step 2"]
    C --> D["Step 3"]
    D --> E["Step 4"]
    E --> F["Step 5"]
    F --> G["Bottom Component"]
Fig.4c Fig.4d Fig.4eFig.4bFig.4a
- Place containers both the juice and pulp outlets (see Fig. 5). Product is now ready to operate.
Warning: When moving slow juicer, please lift the juicer by holding the motor unit.
DO NOT operate the juicer without the pulp and juice containers.
natural_image
Technical line drawing of a mechanical device with three cylindrical components (no text or symbols)Fig.5
Using Your Juicer
- Power switch settings are:
I Switch juicer on
0 Switch juicer off
R Reverse rotation. Hold the button to clear clogs.
- Make sure both juice and pulp containers are placed in position.
- For best results cut food into smaller pieces. For example, the carrots shall be cut into thin slices with size of 15mm × 15mm before being put into the machine.
NOTE:
- Remove stones (plums, peaches, mango, apricot, cherries etc.)
- Peel off though skins (melons, pineapples, cucumbers, potatoes etc.)
- Do not process coconuts, sugarcane or similar hard food, to avoid motor damage.
- It is not recommended to process hard fruit or vegetable rich in fiber and starch. Drop food into feed tube on the juicing jar lid. Do not push or force down. Insert food at a slow pace, allowing the pulp to extract. For maximum efficiency, don't overload or rush.
Note: The food pusher should be used if food becomes stuck in the feeding tube.
- Plug in the juicer and switch to "I" position to commence juice extraction.
Caution: DO NOT switch directly from "I" to "R" nor "R" to "I" at any time during operation. If required, always switch off the juicer by switching to "O" position. Once juicer stop working, select "I" or "R".
Caution: Do not use the juicer without food inside.
Caution: Never put your fingers or other objects into feeding tube than food intended to use with slow juicer when it is working. Unplug before unblocking the feed tube.
- Slow juicer is equipped in safety device to prevent motor damages.
If the juicer is stuck and don't work:
- switch off "0" the juicer
- reset the juicer by pressing the reset switch underneath the motor unit.
- after reset switch and hold reverse "R" position

Fig.6
for a few seconds. Switch off "O" and tun on (I) again.
- If reverse "R" don't work, turn off juicer "O", unplug and reassemble the juicer by following "product assembly" instructions, plug in and turn on "I" the juicer.
- Once juice container is full (the maximum capacity is 400ml) or work done, please switch off the juicer "0" and empty both containers before continuing to use.
Note: The maximum time of operation should not exceed 15 minutes and it is recommended to maintain minimum 30 minutes of rest time between continuous two cycles.
Note: Do not insert too much food to extract per time. During operation, once the juice container is full, you must stop the appliance and empty the residue container before next cycle.
Note: During operation, if the interlock switch between the jar lid and the motor unit is disconnected, the motor will stop to prevent from danger.
Cleaning and Maintenance
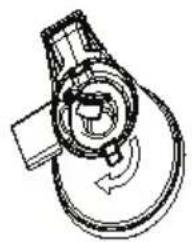
- In order to make easy the disassembly and cleaning of the appliance, run the juicer without any load for around 30 seconds. If the jar lid is hard to detach, try to turn on reverse "R" or pout some water into feeding tube to clean it.
- Before cleaning, unplug the appliance and wait until it is cool down.
- Reverse the assembly procedure to take the juicer apart.
Caution: DO NOT switch directly from "I" to "R" nor "R" to "I" at any time during operation. If required, always switch off the juicer by switching to "O" position. Once juicer stop working, select "I" or "R".
Note: The grinding head can be easily detached from juicing jar, if pushed the axis at the bottom of the juicing jar (see Fig. 7)
- Empty the residue container, and then clean the jar lid, grinding head, strainer, jar and residue container under running water. When cleaning the strainer, only need to brush the concave surface of the strainer under running water with the small cleaning brush for several times, and then the whole strainer can be cleaned well.
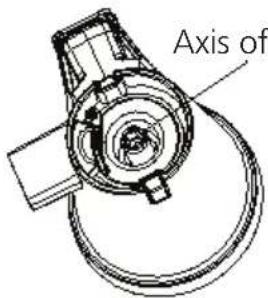
Axis of grinding head
Fig.7
- Wipe the outside of motor unit with damp cloth. Never immerse the motor unit in water.
- Dry all parts and assemble all parts well and then store the appliance in a dry place. The juice container can be stored in the residue container.
Recipes
Spinach and Banana Juice Paprika Tomato Juice
(For 2 servings)
- Spinach....120 g (4.2 oz)
- Banana 180 g (6.4 oz)
• Apple....300 g (10.6 oz) - Lemon 20 g (0.7 oz)
(For 2 servings)
• Red Paprika.....120 g (4.2 oz)
- Tomato 200 g (7.1 oz)
- Banana 60 g (2.1 oz)
- Lemon 10 g (0.4 oz)
• Apple....200 g (7.1 oz)
Carrot and Orange Juice Carrot and Tomato Juice
(For 2 servings)
• Carrot....300 g (10.6 oz)
- Banana 120 g (4.2 oz)
• Orange 210 g (7.4 oz)
- Lemon 10 g (0.4 oz)
(For 2 servings)
- Carrot....200 g (7.1 oz)
- Tomato 160 g (5.7 oz)
- Orange 100 g (3.5 oz)
- Lemon 30 g (1.1 oz)
Carrot and Apple Juice Blueberry and Banana Frozen Dish
(For 2 servings)
- Carrot....300 g (10.6 oz)
• Apple....300 g (10.6 oz) - Lemon 30 g (1.1 oz)
(For 2 servings)
- Blueberry 100 g (3.5 oz)
- Banana 180 g (6.4 oz)
Guarantee
Please keep your receipt as this will be required for any claims under this guarantee.
During this guaranteed period, if in the unlikely event the appliance no longer functions due to a design or manufacturing fault, please take it back to the place of purchase, with your till receipt and a copy of this guarantee.
The rights and benefits under this guarantee are additional to your statutory rights, which are not affected by this guarantee. Only Sharp Home Appliances (Europe) has the right to change these terms.
Further Terms & conditions of the warranty, please visit www.sharphomeappliances.com
natural_image
Line drawing of a mechanical device with an arrow indicating downward motion (no text or symbols)Fig.1

natural_image
Technical line drawing of a mechanical component with no visible text or symbols
natural_image
Technical line drawing of a mechanical component with no visible text or symbolsFig.2
natural_image
Diagram of a hand-painted manual shaver mechanism showing blade, spring, and handle (no text or labels)Abb. 3a Abb. 3b
natural_image
Technical line drawing of a mechanical device with three cylindrical components (no text or symbols)Abb. 5
natural_image
Line drawing of a mechanical device with an arrow indicating downward motion (no text or symbols)Figura 1

natural_image
Technical line drawing of a mechanical component with no visible text or symbols
natural_image
Technical line drawing of a mechanical component with no visible text or symbolsFigura 2
natural_image
Technical line drawing of a mechanical device showing two stages of assembly or disassembly (no text or symbols present)Figura 3a Figura 3b
flowchart
graph TD
    A["Step 1: Top cylindrical component"] --> B["Step 2: Left side, arrow pointing to top cylinder"]
    B --> C["Step 3: Right side, arrow pointing to bottom cylinder"]
    C --> D["Step 4: Bottom cylinder with arrow pointing to top cylinder"]
    D --> E["Step 5: Right side, arrow pointing to bottom cylinder"]
Figura 4c Figura 4d Figura 4eFigura 4bFigura 4a
natural_image
Technical line drawing of a mechanical device with three cylindrical components (no text or symbols)Figura 5
Uso del exprimidor
natural_image
Line drawing of a hand pump mechanism with a downward arrow indicating motion (no text or symbols)Fig.1

natural_image
Mechanical component diagram showing a rotating arm and housing (no text or symbols)
natural_image
Technical line drawing of a mechanical component with no visible text or symbolsFig.2
natural_image
Diagram of a hand-painted manual pump mechanism showing internal components and motion (no text or labels)Fig.3a Fig.3b
natural_image
Technical line drawing of a mechanical device with three cylindrical components (no text or symbols)Fig.5
www.sharphomeappliances.com
FR
LEGGERE CON ATTENZIONE QUESTO MANUALE PRIMA DI USARE L'APPARECCHIO E CONSERVARLO PER FUTURE CONSULTAZIONI
natural_image
Line drawing of a mechanical device with an arrow indicating downward motion (no text or symbols)Fig.1

natural_image
Mechanical component diagram showing a rotating arm and housing (no text or symbols)
natural_image
Technical line drawing of a mechanical component with no visible text or symbolsFig.2
natural_image
Diagram of a hand-painted manual pump mechanism showing internal components and motion arrows (no text or labels)Fig.3a Fig.3b
natural_image
Technical line drawing of a mechanical device with three cylindrical components (no text or symbols)Fig.5
Usare l'estrattore
natural_image
Line drawing of a mechanical device with an arrow indicating downward motion (no text or symbols)Afb. 1

natural_image
Mechanical component diagram showing a rotating arm and housing (no text or symbols)
natural_image
Technical line drawing of a mechanical component with no visible text or symbolsAfb. 2
natural_image
Technical line drawing of a mechanical device showing two stages of assembly or disassembly (no text or symbols present)Afb. 3a Afb. 3b
flowchart
graph TD
    A["Step 1: Top cylindrical component"] --> B["Step 2: Left side, arrow pointing to top cylinder"]
    B --> C["Step 3: Right side, arrow pointing to bottom cylinder"]
    C --> D["Step 4: Bottom cylinder with arrow pointing to top cylinder"]
    D --> E["Step 5: Right side, arrow pointing to bottom cylinder"]
natural_image
Technical line drawing of a mechanical device with three cylindrical components (no text or symbols)Afb. 5
natural_image
Line drawing of a mechanical device with an arrow indicating downward motion (no text or symbols)Fig. 1

natural_image
Mechanical component diagram showing a rotating arm and housing (no text or symbols)
natural_image
Technical line drawing of a mechanical component with no visible text or symbolsFig.2
natural_image
Diagram of a hand-painted manual shaver mechanism showing blade, spring, and handle (no text or labels)Fig.3a Fig.3b
flowchart
graph TD
    A["Top Pump"] --> B["Downward Arrow"]
    B --> C["Arrow to Valve"]
    C --> D["Arrow to Pump"]
    D --> E["Downward Arrow"]
    E --> F["Arrow to Valve"]
    F --> G["Downward Arrow"]
Fig.4c Fig.4d Fig.4eFig.4bFig.4a
natural_image
Technical line drawing of a mechanical device with three cylindrical components (no text or symbols)Fig.5
natural_image
Line drawing of a mechanical device with a downward arrow indicating motion (no text or symbols)Fig. 1

natural_image
Mechanical component diagram showing a rotating arm and housing (no text or symbols)
natural_image
Technical line drawing of a mechanical component with no visible text or symbolsFig.2
natural_image
Diagram of a hand-painted manual shaver mechanism showing blade, spring, and handle (no text or labels)Fig.3a Fig.3b
BEMÆRK: Slow juiceren leveres med 3 forskellige typer filtre:
natural_image
Technical line drawing of a mechanical device with three cylindrical components (no text or symbols)Fig.5
Sådan bruges slow juiceren
- sluk slow juiceren "0"
natural_image
Line drawing of a mechanical device with a downward arrow indicating motion (no text or symbols)Fig. 1

natural_image
Mechanical component diagram showing a rotating arm and housing (no text or symbols)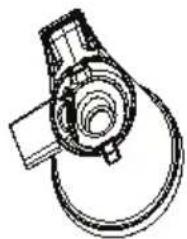
natural_image
Technical line drawing of a mechanical component with no visible text or symbolsFig. 2
- Velg egnet filter og plasser det i filterholderen i saftpressekrukken (se fig. 3a). Når egnet filter er på plass, plasserer du slipehodet i saftpressekrukken (se fig. 3b).

natural_image
Diagram of a hand-painted manual shaver mechanism showing blade, spring, and handle (no text or labels)Fig.3a Fig.3b
MERK: Den saktegående saftpressen har tre ulike filtertyper:
flowchart
graph TD
    A["Top Pump"] --> B["Downward Arrow"]
    B --> C["Arrow to Valve"]
    C --> D["Arrow to Pump"]
    D --> E["Downward Arrow"]
    E --> F["Arrow to Valve"]
    F --> G["Downward Arrow"]
Fig.4c Fig.4d Fig.4eFig.4bFig.4a
natural_image
Technical line drawing of a mechanical device with three cylindrical components (no text or symbols)Fig.5
Bruke saftpressen
- Strømbryterinnstillinger:
I Slå på saftpressen
Fig.6
natural_image
Line drawing of a mechanical device with an arrow indicating downward motion (no text or symbols)Kuva 1

natural_image
Mechanical component diagram showing a rotating arm and housing (no text or symbols)
natural_image
Technical line drawing of a mechanical component with no visible text or symbolsKuva 2
natural_image
Technical line drawing of a mechanical device showing two stages: before and after assembly, with no visible text or symbols.Kuva 3a Kuva 3b
flowchart
graph TD
    A["Top pump"] --> B["Down arrow"]
    B --> C["Arrow to pump"]
    C --> D["Arrow to motor"]
    D --> E["Arrow to pump"]
    E --> F["Down arrow"]
natural_image
Technical line drawing of a mechanical device with three cylindrical components (no text or symbols)Kuva 5
正
Kuva 6
natural_image
Line drawing of a mechanical device with an arrow indicating downward motion (no text or symbols)Fig.1

natural_image
Mechanical component diagram showing a rotating arm and housing (no text or symbols)
natural_image
Technical line drawing of a mechanical component with no visible text or symbolsFig.2
natural_image
Diagram of a hand-painted manual pump mechanism showing internal components and motion (no text or labels)Fig.3a Fig.3b
NOTA: A máquina de sumos lenta vem com 3 tipos de filtros diferentes:
natural_image
Technical line drawing of a mechanical device with three cylindrical components (no text or symbols)Fig.5
natural_image
Line drawing of a mechanical device with an arrow indicating downward motion (no text or symbols)Rys. 1
natural_image
Mechanical component diagram showing a rotating arm and housing (no text or symbols)
natural_image
Technical line drawing of a mechanical component with no visible text or symbolsRys. 2
natural_image
Technical line drawing of a mechanical device showing two stages of assembly or disassembly (no text or symbols present)Rys. 3a Rys. 3b
natural_image
Technical line drawing of a mechanical device with three cylindrical components (no text or symbols)Rys. 5
Obstuga wyciskarki
*Microwave oven, Vacuum cleaners and SDA service only
Follow us:

Service & Support
Visit our website:
www.sharphomeappliances.com
Or contact us:


YouTube