
Bravia KDL43WG665 - TV SONY - Free user manual and instructions
Find the device manual for free Bravia KDL43WG665 SONY in PDF.
| Product type | LED TV |
| Brand | Sony |
| Model | Bravia KDL-43WG665 |
| Screen size | 43 inches (108 cm) |
| Resolution | Full HD 1920 x 1080 pixels |
| Dimensions (W x H) without stand | 974 x 572 mm |
| Depth (standard wall mount) | 130 mm |
| Depth (slim wall mount) | 88 mm |
| Wall mount compatibility | Sony SU-WL450 (VESA 400x300) |
| Power supply | 220-240 V AC, 50/60 Hz |
| Main functions | DVB-T/C/S reception, teletext, timer, parental control |
| Connectivity | HDMI, USB, Ethernet, Wi-Fi inputs (depending on version) |
| Care and cleaning | Clean with a soft, dry cloth. Do not use abrasive products. |
| Safety | Professional installation required. Do not lean on the TV. |
| Spare parts | Available through Sony authorized service centers |
Frequently Asked Questions - Bravia KDL43WG665 SONY
User questions about Bravia KDL43WG665 SONY
0 question about this device. Answer the ones you know or ask your own.
Ask a new question about this device
Download the instructions for your TV in PDF format for free! Find your manual Bravia KDL43WG665 - SONY and take your electronic device back in hand. On this page are published all the documents necessary for the use of your device. Bravia KDL43WG665 by SONY.
USER MANUAL Bravia KDL43WG665 SONY
* In the actual model names, the “☐☐” indicates numbers and/or characters specific to each model.
To Customers
For product protection and safety reasons, Sony strongly recommends that installation of your TV be performed by Sony dealers or licensed contractors. Do not attempt to install it yourself.
To Sony Dealers and Contractors
Provide full attention to safety during the installation, periodic maintenance and examination of this product.
Sufficient expertise is required for installing this product, especially to determine the strength of the wall for withstanding the TV's weight. Be sure to entrust the attachment of this product to the wall to Sony dealers or licensed contractors and pay adequate attention to safety during the installation. Sony is not liable for any damage or injury caused by mishandling or improper installation.
For Safety and proper installation, follow the Wall-mount Bracket Operation Instructions, TV Setup Guide and the directions in this manual.
On Safety
Thank you for purchasing this product.
To Customers
Sufficient expertise is required for installing this product. Be sure to subcontract the installation to Sony dealers or licensed contractors and pay special attention to safety during the installation. Sony is not liable for any damages or injury caused by mishandling or improper installation, or installing any other than the specified product. Your Statutory Rights (if any) are not affected.
To Sony dealers
Sufficient expertise is required for installing this product. Be sure to read this instruction manual thoroughly to do the installation work safely. Sony is not liable for any damages or injury caused by mishandling or improper installation. Please give this manual to the customer after installation.
This instruction manual shows the correct handling of the product and important precautions necessary to prevent accidents. Be sure to read this manual thoroughly and use the product correctly. Keep this manual available for future reference.
Products by Sony are designed with safety in mind. If the products are used incorrectly, however, it may result in a serious injury through fire, electric shock, the product toppling over, or the product dropping. Be sure to observe the precautions for safety to prevent such accidents.
CAUTION
Specified products
This Wall-Mount Bracket is designed for use with the products specified TVs. For TVs, refer to their Reference Guide to verify that the Wall-Mount Bracket can be used.
To Customers
WARNING
If the following precautions are not observed, serious injury or death through fire, electric shock, or the product dropping can result.
Be sure to subcontract the installation to licensed contractors and keep small children away during the installation.
If the Wall-Mount Bracket or the TV is not installed correctly, the following accidents may occur. Be sure licensed contractors carry out installation.
- The TV may fall and cause a serious injury such as a bruise or a fracture.
- If the wall on which the Wall-Mount Bracket is installed is unstable, uneven, or not perpendicular to the floor, the unit may fall and cause injury or property damage. The wall should be capable of supporting a weight of at least four times the TV weight.
(Refer to your TV's Reference Guide for its weight.) - If the installation of the Wall-Mount Bracket on the wall is not sufficiently sturdy, the unit may fall and cause injury or property damage.
Be sure to subcontract moving or dismounting of the TV to licensed contractors.
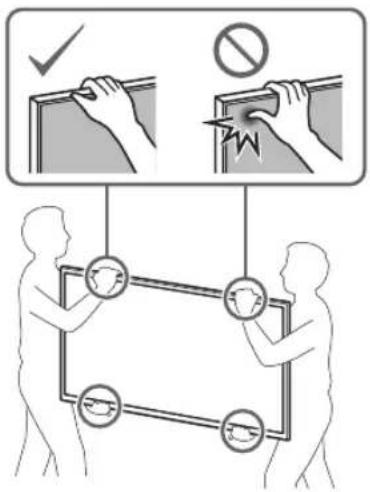
If persons other than licensed contractors transport or dismount the TV, it may fall and cause injury or property damage. Be sure that two or more persons (three or more persons for 75 inches and above TV set) carry or dismount the TV.
Do not remove screws, etc., after mounting the TV.
If you do so, the TV may fall and cause injury or property damage.
Do not make alterations to the parts of the Wall-Mount Bracket.
If you do so, the Wall-Mount Bracket may fall and cause injury or property damage.
Do not mount any equipment other than the specified product.
This Wall-Mount Bracket is designed for use with the specified product only. If you mount equipment other than specified, it may fall or break, and cause injury or property damage.
Do not apply any load other than the TV on the Wall-Mount Bracket. Do not shake the TV left/right, up/down.
If you do so, the TV may fall and cause injury or property damage.
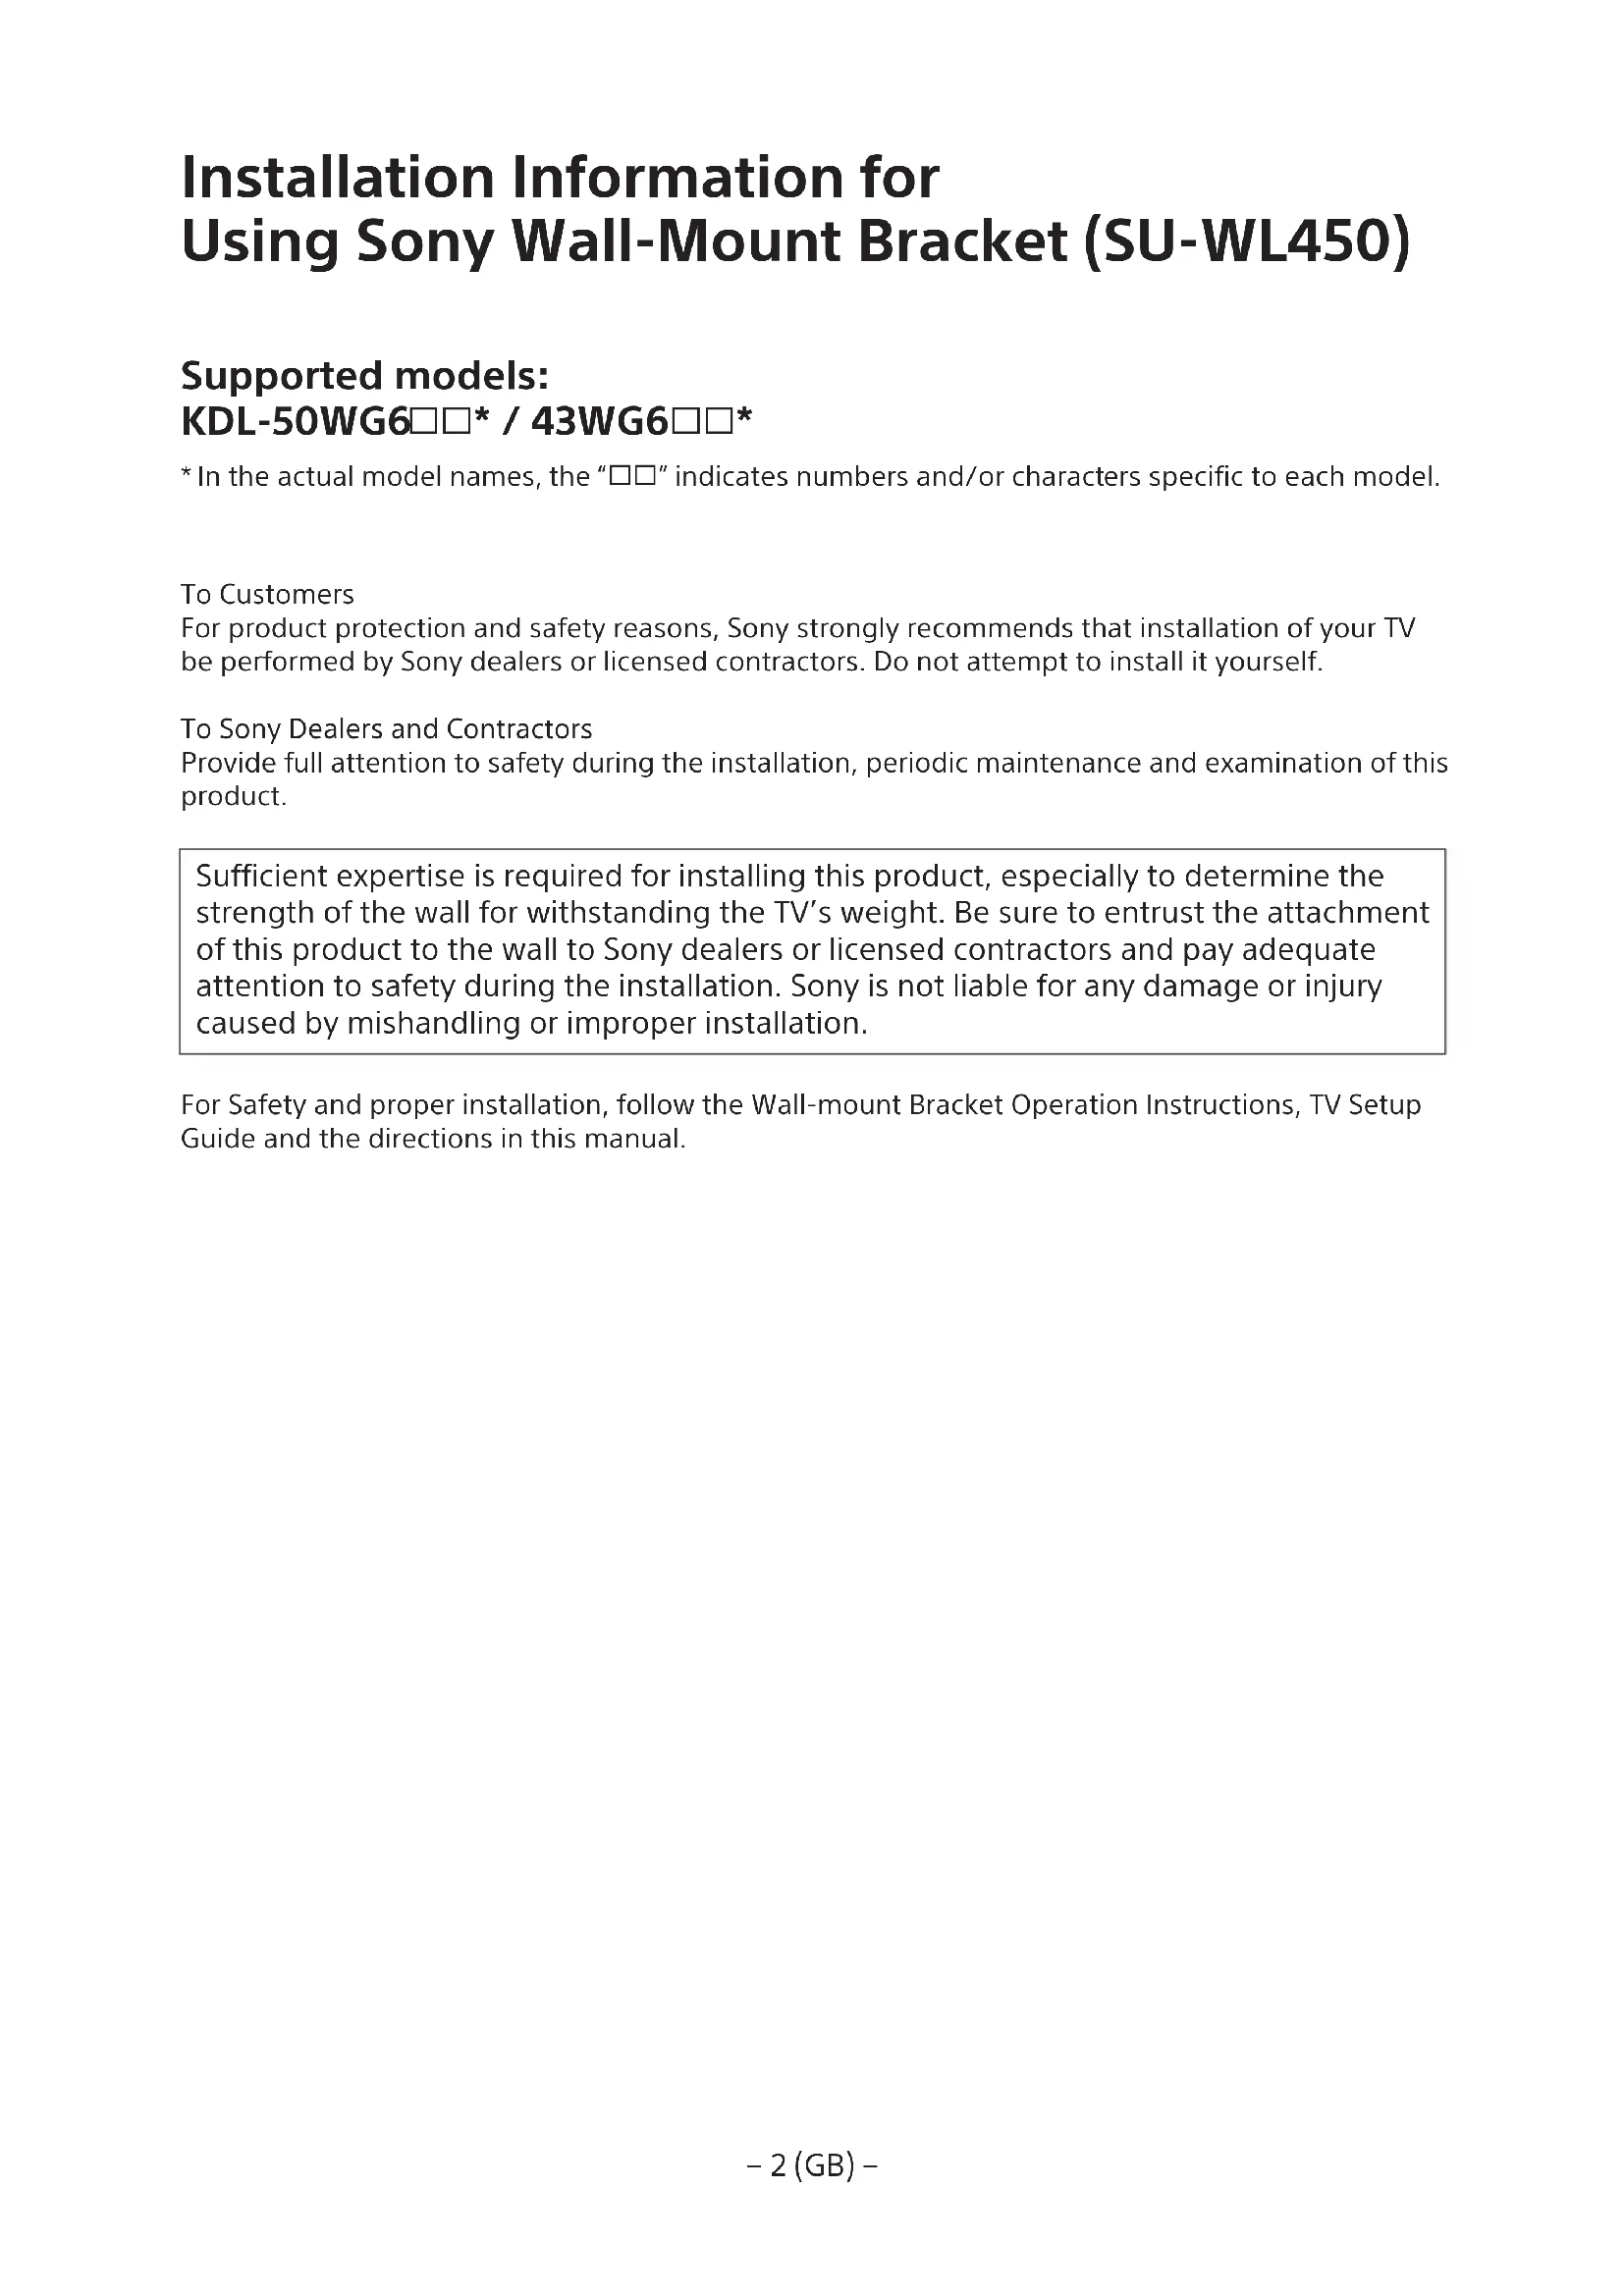
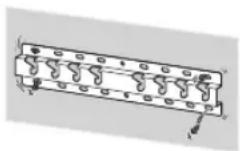
Do not lean on or hang from the TV.
Do not lean on or hang from the TV as it may fall on you and cause serious injury.
CAUTION
If the following precautions are not observed, injury or property damage may occur.
Do not handle the product with excessive force during cleaning or maintenance.
Do not apply excessive force on the topside of the TV. If you do so, the TV may fall and cause injury or property damage.
Precautions
- If you use the TV installed on the Wall-Mount Bracket for a long time, the wall behind or above the TV may become discolored or the wallpaper may come unstuck, depending on the material of the wall.
- If the Wall-Mount Bracket is removed after installing it on the wall, the screw holes are left.
- Do not use the Wall-Mount Bracket in a place where it is subjected to mechanical vibrations.
Installing the Wall-Mount Bracket
To Sony Dealers
WARNING
The following instructions are for Sony dealers only. Be sure to read safety precautions described above and pay special attention to safety during the installation, maintenance and checking of this product.
Do not install the Wall-Mount Bracket on wall surfaces where the corners or the sides of the TV protrude away from the wall surface.
Do not install the Wall-Mount Bracket on wall surfaces such as a pillar, where the corners or the sides of the TV protrude away from the wall surface. If a person or object happens to hit the protruded corner or side of the TV, it may cause injury or property damage.
Do not install the TV over or under an air-conditioner.
If the TV is exposed to water leaks or air current from an air conditioner for a long time, it may cause a fire, an electric shock or a malfunction of the TV.
Be sure to install the Wall-Mount Bracket securely to the wall following the instructions in this instruction manual.
If any of the screws are loose or fall out, the Wall-Mount Bracket may fall and cause injury or property damage. Be sure to use the appropriate screws for the material of the wall and install the unit securely using four or more screws of 8 mm diameter (or equivalent).
Be sure to use the supplied screws and attachment parts properly following the instructions given in this instruction manual. If you use substitute items, the TV may fall and cause bodily injury to someone or damage to the TV.
Be sure to assemble the bracket properly following the instructed procedure explained in this instruction manual.
If any of the screws are loose or fall out, the TV may fall and cause bodily injury to someone or damage to the TV.
Be sure to tighten the screws securely in the designated position.
If you fail to do so, the TV may fall and cause bodily injury to someone or damage to the TV.
Be careful not to subject the TV to shock during installation.
If the TV is exposed to shock, it may fall or break apart. This may cause injury.
Be sure to install the TV on a wall that is both perpendicular and flat.
If you fail to do so, the TV may fall and cause injury.
After proper installation of the TV, secure the cables properly.
If people or objects get tangled with cables, this may result in injury or damage to the TV.
Do not allow the mains lead or the connecting cable to be pinched.
If the mains lead or the connecting cable is pinched between the unit and the wall or is bent or twisted by force, the internal conductors may become exposed and cause a short circuit or an electrical break. This may cause a fire or an electric shock.
The screws needed to secure the Wall-Mount Bracket to the wall are not supplied.
Use the appropriate screws for the wall material and structure when mounting the Wall-Mount Bracket.
Installing the TV onto the wall
Installation procedure differs, depending on your TV.
Use the Wall-Mount Bracket SU-WL450 to install the TV to the wall.
Note
- If the Table-Top Stand is attached to the TV, detach the Table-Top Stand beforehand. See the Setup Guide and follow in reverse order the steps to detach the Table-Top Stand.
- Place the TV with its screen facing down on a level and stable surface covered with a thick and soft cloth, when securing the Attachment parts for Wall-Mount Bracket or when removing the Table-Top Stand from the TV to prevent damaging the surface of the LCD display.
- Be sure to store the removed screws in a safe place, keeping them away from children.
Preparing for installation
- Have the TV's Reference Guide and Setup Guide at hand before installation.
- Be sure to have a Phillips screwdriver that fits the screws prior to the assembly.
- Confirm the installing position of your TV.
- Prepare four or more screws of 8 mm diameter and one screw of 5 mm or equivalent (not supplied). Select screws suitable for the material of the wall.
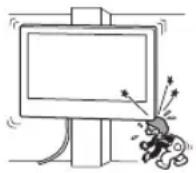
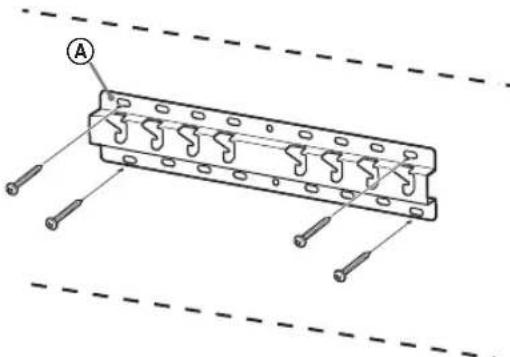
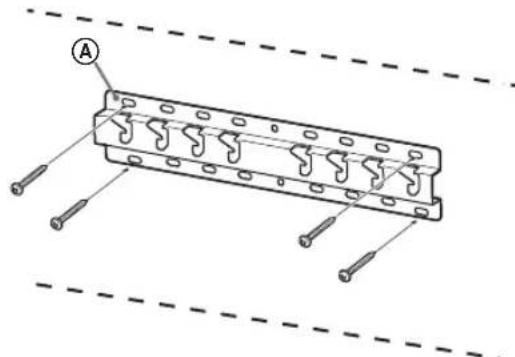
Checking the parts
Supplied with SU-WL450
- Verify that all the parts are included.
A Base (20) (1) B Pulley (2)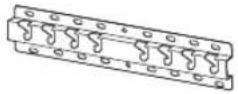 |  |
C PSW 6x20 (4) D PSW 4x20 with Bush (2) |  |
E Spacer (20) (2) F Belt (1) | 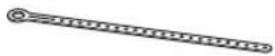 |
G Bush (20) (M4) (2) H PSW 4x20 (2) |  |
I Base Adaptor (2) J PSW 4x10 (8) |  |
K Spacer (60) (2) L PSW 6x50 (2)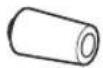 |  |
M Bush (M4) (2) N PSW 4x50 (2)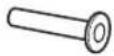 |  |
Deciding on the installation location
1 Decide on the installation location.
Make sure that the wall has enough space for the TV and is capable of supporting a weight of at least four times that of the TV.
Refer to the following table on installing the TV to the wall. Refer to your TV's Reference Guide for the TV's weight.
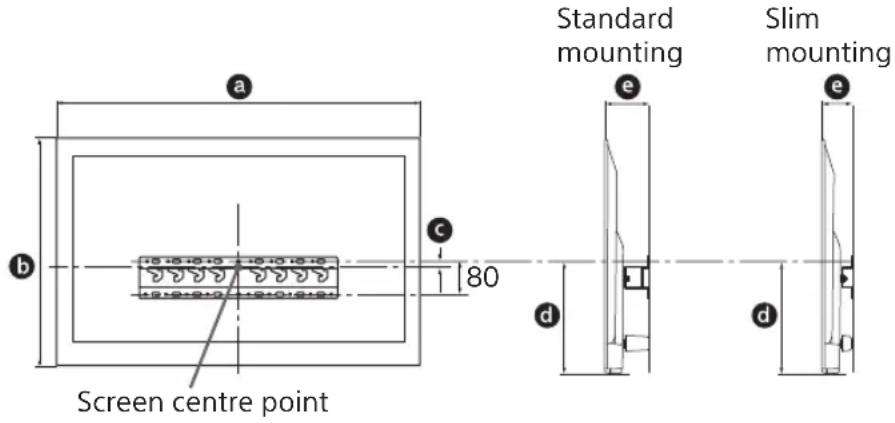
Unit: mm
| Model Name | Display dimensions | Screen centre dimension | Length for mounting | ||
| a | b | c | d | e | |
| Standard mounting Slim mounting | |||||
| KDL-50WG6□□ | 1,130 660 21 358 130 88 | ||||
| KDL-43WG6□□ | 974 572 54 346 130 88 | ||||
Note
- Figures in the table may differ slightly depending on the installation.
- When your TV is installed on the wall, the upper side of the TV slightly leans forward.
Allow for suitable clearance between the TV and the ceiling and protruding parts of the wall as shown below.
Unit: mm
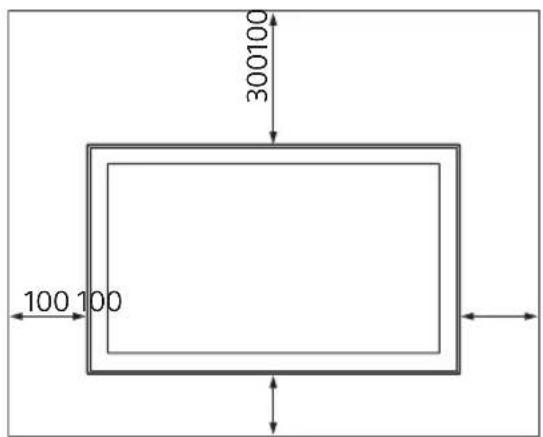
• To ensure proper ventilation and prevent the collection of dirt or dust:
— Do not lay the TV set flat, install upside down, backwards, or sideways.
— Do not place the TV set on a shelf, rug, bed or in a closet.
— Do not cover the TV set with a cloth, such as curtains, or items such as newspapers, etc.
— Do not install the TV set as shown below.
Air circulation is blocked.
natural_image
Architectural cross-section diagram of a wall with decorative patterns and structural elements (no text or symbols)Note
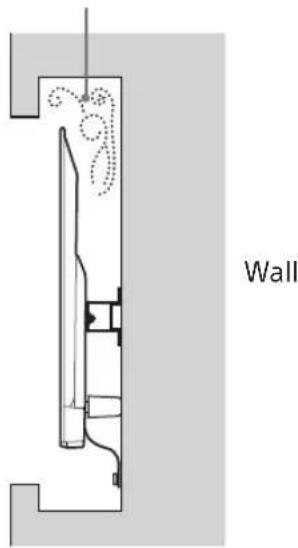
- If you intend to route the cables in the wall, make a hole in the wall to insert the cables before beginning the installation.
To prevent pinching the cables, prepare a hole in the wall somewhere outside the perimeter of the Base (20) Ⓐ, Base Adaptor ① and Spacer (20) Ⓔ, Spacer (60) Ⓚ.
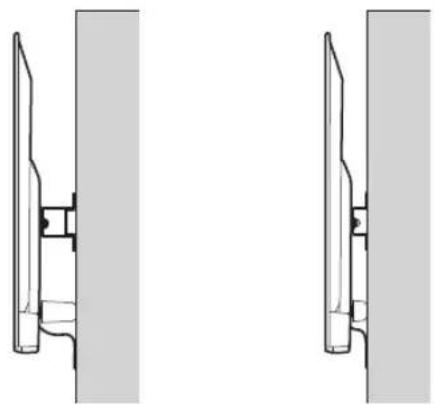
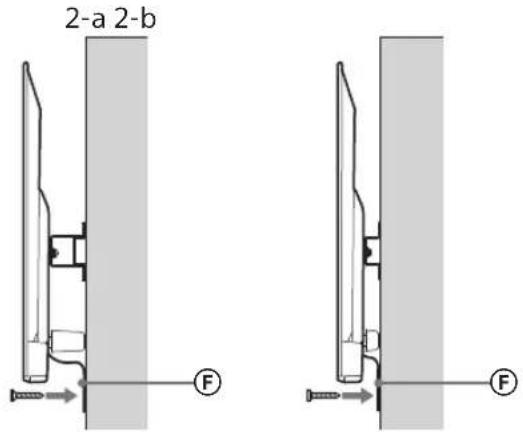
2 Select Wall mounting style. It is selectable as shown below.
2-a Standard mount
2-b Slim mount
Refer to the table of step 1.
WARNING
- When 2-b is selected, rear terminal access is limited.
2-a 2-b
natural_image
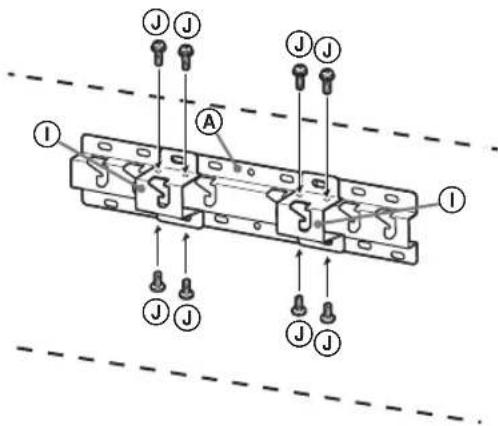
Pure technical line drawing of two vertical structural components without any text, numbers, or symbols3 Refer to the below table about the Base Adaptor fitting location. In case of selecting 2-b, then skip this step.
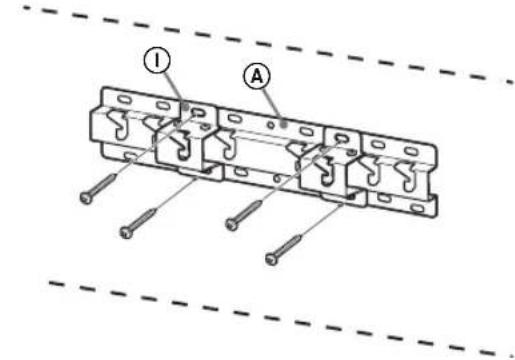
Model Name Hook location
Fit Base Adaptor ① by using Screw (PSW 4x10) ② to Base (20) ③ when selecting 2-a.
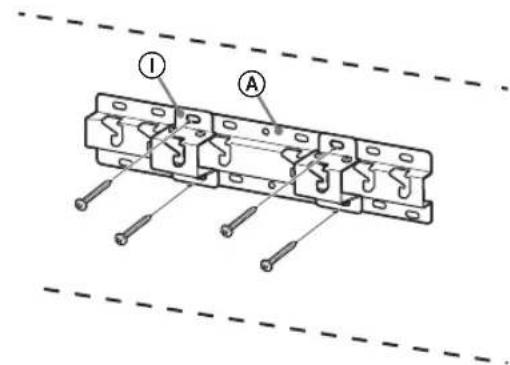
4 Decide the positions of the screws for installing the Base (20) Ⓐ.
Refer to the specifications on page 12. When selecting 2-a, please use the hole positions of Base Adaptor ①.
WARNING
- The wall that the TV will be mounted on should be able to support a weight of at least four times that of the TV (Refer to your TV's Reference Guide for its weight.).
- Determine the strength of the wall the TV will be mounted on. Reinforce the wall sufficiently, if necessary.
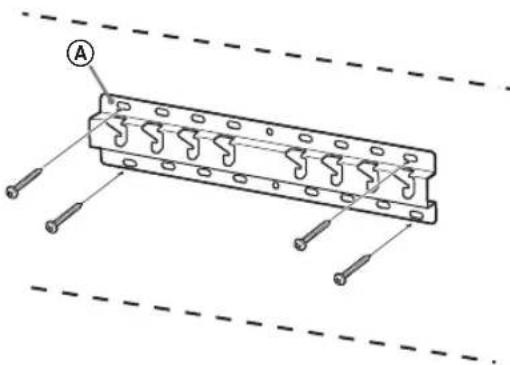
Installing the Base on the wall
- Use four or more screws of 8 mm diameter or equivalent (not supplied).
- Fit four screws to the holes of Base Adaptor ① with Base (20) Ⓐ (2-a only).
• Install the Base (20) Ⓐ on the wall horizontally.
Standard mounting (2-a)
Slim mounting (2-b)

Preparing for the installation of the TV
Refer to the Setup Guide for stand installation.
1 Detach the Table-Top Stand from the TV.
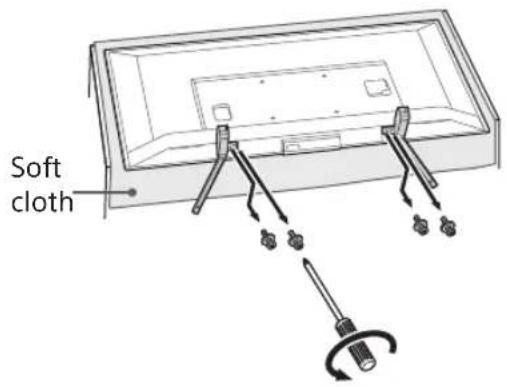
Note
- Make sure to place TV on the place where you put a soft cloth on to prevent damaging display's surface.
- When installing the Wall-Mount Bracket, do not use the screws removed from the Table-Top Stand.
- Be sure to store the removed Table-top Stand and its screws in a safe place, keeping them away from children. You will need them if you want to use the TV on a table in the future. The Table-Top Stand cannot be purchased separately.
WARNING
- Be sure the TV is on the vertical position before switching on. TV set must not powered on with LCD panel face down to avoid uneven picture uniformity.
- If pressure or shock is applied to the surface of the TV, the TV may break or become damaged.
- Lay the TV face down on a stable and level surface with the Table-Top Stand hanging over the edge of the surface. Having the TV face and the base of the Table-Top Stand on the same level surface will create an unstable working condition and can damage the TV.
- When detaching the Table-Top Stand from the TV, hold the Table-Top Stand securely.
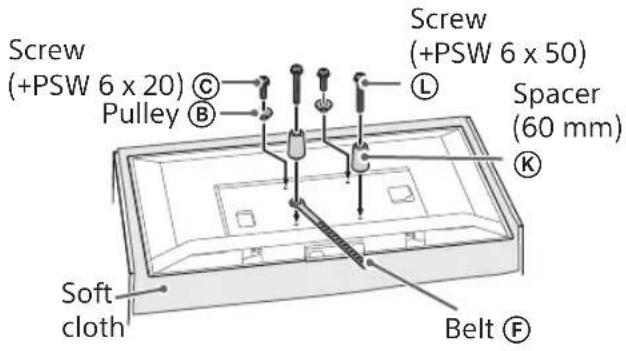
2 Attach the Attachment parts for Wall-Mount Bracket. Check the Attachment parts by referring to "Supplied with SU-WL450" in "Checking the parts" on page 5.
Note
- Firmly secure the Attachment parts using screws.
- When using an electric screwdriver, set the torque setting to approximately 1.5 N·m {15 kgf·cm}.
- Be sure to store the used or unused parts in a safe place for future use. Retain this manual for future reference.
Standard mounting (2-a)
Slim mounting (2-b)
Note
- You cannot use some of the terminals on the rear of the TV when using this mounting style.
natural_image
Line drawing of a rectangular device with a recessed top and internal compartments, marked with a prohibition symbol (no text or labels)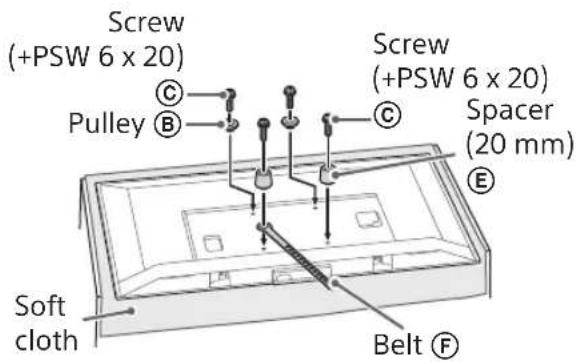
3 Connect the necessary cable(s) to the TV.
Make sure to connect the cables before installing the TV on the wall. You will be unable to connect the cables when the TV is installed.
Refer to the Reference Guide supplied with your TV.
Note
- Subcontract the cable routing in the wall to a licensed contractor.
- Bundle the connecting cables to prevent stepping on them before wall mounting.
Installing the TV on the wall
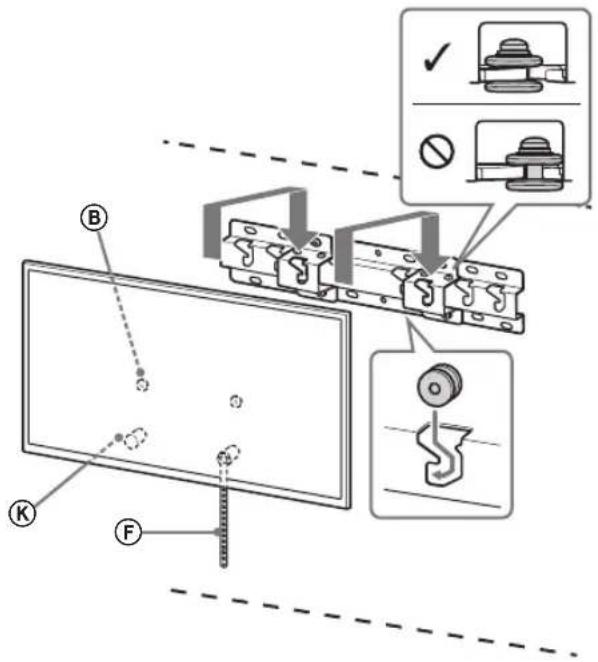
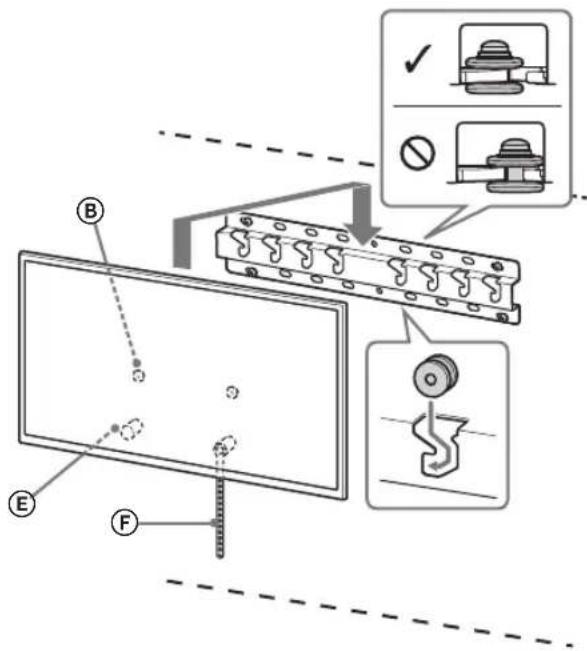
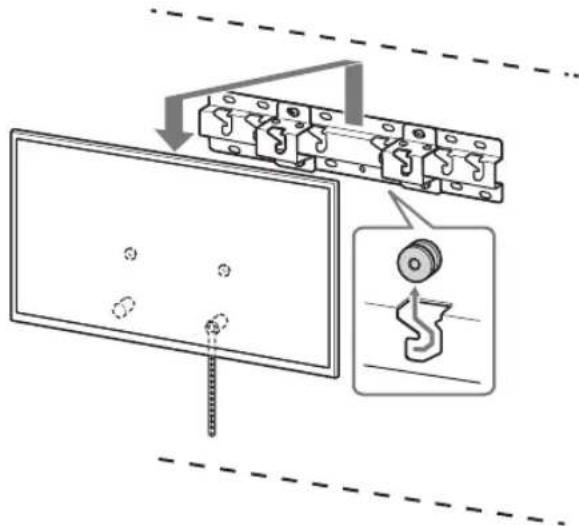
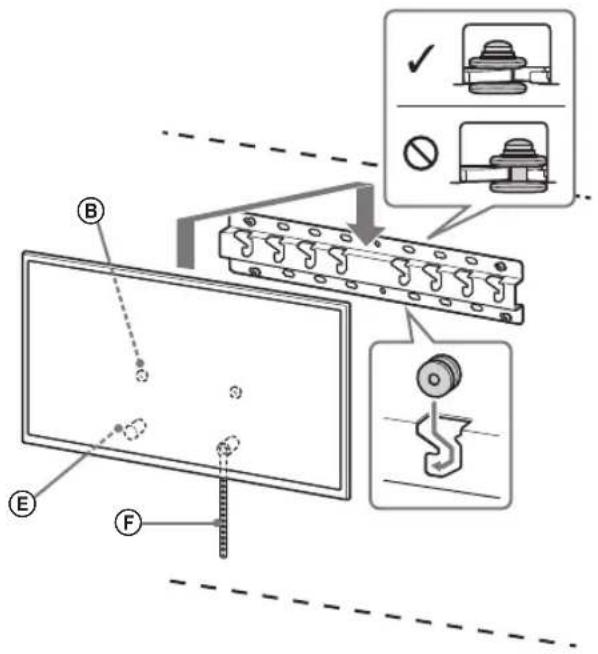
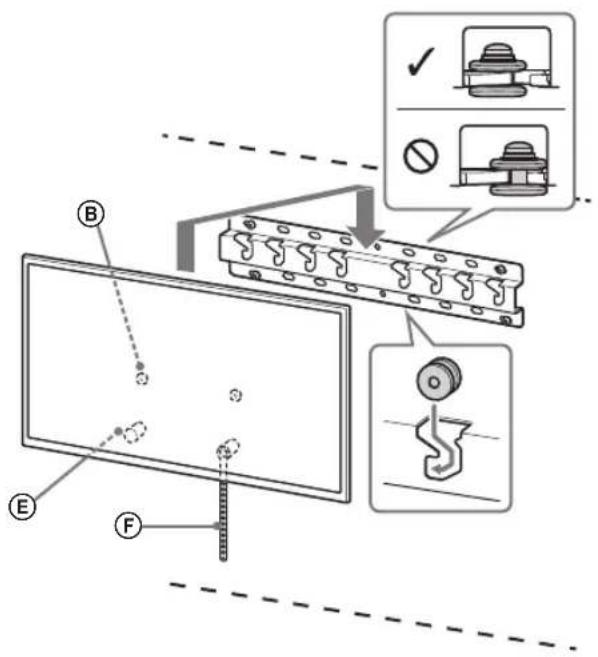
1 Install the TV onto the Base or Base Adaptor.
- For the location of the Pulleys Ⓑ to the hang on the Base or Base Adaptor, refer to the table of step 3 in "Deciding on the installation location" on page 7.
- Gently slide down the TV and hang the Pulleys Ⓑ attached to the rear of the TV to the Base or Base Adaptor, making sure to confirm the shape of the holes.
- After installing the TV on the wall, confirm the Pulleys ® are firmly latched into the Base or Base Adaptor.
- Release both hands slowly to ensure that the TV does not fall.
Standard mounting (2-a)
Slim mounting (2-b)
WARNING
- Be sure that two or more persons (three or more persons for 75 inches and above TV set) hold the TV when carrying it.

2 Preventing the bottom of the TV from shifting.
- Take up the slack of Belt Ⓔ and attach it to the wall tightly.
- Use a 5 mm diameter screw or equivalent (not supplied).
Note
- Try to pull the bottom of the TV forwards yourself slightly, to make sure that it does not move forward. If there is any movement, it is not fixed correctly, and the Belt ⑤ should be secured firmly again.
Confirming the completion of the installation
Check the following points.
- The Pulleys Ⓑ are firmly hung onto the Base or Base Adaptor.
- The cord and the cable are not twisted or pinched.
- The Belt Ⓕ is tight with no slack.
WARNING
- Improper placement of the mains lead, etc., may cause fire or electric shock through a short circuit. Be sure to confirm the completion of the installation for safety.
Other information
When removing the TV, reverse the previous installation procedure.
WARNING
- Be sure that two or more persons (three or more persons for 75 inches and above TV set) hold the TV when removing it.
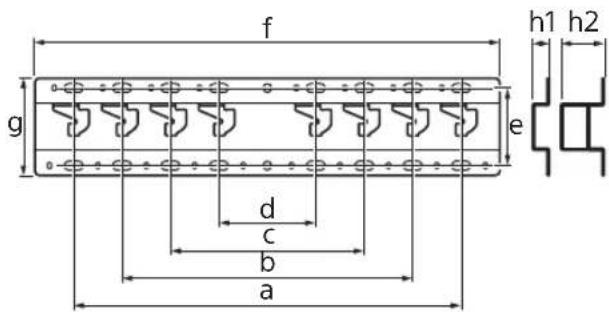
Specifications
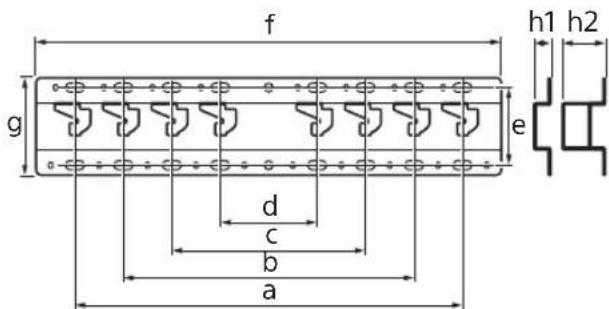
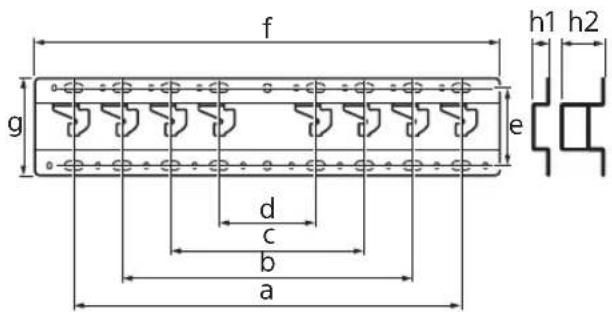
Dimensions: (Approx.) [mm]
a : 400
b : 300
c : 200
d : 100
e : 80
f : 480
g : 100
h1 : 20 (case 2-b)
h2 : 60 (case 2-a)
Weight (base only): (Approx.) [kg]
0.8
Design and specifications are subject to change without notice.
natural_image
Technical line drawing of two mechanical components labeled 2-a and 2-b, shown from different angles (no text or symbols beyond labels)Montage fin (2-b)

Montage fin (2-b)

AVERTISSEMENT
AVERTISSEMENT
Dimensions : (approx.) [mm]
a : 400
b : 300
c : 200
d : 100
e : 80
f : 480
g : 100
h1 : 20 (cas 2-b)
h2 : 60 (cas 2-a)
Poids (base seule) : (approx.) [kg]
0,8
natural_image
Technical line drawing of two mechanical components labeled 2-a and 2-b, shown from different angles (no text or symbols beyond labels)ADVERTENCIA
ADVERTENCIA
natural_image
Technical line drawing of two mechanical components labeled 2-a and 2-b, shown in side profile (no text or symbols beyond labels)natural_image
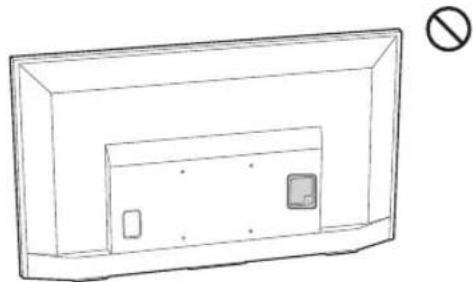
Line drawing of a rectangular TV with a small wall-mounted door and a prohibition symbol (no text or labels)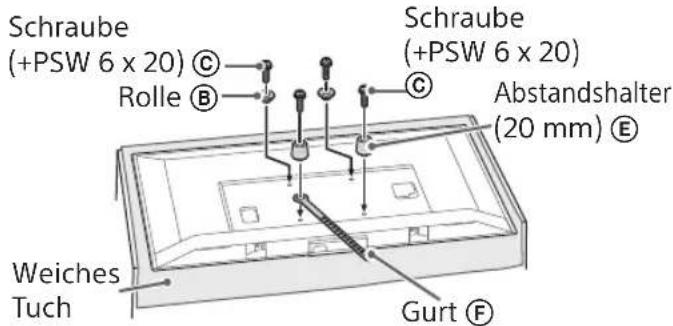
WARNUNG
WARNUNG
natural_image
Technical line drawing of two mechanical components labeled 2-a and 2-b, shown from different angles (no text or symbols beyond labels)Smalle montage (2-b)
natural_image
Line drawing of a rectangular device with internal components and a prohibition symbol (no text or labels)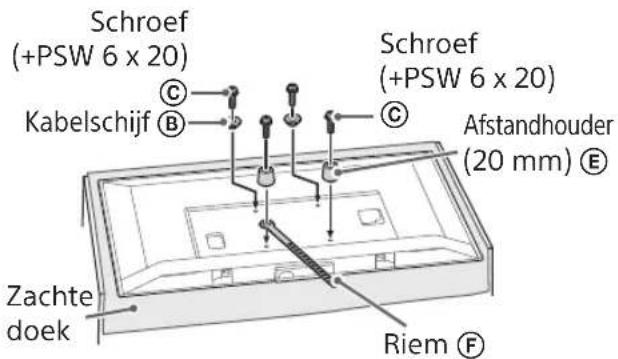
Smalle montage (2-b)

WAARSCHUWING
WAARSCHUWING
AVVERTENZA
AVVERTENZA
natural_image
Technical line drawing of two mechanical components labeled 2-a and 2-b, shown from different angles (no text or symbols beyond labels)WARNING
WARNING
Płaski montaż (2-b)

natural_image
Simple line drawing of a rectangular device with two internal compartments and a prohibition symbol (no text or labels)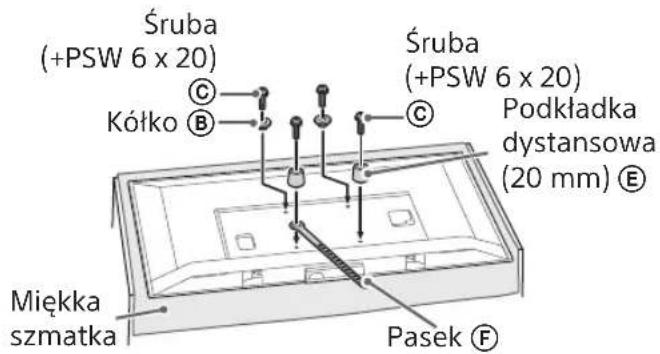
Płaski montaż (2-b)

OSTRZEŻENIE
OSTRZEŻENIE
natural_image
Technical line drawing of two mechanical components labeled 2-a and 2-b, shown from different angles (no text or symbols beyond labels)natural_image
Line drawing of a rectangular TV or monitor with a small square on the front panel and a prohibition symbol on the right (no text or labels)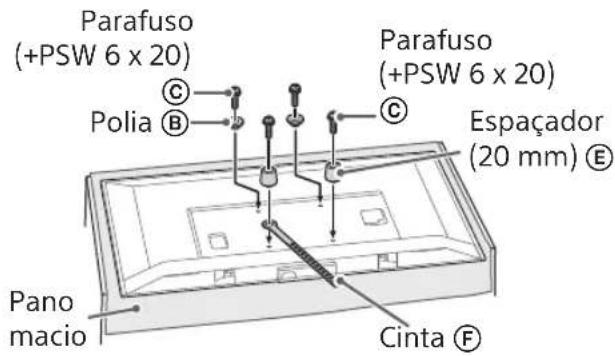
AVISO
AVISO
Peso (apenas base): (Aprox.) [kg]
0,8
Klargøring for installation
1 Find TV'ets placering.
Smal-montering (2-b)

natural_image
Line drawing of a rectangular device with a recessed panel and a small square component, no text or symbols present.
Smal montering (2-b)

ADVARSEL
2 Sådan forhindres, at TV'et bund flytter sig.
ADVARSEL
natural_image
Line drawing of a rectangular device with internal compartments and a symbol indicating prohibition (no text or labels present)
Kapea asennus (2-b)
VAROITUS
VAROITUS
Tynn montering (2-b)

Tynn montering (2-b)

ADVARSEL
- Sørg for at to eller flere personer (tre eller flere personer for TV-er på 75 tommer eller mer) holder TV-en när den bæres.
ADVARSEL
- Sørg for at to eller flere personer (tre eller flere personer for TV-er på 75 tommer eller mer) holder TV-en när den fjernes.
Spesifikasjoner
Mål: (Ca.) [mm]
a : 400
b : 300
c : 200
d : 100
e : 80
f : 480
g : 100
h1 : 20 (tilfelle 2-b)
h2 : 60 (tilfelle 2-a)
Vekt (kun sokkel): (Ca.) [kg]
0,8
natural_image
Technical line drawing of two identical mechanical components mounted on a vertical surface, shown from top and side views (no text or symbols)natural_image
Line drawing of a rectangular TV or monitor with a small square cutout and a prohibition symbol (no text or labels)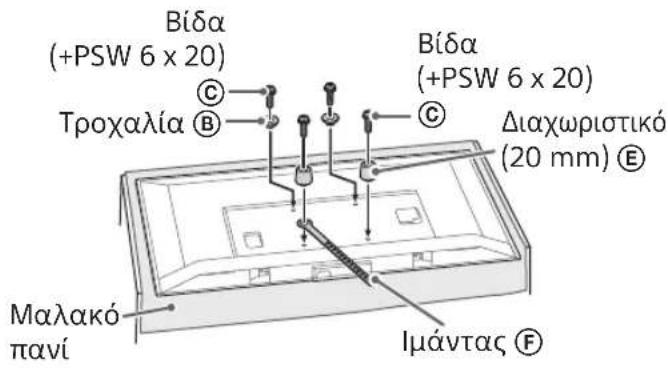
ΠΡΟΕΙΔΟΠΟΙΗΣΗ
ΠΡΟΕΙΔΟΠΟΙΗΣΗ
ince montaj (2-b)
Not
natural_image
Simple line drawing of a rectangular device with a recessed panel and a prohibition symbol (no text or labels)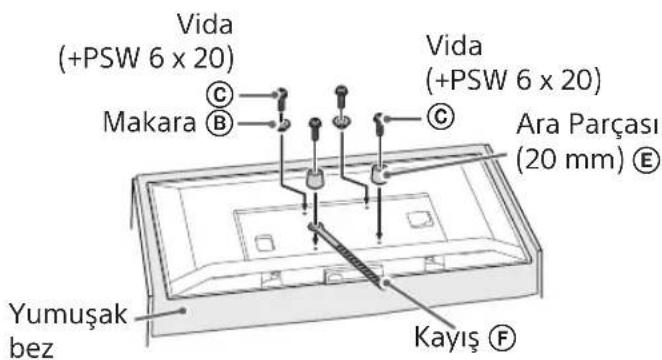
ince montaj (2-b)

UYARI
UYARI
natural_image
Architectural cross-section diagram of a room with furniture and decorative elements, labeled 'Fal' (no text or symbols within the diagram itself)Megjegyzés
natural_image
Line drawing of a rectangular device with internal components and a prohibition symbol (no text or labels)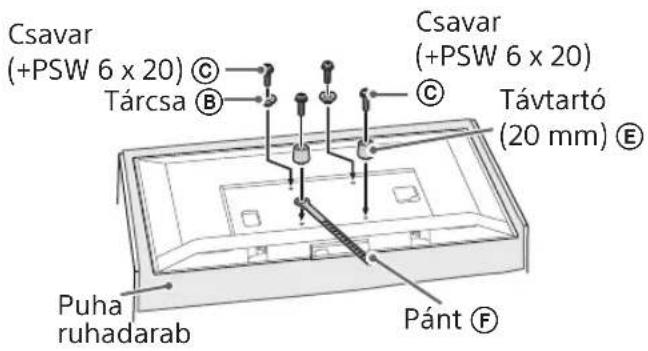
FIGYELMEZTETÉS
FIGYELMEZTETÉS
natural_image
Line drawing of a rectangular device with a recessed top and two internal compartments, marked with a prohibition symbol (no text or labels)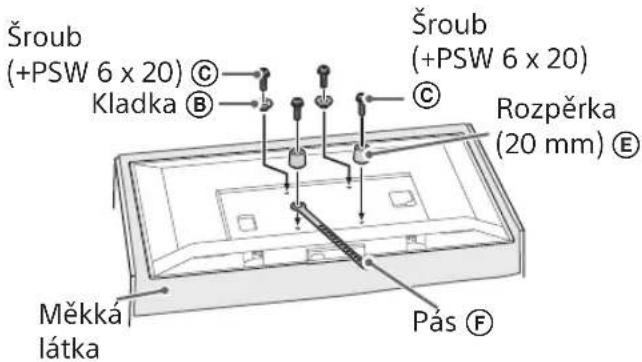
VAROVÁNÍ
VAROVÁNÍ
natural_image
Technical line drawing of two mechanical components labeled 2-a and 2-b, shown from different angles (no text or symbols beyond labels)4 Určte pozíciu skrutiek na montáž podstavca (20) Ⓐ.
natural_image
Line drawing of a rectangular device with internal compartments and a prohibition symbol (no text or labels)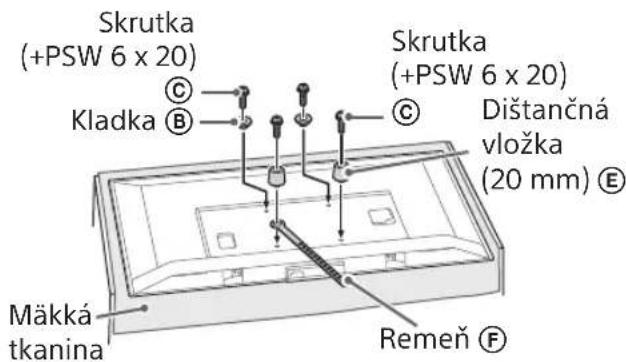
3 Pripojte k TV prijímaču potrebné káble.
VÝSTRAHA
VÝSTRAHA
Rozmery: (pribl.) [mm]
a : 400
b : 300
c : 200
d : 100
e : 80
f : 480
g : 100
natural_image
Technical line drawing of two mechanical components labeled 2-a and 2-b, shown from different angles (no text or symbols beyond labels)AVERTISMENT
AVERTISMENT
Тесен монтаж (2-b)
natural_image
Line drawing of a rectangular device with a recessed panel and two small square cutouts, no text or symbols present.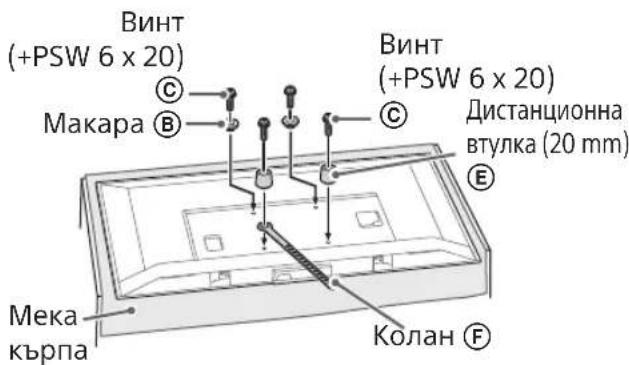
Тесен монтаж (2-b)
ПРЕДУПРЕЖДЕНИЕ
ПРЕДУПРЕЖДЕНИЕ
natural_image
Line drawing of a rectangular TV or monitor with a small wall-mounted screen and a prohibition symbol (no text or labels)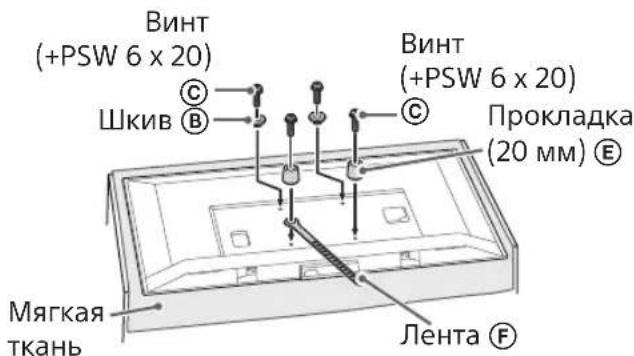
ПРЕДУПРЕЖДЕНИЕ
ВНИМАНИЕ
natural_image
Technical line drawing of two mechanical components labeled 2-a and 2-b, shown from different angles (no text or symbols beyond labels)natural_image
Line drawing of a rectangular TV or monitor with a small square on the front panel and a prohibition symbol on the right (no text or labels)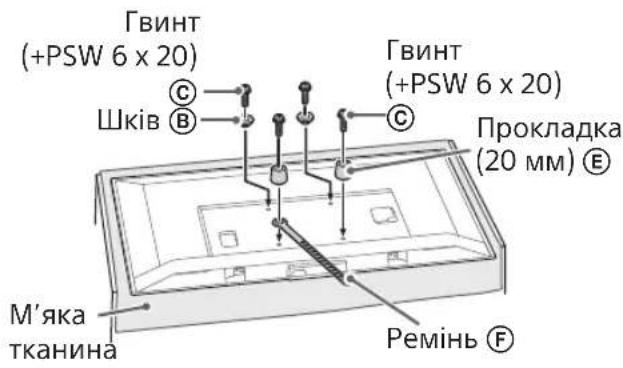
ЗАСТЕРЕЖЕННЯ
ЗАСТЕРЕЖЕННЯ
Õhuke paigaldus (2-b)

natural_image
Line drawing of a rectangular TV or monitor with a small square on the front panel and a prohibition symbol on the right (no text or labels)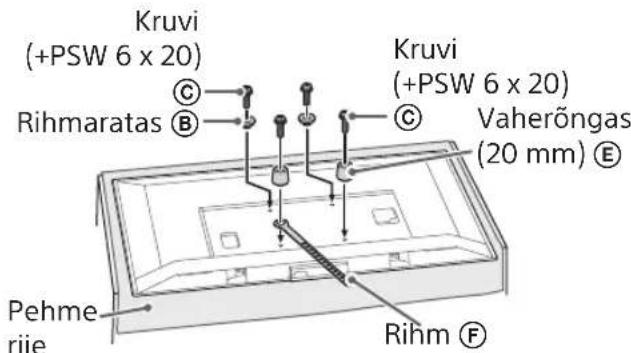
Õhuke paigaldus (2-b)

HOIATUS
HOIATUS
Mass (ainult alus): (umbes) [kg]
0,8
natural_image
Line drawing of a rectangular device with internal components and a prohibition symbol (no text or labels)
BRĪDINĀJUMS!
2 Nesasveriet televizora apakšpusi.
- Satveriet saites Ⓖ galu un cieši piestipriniet to pie sienas.

BRĪDINĀJUMS!
natural_image
Line drawing of a rectangular device with internal components and a prohibition symbol (no text or labels)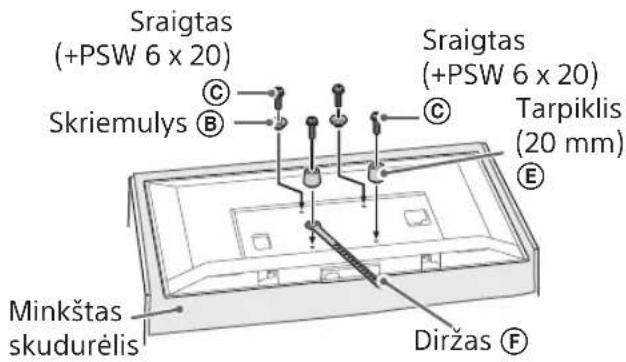
JSPÈJIMAS
JSPÈJIMAS
4 Določite položaje vijakov za vgradnjo podstavka (20) Ⓐ.
Tanki nosilec (2-b)

natural_image
Simple line drawing of a rectangular room with two internal compartments and a 'no' symbol on the wall (no text or labels)
3 Na televizor priključite potrebne kable.
Pred vgradnjo televizorja na steno obvezno priključite kable. Ko je televizor vgrajen, kablov ne boste mogli priključiti.
Tanki nosilec (2-b)

OPOZORILO
OPOZORILO
4 Odlučite o položaju vijaka za postavljanje baze (20) Ⓐ.
Pogledajte specifikaciju na stranici 12. Kada odaberete opciju 2-a, poslužite se položajima rupa za adapter baze ①.
UPOZORENJE
- Zid na koji postavljate televizor mora izdržati težinu barem četiri puta veću od težine televizora (Pogledajte Referentni vodič Vašeg televizora za podatak o njegovoj težini.).
- Provjerite čvrstoću zida na koji ćete postaviti televizor. Ako je potrebno, ojačajte zid.
Postavljanje baze na zid
- Pripremite četiri ili više vijaka promjera 8 mm ili slične vijke (nisu isporučeni).
- Pričvrstite četiri vijka u rupe za bazu adaptera ① U slučaju baze (20) ④ (samo 2-a).
• Postavite bazu (20) Ⓐ na zid vodoravno.
Standardno postavljanje (2-a)
Tanko postavljanje (2-b)

Priprema za postavljanje televizora na zid
Za postavljanje postolja pogledajte Vodič za postavljanje.
1 Skinite Postolje za stol s televizora.
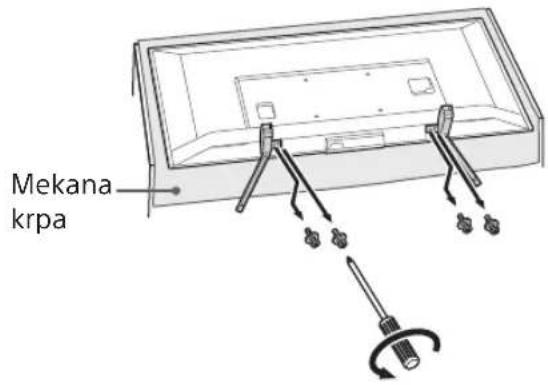
Napomena
- Pripazite da televizor postavite na mjesto gdje ste stavili mekanu tkaninu kako biste spriječili oštećenje površine zaslona.
- Kada postavljate Nosač za postavljanje na zid, nemojte koristiti vijke koje ste skinuli s Postolja za stol.
- Pazite da skinuto Postolje za stol i njegove vijke spremite na sigurno, držeći ih dalje od djece. Bit će Vam potrebni ako u budućnosti budete željeli televizor držati na stolu. Postolje za stol se ne može kupiti zasebno.
UPOZORENJE
natural_image
Line drawing of a rectangular TV with a small display and no text or symbols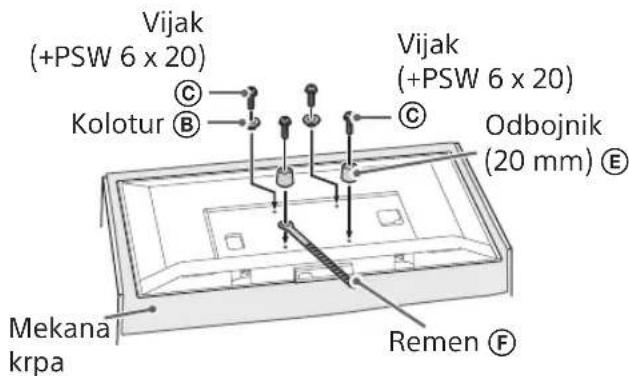
3 Priključite potrebne kabele u televizor.
Svakako spojite kabele prije postavljanja televizora na zid. Kabele nećete moći priključiti kada je televizor bude postavljen. Pogledajte Referentni vodič isporučen s Vašim TV-om.
Napomena
- Prepustite provlačenje kabela u zidu licenciranom izvodaču.
- Povežite spojne kabele da ne biste na njih nagazili prilikom postavljanja na zid.
Postavljanje televizora na zid
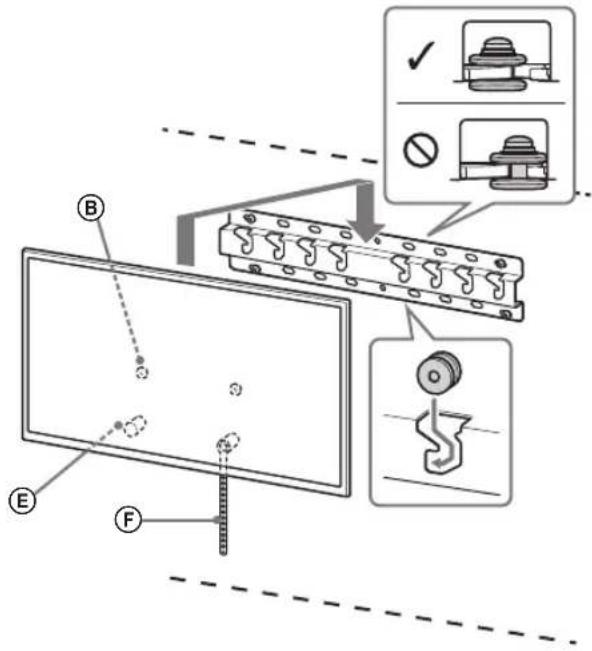
1 Postavite TV na bazu ili adapter za bazu.
- Položaj kolotura Ⓑ za postavljanje na bazu ili adapter za bazu možete saznati u tablici koraka 3 pod naslovom »Odlučivanje o mjestu postavljanja« na stranici 7.
- Pažljivo gurnite TV prema dolje i zakvačite koloture Ⓑ pričvršćene na stražnjoj strani TV-a na bazu ili adapter za bazu i uvjerite se da su ispravno uglavljeni u otvor.
- Nakon postavljanja televizora na zid, provjerite da su koloturi Ⓑ dobro pričvršćeni za bazu ili Adapter za bazu.
- Polako odmaknite ruke kako biste se uvjerili da TV neće pasti.
Standardno postavljanje (2-a)

Tanko postavljanje (2-b)
UPOZORENJE
2 Sprječavanje prevrtanja televizora.
- Uzmite komad remen Ⓔ i lagano je pričvrstite za zid.

UPOZORENJE
- Pobrinite se da dvije ili više osoba (tri ili više osoba za televizor veličine 75 inča ili veći) drži TV prilikom njegovog uklanjanja.
Specifikacije
Dimenzije: (približno) [mm]
a : 400
b : 300
c : 200
d : 100
e : 80
f : 480
g : 100
natural_image
Technical line drawing of two mechanical components labeled 2-a and 2-b, shown from different angles (no text or symbols beyond labels)4 Herizdi (20) Ⓐ ornaty yshin бурандалардың orнын аныктаңыз.
Жақын орнату (2-b)

natural_image
Line drawing of a rectangular room with a small square vent and a prohibition symbol (no text or labels)
Жакын орнату (2-b)
ECKEPTY
ECKEPTY
natural_image
Technical line drawing of two mechanical components labeled 2-a and 2-b, shown from different angles (no text or symbols beyond labels)4 Odlučite o položajima vijaka za postavljanje osnove (20) Ⓐ.
Pogledajte specifikacije na strani 12. Prilikom izbora 2-a, izaberite položaje rupa spojnice adaptera ①.
UPOZORENJE
- Zid na koji će se montirati TV treba da bude u stanju da podnese težinu od najmanje četiri puta težine TV-a (Pogledajte Vodič za reference svog TV-a radi njegove težine.).
- Odredite jačinu zida na koji će TV biti montiran. Ojačajte dovoljno zid, ako je potrebno.
Postavljanje osnove na zid
- Upotrebite četiri ili više vijaka prečnika 8 mm ili ekvivalentne (nisu isporučeni).
- Postavite četiri vijka u rupe spojnice osnove ① sa osnovom (20) Ⓐ (samo 2-a).
- Postavite horizontalno osnovu (20) Ⓐ na zid.
Standardna montaža (2-a)

Uzana montaža (2-b)

Priprema za postavljanje TV-a
Pogledajte Vodič za podešavanje za postavljanje postolja.
1 Odvojite postolje za sto od TV-a.
Napomena
- Pobrinite se da postavite TV na mesto gde ste stavili meku krpu da biste sprečili oštećivanje površine ekrana.
- Prilikom montaže nosača za postavljanje na zid, ne upotrebljavajte vijke izvađene iz postolja za sto.
- Obavezno čuvajte skinuto postolje za sto i njegove vijke na bezbednom mestu, držeći ih dalje od dece. Biće vam potrebni, ako u budućnosti budete želeli da koristite TV na stolu. Postolje za sto ne može da se kupi odvojeno.
UPOZORENJE
- Obavezno proverite da li je TV u vertikalnom položaju pre uključenja. TV prijemnik ne sme da se uključuje sa LCD panelom okrenutim nadole da bi se izbegla neravnomerna ujednačenost slike.
- Ako se na površinu TV-a primene pritisak ili udarac, TV može da se razbije ili bude oštećen.
- Položite TV licem prema dole na stabilnu i ravnu površinu sa postoljem za sto koje visi preko ivice površine. Držanje lica TV-a i osnove postolja za sto na istoj ravnoj površini će stvoriti nestabilne radne uslove i može da ošteti TV.
- Prilikom odvajanja postolja za sto od TV-a, čvrsto držite postolje za sto.
2 Pričvrstite delove za pričvršćenje za nosač za postavljanje na zid. Proverite delove za pričvršćenje pozivajući se na „Isporučeno uz SU-WL450“ u „Provera delova“ na strani 5.
Napomena
natural_image
Line drawing of a rectangular TV with a small wall-mounted door and a prohibition symbol (no text or labels)
Uzana montaža (2-b)
UPOZORENJE
2 Sprečavanje pomeranja dna TV-a.
- Podignite labavi deo remena Ⓔ i pričvrstite ga čvrsto na zid.
- Upotrebite vijak prečnika 5 mm ili ekvivalentan (nije isporučen).
Napomena
UPOZORENJE
natural_image
Diagram of a mechanical assembly with a vertical component and a side view labeled '2-a' (no text or symbols on the diagram itself)
natural_image
Simple line drawing of a mechanical component with no text or symbolsnatural_image
Architectural floor plan showing room layout with furniture placement (no text or labels)תְּק
תְרַעָה
• אַרְה, בָּוֹתָם:
הכלה, 2-a
4
.⑨ (20)
natural_image
Line drawing of a rectangular device with a recessed top and two internal slots, no text or symbols present.
2 (2-b)
.תָּלְרִי
תַלְרָה
תְרָה

[ה"י] (ה"י):ה"י
400: a
300: b
200: c
100: d
80: e
480: f
100: g
(2-b nppn) 20: h1
(2-a npp) 60: h2
תְרָה
תְקָרִי אַלְאָה