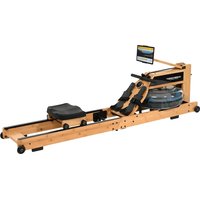
Como - Rowing Machine Christopeit - Free user manual and instructions
Find the device manual for free Como Christopeit in PDF.

| Product type | Rowing machine |
| Brand | Christopeit |
| Model | Como |
| Dimensions (L x W x H) | 230 x 55 x 87 cm |
| Folded dimensions | 120 x 55 x 149 cm |
| Product weight | 40 kg |
| Maximum user weight | 150 kg |
| Resistance type | Magnetic brake with 24 levels, motorized adjustment |
| Power supply | AC adapter 9V DC / 500 mA |
| Display | Digital screen: time, strokes/min, distance, calories, strokes, heart rate, watts |
| Training programs | 12 resistance programs, 4 heart rate programs, 1 customizable program, 1 manual, 1 competition |
| Heart rate reception | Uncoded frequency 5.0 - 5.5 kHz (optional chest strap) |
| Seat rail | Aluminum, usable length approx. 112 cm |
| Seat | Comfortable with bearings rollers |
| Pedals | Foot shells with Velcro straps |
| Folded footprint | Space-saving thanks to vertical folding |
| Transport wheels | Yes |
| Usage class | Private domestic use, class H/C |
| Cleaning | Damp cloth, no harsh products |
| Maintenance | Check screws every 50 h, oil threads every 100 h |
| Storage | Dry place, away from dust and sun |
Frequently Asked Questions - Como Christopeit
User questions about Como Christopeit
0 question about this device. Answer the ones you know or ask your own.
Ask a new question about this device
Download the instructions for your Rowing Machine in PDF format for free! Find your manual Como - Christopeit and take your electronic device back in hand. On this page are published all the documents necessary for the use of your device. Como by Christopeit.
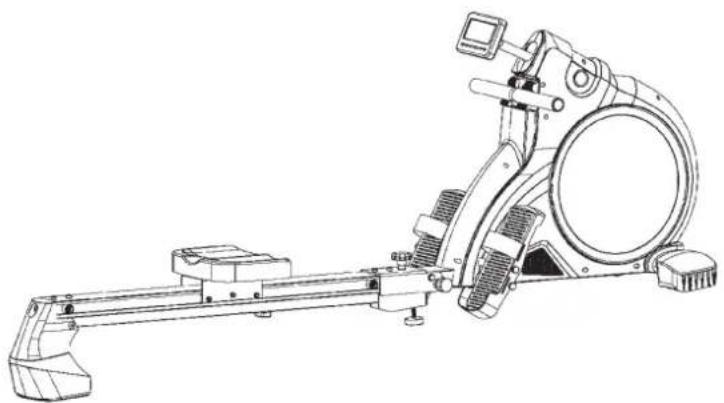
USER MANUAL Como Christopeit
- Summary of Parts Page 3 + 71
- Important Recommendations and Safety Information Page 14
- Assembly Instructions With Exploded Diagrams Page 15 - 17
- Computer instructions Page 18 - 19
- Cleaning, Storage, Checks, Troubleshooting Page 20
- Training Instructions, Warm up exercises (Warm Up) Page 21
- Parts List
Dear customer,
We congratulate you on your purchase of this home training sports unit and hope that we will have a great deal of pleasure with it. Please take heed of the enclosed notes and instructions and follow them closely concerning assembly and use.
Please do not hesitate to contact us at any time if you should have any questions.
Important Recommendations and Safety Instructions
Our products are all TUV-GS tested and therefore represent the highest current safety standards. However, this fact does not make it unnecessary to observe the following principles strictly.
- Assembly the machine exactly as described in the installation instructions and use only the enclosed, specific parts of the machine. Before assembling, verify the completeness of the delivery against the delivery notice and the completeness of the carton against the assembly steps in the installation and operating instructions.
- Check the firm seating off all screws, nuts and other connections before using the machine for the first time and at regular intervals to ensure that the trainer is in a safe condition.
- Set up the machine in a dry, level place and protect it from moisture and water. Uneven parts of the floor must be compensated by suitable measures and by the provided adjustable parts of the machine if such are installed. Ensure that no contact occurs with moisture or water.
- Place a suitable base (e.g. rubber mat, wooden board etc.) beneath the machine if the area of the machine must be specially protected against indentations, dirt etc.
- Before beginning training, remove all objects within a radius of 2 metres from the machine.
- Do not use aggressive cleaning agents to clean the machine and employ only the supplied tools or suitable tools of your own to assemble the machine and for any necessary repairs. Remove drops of sweat from the machine immediately after finishing training.
- WARNING! Systems of the heart frequency supervision can be inexact. Excessive training can lead to serious health damage or to the death. Consult a doctor before beginning a planned training programme. He can define the maximum exertion (pulse, Watts, duration of training etc.) to which you may expose yourself and can give you precise information on the correct posture during training, the targets of your training and your diet. Never train after eating large meals.
- Only train on the machine when it is in correct working order. Use original spare parts only for any necessary repairs. WARNING! Replace the worm parts immediately and keep this equipment out of use until repaired.
- When setting the adjustable parts, observe the correct position and the marked, maximum setting positions and ensure that the newly adjusted position is correctly secured.
-
Unless otherwise described in the instructions, the machine must only be used for training by one person at a time. The exercise time should not overtake 75 min./daily.
-
Wear training clothes and shoes which are suitable for fitness training with the machine. Your clothes must be such that they cannot catch during training due to their shape (e.g. length). Your training shoes should be appropriate for the trainer, must support your feet firmly and must have non-slip soles.
- WARNING! If you notice a feeling of dizziness, sickness, chest pain or other abnormal symptoms, stop training and consult a doctor.
- Never forget that sports machines are not toys. They must therefore only be used according to their purpose and by suitably informed and instructed persons.
- People such as children, invalids and handicapped persons should only use the machine in the presence of another person who can give aid and advice. Take suitable measures to ensure that children never use the machine without supervision.
- Ensure that the person conducting training and other people never move or hold any parts of their body into the vicinity of moving parts.
- At the end of its life span this product is not allowed to dispose over the normal household waste, but it must be given to an assembly point for the recycling of electric and electronic components. You may find the symbol on the product, on the instructions or on the packing. The materials are reusable in accordance with their marking. With the re-use, the material utilization or the protection of our environment. Please ask the local administration for the responsible disposal place.
- To protect the environment, do not dispose of the packaging materials, used batteries or parts of the machine as household waste. Put these in the appropriate collection bins or bring them to a suitable collection point.
- This machine is a speeddependant machine.
- The machine is equipped with 16-step resistance adjustment. This makes it possible to reduce or increase the braking resistance and thereby the training exertion. Pressing the button " - " for the resistance setting towards stage 1 reduces the braking resistance and thereby the training exertion. Pressing the button " + " for the resistance setting towards stage 24 increases the braking resistance and thereby the training exertion.
- This machine has been tested and certified in compliance with EN ISO 20957-1:2013 + EN 957-7:1998 H/A. The maximum permissible load (=body weight) is specified as 150kg . This item's computer corresponds to the basic demands of the EMV Directive of 2014/30EU.
- The assembly and operating instructions is part of the product. If selling or passing to another person the documentation must be provided with the product.
Assembly Instructions
Remove all the separate parts from the packaging, lay them on the floor and check roughly that all are there on the base of the assembly steps.
Please note that a number of parts are connected directly to the main frame preassembled. In addition, there are several other individual parts that have been attached to separate units. This will makes assembly easier and quicker for you. Assembly time: 30 min.
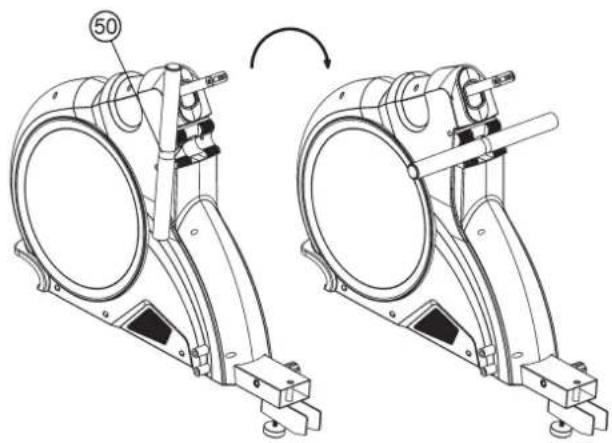
When removing the components from the carton, make sure that the handlebar (50) turn only 90^ to the right and position into the handle holder.
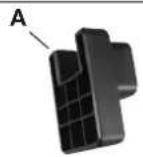
Part "A" serves as a transport safety device and it is no need after build up.
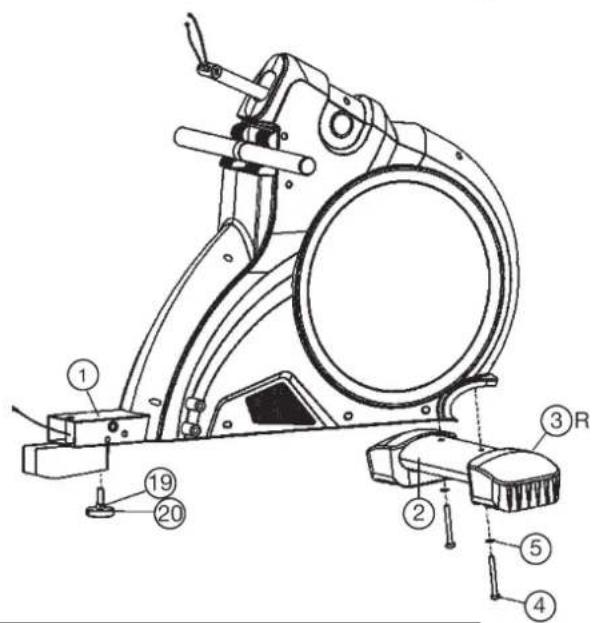
Step 1: Attach the front stabilizer (2) to main frame (1).
- Attach the front stabilizer (2) assembled with end caps with transportation rollers (3) to main frame (1), using inner hex screw M8x75 (4) and washers (5).
- Screw in the adjustable foot (20) into appropriate position at main frame (1) and secure the position by nut (19) to level the item into a stabile stand.
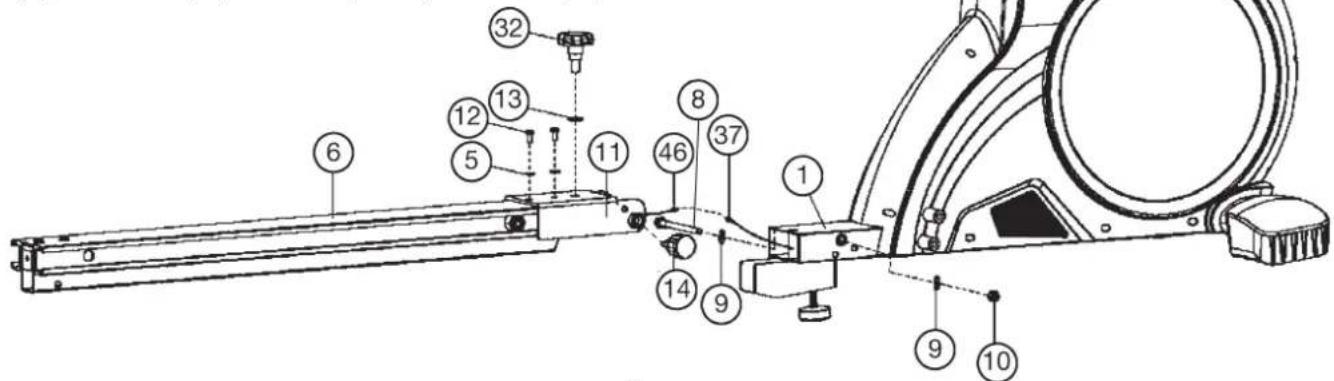
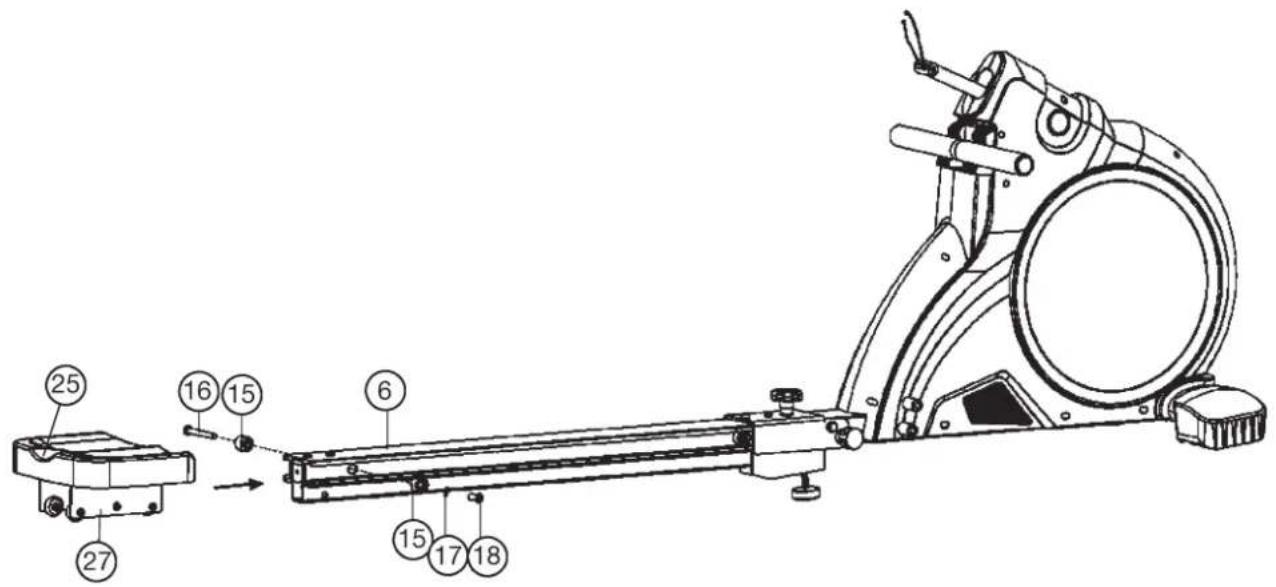
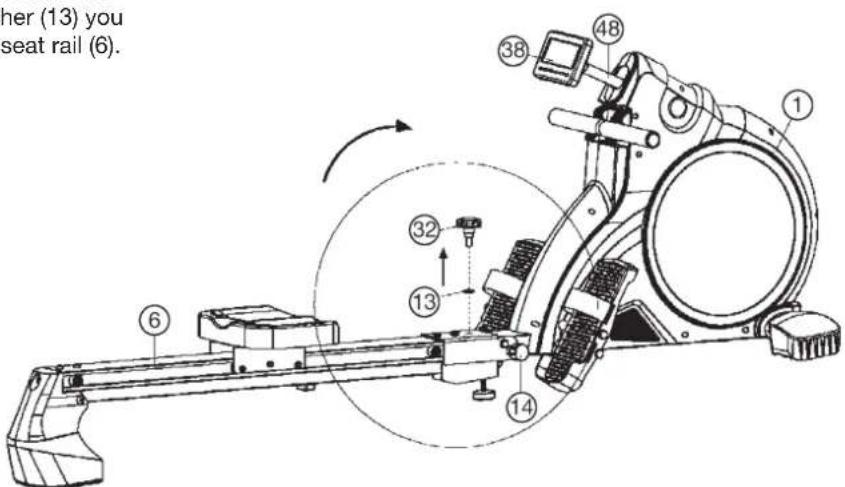
Step 2: Attach the seat rail (6) at main frame (1).
- Place the connection U-plate (11) onto the seat rail (6), so that the holes pattern and screw the connection U-plate (11) at seat rail (6) by using screws M8x20 (12) and washers (5).
- Lead the seat rail (6) against the main frame (1) and connect the sensor 1 (46) with sensor connection cable (37).
- Place the connection U-plate (11) onto the holder of main frame (1), sothat the side holes pattern and tighten the connection U-plate (11) at main frame (1) by using screw M10x125 (8), washer (9) and nut (10). Don't tighten the screw (8) too much, sothat the fold up system works easy.
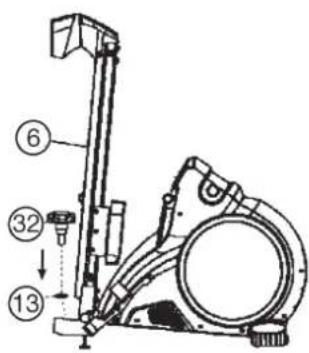
- Secure the seat rail (6) before training by screw in the hand grip-screw (32) with washer (13) and lock up with quick release (14).
Step 3: Attach the seat sled (27) with seat (25) at seat rail (6).
- Screw out the limit stopper (15) from seat rail (6) and push the seat sled (27) with preassembled seat (25) onto the seat rail (6) in the right way as showed in figure Step 3.
- Fix the limit stoppers (15) at appropriate position of seat rail (6) by using axle for limited stopper (16), washer (17) and screw (18).
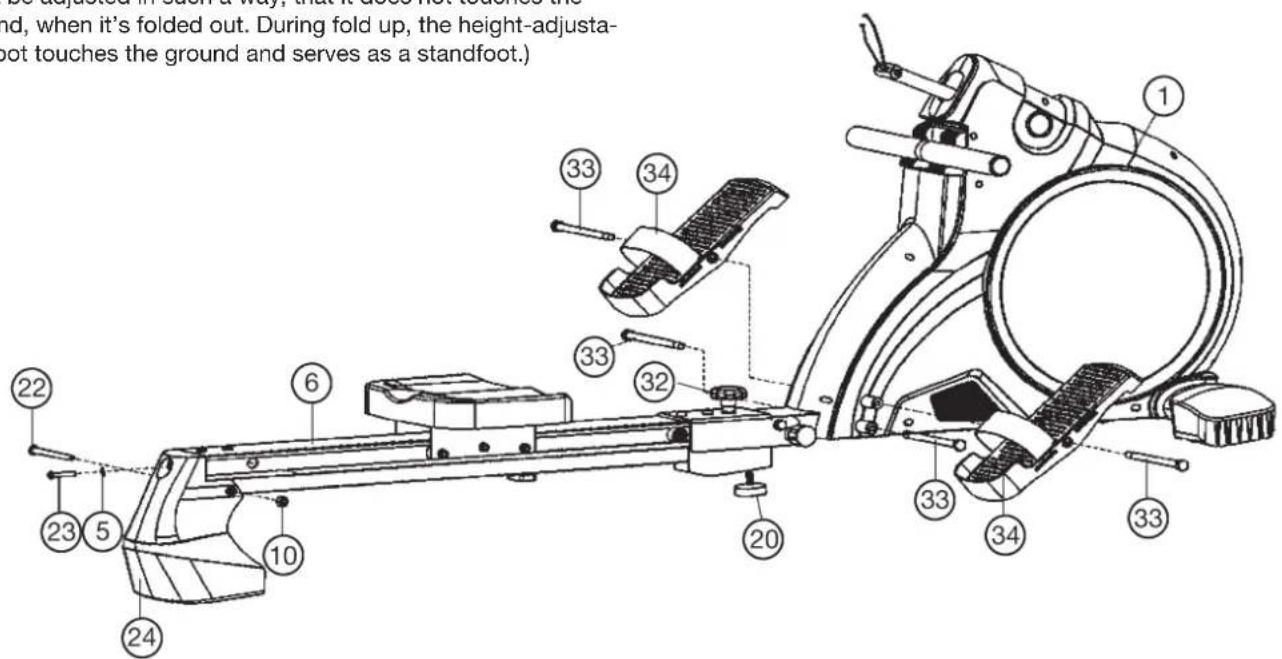
Step 4: Attach the rear foot (24) and foot pedals (34).
- Put the rear foot (24) into the holder at seat rail (6) and screw it tightly by using screw M10x110 (22), screw M8x45 (23), washers (5) and self locking nut (10).
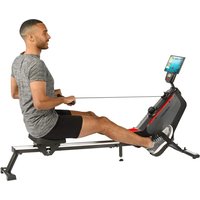
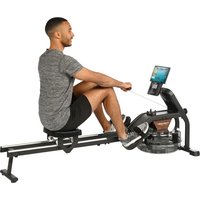
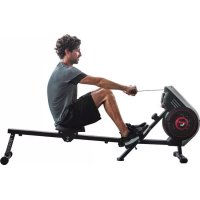
- Screw into below threats at main frame the screws M12x170 (33). Then attach the foot pedals (34) at main frame (1) into appropriate position in upper threats with screws M12x170 (33). (For safe exercise condition of the rowing machine, the star grip screw No. 32 must be firmly tightened, before user take exercise position. The height-adjustable foot 20 under the seat rail must be adjusted in such a way, that it does not touches the ground, when it's folded out. During fold up, the height-adjustable foot touches the ground and serves as a standfoot.)
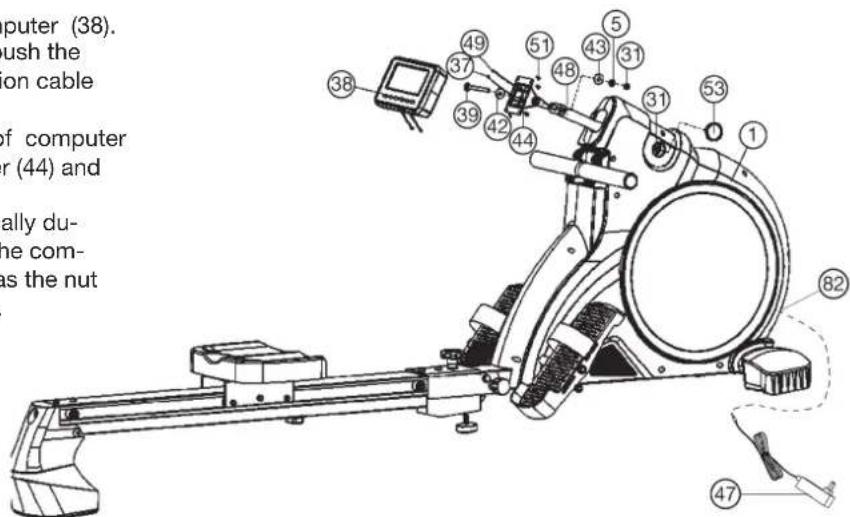
Step 5: Attach the computer (38) at computer support (48).
- Push the connecting cable (49) and sensor connection cable (37) through the computer holder (44) into front position.
- Put the computer holder (44) with two plastic washers (42 + 43) onto the computer support (48) and attach it with carriage bolt M8x75 (39), washer (5) and nut (31).
- Remove the 4 screws (51) from backside of computer (38). Lead the computer (38) to computer holder (44) and push the plug of the connecting cable (49) and sensor connection cable (37) into the associated socket of the computer (38).
- Storage the cable connection into the backside of computer (38) and put the computer (38) on the computer holder (44) and attach it with the screws (51).
Note: If the set position of computer change automatically during exercising, then tighten the nut (31) a little bit at the computer support (44) for a fixed incline position, as well as the nut (31) behind the plug (53) for computer height position.
Step 6: Attach the power.
- Please insert the plug of adaptor (47) to the power plug (82) at end of chain guard.
- Please insert the plug of adaptor (47) to the jack of wall power (230V 50Hz)
Step 7: Checks
- Check the correct installation and function of all screwed and plug connections. Installation is thereby complete.
- When everything is in order, familiarize yourself with the machine at a low resistance setting and make your individual adjustments.
Note: Please keep the tool set and the instructions in a safe place as these may be required for repairs or spare parts orders becoming necessary later.
Fold up and storage the rowing machine.
- To storage the rowing machine, screw out the hand grip screw (32) totally and turn/pull the quick release (14) to unlock the seat rail (6). Fold up the seat rail (6) into vertically position and secure this position with turn/pull the quick release (14) at bottom side of main frame (1). The hand grip screw (32) and washer (13) you can storage into the threat holder at bottom area of seat rail (6).
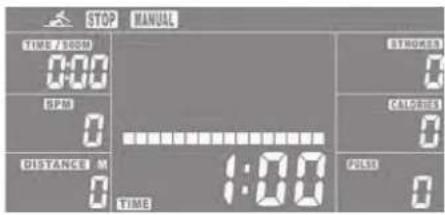
Computer instructions
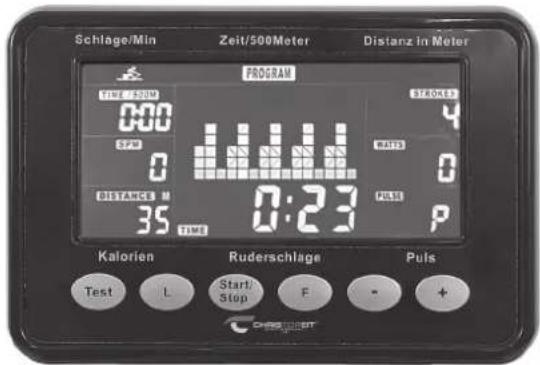
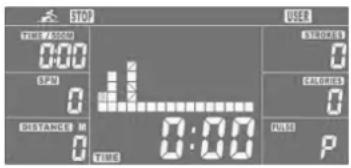
As soon as the computer is connected with power supply, an acoustic signal sounds and all of the displays are shown on LCD for 2 seconds.

If no button are pressed and the pedals have not been moved for approx. 4 minutes, the computer will switch to power saving mode.
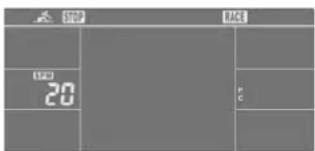
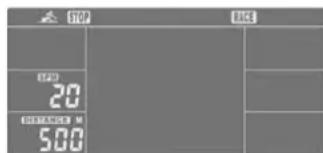
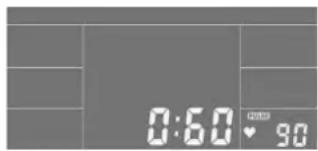
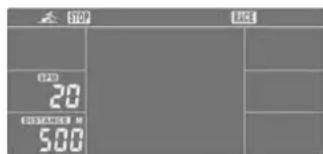
DISPLAY & BUTTON FUNCTIONS
| Training Values | Display Range | Description/ Setting Range |
| SPM | 0 ~ 999 Strokes per minute / 10 - 95 | |
| Time | 0,00 ~ 99:00min | Exercise time / 0 - 99 |
| Time/500m | 0,0 ~ 99:00min | Exercise time on 500m distance |
| DISTANCE | 0 ~ 99900m | Distance in meter / 100 - 99900 |
| CALORIES | 0 ~ 9999 Cal. | approx. calories in kcal / 10 - 9990 |
| STROKES | 0 ~ 99900 | Rowing strokes |
| PULSE | 30 - 240 BPM | Actually heart rate frequency / 30 - 240, during resistance adjustment level / 1 - 16 |
| WATT | 0 ~ 999 Display of rower power in Watt | |
| BUTTON FUNCTION | |
| Plus - key | - Increase resistance level - Function selection |
| - key | - Decrease resistance level - Function selection |
| F - key | - Confirm setting or selection. |
| L - key | - Hold on pressing for 2 seconds, computer will reboot. - Reset all values to zero. - Reverse to main menu after finishing a workout. |
| Start/ Stop - key | - Start or Stop rowing training. |
| Test - key | - Track user Heart rate in recovery phase. |
Acoustic Signals
All settings made with the computer are confirmed with an acoustic signal:
1 shot beep = setting confirmed
2 shot beeps = It is impossible to make any settings
Starting exercise immediately (MANUAL)
Then MANUAL->PROGRAM->H.R.C.-->RACE--->USER is flashing with 1Hz. Press +/- key to choose MANUAL and confirm by pressing F - key. If you have previously selected a program or started your workout, press L - key to return to the starting display.
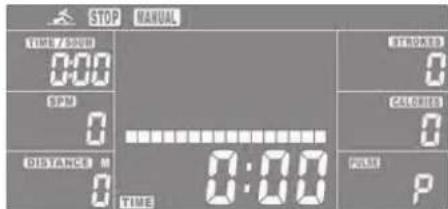
- Press START/STOP button to start workout immediately without entering further settings.
- Press +/- - key to input your personal settings and press
F - key to confirm. The following fields will flash in turn:
Resistance level (1~16) - TIME (or METERS) (Time and Meters can't preset at the same time.)
CALORIES
PULSE
Use +/- key to set values and confirm your selection by F - key. Press START/STOP to start workout.
As soon as one of the set values reach the preset Target, the computer will alarm with Bi-bi sound and stop.
- You can adjust the level of resistance on the paddles while rowing by pressing +/- key. The newly set level value will be shown in the profile(default value is Level 1).
- Press START/STOP to end exercising. All exercising value will remain.
- Press L - key to reverse to workout selection menu.
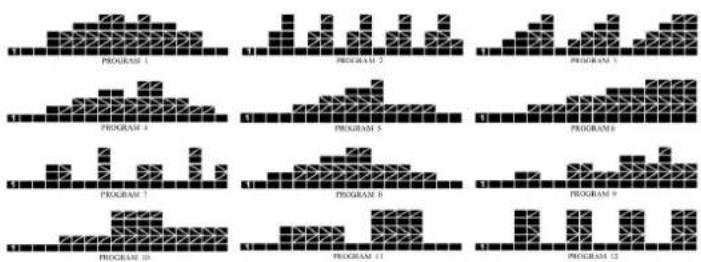
Selecting a Program to do training (PROGRAM)
- Press +/- - key to scan MANUAL->PROGRAM->H.R.C. ->RACE->USER.
- Choose PROGRAM and press F - key to confirm. The programs are preset with 12 profiles. Press +/- - key to select one from the 12 preset profiles. Set the desired session value and confirm by F - key:
Resistance level (1~16)
TIME
- Press STATR/STOP to start workout.

-You can adjust the level of resistance on the paddles while rowing by pressing + / - key. The newly set level value will be shown in the profile (default value is Level 1).
-Program profiles:
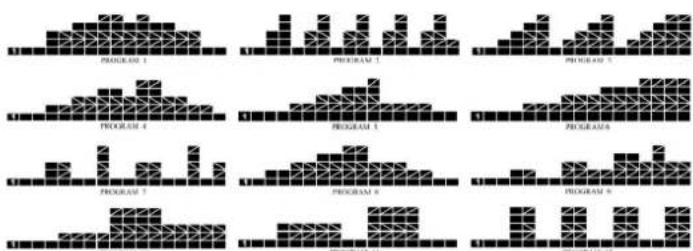
- Press START/STOP to end exercising. All exercising value will remain.
- Press L - key to reverse to workout selection menu.
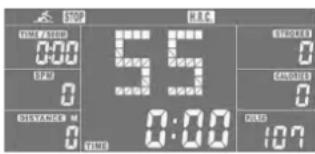
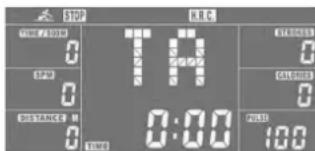
Set program according to heart rate (H.R.C.)
In this program, the rower reacts to your pulse as measured by the chest belt. In addition, simple graphics also show you whether you need to need to increase or decrease your stress Level. You can choose between:
HRC 55: Here you are rowing in the very efficient range of 55% , ideal for beginners and for general fat Burning.
HRC 75: This range of 75% of the maximum pulse rate is suitable for experienced users and athletes.
HRC 90 : The anaerobic range of 90% of the maximum pulse rate is only suitable for competitive athletes and short sprint exercises.
TA : The computer uses your Age to calculate a target pulse rate, which you can change as per your willing. Never select a target pulse that is higher than your age-determined maximum pulse rate.
- Press +/- - key to select H.R.C. and enter by pressing F - key. Choose HRC55-->HRC75-->HRC90->TARGET. With HRC55, HRC75,HRC90, the max. Heart rate will be calculated by the computer automatically.
- With the TARGET program, the preset value 100 will be shown. Press +/- key to set a value between 30~240 and confirm by F - key. The program has been saved.
- Set the desired session TIME with +/- - key and press F - key to confirm.
- Press START/STOP to start workout.
For this program, it is necessary to wear the chest belt so that computer can detect and display your heart rate value.
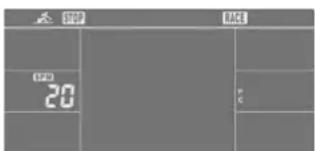
Training with competition mode (RACE)
In this program, you can enjoy rowing just like an competition, while your rival is the computer.
- Press +/- - key to select RACE and press F - key to confirm.
- Press +/- - key to set SPM confirm by pressing F - key.
- Press +/- - key to select desired rowing METERS and confirm by F - key.
- Press +/- - key to adjust paddle resistance level.
- Press START/STOP to start workout. Computer will display USER & PC workout status.
- Press +/- - key to adjust resistance level.
Either PC or User finish the set rowing distance first, computer will stop and show PC win or User win.
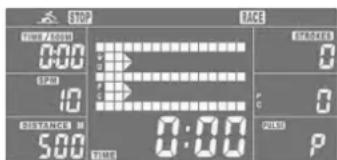
- Press START/STOP to end exercising. All exercising value will remain.
- Press L - key to reverse to workout selection menu.
User-defined profile (USER PROGRAM)
Here you can design your own profile with bars just like the preset program profiles.
- Press +/- - key to select USER PROGRAM and press F - key to confirm. The first bar will be displayed.
- Press +/- - key to set resistance level and confirm by F - key. The next bar will be displayed.
- Continue this process till set up 16 bars. The max. resistance level is 16. To finish your setting or quit setting, hold on pressing F - key.
- Press F -key for 2 seconds to enter exercise time with +/- -key.
- Press START/STOP to start workout.
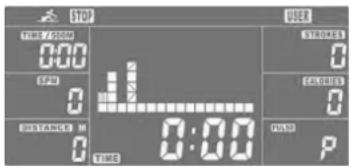
As soon as one of the set values reach the preset Target, the computer will alarm with Bi-bi sound and stop.
- You can adjust the level of resistance on the paddles while rowing by pressing +/- key. The newly set level value will be shown in the profile(default value is Level 1).
- Press START/STOP to end exercising. All exercising value will remain.
- Press L - key to reverse to workout selection menu.
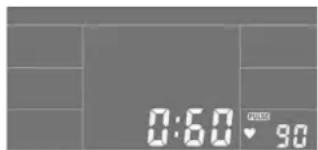
Recovery phase (TEST)
It is recommended to end an intensive rowing session with a recovery phase. During this phase you should be able to relax and paddle without strong resistance until your pulse slows close to its usual rate.
- Press TEST-key and wear chest belt again. Then only TIME is showing with counting down from 60 seconds to 0, all other functions are not available.
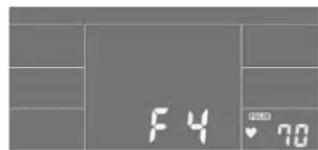
Once the 60 seconds recovery phase is over, an evaluation of the achieved heart rate will be shown.
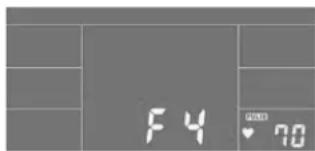
| 1.0 OUTSTANDING | |
| 1.0 < F < 1.9 EXCELLENT | |
| 2.0 < F < 2.9 GOOD | |
| 3.0 < F < 3.9 FAIR | |
| 4.0 < F < 5.9 BELOW | W AVERAGE |
| 6.0 POOR |
- If your heart rate is still very high after 60s (F is between 4 and 6), you could restart the recovery program to gradually slow your heart rate further.
Trouble shooting:
E-2: Motor stroke over the normal range. Plug the adaptor again. Repowering on the console and the motor will back to the normal range.
E-7: Check if cables were well connected or damaged.
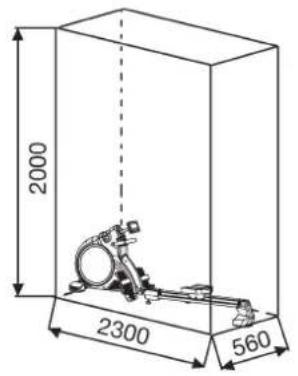
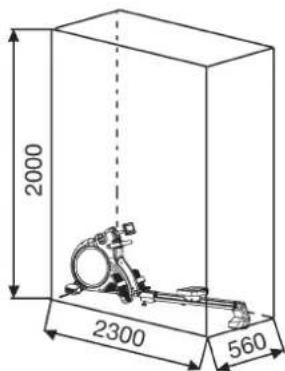
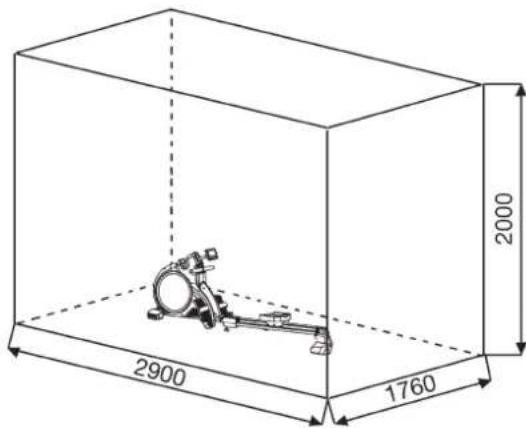
Training area in mm (for home trainer and user)
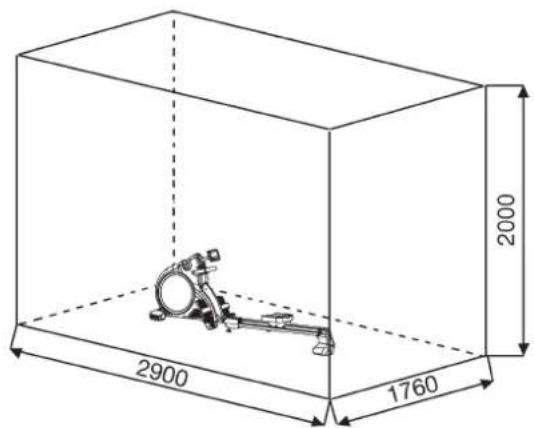
Free area in mm (Training area and security area (rotating 60cm))
Cleaning, Checks and Storage of the home bike:
1. Cleaning
Use only a less wet cloth for cleaning.
Caution: Never use benzene, thinner or other aggressive cleaning agents for surface cleaning as this damage caused.
The device is only for private home use and for use suitable indoors. Keep the unit clean and moisture from the device.
2. Storage
Plug out the power supply unit while intending the unit for more than 4 weeks not to use. Fold up the seat frame until it is locked.
Choose a dry storage in-house and spray some oil to the thread of the handlebar bolt and on the thread of the quick release for fold up function. Cover the bike to protect it from being discolor by any sunlight and dirty through dust.
3. Checks
We recommend every 50 hours to review the screw connections for tightness, which were prepared in the assembly. Every 100 operating hours, you should spray some oil at the thread of the handlebar bolts and to the thread of quick release for fold up function.
Troubleshooting
If you cannot solve the problem with the following information, please contact the authorized service center.
| Problem Possible | Cause Solution | |
| Computer has no value at Dis-play if you press any key. | No power adapter is well plugged or wall power is without power. | Check that the power adapter is properly plugged in, possibly with another electric device check if the wall power is fine. |
| Computer is not counting data and do not switch on after start cycling. | Sensor impulse missing base on not well plugged connection | Check the plug connections at computer and under the fold up constrcution. |
Training instructions
You must consider the following factors in determining the amount of training effort required in order to attain tangible physical and health benefits:
1. Intensity:
The level of physical exertion in training must exceed the level of normal exertion without reaching the point of breathlessness and / or exhaustion. A suitable guideline for effective training can be taken from the pulse rate. During training this should rise to the region of between 70% to 85% of the maximum pulse rate (see the table and formular for determination and calculation of this).
During the first weeks, the pulse rate should remain at the lower end of this region, at around 70% of the maximum pulse rate. In the course of the following weeks and months, the pulse rate should be slowly raised to the upper limit of 85% of the maximum pulse rate. The better the physical condition of the person doing the exercise, the more the level of training should be increased to remain in the region of between 70% to 85% of the maximum pulse rate. This should be done by lengthening the time for the training and / or increasing the level of difficulty.
If the pulse rate is not shown on the computer display or if for safety reasons you wish to check your pulse rate, which could have been displayed wrongly due to error in use, etc., you can do the following:
a. Pulse rate measurement in the conventional way (feeling the pulse at the wrist, for example, and counting the number of beats in one minute).
b. Pulse rate measurement with a suitable specialised device (available from dealers specialising in health-related equipment).
2. Frequency
Most experts recommend a combination of health-conscious nutrition, which must be determined on the basis of your training goal, and physical training three times a week. A normal adult must train twice a week to maintain his current level of condition. At least three training sessions a week are required to improve one's condition and reduce one's weight. Of course the ideal frequency of training is five sessions a week.
3. Planning the training
Each training session should consist of three phases: the warm-up phase, the training phase, and the cool-down phase. The body temperature and oxygen intake should be raised slowly in the warm-up phase. This can be done with gymnastic exercises lasting five to ten minutes.
Then the actual training (training phase) should begin. The training exertion should be relatively low for the first few minutes and then raised over a period of 15 to 30 minutes such that the pulse rate reaches the region of between 70% to 85% of the maximum pulse rate.
In order to support the circulation after the training phase and to prevent aching or strained muscles later, it is necessary to follow the training phase with a cool-down phase. This should be consist of stretching exercises and / or light gymnastic exercises for a period of five to ten minutes.
You find further information on the subject warm-up exercises, stretch exercises or general gymnastics exercises in our download area under www.christopeit-sport.net
4. Motivation
The key to a successful program is regular training. You should set a fixed time and place for each day of training and prepare yourself mentally for the training. Only train when you are in the mood for it and always have your goal in view. With continuous training you will be able to see how you are progressing day by day and are approaching your personal training goal bit by bit.
Calculation formula: Maximum pulse rate = 220· age (220 minus your age)
90% of the maximum pulse rate = (220 - age) x 0.9
85% of the maximum pulse rate = (220 - age) x 0.85
70% of the maximum pulse rate = (220 - age) x 0.7
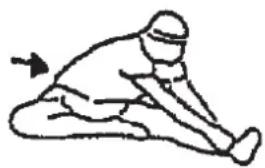
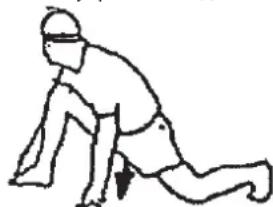
Warm up exercises (Warm Up)
Start your warm up by walking on the spot for at least 3 minutes and then perform the following gymnastic exercises to the body for the training phase to prepare accordingly. The exercises do not overdo it and only as far run until a slight drag felt. This position will hold a while.


Reach with your left hand behind your head to the right shoulder and pull with the right hand slightly to the left elbow. After 20sec. switch arm.
Bend forward as far forward as possible and let your legs almost stretched. Show it with your fingers in the direction of toe. 2 x 20sec.
Sit down with one leg stretched out on the floor and bend forward and try to reach the foot with your hands. 2 x 20sec.
Kneel in a wide lunge forward and support yourself with your hands on the floor. Press the pelvis down. Change after 20 sec leg.
Part list-spare part list Como Art.-No. 16601 „Black Edition"
Technical data: Issue: 01.09.2019
16-stepped Motor- and Computer-controlled resistance (Magnetic-Brake-System)
Approx. 9 kg flywheel mass
12 stored training programs
4 Heart rate programs with presetting of the pulse limit (Possible only with optional pulse measuring belt, un-coded - 5.3kHz.)
1 individual user program
1 manually program
- 1 competition program
High quality aluminum rail with a length of approx. 112 cm
- Comfort saddle with easy slide rollers for fluid and efficient strokes
- Stable and extra length rope
- Stable foot-position by means of strong Velcro fastener
- Foldable for save space
Transport rollers
- Power plug (Adapter)
Computer height- and inclination adjustable
- Blue Backlit LCD display, 7 windows display with simultaneous display of: Time, Strokes, Strokes per minute, Distance, approx. Calorie consumption, Watt and Pulse frequency
- Input of individual limits: Time, Distance, approx. Calorie consumption and Pulse frequency
- Announcement when limits exceeded
- Receiver for wireless pulse belt integrated in computer
- Load max. 150 kg (Body weight)
Space requirement approx.: L 230 x W 55 x H 87 cm
Space requirement folded approx.: L 120 x W 55 x H 149 cm
Items weight: 40kg
Exercise space approx: 2,5m^2
Please check after opening the packing that all the parts shown in the following parts lists are there. Once you are sure that this is the case, you can start assembly.
Please contact us if any components are defective or missing, or if you need any spare parts or replacements in future.
Internet service- and spare parts data base: www.christopeit-service.de
This product is created only for private Home sports activity and not allowed to us in a commercial or professional area. Home Sport use class H/A
| 0 | 5 | 10 | 15 | 20 | 25 | 30 | 35 | 40 | 50 | 60 | 70 | 80 | 90 | 100 mm |
| Illus.-No. | Designation Dimensions | mm | Quantity Attached | to Illustration No. | ET number |
| 1 Main Frame 1 33-1660-01-SW | |||||
| 2 Front bottom tube 1 133-1660-02-SW | |||||
| 3L Front end cap left 1 2 36-1660-06-BT | |||||
| 3R Front end cap right 1 2 36-1660-07-BT | |||||
| 4 Inner hex bolt M8x75 2 1+2 39-10019-CR | |||||
| 5 | Washer | 8//16 | 9 | 4,12,23+39 | 39-9861-CR |
| 6 Seat rail | 1 1+7 | 33-1660-03-SI | |||
| 7 Seat rail tube | 1 6 33 | 1660-04-SW | |||
| 8 Hex bolt | M10x125 | 1 1+11 | 39-10505 | ||
| 9 | Washer | 10//20 | 6 | 8,63,79+92 | 39-9989-CR |
| 10 | Nylon nut | M10 | 3 | 22,33+63 | 39-9981 |
| 11 | Connection U-plate | 1 6 33-1660-05-SW | |||
| 12 | Inner hex screw | M8x20 | 4 | 6,11+21 | 39-10095-CR |
| 13 | Washer | 12//24 | 1 | 32 | 39-9986-CR |
| 14 | Quick release | 1 11 | 36-1260-09-BT | ||
| 15 | Limit stopper | 4 | 6 36-1660-46-BT | ||
| 16 | Axle for limiting base | 11x80 | 2 | 6+15 | 36-1660-47-BT |
| 17 | Washer | 6//16 | 2 | 18 | 39-10007-CR |
| 18 | Cross screw | M6x15 | 2 | 16 | 39-10120-VC |
| 19 | Nut | M10 | 3 | 8,22+63 | 39-9981 |
| 20 | Adjustable foot | 1 1 36-1660-08-BT | |||
| 21 | Connection L-plate | 1 | 6+24 | 36-1660-09-BT | |
| 22 | Inner hex bolt | M10x110 | 1 | 24 | 39-10502 |
| 23 | Inner hex bolt M8x45 1 24 39-9914 | ||||
| 24 | Rear foot | 1 6 36-1660-04-BT | |||
| 25 | Seat | 1 27 | 36-1660-10-BT | ||
| 26 | Cross screw | M6X20 | 4 | 25+27 | 39-9960 |
| 27 | Seat sled | 1 6 33-1660-06-SW | |||
| 28 | Screw | M8x28 | 6 | 27+30 | 39-10134 |
| Illus.-No. | Designation Dimensions | mm | Quantity Attached to Illustration No. | ET number |
| 29 Spacer 6 28 36-1660-11-BT | ||||
| 30 Roller 6 27 36-1660-12-BT | ||||
| 31 Nylon nut M8 9 28, 39+73 39-9918-CR | ||||
| 32 Hand grip screw M12 1 11 36-1660-13-BT | ||||
| 33 Long bolt M12x170 4 1+34 39-10506 | ||||
| 34 Pedal 2 1 36-1660-05-BT | ||||
| 35 Round stop | 2 50 36-1260-21-BT | |||
| 36 Foam grip | 2 50 36-1260-07-BT | |||
| 37 Sensor connection cable | 1 38 36-1660-14-BT | |||
| 38 Computer | 1 44 36-1660-03-BT | |||
| 39 Carriage bolt | M8x75 | 2 | 44+48 | 39-10019 |
| 40 Screw | 4.2x18 | 21 | 1,3,67,78+89 | 36-9111-38-BT |
| 41 Cable save | 1 6 | 36-1660-15-BT | ||
| 42 Nylon washer 1 | 2 39 36-1660-16-BT | |||
| 43 Nylon washer 2 | 2 39 36-1660-17-BT | |||
| 44 Computer bracket | 1 38+48 | 36-1660-18-BT | ||
| 45 Steel bushing | 4 48 36-1660-19-BT | |||
| 46 Sensor 1 | 1 6 | 36-1660-20-BT | ||
| 47 Adaptor | 9V=DC/500mA | 1 82 36-1660-22-BT | ||
| 48 Computer support | 1 1+44 33-1660-07-SW | |||
| 49 Connection cable | 1 38+78 | 36-1660-21-BT | ||
| 50 Handlebar | 1 93 33-1260-08-SW | |||
| 51 Cross screw | M5x10 | 4 | 38+44 | 39-9903-SW |
| 52 Plastic bushing | 2 8 | 36-1660-23-BT | ||
| 53 Round cap | 1 89R 36-1660-24-BT | |||
| 54 Axle nut | M10x1 | 4 62+86 | 39-9820 | |
| 55 Nylon nut M6 3 59 39-9861-VC | ||||
| 56 U-Shape washer | 3 59 36-9713-55-BT | |||
| 57 Eye bolt | M6x40 | 3 62+86 | 39-10000 | |
| 58 Nut | M10x1 | 2 62+86 | 39-9820 | |
| 59 Axle nut small | M10x1 | 1 62 39-9820-SI | ||
| 60 Spacer | 10//15//6 | 1 62 36-1660-25-BT | ||
| 61 Bearing | 6000 | 2 62 36-9317-21-BT | ||
| 62 Belt wheel | 1 1 | 36-1660-26-BT | ||
| 63 Hex bolt | M10x112 1 66 39-10502 | |||
| 64 Spacer 1 | 1 63 36-1660-27-BT | |||
| 65 Spacer 2 | 1 63 36-1660-28-BT | |||
| 66 Pulley for pull rope | 1 63 36-1660-29-BT | |||
| 67 Tube bracket | 2 1 | 36-1660-30-BT | ||
| 68 Sensor 2 | 2 70 36-1660-31-BT | |||
| 69 Screw | 4.2x12 | 4 68+70 | 39-10185 | |
| 70 Sensor bracket | 1 1 | 36-1660-32-BT | ||
| 71 Pulley | 3 1 | 36-1660-33-BT | ||
| 72 Hex bolt | M8x35 | 2 71 39-9912 | ||
| 73 Inner hex bolt | M8x40 | 2 1+71 39-10125-VC | ||
| 74 Washer | 8//30 | 1 73 39-10180-CR | ||
| 75 Spacer 3 | 8//12/21.5 | 1 73 36-1660-34-BT | ||
| 76 Hex bolt | M6x65 | 2 1 | 39-10507 | |
| 77 Nylon nut M6 2 76 39-9861-VC | ||||
| 78 Motor | 1 1 | 36-1660-35-BT | ||
| 79 Idler bracket | 1 1 | 33-1660-08-SI | ||
| 80 Spring | 1 1+79 36-1660-36-BT | |||
| 81 Tension cable | 1 78+86 | 36-1660-37-BT | ||
| 82 DC connection cable | 1 78+89L | 36-1660-38-BT | ||
| 83 Idler | 1 79 36-1660-39-BT |
| Illus.-No. | Designation Dimensions | mm | Quantity Attached to Illustration No. | ET number | |
| 84 Inner | hex bolt M10x25 1 83 39-10025-CR | ||||
| 85 Nut | M10x1 1 86 39-9820-SI | ||||
| 86 Flywheel 1 1 33-1660-09-SI | |||||
| 87 Belt | 1 62+86 36-1660-40-BT | ||||
| 88 Return rope 1 1+62 36-1660-41-BT | |||||
| 89L | Chain cover left | 1 | 1+89R | ||
| 89R | Chain cover right | 1 | 1+89L | ||
| 90 Handlebar holder | 1 89 36-1660-42-BT | ||||
| 91 Screw | M5x25 2 90 39-10450-CR | ||||
| 92 Axle | 1 62 36-1660-43-BT | ||||
| 93 Tension belt | 1 50+62 36-1660-44-BT | ||||
| 94 Sealing ring | 1 67 36-1660-45-BT | ||||
| 95 | Tool Set | 1 | |||
| 96 | Assembly and exercise instruction | 1 | |||

Sommaire
Chere cliente, cher client,
Programme manuel (MANUAL)
Warming-up oefingen (Warm Up)
- Stuklijst
pagina 43
pagina 44-46
Geachte klant
3. Planning van de training
Warming-up oefingen (Warm Up)
BCTpoeHHbIe TpeHnpoBOuyhIbe nporpaMMbl (PROGRAM)
Bb6epnte B Bb6ope nporpammbc nOmoIb+ oCHOBhix yue6hbx nporpamn (nporpamma) nnoTBePmTc nOMoIbKnabuN F.
EcTb 12 pa3nHbix yue6hIx nporpamM, KOtOpBie MOxHO nonuYHTb, HaxaHa KhoNky ^+ . HaxMnte KnaBnUy F Bb6upaet nporpamMy n HaxMnte KhoNky Start / Stop 3anyckaet nporpamMy. COnpoTnBHeHne MOKET 6bITb 3aTPOHYa KhoNkAMn +/-. 3aDaHHe Bpem MoXHO cEeNaTb, HaxaBa Ha KhoNky F IN BBODc NOMOJIbIO KhoNOK +/-, YTObI Bb6paTb nporpamMy.

Pporpma3aKaHnBaetc HaxaTne KhoNk Start / Stop nnn KOrda 3aDaHHoe BpeMnCTeKnO. HaxmTe KnabuLy L dner CTapTOBOro ekpaHa C BBOpom PporpMaBlnNoIyHeHH
nporpammbi KOHTpony qactotbI cepdeuHbIX cokpaueHn (H.R.C.)
BbI6epNTe B bIbOpe nporpaMMbI c NOMOsbIO KHOKN + nporpaMMbIMNyNbCOB (H.R.C.) n NOITBePnTb 3TN 3aRIOBKn C NOMOsbIO KNaBNI F. ECTb 3 nporpaMMbI Yactota cepdeHybIX cokpaueHn (55%, 75% + 90%OT MAKCmAbHo JAcTOb Tc cepDeHybIX cokpaueHn (220-Bo3pact)) INporpaMMa IMNynbChoi MNUeHbIO dINr HENOCpeDCTBEHHORo yCTAHOBNeHnTreHNPOBOHTHO IMNynbCa. C NOMOsbIO KNaBNI + CHaHana BBeDInTe CBOIBO3pact C NOMOsbIO KHOKNOK +/-, a 3aTEM Bb13BaTc NOMOsbIO KNaBNI + NocneIOBaTEbHO nporpaMMbIMNynbCOB. (Nocne TORo, kK Bo3pactBbXoHa KOMNbTOE pBIuNCnAETBepxHn npedEn NybcHa 55%, 75% IN90%). HaxMnte KHOKNF Y, UTo6bl BIL6paTb ONDHy nporpaMM. Nocne 3TORonapametp no yMOJUaNHO BPEMeHn npoCXoDn. B nporpaMMe IMNynbCa Target MoKet 6bly yCTaHOBHeHn HENOCpeDCTBEHHo Ha BepxHn npedeNnybca. HaxMnte KHOKNY Start / Stop 3anyckaet nporpaMMy.
HRC 55: Bby rpe6n, KaK MeDneHHo, Ho BepHO NOxOHTBΦΦeKTINBHOM dnaana3OHe NmnyIbcoB 55%
HRC 75:BbINOHNHe CNOXHbIe TpeHnPOBKn Do DocTnKeHn75% INDNBNUdyaJIbHbIX CEJIeI OByeHnI.
HRC 90:ИМпьс nporpambl 90% TолькдяnpoceccnoHaNbHbIX cnopTcmeHOB,чOБы npobectn KpaTkocpoHoe obyuHne BlicOKOr HAnprxKeHn.
KoHkpchna nporpamma (RACE)
B 308 nporpamme y Bac ec7b KOMnbIOTe B KaueCTBe KOHKypeHTHO npOTNBnka. Bb6epnte B Bb6ope nporpaMMbl c nOmoaio KnOua + KOHKpyra nporpamma (RACE) n noTBePNTb 3o C nOMOuBo KNABuHn F. XapakTepncTNk ynapOB B MNHyTu (C3M) n pacctOraHne (Distance) doNKHb6bTB cdeNaHb NO b6bpO nporpaMMbl c NOMoUBo KHONOK +/-. HaxMnTe KNABmuy F, YTO6b NODTBePNTb BBeDeHHbIe NaHbE I HaXMnTe KHOKny Start / Stop 3anyckaet nporpammy.
Ha ncnnee oTo6paKaTeTcnoIb3oBaTeNIO (YU) IN KOMNbIOpE(P C) TeKyuei No3nMn NDoTROBKn. NepBbIrnpK, YTO6bl DocTHy 3aDaHHorO MapuTy, 3aOKHnINCBOn TpaccBIn OTo6paKaTeCBAKeCTBe No6eIITeNa dncnnee. (PC = KomNbIOpE; YU = noIb3oBaTeNb.
Haxmnte KhoNky Start / Stop 6yndet 3aynctntb nporpammy eue pa3. HaxmTe knaBnuy L dny cTapTOBOrO ekpaHa C bblOpom nporpammbI dny nOnyuEHHa.
HnHbNduyanaNbhe nporpammbi (USER)
3Decb Bbl MoKTe CO3DaTb CBoi Co6CTBeHbI nPoOpMbI ynpaxHeHnI nOe3d. Bbl6epnte B Bbl6ope nporpAmMbI C NOMOuBIO KHOKNI +, aReHT NOJIb3OBaTeNl (USER) I NOITBepNTb 3TO C NOMOuBIO KNABUNF C NOMOuBIO KHOKN+/TepeB, nepBbl 6ap conpoTUBneHnE yctahabNBnBaETc. HxKaTne KNaBUN 3Anpc F NoDTBepNTb Ha nepBbl ypoBeHb ConpoTUBneHn I Do6paTbcra
do Btporo 6apa conpotnbneHn. Nobtopnte npoucc, noka BCE 16 6apob CnpotnbneHn He npBedeHb. HaxMITE KhONky F B TceHHe 2 cekynd do nepnoDa oyuHn C nOMOu bHO KHONOK +/ - npTbopraTbcra. HaxMITE KhONky Start /Stop zanyckaet nporpamMy. ConpotnbneHn MoKet 6bltb 3aTpohyta KHONkAM +/-
PpOrpAmma 3aKaHnBaetc HaxaTneM KhoNk Start / Stop nnn KOrda 3aDaHHeoe BpeM nCTeKNo. HaxMnte KnaBnUy L dner cTapToBoro ekpaHa c BB6opom nporpAmMbI dner nonyuHenra.
Φινθεc-Tεcτ (Test)
TpHnOBK nI3MepeHem npbca MoKeT 6bIt bOpedeHa nocTe TpeHnOBKn cHTHeC OeHka. PnHIMa BO BHIMaHHe NOcTe OKOHuaHNo6yHn, HAKMTe KONky, ToToBk aKtNBPOBaT b KHONky TeCTNObaHN da N3MepeHn bEaTn Ce6r cNoKOHO. DInCNne Odn HNCxOrauOn ot 60 cekHyd do 0 BHNz I Mepet naadoou nnMmnybc. B TeueHne 3TOB BpeMeHN HOn dhyHKun NKHON KeBO3MOXHO.
B 3aBnCIMOCtN OT npriOHOCTN CToTb abapnHbI F1 -F6 pe3yNbTaT OTo6paKaETcB CnCTeMe WkOJIbHbIX OueHOK.
| 1.0 OTLNUH |
| 1.0 < F < 1.9 Xorpo |
| 2.0 < F < 2.9 CpeДe |
| 3.0 < F < 3.9 ДостаTOUH |
| 4.0 < F < 5.9 Плoxo |
| 6.0 Oчень плoxo |
Coo6eHnna 06 oun6kax:
E-2: CepBoDnBraTeIb IMeet HnpeBaIbHyIO nO3nIIO. NpIKNIOHTe 6nOK nITAHnBaBkHIOueH nYepe3 10 cekyH, TaK yTO cepBoDnBraTeIa nepemeaaetcB INCXODHoe nOIOKeHne.
E-7:ПрбнemaВпровдke.Проверпе paьembl yctaHOBJIeHbl npabINbHo HET KOHTAKTA Bnp6ke He crn6aetcra.
0b6yHnBMM (NyaYcpoNCTBa nNoIb3oBATEA)
BecnnaTbnoBepxHocTb BMM (PiouaDbObyeHneN30hBi 630NaChOcTN(BpaauoUmeC86cm))
Ynctka, TexHueckoe 6cbnyKbAHne XpaHeHne TpeHaXepa
1. YucTeKa
IINCTKIN CNOB3yTE YNCTYIO BIAxHyO caIpeTky. BHIMAHNE: HIKORda He IcNoB3yTe dIaYnCTKIN 6eH3mH, pa36abNTenbNN Dpyrne arpeccNBhIE YNCTAUNe cpeCTBa, KOtOpBle MOryt NOBpeDnTB NOBepxHocTb. TpeHaxEp NpeDHa3NaueH ToIbKO dIaDOMaSHero INCNoB3oBAHN B NOMEuEHNI. PpeDOxAHHTe TpeHaxKe pO CTn Nblnn.
2. XpaHeHne TpeHaXkepa
PnHe nCNoJIb3OBAHmN TpeHaxKepe 6oJIbWe 4 HeJeB, Heo6xOaIMO OTKIOUHTb erO OT CETn.
IocTabbTe TpeHaxep B cyxoe nomeueHne n pacnbInte HEMHO macna a TaKxe Ha pe3b6y BnHTa pyJn 3aTbopa. HakpoTe TpeHaxep, YTO6bI 3auNTtB erO OT coJIHeHbIX JyueN I bJIIN 3TNM npedOBpaTITb NImeHne OKpackn
3. TexHnueckoe 06cnyKnBaHne
Mby peKOMeHdyem nocIe KaKdbix 50 yacOB nonb3ObaHn npo-BepaTb 6oNTOBIE coeINHeHH n nocIe KaKdbix 100 yacOB nObl3ObaHn Cma3bIBaTb, pe3b6y BNHTa pyJn 3aTBopa Maclom n3pacBbInTeJ
IcnpabnneHHeNoJadok:
Ecnn npo6nema He moKeT 6bItb peWeHa C NOMOsbH NHXeCTOAnx yka3aHn, noKaanyIcTa, o6paTntecb B cHTp, rDe Bbl Kynnn TpeHakep.
MaKc. HacToTa nylbca = 220 - Bo3pact
(220-BaawBospacT)
90% OT MaKc. qactotbI nyIbCa = (220 - Bo3pact) x 0.9
85% OT MaKc. yAcToTbI nylbca = (220 - Bo3pacT) x 0.85
70% OT MACK. HACTOTbI NyIbCa = (220 - Bo3pact) x 0.7
YnpaXHeHn dna pa3MHKn nepeed TpeHnpOBKo
HaHTHe pa3MHky C XOdbbHa MecTe B TeHHe 3 MNHyT. Iocne 3TOB bInONHte CnElyoUe ynpaxKHeHn, KOtOpBie NOMORY Bam ONTMaJIbHO NOrTOBnTBc K TpeHnpOBKe. Bo BpemBaBInONHeHn ynpaxKHeHn Bbl He DoJnxHbI NCbITbIBaTb 60nb. BbInONHaeY npaxKHeHne do NoRBeHn TaHyUeO CyBCTBa B MbIuue.


BcTaHbTe poBHO n3aBeDnTe Ondy pyky 3a rOnoby.
BTopyo pyky noLoXknte CBepxy,BO3bMnTecb 3a loKOTb N NotAHnTe Do OuyueHnpaCTJKeHnra Tpncenca.OctaHbTecb B 3tOM NoOxKeHn Ha 20 CeKYHD, NOBTOPiTe Dpyroyn pykoi.
HaKNoHTeCb BnepeI He cR6aH HOR NOnbItaTHe bOcTaB NaIbCuMn pyk Do nona. BbInonHnTe ynpaxKHeHne 2 pa3a no 20 cekyHd.
CnBbTe Ha non N BbITAHInTe OdHy Hory. HAcNoHNTecb Bnepei nnonpo6yIte DoCTaTb CTynHO. BblonHnYe nppaXHeHne 2 pa3a no 20 cekyHd.
B noJoxhenn uipokoro Bbina da oobnpntecb pykamn B noI nNotAHNTeMbIuHb Hor. Ype3 20 cekyHn NOMeHaHTe Hory.
Pocne pa3MHKNIOTpncnteHorAMnpykAmN,HTO6bI paccna6nTbMbHcBHepeKpaauTe TpeHnpOBky Bhe3aHNo.ChaJana yMeHbWnte Temn TpeHnpOBKn, 706bl npbc onyctncrdoobuHoro noka3aTeJIra(Cool down).Ml peKomeHdyem B KOHc TepeHnpOBKn CHOba BBINOHNtB KOMnJIeKC ynpaxHeHm dPa3MHKN.
Cneunqkaun - Cnncok 3anachbix qacte Nco No 3aka3a 16601 „Black Edition"
TexHHueckn XapakTePncTnK No coCToRnHO Ha 01.09.2019
3neKtpoHHa perympoBka Harpy3kncn yIbTa KOMnbIOTepa, 16 ypOBHeHarpy3kn
MarHHTHaN CNTema HapyKeHn, INHHePUNOHHa MRacCa np6Jn.9Kt
12 BCTPOEHHbIX INPOrpAmM TpeHINPOBKN
4 nporpammbi qactotbI cepdeyhBIX COKpaueHm C 3apahee yctaHOBNEHHbIM npedemnnybca. (NcnoB3OBAHHe BO3MOXHO TOIbKO, IN-3aKOIpOBaH HbC nOMOuBIO DOnONHHTeBbIX pEmHe IMNpylbcoB -5,3kHz.)
- 1nporpamma pyHoi yCTaHOBKn
1 pyHn nporpamma
1 KOHHKpyehHnnpoppamma
BbICOKOKaHeCTBeHHaAJIOMMHnEBAI DOPOKKa dINHOI OKOIO 112cm
Maeoe ydohoe cndhebc pOJkamcckjkeHH
CTabnBna,CbepxnnHHbIe HHPKOM
CtabnBhoe nooXeHne cToBb npn nOOMU HxKhIx 60NoeK C JInyKoN
-CKlaDHaKOHCTpykUINIIN3KOHOMMMECTa
TpaHcnpTnpoBOOuHbIe poJINKU
-6JOKNTAHNA
BbICOTa HAKJIOH KOMNBIOTepa perynnpyema
7-OKOeHbKOMIbOTep COnHOBpeMeHHo INHnKaUne CneJeIOxNnapamETPOB:BpEMa,INCTAHua,KOIuHeCTBO rpe6koB,KOIuHeCTBO rpe6koB/MnHyTy,pacXoD KaOpn n Pylbco3a
Bo3MOXHOCTb 3aDaBaTb C06CTBeHHbIe npaMeTpbl: BpemR, DnCTaHUR, np6bn, pacxOJd KAnOpu n PyNbco3a.
- N3BeeHHe O ppeBbIeEHm 3a,dAHHbx npaMeTPOB
BCTPOeHHbI B KOMMbIOTeP pIeMmIK CmHAnOB dIa HArpydHorO KapDIOdaTHMa
MaKcImaHbH BEC NOB3OBaTeHa:150Kr
fa6apntHbpea3mepb: npn5n. 230 x L5 x B 87 cm
Pa3MeBb B CNOKeHHOM COCTOHN: np6n. 120 x LI 55 x B 149 cm
Bec: 40 kT
Heo6xoDmma nloaaDbIa TpeHnpoBKn:Mn.2,5M
Chyynakobky, npOBepbTe no cnNcKy, Bce nIeTaNHa MeCTe. EcnBce B nopAKe, To MOxHNo HauHnAcb6OpKy. Ecn KaKo-NH6yDb arperat He B nopAKe nn OTCyTcByET, oBaPaaaTeCb K Ham:
INHTepHET-cepBn 3aNaChbIe YacTn npTana:
www.christopeit-service.de
© by Top-Sports Gilles GmbH
D-42551 Velbert (Germany)
Service:
Tel.: +49 (0)2051/6067-0