Foodi OP300EU - Multi-cooker NINJA - Free user manual and instructions
Find the device manual for free Foodi OP300EU NINJA in PDF.
| Product Type | Multi-Cooker |
| Brand | Ninja |
| Model | Foodi OP300EU |
| Power Supply | 230 V, 50 Hz, 1460 W |
| Capacity | 6 L |
| Main Functions | Air Crisp (hot air roasting), Bake/Roast (oven cooking), Grill (grilling), Pressure Cook (pressure cooking), Steam (steaming), Slow Cook (simmer), Sear/Sauté (searing/sautéing), Keep Warm (keep warm) |
| Included Accessories | Removable 6 L cooking pot, Cook & Crisp basket, reversible rack, removable diffuser, roasting lid, pressure cooking lid, condensation collector, silicone gasket, anti-clog cap |
| Materials | Non-stick pot, silicone gasket, plastic body, metal lid |
| Cleaning | Pot, basket, rack, diffuser and silicone gasket are dishwasher safe. Body and pressure lid hand wash. Do not immerse the body. |
| Safety | Pressure release valve, red float valve, pressure lock, overheat protection, automatic shut-off |
| Spare parts and repairability | Additional silicone gaskets available on ninjakitchen.eu. Technical support and parts via customer service. |
| Warranty | 2-year limited (online registration recommended within 28 days) |
| General information | Domestic use only. Weight and dimensions not specified in manual. Compatible with accessories sold separately (reversible rack, cake pan, roasting dish, etc.) |
Frequently Asked Questions - Foodi OP300EU NINJA
User questions about Foodi OP300EU NINJA
0 question about this device. Answer the ones you know or ask your own.
Ask a new question about this device
Download the instructions for your Multi-cooker in PDF format for free! Find your manual Foodi OP300EU - NINJA and take your electronic device back in hand. On this page are published all the documents necessary for the use of your device. Foodi OP300EU by NINJA.
USER MANUAL Foodi OP300EU NINJA
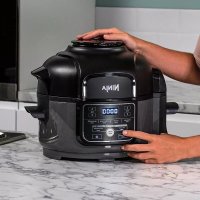
The pressure cooker that crisps.
BRUGERVEJLEDNING
GEBRAUCHSANWEISUNG
INSTRUCTIONS
INSTRUCCIONES
INSTRUCTIONS
ISTRUZIONI
INSTRUCTIONS
BRUKSANVISNING
OHJEET
INSTRUKTIONER
TAK
Saette under tryk 15
TILBEHOR (SAELGES SEPARAT)
Cook & Crisp leg-indsats
Universalpande
R Stegehydeindsats
S Dehydrenderingshylde
T Brcaform
U Sorocform


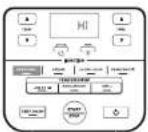
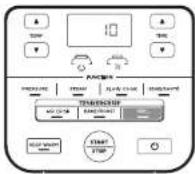
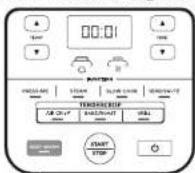
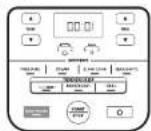
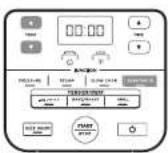
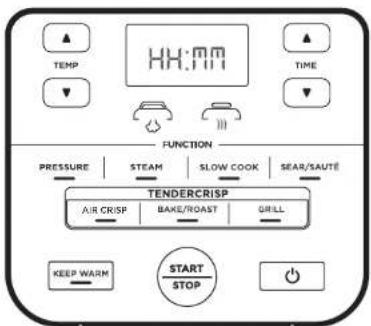
BRUG AF KONTROLPANELET INDEN FØRSTE BRUG
BEMAERK: Kcrtro panel kan variere eiter model
FUNKTIONSKNAPPER
TRYK: Bruges bil at bilberee mad hurtigtog. fashfolde marhed
DAMP: Bruges Uit haansont at tibereedelakte fadevare veh haj temperstur.
LANGTIDSTILBEREDNING: liberei dir mad vend en lac temperatur, laenge/ere perider.
SVITS/SAUTER: Bruges 1 at brune keid, sautere gruntsager, simme sauter og mere.
LUFT-SPRD: Bruges som en luft-sprader bil at gare mad spred cg knasende mad lidt oller ingen illis.
BAG/STEG: Brug apparent som en om ti mert kad, bagte laekkerier mec mere.
GRILL: Bruges til at karamollisere og brue din mad.
BETJENINGSKNAPPER
TEMP-BUG: Rup ag+nd neo-TEMP-PEG-1 at justekeogtemperunt og/ellier Tryknaiveaes
TID-pile: Brug op- agned-TID-piene t at juste tilberedringnsit.
BEMERK: Brug ag-og nedolire til at justere temporatur iller tid under liloderedng. Apparatei vili derefter bruge disci indstillingcr.
START/STOP-Knapt: Nar du har valg dt kogeemater (eler tey) og tiberedningstd, ska du trykce pa STAST/STOP for at startt ltberedingen. Den kan stopps ve attrykke pa den programknak, som aparatet bruger.
HOLD VARM-knap: After trykogonn, damoning eler langostilberering vil apparatel automatisk seite | Hold varm-1stand og negynde at taile opao. Hold varm-1standon forlorbl activi 12 timor, eler du kain tryke pa HOLD VARM for al sljike. Hold varm-1standen er ikke geregnit al varme kold mad op, men at lada Foodi Tendercrsp trkykogeren opoevere tilberedt mad ved en sikker temperatur.
AFBRYDER-knap: Afbryderen sikker apparatus: ag stoozer al tiberingd.
STANDBY-tilstand: Efter 10 minutur uden aktivitet na kontrolpamer gär apparatet i standby-tilstand.
ogned-TEMP-pilene for at vaelge en
temperatur malem 150°C og 200°C.

2 Brug oo-ogned-TID-knapeerne for at nside lberedngsdeni minutintevaler op oI en time
3 När gryden er sat i, placere enten Cook & Crisp! Basket aller den vendbare hylde i gryden. Basket skal have diffuser tiisutot.
BEMERK: Del anbefales at opvarne apparatet i fom minutior. Incon der kommes nogat L.Under forvarming, inden trin fire skul du xukte lagt og trykke sa START/ STOP-Knapeno for s begynde.
4 Tifti ingredientserve! Cook & Crisp® Basket aller den vondbare hylde. Låget og tryk à START/STOP for at: starte übercogenen.
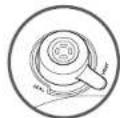
PASETNINGOGFJOURNALSEAF TRYKLAGET
Pleccr tykldget oven pa apparatet, og sae t pe liget pa injie med pa basen. Dre liget med uret, incitl det leser pa clad.
For at lesse tryiklage skal du direje dot mod urs. Lait laget i en vinkel for atforndre sprout.Lait kike lagelige op.
BEMERK: Tryldagot vill klok scc, far al tryki aparaterc or udignet.

FJERN
BRUG AF DIN NINJA* FOODI* TENDERCRISP™ TRYKKOGER - FORTSAT
BRUG AF TILBEREDNINGSFUNKTIONER SAMMEN MED TRYLAGET
For at taande appearet skal da soutte stikketi enkontakt og trykke auf afoeryerknappen.
Trykkogning
1 Placer ingrediener og minds: 200 ml. vaske i gryden, inklusive bilberon, Ivis cin oopschrift angiver de. Overskrid IKKE injen markera. MAKS. ITRYK, nr du tykrogker

BEMERK: När du tlibereder ris, bonner et alter. andre ingrediender, der udvidig sig, ma du IIKE fydo grydon more end halvojs op.
2 Folg trinnene p6e side 16 for at pasatte tyklaget. Dre tryckngningsventilen til FORSEGLT-positionen.
3 Tryk pä TRYK-kappen. Standard trykket vī litv vist. Brug oog-og nest-TEMP-kruppen fer at vailegen ent HÖJ ell er LAV.
BEMARK: I vis apparatot koren cn time oer mindro, vurrc taed ncd meo minutner og sekunder. Hvis del koren en time efer mere, vurc kun taed ncd meo minutner.
4 Brug op-og ncd-TID-knappme til at instile tilberedngndsten imnutintervaler op tilen og if em minutters intervaller fra en timetifire timer.
5 Tryk pa 5TART/STOP-knappen. Displayet vill vise roterende lys pe deite lidssounkt. Nar apparentar nar den passende temperature, vill don tcl, du har indstitet, segynde at taile nep.
Besog ninjakitcheneu for at bestille nyere reservede eg tilbehor.
PRODUKTREGISTRERING
TO (2) ARS BEGRANSET GARANTI
for purchasing the Ninja* Foodi*

REGISTER YOUR PURCHASE
njinjakitchen.eu
Scan QR code using mobile device
RECORD THIS INFORMATION
Model Number:
Serial Number:
Date of Purchase:
(Keep receipt)
Store of Purchase:
THIS BOOK COVERS MODEL
NUMBER:
OP300EU
TECHNICAL SPECIFICATIONS
Voltage: 230V-50Hz
Power: 1460 Watts
Volume: 6
Fluid Group: 2
TIP: You can find the model and serial numbers on the QR code label located on the back of the unit by the power cord.

This marking indicates this product should not be disposed of with other household wastes throughout the EU. To prevent possible harm to
the environment or human health from uncontrolled waste disposal,recycle it responsibly to promote the sustainable reuse of material sources.To return your used device, please use the return and collection systems or contact the retailer where this product was purchased. They can take this product for environmentally safe recycling.
CONTENTS
Important Safeguards. 54
Parts & Accessories 58
Using the Control Panel 60
Function Buttons 60
Operating Buttons 60
Before First Use 61
Installing the Condensation Collector 61
Removing & Reinstalling the Anti-Clog Cap. 61
Using Your Ninja Foodl TendercrispTM Pressure Cooker .. 62
Why Two Lids 62
Using the Crisping Lid 62
Using the Cooking Functions with the Crisping Lid. 62
Air Crisp. 62
Bake/Roast 63
Grrll 64
Familiarising Yourself With Pressure Cooking 65
Natural Pressure Release vs. Quick Pressure Release: 66
Pressuring 66
Installing & Removing the Pressure Lid 67
Using the Cooking Functions with the Pressure Lid. 68
Pressure Cook 68
Steam 69
Slow Cook 70
Sear/Saute 70
Cleaning & Maintenance 71
Cleaning: Dishwasher & Hand-Washing 71
Removing & Reinstalling the Silicone Ring. 71
Accessories for Purchase 72
Troubleshooting Guide. 73
Helpful Tips. 74
Replacement Parts 75
Product Registration. 76
IMPORTANT SAFEGUARDS
HOUSEHOLD USE ONLY · READ ALL INSTRUCTIONS BEFORE USE
Read all instructions before using your Ninja Foodi.
When using electrical appliances, basic safety precautions should always be followed, including the following:
AWARNING
1 This appliance can be used by persons with reduced physical, sensory or mental capabilities or lack of experience and knowledge if they have been given supervision or instruction concerning use of the appliance in a safe way and understand the hazards involved.
2 Keep the appliance and its cord out of reach of children. DO NOT allow the appliance to be used by children. Close supervision is necessary when used near children
3 To eliminate a choking hazard for young children, remove and discard the protective cover fitted on the power plug of this appliance.
4 Children shall not play with the appliance.
5 NEVER use socket below counter.
6 NEVER connect this appliance to an external timer switch or separate remote-control system.
7 DO NOT use an extension cord. A short power-supply cord is used to reduce the risk of children less than 8 years grabbing the cord or becoming entangled and to reduce the risk of people tripping over a longer cord.
8 To protect against electrical shock DO NOT immerse cord, plugs, or main unit housing in water or other liquid. Cook only in the pot provided or in a container recommended by SharkNinja placed in the provided pot.
Regularly inspect the appliance and power cord. DO NOT use the appliance if there is damage to the power cord or plug. If the appliance malfunctions or has been damaged in any way, immediately stop use and call Customer Service.
10 ALWAYS ensure the appliance is properly assembled before use.
11 Before use, ALWAYS check pressure release valve and red float valve for clogging or obstruction, and clean them if necessary. Check to make sure the red float valve on the pressure lid moves freely. Foods such as apple sauce, cranberries, pearl barley, oatmeal or other cereals, split peas, noodles, macaroni, rhubarb, or spaghetti can foam, froth, and splutter when pressure cooked, clogging the pressure release valve. These and similar expanding foods (such as dried vegetables, beans, grains, and rice) should not be cooked in a pressure cooker, except when following a Ninja FoodTM recipe.
12 DO NOT cover the air intake vent or air socket vent while cripping lid is closed. Doing so will prevent even cooking and may damage the unit or cause it to overheat.
13 To prevent risk of explosion and injury, use only SharkNinja Silicone rings. Make certain silicone ring is installed and lid is properly closed before operating. DO NOT use if torn or damaged. Replace before using.
14 Before placing removable cooking pot into the cooker base, ensure pot and cooker base are clean and dry by wiping with a soft cloth.
15 This appliance is for household use only. DO NOT use this appliance for anything other than its intended use. DO NOT use in moving vehicles or boats. DO NOT use outdoors. Misuse may cause injury.
16 Intended for worktop use only. Ensure the surface is level, clean and dry. DO NOT move the appliance when in use.
17 DO NOT place appliance on hot surfaces or near a hot gas or electric burner or in a heated oven.
18 DO NOT use accessory attachments not recommended or sold by SharkNinja. DO NOT place accessories in a microwave, toaster oven, convection oven, or conventional oven or on a ceramic cooktop, electric coil, gas burner range, or outdoor grill. The use of accessory attachments not recommended by SharkNinja may cause fire, electric shock, or injuries.
19 When using this appliance, provide adequate space above and on all sides for air circulation.
20 ALWAYS follow the maximum and minimum quantities of liquid as stated in instructions and recipes.
21 NEVER use SLOW COOK setting without food and liquids in the removable cooking pot.
22 DO NOT use the appliance without the removable cooking pot installed.
23 DO NOT use this appliance for deep frying.
24 DO NOT cover the pressure valves.
25 DO NOT saute or fry with oil while pressure cooking.
26 Prevent food contact with heating elements. DO NOT overfill or exceed the MAX fill level when cooking. Overfilling may cause personal injury or property damage or affect the safe use of the appliance.
27 When pressure cooking foods that expand (such as dried vegetables, beans, grains, rice, etc.). DO NOT fill pot more than halfway, or as otherwise instructed in a Ninja FoodTM recipe.
28 DO NOT use this unit to cook instant rice.
29 To prevent food contact with the heating elements, DO NOT overfill the Cook & Crisp™ Basket.
30 Use extreme caution when closing the crisping lid, taking care that nothing is caught in or pinched by the hinge.
31 Socket voltages can vary, affecting the performance of your product. To prevent possible illness, use a thermometer to check that your food is cooked to the temperatures recommended.
32 DO NOT place the appliance near the edge of a worktop during operation.
33 To avoid possible steam damage, place the unit away from walls and cabinets during use.
34 Should the unit emit black smoke, unplug immediately and wait for smoking to stop before removing the cooking pot and Cook & Crisp Basket.
IMPORTANT SAFEGUARDS
HOUSEHOLD USE ONLY · READ ALL INSTRUCTIONS BEFORE USE
35 DO NOT touch hot surfaces. Appliance surfaces are hot during and after operation. To prevent burns or personal injury, ALWAYS use protective hot pads or insulated oven mitts and use available handles and knobs.
Extreme caution must be used when the cooker contains hot oil, hot food, or hot liquids, or if the cooker is under pressure. Improper use, including moving the cooker, may result in personal injury. When using this appliance to pressure cook, ensure the lid is properly assembled and locked into position before use.
37 Caution should be used when searing meats and sauteing in hot oil. Keep hands and face away from the removable cooking pot, especially when adding new ingredients, as hot oil may splatter.
38 When unit is in operation, hot steam is released through the air socket vent. Place unit so vent is not directed toward the power cord, sockets, or other appliances. Keep your hands and face at a safe distance from vent.
39 DO NOT attempt to open the lid during or after pressure cooking until all internal pressure has been released through the pressure release valve and the unit has cooled slightly. DO NOT tamper with, disassemble, or otherwise remove the red float valve or pressure release assembly.
40 When using SLOW COOK or SEAR/SAUTETe settings, ALWAYS keep the pressure lid closed and the pressure release valve in the VENT position. If the lid is closed and the pressure release valve is in the SEAL position, an audible alarm will sound. "VENT" error code will appear on LED display to signal the need to turn the pressure release valve to the VENT position.
41 When using the PRESSURE COOK setting, ALWAYS keep the pressure lid locked and the pressure release valve turned anticlockwise to the SEAL position.
42 If the lid will not turn to unlock, this indicates the appliance is still under pressure. Any pressure remaining can be hazardous. Let unit naturally release pressure or turn the Pressure Release Valve slowly to the VENT position to release steam. Take care to avoid contact with the releasing steam to avoid burns or injury. When the steam is completely released, the red float valve will be in the lower position allowing the lid to be removed.
43 Spilled food can cause serious burns. Keep appliance and cord away from children. DO NOT let cord hang over edge of tables or counters or touch hot surfaces.
44 ALWAYS keep hands, face, and other body parts away from the pressure release valve prior to or during pressure release and when removing the pressure lid after cooking. Serious burns can result from the steam inside. ALWAYS lift and tilt the lid away from you when removing.
45 When removable cooking pot is empty. DO NOT heat it for more than 10 minutes, as doing so may damage the cooking surface.
46 The cooking pot, Cook & Crisp™ Basket, and reversible rack become extremely hot during the cooking process. Avoid hot steam and air while removing the cooking pot and Cook & Crisp™ Basket from the appliance, and ALWAYS place them on a heat resistant surface after removing. DO NOT touch accessories during or immediately after cooking.
47 Removable cooking pot can be extremely heavy when full of ingredients. Care should be taken when lifting pot from cooker base
48 Cleaning and user maintenance shall not be made by children unless they are older than 8 and supervised.
49 Let the appliance cool for approximately 30 minutes before handling, cleaning, or storing.
50 To disconnect, turn any control to "off", then unplug from socket when not in use and before cleaning. Allow to cool before cleaning, disassembly, putting in or taking off parts and for storage.
51 DO NOT clean with metal scouring pads. Pieces can break off the pad and touch electrical parts, creating a risk of electric shock.
52 Please refer to the Cleaning & Maintenance section for regular maintenance of the appliance.
Indicates to read and review instructions to understand operation and use of product.
Indicates the presence of a hazard that can cause personal injury, death or substantial property damage if the warning included with this symbol is ignored.
Take care to avoid contact with hot surface. Always use hard protection to avoid burns.
For indoor and household use only.
SAVE THESE INSTRUCTIONS
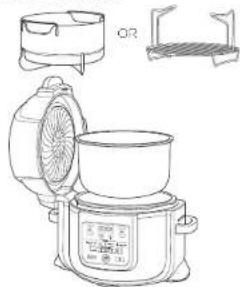
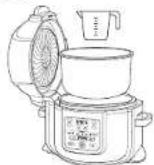
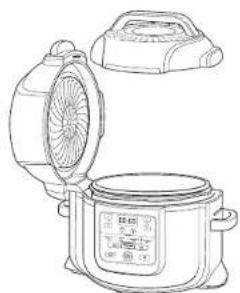
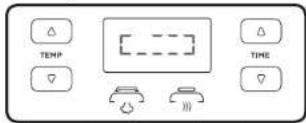
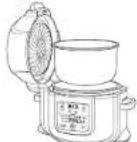
PARTS & ACCESSORIES
PARTS
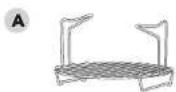
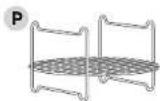
A Reversible Rack
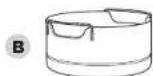
B Cook & Crisp Basket
C Detachable Diffuser
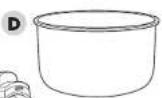
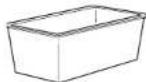
D Removable 6L Cooking Pot
E Crisping Lid
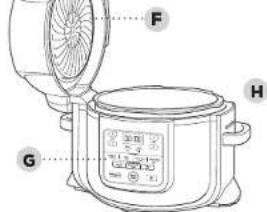
F Heat Shield
Control Panel
H Cooker Base
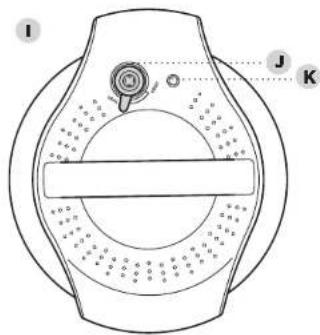
Pressure Lid
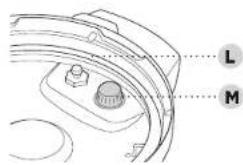
Pressure Release Valve
K Float Valve (Red)
Silicone Ring
M Anti-Clog Cap
Air Socket Vent
Condensation Collector

Underside of Pressure Lid

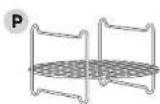
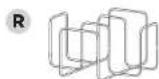
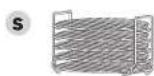
ACCESSIONS (SOLD SEPARATELY)
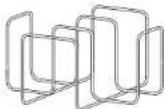
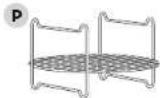
Cook & Crisp™ Layered Insert
Multi-Purpose Pan
Roasting Rack Insert
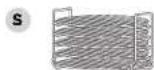
$ Dehydrating Rack
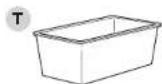
T Loaf Pan
U Crisper Pan


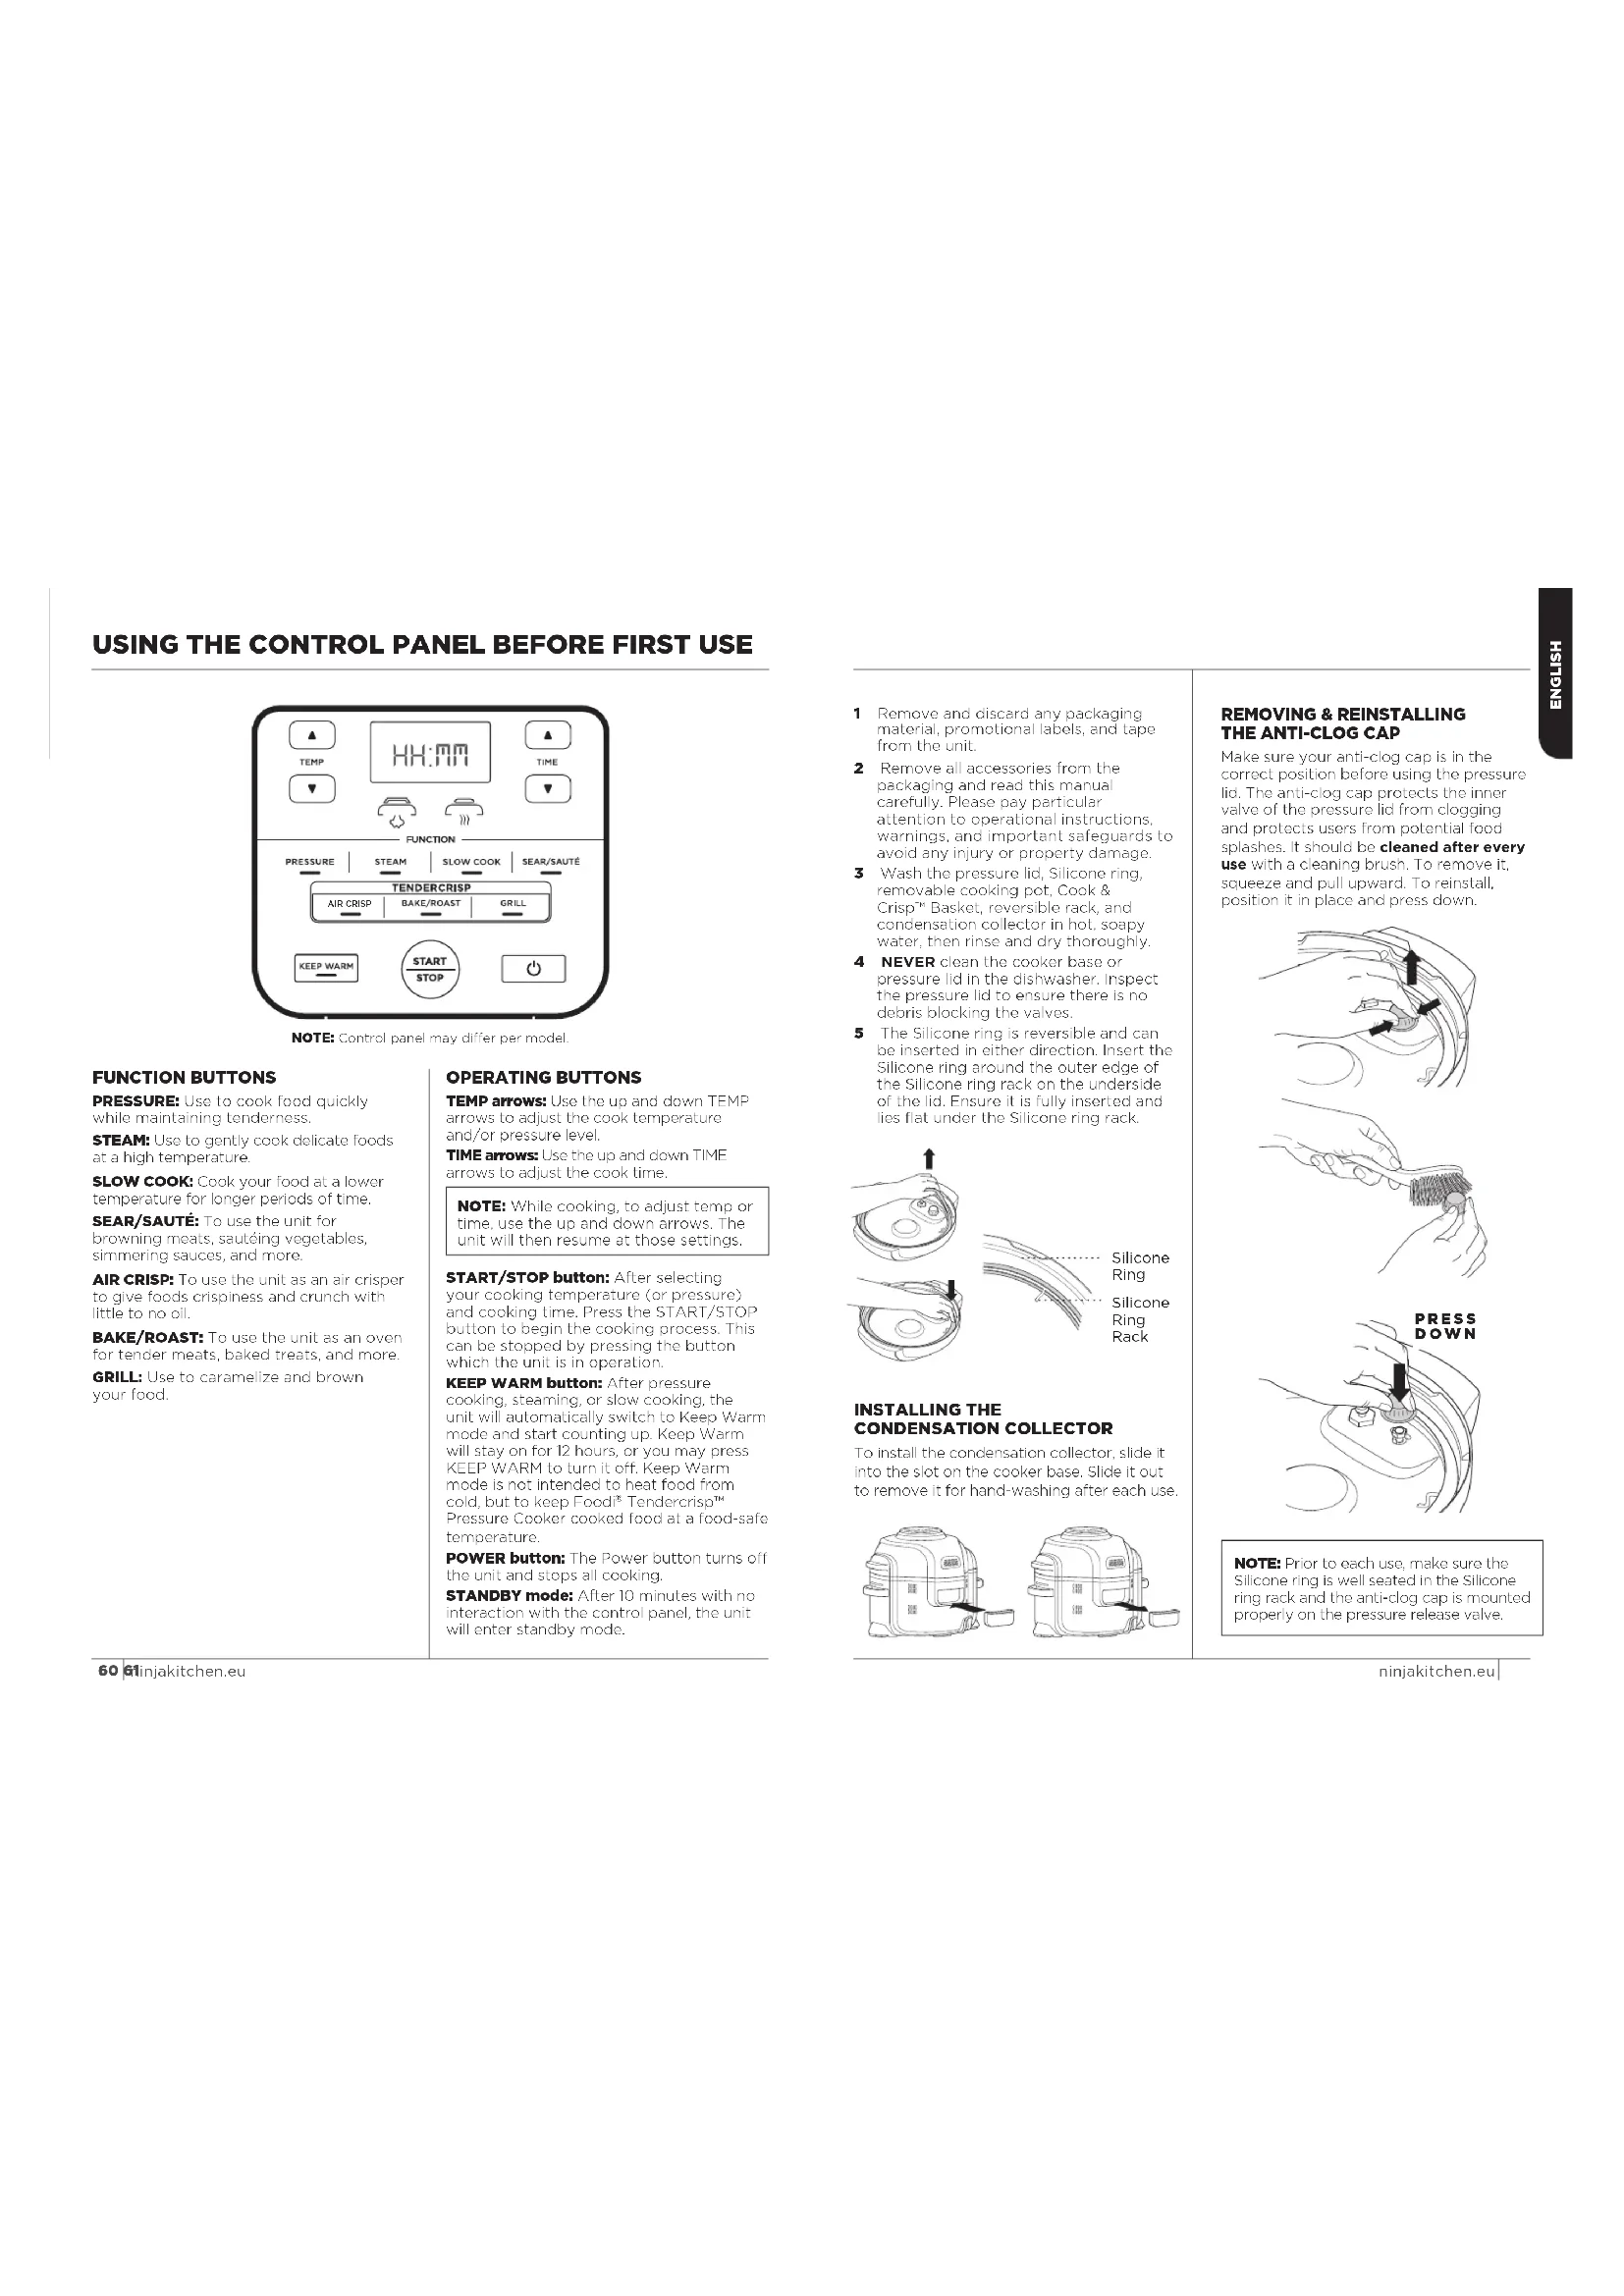
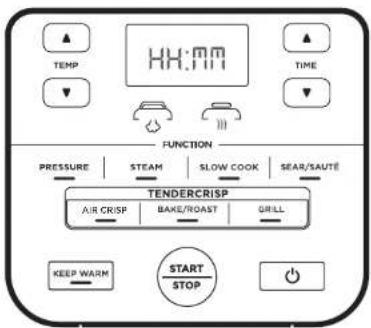
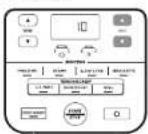
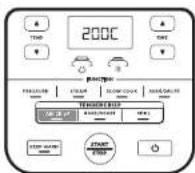
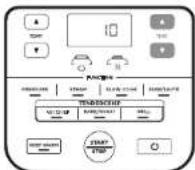
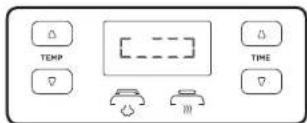
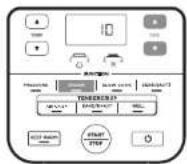
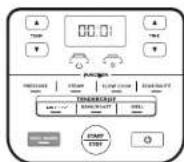
USING THE CONTROL PANEL BEFORE FIRST USE

NOTE: Control panel may differ per model
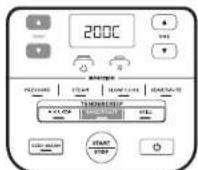
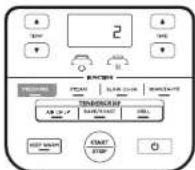
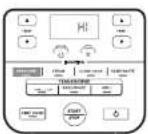
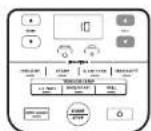
FUNCTION BUTTONS
PRESSURE: Use to cook food quickly while maintaining tenderness.
STEAM: Use to gently cook delicate foods at a high temperature.
SLOW COOK: Cook your food at a lower temperature for longer periods of time.
SEAR/SAUTE: To use the unit for browning meats, sautéing vegetables, simmering sauces, and more.
AIR CRISP: To use the unit as an air crisper to give foods crispiness and crunch with little to no oil.
BAKE/ROAST: To use the unit as an oven for tender meals, baked treats, and more.
GRILL: Use to caramelize and brown your food.
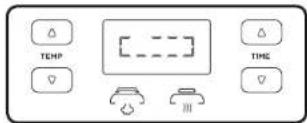
OPERATING BUTTONS
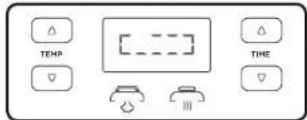
TEMP arrows: Use the up and down TEMP arrows to adjust the cook temperature and/or pressure level.
TIME arrows: Use the up and down TIME arrows to adjust the cook time.
NOTE: While cooling, to adjust temp or time, use the up and down arrows. The unit will then resume at those settings.
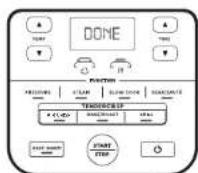
START/STOP button: After selecting your cooking temperature (or pressure) and cooking time. Press the START/STOP button to begin the cooking process. This can be stopped by pressing the button which the unit is in operation.
KEEP WARM button: After pressure cooking, steaming, or slow cooking, the unit will automatically switch to Keep Warm mode and start counting up. Keep Warm will stay on for 12 hours, or you may press KEEP WARM to turn it off. Keep Warm mode is not intended to heat food from cold, but to keep Food® Tendercrisp™ Pressure Cooker cooked food at a food-safe temperature.
POWER button: The Power button turns off the unit and stops all cooking.
STANDBY model: After 10 minutes with no interaction with the control panel, the unit will enter standby mode.
1 Remove and discard any packaging material, promotional labels, and tape from the unit.
2 Remove all accessories from the packaging and read this manual carefully. Please pay particular attention to operational instructions, warnings, and important safeguards to avoid any injury or property damage.
3 Wash the pressure lid, Silicone ring, removable cooking pot, Cook & Crisp Basket, reversible rack, and condensation collector in hot, soapy water, then rinse and dry thoroughly.
NEVER clean the cooker base or pressure lid in the dishwasher. Inspect the pressure lid to ensure there is no debris blocking the valves.
5 The Silicone ring is reversible and can be inserted in either direction. Insert the Silicone ring around the outer edge of the Silicone ring rack on the underside of the lid. Ensure it is fully inserted and lies flat under the Silicone ring rack.
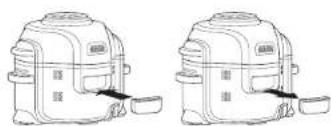
INSTALLING THE CONDENSATION COLLECTOR
To install the condensation collector, slide it into the slot on the cooker base. Slide it out to remove it for hand-washing after each use.
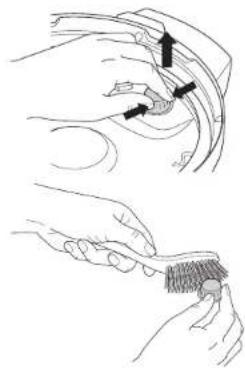
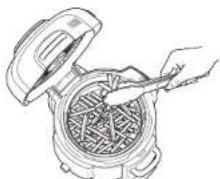
REMOVING & REINSTALLING THE ANTI-CLOG CAP
Make sure your anti-clog cap is in the correct position before using the pressure lid. The anti-clog cap protects the inner valve of the pressure lid from clogging and protects users from potential food splashes. It should be cleaned after every use with a cleaning brush. To remove it, squeeze and pull upward. To reinstall, position it in place and press down.

NOTE: Prior to each use, make sure the Silicone ring is well seated in the Silicone ring rack and the anti-dog cap is mounted properly on the pressure release valve.
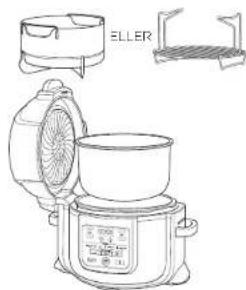
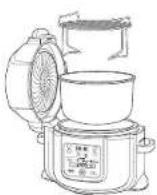
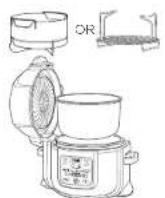
USING YOUR NINJA* FOODI* TENDERCRISP™ PRESSURE COOKER
WHY TWO LIDS?
The two kids allow you to seamlessly transition between all your favourite cooking methods. Use the pressure lid to tenderse, then use the crisping lid to crisp up your food.
USING THE CRISPING LID
The crisping lid is attached to the unit by a hinge and features an easy-open design. The lid can be opened during any convection cooking function so you can check on and access the ingredients. When the lid is opened, cooking will stop, the timer will pause, and the heating element in the lid will turn off. When the lid is closed, the cooking an timer functions will resume.
USING THE COOKING FUNCTIONS WITH THE CRISPING LID
To turn on the unit, plug the power cord into a socket, then press the Power button.
Air Crisp
1 Press the Air Crisp button. The default temperature setting will display. Use the up and down TEMP arrows to choose a temperature between 150^ and 200^ .
2 Use the up and down TIME arrows to set the cook time in minute increments up to 1 hour.

With the pot installed, place either the Cook & Crisp Basket or reversible rack in the pot. Basket must have the diffuser attached.
NOTE: It is recommended to let the unit preheat for 5 minutes before adding ingredients, before heating, before step 4, close the lid, and press the START/STOP button to begin.
4 Add ingredients to the Cook & Crisp™ Basket or reversible rack. Close the lid and press the START/STOP button to begin cooking.
5 During cooking, you can open the lid and lift out the basket to shake or toss ingredients for even browning, if needed. When done, lower basket back into pot and close lid. Cooking will automatically resume after lid is closed.
NOTE: if you press the STOP during Air Crisp Mode, the unit will wait 10 seconds before entering Standby mode.
6 When cooking is complete, the unit will beep.
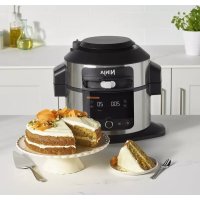
Bake/Roast
1 Press the BAKE/ROAST button. The default temperature setting will display. Use the up and down TEMP arrows to choose a temperature between 150°C and 200°C.
2 Use the up and down TIME arrows to set the cook time in minute increments up to 1 hour. 5-minute increments from 1 hour to 4 hours.

NOTE: If running for 1 hour or less, the clock will count down by minutes and seconds. If running for more than 1 hour, the clock will count down by minutes only.
NOTE: It is recommended to let the unit preheat for 5 minutes before adding ingredients. If preheating, before step 3, close the lid, and press the START/STOP button to begin.
3 Add ingredients, along with any accessories called for in your recipe, to the pot. Close the lid and press the START/STOP button to begin cooking.
4 When cooking is complete, the unit will beep.
USING YOUR NINJA* FOODI* TENDERCRISP™ PRESSURE COOKER - CONT.
Grill
1 Press the GRILL button.
NOTE: There is no temperature adjustment available or necessary when using the Grill function.
2 Use the up and down TIME arrows to set the cook time in minute increments up to 30 minutes.
3 Place the reversible rack in the pot in the upper grill position or follow directions per recipe.
4 Place ingredients on the rack, then close the lid.

5 Press the START/STOP button to begin cooking.

6 When cooking is complete, the unit will be open.
PRESSURE TEST
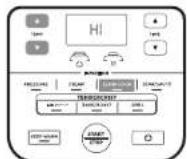
FAMILIARISING YOURSELF WITH PRESSURE COOKING
In order to familiarise yourself with the Pressure Cook function and start cooking, it is highly recommended for first-time users to do an initial run with water only.
1 Place the pot in the cooker base and add 700ml room-temperature water to the pot.
2 Assemble the pressure lid by aligning the arrow on the front of the lid with the arrow on the front of the cocker base. Then turn the lid clockwise until it locks into place.
3 Make sure the pressure release valve on the lid is in the SEAL position.

4 Turn the unit on. Press the PRESSURE button, the unit will default to high (HI) pressure. Set the time to 2 minutes. Press the START/STOP button to begin.
5 Your Ninja Food™ Tendercrisp™ Pressure Cooker will begin to build pressure, indicated by the rotating lights. The unit will begin counting down when it is fully pressurised.
6 When the countdown is finished, the Ninja Food® Tendercrisp® Pressure Cooker will be automatically switched to the Keep Warm mode, and begin counting up.
7 Turn the pressure release valve to the VENT position to quick release the pressurised steam. A quick burst of steam will spur out of the pressure release valve. When steam is completely released, the unit will be ready to open.

NOTE: To maintain the quick release pressure, the value will lock in to place in the VENT position.
USING YOUR NINJA* FOODI* TENDERCRISP™ PRESSURE COOKER - CONT.
NATURAL PRESSURE RELEASE VS. QUICK PRESSURE RELEASE
Natural Pressure Release: When pressure cooking is complete, steam will naturally release from the unit as it cools down. This can take up to 20 minutes or more, depending on the amount of liquid and food in the pot. During this time, the unit will switch to Keep Warm mode. Press the KEEP WARM button if you would like to turn Keep Warm mode off. When natural pressure release is complete, the red float valve will drop down.
Quick Pressure Release: Use ONLY if your recipe calls for it. When pressure cooking is complete and the KEEP WARM light is on, turn the pressure release valve to the VENT position to instantly release pressure through the valve.
Even after releasing pressure naturally or using the pressure release valve, some steam will remain in the unit and will escape when the lid is opened. Lift and tilt it away from you, making sure no condensation grips into the cooker base.

NOTE: At any time during the natural release process, you can switch to quick release by turning the pressure release valve to the VENT position.
WARNING: Caution HOT Steam emitted.
PRESSURISING
As pressure builds in the unit, the control panel will display rotating lights. Pressurising time varies, depending on the amount of ingredients and liquid in the pot. As the unit pressurises, the lid will lock as a safety measure, and it will not unlock until pressure is released. Once the unit has reached full pressure, the lid pressure cone light will glow steadily. The pressure cooking cycle will begin and the timer will start counting down.
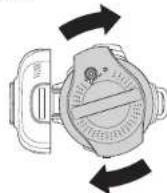
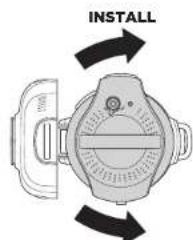
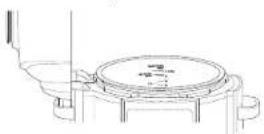
INSTALLING & REMOVING THE PRESSURE LID
Place the pressure lid on top of the unit with the lid on the lid and the lid in the case lined up evenly. Turn the lid clockwise until it locks in place.
To unlock the pressure lid, turn it anticlockwise. Lift the lid at an angle to prevent splatter. Do not lift the lid straight up.
NOTE: The pressure lid will not unlock until the unit is completely depressurised.

REMOVE
USING YOUR NINJA* FOODI* TENDERCRISP™ PRESSURE COOKER - CONT.
USING THE COOKING FUNCTIONS WITH THE PRESSURE LID
To turn on the unit, plug the power cord into a socket, then press the Power button.
Pressure Cook
1 Place ingredients and at least 200ml of liquid in the pot, including an accessory if your recipe calls for it. DO NOT exceed the line marked PRESSURE MAX when pressure cooking.
NOTE: When cooking rice, beans, or other ingredients that expand, DO NOT fill the pot more than halfway.
2 Follow the steps on page 16 to install the pressure lid. Turn the pressure release valve to the SEAL position.

Press the PRESSURE button. The default pressure level will display. Use the up and down TEMP arrows to select either HIGH or LOW.
NOTE: If running for 1 hour or less, the clock will count down by minutes and seconds. If running for more than 1 hour, the clock will count down by minutes only.
4 Use the up and down TIME arrows to set the cook time in minute increments up to 1 hour, and in 5-minute increments from 1 hour to 4 hours.
Press the START/STOP button. The display will show rotating lights during this time. When the unit reaches the proper temperature, the time you set will begin counting down.
6 When cooking is complete, the unit will be open, automatically switch to Keep Warm mode, and start counting up from 00:00.
NOTE: After Pressure Cooking is complete, you may press the KEEP WARM button to turn the Keep Warm mode off.
7 Let the unit naturally release pressure or, if the recipe instructs, turn the pressure release valve to the VENT position, quickly releasing steam through the valve.

Steam
1 Add 240ml of liquid (or amount of liquid the recipe specifies) to the pot, then place the reversible rack or Cook & Crisp Basket with ingredients in the pot.
2 Follow the steps above to install the pressure lid on page 16. Turn the pressure release valve to the VENT position.

Press the STEAM button. Use the up and down TIME arrows to set the cook time in minute increments up to 30 minutes.
NOTE: There is no temperature adjustment available or necessary when using the Steam function.
4 Press the START/STOP button.
5 The unit will automatically preheat to bring the steaming liquid to a boil. The display will show rotating lights during this time. When the unit reaches the proper temperature, the time you set will begin counting down.
6 When cook time is complete, the unit will be open and automatically switch to Keep Warm mode. If the red float valve pops up, wait for it to drop and then you can open the lid.
NOTE: After Steam cooking is complete, you may press the KEEP WARM button to turn the Keep Warm mode off.
USING YOUR NINJA* FOODI* TENDERCRISP™ PRESSURE COOKER - CONT.
Slow Cook
1 Add ingredients to the pot. DO NOT exceed the line marked MAX when slow cooking.
2 Follow the steps above to install pressure lid. Turn the pressure release valve to the VENT position.
Press the SLOW COOK button. The default temperature setting will display. Use the up and down TEMP arrows to select either Slow Cook HIGH or LOW.
4 Use the up and down TIME arrows to set the cook time in 15-minute increments up to 12 hours.

Press the START/STOP button to begin cooking.
NOTE: The Slow Cook HI/GI time setting may be adjusted anywhere between 4 and 12 hours; the Slow Cook LOW time setting may be adjusted anywhere between 6 and 12 hours.
6 When cook time is complete, the unit will beep and automatically switch to Keep Warm mode.
Sear/Saute
1 Insert the pot:
Press the STAR/SAUTE button. The default temperature setting will display. Use the up and down TEMP arrows to select one of the setting options (low, medium-low, medium, medium-high, or high).
NOTE: There is no time adjustment available or necessary when using the Sear/Seule function.
3 Press the START/STOP button to begin cooking.
4 To turn off the Sear/Saute function, press the START/STOP button. To switch to a different cooking function, press the corresponding function button.
NOTE: You can use this function with either the crisping lid in the open position or the pressure lid with the pressure release valve in the VENT position.
NOTE: ALWAYS use nonstick utensils in the cooking pot. DO NOT use metal utensils, as they will scratch the nonstick coating on the pot.
CLEANING & MAINTENANCE
Cleaning: Dishwasher & Hand-Washing The unit should be cleaned thoroughly after every use.
1 Unplug the unit from the socket before cleaning.
NEVER out the cooker base in the dishwasher, or immerse it in water or any other liquid.
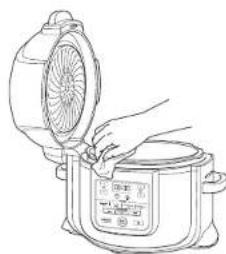
3 To clean the cooker base and the control panel, wipe with a clean damp cloth.
4 The cooking pot, Silicone ring, reversible rack. Cook & Crisp® Basket, and detachable diffuser can be washed in the dishwasher.
5 The pressure lid, including the pressure release valve and anti-clog cap, can be washed with water and dish soap. DO NOT wash the pressure lid or any of its components in the dishwasher, and DO NOT take apart the pressure release valve or red float valve assembly.
To clean the crisping lid, wipe it down with a wet cloth or paper towel after the heat shield cools.
7 If food residue is stuck on the cooking pot, reversible rack or Cook & Crisp Besket, fill the pot with water and allow to soak before cleaning. DO NOT use scouring pads. If scrubbing is necessary, use a non-abrasive cleanser or liquid dish soap with a nylon pad or brush.
8 Air-dry all parts after each use, or use a soft dry towel.
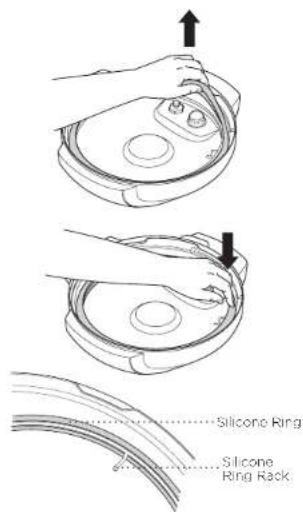
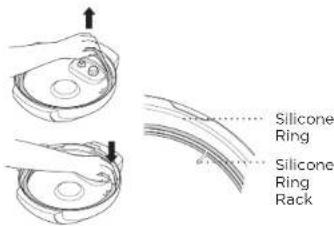
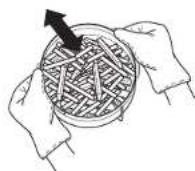
Removing & Reinstalling the Silicone Ring
To remove the Silicone ring, pull it outward, section by section, from the Silicone ring rack. The ring can be installed with either side facing up. To reinstall, press it down into the rack section by section.
After use, remove any food debris from the Silicone ring and anti-clog cao.
Keep the Silicone ring clean to avoid odour. Washing it in warm, soapy water or in the dishwasher can remove odour. However, it is normal for it to absorb the smell of certain acidic foods. It is recommended to have more than one Silicone ring on hand. You can purchase additional Silicone rings on ninjakitchenecu.
NEVER pull out the Silicone ring with excessive force, as that may deform it and the rack and affect the pressure-sealing function. A Silicone ring with cracks, cuts, or other damage should be replaced immediately.
ACCESSIONS FOR PURCHASE
We offer a suite of accessories custom made for your Ninja Food Tendercrisp Pressure Cooker. Visit ninjakitchen to expand your capabilities and take your cooking to the next level.
Multi-Purpose Pan

With this pan, you can create bubbly casseroloes, dils, and sweet and savoury pies, or bake a fluffy, moist cake with a golden top for dessert.
Dimensions: 22cm D x 6cm H
Roasting Rack Insert
Use this rack in the Cook & Crisp Basket to crisp up shells on Taco Tuesday, roast a rack of ribs on BBQ Sunday, or evenly toast garlic bread on pasta night.
Crisper Pan

- Perforated with holes for improved airflow, this pan is great for crisping and rehealing pizzas, quesadillas, and vegetables.
Dimensions: 23cm D x 2cm H
Loaf Pan
Our specially designed can is the perfectly sized baking accessory for bread mixes like banana and zucchini.
Dimensions: 21cm x 11cm x 9cm
Extra Pack of Silicone Rings

2-pack Silicone ring set helps keep flavours separate-use one when cooking savoury foods and the other when cooking sweet foods.
TROUBLESHOOTING GUIDE
Why Is my unit taking so long to come to pressure? How long does it take to come to pressure?
- Cooking limes may vary based on the selected temperature, current temperature of the cooking pot, and temperature or quantity of the ingredients.
- Check to make sure your Silicone ring is fully seated and flush against the lid. If installed correctly, you should be able to tug tightly on the ring to rotate it.
- Check that the pressure lid is fully locked, and the pressure release valve is in the SEAL position when pressure cooking.
Why Is the time counting down so slowly?
- You may have set hours rather than minutes. When setting time, the display will show HH:MM and the time will increase/decrease in minute increments.
How can I tell when the unit is pressurising?
The rotating lights will display on the screen to indicate the unit is building pressure.
Lights are rotating on the display screen when using the Pressure or Steam function.
This indicates the unit is building pressure or preheating when using STEAM or PRESSURE. When the unit has finished building pressure, your set cook time will begin counting down.
There is a lot of steam coming from my unit when using the steam function.
- It's normal for steam to release through the pressure release valve during cooking. Leave the pressure release valve in the VENT position for Steam, Slow Cook, and Soar/Saute
Why can't I take the pressure lid off?
As a safety feature, the pressure lid will not unlock until the unit is completely depressurised. Turn the pressure release valve to the VFNT position to quick release the pressurised steam. A quick burst of steam will spur out of the pressure release valve. When the steam is completely released, the unit will be ready to open. Turn the pressure lid anticlockwise, then lift it up and away from you.
Is the pressure release valve supposed to be loose?
Yes The pressure release valve's loose fit is intentional; it enables a quick and easy transition between SEAL and VENT and helps regulate pressure by releasing small amounts of steam during cooking to ensure great results. Please make sure it is turned as far as possible toward the SEAL position when pressure cooking and as far as possible toward the VENT position when quick releasing.
The unit is hissing and not reaching pressure.
- Make sure the pressure release valve is turned to the SEAL position. If you've done this and still hear a loud hissing noise, it may indicate your Silicone seal is not fully in place. Press START/STOP to stop cooking, VENT as necessary, and remove the pressure lid. Press down on the Silicone ring, ensuring it is fully inserted and lies flat under the ring rack. Once fully installed, you should be able to tug lightly on the ring to rotate it.
The unit is counting up rather than down.
The cooking cycle is complete and the unit is in Keep Warm mode.
How long does the unit take to depressurise?
- Quick release is about 2 minutes or less. Natural release can take up to 20 minutes or more, depending on the type of food and/or the amount of liquid and food in the pol
TROUBLESHOOTING GUIDE
"POT" error message appears on display screen.
Cooking pot is not inside the cooker base. Cooking pot is required for all functions.
"LID" error message appears on display screen and lid icon flashes.
- The incorrect lid is installed for your desired cooking function. Place the pressure lid on the unit if you want to use the Pressure, Slow Cook, Steam, Sear/Saute, or Keep Warm functions and in the close position.
"SHUT" error message appears on display screen.
The crisping lid is open and needs to be closed for the selected function to start.
"VENT" error message appears on display screen.
- When set to Slow Cook or Sear/Saute, and the unit senses pressure building up, this message indicates the pressure release valve is in the SEAL position.
- Turn the pressure release valve to the VENT position and leave it there for the remainder of the cooking function.
If you do not turn the pressure release valve to the VENT position within 5 minutes, the program will cancel and the unit will shut off.
"WATR" error message appears on display screen when using the Steam function.
The water level is too low. Add more water to the unit for the function to continue.
"WATR" error message appears on display screen when using the Pressure function.
- Add more liquid to the cooking pot before restarting the pressure cook cycle.
Make sure the pressure release valve is in the SEAL position.
Make sure the Silicone ring is installed correctly.
"HOT" error message appears on display screen.
This indicates the unit has overheated. Let the unit cool down.
Once unit has cooled down, ensure there is no food caked on the bottom of the pot and there is enough liquid in the pot for the recipe you are preparing.
"ERR" message appears.
The unit is not functioning properly. Please contact Customer Service at 0800 000 9063.
HELPFUL TIPS
1 For consistent browning, make sure ingredients are arranged in an even layer on the bottom of the cooking pot with no overlapping. If ingredients are overlapping, make sure to shake half way through the set cook time.
2 For smaller ingredients that could fall through the reversible rack, we recommend first wrapping them in a parchment paper or foil pouch.
3 When switching from pressure cooking to using the crisping lid it is recommended to empty the pot of any remaining liquid for best crising results.
4 Press and hold down the up or down Time arrows to move faster through Time display.
Use the Keep Warm mode to keep food at a warm, food-safe temperature after cooking. To prevent food from drying out, we recommend keeping the lid closed and using this function just before serving. To reheat food, use the Air Crisping function.
6 To have your unit build pressure quicker, set it to SFAR/SAUTF HIGH. Once ready to pressure cook, press the PRESSURE button and continue as you normally would.
REPLACEMENT PARTS
To order additional parts and accessories, visit ninjakitchen.eu or contact Customer Service at: 0800 000 9063.
PRODUCT REGISTRATION
TWO (2) YEAR LIMITED GUARANTEE
When you buy a product in Germany as a consumer, you get the benefit of legal rights relating to the quality of the product (your "statutory rights"). You can enforce these statutory rights against your retailer. However, at Ninja we are so confident about the quality of our products ("Products") that we give you an additional manufacturer's guarantee of up to two years. This guarantee only applies to the Product if it is bought in new and unused condition. These terms and conditions relate to our guarantees only - your statutory rights as a buyer are unaffected. Please note that the 2 year guarantee is available in all EU countries and in the UK if it stops being an EU country during the guarantee term.
The conditions below describe the prerequisites and scope of our guarantees which are issued by SharkNinja Germany GmbH, Kurt Blaum-Platz 8, 63450 Hanau (Germany) ("us", "our" or "we"). They do not affect your statutory rights or the obligations of your retailer and your contract with them. The same applies if you have purchased the product directly from Ninja.
Ninja Guarantees
A household kitchen appliance constitutes a sizeable investment. Your new machine needs to work properly for as long as possible. The guarantee it comes with is an important consideration - and reflects how much confidence the manufacturer has in its product and manufacturing quality.
Our customer service helpline (0800 000 9063) is open from 9.00am to 6.00pm Monday - Friday. It's free to call, and you'll be put straight through to a Ninja representative. You'll also find online support at www.ninjakitchen.eu.
How do I register my guarantee?
You can register your guarantee online within 28 days of purchase. To save time, you'll need the following information about your machine:
Model no.
Serial Number (only if available)
- Date of purchase of the Product (receipt or delivery note)
To register online, please visit www.ninjakitchen.eu
IMPORTANT
The guarantee covers your Product for 2 years starting on the date of purchase.
- Please keep the receipt at all times. Should you need to use your guarantee we will need the receipt to verify the information supplied to us is correct. The inability to produce a valid receipt will invalidate your guarantee.
What are the benefits of registering my guarantee?
When you register your guarantee, you can choose to receive our newsletter containing tips, advice and competitions. Hear the latest news about new Ninja Technology and launches. If you register your guarantee online, you'll get instant confirmation that we've received your details.
For details of our privacy policy please visit www.ninjakitchen.eu
How long are our Products guaranteed for?
Our confidence in our design and quality control means that your Product is guaranteed for a total of two years.
What is covered by the guarantee?
Repair or replacement (at Njra's discretion) of your Product, including all parts and labour in case of any defect in design, materials and workmanship (including transport and shipping costs). Our guarantee is in addition to your legal rights as a consumer.
What is not covered by the guarantee?
Normal wear and tear.
- Accidental damage, faults caused by negligent use or care, misuse, neglect, careless operation or handling of the kitchen appliance which is not in accordance with the Ninja Instruction Manual supplied with your machine.
- Use of the kitchen appliance for anything other than normal domestic household purposes.
- Use of parts not assembled or installed in accordance with the operating instructions.
Use of parts and accessories which are not Ninja® Genuine Components. - Faulty installation (except where installed by Ninja 3).
- Repairs or alterations carried out by parties other than Ninja or its agents, Repairs or alterations carried out by parties other than Ninja or its agents, unless you can show that the repairs or alterations carried out by others are not related to the defect for which you exercise the guarantee.
What happens when my guarantee runs out?
Ninja does not design products to last for a limited time. We do appreciate that there may be a desire for our customers to want to repair their kitchen appliance after the guarantee has clapsed. In this case please contact our free phone customer service help line and ask about our guarantee program, on 0800 000 9063.
Where can I buy genuine Ninja spares and accessories?
Ninja spares and accessories are developed by the same engineers who developed your Ninja kitchen appliance. You'll find a full range of Ninja spere, replacement parts and accessories for all Ninja machines at www.ninakitchen.eu
Please remember that using non-Ninja spares may invalidate your manufacturer's guarantee. However, your statutory rights are unaffected.
Bake/Roast (Guisar/Asar)
Sear/Saute (Sofreir/Saltear)
Tension: 230 V-50 Hz
Potenza: 1460 Watt
Volume: 6L
ACCESSIONS (APART VERKOCHT)
Cook & Criso™ Gelaagd Inzetstuk
Multi-Purpose Pan
Roosterreinzetstuk
S Dehydratierek
T Bakblik
U Crisper Pan


HET BESTURINGSPANEEL GEBRUIKEN VOOR HET EERSTE GEBRUIK
OPMERKING: Besturingspaneel kan per mode, verschillen.
FUNCTIEKNOPPEN
DRUK: Kan gekrutt den om voedse能力和there bereidert verwjit het sapog blift.
6 De one haid gaet piecen as hot koken klaer is.
Bakken/Braden
1 Druke GRIL-knop in.
TILBEHØR (SELGES SEPARAT)
Cook & CrispTM-innsats lag
Fierbruksform
R Innsats for grillist
S Dehydreringsrist
T Bradform
U Crisper-form


BRUK AV BETJENINGSPANELET FØR DU BRUKER DEN FØRSTE GANG
RENGJØRING OG VEDLIKEHOLD
Langsom tilberedning
1 Legg ingrediensene i gryten. IKKE ga over linen merket med PRESSURE MAX ved langsom uberceding.
Folg trinnene ovenfor for montere Lyckklokev. Vri trykkbogrennsingsventlen tll VENT-posisjon.
Steke/sautere
1 Sett inn gryten.
3 Trykkp sa SLOW COOK-kneppen. Standardtemperature vises pa displayat Brux opg od TEMP-pilene tila velge enten Slow Cook HIGH ell LOW.
2 Trykk pA SEAR/SAUTENkappen. Standardtemperatureen vises pa displayet, Bruk opg oed TEMP-pilene for a velge en av instillingsvalgene (low, medium-low, medium, medium-high ellnigh).

Innsats for grillist
Buk denne risi tien I Cook & CrispTM kurvon til aige tacoskellepn serra grille sparrero en sandag etrer niste ivhiltsbrod til paasten din.
Crisper-form

Denne formen har hull fororeader luftstram, og er perfekt til varme opp pizza, quesadilla og grønnsaker og gjare dem sprz.
Dimensjoner:23cmDx2cmH
Brodform
Vär speljaldesigne former et perfekt. bakelbehör for brodmikser som banen og sauush
Dimensjoner:21cmx11cmx9cm
KONDENSIVEN KERAAJAN KINNITÄMINKEN
Klinnita koncessivende koraiä liu'ttamala se keittem alustasse clevaan hahoon. Lirua se uicos je pesc kaskin joxaden kayton jalken.
TUKKEUTUMISSUOJAN IRROTUS JA TAKAISUINKINITYS
TILLBEHOR (SALJS SEPARAT)
Cook & Crisp™-insats
Panna for oika bruk
R Stek-insats
Torkningsstall
T Brodform
U Krispingspanna


ANVÄNDNING AV KONTROLLPANELEN FÖRE FÜRSTA ANVÄNDNING

OBS: Kontrollpaneler kan variera berpence pa modell
FUNKTIONSKNAPPAR
Enheten sika rengoras nogrant after varie ananding.
Illustrations may differ from actual product. We are constantly striving to improve our products; therefore the specifications contained herein are subject to change without notice.
NINJA is a registered trademark of SharkNinja Operating LLC. TENDERCRISP and COOK & CRISP are trademarks of SharkNinja Operating LLC.
PRINTED IN CHINA