
KA 201 CB - Coffee machine BOMANN - Free user manual and instructions
Find the device manual for free KA 201 CB BOMANN in PDF.
| Product type | Coffee machine (automatic coffee maker) |
| Brand | Bomann |
| Model | KA 201 CB |
| Power supply | 220-240 V ~, 50 Hz, 270-330 W |
| Protection class | I (grounded plug) |
| Net weight | 0.61 kg |
| Water tank capacity | 140 ml (max) |
| Ground coffee capacity | 4 g (max) |
| Number of cups per cycle | 1 cup |
| Filter type | Permanent filter (reusable) |
| Filter holder | Yes, removable |
| Automatic shut-off | Yes, approx. 15 seconds after brewing ends |
| Operation indicator | Light indicator |
| On/off switch | Yes, rocker switch (I/O) |
| Start button | Yes (to restart after cooling) |
| Drip-stop system | Yes (adjustable water outlet) |
| Cup holder | Yes, removable |
| Recommended descaling | With citric acid |
| Cleaning | Wipe exterior with damp cloth; do not immerse |
| Included parts | Coffee maker, filter holder, permanent filter, cup |
| Repairability | By a qualified technician, use original parts |
| Intended use | Household use only |
Frequently Asked Questions - KA 201 CB BOMANN
User questions about KA 201 CB BOMANN
0 question about this device. Answer the ones you know or ask your own.
Ask a new question about this device
Download the instructions for your Coffee machine in PDF format for free! Find your manual KA 201 CB - BOMANN and take your electronic device back in hand. On this page are published all the documents necessary for the use of your device. KA 201 CB by BOMANN.
USER MANUAL KA 201 CB BOMANN
Elimination. Page 16
ESPANOL
#
Overview of the Components.. Page 3
Instruction Manual.. 29
Technical Data.. Page 32
Disposal.. 32
JEZYK POLSKI
Spis tresci
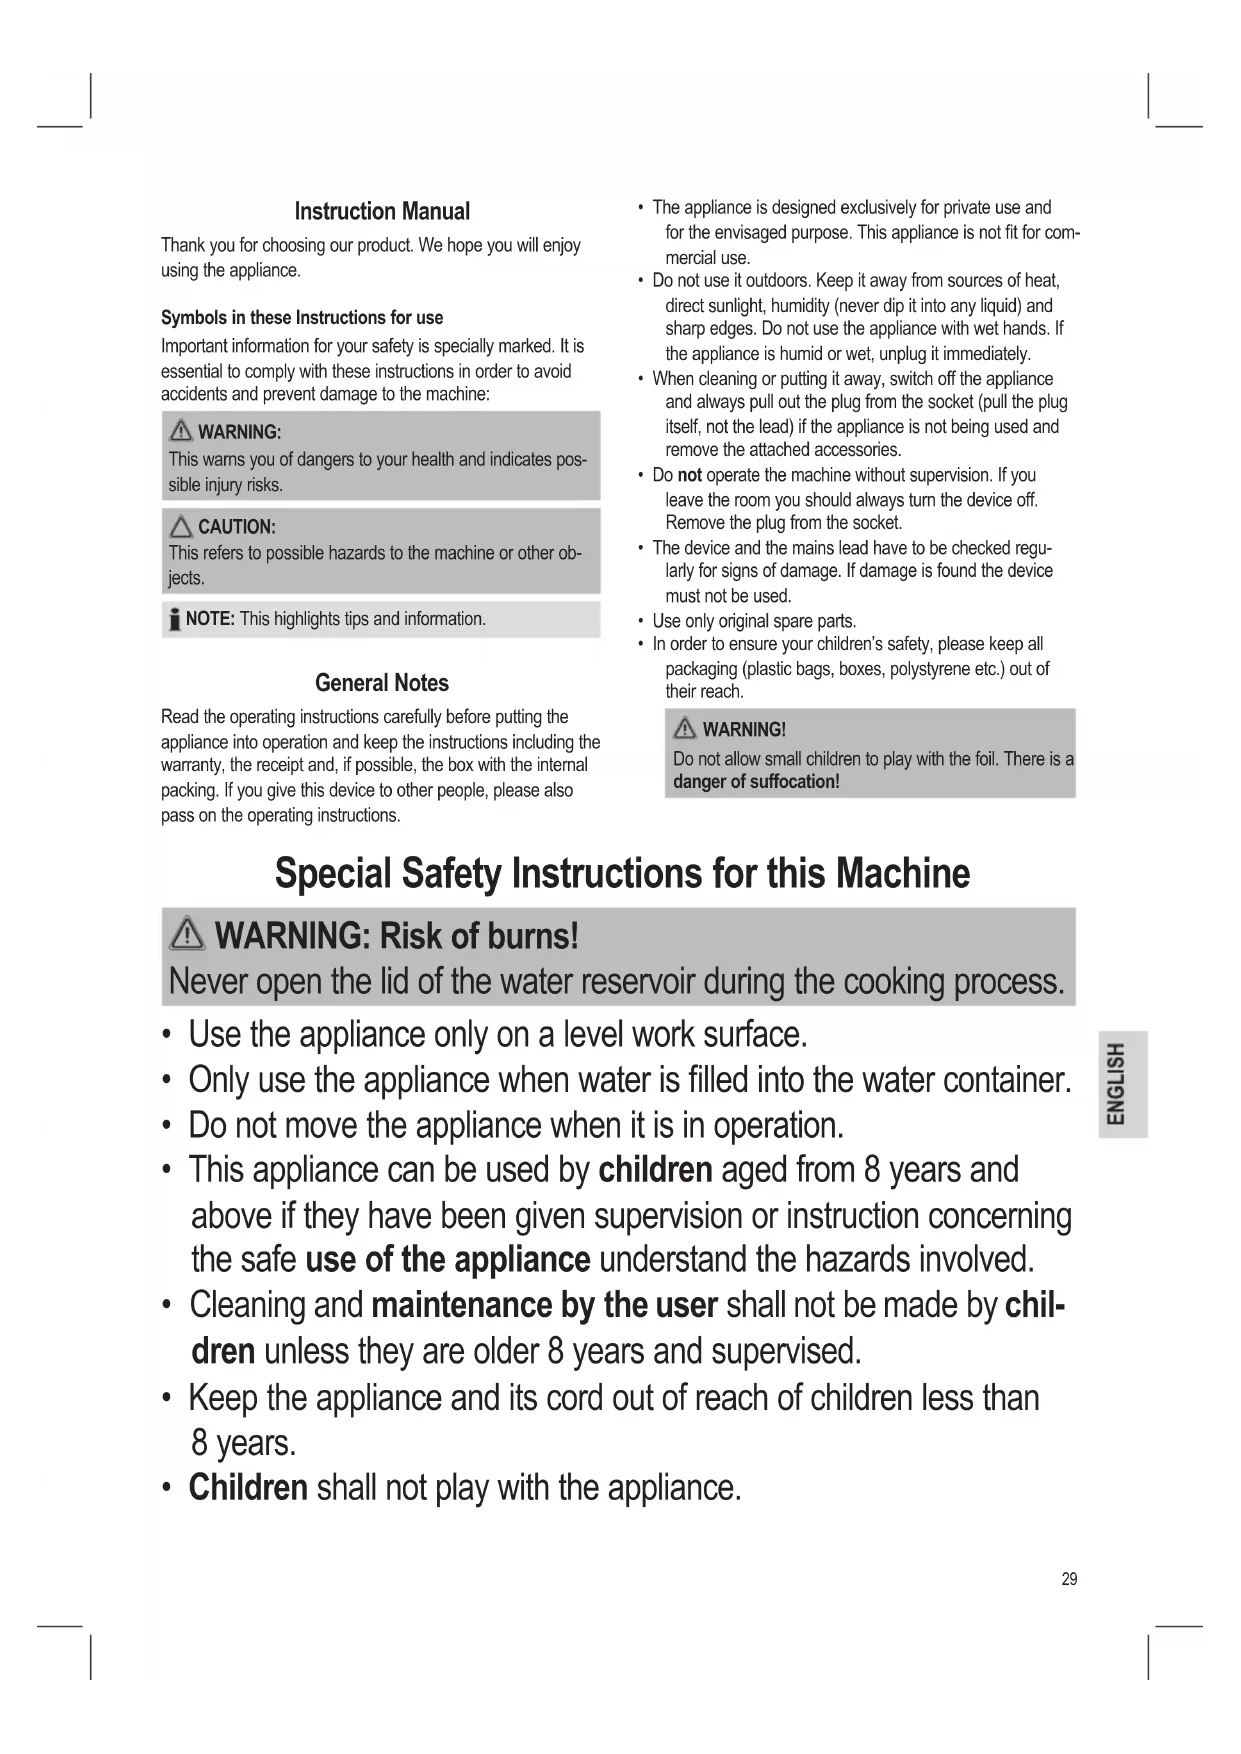
Thank you for choosing our product. We hope you will enjoy using the appliance.
Symbols in these Instructions for use
Important information for your safety is specially marked. It is essential to comply with these instructions in order to avoid accidents and prevent damage to the machine:
WARNING:
This warns you of dangers to your health and indicates possible injury risks.
CAUTION:
This refers to possible hazards to the machine or other objects.
NOTE: This highlights tips and information.
General Notes
Read the operating instructions carefully before putting the appliance into operation and keep the instructions including the warranty, the receipt and, if possible, the box with the internal packing. If you give this device to other people, please also pass on the operating instructions.
- The appliance is designed exclusively for private use and for the envisaged purpose. This appliance is not fit for commercial use.
- Do not use it outdoors. Keep it away from sources of heat, direct sunlight, humidity (never dip it into any liquid) and sharp edges. Do not use the appliance with wet hands. If the appliance is humid or wet, unplug it immediately.
- When cleaning or putting it away, switch off the appliance and always pull out the plug from the socket (pull the plug itself, not the lead) if the appliance is not being used and remove the attached accessories.
- Do not operate the machine without supervision. If you leave the room you should always turn the device off. Remove the plug from the socket.
- The device and the mains lead have to be checked regularly for signs of damage. If damage is found the device must not be used.
- Use only original spare parts.
- In order to ensure your children's safety, please keep all packaging (plastic bags, boxes, polystyrene etc.) out of their reach.
WARNING!
Do not allow small children to play with the foil. There is a danger of suffocation!
Special Safety Instructions for this Machine
WARNING: Risk of burns!
Never open the lid of the water reservoir during the cooking process.
- Use the appliance only on a level work surface.
- Only use the appliance when water is filled into the water container.
- Do not move the appliance when it is in operation.
- This appliance can be used by children aged from 8 years and above if they have been given supervision or instruction concerning the safe use of the appliance understand the hazards involved.
- Cleaning and maintenance by the user shall not be made by children unless they are older 8 years and supervised.
-
Keep the appliance and its cord out of reach of children less than 8 years.
Children shall not play with the appliance. -
Appliances can be used by persons with reduced physical, sensory or mental capabilities or lack of experience and knowledge if they have been given supervision or instruction concerning use of the appliance in a safe way and if they understand the hazards involved.
- Do not try to repair the appliance on your own. Always contact an authorized technician. To avoid the exposure to danger, always have a faulty cable be replaced only by the manufacturer, by our customer service or by a qualified person and with a cable of the same type.
- This appliance serves for brewing of ground coffee.
-
Only use the appliance in a dry, indoor area. It is intended for domestic use and similar areas of use such as e.g.
-
In staff kitchens in shops, offices and other commercial areas;
- By guests in hotels, motels and other accommodation facilities.
It is not intended for use in farm accommodation or Bed & Breakfast establishments.

CAUTION:
The appliance must not be immersed in water for cleaning. Refer to the instructions provided in the chapter "Cleaning".
Supplied parts
1 x Automatic coffee maker
1 x Filter holder
1 x Permanent filter
1 x Cup
Unpacking the appliance
- Remove the appliance from its packaging.
- Remove all packaging materials such as films, filler material, cable clips and carton.
- Check the contents for completeness.
- In the event that the packaging content should be incomplete or if damages are noticeable, do not operate the appliance. Return it to the dealer immediately.
NOTE:
Production residue or dust may have collected on the appliance. We recommend cleaning the appliance according to chapter "Cleaning".
Overview of the Components
1 Permanent filter
2 Water outlet (SCHLIESSEN)
3 MAX mark
4 Water tank lid
5 Water tank
6 Filter holder
7 Power switch I/O
8 Start button
9 Power indicator lamp
10 Mains plug
11 Cup shelf (removable)
12 Cup
Instructions
Placement
- Place the automatic coffee maker on a stable and level surface. Place the appliance in such way that it cannot tip over.
- Do not place the appliance in close proximity to a gas or electric stove or any other heat source.
Electric Connection
- Set the power switch (7) to "O", otherwise the appliance may accidentally switch on.
- Ensure that your mains power corresponds with the specifications of the appliance. The specifications are printed on the type label.
- Connect the mains cable to a properly installed and earthed wall outlet.
Operation
Before brewing coffee for the first time, operate the appliance twice with clean water only and without coffee powder. This removes dust, which may have collected during transport. Proceed as described under "Operation".
Operation
- Ensure that the power switch (7) is set to "O".
- Fold open the water tank lid.
- Fill the water tank with cold water.
CAUTION:
Do not overfill the tank! Do not fill it above the MAX mark.
-
Push the water outlet to the side so that you can take out the filter. Then pull the permanent filter out. Fill not more than 4g of coffee powder into the permanent filter, otherwise there is a danger that it will overflow. Reinsert the permanent filter. Push the spout back over the filter.
-
Place the cup on the tray and close the lid of the water tank.
- Plug the mains plug into a tested plug socket.
- Position the switch in position "l". If the power indicator lamp does not light up, press the start button. The brewing is started.

NOTE:
- The power indicator lamp lights up.
- The brewing process lasts approximately 3-4 minutes.
- Approx. 15 seconds after the end of the brewing process, the appliance automatically switches off. The power indicator lamp goes out.
-
You can interrupt the brewing process at any time by setting the power switch (7) to "0".
-
Always set the power switch to "O" to turn the appliance off.

WARNING:
If you would like to make another cup of coffee immediately, switch the device off. Allow it to cool down with the water tank open in order to prevent hot water splashing out when the machine is refilled.

NOTE:
The appliance can only be switched on again with the start button after a cool-down phase of approx. 1 minute.
De-scaling
De-scaling is necessary when the brewing time increases substantially.
- Use only commercially available citrus acidbased de-scaler.
- Follow the recommended instructions for use.
- Place the cup or other suitable vessel onto the cup shelf.

WARNING:
- Afterwards you should boil fresh water in the pot three or four times in order to rinse out residues of the descaling agent.
- Do not use any coffee powder!
- Do not use this water for consumption.
Cleaning

WARNING:
- Before cleaning, always remove the mains plug and wait until the device has cooled down.
- Do not immerse the device in water. Otherwise this might result in an electric shock or fire.

CAUTION:
- Do not use a wire brush or any abrasive items.
-
Do not use any acidic or abrasive detergents.
-
The exterior of the device should be cleaned as necessary with a slightly damp cloth - without any additives.
- Remove spilled coffee grounds with a paper towel from the inner casing. Afterwards wipe with a damp cloth.
- The cup, cup tray and permanent filter can be cleaned as normal in soapy water. Please reinsert the cup shelf correctly after cleaning. Be careful when handling the cup shelf.
Storage
- Clean the appliance as described and let it dry completely.
- For longer periods of non-use we recommend storing the appliance in its original packaging.
- Always store the appliance in a well-ventilated and dry place out of reach of children.
Technical Data
Model: .KA 201 CB
Power supply: 220-240 V~, 50 Hz
Power consumption: 270-330 W
Filling quantity: max. 140 ml
Protection class:
Net weight: approx. 0.61 kg
The right to make technical and design modifications in the course of continuous product development remains reserved.
This device has been tested according to all relevant current CE guidelines, such as electromagnetic compatibility and low voltage directives, and has been constructed in accordance with the latest safety regulations.
Disposal
Meaning of the "Dustbin" Symbol
Protect our environment: do not dispose of electrical equipment in the domestic waste.
Please return any electrical equipment that you will no longer use to the collection points provided for their disposal.
This helps avoid the potential effects of incorrect disposal on the environment and human health.
This will contribute to the recycling and other forms of reutilisation of electrical and electronic equipment.
Information concerning where the equipment can be disposed of can be obtained from your local authority.
Instrukcja obstugi
He cnid nepenOBHOBaTn EMHicTb! PibeHb BODn He Mae nepebuCyBaTn No3HaKy MAX.
4.ПepecyhTe OTbIP DnA BnTOkY BoDn y CTOpOHy,Uo6 BnHrTn fInbTp i3 npnaLy.BmIMtB noctiHn foInbTp i3 npnaLy.3aOBHIOte MAKcImaJIbHO 4r nopOlyKy KaBn B fInbTp,iHaKJSe rOToBA KABA MoKe IepenOBHTn EMHCTb I BnTEKn. IocTaBe fInbTp Ha NOrO MicJe B npnaI. PepeCyhTe OTbIP DnA BnTOkY BoDn 3HOB Ha NOrO MicJe HAd fInbTpom.
5. NocTaBte yauKy Ha niCtBaKy i 3akPnTe KpuKy eMHocTi Dnra BODn.
6. BctaTe Ka6eBj KInBJeHHA B IpeBepHpy po3ETy.
7. IpebeBedIb nepemkaueB no3nio "I. RaKIO iHdkatop XINBHeHH He 3acBITbCra, HATNCHTb KONkY "Nyck"O KabOBapka nOHe onepaio npiroTsyBaHH KaBn.
ITPUMITKA.
-ламнода КОНТРОЛЮ рекиму роботи CBITINьс.
- Onpaia npirotoyBaHHKaBn npoobxycbC npi6n3HO 3-4 XBNIH.
-Приблзно чес 15 секунд псия зakihунь варкп рплад abTomatMuHOBUMKAcTbC.ИнdkaTopЖИВЛEHN BUMNKAcTbC.
Bapky MoXHa npnHHInB 6yDb-My MmOeHT, nepeBIBuBIMKaHJxMBHeHHa (7) y noNoKeHHa "O".
8.ДЯВIMKHeHnI npInaIy o6OB'3KOBO cIiD nepeBoDTN BIMNKaY KINBHeHnB NIOJKeHHa "O".
TIOIEPEDKEEHNA.
Ku Bo xoyote Opa3y J npiroTyBaTn 0e Ondy uAkiKy KABN, BmKHiB KabOBapKy. BiKpnTe KpUkKy EMHocTi Ira Bodi i daIte KaOBapU cxOIOHyTN, 06b YHKnHyTn rapaNX bpi3OK pni HAnBaHHoBn BmEhictb.
I PUMITKAK.
IOBTOPO BBIMKHyTN npNJiaD MOXHa TINbKN KHOIOHO 1 nicra oxonodkeHH npnaNy npotrrom npn6n3HO 1 XBNIHN.
BndaJIeHHBaNNHHOHaIbOTo
EMHOCTI KABOBAPK CNID OUYBATN BID BAHNHO HANBO TY, AAKUO YAC NPIROTOYBAHH KAIB 3NaHNO 36iNbWBCR.
-
PpocMo Bac 3actocobByaTn DnA BndaJIeHnBaIHHaHO HbOTo TIIbKn pIn3HaYeHi nIraBo 3aco6n Ha niCTabi JIMMOHHO KICLOTn, kki npOaHObCBA MRa3IHax.
BmMOKeTe Do3yBaTn nponopci KaBn i BOni 3aJeKHO BiD IHCTpykui Ha yynakobci afo hOpmauiHomy apkyu. -
NocTaBTe ropHrTko Hn iHny nocyDnHy Ha nDctabky dna roPHTka.
IIOPEDEKEXHHA.
-Писяцябуто пidогрипгte 3-4 рази чьту Body,цоб вдалити задшким засову npotn Bavha.
- He BnKOpNCTaTe NopOuK KaBn!
LByoDa He npin3HaueHa DnI nTTT.
UH
!NONEPEIXEHHY.
- Перацьпглд риладу сд овязкobo витггь Вику i3 po3etkn i datn kaBOBapci OCTNRHyTN.
3a6bopohjEtbc8 onyckatn npinapB B Ody. Lc MoKe npn3BeCTN do eIektpnHoro ydapy a6o noxexi.
YBATA.
3a6opohraetcbnBkOpncTahHnIpyOuHHeHH npToHHX uitok a0iHux abpa3nbHnx MaTepianib.
3a60pOHaTbCBAKOpNCtAHHiaKnx a6o abpa3nBnX MNIOuNX 3ac06IB.
30BHIuHIO CTOpOHy npuaNy cnd OunuATn 3a nOTpe6oBOIoroHO TKAHHN -6e3 DoaTkoBHX 3ac06IB.
- Ycyhhe npolny Kaby i3 BHytpiHix DeTanee 3a donomoro nanepoboro pyuHnka. Todi npotpiB BOJoroo raHijpkOIO.
OuIyTe aIky, nCTabKn dIy aIkwT Ta noCTiHn IpbTp 3BnuAynn 3acobom y BODj 3doabneHHm NocyDOMNHNX 3acob. Picn OunseHn CnID npaBnHo nDiBi-lyBaTN nCTabKy dIy aIkwHa II MiCe. BybTe oBepekHi npn nobOkeHHi 3 ndTabKOIO nn YAkwN.
36epirahn
-Почсьтpe пиад BiДпОВИн Ho ДО onИcaHOro i daiTe IOMy NOBHICTU BINOxHyTN.
KIO npnIaH He BIKOPNCTOBvBaTmETbC npOTAROM TpBaIoro TepMiHy, Mn peKOMeHdyE mo 36epiratN Ioro B opriHaJIbHOMy ynaKyBaHHi.
3abxnd 36epiraTe npuiaD no3a 30HO IOcKHOCTI dTe B cyXOMy,do6pe npoBtPBOHaHOMy Micji.
TexhiHni napametpn
Modenb: KA 201 CB
IopdHJXMBHeHH: 220-240 B\~,50
CnoxnbHnnotyKHOCTi: 270-330BT
EMHichi dani: .MAKC.140 mN
Tpyna enektpo6e3neuhocti:
Bara HeTTo: np65n. 0,61 Kr
IpaBOHaTexHHi3MiHN Ta 3MiHN y dN3aHi 36epiraetbcra npoDobK npouecy po3po6kn npodky.
Ley npnilad 6byo nepebipeho 3ndno BCix BiNobiHnx, akTyalbHnX dIpeKTHB CE, HapnKnaJd 0do eNeKtpomarHHTHOcymIOCTa Hn3bKOBoTbHOI dIpeKTHBn, Ta 36yDObaHO 3 a HOBITIMI NIOJOXeHHMaN TeXHk 6e3neKn.
GARANTIEKARTE
warranty card · garantiekaart · carte de garantie · schedadi garanzia · tarjeta de garantia · cartao de garantia · garantiokort karta gwarancyjna · zarucni list · karta jamstva · carte de garantei · fapaunnoHa Kapta · zaruyn list · garancijski list · garanciajegy · rapaHTHnHOpMynp · fapaHTnHbIraon
KA 201 CB
24 Monate Garantie gemäß Garantieerklarung 24 months warranty according to warranty declaration 24manden garantie volgens garantieverklaring 24 mois de garantie selon la déclaration de garantie 24mesi di garanzia secondo la dichiarazione di garanzia 24meses de garantie a accordo con la déclaration de garantia 24manedors garanti i henhold til garantibetingelense 24miesiacgwarancj na podstawie odwiadzcnia gwarancyjngo zarauka 24mescu podle prohlaseo zarauke 24mjeseco jamstvo u skladu s jamstvenom declaracionj 24luni garantie conform declaraties de garantie 24meeca rapanua b cboTBeTcne c rapaunHnHata deknapaua 24mesa nza zarauka podlaVyhlasena o zarauke 24-meseca gnarcjna, skladno z garancjsko (jazo 24 honaparagacia a garanciafeletetekeben leirtak szerint - rapaHTnHa 24 mnciB ilnoiHO npo rapaHTIO - rapaHTN2 24 meca cornacho zanaeneHHbIM RAPAYNTNHIN RPABNAM - Jnai SdIyIq 24SdI
Kaufdatum, Handlstermeltemp, Unterschiedt - date of purchase, dealer stamp, signature - aankoopdatum, dealstermelt, handledienkung - date d'achat, tampon du concessionaire, signature - data du acquito, timbre del revinditori, firma - fecha de compra, sello del distribuidor,irma - data de compra, carimbe do distribuidor, assinatura - kjpsdato, forhandistermelt, signature - data zakupu, pieczié spredawy, podpis - datum zakupensil, razzitka prodejece, podpis - datum kapuvine, zig trgovce, podpis - data de achirjne, stampia fumizonutii, semnktiva -data na noxynsara, Teviar na Tpogasana, Tpogac - datum nikuspu, peCatka obchodnika/pedaguci, podpis - datum nakupu, zig trgovce, podpis - vasaris datumta, karestedö belyegejro, akiras - data npwbaanen, nekatna npogarul, nipvat - Data npogepenrtn. lIAMT npogdaru, npogncs - 2019/2020/2021/2022/2023/2024/2025/2026
BOMANN® www.bomann.de
BOMANN®
C. Bomann GmbH
Internet: www.bomann.de


- ESPANOL
- #
- JEZYK POLSKI
- Spis tresci
- Symbols in these Instructions for use
- WARNING:
- CAUTION:
- General Notes
- WARNING!
- Special Safety Instructions for this Machine
- WARNING: Risk of burns!
- Supplied parts
- Unpacking the appliance
- NOTE:
- Overview of the Components
- Instructions
- Placement
- Electric Connection
- Operation
- De-scaling
- Cleaning
- Storage
- Technical Data
- Disposal
- Meaning of the "Dustbin" Symbol
- Instrukcja obstugi
- ITPUMITKA.
- TIOIEPEDKEEHNA.
- I PUMITKAK.
- BndaJIeHHBaNNHHOHaIbOTo
- IIOPEDEKEXHHA.
- UH
- !NONEPEIXEHHY.
- YBATA.
- 36epirahn
- TexhiHni napametpn
- GARANTIEKARTE
- KA 201 CB
- BOMANN® www.bomann.de
Brand : BOMANN
Model : KA 201 CB
Category : Coffee machine