W1355A - Air purifier BONECO - Free user manual and instructions
Find the device manual for free W1355A BONECO in PDF.
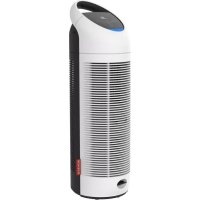
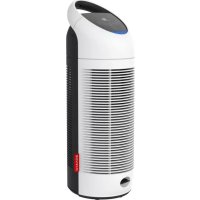
| Product Type | Air purifier and evaporative humidifier (Air Washer) |
| Brand | Boneco |
| Model | W1355A |
| Dimensions (mm) | 380 x 320 x 425 |
| Empty weight (kg) | 6.0 |
| Power supply | 230 V ~ 50 Hz |
| Power consumption | 9 W (standby) / 15 W (normal operation) |
| Water tank capacity | 7 liters |
| Maximum humidification output | 300 g/h |
| Recommended area | Up to 50 m² (125 m³) |
| Noise level | < 25 dB(A) (night mode) |
| Operating modes | Night mode (silent) and normal mode |
| Special features | Automatic shut-off when tank empty; LED water level indicator; Ionic Silver Stick (ISS) for water preservation |
| Included accessories | Ionic Silver Stick (ISS) A7017 |
| Maintenance and cleaning | Clean tank and basin every 2 weeks; humidification discs every 4 weeks; top unit 1 to 2 times per year; descale with CalcOff A7417 |
| Safety | Automatic shut-off if basin empty; do not use with damaged cable; do not add essential oils; supervision of children required |
| Spare parts and repairability | Spare parts available (Ionic Silver Stick, CalcOff); repairs by specialists or customer service |
| Warranty | Subject to national representative conditions; invoice required |
| General information | Operates without filter mat; cold evaporation principle; self-regulating humidification |
Frequently Asked Questions - W1355A BONECO
User questions about W1355A BONECO
0 question about this device. Answer the ones you know or ask your own.
Ask a new question about this device
Download the instructions for your Air purifier in PDF format for free! Find your manual W1355A - BONECO and take your electronic device back in hand. On this page are published all the documents necessary for the use of your device. W1355A by BONECO.
USER MANUAL W1355A BONECO
Instructions for use
Foreword
Congratulations on purchasing the W1355A Air Washer!
Proper use:
The appliance must only be used for humidification and cleaning of the air indoors.
Did you know that excessively dry indoor air
- dries out mucous membranes and causes chapped lips and stinging eyes?
promotes infections and diseases of the respiratory tract? - leads to weariness, tiredness and poor concentration?
- is a burden on pets and houseplants?
promotes the formation of dust and increases the electrostatic charge of textiles made from synthetic fibers, carpets and synthetic floors? - damages furnishings made from wood, especially parquet floors?
- makes musical instruments go out of tune?
General
The indoor climate is generally pleasant when the relative humidity is between 40 and 60% .
Air humidification is especially sensible in winter, but does not replace the regular airing of living spaces.
Safety instructions
- Read the instructions for use carefully before putting the appliance into operation, and keep in a safe place for later reference.
Only use the air humidifier in living spaces and within the specified technical data. Incorrect use may be dangerous to health and life.
Children cannot recognize the dangers associated with the use of electrical devices. For this reason, always supervise children when they are in the vicinity of the air humidifier (Fig. 8). - Persons who have not familiarized themselves with the instructions for use, as well as children and persons under the influence of medicines, alcohol or drugs, must not operate the unit, or do so only under supervision.
- Never use the appliance if a cable or plug is damaged (41), after the appliance malfunctions or if it has fallen to the floor (42), or has been damaged in any other way.
- Do not add any additives such as essential oils directly into the water tank or the water base. These additives will damage your appliance! Appliances that are damaged by additives are excluded from the warranty.
- Only use CalcOff for decalcification and cleaning of the product. Damage that is caused by the use of other cleaning agents is not covered by the warranty.
How it works
Your appliance
- washes and humidifies the air without using filter mats
- works quietly in two operation modes
- is manufactured from high-quality, long-lasting components
Special humidifier discs rotate in a water bath inside the appliance, cleaning the air passing over them of impurities in a natural way - the same way that air is washed by the rain in nature.
The air humidification takes place according to the self-regulating principle of cold evaporation. The appliance therefore generates ideal air humidity, without the need for additional control units.
Unpacking
- Remove the appliance carefully from the packaging.
- Warning: The upper part is only placed loosely on the base (1 - 2).
- Remove the plastic bag from the unit (3).
- Remove all strips of cardboard from the disc assembly (5).
- Check the details of the power supply on the rating plate (7).
- Use the original packaging to store the appliance if you do not use it throughout the year.
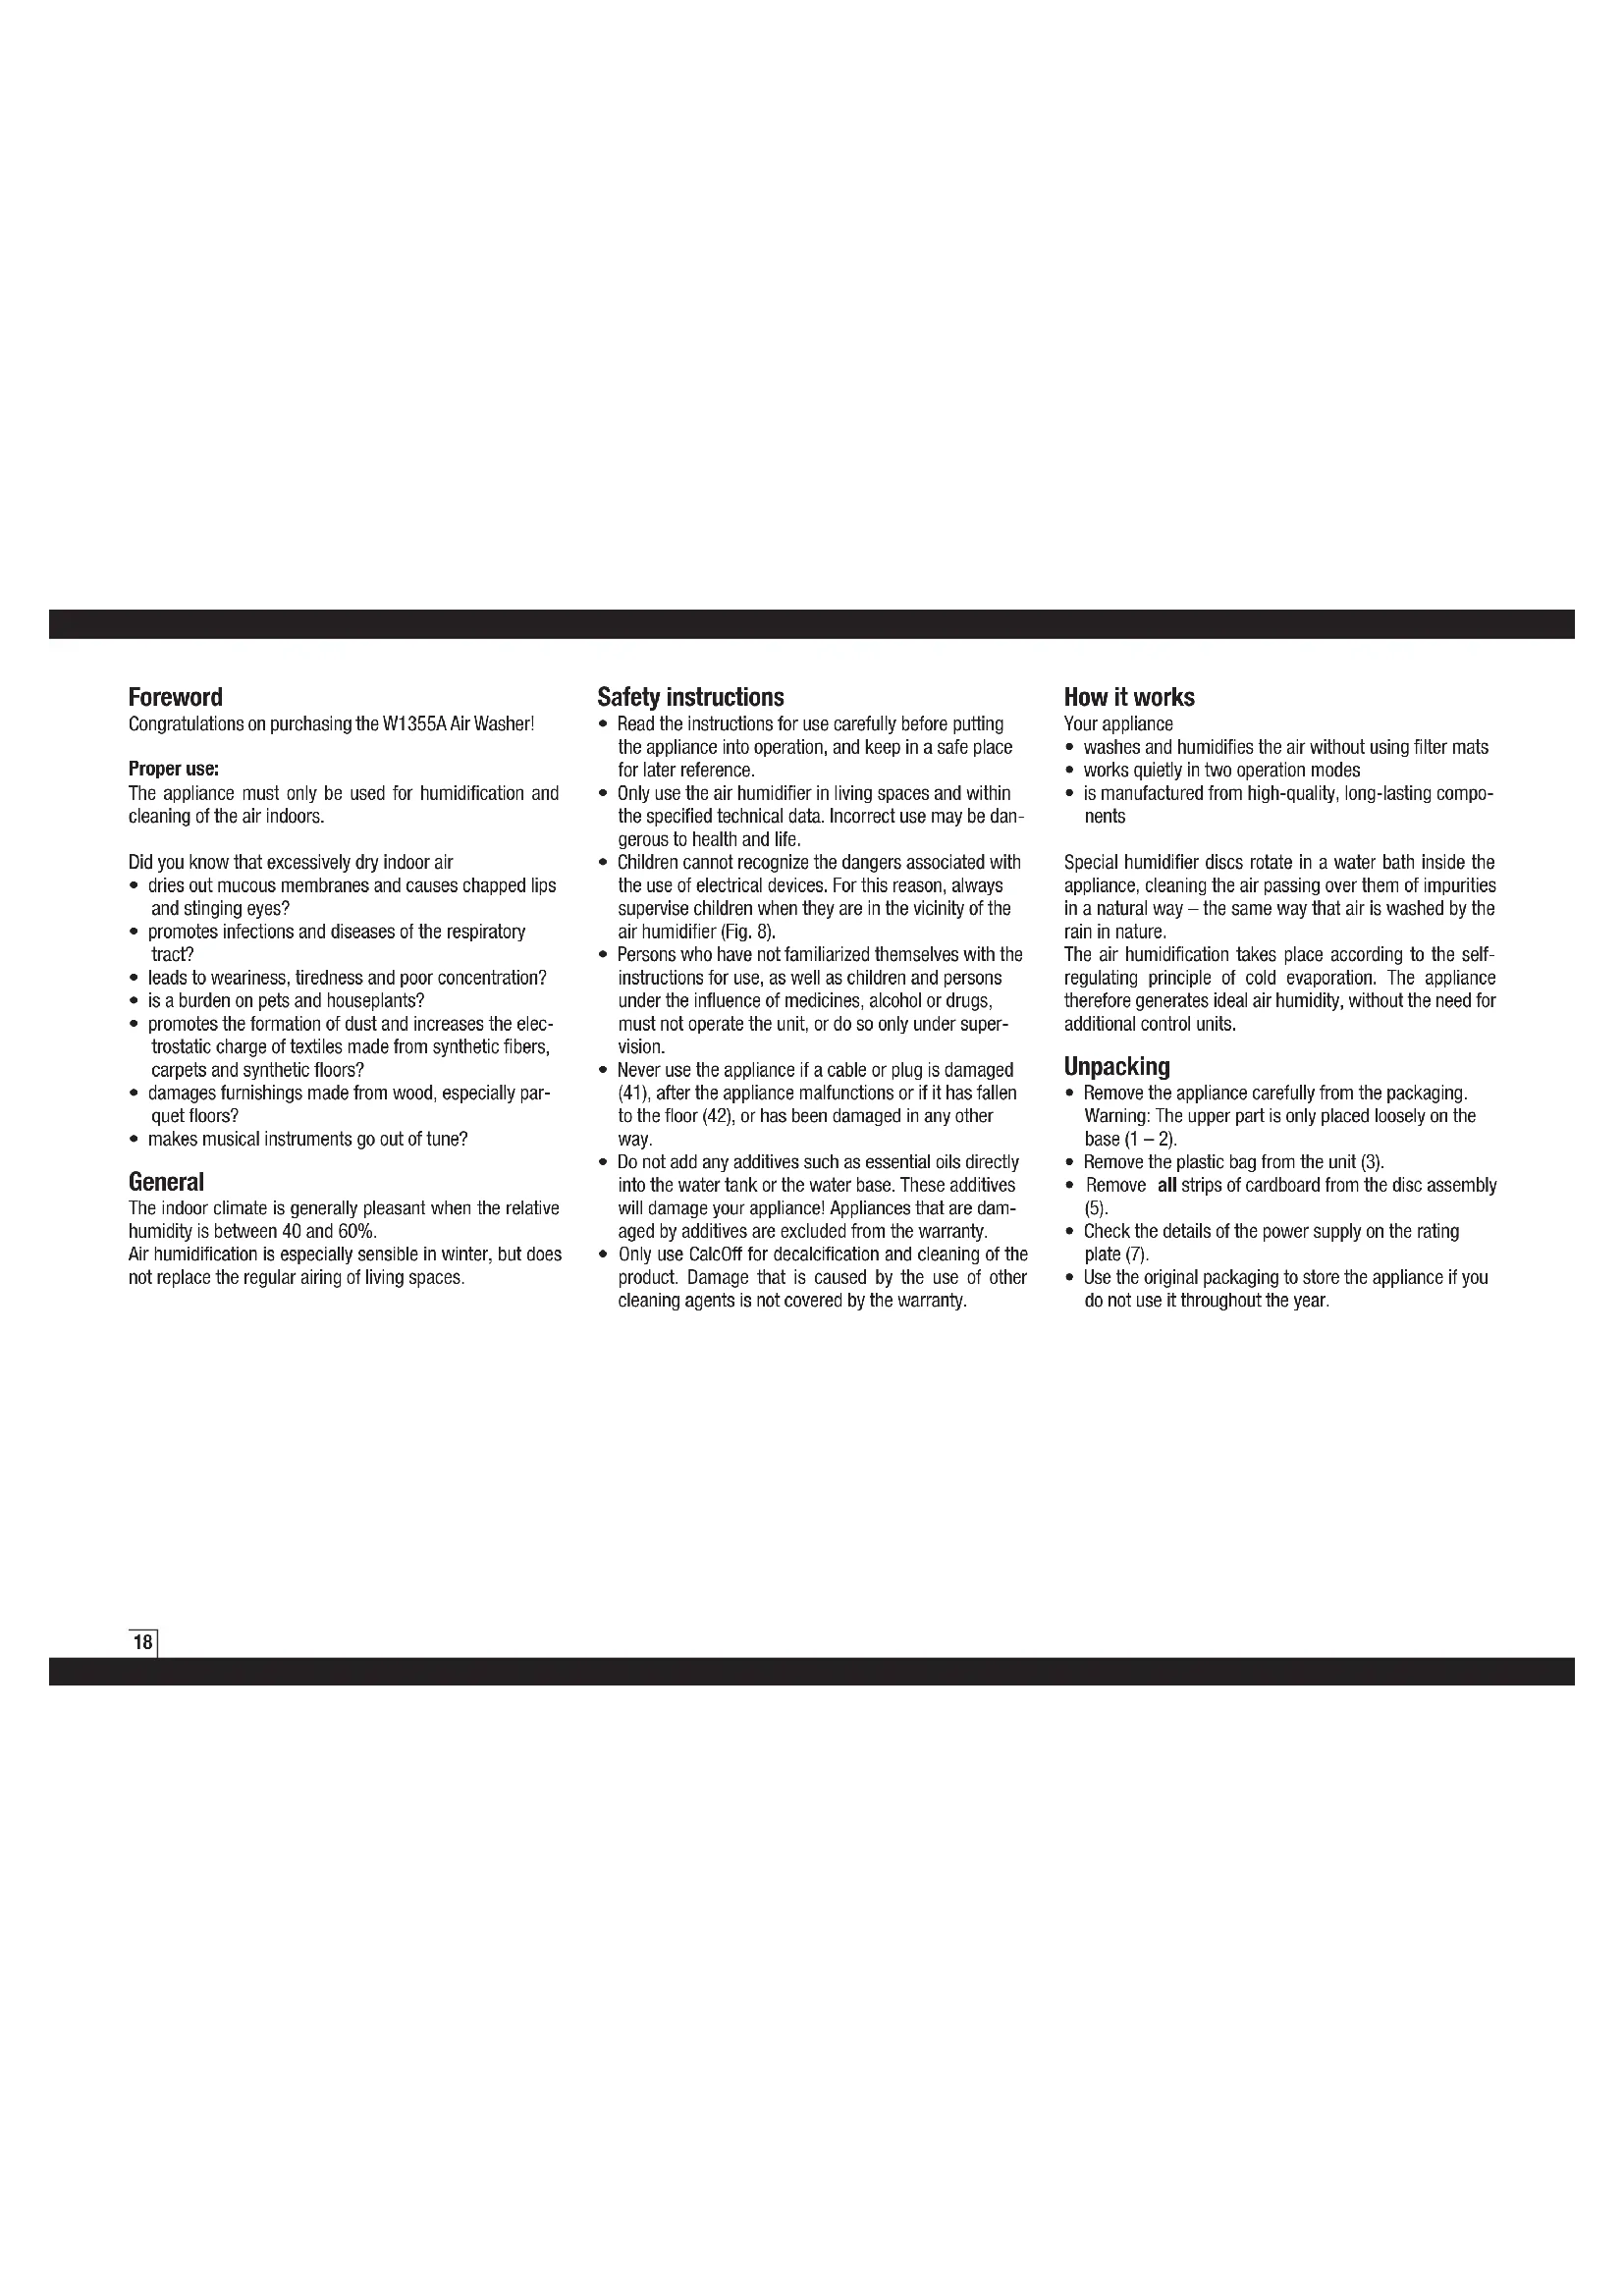
Description of the appliance
Putting into operation
The best location for your appliance is:
- On the floor, or on a level, dry surface in the room
- Pay proper attention to easy accessibility and sufficient space for servicing and cleaning the unit.
- For increased evaporation performance in large rooms, place the appliance near a radiator (warning: a temperature of 50^ must not be exceeded).
- Read the section "Filling the tank" on how to fill the water tank (12 - 15).
- Place the water tank on the lower part (16).
- Connect the power cable to the power supply and switch the appliance on using the On/Off switch.
The unit will reach full capacity about 10-15 minutes after you switch it on. - Ensure that the power cable is not trapped (20). Do not switch on the unit if the power cable is defective (41).
Filling the tank

Do not operate the appliance when the water tank is empty!
- Remove the water tank (12).
- Ensure that there are no foreign objects in the water tank.
- Remove the water tank cap from the tank (13). Fill the tank with fresh, cold tap water (14). Fully close the tank cover to prevent the water tank from leaking (14). Place the water tank on the water base (15). Do not add any additives to the water!
- Do not pressurize the water tank, e.g. by filling it with carbonated mineral water.
- Connect the power cable to the power supply and switch the appliance on.
The appliances are fitted with an automatic cut-off switch. As soon as the water base is empty, the unit switches off automatically. The empty indicator illuminates (also see section "Operation").

Do not pressurize the water tank, e.g. by filling it with carbonated mineral water. Do not add any essential oils or scents to the water; this may
discolor or damage the plastic material. Completely close the screw seal to prevent the water tank from leaking.
Water quality maintenance (ISS)
The ionic Silver Stick (ISS) utilizes the antimicrobial property of silver and provides one season of optimum water quality maintenance in all BONECO humidifiers. The ISS begins working as soon as it comes into contact with water - even if the unit is switched off. The ISS is intended exclusively for use in humidifiers. Look at picture 11 for the position of the ISS in the appliance.
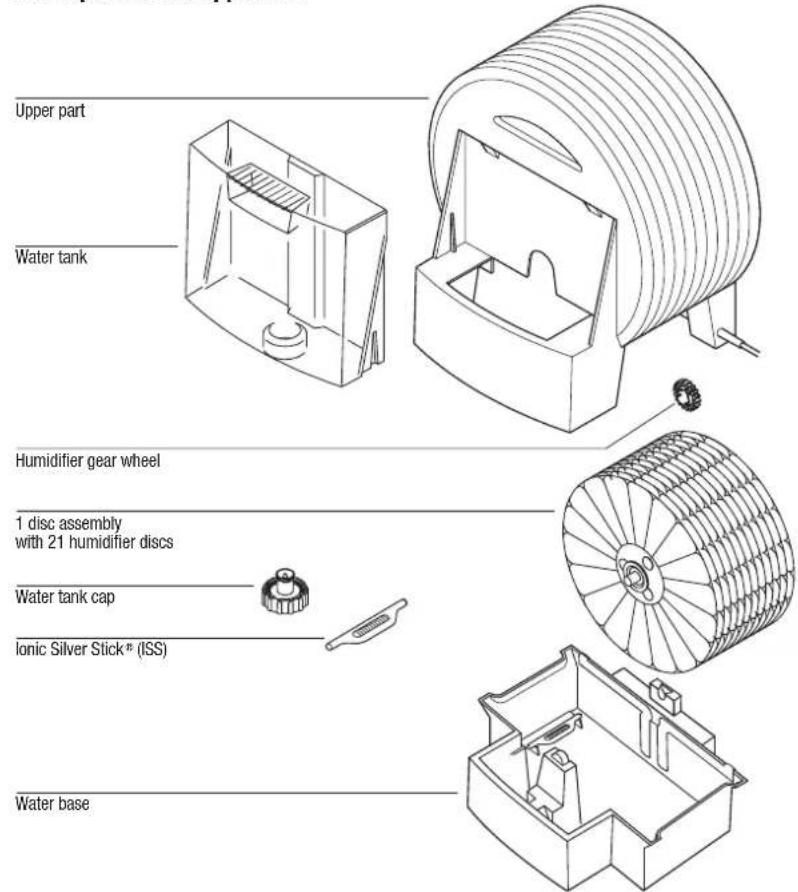
Lifecycle indicator
Your appliance comes with a standard lifecycle indicator on the back of the upper part for changing the ionic Silver Stick. To remind yourself of when you put the ISS into operation, please cross the current month on the indicator and write the current year on the line provided.
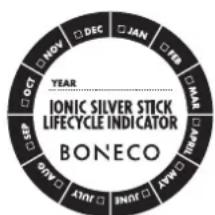
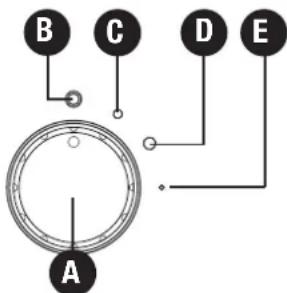
Operating W1355A
A) Rotary switch
Connect the appliance to the power supply and turn rotary switch A to position C or D as required. To switch the appliance off, turn the rotary switch to position B.
B) Switching on/off
If the rotary switch is in position B, the appliance is switched off.
C) Night mode
If you turn the rotary switch to position C, the appliance works in night mode and is especially quiet.
D) Normal mode
If you select position D, then normal mode is set, and the appliance reaches maximum humidity output.
E) Operating light
The green light (LED) (E) illuminates when the appliance is switched on. When the water level is low, the appliance automatically switches off. The LED display changes from green to red. The appliance automatically continues operating when filled with water.
"Tank empty" automatic switch-off
The water quantity is easy to see thanks to the transparent water tank. The LED on the appliance also shows when the unit should be refilled with water.
Warning: When lifting the upper part off the base, the appliance also switches off. The LED display here also changes from green to red. Only when the upper part is replaced on the base does the LED change from red to green and the appliance continues operating.
Cleaning/maintenance

Switch the appliance off and remove the power plug from the power outlet before you clean the appliance (23).
- Regular cleaning is a precondition for hygienic, trouble-free operation.
The appliance can be disassembled for cleaning in a few moves. - Never submerge the entire unit in water (25).
- The unit must be completely emptied and cleaned, if it has been filled with water for longer than a week without being used.
Recommended cleaning intervals
The recommended cleaning intervals depend on the air and water quality, as well as operating times. A thin film of lime scale on the discs actually increases the humidity output!
- once to twice a year: upper part of housing and fan
every 2 weeks: water tank and base
every 4 weeks: humidifier discs
Cleaning the upper part of the housing
Remove the upper part of the unit (29) and wipe out thoroughly once to twice a year with a damp cleaning cloth (30).
Cleaning the water tank and base (every 2 weeks)
- Lift the water tank out of the unit, open the water tank cap and clean the tank (26 - 28).
- Lift the upper part of the unit off the base and remove the ionic Silver Stick (33).
- Fill the base with water, pour in a commercial decalcification agent (CalcOff) and allow it to take effect; rotate the disc assembly a few times by hand (36).
- Empty the water base (37), remove the disc assembly (38) and rinse (39).
- Remove deposits from the base using a plastic or wooden brush and a diluted, commercial washing-up detergent (32).
Cleaning the humidifier discs (every 4 weeks)
Fill the base with water, pour in a commercial decalcification agent (CalcOff) and allow it to take effect; rotate the disc assembly a few times by hand. Empty the base and rinse it out together with the disc assembly.
Troubleshooting
| Problem Possible cause | What to do | |
| No function Power cable | not connected. Rotary knob set to the small dot. | Connect the power cable to the outlet. Set the rotary knob to the medium or large dot. |
| Brushing noise | Disc assembly is not correctly inserted in the base. | Insert the disc assembly correctly |
| No humidification | Disc assembly is not correctly inserted in the base. No water in the base | Insert the disc assembly correctly Refill the water tank |
| LED display lights up red | Low water level | Refill the water tank |
Storage
Empty the water tank. Clean the Air Washer as described and allow it to dry completely. Remove the screw seal from the water tank and store it separately to protect the seal. Store the Air Washer in a dry place, preferably in the original packaging and away from excessive heat.
Disposal
Give your decommissioned Air Washer to your dealer for proper disposal. For other disposal options, please refer to your local authority.

Spare parts
The spare parts depicted can be obtained from your specialist dealer and installed in the Air Washer by yourself.
Only original manufacturer's parts may be used.

All other repairs must be carried out by a specialist or customer service. This also applies to a defective power cable.
Warranty
The warranty conditions are defined by our representative in the country of sale.
- Please contact your dealer if, despite strict quality control, your Air Washer becomes defective.
- You must present your original receipt when making a claim under the warranty.
Legal notices
The appliance is CE-compliant and meets the following directives:
2006/95/EC for electrical safety
2004/108/EC for electromagnetic compatibility
2002/95/EC for restriction of the use of certain hazardous materials in electrical and electronic equipment
2002/96/EC on waste electrical and electronic equipment
Subject to technical change. These Instructions for Use are protected by copyright.
Technical specifications
| AC voltage 230 V ~ 50 Hz | |
| Power consumption | 9 W / 15 W |
| Humidification performance up to 300 g/h | |
| Suitable for rooms up to 50 m | 2/125 m³ |
| Water capacity 7 liters | |
| Dimensions (mm) 380x320x425 | |
| Weight (empty) 6.0 kg | |
| Operating noise level < 25 dB(A) | |
| Accessories A7017 Ionic Silver Stick | ® (ISS) |
| A7417 CalcOff | |
Yka3aHmno 6e3oNaCHOCTM
Ipeep BBOOM np60paB 3KcNpyataaHIO CNeyET O3HAKOIMTBc HCTAOUeMHCTPYKmE, a TaKKe COxPAHnTb EE BAeCTBE CnpBaOuHnKa Ira NocJeYUoEO HNCNOB3OBAHN.
- PnH6Op cIeNyET npIMHeHbT ToIbKO B KInbIX NOMeUeHNHX INPcO6IIOEHN CIEUNFmUPOBaHNbIX TExHHecKINx YCIOBNI. HeaJIeKaIeep npIMHeHneYCTpOHTBA MoKET Co3dTaYrpo3y 3DopOBbIO N KJ3HNI.
- DeTN MOrTy HE Oco3HabTa OnaChOCTb PnN 6paueHm C3JIeKTPo06OpDyOBAHMeM. IIO3ToMy HE OCTABYIte DeTc 6e3 HAd30pa, KOrDa OHn HaxOJaTcB 6bIImN npH6opa (pmc.8).
KObcnykmbaHIO npbOpa He doNyckAOTcI Iua,He O3HAKOMMHeHbC NCHPTyCKMeN O KcNPlaTAtuIm, DeTn,A Toke Iua, HaxoJaMecN oD B JInHmE MMeIMUHCKHX npenapAOB IIOBO COTcOHN aJkoTOrBoHOrO ININ HAPKOTMueCKOToIbHEHn.
3anpeaetcBKNIOHbTB 3eKtPOCeTb np6Op C HnepaBHBIM Ka6eHem NITAHNIA INM cTeBBIM WTEKEPOM (pnc.41),IINo NOCE TOrO, KAK np6Op 6bl nobpeJenB pe3yIbTaTE naEHnna (pnc.42) INN KAKHM-NIN6DpyrMMOB430M
Bo n36exkanHe NoBpeKdEHHn npb6pa KaTeOpHcck 3anPeaetca 3aIINBaTb 3fnpHbIe Macna nn apomatm3atopb B p3eepByap IIN BObl INN NOdoh. 3To MoKet npBeCTn K NoBpeKdEHHo yBlaKnHTe! NOBpeKdEHn bTAKM o6pa3OM np6bOp He noDnExkHT rapaHTnHOMy peMOHTy.
NcnoB3yTe TOnbKO CpEeCTBO CalOfKdIra ydaJeHnH N3BeCtKOBOr HAneta M OChTKn PnpOyKa. IOppeJKeH NpOyHeHH BcNEeCTBMeN CNOJIb3OBAHnA DpyHx NCTaXm CpEeCTB, He NokpbBaAOTc RaPahTne.
Ppinnipapobti npnbopa
YbnaaHnTeB Bo3dyxa:
OuIaet N yBnaJXHReTOB3Dy6E3NCNl30BaHnM CmEHbIXΦnJIbTPOB nPacXoDhXbMATEpMaNoB,
pa6oTaet 6ecwymHO B DByX peKIMax MOUHOCTN,
I3TROBHeH N3 BbICOKOKAueCTBeHHbIX KOMNHOEHTOB C IINITeBbIM CpOKM CnyK6bl
Bo3dyx, noctynaoiB npn60p, npoxoHITpee3cHCTemy BpaauohxxCy ybaaknHOxN DACKOB, HANOBOHy NOpykeHHbX B BOY. TbInb, MKNPOaCTNuI N pnpMeCN ydepKBAHTC Ha DCkax n 3aTeM oCeAOT B NoDOHe, a Bo3dyx BxIOHDTCHbTm N yBaALKHeHHbIM-TAK B pnpOde Bo3dyx npOMbIAeTCB DOB OBO BPemdo
YBnaKHeHne BO3Dyxa npOxCoNT No pNnHnny aBTOMaTHeCKORO camOperynPOBaHnA (XJIOJHOe nCnapeHne). NToTomy np60bp Co3Daet ONTMmaJIbHy BoJAXKHOCTb BO3Dyxa 6e3 npmMeHnHa DOONJIHTeNbIbIx np60bpOy npab-NeHnA.
Pacnakokka
Akkypatho NIBNEKNTe PnH6pO n3 KOpO6Kn. BHIMAHNE: BepxHry NaCTb PnpOpa npocTo cTOnT Ha noDIOne H ne 3akpenPeha (puc.1-2).
- CHIMITE IIaactIKOBbl naket (Pnc. 3).
- YdAnTe BCE NOIocbI KapToHa C NaKeTa C DnCKaMn (pnc.5).
-Поверьт,чTo Hanржснe 3NeKTPocTeN COOTBetCTByeY kza3aHHOMy Ha 3aBodcKoT Ta6nUKe (pnc.7).
EcmBbHe noJb3yeTeCb npn60pom KpyrIbI rOaHHTe erO B opnHaJIbHOy nakOBKe.
Oncanhe npnbopa

IpoTobka K pa6oTe
PmBbOpe MeCTa yCTAHOBKN yBnAaXHNTeIe CNeyIte PnBBeDEHHbIM HNOke peKOMeHNaUMM:
YCTAHOBHTe npH60p Ha non Ha nn dpyyO cyxyO rOpN3OTaBHyIO NOBepxHOCTb B NOMEeHN.
- 06e3ebe 6e3epeaTCTBENHbI DnOCTyK npN6OpA, y aTKKe DoCTatoVHoe CBO6oDHOe IpocTpaHCTBO Iraero 06cLyKBAHINs.
-Дя NOБИЕСHA HINTEHCMBHOCTM ICNAPENHBA B OBOIUX NOMEUEHIXMOXHO YCTAHOBITb npN60p BOHN3M (20 -30 CM) HArpeBaTeJIbHbIX npN60BOP (BHIMAHe: MaKcMmJIbHa TEMNEPATyPAHrpeBaTeJIbHO rnp6Opa HeJONKHnpeBBUATb 50^
03Hakombtebcpa3dJeIOM 3anpaBkape3epByapa BOIOHACTOUEINHCTpyKm(pnc.12-15)
- YcTaHOBInTe pe3epByap DnBaBoDHa nOdoH (Pnc. 16).
BCTABTE CETEBO WTEKep B PO3Eky IN BKIOUHTe pIM60P BIKIOHATENEM NITAHIN.
Pn60DIOCTMHTMAKCMMAHBOHINTHECNBHOCTN yblaxHexHHN OCHCTKN BO3dyxa Ypee3 10-15 MMHyT.
Y6eDNTecb, YTO Ka6eB NITAHNpaCnONoKEn TAK, YTO HAr Hero HeBcMOxHO HAcyTNIb (pMC. 20). KaterOpueCKn 3AaPeTaTcRA BkIOHbTbnPbO6PcNobpeXeHHbIM Ka6eIem NITAHN (pMC.41).
3anpaKa pe3epByapa BOOJ

3anpeaaetcBKNIOuYb npn6op C nycbIM pe3epByapom DnB0bl!
- CHMNTe pe3epByap nra BODb (pnc. 12).
- Y6eDNTecb, YTO BHyTpni pe3epByapa Het NOCTOpOHnIX npedMETOB.
- CHIMMITE np66ky pe3epbyapa (pnc. 13). 3anoHNHTe pe3epbyap uHCTOJ KOIOHOB BOOPBOBDH OBOI (pnc. 14). Bo N36ekaHneye TeyKn BObl IIOTHo BKPyTNTpe np66ky BOTBPCTME pe3epbyapa (pnc. 14). YcTaHOBITE pe3epbyap Dn BObl Ha NODOn (pnc. 15). He Do6abNtBE B DOBy HNKAKHX NOCTOPOHNX BEueCT!
He donnyckaTne NObIeHnA DAJIeHnB HByTpnepeepyapa. He zanolniTe pe3epyapar 4aMPOBaHHMO MHepePbHbBoDdO.
BCTABBe CTeBOI WTeKep B PO3eTKy IN KINIOHTe 3JIeKTPoINrTaHHe BbIKIOHaTeMe pN60pa.
Pn60p OCHaEN yCTPOiCTBOM ABTOMaTHeCKOrO tKIOHcHHeN.PnOTCYTCTBM BOJ B pe3epByape np60p OTKIOHaeTc ABOTAMHTeCKn.Pn3OTm 3aIopAETCn INIKATOP HN3KOY UPOBb BOJBpe3epByapc (cm. pa3dEn «3KnIyatauA).

He donyckaiTe NOBbIeHnAabneHn BHytpn pe3epByapa.He 3anoJIHnTe pe3epByap rAsnpoBaHHO MInHepaIbHO BDOJ. He do6aBJIte B
Body 30nHbIe MACaI n apOMAT3aTOpbI, TAK KAK 3TO MOKeT NOKpACNTb INN NOBpeNTb NnACTMaccOBBe DeTAMn BO I36EJAHNe YEChN BOBd IIOTHO BkpyTte np6ky BoTBPcTe pe3epByapa.
IoppeXaHHe BObI B YnCTOM COCTOHN (ISS)
DieCTBNE NOH3Npyoio cepe6pHOrO cTepxHn Ionic Silver Stick (ISS) OCHOBaHO Na DOKa3AHbIX AHTNCNTIeCKHX CBOITBxcepe6pa,NOHb KOTOPORO 30fKeKTHBHO OHuaHOT BOyOT BPeHbX BaKTepm N MIKPO6OB,ObcCNEWBAOdMH C2OH ONTHMANbHON OYCTKN BOBy BO BCExycTbXbDnA OYMCtKN Bo3dyxa BONECO.DieCTBNE cTePKHSSPONCXODnPc3yNocNe KOHTAKC BcBOD,DAke eCN annapat HE BkIOuHc.NCCTema ISS PnpHa3HaHeHa NCKIOHHTeBHO nI NcIOJIb3OBAHn B annapata DN OYMCtKN Bo3dyxa.PIpCMOTPnE pCYHOK 11,TO6bl y3HaTb NOnOKeHne cTepxHsISS B np6ope.
OTMeTka 03ameHe ISS
Ha TbIbHOb CTOpOHe BepxHeu Yactn Pnpbopa MmEeTcK KpyTbn TaBmUHa Kdy OMTeKn 3aMeHe ISS. Nocle 3aMeHb ISS OTeSTe KpeCTIKOM TeKyUus MecaN 3aMUnITE TekyUus TOrB INpeDyCMOTpEHNO DTH 3TOr TOcPOke.

UnpaBneHMe W1355A
A) TobopoThbI nepeKJIouaTeIb.
NIOKIOHHTe npH60 K 3NEKTPOcETn U yCTaHOBtE NOBOPTHnepeKIOHATeNTb (A) B TpeSyEmoe noJIOXKeHMe: (C) UIN (D). YTObO tOKIOHHTb npH60, yCTaHOBtE NOBOPTHnepeKIOHATeNTb B noJIOXKeHMe (B).
2006/95/EG no 3neKtpnueckoB 6eOtnaHcOCTN
2004/108/EG no 3JNEKTPOMAHHTHO COBMECTMOCTN
2002/95/EG NO ORPANHENHIO INCNOB3OBAHMA HEKOTOPBX ONaCHbIX BeueCTB B 3NEKTPOHECKOM 3NEKTPOHOHMO 6OpyDObAHM
2002/96/EG no yTmN3aMn 3NeKtpnEckoro n 3NeKtpOHoro o6bpyoBAMn
MbOCTABJREM 3a C06oI npABo HA BHEcHHe TExHHueckHX N3MeHENH. PyKOBODCTBO 3aUJIuEHO aBTOpCKHMn npBaAMn.
TexHueckne xapaKTePncTnKn npnbopa
BONECO is a registered trademark of BONECO AG, Switzerland
39637-06