
MGK 7020 - Electric mower BRAUN - Free user manual and instructions
Find the device manual for free MGK 7020 BRAUN in PDF.
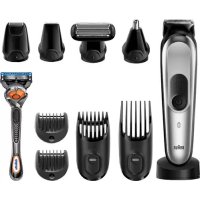



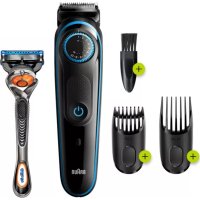
| Product type | Multi-purpose electric trimmer |
| Brand | Braun |
| Model | MGK 7020 |
| Power supply | Built-in rechargeable battery, charges via special power cord (very low voltage) |
| Charging time | Approximately 1 hour |
| Battery life | Up to 100 minutes of cordless shaving |
| Charge indicator | Green flashing light (charging), solid green (fully charged/in-use), solid red (low battery), flashing red (recharge needed) |
| Interchangeable heads | Trimmer head (2a), ear and nose head (2b), precision head (2c), body head (2d), mini foil shaver head (2e) |
| Cutting combs | Beard sliding comb (3-11 mm, 2 mm steps), hair sliding comb (13-21 mm, 2 mm steps), fixed comb 1 mm, fixed comb 2 mm |
| Use in shower/bath | Yes, cordless only |
| Travel lock | Press and hold the on/off button for 3 seconds |
| Cleaning | Heads and combs washable under running water; brush the appliance; do not brush the foil |
| Maintenance | Regularly apply a drop of light oil to the trimmer and foils (oil not included) |
| Safety | Use by children aged 8 years and above under supervision; do not open the appliance; use only the supplied special cord |
| Warranty | 2 years from date of purchase, free repair of manufacturing defects |
| Recommended charging temperature | 5 °C to 35 °C |
| Recommended trimming temperature | 15 °C to 35 °C |
| Spare parts | Available through authorized Braun service centers or www.service.braun.com |
| Recycling | Do not dispose of with household waste; drop off at a recycling point for electrical waste |
| Box contents | Appliance, special power cord, 5 heads, 2 sliding combs, 2 fixed combs, charging stand (depending on model), cleaning brush |
Frequently Asked Questions - MGK 7020 BRAUN
User questions about MGK 7020 BRAUN
0 question about this device. Answer the ones you know or ask your own.
Ask a new question about this device
Download the instructions for your Electric mower in PDF format for free! Find your manual MGK 7020 - BRAUN and take your electronic device back in hand. On this page are published all the documents necessary for the use of your device. MGK 7020 by BRAUN.
USER MANUAL MGK 7020 BRAUN
Read these instructions completely, they contain safety information. Keep them for future reference.
Warnings
This appliance is suitable for use in a bathtub or shower. For safety reasons this appliance can only be operated cordless.
The appliance is provided with a special cord set with integrated Safety Extra Low Voltage power supply. Do not exchange or manipulate any part of it. Otherwise there is a risk of electric shock.
Only use the special cord set provided with your appliance.
If the appliance is marked ⇒ C 492, you can use it with any Braun power supply coded 492-XXXX.
Never use the appliance with any damaged accessory like trimmers, combs or special cord set.
Do not open the appliance!
This appliance can be used by children aged from 8 years and above and persons with reduced physical, sensory or mental capabilities or lack of experience and knowledge if they have been given supervision or instruction concerning the safe use of the appliance and understand the hazards involved. Children shall not play with the appliance. Cleaning and user maintenance shall not be made by children unless they are older than 8 years and supervised.
Description
1a Sliding beard comb (3-11 mm in 2 mm steps) 1b Sliding hair comb (13-21 mm in 2 mm steps) 1c Release button sliding combs 1d Fix comb 1 (1 mm) 1e Fix comb 2 (2 mm)
2a Trimmer head 2b Ear & nose trimmer head 2c Detailed trimmer head 2d Body groomer head 2e Mini foil shaver head 3 On/off button 4 Charging indicator 5 Power socket 6 Special cord set (design can differ) 7 Charging stand*
* not with all models
For electric specifications, see printing on the special cord set.
Charging
Recommended ambient temperature for charging is 5°C to 35°C.
The battery may not charge properly or at all under extreme low or high temperatures. Recommended ambient temperature for trimming is 15°C to 35°C. Do not expose the appliance to temperatures higher than 50°C for extended periods of time.
- Connect the appliance (switched off) via the special cord set (6) to an electrical outlet.
- A full charge takes approx. 1 hour and provides up to 100 minutes of cordless operation time.
- Once the appliance is completely charged, discharge it through normal use. Then recharge again to full capacity.
Charging indicator (4)
- The charging indicator blinks green when the appliance is being charged.
- It lights up permanently green for a few seconds when the battery is fully charged. During usage it shines permanently green.
- The charging indicator shines permanently red when the battery is running low. Once it flashes red, connect the appliance to the mains.
Usage
Exchange the attachments only when the appliance is switched off. To turn the appliance on, push the on/off button (3).
Travel lock
Press the on/off button (3) for 3 seconds to lock the appliance. A beep confirms that the travel lock is activated. To unlock, press the on/off button 6
3 seconds. 3 beeps will sound when your unlock attempt failed. Try again or simply connect the appliance to the mains.
Beard Trimming / Hair Clipping
Sliding combs (1a, 1b): Place one of the combs over the trimmer head (2a).
Press the release button (1c) and slide the comb to your desired length.
Fixed combs (1d, 1e): Click one of the combs onto the trimmer head (2a).
- Trim against hair growth by guiding the flat comb part over the skin.
- Do not force the appliance through the hair faster than it can be cut.
- Avoid clogging the comb with hair. Remove and clean it from time to time.
Precision and Contour Trimming
Use the trimmer head (2a) without comb attachment, the detailed trimmer head (2c) or the mini foil shaver (2e) for shaping sideburns, moustaches and partial short beards.
Ear/Nose Trimming
- Remove any head and click the ear & nose trimmer head (2b) onto the handle of the appliance.
- Carefully guide the appliance to the hair to be trimmed so that they reach into the cutting cage. Avoid introducing the trimmer more than 5 mm (1/4") into nose or ear.
Body grooming
Remove any head and click the body groomer head (2d) onto the handle. It is designed for shaving and trimming of hair on legs, chest and underarms. Use it on dry skin only.
Cleaning and maintenance
- Switch off the appliance. Take off any head and comb.
- Use the brush to clean the heads, combs and the appliance. Do not clean the foil of the body groomer head and mini foil shaver head with the brush as this may damage it.
- The mini foil shaver head can be disassembled for proper cleaning. In case the foil frame is pulled out, it can just be clicked into the housing again.
- The handle, the heads and combs can be cleaned under running water. Rinse until all residues have been removed. Let all parts dry completely before reassembling them.
- To keep the attachments working properly, oil the trimmer and the foils with a drop of light machine oil (not included) regularly.
Environmental notice
Product contains batteries and/or recyclable electric waste.
For environment protection do not dispose of in household waste, but for recycling take to electric waste collection points provided in your country.

Subject to change without notice.
Guarantee
We grant a 2 year guarantee on the product commencing on the date of purchase. Within the guarantee period we will eliminate any defects in the appliance resulting from faults in materials or workmanship, free of charge either by repairing or replacing the complete appliance at our discretion. This guarantee extends to every country where this appliance is supplied by Braun or its appointed distributor.
This guarantee does not cover: damage due to improper use, normal wear or use as well as defects that have a negligible effect on the value or operation of the appliance. The guarantee becomes void if repairs are undertaken by unauthorised persons and if original Braun parts are not used.
To obtain service within the guarantee period, hand in or send the complete appliance with your sales receipt to an authorised Braun Customer Service Centre (address information available online at www.service.braun.com).
For UK only:
This guarantee in no way affects your rights under statutory law.
ELMIN, Durdevac 48350
R. Boškovića 20, Tel. 048 813 365, elmin@optinet.hr
BKS d.o.o., Slavonski Brod 35 000
J. J. Strossmayera 29, Tel. 035 203 101, bks.servis035@gmail.com
FRUK d.o.o., Virovitica 33 000
J. J. Strossmayera 23, Tel. 033 553 068, fruk.servis@vt.t-com.hr
MARKOVIĆ OBRT ZA EL.USLUGE, Varaždin 42 000
Krešimira Filica 9, Tel. 042 210 588, i_markovic@inet.hr
RADAN ELEKTRONIK CENTAR d.o.o., Dubrovnik 20 000
Ob. Pape I. Pavla II 17, Tel. 020 321 500, radanelektronikcentar@gmail.com
Tehno-Jelčić d.o.o., Šibenik 22 000
VIII Dalmatinske Udarne Brigade 71, Tel. 022 340 229
SINGULI D.O.O., 21000 SPLIT-KAMEN
UL. 4. Gardijske brigade 43, Tel. 072 700 707
(u sklopu poslovnog prostora ROBOT COMMERCE d.o.o. (TTTS))
Slovenski
Block the transport
- He C BCnUKN MoJeJI N
For electrical characteristics, see the label on the charger.
Charging
The recommended ambient temperature for charging is from 5°C to 35°C. At very low or high temperatures, the battery may not charge properly or may not charge at all.
The recommended ambient temperature for operation is from 15°C to 35°C. Do not expose the device to temperatures higher than 50°C.
- Connect the device (charger) to an electrical contact using the special charger cable (6).
- A full charge takes about 1 hour, which provides 100 minutes of operation.
- After the charger is fully charged, use it as usual until the battery is completely discharged. Then recharge it fully again.
Charge indicator (4)
- The charge indicator flashes green while the device is charging.
- The light stays solid green for a few seconds when the battery is fully charged. During use, the light stays solid green.
- The charge indicator flashes red when the battery is depleted. After the light turns red, connect the device to the charger.
Replace the attachment only when the device is unplugged. Press the on/off button (3) to turn the device on.
Locking for rescue
Press the on/off button (4) for 3 seconds to lock the self-rescuer. A beep will sound, confirming that the locking for rescue is activated. Press the on/off button for 3 seconds to unlock the self-rescuer. If the unlocking attempt is unsuccessful, a triple beep will signal. Repeat the operation or simply turn the device on to the rescue position.
Precise trimming
Use the trimmer head (2a) without the comb attachment, the precision trimmer head (2c), or the beard comb head (2e) for trimming beards, mustaches, and also for short stubble.
Manufacturer's warranty obligations
For all products, the manufacturer provides a warranty for two years, starting from the moment the product is received or from the date of its manufacture, in case of absence or improper execution of the warranty card for the product.
During the warranty period, we will free of charge eliminate any factory defects caused by poor quality of materials or components by means of repair, replacement of parts, or replacement of the entire product. In case of impossibility of repair during the warranty period, the product may be replaced with a new one or an analogous one in accordance with the law of Ukraine «On Protection of Consumer Rights».
The warranty is valid only if the purchase date is confirmed by the seller's stamp (store) on the warranty card or on the last page of the original instruction manual, and may also be a warranty card. The warranty is valid in any country where this product is supplied by the manufacturer's representative or authorized distributor, and is not limited by import or
other legal provisions that do not contradict the provision of warranty service.
Country of origin: China
To determine the year of manufacture, remove the head and find the 3-digit production code located inside the housing. The first digit of the production code refers to the last digit of the year of manufacture. The next two digits refer to the calendar week in the year of manufacture. Example: “527” – The product was manufactured in week 27 of 2015.
1000 1
(3) 1/2 1/2 1/2 1/2 1/2 1/2 1/2 1/2 1/2 1/2 1/2 1/2 1/2 1/2 1/2 1/2 1/2 10/2
J
J 35 J 5 J 5 J 5 J 5 J 5 J 5 J 5 J 5 J 5 J 5 J 5 J 5 J 5 J 5 J 5 J 5 J 5 J 5 J 5 J 5 J 5 J 5 J 5 J 5 J 5 J 5 J 5 J 5 J 5 J 5 J 5 J 5 J 15 J 15 J 15 J 15 J 15 J 15 J 15 J 15 J 15 J 15 J 15
(6) aolal llll aegg (Jiaaii jao g y 1y
100 1 J L lo 1o 1 o 1 o 1 o 1 o
J . 1
JolSjLgic
(4)
.

15 1
.
.
Therefore, even number
Therefore, the area of triangle ACD equals the area of triangle CDA equals 2.
.1511 1
(102 2 11-3 1g) a
(21-13)
aJzaiI bla 1 j c1
(plo 1) 1 uua bdo d1
- WARNINGS
- DESCRIPTION
- CHARGING
- CHARGING INDICATOR (4)
- USAGE
- TRAVEL LOCK
- BEARD TRIMMING / HAIR CLIPPING
- PRECISION AND CONTOUR TRIMMING
- EAR/NOSE TRIMMING
- BODY GROOMING
- CLEANING AND MAINTENANCE
- ENVIRONMENTAL NOTICE
- GUARANTEE
- FOR UK ONLY
- ELMIN, DURDEVAC
- BKS D.O.O., SLAVONSKI BROD
- FRUK D.O.O., VIROVITICA
- SLOVENSKI
- BLOCK THE TRANSPORT
- CHARGE INDICATOR (4)
- LOCKING FOR RESCUE
- PRECISE TRIMMING
- MANUFACTURER'S WARRANTY OBLIGATIONS
- COUNTRY OF ORIGIN: CHINA
Brand : BRAUN
Model : MGK 7020
Category : Electric mower