
TH140 - Weather Station HAMA - Free user manual and instructions
Find the device manual for free TH140 HAMA in PDF.
| Brand | Hama |
| Model | TH140 |
| Product type | Indoor weather station with thermometer, hygrometer and weather indicator |
| Power supply | 3 V, 2 LR1130 button cells (included) |
| Temperature measurement range | -40 °C to +50 °C |
| Humidity measurement range | 20 % to 90 % |
| Display | Time (12/24 h), date, temperature, humidity, weather symbols (sunny, cloudy, rainy) |
| Time functions | Manual time and date setting, 12/24 h format |
| Alarm | Single alarm with snooze function (4 minutes) |
| Hourly chime | Hourly beep (activatable/deactivatable) |
| Memory values | Automatic recording of maximum and minimum temperature and humidity (MAX/MIN) |
| Weather indicator | Symbols based on humidity: ≤45 % sunny, ≤56 % cloudy, >56 % rainy |
| Temperature display | °C or °F selection |
| Stand | Foldable stand for vertical position |
| Cleaning | Slightly damp lint-free cloth, avoid harsh detergents |
| Safety | Button cells: risk of ingestion, keep out of reach of children |
| Intended use | Household, indoor, moderate climatic conditions |
| Repairability | Do not open or repair yourself, contact a qualified technician |
| Package contents | Thermometer/hygrometer, 2 LR1130 button cells, instruction manual |
Frequently Asked Questions - TH140 HAMA
User questions about TH140 HAMA
0 question about this device. Answer the ones you know or ask your own.
Ask a new question about this device
Download the instructions for your Weather Station in PDF format for free! Find your manual TH140 - HAMA and take your electronic device back in hand. On this page are published all the documents necessary for the use of your device. TH140 by HAMA.
USER MANUAL TH140 HAMA
Operating Instructions
Bedienungsanleitung
Moded'emploi
Instruetionesdeuso
Gebruiksaanwijzing
Istruzioniperl'uso
Instrukcjaobsfugi
Hasznalatiutmutató
Manualdeutilizare
Navodk pouziti
Návodnapoužitie
Manualdeinstrções
Bruksanvisning
PykoBODCTBOONKcNlyatauIN
Pa6OThaHnHCTpyKuIn
O8nyiecxpononc
Käyttoohje
GB
D
F
E
NL
1
PL
H
RO
CZ
SK
P
S
RUS
BG
GR
FIN

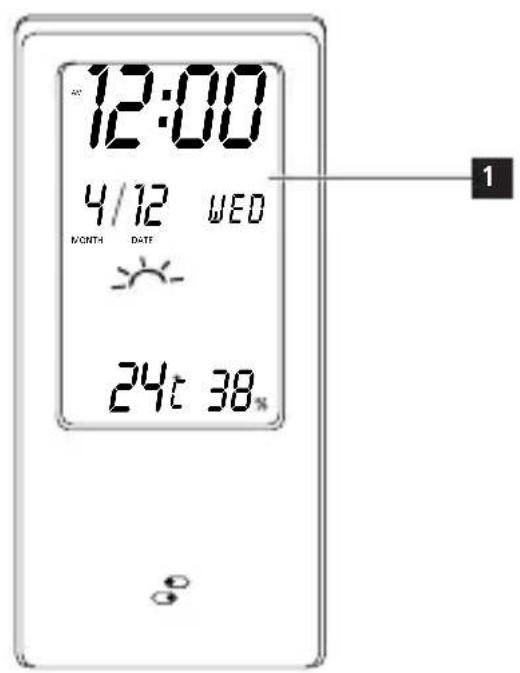
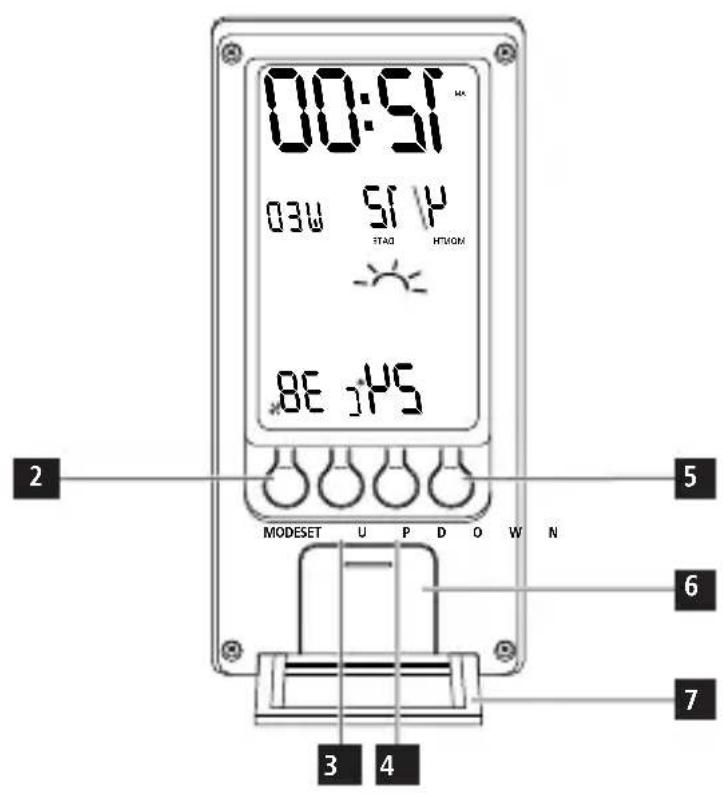
Controlsanddisplays
1.Display
2.MODEbutton
3. SET button
4. UP button
- DOWNbutton
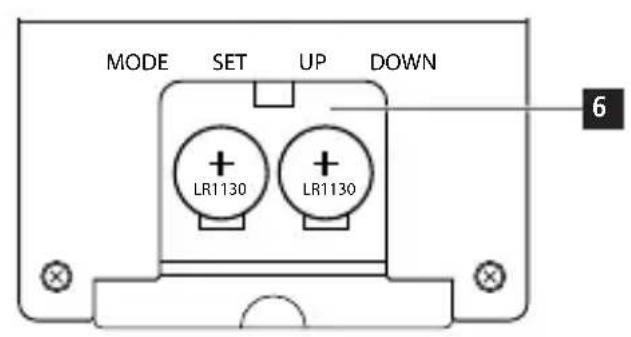
6.Batterycompartmentcover
7.Base
1.ExplanationofWarningSymbolsandNotes
Warning
Thissymbolisusedtoindicatesafetyinstructionsorttodrawyourattentionto specific hazardsandrisks.

Note
This symbolis used to indicate additional information or important notes.

2.Packagecontents
- T hermometer/hygrometer
- 2 x LR1130buttoncell
T heseoperatinginstructions
3.SafetyNotes
T heproductisintendedforprivate,non-commercialuseonly.
- Protect the product from dirt, moisture and overheating, and only use it in a dry environment.
- Do not operate the product outside the power limits given in the specifications.
D on otusetheproductinmoistenvinmentsandavoidsplashes.
- Do not use the product in areas where the use of electronic devices is not permitted.
D on otdroptheproductanddonotexposeittoanymajorshocks.
- Do not attempt to service or repair the product yourself. Leave any and all service worktoqualifiedexperts.
- K eepthepackagingmaterialoutofthereachofchildrenduetotheriskof suffocation.
- D isposeofpackagingmaterialimmediatelyaccordingtolocallyapplicable regulations.
- Do not modify the product in any way. Doing so voids the warranty.
- Donotusetheproductintheimmediatevicinityofheatersorotherheatsources orindirectsunlight.
- Donotopenthedevicereorcontinuetooperateitiftitbecomesdamaged.
- Keepthisproduct, asallelectricalproducts, outofthereachofchildren!
- Use the item only in moderate climatic conditions.
Warning-Batteries

- When inserting batteries, note the correct polarity (+ and - markings) and insert the batteries accordingly. Failure to do so could result in the batteries leakingoreexploding.
- Only use batteries (or rechargeable batteries) that match the specified type.
- Before you insert the batteries, clean the battery contacts and the polar contacts.
- D o n otallowchildrentochangebatterieswithoutsupervision.
- Do not mix old and new batteries or batteries of a different type or make.
- Remove the batteries from products that are not being used for an extended period (unless theseare be eingkeptreadyforanemergency).
- D o n otshort-circuitbatteries.
Warning-Batteries

D on otchargebatteries.
- Do not throw batteries in a fire.
- K eepbatteriesoutofthereachofchildren.
- N everopen,damageorswallbatteriesorallowthemtoenterthe environment.Theycancontaintoxic,environmentallyharmfulheavymetals.
- I mmediatelyremoveanddisposefdeadbatteriesfromtheproduct.
- A voidstoring, charging or using the device in extremetemperatures and extremely low atmospheric pressure (forexample, athighaltitudes).
Warning-B buttoncells

- Do not ingest battery, risk of burns due to dangerous substances.
- This product contains button cells. If swallowed, the button cell can cause severe internal burns within just two hours and lead to death.
- K eepnewandusedbatteriesoutofthereachofchildren.
- If the battery compartment does not close securely, stop using the product and keepitoutofthereachofchildren.
If you think that batteries were swallowed or are in a part of the body, seek medicalassistanceimmediately.
4. Getting started
Openthebatterycompartmentcover(6),removethecontactbreakerandthen closetethebatterycompartmentcover(6).Thethermometerisnowreadyforuse.
4.1Base(7)
To stand the product, the base (7) must be pulled out beneath the battery compartmentcover(6)andfoldedover.
5. Operation
5.1 Settingthedate/time/timeformat
After removal of the batteries' contact breaker, the normal time is displayed in 12-hour format and a melody signals that the product is ready for use. (Normal timemode)
- Press the UP (4) or DOWN button (5) to switch between the 12 and 24-hour formats.
- U setheUPbutton(4)orDOWNbutton(5)toselectthedesiredformat.
- T henpresstheSETbutton(3)tomakethefollowingsettings:
·Hours
·Minutes
To select individual values (hours/minutes), press the UP button (4) or the DOWN button(5)andconfirmeachselectionbypressingtheSETbutton(3).
- T hencollectetheprocessusingtheMODEbutton(2).
- To change the set time, you must press the SET button (3) for 2 seconds; you can thencontinueasdescribedabove.
- Pressing the MODE button (2) twice takes you to the date/year/month settings. To enter the values, hold the SET button for approximately 3 seconds.
- To select individual values, press the UP button (4) or the DOWN button (5) and confirmeachselectionbypressingtheSETbutton(3).
To confirm all your settings and return to the start display, you must press the MODEbutton.
Note-I nput

- Hold the UP button (4) and the DOWN button (5) to select the values faster.
- A selectedItemwillflashtoindicatethatitcanbeset.
Note

T hedayofthewEEKisautomaticallyselectedwhenyousetthedatemanusually.
- The settings will automatically close if there is no entry for 20 seconds. The settings that were made up to that point are not saved!
5.2Settingandusingthealarmfunction
- In normal time mode, press the MODE button (2) once to set the alarm function. ALMisshowonthedisplay.
- Press the SET button (3) for approximately 2 seconds. The hours display begins to flash.
- Press the UP button (4) or the DOWN button (5) to select the hour for the alarm time and confirm your selection by pressing the SET button (3). The minutes displaybeginstoflash.
- Repeat the process to set the minutes for the alarm time. Then confirm the process withtheMODEbutton.
- Press the MODE button (2) twice to go to the start display.
- To activate the alarm function, you must press the MODE button (2) once to switchtoALMmode.IfyoupresstheUPbutton(4)once,thebellsymbol appearsonthedisplayandthealarmmisset.
- If you press the DOWN button (5) during the alarm, the alarm will be interrupted for 4 minutes and then go off again. The (^ and · ) symbol flashes.
- If no button is pressed, the alarm automatically switches to the snooze function; the alarm will be likewise interrupted for 4 minutes and then go off again. The (Z² and:) symbol flashes.
- Press any button (except the DOWN button) to stop the alarm/snooze function.
Note

- W henthealarmfunctionisactivated, thealarmmelodysoundsdailyatthe selectedtime.
- To completely deactivate the alarm function, press the MODE button (2) and thenpresstheUPbutton(4)threetimesuntilthesymbollonger shown on the display. Press the MODE button (2) twice to return to the start display.is no longershownonthedisplay.
5.3Maximumandminimumvalue(MAX/MIN)
- T hebasestationautomaticallystoresthemaximumandminimumindoor temperature andhumidityvalues.
- Repeatedly press the UP button (4) to switch between the current temperature, maximum temperature (MAX) and minimum temperature (MIN).
- Press and hold the UP button (4) for approximately 2 seconds to reset the stored maximum and minimum values.
5.4Hourlyreminderalarm
If you activate the hourly reminder alarm, a signal will sound every hour on thehour.
- Press the MODE button (2) once to go to alarm mode (ALM).
- Press the UP button (4) twice to activate the hourly reminder alarm.
- If you press the UP button (4) a third time, both the alarm you have set (to go off at a particular time) and the hourly reminder alarm will be activated. Press the buttona fourthtimetodeactivatebothalarms.
appearsonthedisplayifthehourlyreminderalarmisactivated. appearsonthedisplayifboththealarmyouhavesetandthehourly reminderalarmare a c tivated.
Note-WeathersymboIs

T heproductusesvisualpicturestoshowthecurrentweatherconditions (sunny/cloudy/rainy).
The weather conditions are measured based on temperature and humidity.
- N os symbolisdisplayedifthehumidityshow's--'.
| Sunny | Humidity ≤45% | |
| Cloudy≤56% | ||
| Rainy>56% |
5.5Temperatureindicator
- Press the SET button (3) in normal time mode to switch between ^ C and ^ F for the temperature display.
- Temperature measurement starts automatically when the batteries are inserted. In normaltimemode, the display shows the current temperature, which is automatically updated every 20 seconds.
6.CareandMaintenance
- Only clean this product with a slightly damp, lint-free cloth and do not use aggressivecleaningagents.
Make sure that water does not get into the product.
7.WarrantyDisclaimer
Hama GmbH & Co KG assumes no liability and provides no warranty for damage resulting from improper installation/mounting, improper use of the product from failure to o bserve the operating instructions and/or safety notes.
8.TechnicalData
| Thermometer/hygrometerwithweather indicator | |
| Powersupply | 3 V 2 x L R 1 130buttoncells |
| Measuringrange: Temperature | -40°C to +50°C |
| Measuringrange: Humidity | 20% to 90% |
- TepMometp ngurpometp
2 6atapeuLR1130 - HactoIaIHHCTpyKUIN
3.TexHnka6e30nachocctn
-ИЗденипретнаначеснолбкддомшero npimmehenia.
- Bepeb ot rpa3n, BlaIaI N IcToHKnOB TeIIa. 3KcNJIyATnpoBaTb TOfkO B cynxX yCNOBnIX.
C6bHnOaTbTexHnueckneXapaKTePncTtKN.
-BepebOTBlaIaNb6pb3r.
He npmehaB 3aIpeTHbIX 30hX.
-HepoHrTb.BepeybotcNJIbHbIxydapOB.
3aPpeaaetcamaocToTeBHO pEmOHnPOBaTb yCTPOCTBO.PeMOHT pa3peaaetc npOn3BOoNTb TOnbKO KBaINΦuNPOBAHHOMy NepcoHany.
- YnakOBky He daBaTb DeTAM: onaCHOCTb acDfKcM.
- Yttnn3npoBaTb ynaKOBky B COOTBcTCTBUN C MecThbIMN HOpMaM.
3anpeaetcBHOCTbM3MeHHeNBA KOHCTpyKcHIO.B npOTNBOM Cnyae rapaHTnHbEo6aTeJIbCTBaAHHyInpyIOTc.
HeKcIpyaTnpoBaTB HENOpceDCTBeHHOn 6n3OCTn CHarpeBaTeNbHbIM np60paMn,6epeyBoTnpmBxCONHeHyxNyue.
- ⅢdènèHeoTkpbIbAaTb.3anpeuαeTcKcnnyaTnpOBaTbHeuCnPabHOeN3dènne.
-HeJaBaTbDeTЯM!
IcnoIb3yIte n3dene TOnbKO ByMepeHHbIX KINMaTnueeCKNX yCNOBnX.
BHHMaHHe.BaTapeu

CobnOaTb noJrHocTb 6atae (+n - ) .HecoBIOJeHne noJrPHocTm MoKet CTaTb npuHHoB B3pbBa 6atae.
Pa3peWaaetc npImeHb aKkMyIaTOpbToJbKO yKa3aHHO Tnna.
-Перетдагузковаатapеиночтьконтakтbl.
3anpeaetaTcndetam3ameHt6aTaapei6e3npuCMOTpaB3pocnbix.
He npimehrTa pa3nHbIe Tnbl NHOBbI cTapblc BmecTe.
B cnlyae 60nbwo rnepepbB 3Kcnnyataun ydaanmbatapen n3 yctpoNCTBa (Kpome cnyyaeB, KOrda n3dene npnmeHareTcB kaeeCTBe abapuHoro).
- He3aKopaUbaTbKOHTaKTbIbTapei.
-06bIyHbIe6aTaapeHne3apJxKaTb.
Batapeu BoroHb He 6pocatb.
Batapeu XpaHntb B 6e30nachOM MeCTe H He DaBaTb DeTAM.
He otkpbibaTe, He pa3bupaTe, He rnotaTe n He ytnn3npyTe 6atape n C 6bTOBIM Mycopom. B 6atapex Moryr codepxatbc BpeHbIe TjXeJIbIe MetaIIbl.
- 3pacxoOBOaHHbIe 6bapen HeMeIeHHO ydaJIaTb n3 npu6opa n yTuJIN3nPoBaTb.
I36eaiTe xpaHEnH, 3apJKN HNCIOb3OBaHnN PpN EKCTpeMaJIbHbIX Tempeatypax N KCTpeMaJIbHO Hn3KOM aTMocOepHOM DaJIbeHnN (HaNPmEp, HaobuoiBbICote).
BHMaHne-BaTapei

He biiHmaiTe 6atapen. PnCK OXIOROB OAnChbIMN BeUeCTBaMn.
- 3TO n3dene coepknt Khoonohhe 6atape. Pn npornaatbHaHn Khoonohbx 6atape B03MOxHb cepbe3hble OXoTN BHyTpEHNX opraHO, KOtOpBte MoryT pa3BHTcB a TceHne 2 YacOB n npuBeCTN K CmePTN.
XpaHHTe HOBIE IN NCIOJIb3OBAHHbIe 6aTapeIN B MeCTax, HeIOCTyHbIX IJIaTei.
- Ecnn OTeJeHne IJn 6TaapeH He 3aKpbBaTc HAdExHo, He NcNoJIb3yIte n3dJIeNn XpaHnTe erO B MeCTax, HeNOCTynhBix JnIeTe.
- PnnoO3peHn Ha nporNaTbIbAHne 6aTapeH nn nonaHaHn IX B opraHn3M INhBMcNocobomHemeJeHHoo6paTntEc3aMeuHCKoHNOMOUHO.
4.BbOdB 3 KcnnnyatauH0
OTkpOte KpbIwKy otceka 6atape (6), ydaJInte n3oJIaTOp n 3akpoTe KpbIwKy otceka 6atape (6). TepMometp rOtOB k pa6ote.
4.1Noctabka(7)
TTO TTObIyCTaHOBHTb N3dJIe, Heo6xoIMo BbITHyTb NTKnHyTb NOCTaBky (7) nOJ OTcEKOM dJaBaTpei (6).
5.3knnyataa
5.1 HactpoKa DaTbI, Yacob mΦopMaTa MmKauu BpeMeHH
Iocne ydaenna n3oJrtoPob 6aTape np6op BkHuaetcB O6bHOM pexnme. Pn Eton Ha nCnlee OT6paXaETc BpeM B foOpMaTe 12:00, a MeIoNn CnHaJIIN3npyE T o RotOBHOCTK paOte. (ObuHbI pexm)
C NOMOJIbIO KHOJOK UP (4) IIN DOWN (5) yCTaHOBNTe 12- YacOBoi nnn 24-YacOBoi fOpMaT BpeMeHn.
- BbIepeTe JxJaembl fOpMaT c NOMOsbIO KHOJOK UP (4) nn DOWN (5).
3aTeMaHxMmaIe KhoNky SET (3),yTo6bI nocneIOBaTeJIbHO noITBepdntb CNeDyUoIeHaCTpOoiK:
4acbl
-
MHHyTbI.
-
YCTAHOBITE 3HaueHnra (aCbI/MmHyTbI) C NOMOUsIO KHOKNu UP (4) uNn DOWN (5), 3aTeM NOITBepINTE Bb6Op C NOMOUsIO KHOKNu SET (3).
- Nocne 3Toro 3aBepWite HactpoKy C nMOuBIO KHONK MODE (2).
-ДяизмehнгногьсмпгнногьсmнгногьсmнгногьсmнгногьсmнгногьсmнгногьсmнгногьсmнгногьсmнгногьсmнгногьсmнгногьсmнгногьсmнгногьсmнгногьсmнгногьсmнгнogьсmнгногьсmнгногьсmнгногьсmнгногьсmнгногьсmнгногьсmнгногьсmнгногьсmнгногьсmнгногьсmнгногьсmнгногьсmнгногьсmнгногьСmngy - Пи NOВTOPHOM Haxatm KhoNk MODE (2) OTKpbIbaeTc MeHIO HaCTpoKn DaTbI/roJa/Meca.ДЯ BBOda 3HaueHn HaxMITE n ydepxNBaTe KhoNky SET b TeueHne npMpEphO3c.
- YCTAHOBITE 3HaueHHe C NOMOJIbIO KHOKNI UP (4) INN DOWN (5), 3aTeM NOITBEPINTE Bb6Op C NOMOJIbIO KHOKNI SET (3).
-Дяп подеверкдань Вьбopaи ВОЗврета К Начальнй З actabke ДИСПЛЕНжмт ekноку MODE.
PpmeaHne-BBODaHHbIX
-TO6bIyCkOpntBm3MeHHeHne3HaueHnABOBpeMaHAcTpOuKN,ydepxNBaIte KhoNky UP (4) nn DOWN (5).
- BobpemHaCTpoKn3HaueHHeNepaMeTpamirraet.

PpmeaHne
-ДeньнебеллстановпльваетаВТOMATИСЕКИОСЕНACtpoйкдТы.
- Pekim Hacptponk BbIKNoaetcABTOMaTneckn, cHn HOnHa KhoNka He Haxkata BteHHe 20 ckyH. NImeHHbIe Do 3tOro npaMetpbl He coxpaHIOCTCA!

5.2HaCToPouKaΦyHKUa6yDnIbHnKa
-Дя HabToKnФyHKuN 6yДЛbHnKa B HopMaJIbHOM pexmE OJHOKpaTHo HaxMTE KONky MODE (2).Ha dinCnIee nOraBITcra HaIIMCb ALARM (6yDINJIbHnK).
Haxmnte n OK. DByx cekyHd ydepXnBaIte KhoNky SET (3). HauHet MInraTb 3HaueHneuca.
C NOMOJIbKHOKNUP (4) nIN DOWN (5) yCTaHOBITe 3HaueHne Yaca dIyINbHnKa I NOITBepInTe Bbl6Op C NOMOJIbKHOKN SET (3). HaHT MIRAtb3HaueHHeMnHyT.
- NOBTOPUte npoueDpy nla HAcTpoiKN MmHyT. 3aTeM noDTBePnTE HAcTpoiKy c nOMOUsbKHOHONKMODE.
-ДявОЗВРаТКнанальНоиЗ actaBKeДИСПЛЕЯДБЖдыHaЖМITEKHONKY MODE(2).
ДяakTnBaCmNФyHKcMn6yDnIbHnKa Heo6xOdHMo nepeiTu B pexuM ALM, HaxaB KhoNkY MODE (2) OIN pa3. PpO OHOKpaTHOM HaxaTN KhoNk UP (4) Ha DnCnJIe NOBnEeTcNMBON KOLOKbUHaKa -6yDnIbHNKBKnIOueH.
- TTo6bI BKJIQUHTb ABTONOBTOp CnHnla 6yDnHbHKa (yepe3 4 MNHyTb), BO BPeMRA 3BOHKA HAXMITE KHOKNY DOWN (5). CnMBON (Zz n:) MURAeT.
- EcHn HN OHa KHONKa He Haxata, 6yHJIbHnK ABTomaTueckn NepexOHT B pexm Snooze, CnHaj npepbIbaeTc Ha 4 MInHytbl, 3aTeM NOBTopraTc. CmBOn (W) mnaer.
- TTo6bI OTKJIIOHTb CnHaN, HaxMnte JIo6yIO KOnKy, KpOme DOWN.

PpMueaHne
-PrnBKNHueHHoHfHKuN6yDnIbHnKamEJIOJIN3ByUHTeKeIHeBHO 3a,dHaHHoeBpeM.
ДлгTO rOTO6bI NOJHOCBtIO OTKJIIOHTbФyHKcIIO 6yDINbHnka,HaKMITE KhoNk Ky Mode (2),a3aTeM TpIXKdbI HaxMMte KhoNky UP (4),YTO6bl Ha DInCnIe 60JIbWe He OTo6paXaJcra CmBOJ .ДЯ BO3BpTa KaHauJIbHOI 3aCTaBKe DInCnIeR DAbxDbI HaxMMte KhoNky MODE (2).Ha DInCnIee Ncye3Het CmBOJ.
5.3 MakcmaJIbHbIe m MmHMaJIbHbIe 3HaueHnRA (MAX/MIN)
3aФИКСИРОВАHьIE MaKcIMaJIbHьIe MmHIMaJIbHьIe 3HaueHn KOMHaTHOH TempepaTpybl, a TAKXe BlnaxHOCTN BO3dYxa ABTomaTNUeCKn COxpaHryOTcB namATINp60pa.
Haxmamte KhoNky UP (4), TTo6bl nepeKJIouaTb HnDnKaUIO TeKyuei TemnepaTypbI, MmHmAbHo TEMnepaTypbI (MIN) n MaKcImaJIbHOI TemnepaTypbI(MAX).
Haxmte n okono 2 ckynd ydepknBaite KhoNky UP (4),yTo6bl ydaIntb coXpaHeHHbIe MaKcMmaJIbHOe IMHImMaJIbHOe 3HaueHn.
5.4HaHOMnHaHne
- HanomHaHHe -3TO CnHAn, KOtOpBn 3ByuHT KaKDbI qac.
- Haxmte KhoNky MODE (2) Odnp 43 dIy nepexoDa B pexm 6yDnIbHnka (ALM).
-ДяakTnBaCmHAnOMMHaHnДBaXdIbHaxMnteKhONkyUP(4).
ДлгaktnBaun6dUnbHnKa nHaONmHaHnHaXmnte KhONky UP (4)Втети pa3.Поссе утврстOrHaHaxaTnHa 3Ty KhONky oba cnHaja otKnIOuohIoTc.
-ECnHaONMHaHHeBkJIOyeHo,Ha3KpaHEnOBaTeTCaMBOJ BKNIOeHbIbNbHnHaNOMHaHHe,Ha3KpaHE NOBJIOTCA MMBOJIbI
PnmeaHne-CmBolbnorOdbi
- Pnp60 npok3bIbaetekyuiee coctoHne nOroDbIC NOMOuIO CnMBOIOB (rcho/06naHNO/DOxkb).
CocToHnne nOrObl onpeJeTcryTeM N3MepeHnre TempeaTypbIN BnaXHOCTN. - EcnBMeCTo 3HaueHnBnJaxHoCTN Bo3nya OTo6paKaetcA - - - ,Dpyrne CmBOJIbHeOTo6paKaIOTcA.
-TepMomemTbp/XIrpomMeTbp
2xLR11306aTepeTn"KoNue"
-TaunHCTpyKzmaaynoTpe6a
3.3a6eJekn3a6e30nachocT
- PpOdyKtBt e npE,dbuDcH 3a JnUHa, HeCToNaHcKa 6bTuBa yNTope6a.
- Na3e Te npdykTa OT 3aMbpcBaHe, Bnara n npperpaBe H ro n3no3BaTe cMo B C yXINOMEueHn.
He n3noJI3BaIte npOyKta I3BbH HeROBITE rpaHnHa MoUHOCCTa, NOCOeHN B TexHnueCKNTeHaHH.
He n3non3BaIte npdykTa BbB BlaJxHa CpeDa Nn36raRbaTe BoHn npckn.
He n3no3BaIte npOdykTa B 30Hn, B KOnTO He ca pa3peuEHN eNeKtpoHHnpOdykTn.
He no3B0JaBaIte Ha npOyKta da na ana He ro n3JaaraTe Ha cnHn Bn6paun.
He ce onntbaite camn da obcnykbate nnpemOnhtnape npOkyta. Octabete BcKaKbA TexHuecka NoDpBkKa Ha KOMNteHTHnTe CneuaJInCTn.
3aIbJIxNTeJHO npBxTe MaIKnTe Deua DaJeue OTo NaKOBuHnMaTePnA,IMaONaCHOCTOT3aNyUbaHe. - 3xBbPte OAnKOBbUHMaTeepnA BEdHaCByIaCHO DeNCTBaUHTe Ha MRCOpa3IOpe6n3aN3XbBpJHeHaOTnAbu.
He npabete npomeHbypea.Taka 3ary6nte npabo Ha BcKaBn rapaHouHHnpTeu.
He 3n0JI3BaIte npOyKTA B HENOCpeDCTBeHa 6NI3OCT DO OTONITeHN ypeH, DpyrHn3TOHHuHaTOnnHaUNHaNDpeKTHACNbHYeBacBTJINHa.
He OTBapnpoDyKta n npn noBpeHa He npoDbJXaBaA da ro n3no3BaW.
-ПоюбногаьсчкneilekeTpuecknpoDyKTInTo3npoDyKTHe6nBa,danona,baBp bceTeHaedeca!
-Използоваьтейрόдуктасмогиморуноклиматичнистовя.
BHHMaHb-5aTePm

3aIbIxNteHNO BHMMaBaIte 3a npabHnHOTo pa3noJoxHe Ha noIOcIte (HaIINCn + n-) Ha 6atePnte n rNoCTABete No CbOTBTHMa HauHH. Ppu HeCnA3BaHEMaonacCHOtOTn3TuHaENIIKeKnIO3nHa6atePnte.
- I3noJ3BaIe caMo akymyIaTopn (nn 6aTePn), KOUTO CbOTBETCTBaT ha nOCoeyHnTn.
-ПпспнocтавянHeHa6aTepeuNTeNoUcTeTeKoHTaKTnTeHa6aTepuNTe HacpeuNTeKoHTaKTn.
BHHMaHb-BaTeepu

- He pa3pewabaihe Na decaTa da cmeHr 6atepn 6e3 n43Op.
He cmecbaTe capan n HOBn 6aTeepnn n 6aTeepnn O T pa3nueH Tn nn npon3BQnten.
MaxaTe 6atepnTe OT npOdykTN, KOTo He ce n3NoI3BaT No-DbNro BpeMe. (OCBeH aKO Te CE NOnBpKAT B rOTOBHOCT 3a CneuHn CnyaH)
-HeCbBp3BaIte6aTepeHtEHaKbco.
-HezapexkdaTbe6aTepeuNTe
HeXbplnTe6atepnntBOrbH.
CbxpnaHbAte 6aTePnTE,HeoctbHm3a Deua.
BaTeepnIe HnKora He 6bBa da 6bDaT OTBapRnH, NOBpeXdaHn, TblTaHn nn IN3XbBpJrHn B npiPoJdata. Te MoRa Ia CbIbpxkAT TeKKn MetaJIH, KOUTo Ca OtpOBHN nn ONaCHN 3a OKoJIHata cpeA.
MaxheTeOT npOyKTA HHe3a6abHNO 3XbBpIeTne 3xa6eHnTe 6aTePN.
- 368raTe CbxaHHe, 3apeXdaHe m 3no3BaHe npEektpemn TemepaTpN m3KIOHTeHNO HsCKO Bb3yUHO HaJraHe (HaP. Ha rOenM BcOuHH).
BHHMaHb - BaTePm Tn „Konue"

He n3baaJaTe 6atepnaTa,cbueCTByBa onaCHOCT OT n3raphe 3apaOnaCHNBeeCTBA.
To3n npOdyKT cbIbpxka 6aTeepuT TIN ,KOnue". Ako 6atepuTAt TIN ,KOnue" 6bJe nOrbHATA, MoXe Da HacTbIaT TeXKn I3rapAHH B paMKte cMo Ha 2 yaca N da DOBeDAT Do Cmbpt.
CbxpaaHbAte HOBTe m3non3BaHnTe 6aTeepnn daenee ot deca.
AkoOTdeneHnTo3a6atepnntHece3aTbapcunpyphO,HeI3noI3BaIte NOBue npOdykTa nroCbxpaHbAte daJecheOTdeua.
Ako cmtate, ye 6aTeepn ca noTbHATn nn Ce HAMnP aB HAKO YACT Ha TAYIOT, He3a6abHONOTbpcTeMeDnUHCKaNOMO.
4.NyckaheBeknloataa
OtbopeTe KaNaka Ha otdeleHneTo 3a 6atepnn (6), otctpaheTe npeKbCbaaata JIeHTa N 3aTbopeTe OTHOBo KaNaka Ha otdeleHneTo (6). TepMometbpt e rOTOB 3a eknloatauia.
4.1CtoKa(7)
3aДаИЗправITE npOуКТа,ТрбБаДа ce ИЗдьрna I OTbOPn CTоиKaTа (7),KoЯTO ce HAMIPA NOД KANAKA Ha OTdeHneHMeTo 3a 6aTePmN (6).
5. Eknnoataa
5.1 HactpoKaJaTa/uc/φopMaT3aBpeMe
CneIOTcpanBaHe Ha 30JnpaataJeHTa Ha 6atepnaTce NOKa3Ba CTAndaptHO BpeMe BBΦopMat 12:00 m MeIOJn CnHnN3npa, Ye npOyKTBt e rOToB 3a paBota. (PekIM Ha cTaNdaptHO NOKa3BaHe Ha BpeMeTO)
HaTnCHHe 6yToH UP (4) nIn DOWN (5), 3a da n3bepTe MeKdy 12- n 24-ycob fOpMaT.
C6ytohUP(4)uIN6ytohDOWN(5)u36epeteXeJahnmaqopmat.
Cnei toBa HATNCHE Te 6yToH SET (3), 3a da npednpemete CnEHNHe HaCTpoKn:
-
yacobe
-
MNHYTN
3a n360p Ha OTDeHnTe CTOnHOCTn (yacOBe/MnHyTu) HaTnCHeTe 6yToHa UP (4) mnn 6yToHa DOWN (5) nOTBbPdTe CbOTBeTHnHa n36Op qpe3 HATnCKaHe Ha 6yToHaSET(3).
CneTobnpoceBcTe npknHouBa ot bytoHa MODE (2)
3a da npomeHnte Beue HacTpoEHn Yac, TpRbBa da HaTncHe 6yToHa SET (3) 3a 2 cekyni, Cnei TOBa MoKe da npOdbJnxTe KaKTo e OINcHo no-rope.
-Чрздыкрано натуckане на 6утона MODE (2) стигate ДО настюкata Data/ rodnha/Meceu. 3a Да вьбete CTоюнocite, 3aДрьхte HaTCHAT 6утона SET 3aOKono3cek.
3a n360p Ha OTdENHHe CTOnHOCTn HATNCHEte 6yToHa UP (4) nnn 6yToHa DOWN (5) nNOTBbPDTe CbOTBeTHn n360p Upe3 HA TnCKaHe Ha 6yToHa SET (3).
3a da notBbpynte BCNUKO n da ce BbpHTe KbM HaayanHnEkpaH, Tp6Ba da HAHTCHETe6yToHa MODE.
3a6eJexKa-BbBExKaHaHeHaCToHocTn

-ДрьхтЕ haTиСHAT 6byToHa UP (4) nIi 6byToHa DOWN (5), 3a Ja n36uPate CTOnHOCTHTeNo-6bp30.
- PpIMRBAHeto Ha n36paHata No3nua CnHaJIIN3npa, ye Ta MoKe da 6bJe HAcTPOeHa.
3a6eJexkka

HactpoikataHaJeHrOT CeMnuaTaCe N3BbPwBa ABTomuHOp 4pe3 pbHata HactpoKaHaDaTata.
HaCtpoiknte aBtOMaTHUHO ce npeKpaTbAT, aKO He nocJeBa BbBexJaHe B npOdbJxHHe Ha 20 cekyHn. BcNKn npEepnpEnDotoraba HActpoikn He ce3anamETbBAT!
5.3 Han-BnCoka n Han-HnCKa CTOnHOCT (MAX/MIN)
-
OCHOBHATA cTAHUNA ABOTMaTHUHO CbXpAHRA HaH-BNCOKNTe HHa-HNCKNTe CTOHCTNa TEMNEpaTApaN BnAXHOCTTa HA Bb3DyxA B NOMEUEHENETO.
-
HatnckaIte noCneIOBateHNO 6yToHa UP (4), 3a da npemnhabTe mexdy noka3BaHTo Ha akTuJIHata, Hau-Bucokata (MAX) n Hau-Hnckata (MIN) temnepaTypa.
- Hatnche n 3aipbke Te Hatahchat 6yToHa UP (4) 3a okono 2 cekyni, 3a da Hyinpate 3anaMeTeHne HaB-BnCOKn Hn-HnCKn CTouHOCTN.
5.4AInapMa3aHaNoMnHHe
AJaPMaTa3aHaNoHMHeH3dAbacnHaJIHaBcEKNKpbIbJYac.
- Hatnche 6ytoHa MODE (2) BeHbX, 3a da CTnHete Do pexm "AnapMa" (ALM).
Ako 6ytohBt UP (4) 6bJe HATnCHa TBa NbTu, ce aKTNBupa anapMaTa 3a HAnOMHHe.
Ako 6yToHbT UP (4) 6bJe HATNCaT TpeTu NbT, Ce AKTNBnPaT aIapMaTa 3a C6yXJaHe n aIapMaTa 3a HanOMHHe. Ako 6yToHbT 6bJe HATNCaT YETBbPtn NbT, DBeTeaJAPMNCEeAKTNBnPaT.
Ako e 3aadaeHa aIapMaTa 3a HAnOMHHe, Ha ekpaHa ce noBBA Ako aIapMaTa 3a cb6yKdaHe n aIapMaTa 3a HAnOMHHe ca 3aadaeHn, Ha ekpaHa cenOABBa
3a6eJexKa-CmB0n3aBpeMeTo
- PpOyKbT nKa3Ba aKtyaHnHaTa MeTeOpOToRnUHa cTuYaunr Ype3 Bn3yaAHH N3o6paXeHnra (CtBnHuEBO/O6NaHNO/DbXKnOBHO)
ToBaCe n3MepBa Bb3 OCHOBa Ha TempepaTpaTa N BlaXHoCTTa Ha Bb3Dyxa.
He ce noka3Ba cunBOn, KoraTo BnaJXHOCTTa Ha Bb3Dyxa noka3Ba
86652Monheim /Germany
Service& Support

www.hama.com

+499091502-0
D GB
CE
All listed brands are trademarks of the corresponding companies.
Errors and omissions excepted, and subject to technical changes.
Our general terms of delivery and payment are applied.

- Controlsanddisplays
- 1.ExplanationofWarningSymbolsandNotes
- Warning
- Note
- 2.Packagecontents
- 3.SafetyNotes
- Warning-Batteries
- Warning-B buttoncells
- Getting started
- 4.1Base(7)
- Operation
- Settingthedate/time/timeformat
- Note-I nput
- 5.2Settingandusingthealarmfunction
- 5.3Maximumandminimumvalue(MAX/MIN)
- 5.4Hourlyreminderalarm
- Note-WeathersymboIs
- 5.5Temperatureindicator
- 6.CareandMaintenance
- 7.WarrantyDisclaimer
- 8.TechnicalData
- 3.TexHnka6e30nachocctn
- BHHMaHHe.BaTapeu
- BHMaHne-BaTapei
- 4.BbOdB 3 KcnnnyatauH0
- 4.1Noctabka(7)
- 5.3knnyataa
- HactpoKa DaTbI, Yacob mΦopMaTa MmKauu BpeMeHH
- PpmeaHne-BBODaHHbIX
- PpmeaHne
- 5.2HaCToPouKaΦyHKUa6yDnIbHnKa
- PpMueaHne
- MakcmaJIbHbIe m MmHMaJIbHbIe 3HaueHnRA (MAX/MIN)
- 5.4HaHOMnHaHne
- PnmeaHne-CmBolbnorOdbi
- 3.3a6eJekn3a6e30nachocT
- BHHMaHb-5aTePm
- BHHMaHb-BaTeepu
- BHHMaHb - BaTePm Tn „Konue"
- 4.NyckaheBeknloataa
- 4.1CtoKa(7)
- Eknnoataa
- HactpoKaJaTa/uc/φopMaT3aBpeMe
- 3a6eJexKa-BbBExKaHaHeHaCToHocTn
- 3a6eJexkka
- Han-BnCoka n Han-HnCKa CTOnHOCT (MAX/MIN)
- 5.4AInapMa3aHaNoMnHHe
- 3a6eJexKa-CmB0n3aBpeMeTo
- 86652Monheim /Germany
Brand : HAMA
Model : TH140
Category : Weather Station