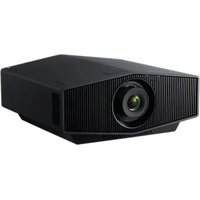
VPLPWZ10 - Projector SONY - Free user manual and instructions
Find the device manual for free VPLPWZ10 SONY in PDF.
User questions about VPLPWZ10 SONY
0 question about this device. Answer the ones you know or ask your own.
Ask a new question about this device
Download the instructions for your Projector in PDF format for free! Find your manual VPLPWZ10 - SONY and take your electronic device back in hand. On this page are published all the documents necessary for the use of your device. VPLPWZ10 by SONY.
USER MANUAL VPLPWZ10 SONY
Sony Corporation Printed in China
VPL-PHZ10/PWZ10
上(九)
警告
電報對賠償安全的故款事項在守法與法。
© 2017 Sony Corporation


4695875010
そのマニュルについて
This Quick Reference Manual explains the basic operations for projecting pictures. It also describes important notes and cautions to which you have to pay attention when handling and using this unit.
Refer to "Indicators," and "Cleaning the Air Filter," as necessary. For details on the operations, refer to the Operating Instructions contained in the supplied CD-ROM.
Step 1
Preparing Page 13
Step 2
Connecting.. Page 15
Step 3
Projecting......Page 16
Indicators.. Page 20
Cleaning the Air Filter Page 22
Before operating the unit, please read this manual thoroughly and retain it for future reference.
WARNING
To reduce the risk of fire or electric shock, do not expose this apparatus to rain or moisture.
To avoid electrical shock, do not open the cabinet. Refer servicing to qualified personnel only.
WARNING
THIS APPARATUS MUST BE EARTHED.
CAUTION
Danger of explosion if battery is incorrectly replaced.
Replace only with the same or equivalent type recommended by the manufacturer. When you dispose of the battery, you must obey the law in the relative area or country.
CAUTION
One lithium battery (CR2025) is supplied for the RM-PJ8 Remote Commander. To avoid risk of explosion, use a lithium battery (CR2025).
WARNING
When installing the unit, incorporate a readily accessible disconnect device in the fixed wiring, or connect the power plug to an easily accessible socketoutlet near the unit. If a fault should occur during operation of the unit, operate the disconnect device to switch the power supply off, or disconnect the power plug.
CAUTION
About the LAN connector
For safety, do not connect the connector for peripheral device wiring that might have excessive voltage to this port.
WARNING
- Use the approved Power Cord (3-core mains lead) / Appliance Connector / Plug with earthing-contacts that conforms to the safety regulations of each country if applicable.
- Use the Power Cord (3-core mains lead) / Appliance Connector / Plug conforming to the proper ratings (Voltage, Ampere).
If you have questions on the use of the above Power Cord / Appliance Connector / Plug, please consult a qualified service personnel.
IMPORTANT
The nameplate is located on the bottom.
For the customers in the U.S.A.
This equipment has been tested and found to comply with the limits for a Class A digital device, pursuant to part 15 of the FCC Rules. These limits are designed to provide reasonable protection against harmful interference when the equipment is operated in a commercial environment. This equipment generates, uses, and can radiate radio frequency energy and, if not installed and used in accordance with the instruction manual, may cause harmful interference to radio communications. Operation of this equipment in a residential area is likely to cause harmful interference in which case the user will be required to correct the interference at his own expense.
You are cautioned that any changes or modifications not expressly approved in this manual could void your authority to operate this equipment.
All interface cables used to connect peripherals must be shielded in order to comply with the limits for a digital device pursuant to Subpart B of part 15 of FCC Rules.
This device complies with part 15 of the FCC Rules. Operation is subject to the following two conditions: (1) This device may not cause harmful interference, and (2) this device must accept any interference received, including interference that may cause undesired operation.
For the customers in Canada CANICES-3 (A)/NMB-3(A)
For the customers in Europe, Australia and New Zealand
WARNING
This equipment is compliant with Class A of CISPR 32. In a residential environment this equipment may cause radio interference.
For the customers in Europe
This apparatus shall not be used in the residential area.
A国吉(用早用兑通
i i 1
For the customers in the U.S.A.
CAUTION
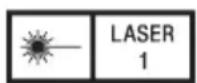
Use of controls or adjustments or performance of procedures other than those specified herein may result in hazardous radiation exposure. This product is classified as a CLASS 3R LASER PRODUCT.
WARNING
LASER RADIATION AVOID DIRECT EYE EXPOSURE CLASS 3R LASER PRODUCT
CAUTION
Do not look into the lens while in use.
CAUTION
Do not allow children to operate this product without supervision.
CAUTION
The use of optical instruments with this product will increase eye hazard.
For the customers in other countries
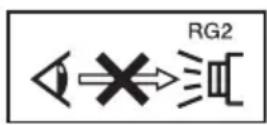
IEC 60825-1:2014 CLASS 1 LASER PRODUCT
As with any bright light source, do not stare into the beam, RG2 IEC 62471-5: 2015.
WARNING: Do not look into the lens while in use.
Caution
Use of controls or adjustments or performance of procedures other than those specified herein may result in hazardous radiation exposure.
Caution
The use of optical instruments with this product will increase eye hazard.
IEC 60825-1:2014 LASERPRODUKT AV KCLASS 1
Precis som med alla starka Ijuskallor bør man inte titta direkt i stralen, RG2 IEC 62471-5:2015.
VARNING: Titta aldrig in i projektorns lins medan den anvands.
Forsiktigkeit!
For the State of California, USA only
Perchlorate Material - special handling may apply, See www.dtsc.ca.gov/hazardouswaste/perchlorate
For the Customers in Brazil only
For the customers in the U.S.A.
SONY LIMITED WARRANTY - Please visit http://www.sony.com/psa/warranty for important information and complete terms and conditions of Sony's limited warranty applicable to this product.
For the customers in Canada SONY LIMITED WARRANTY - Please visit http://www.sonybiz.ca/pro/ lang/en/ca/article/resources-warranty for important information and complete terms and conditions of Sony's limited warranty applicable to this product.
For the customers in Europe
Sony Professional Solutions Europe Standard Warranty and Exceptions on Standard Warranty. Please visit http:// www.pro.sony.eu/warranty for important information and complete terms and conditions.
For the customers in Korea
SONY LIMITED WARRANTY - Please visit http://bpeng.sony.co.kr/ handler/BPAS-Start for important information and complete terms and conditions of Sony's limited warranty applicable to this product.
Location information of the labels
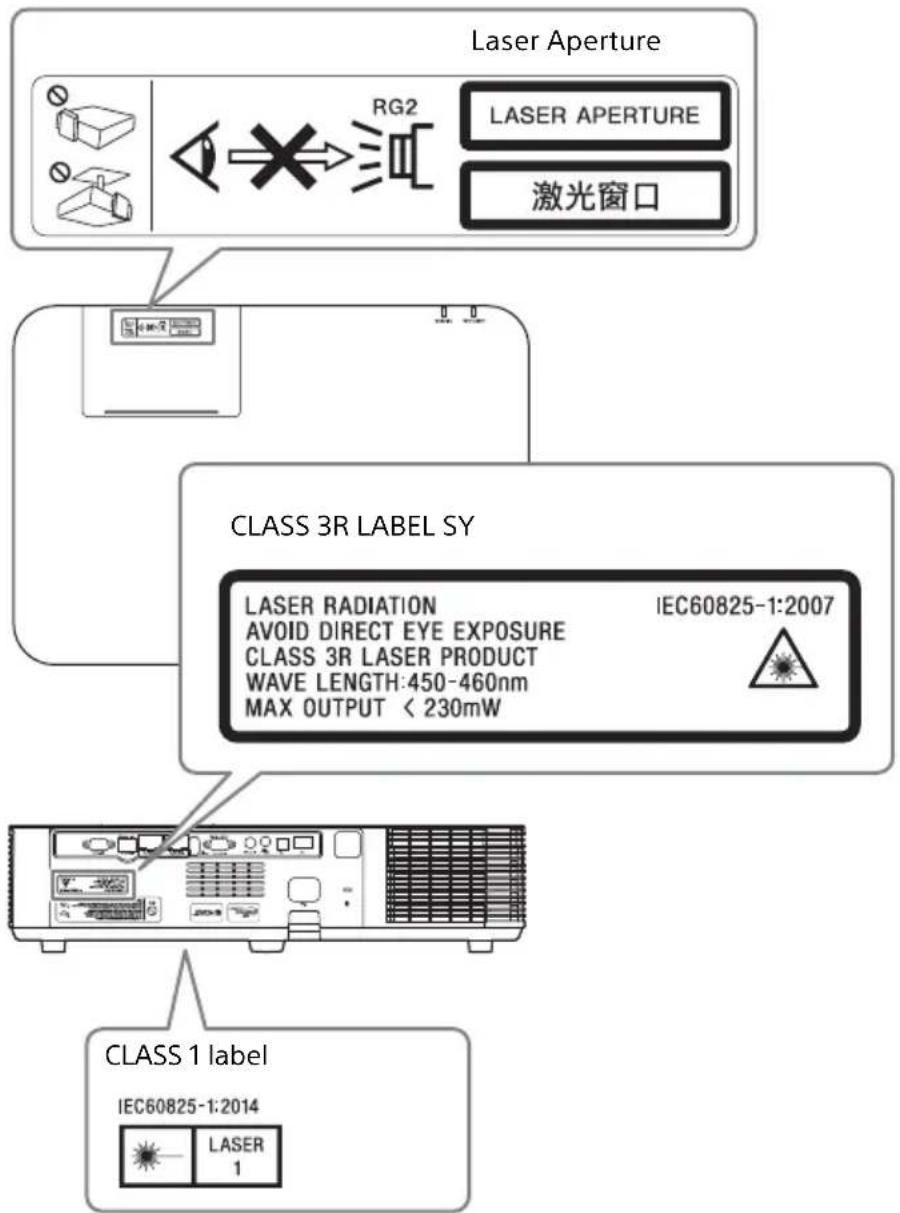
Light source specifications
4.5 W laser diodes
21 pcs
20 pcs*2
Wavelength: 450 - 460 nm
*1: VPL-PHZ10
*2: VPL-PWZ10
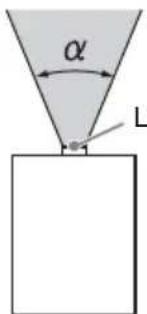
Beam divergence angle from lens of this unit
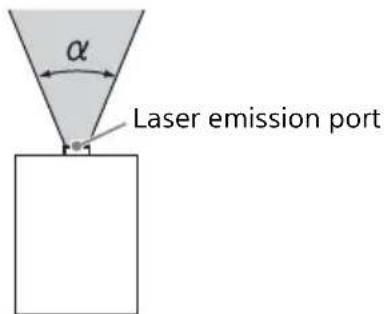
Model Name Zoom maximum: Zoom minimum:
VPL-PHZ10/PWZ10 42^30^

廢電池請回收
第一類雷射產品
- Check that the operating voltage of your unit is identical with the voltage of your local power supply. If voltage adaptation is required, consult with qualified Sony personnel.
- Should any liquid or solid object fall into the cabinet, unplug the unit and have it checked by qualified Sony personnel before operating it further.
- Unplug the unit from the wall outlet if it is not to be used for several days.
- To disconnect the cord, pull it out by the plug. Never pull the cord itself.
- The wall outlet should be near the unit and easily accessible.
- The unit is not disconnected from the AC power source (mains) as long as it is connected to the wall outlet, even if the unit itself has been turned off.
- Do not look into the lens while in use.
- When turning on the projector, make sure no one is peeking at the projection lens.
- Do not let children use the unit alone.
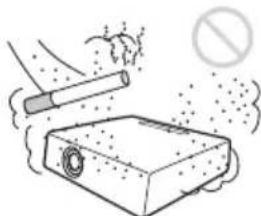
- Do not place your hand or objects near the ventilation holes - the air coming out is hot.
- Be careful not to catch your fingers by the feet (adjustable) when you adjust the height of the unit. Do not push hard on the top of the unit with the adjuster out.
- Be sure to use two people to grasp both sides of the unit when carrying the unit.
- Avoid using an extension cord with a low voltage limited since it may cause the short-circuit and physical incidents.
- Do not catch your finger between the unit and surface of the floor when moving the projector installed on the floor.
- Be careful not to catch your finger in the cooling fan.
-
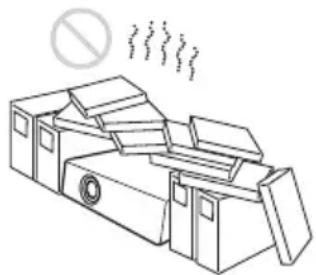
Do not carry the projector with the cabinet on and with its cover open.
-
Do not install the unit in a location near heat sources such as radiators or air ducts, or in a place subject to direct sunlight, excessive dust or humidity, mechanical vibration or shock.
- If a user disassembles, repairs, or alters the unit, it may cause a serious problem to the user's safety.
- If the projector malfunctions or is damaged, consult with a qualified Sony personnel.
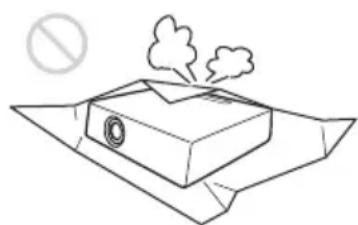
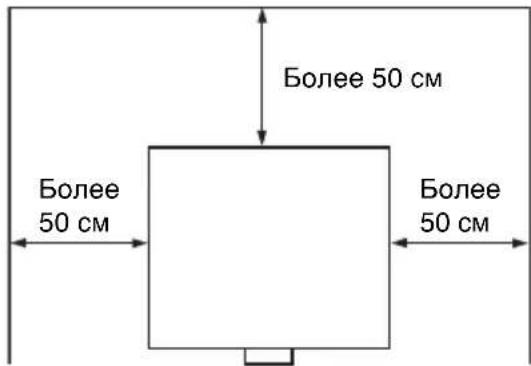
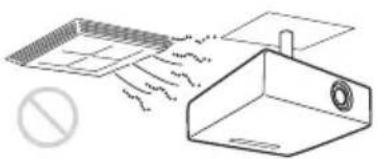
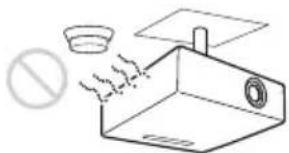
- If the ventilation holes are blocked, internal heat builds up, and it may cause a fire or damage the unit. To allow adequate air circulation and prevent internal heat build-up, follow the items below:
- Place the unit, leaving sufficient space from walls or any objects (page 10).
- Avoid using something to cover the ventilation holes (exhaust/intake).
- Do not place the unit on surfaces such as an original packing sheet, soft cloth, papers, rugs, or scraps of paper. The ventilation holes may take in such materials.
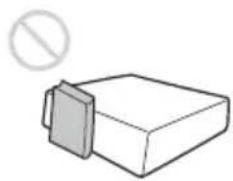
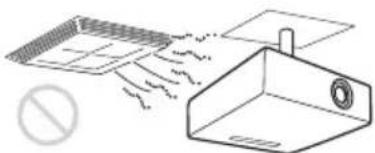
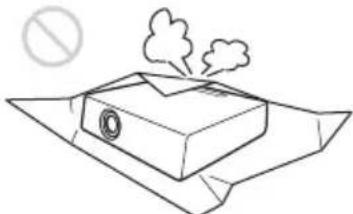
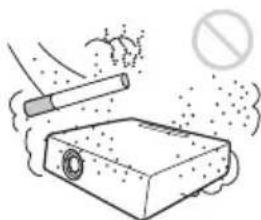
- Do not place any object just in front of the lens that may block the light during projection. Heat from the light may damage the object. Use the picture muting function to cut off the picture.
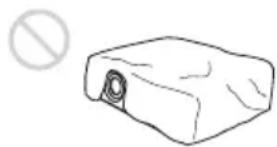
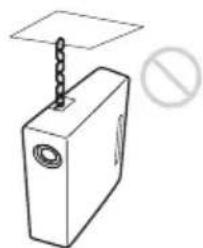
- Do not use the Security bar for the purpose of preventing theft for transporting or installing the unit. If you lift the unit by the Security bar or hang the unit by this bar, it may cause the unit to fall and be damaged, and may result in personal injury.
For dealers
- When the projector is mounted on the ceiling, a Sony bracket or recommended equivalent must be used for installation.
- Be sure to secure the cabinet cover firmly when installing to the ceiling firmly.
Caution
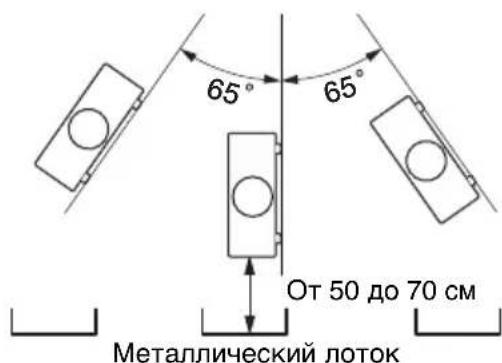
When installing the unit at the angle illustrated, if the ventilation holes are facing down, install a metal tray (min. 40cm× 40cm (15^3 / 4^ × 15^3 / 4^ ) ) at the distance indicated below directly under the ventilation holes.
Ensure that foreign materials or liquids do not drop into the ventilation holes.
Portrait (The buttons of the unit face down)
Safety precautions for installing the unit on a ceiling
- Never mount the projector on the ceiling or move it by yourself. Be sure to consult the store where you purchased the projector or a dedicated installer.
- When installing the unit on a ceiling, be sure to use a safety wire, etc., to prevent the unit from falling. For the installation, be sure to consult the store where you purchased the projector or a dedicated installer.
On Installation
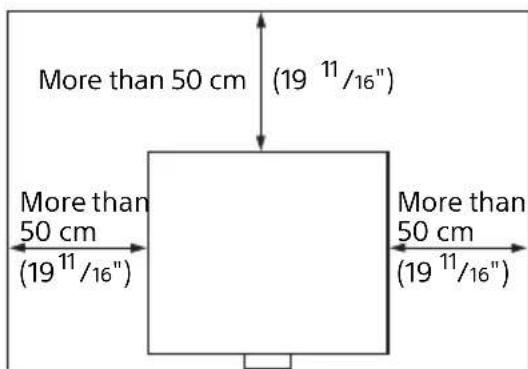
- When installing the unit, leave space between any walls, etc. and the unit as illustrated.
- Avoid using the unit in a location where the temperature or humidity is very high, or temperature is very low.
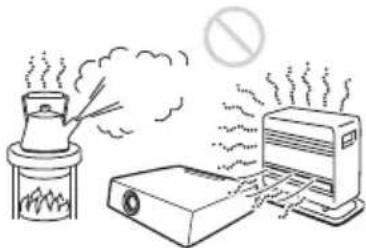
- Avoid installing the unit in a location subject to direct cool or warm air from an air-conditioner. Installing in such a location may cause malfunction of the unit due to moisture condensation or rise in temperature.
- Avoid installing the unit in a location near a heat or smoke sensor. Installing in such a location may cause malfunction of the sensor.

- Avoid installing the unit in a very dusty or extremely smoky environment. Otherwise, the air filter
will become obstructed, and this may cause a malfunction of the unit or damage it.
-
When using the unit at an altitude of 1,500m or higher, set "High Altitude Mode" to "On" in the Installation menu. Failing to set this mode when using the unit at high altitudes could have adverse effects, such as reducing the reliability of certain components.
-
Set "Installation Attitude" on the Installation menu correctly to suit to the Installation angle. Continuing to use the wrong setting may affect component reliability.
On cleaning the projection window and the cabinet
- Be sure to disconnect the AC power cord from the AC outlet before cleaning.
- If you rub on the unit with a stained cloth, the cabinet may be scratched.
- If the unit is exposed to volatile materials such as insecticide, or the unit is in contact with a rubber or vinyl resin product for a long period of time, the unit may deteriorate or the coating may come off.
- Do not touch the projection window with bare hands.
-
On cleaning the projection window surface: Wipe the projection window gently with a soft cloth, such as a glass cleaning cloth. Stubborn stains may be removed with a soft cloth lightly dampened with water. Never use solvent such as alcohol, benzene or thinner, or acid, alkaline or abrasive detergent, or a chemical cleaning cloth.
-
On cleaning the cabinet: Clean the cabinet gently with a soft cloth. Stubborn stains may be removed with a soft cloth lightly dampened with mild detergent solution and wrung, followed by wiping with a soft dry cloth. Never use solvent such as alcohol, benzene or thinner, or acid, alkaline or abrasive detergent, or a chemical cleaning cloth.
On Illumination
To obtain the best picture, the front of the screen should not be exposed to direct lighting or sunlight.
On Heat Dissipation
The temperature of the projector cabinet may increase during or immediately after use; however, this is not a malfunction.
On Screen
When using a screen with an uneven surface, stripes pattern may rarely appear on the screen depending on the distance between the screen and the unit or the zooming magnifications. This is not a malfunction of the unit.
On Fan
Since the projector is equipped with a fan inside to prevent internal temperature from rising, there may be some noise. This is a normal result of the manufacturing process and does not indicate a malfunction. If, however, in a case of abnormal noise, consult with qualified Sony personnel.
On inspection of light source related parts
Since the unit uses a laser, when performing maintenance or inspection of light source related parts, particular attention and a safe environment are necessary. Be sure to consult with qualified Sony personnel.
On disposing used products
Do not dispose the used products and general garbage together.
Correctly dispose of used products to avoid harming the environment or the health of yourself and others. Follow the disposal regulations of your area.
On LCD Projector
The LCD projector is manufactured using high-precision technology. You may, however, see tiny black points and/or bright points (red, blue, or green) that continuously appear on the LCD projector. This is a normal result of the manufacturing process and does not indicate a malfunction. Also, when you use multiple LCD projectors to project onto a screen, even if they are of the same model, the color reproduction among projectors may vary, since color balance may be set differently from one projector to the next.
On condensation
If the room temperature where the projector is installed changes rapidly, or if the projector is moved suddenly from a cold to a warm place, condensation in the projector may occur. As the condensation may cause malfunction, be careful in adjusting temperature settings of the air conditioner. If condensation occurs, leave the projector turned on for about two hours before use.
Notes on security
- SONY WILL NOT BE LIABLE FOR DAMAGES OF ANY KIND RESULTING FROM A FAILURE TO IMPLEMENT PROPER SECURITY MEASURES ON TRANSMISSION DEVICES, UNAVOIDABLE DATA LEAKS RESULTING FROM TRANSMISSION SPECIFICATIONS, OR SECURITY PROBLEMS OF ANY KIND.
Depending on the operating environment, unauthorized third parties on the network may be able to access the unit. When connecting the unit to the network, be sure to confirm that the network is protected securely. - Communication content may be unknowingly intercepted by unauthorized third parties in the vicinity of the signals. When using wireless LAN communication, implement security measures properly to protect the communication content.
- From a safety standpoint, when using the unit connected with the network, it is strongly recommended to access the Control window via a Web browser and change the access limitation settings from the factory preset values (refer to "Using Network Features" in the Operating Instructions). Changing the password regularly is also recommended.
- Do not browse any other website in the Web browser while making settings or after making settings. Since the login status remains in the Web browser, close the Web browser when you complete the settings to prevent unauthorized third parties from using the unit or harmful programs from running.
Notes
- Always verify that the unit is operating properly before use.
- SONY WILL NOT BE LIABLE FOR DAMAGES OF ANY KIND INCLUDING, BUT NOT LIMITED TO, COMPENSATION OR REIMBURSEMENT ON ACCOUNT OF THE LOSS OF PRESENT OR PROSPECTIVE PROFITS DUE TO FAILURE OF THIS UNIT, EITHER DURING THE WARRANTY PERIOD OR AFTER EXPIRATION OF THE WARRANTY, OR FOR ANY OTHER REASON WHATSOEVER.
- SONY WILL NOT BE LIABLE FOR CLAIMS OF ANY KIND MADE BY USERS OF THIS UNIT OR MADE BY THIRD PARTIES.
- SONY WILL NOT BE LIABLE FOR THE TERMINATION OR DISCONTINUATION OF ANY SERVICES RELATED TO THIS UNIT THAT MAY RESULT DUE TO CIRCUMSTANCES OF ANY KIND.
Checking the Supplied Accessories
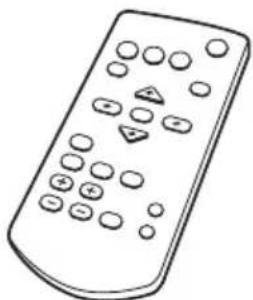
RM-PJ8 Remote Commander (1)
Lithium battery (CR2025) (1)
The battery is already installed.
Before using the remote commander, remove the insulation film.
AC power cord (1)
Quick Reference Manual (this manual) (1)
Operating Instructions (CD-ROM) (1)
Using the CD-ROM manual
The manual can be read on a computer with Adobe Reader installed.
You can download Adobe Reader free from the Adobe website.
1 Open the index.html file in the CD-ROM.
2 Select and click on the manual that you want to read.
Note
If you have lost or damaged the CD-ROM, you can purchase a new one from your Sony dealer or Sony service counter.
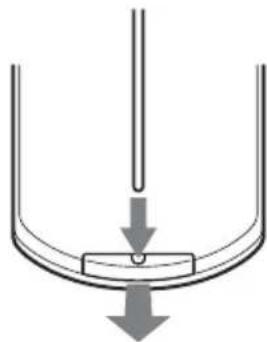
Installing batteries
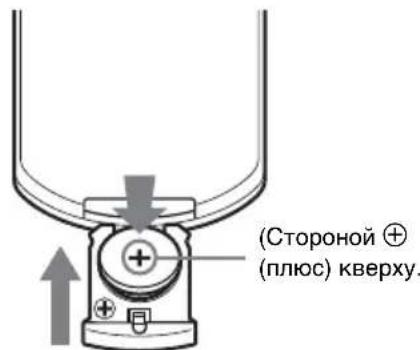
1 Pull out the lithium battery compartment.
Pull out the battery compartment with a stick as shown in the illustration.
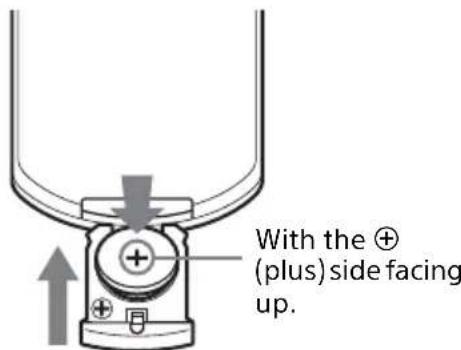
2 Insert a lithium battery.
3 Close the lithium battery compartment.
Selecting the Menu Language
The factory setting for the language for displaying menus, messages, etc. is English.
To change the on-screen language, proceed as follows:

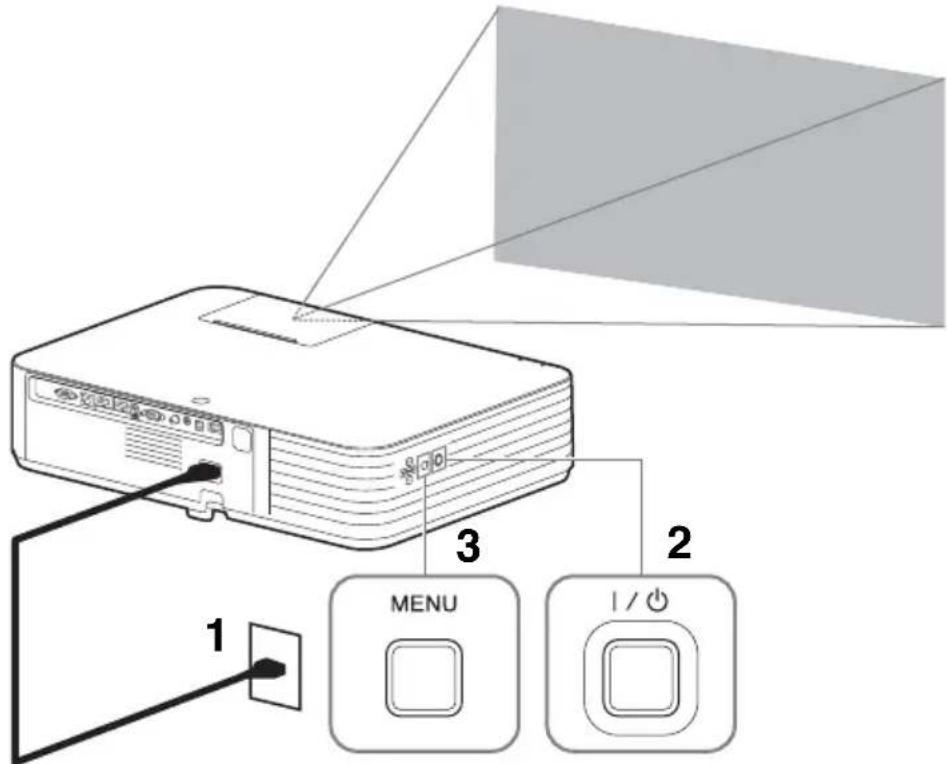
1 Plug the AC power cord into a wall outlet.
2 Turn on the projector. Press the I/ key on the main unit or the I key on the Remote Commander.
3 Press the MENU key to display the menu. If the display cannot be properly seen, adjust the focus, size, and position of the projected image (page 17).
4 Select the menu language.
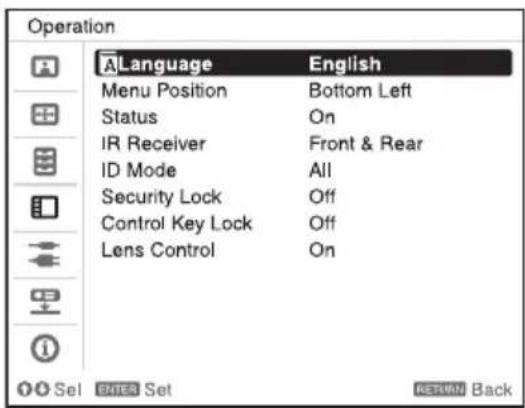
① Press the or key to select the Operation (menu then press the ENTER key.
② Press the or key to select "Language (A then press the ENTER key.
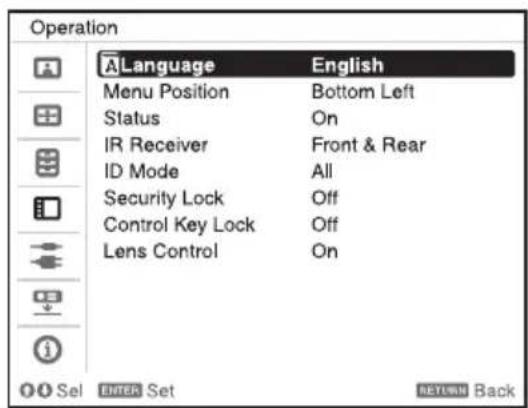
③ Press the / / / key to select a language, then press the ENTER key.
5 Press the MENU key to turn off the menu screen.
Step 2
Connecting
Notes
-
Turn off all equipment before making any connections.
-
Use the proper cables for each connection.
-
Insert the cable plugs firmly; Loose connections may reduce performance of picture signals or cause a malfunction. When pulling out a cable, be sure to grip it by the plug, not the cable itself.
-
For more information, refer also to the instruction manuals of the equipment you are connecting.
Connecting a Computer
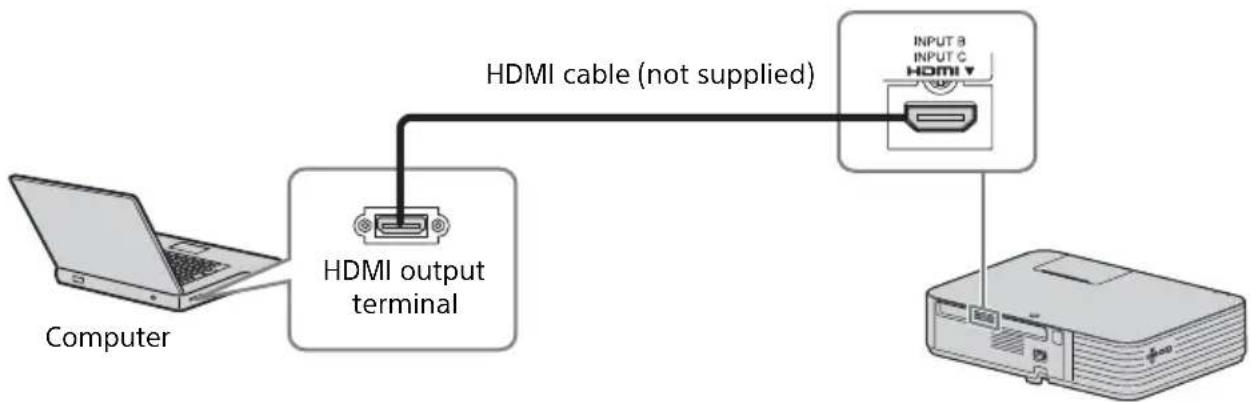
Notes
-
Use HDMI-compatible equipment which has the HDMI Logo.
-
Use a high speed HDMI cable(s) on which the cable type logo is specified. (Sony products are recommended.)
-
The HDMI terminal of this projector is not compatible with DSD (Direct Stream Digital) Signal or CEC (Consumer Electronics Control) Signal.
For information on other connecting methods, refer to "Connecting the Projector" in the Operating Instructions contained in the supplied CD-ROM.
Projecting an Image
The size of a projected image depends on the distance between the projector and screen. Install the projector so that the projected image fits the screen size. For details on projection distances and projected image sizes, see "Projection Distance and Lens Shift Range" in the Operating Instructions contained in the supplied CD-ROM.
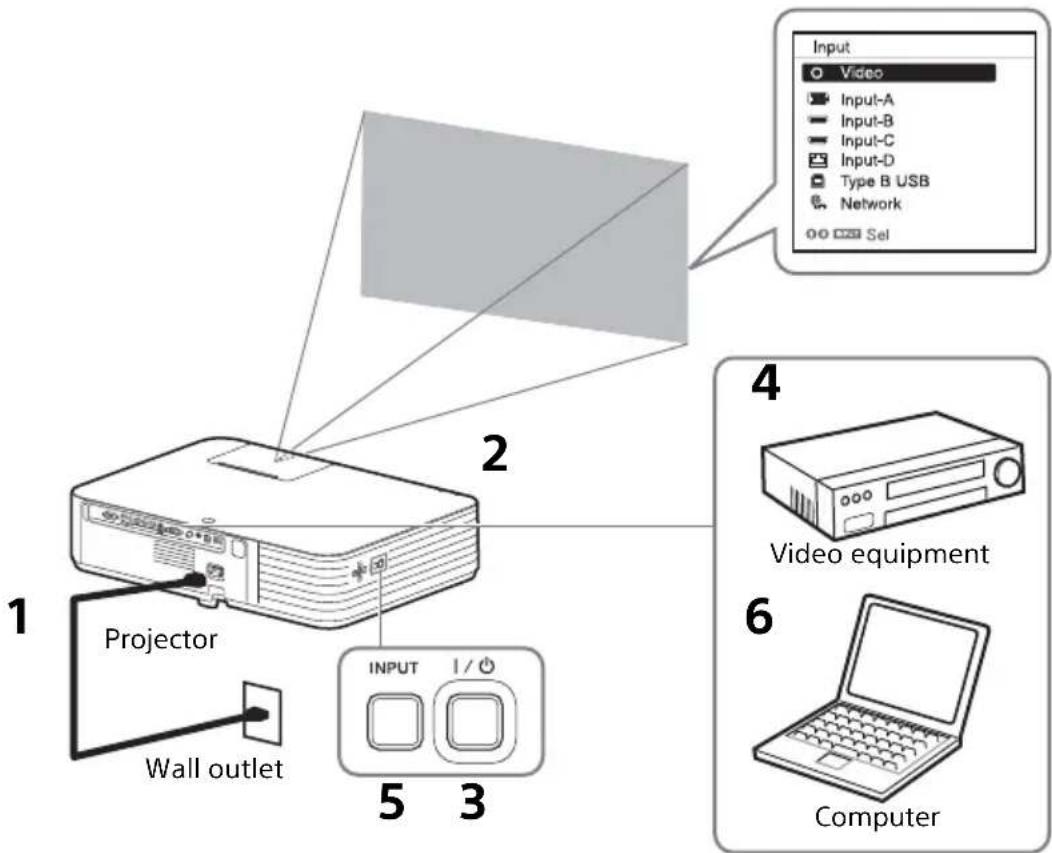
1 Plug the AC power cord into the wall outlet.
2 Connect all equipment to the projector (page 15).
3 Press the I/O key to turn on the unit.
4 Turn on the connected equipment.
5 Select the input source.
Press the INPUT key on the projector to display the menu for switching input signal on the screen. Press the INPUT key repeatedly, or press the / key to select an image to be projected.
6 When projecting a computer image, switch your computer's output to external display.
The method to switch the output varies depending on the type of computer.
(Example)

To play video and audio using USB Connection, see "Playing Video and Audio using USB Connection". To use Presentation Function via Network, see "Presentation Function via Network".
7 Adjust the focus, size and position of the projected image (page 17).
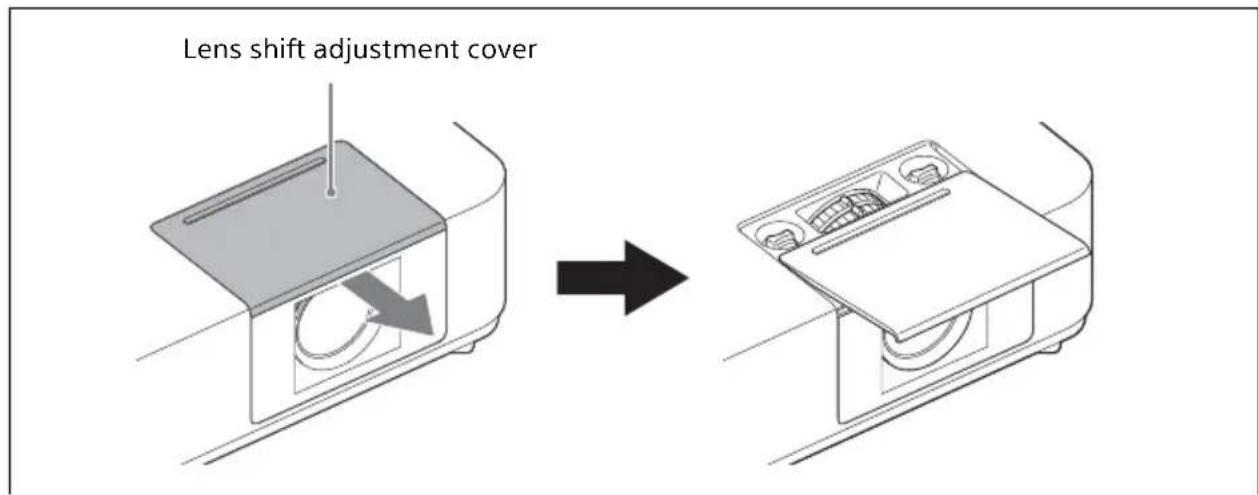
Adjusting the Focus, Size, and Position of the Projected Image
| Focus Size (Zoom) Position (Lens shift) | ||
| Focus lever | Zoom lever | H lens shift dial V lens shift dial |
Slide the lens shift adjustment cover as below.
Adjusting the tilt of the projector with the front feet (adjustable)
By changing the slope of the projector with front feet (adjustable), you can adjust the position of the projected image.
How to alter the angle
1 Keeping the button pushed in, raise the main unit to the desired angle.
2 For fine positioning, turn the right and left front feet (adjustable) beneath the unit.
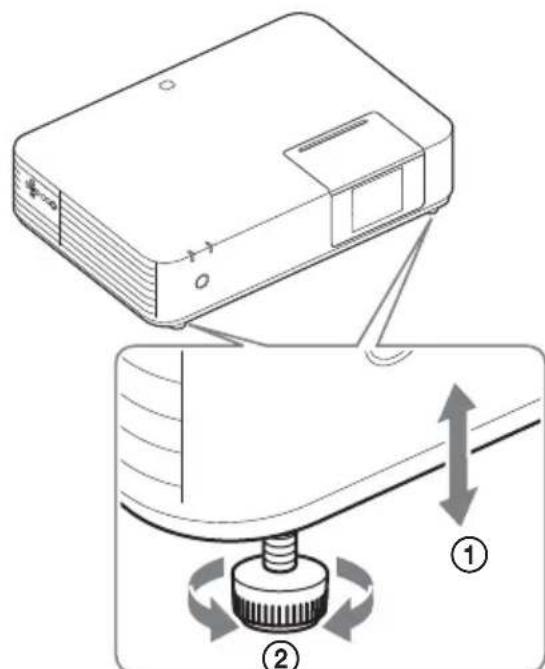
Notes
- Be careful not to let the projector down on your fingers.
- Do not push hard on the top of the projector with the front feet (adjustable) extended. It may cause malfunction.
Turning Off the Power
1 Press the I/ key on the unit or the remote commander. The projector starts shutdown and turns off.
2 Unplug the AC power cord from the wall outlet.
If you need to further adjust projected images, refer to "Projecting/Adjusting an Image" in the Operating Instructions contained in the supplied CD-ROM.
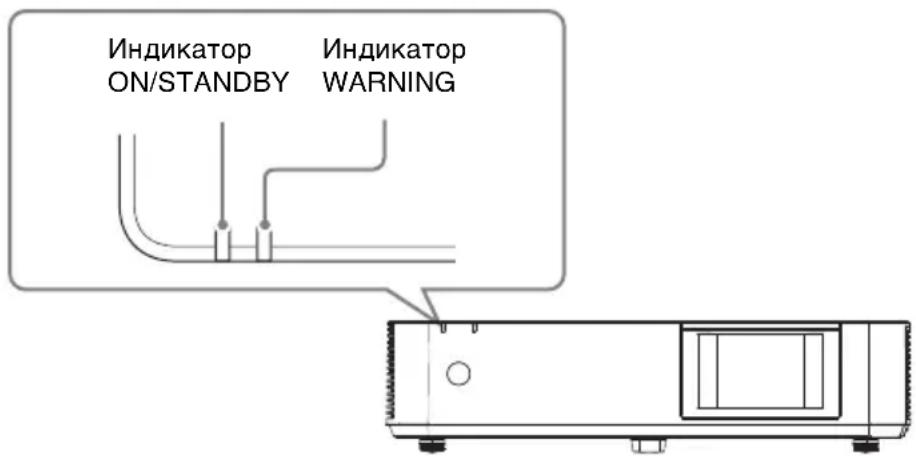
Indicators
You can check the projector status or abnormality by checking the lighting/ flashing status of the ON/STANDBY indicator and WARNING indicator on the front. If the indicators flash in red, address the problem in accordance with "Warning indicators and remedies" (page 21).

Operating status indication
| Indicator status Operating status Meaning | |
| (Off)(Lig) | Standby The power is supplied to the projector and the projector is in a standby mode according to the setting. |
| (Off)(Fla) | Warm-up The projector is warming up after it is turned on. |
| (Off)(Lig) | Power on The projector is ready for projection. |
| (Lights in orange)(Off) | Other standby status The projector is in With No Input (Light Cutoff), Quick Reboot standby mode, or the Speaker Setting is set to "Always On." |
Warning indicators and remedies
| Indicator status The number of flashes | Meaning Remedies | |
| (Lights in red) (Flashes in red) | Twice The air filter is not installed securely. | Check how the air filter is attached and install securely. |
| Three times The light source does not light properly. | Unplug the AC power cord and make sure the ON/STANDBY indicator turns off, then plug the AC power cord into the wall outlet and turn on the projector. | |
| Six times A strong shock to the projector is detected. | If there is no visible abnormality, unplug the AC power cord and make sure the ON/STANDBY indicator turns off, then plug the AC power cord into the wall outlet and turn on the projector. | |
| (Flashes (Flashes in red) in red) Both indicators flash | Twice The temperature in the projector is abnormal. | · Check if the air filter is clogged, then clean or replace it (page 22). · Check if the ventilation holes (intake/exhaust) are not blocked by the wall or an object and secure a sufficient gap. · Check the ambient temperature and use the projector within the range of operating temperature. |
If the indicators flash in a manner other than described above, unplug the AC power cord and make sure the ON/STANDBY indicator turns off, then plug the AC power cord into the wall outlet and turn on the projector.
If the problem still persists, consult with qualified Sony personnel.
If there is any problem or an error message appears on the screen, refer to "Messages List" or "Troubleshooting" in the Operating Instructions contained in the supplied CD-ROM.
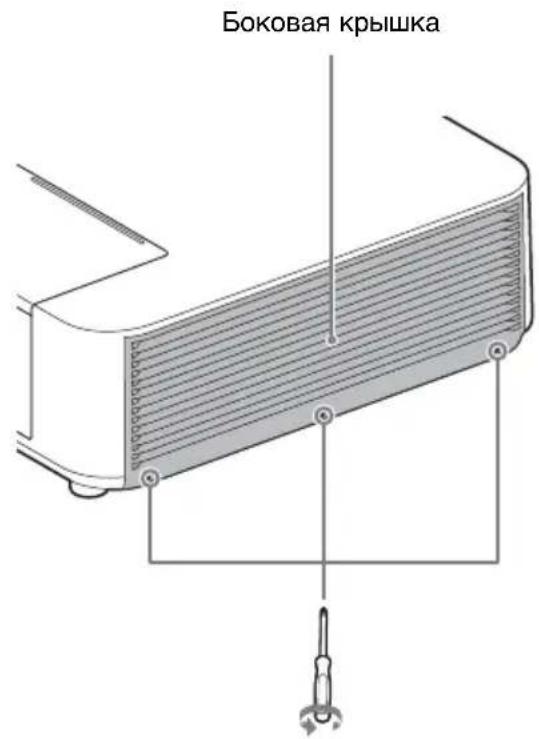
Cleaning the Air Filter
When the message on cleaning the air filter is displayed on the projected image, clean the air filter. If the dust cannot be removed from the air filter even after cleaning, replace the air filter with a new one. For details on a new air filter, consult with qualified Sony personnel.
Caution
If you keep using the projector even after the message is displayed, dust may accumulate, clogging it. As a result, the temperature may rise inside the unit, leading to a possible malfunction or fire.
1 Turn off the projector, and disconnect the AC power cord from the AC outlet.
Note
If you remove the side cover while the AC power cord is not removed from the AC outlet and power is not turned off, you may touch the fan inside the unit, resulting in injury.
2 Loosen the screws (three) on the side cover.
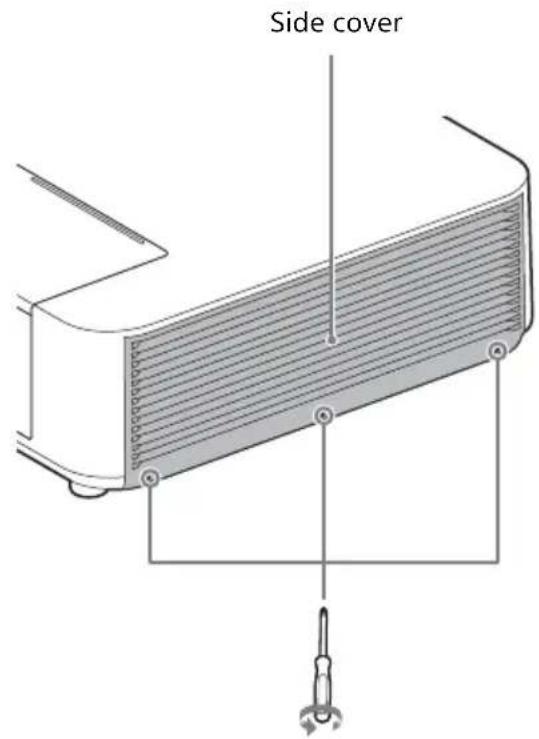
3 Lift up the bottom of the side cover to remove.
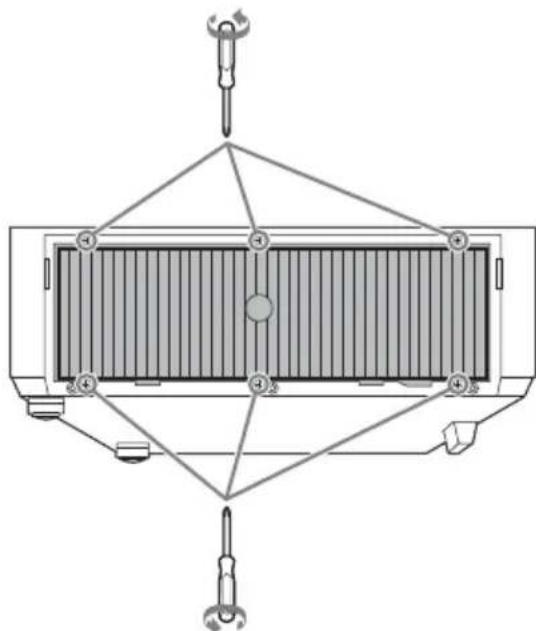
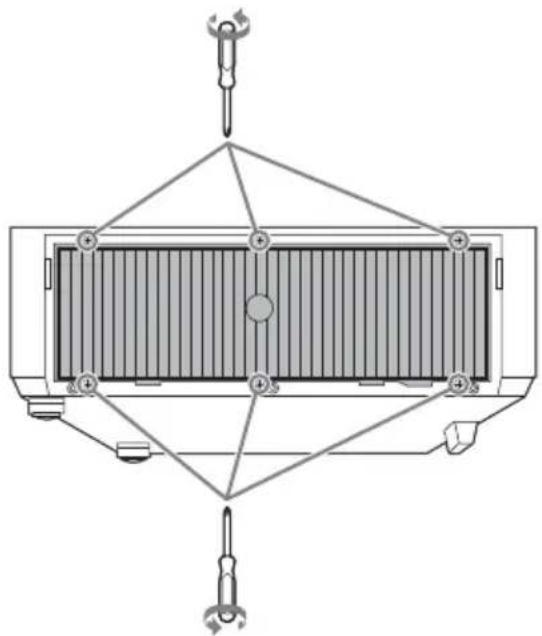
4 Loosen the screws (six) on the air filter.
7 Replace the air filter and attach the side cover.
Notes
- Be sure to attach the air filter firmly; the power cannot be turned on if it is not attached securely.
- Be sure to attach the side cover firmly. Incorrect attachment of the cover may cause a malfunction.
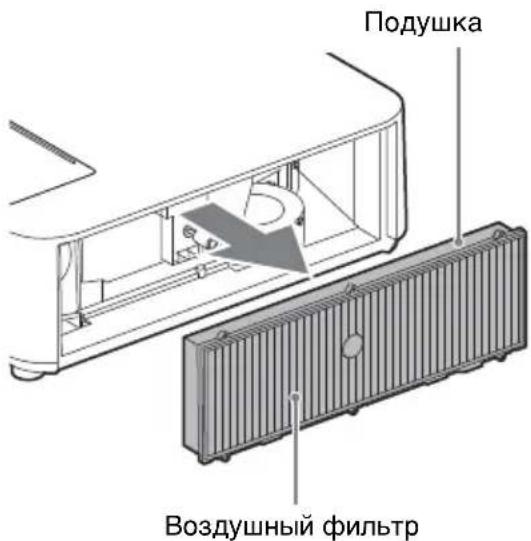
5 Remove the air filter.

6 Clean the air filter with a vacuum cleaner.
Note
Before attaching the air filter to the unit, make sure that the cushion on the frame of the air filter is dislocated or loose.
Preparation.. Page 11
Etape 2
Raccordement.. Page 13
Etape 3
Projection... Page 14
Témoins... Page 18
Wavelength: 450 - 460 nm
*1: VPL-PHZ10
*2: VPL-PWZ10
Wavelength: 450 - 460 nm
*1: VPL-PHZ10
*2: VPL-PWZ10
Wavelength: 450 - 460 nm
*1: VPL-PHZ10
*2: VPL-PWZ10
OuNTka Bo3dUnHoro fIbTp..Ctp.22
ПюeoКтор дaHHbIX VPL-PHZ10/PWZ10
IpeiHcIOJIb3OBAHnem yCTpOInCTBa BHHMaTeJIbHO IIPOHTaHTe HAcTOrIeepyKOBODTBO HCOxpaHNTe eRO IJIa IIOJIyuEHHaHEo6XoINMOHnHΦOpMauHN B 6yDyWeM.
PPEДУПЕЖDEHNE
Для снжehн риcka BO3ROPaHnИ Поржehн элктпчecKM TOKOM He ДОпсkaite BO3deICTBnHa annapaT BnAriN CbIpOCTN. ЧтобИ NCKЛIOUHTb риck поржehн элктпчecKM TOKOM, He ВСКрьИBaIte KOpnyc. Осclужване annapata DoJxHbI ВыINOLHЯТ bToIbKO КВаINФицюРовынbie Спeциалистbl.
ПЕДУПЕЖDEHNE DAHHOE YCTPOICTBO DOJIXHO BbITb 3A3EMJIENO.
OCTOPOXHO
IIpn HeIppaBnJIbHOJ 3aMeHe 3JIeMeHTOB
IIITaHnI BO3HnKaeT OIIaCHOCt b B3pIbA.
INIOJIb3yIte IJIa 3aMeHbI TOJIbKO
NIEHTuHbIe HJIN 3KBnBaJIeHTHbIe
3JIeMeHTbI IIITaHnI, peKOMeHJyEmbIe
H3TOBOTBeJIem.
IIpn yTHJIN3aUHN OTPa6OTaHHbIX
3JIeMeHTOB IIITaHnI HeO6XoIMO
CJIeIOBaTb IIpaBnJIaM, JeIcTBYIOIm M B
COOTBcETCTBYIOIepeHNOHe HJIN cTpaHe.
OCTOPOXHO
B KOMIIJEKT IIOCTaBKN IIyJIbTa IINCTaHUNHOrO yIpaBJeHHRA RM-PJ8 BXOINT OHa JINTHeBA6aTapeKa (CR2025).Bo H36eKaHne OIIacHOcTH B3pbIBa HcIOJIb3yIte JINTHeBYIO 6aTapeKy (CR2025).
NPEdynPExKeHne
Pn yctaHOBKe ycTPOcTBa HCIOJIb3yIte JeERKOIOCTYINHbI
IpepbIBaTeJIb IIITaHnA C
fHKcnpoBaHHo IIPOBOJKO HIN
IIOKJIIOHTe IIPOBOJ IIITaHnA K
JIeTKOIOCTUHOHaCTeHHoP03eTKa,
pacIOJOKeHHoPraOMcycTPOIcTBOM.
EcInB IIpoceCE 3KcIIpyatauIN 6JIOKa
BO3HNKHET HeNCIIpaBHOCtB, C IIOMOIbIO
IpepbIBaTeJIa OTKJIIOHTe IIITaHne, HIN
OTCOeINHHTE IIPOBOJ IIITaHnA.
OCTOPOXHO
Pa3bem LAN
B IeJx OBeCneueHn 6e3oNaChocTn He IIOKJIIOuHaIte K 3TOMy IOpTy coEINHTeJIbHbIe pa3BeMbl EJIeKTPOIIpOBOIKn IepnΦepHueCKHX yCTpoIcTB, KOTOpbIe, BO3MOXHO, IMcIOT Upe3MePHO BbICOKOE HaIIpJKeHne.
PPEyPPEKDEHNE
1.ИсПОЛБ3уНTe pa3peIIeHHbIe K IIpIMHeHnIO IINHyp IITaHnIa(c 3- JXJIbHbIM cNIOBbIM IPOBOJOM)/ pa3beM IJIg IIOJKJIIOUeHnIg6bITOBbIX IIpH6OpOB /IITeIceJIbHYIO BNIJKy c 3a3cMJIYIOIIHM KOHTaKTaMH, COOTBeTCTByIOIIne DeIcTBYIOIIHM HopMaM TeXHnKn 6e3OIIaCHOCTH KaXIOI OTJeJIbHOI CTpaHBI.
2.ИспоьзуITEIHHypПИТанн(a3- KINJBHBIM CNIOBBIM IPOBODOM) / pa3bemIIJIIOKJIIOUeHnI6bITOBbIX IIpIbOpOB/IIITeICeJbHyIO BNIJKy, COOTBeTCTByIOUHe IOIYCTHMbIM HOMHaJIbHBIM XapaKTepNcTHKaM (HaIIprJKeHne, cIIa TOka).
B cIyuae BOIIpOcOB OTHOCHTeJIbHO HcIOJIb3OBAHnY IIOmAHyTBIX BbIIIE IIHypa IIITaHnra / pa3bema IIJIA IOIKJIIOUeHHN 6bITOBbIX IIpH6OpOB / IIITeINCCJIbHOI BNJKN, IOXaJIyIcTa, O6paIaIteCb K KBaJIHΦHnIPoBAHHbIM CIIeIHaJIHCTam IIO cepBnCHOMy O6cJIyKINBaHHIO.
BAXHO
HΦopMaUHOHa Ta6JIuYka pacIOJIOKeHa BHN3y.
PPEyPPEKDEHNE
TOOBpyOBAHne COOTBeTCTByET KJIaccy A cTaHapTa CISPR 32.B
XHJIOI 3OHe 3TO O6OpUIOBaHHe MOKeT BbI3BaTb paIIOIIOMExN.
JaHHbI aIIIapaT He cJIeJyET HCIOJIb3OBA Tb B XNJIOJ 3OHe.
IEC 60825-1:2014
JI3EPHAR
ANAPATYPA
KJIACCA 1
KaK IN BCJIyuae c JIO6bIM
HCTOuHHKOM
JPKORO CBeTa, He CMOTpHTe IprMo Ha JyU, RG2 IEC
62471-5:2015.
PNEyPPEXDEHNE
HeJIb3a CMOTpeTb CKBO3b JINH3y IIpH NCIOJIb3OBAHH.
BHHMaHHe
IcnoJb3OBAHHe ycTpoiCTB yIpaBJIeHnpeRyJIInpOBOK N IpyTHX IpoUeIyp MoKeTIIpNBecTN K OIIaCHO JKcIO3NIIHN3JIyueHn.
OctopoXHo!
IcnoJIb3OBaHHe OHTNueckHX HHCTpyMeHTOB C daHHbIM H3JeJIHeM IIpNBeJET K yBeJIuYeHNIO OIIaCHORO BO3IeICTBnHa rJa3a.
SONY
CoHn KopnopeHH
1-7-1 KoHaH MnHaTo-Ky TokNo, 108-0075 YIOHnIa
CJeJanaHO B Krtae
HMIIOPTep Ha TeppHTOpHN cTpaH
TamoxeHHoro co103a
AO CoHn 3JIeKtpoHnKc, Pocchra, 123103,
MockBa, KapamblieBckn npoe3n, 6
TO yCTPOIcTBO AIBJETCIA POEKTOPOM IJIa IIPOeIINPOBAHn H3O6paXKeHN C IOKJIIOUeHHORO KOMIIbIOTepa HJN BUNDeOO6OpyIDoBaHn.
OpraHH3auny, yIOJHOMOeHHa IIpHHMaTb IpeTeH3nN OT IOJIb3OBaTeJeHa TeppHTopHH
Ka3axCTaHa:
AO CoHH 3JIeKTPoHnKc
PipeCTaBHTeJIbCTBO B Ka3axCTaHe
050059 AImaTbI, yJHua IBaHNIOBa, n.
58
IaTa H3rOToBJIeHn yKa3aHa Ha H3JeJIHH yIiakOBKe Ha 3TNKeTKe co IITpuX-KoIOM B cJIeIyIOIIeM fOpMaTe:YYYY-MM, rIe MM-Mecra, YYYYY- roI N3rOToBJIeHn.
EcJH HeNCpPaBHOCTb He yJaeTcra
ycTpahHTb cJeIyra daHHoH HHCTpyKIIHN - 06paHTTeCB B 6JIHXaIIHN
aBTOpH3OBAHHbI SONY IeHTp IIO
peMOHTy H O6cJIyXKNBaHHIO.
PeaJIN3aIINIO ocUIIeCTBJIATb B COOTBeTCTBHH C JeIcTBYIOIMM Tpe6OBaHHMaN 3aKOHOJaTeJIbCTBa. OTCJIyXKNBIIIEe H3JeJIne yTHJIN3HIpOBA Tb B COOTBeTCTBHH C JeIcTBYIOIMM Tpe6OBaHHMaN 3aKOHOJaTeJIbCTBa.

PacnoIoxeHne nHΦopMaun Ha NaKJIeKax
XapaKTePnCTnKn nCTOuHnKa CBeta
Ja3epHbIe IIOJbI 4,5BT
21 pcs
20 pcs
Wavelength: 450 - 460 nm
1: VPL-PHZ10
2: VPL-PWZ10
YroJpacXoIIMOCTn Nyka OT 06BeKTHBa yCTpOiCTBa
Laser emission port
Ha3BaHneMoJeMakcImaJIbHoe
yBEnuHHe:α
MHHMaJIbHoe
yBeJIuYeHne: α
VPL-PHZ10/PWZ10 42^30^
MepblnpedoctopoxkHOCTN
CbeHnO 6e3oNaChOCTN
- Y6eIHTecb, yTO pa6Ooee HAnpJxKeHne ycTPOcTBa IHeHTuHO HaIpyKeHHIO MeCTHO 3JIeKTPocETn. IIpn HcO6XoHMocTH aJaTTaIIHN HaIpyKeHHaOBaTHeTecb K KBaINΦHIIpOBAHHOMy IepcoHaJIy KOMIIaHHN Sony.
B cIyac nOIIaHnB HByTp b Kopnyca yCTPOcTBa IOCTOPOHNX IpeIMeTOB HJIN KIKOCTe OTKJIIOHTe eO OT 3JIeKTPnueckoCtHN IIpei DaJIbHeHIM HCIOJIb3OBaHHem IIpeJaIte Ha IIpoBepKy KBaIHΦHIIpOBaHHOMY IIepcoHaJIy KOMIIaHHN Sony.
EcH yctpoCTBO He 6yJeT HCIOJIb3OBaTbc8 Ha IIpOTJKeHHn HeCKOJIbKHX JHeN, OTKJIIOHTe eRO OT 3JEKTpHuECKOPO3eTKN.
-ДяOTcoeHHeHHaHypa6epHTecb3a HTeIeJIb.HNKOrJa He TAHHTe 3a IHHyp. - YcTpoIcTBO cJIeIyEeTIIOKJIIOUaTb K paCIOJIOXKeHHoR pAOM 3JIeKTPnueckOoP03eTKe,IOCTyII K KOtOpO HnueM He 3aTpYdHeH.
- YcTPOHCTBOOCTaETCnIOKJIIOueHHbIM K NCTOuHNky IITaHnI IepMeEHNO TOKa,IOKA OHO IOJKNIOyeHO K 3JIeKTPnueckoN pO3eTKe,JaXe ecJIN CAMO VcTPOHCTBO BbIKJIOueHO.
HeJIb3a CMOTpeTb CKBO3b JINH3y IpiN HcIOJIb3ObaHH. - Pn BkJIOueHnn IpoeKTopa y6eIHTcB, YTO HNKTO He CMOTPNT BO6beKTNB IPOeKTopa.
HeIO3BOJIaHTeJeTAM camOCToTeJIbHO HcIOJIb3OBaTb VCTPOIcTB0.
HeIOHOCHTe pyKn HJIN KaKHe-JIN60 IpeIMTeBtIK BeHTNJIAIHOHHbIM OTBepCTnM-H3 HNX BbIXOINT TOpYn BO3JyX.
Co6JIIOJaTe OCTOpOxHocTb, YTO6bI He 3aIeMHTb IIaJIbIb HOKKaMn (peRyJINpyEmbIMN) BO BpeMa peRyJINPOBKN BBICOTbI yCTpONCTBa. He JaBNTe Ha ycTPOINCTBO C cnJO, KOrJa peRyJITOP BbIDBNHYT.
- IepemeaTb yCTPOcTBO HxKHO BIBOEM, B3AIBINCb 3a O6e CTOpOHbI VCTPOcTBA.
He HcIOJIb3yIte yJINHHTeJIbByCIOBHX HN3KOrHO HAIIpxKeHHa-TOMOXeT BbI3BaTb KOpOTKoe 3aMbIKaHHeHIIpNBecTHK TpaBMam.
ByIbTe oCTOpOxHbI, YTO6bI He IIpHIeMHTb IIaJIbIbI, IpeBnraI pOeKToP, VcTaHOBJeHHbI Ha IIoJY.
- ByIbTe ocToPOxHbI, YTO6bI paJIbIbI He IIOIIaJIN B BEHTNJTOD.
He Iepenochte IpoekTop BHytpn Kopnyca c OTKpbITOn KpbIIKKoI.
He yctaHaBJIbAHTe IpoeKTop BO3Je HcToHnKOB TeIIJa,HaIIpIMep 6aTapei HJIN Tpy6oIPOBOIOB TROPyeRO BO3Jyxa,a TaKKe B MecTaX,He 3aIIHIIeHHbIX OT IIpMbIX COJIHEuHBIX JIyE,ByCIOBHX Ype3MePHO3aIIbJIeHHOCTH NJIH BJIaXHOCTN, MexAHueCKHX B6paIIH NJIH TOJUKOB.
Pa36op,peMOHTIINH3MeHeHne ycTPOcTBaIOJIb3OBaTeJIeM MOKeT IINBeCTN K yTPO3aM 6e3OIIaCHOCTN IOJIb3OBaTeJIa
- EcJH IIpoeKTop HeHcIIpaBeH HJIH IOBpeXJdeH, O6paHTIteCb K KBaJIHΦHIIuPObaHHOMy CIIeIIHaJIInCTy Sony.
B cIyuae 6JIOKnPOBKn BeHTNJIAHNOHBIX OTBepCTN BHyTpeHHra TeMIIepaTpya yCTpOInCTBa IIOBbIiAeTc, YTO MOKeT CTaTB IIpyHHoI IOXapa HJIN IOBpeJxDeHna ycTpoInCTBa. BbIOJIHNTE cJeNyIOuHe DeINCTBn, YTO6bI OBeCIneHTb HEo6XoINMyIO UINPKyJIAuIO BO3dYxa I IpeIOITbI IOBbIiEHe BHyTpeHHeN TeMIIepaTypbI ycTPOInCTBa.
- YcTaHOBHTe ycTpOINCTBO Ha HEKOTOPOM paCCTOHH OT cTeH n pyrNX 06bekTOB (cTp.8).

HnueM He HaKpbBaIte BeHTNJIIIOHHbIE OTBepCTHA (BbIXOHNbIE/BXODHBie).
HeIOKJIaIbIbAHTe IOJ yCTpOncTBO yIIaKOBOHbIMaTePnaJI, MIRKYIO TkaHb, KOBpIKN, JINCTbI NIN O6pe3KN 6yMaH. TaKHe MaTePnaJIbIMORYT IIOIacTb B BeHTNJIINOHHbIE OTBepTHIA.
He pacnoIaIarTe HeIOceIcTBeHNO IpeJINHH30KakHe-JIN6O IIpeIMtbl, KOToPbIe MOrY 3aIopaxNBaTb CBeT BO BpeMnpoeIInpoBaHn. H3Jyuaemoe TeNIO MoKeT IOBpeINTb IIpeIMet. NcIOJIb3yIte yHKuHIO 6JIOKNpOBKn H3OpaXKeHn, YTO6bI IIpePBtB OToOpaxKeHne.

- Pn TpaHcHOpTHPOBKe HJyCTaHOBKe yCTPOCTBa He HcIOJIb3yIte 3aHTHyIO IaHEJIb JJIpeOTBpaIeHnKpaJN yCTPOCTBa. He IOHNMaTe H He IOJBeINBaITc yCTPOCTBO 3a 3aHTHyIO IaHEJIb -TO MoKET IIpHBecTH K IaJeHHIO IIOBpeJdeHHIO yCTPOCTBa, a TaKKe TpaBMam.

HhOpMaunnA nIa dIepeOB
-
IyctaHOBKn IIpoeKTopaHaIIOToJIke Heo6XOJIMO HCIOJIb3OBaTb KPOHITeIN IIPOUN3BOJCTBa KOMIIaHHN Sony Hn aHaIOrHuOe peKOMeHIOBaHHoe KpeIIJeHHe.
-
IIpy yctaHOBKe Ha IIOTOJIOK IIIOTHO 3aKpbIBAaTe KpbIIHKy KopNyca.
BHHMaHHe!
YcTaHOBka ycTPOcTBa IOJ yTJOM, KaK IOKa3aHO Ha pncyHke: ecJIH BeHTNJIIOHHbIE OTBepCTnA O6paIIeHbIBHN3,yCTaHOBHTe MeTaJIINueCKn JIoTOK (MnH.40 cm × 40cm),ocTaHBHeIOcpeIcTBeHHO IIOI BeHTNJIIOHHbIMN OTBepCTnMn Yka3aHHoe JaJIee pacCToRnHe. Y6eINTecbBTOM, YTOIOCTOpOHHe IIpeIMTeBI IN XIKOCTH He MOrYT IIOIAcTB BeHTNJIIOHHbIE OTBepCTnA.
Ioptpet (yCTaHOBka yCTpOuCTBa KHOPIKAMN BHN3)
Mepbl npedocTopoXHocTn npu yctahOBke yctpoiCTBa Ha notolke
He IIbTaIteCb yCTaHOBnTb IpoeKTop Ha IIOToJIke HJIN IepMeCtHTb eRO camOcTOrTeJIbHO. O6aTeJIbHO IPOKOHcyJIbTHpyIteCb CO CNEuHaJIHcTOM B MaRa3HHe, rDe 6blI IIpHo6peTeH IpoeKTop, HJN c ONbITHbIM MOHTaXHHKOM.
- YcTaHaBJIHbA yCtPoIcTBO Ha IOTOJIke, O6a3aTeJIbHO HcHIOJIb3yIITe CTPaXOBOuHbI IIHyp IINIpyTHe cpeCTBa IIJI INPeIOITbPaIIeHnI IaIeHnI yCtPoIcTBA. IpeI yCTaHOBKO I6a3aTeJIbHO IPOKOHcyJIbTIpyIITecb CO CNEIIHaJIHcTOM B MaTa3HHe, TDe 6blI IIpHo6peTeH IIpoEKTOp, HJN C OIIbITHbIM MOHTaXHHKOM.
HΦopMaζη no yctaHOBKe
- YcTaHaBJIINBaIte ycTpOInCTBO Ha pacCToAHnOT cTeH n IpyrNX 06bekTOB, KaIIOKa3aHO Ha pncyHKe.
He yctaHaBJIINBaIte ycTPOCTBO B IOMeHnX CIOBbIIeHHOITcMnepaTyPoN HJIaJxHOCTbIO, JIN IOHNKeHHoTcMnepaTyPoN.

He yctaHaBnBaIte yctpoNCTBO B6JIN3KOHdHIOHOepa,IOI IIpMbIM IOTOKOM XOJOHOrO HIN TeJIIORO BO3yxa.YcTaHOBKa B TaKHX MeCTAX MOKeT IIpNBecTN K HeNCnPpABHOCTN yCTPONCTBA BCJIeIcTBHe KOHdHcaHH BJIaRn HIN IOBbIeHHaTeMIIePaTpybl.
He yTaHaBJIbBaIte ycTpOncTBO B6JIN3n DaTcIKOB TeMIIpePaTypbI INJIN bIMa. 3TO MoKet cTaTB IIpNHHoH HeNCIIpaBHOCT N aTtHKa.
He yctaHaBJIbHbAte yCTpOcTBO B ycIOBnX KpaHHe 3aIIbJIeHHoCTn HJN 3aIbIMJIeHHocTn. Bo3dUHbIΦNJbTp MoKet 3acOpHTbcra, YTO IIpHBeJeT K HeHCIIpaBHOCTHyCTpOcTBA HJN eTo IOBpeJdeHIO.
BcIyuae HcIOJIb3OBAHHaYcTPOHCTBa Ha BBICOTEOT1500 MycTaHaHBnBaHTe IJIInapaMeTpap“PeXHM BbIC.IIOJI 3HaueHHe“BKJ”BMehIO yCTaHOBKn. EcIN IIpN 3KcIIpyatauHa 3HaUHTeJIbHOBBICOTHe yCTaHOBHTb JaHHbIpeKHM,MOrYT BO3HNKaTb HeKeJIaTeJIbHbIE 9ΦΦeKTb,Takne KaK CHHXKeHHe HaJeXHOCTH HeKOTOpbIX KOMIOHCHTOB.
3aIaIte Heo6xOJHMOe 3HaueHHe IJI
IapaMeTpap "IOJIOK.YCTAH."BMehIO
yCTaHOBKN B COOTBeTCTBHN C yTJOM
ycTaHOBKN. NcnoJIb3OBaHne
HEIIpaBnJIbHbIX HaCTPOEKM0XET
IOBJINrTB Ha HaeXHOCTb
KOMIOHOHTOB.
OuNcTKa IINH3bI IN KOpnyca
- IpeI OUHCTKoI OTKJIIOHTe IIHHyp IITaHnI IepMeHHORo TOKa OT 3JIeKTPnueckOJ PO3eTKN.
He BbITnpaTe yCTpoIcTBO rpy3HOJ TKaHbIO - 3TO MOKeT IIpNBecTn K IIOBJIeHHIO capaIIHH Ha KopIyce. - JIINTeJIbHbI KOHTaKT CJIeTuyHMN BeIIeCTBaMn (HaIIpIMep, cpeIcTBO OT HaceKOMbIX), a TaKKe N3JeJINrMaN H3 pe3HHbI HJIN BHNHJa MOKeT IIpNBecTH K I3MeHeHIO BHeIIHeTo BNuJa yCTpoIcTBA HIOBpeXNeHHIO IOKpbITn.
He kacaTecb OKoIka IpoeIInpOBaHra TJIbIMn pyKaMn.
OuHCTKa IIOBepxHOCTN OKOIIKA IIPOeIINPOBaHnA AkKypaTHo IpoTpHTe OKIIKO IIPOeIINPOBaHnMgKoTKaHbIO, HAnPIMeR TkaHbIO JIA OUHCTKN CTekJa.3aFp3HeHnC, KOTOpoe He ydaCTcayCTpaHHTb, MoXHo OUHCTNTb, cJIerKa CMOHbTKaHb BOJoi. He HcIOJIb3yTe paCTBOPHTeJi, cIIHPr, 6eH3HH NJI IN KNCJOTy, IueJIOUHbIE n a6pa3HBbIe MOIOIIne cpeCTBa IIJIN IIPOINTaHHYIO TKaHb IJIa OUHCTKN.
OuHCTKa KOpIyCa: AkKypaTHo OUnCTHTe KOpIyc MraKoT KaHbIO. 3aRpy3HeHH, KOToPbIE He ydaeTcY ycTpaHHTb, MoXHO OUnCTHTb, CJeTKa CMOUHB TkaHb CJIa6bIM paCTBOPOM MOIOSeIco CpeIcTBA, IIpeIBaPHTeJIbHO OTKaB ee, a 3aTeM IIpoTepeB KOpIyc cyXoM MaKoT KaHbIO. He HcIOJIb3yIte paCTBOPHTeJIN, cINpT, oEH3HN HJIN pa36aBHTeJIb, KNCJIOTy, IJeIIOuHbIe H a6pa3NBbIe CpeIcTBA HJIN IIPOINTaHHYTO TkaHb IJIa OUnCTKN.
OcBeueHne
IIJIIOJIyUeHnI3O6paXKeHnXOpOIeIo KaueCTBa HeO6XoIMo,HTO6bI 3KpaH 6bl 3aIIINIEH OT IprMOrOOCBeIeHn HJIN COJIHeHORO CBcTa.
O paccērHn Teŋla
Tempepatka Kopnyca npoeKTopa MoKET IOBbIaTbcra BO Bpem HIOJIb3OBaHn IIN cpa3y IocJIe Hero; OHaKO 3TO He YBJIeTcR HeCIIpaBHOCTbIO.
3KpaH
Pn HcnoJIb3OBaHHN 3KpaHa c HeJIaIKoIIOBepXHOCTbIO Ha 3KpaHe MOrYT HHOITa IIOBJIaTbCIIIOJcBi, B 3aBHCIMOCTn OT paCCTOHnM MeKJy 3KpaHOM N yCTPOINCTBOM, a TaKKe 3NaueHn IIpNoJInxKeHH. To He YBJIeTcH HeHCIIpaBHOCTbIO yCTPOINCTBa.
BentnJIaTOp
IpoeKTop ochaIIeH BHyTppeHHIM
BcHTnJIaTOpOM, KOTOpbI cJyXHT IJIa
CHHXeHHN BHyTppeHHe TeMIIepaTypbI.
Pa6ota BeHTnJIaTopa MoKeT
coIIPOBOxJaTbcra JIeKHM IIYMOM. 3TOT
aΦΦeKT YBJIaTeCra HOpMaJIbHbIM
pe3yJIbTaTOM IIPOH3BOJCTBeHHOTo
IIPOUecca H He CBHJeTeJIbCTByeT O
HeHCIIpaBHocTH. OJHaKO, IIPIBbICOKOM
ypOBHe IIIyMa CJieJyET ObpaHTtbcr K
KBaJIInΦHIIpOBaHHOM IIepcoHaJIy
KOMIIaHHN Sony.
Ocmotp komnoheTOB nCTouHnka ocBeueHna
B JaHHOM yCTpOcTBe HcIOJIb3yeTcra JIa3ep, IIO3TOMy IIpn O6cJyXnBaHnn HJIN OCMOTpe KOMIOHOHTOB HCTOCHNka OCBeIeHNr HEo6xOIMo CO6JIIOJaTB OCTOPOXHOCTb H O6ecIIeHTb 6e3OAnacHOCTb. O6raTeJbHo IIPOKOHcyJIbTHpyInTEcb C KBaJIINΦHIIpOBAHHbIM IIepCOHaJOM KOMIIaHHN Sony.
YTNIN3aunnaNCIOb3OBaHHbIX npOdyKTOB
He yTHJIN3HpyTe HcIOJIb3OBAHHbIe IpojyKtbl BmecTe C 6bITOBbIMN OTXoJaMH.
Co6JIIOJaIe IIOpIAOK yTHJIN3aIIN HcIOJIb3OBAHHbIX IPOyKTOB BO H36eKaHHe HeRaTINBHOrO BO3JeIcTBnHa OKpyKaIOUyIO cpeNy I 3IOPOBBe JIOJe. CJIeYIte HOpMaTINBaM IO yTHJIN3aIIN, JeIcTByIOIIM B BaIIiem peRHOHe.
KndkoKpncTaJInuYeCKn npoeKTop
KK-ⅡpoEKTop co3Дан c
HcIOJIb3OBaHHem BbICOKOTOUHbIX
TexHOJIOrn. OJHaKO, Ha əKpaHe KK-ⅡpoEKTopa MOrYT IIepNoIynchKIN
IOABJIaTbcr MeJIKNe YepHbIe I/IIIN
IrpKne (KpaCHbIe, CInHne IJIIN 3eJIeHbIe)
TOckN. 3TOT əΦΦeKT YBJIaTeCn
HOPMaJIbHbIM pe3yJIbTaTOM
IPOIN3BOIDCTBeHHO rpoIcecca H He
CBnDETeJIbCTByeT O HeINcIIpaBHOCTH.
KpOME TORO, IIpr NcIOJIb3OBaHH INJIa
IpoEINPOBaHH Na OJIN NkpaH
HeCKoJIbKHX KK-ⅡpoEKTopOB, JaXe
ODHOJ MoJeJIN, UBeToIIpeJaY pa3HbIX
IpoEKTopOB MOXET OTJInuATbcR, TaK
KaK BaJIaHC IIbETA Ha HNX MOXET 6bITb
HaCTPoEH IO-pa3HOMY.
OKoHdEhcauN
IIpn6bICTpOM H3MeHeHH TeMIIepaTpyB I IOMeIeHH, B KOTOPOM yCTaHOBJIEH IIPOEKTOp, HIN IIpi 6bICTpOM IIpeMeIeHH IIPOeKTopa H3 XOJIODHO B TEJIIOc MEcTO BHyTpN HEo MOKeT O6pa3OBaTbcra KOHdEcHcaT. TaK KaK KOHdEcHcaT MOKeT IIpNBecTH K HeHCIIpaBHOCtH, CO6JIIOdaIte OCTOPOXHOCTb IIpi H3MeHeHH HaCTPOeK TeMIIePaTpybI KOHdIIOHepa. IIpi 6pa3OBaHH KOHdEcHcaTa IIpeJ INCIOJIb3OBaHHem IIPOeKTopa OCTaBBTe eRO BKJIIOueHHbIM IIpN6JIIN3HTeJIbHO Ha IBa Yaca.
2 BcTaBbTe JIITHeByIO 6aTapeKy.
3 3aKoITe 6aTapeHbI OrceK.
Bb6opЯ3bika MeHIO
Iyo yMOJIyAHHIO IJIa OTo6paXaEMbIX MeHIO,COO6IeHNn H T.Д. BbI6paH aHrJIInCKn J3bIK.
JIa H3MeHeHHra 3bIka 3KpaHa BbIOJHnTe cJeIyOuIe JeCTBnA:
1 BcTaBbTe HHyp IHTaHnIepeMeHHOrTo TOKa B pO3eTKy.
2 BkJIOHTe IpoeKTop. HaKMITE KJIaBnIy I/Ha yCTPOIcTBc HJI KHOIky I Ha IIyJIbTe IINCTaHIIHOHHOуInpaBJIeHNr.
3 HaKMnte KJIaBnIy MENU JIЯ OTO6paKeHnMaMeHIO. EcJIN 3KpaH OTO6paKaeTcHHeYeTKO, OTPeryJInpyTe fOKyc, pa3Mep H IOJOxKeHnE IIpoekTnPyemOro N3O6paKeHnA (Ctp.16).
4 BbI6epHTe 3bIK MeHIO. ① HaKMITE KJIaBnHIIy HJIN YTO6bIBbI6paTb MeHIO Operation (3aTeM HaKMITE KJIaBnHry ENTER.
② HaKMITE KJIaBnIy ↑HJN ↓, YTO6bI BbI6paTb "Language (A, a 3aTeM HaKMITE KJIaBnIy ENTER.
③ HaxmataKeKlaBnIy / / / IJIa BbI6Opa 3bIka, a 3aTeM HaxmTe ENTER.
5 HaKMTe KJIaBnIy MENU, TTO6bI OTKJIIOHTb 3KpaH MeHIO.
Приимechanicals
BbIKIOHTe BCE OobpyOBAHHe Iepen BbIOJIHeHHem JIO6bIX IOKJIIOUeHHI.
- IcnoJIb3yIte COOTBeTCTBYIOIIH KAbJb JIA KaKJOrO coeINHeHH.
- IIOTHO BCTaBJIaIte pa3bEmbI Ka6eJIa. HeHaJeKIIbIKoHTaKT MoKeT IIpNBecTH K CHHXeHHIO KaueCTBa BnIeOCHrHaJa HIN HeIIpaBnJIbHOJ pa6oTe ycTePOHcTBa. Ipn OTcoEINHeHH Ka6eJIa TAHHTe 3a IIITeKeP, a He 3a cam Ka6eJIb.
- IIJIIOJIyUeHHN IOIIOPO6HOH HOpMaIIHN TaKKe cm. HHCtpyKIIHN IIO 3KcJIyAToHHN IOIKJIOUaEMORO O6OpYIOBAHHN.
1 HaKMITE KJIaBnIiy I/Ha OCHOBHOM yCTpO'CTBe HJH Ha NjIbTe JINCTaHIIIOHHORO yIpaBJIeHn.
PpOeKTop 3aIyckaeT 3aBepHHeHne pa6oTBi N BBIKJIIOuAcTcR.
2 OToeHHTe Ka6eJIb IITaHnI IepMeHHOro TOka OT 3JIeKTpHueCKoI pO3eTKn.
Ecaumpe6yemc donoHumebna pezyuropobka npoeuupyeMbix u306paKeHu, cM. pa3de
"IIpoeuupoabaue/pezyuupo6ka u3o6paXceHna" 6 dokyuMeHme
"Hcmpykuu no ekcnayamauu", codepauemcn ha npuaaemom kOnnakm-ducke.
ндкатopyi
CBeTJIeecr/MnraIOJIe HndKATOpbI ON/STANDBY n WARNING ha IpeJeHne YacTH IIpoEKTopa IIo3BOJIaOT IIpoBepHTb COCTOAHne IIpoEKTopa N y3HaTb o eRO HeIIpaBNJbHO pa6Ote. EcJIN INdNKaTOPbIM MInaIOT KpaChbIM CBeTom, peIiAaTe IIpo6JIeMy B COOTBeTcTBnC yKa3aHnMaMn B pa3IeJIe “IIpeJyIIpeJxlaIOUHe HNDNKaTOPbI N DeIcTBnN IO yCTpaHEHIO IIpo6JIeM” (ctp. 20).
Hdkauna pa6oerycoctOHHN
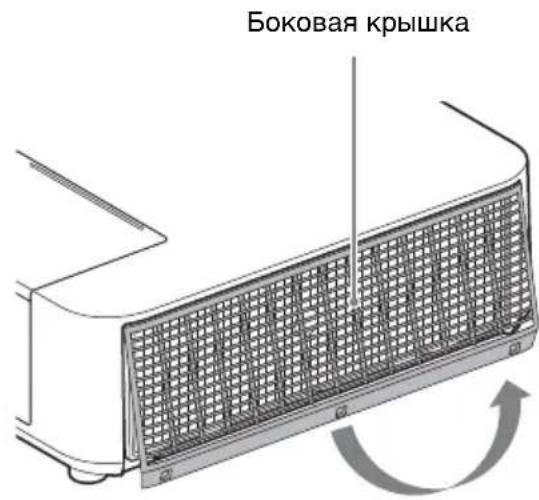
2 BbIKpyTHTe BnHTbI (TpH) Ha 6OKOBON KpbIIKe.
3 PnIOHMMTe HxKHO YoacTb 6OKOBKn CHMTe ee.
4 OcJa6bTe BnHTbI (IIeCTb) Ha BO3dYHOM qNJIbTppe.
5 N3BJIeKHTe BO3IyHbI ΦHJbTp.
6 OuHCTHTe BO3IyIHbI HJIbTp IIbJIIEcOCOM.
PpMmeyaHne
IpeqKpeIIeHHeM BO3yIIIHO
fNJIbTpKa YcTPOINCTBy y6eINTEcb, YTO
IOyIIka Ha paMe BO3yIIIHO
fNJIbTpPa IpaBnIbHo YcTaHOBJeHa H
3aKpeIIeHa.
7 3aMeHHTe BO3IyIIHHbI ΦNJIbTp I yCTaHOBHTe 6OKOByO KpbIiKy.
PpmeaHn
- IIOHO yCTaHOBHTe BO3IyHbI HJIbTp; IIITaHHe 6yIcET HeBO3MOXHO BKJIOHTb,ecJH OH YCTaHOBJEHIIJOTHO.
- IIOTHO IIpHKpeIITc 6OKOByIO KpbIIKcy. HeIIpaBnJIbHa yCTaHOBKa KpbIIKN MOKeT IIpNBecTH K HeHCIIpaBHOcTH.