USER MANUAL EM 95 Bluetooth BEURER
6.1 Fitness & Power-Workouts 12
6.2 Relax & Wellbeing-Workouts 12
- Stromparameter 13
7.1 Impulsform. 13
7.2 Impulsfrequenz 13
7.3 Impulsbreite 13
7.4 Impulsintensitat. 13
6.1 Fitness & Power-Workouts
| Progr.-Nr. | SinnvolleAnwendungsbereiche,Indikationen | Frequenz(Hz) | Laufzeit(Min.) | Schwierigkeitsgrad |
| Anfänger | Fortgeschritten | Experte |
| 1 Warm Up 75 | | | | On 4 sec.Off 4 sec. | On 6 sec.Off 2 sec. | kontinu-lierlich. |
| 2 Cool Down 100 10 On 1 sec. / Off | sec. | | sec | | | |
| 3 Six | Pack 60/420 | | | On 5 sec.Off 9 sec. | On 8 sec.Off 9 sec. | On 8 sec.Off 8 sec. |
| 4 Gesunder Rücken 40/420 | | | | On 4 sec.Off 10 sec. | On 6 sec.Off 10 sec. | On 8 sec.Off 10 sec. |
| 5 Fit im Kreuz 80/420 | | | | On 6 sec.Off 10 sec. | On 8 sec.Off 10 sec. | On 8 sec.Off 8 sec. |
| 6 | Stabile Mitte | 50/4 | 20 | On 6 sec.Off 10 sec | On 8 sec.Off 10 sec. | On 8 sec.Off 8 sec. |
| 7 | Kräftige Arme | 85 20 | | On 3 sec.Off 4 sec. | On 4 sec.Off 4 sec. | On 6 sec.Off 4 sec. |
| 8 Sportliche Beine | 85 20 | | | On 3 sec.Off 4 sec. | On 4 sec.Off 4 sec. | On 6 sec.Off 4 sec. |
| 9 Knackiger Hintern | 30/420 | | | On 4 sec.Off 8 sec. | On 6 sec.Off 8 sec. | On 8 sec.Off 8 sec. |
| 10 Starke Schultern | 75/420 | | | On 3 sec.Off 4 sec. | On 4 sec.Off 4 sec. | On 6 sec.Off 4 sec. |
| 11 | Ausdauer | 25/3 | 20 | On 7 sec. / Off 4 sec. |
| 12 | Ganzkorper Training | 85 | 20 | On 3 sec.Off 4 sec. | On 4 sec.Off 4 sec. | On 6 sec.Off 4 sec. |
6.2 Relax & Wellbeing-Workouts
-
Getting to know your device 19
-
Important notes 20
-
Device description 23
4.Before use 23
4.1 Charging the battery 23
4.2 Securing the belt clip 24
5.Use 24
5.1 Starting use. 24
5.2 Notes on use 25
5.3 Device settings 26
5.4 Using your device with the "beurer EMS HomeStudio" app 27
- Program overview 28
6.1 Fitness & Power workouts 28
6.2 Relax & Wellbeing workouts 28
- Electric current parameters.. 29
7.1 Impulse shape 29
7.2 Impulse frequency 29
7.3 Impulse width 29
7.4 Impulse intensity 29
- Cleaning and storage 29
- Disposal 30
10.Problems/solutions 30
11. Replacement parts and wearing parts 30
12. Technical specifications 31
13. Notes on electromagnetic compatibility 32
14.Warranty/service 32

Read these instructions for use carefully and keep them for later use, be sure to make them accessible to other users and observe the information they contain.
To find out how to use the muscle stimulation device easily, scan the video tutorial QR code on the title page of these instructions for use with your smartphone and watch the video.
Signs and symbols
| ! | WARNING
Warning notice indicating a risk of injury or damage to health |
| ! | IMPORTANT
Safety note indicating possible damage to the device/ accessory |
| i | Note
Note on important information |
| Observe the instructions for use |
| Application part, type BF |
| IP 22 | Protected against ingress of solid foreign objects greater than 12.5 mm in diameter.
Protected against drops of water falling at up to 15° from vertical. |
| Disposal in accordance with the Waste Electrical and Electronic Equipment EC Directive - WEEE |
| CE | This product satisfies the requirements of the appli-
cable European and national directives. |
| Manufacturer |
| The device can emit effective output values above 10 mA, averaged over every 5-second interval |
| EAC | Certification symbol for products that are exported to the Russian Federation and CIS countries. |
| 21
PAP | Dispose of packaging in an environmentally friendly manner |
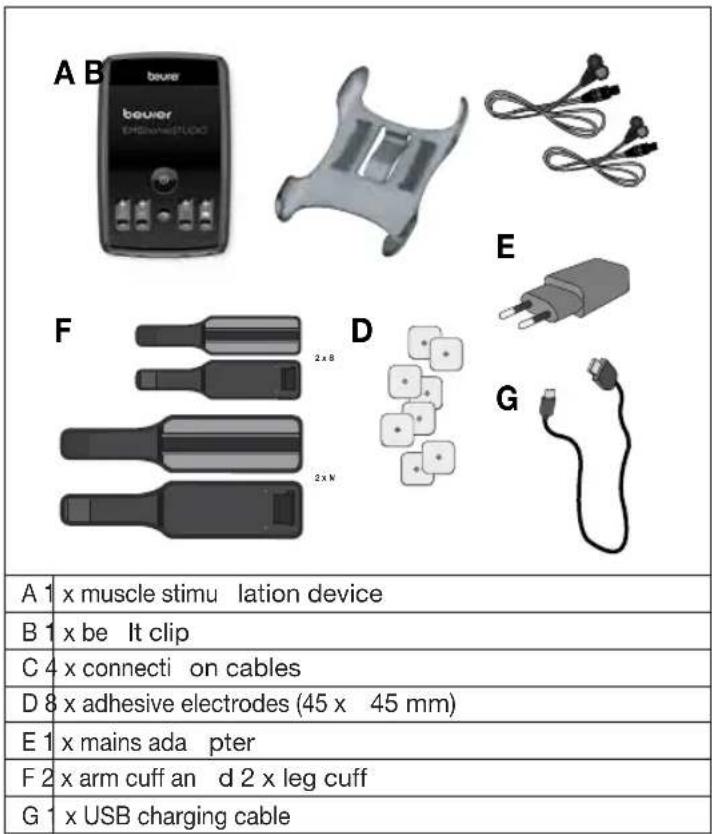
Delivery scope and accessories
Check that the set packaging has not been tampered with and make sure that all contents are present. Before use, ensure that there is no visible damage to the device or accessories and that all packaging material has been removed. If you have any doubts, do not use the device and contact your retailer or the specified Customer Service address.
1. Getting to know your device
The innovative Beurer EM 95 EMS homeSTUDIO muscle stimulation device is a high-end EMS device for home use. When used in combination with the free "beurer EMS HomeStudio" app, it creates a professional EMS training program. You can choose between the categories of "Fitness & Power" and "Relax & Wellbeing". Overall, you have 20 workout options with predefined exercises and which
have adjustable levels of difficulty. You also have the option to create your own workouts in the app from a selection of 50 exercises.
At the start of the training unit, you can first select a virtual coach and your desired workout in the app. Both the 3.5" TFT colour display screen and the app will then show the correct positions for the cuffs and the electrodes. You will be shown videos from the virtual coach which will show you how to do all of the exercises.
After completing the exercise unit, the app provides a detailed overview of your training progress. Graphs give you the means to monitor your performance. Moreover, a calendar function tracks how often the user performs their training.
Electrical muscle stimulation (EMS) is a widespread and generally recognised method and has been used in sports medicine and rehabilitation for years. In sports and fitness, EMS is used to complement conventional muscle training, to increase the performance of muscle groups and to adjust physical proportions to achieve the desired aesthetic results, amongst other things. There are two different types of EMS application. One is for targeted strengthening of the muscles (activating application), and the other is to achieve a relaxing, restful effect (relaxing application).
The activating application involves:
- Muscle training to increase endurance and/or
- Muscle training in order to support the strengthening of specific muscles or muscle groups, and to achieve the desired changes to physical proportions.
The relaxing application involves:
- Muscle relaxation for easing muscle tension
- Improving symptoms of muscular fatigue
- Acceleration of muscle regeneration after high muscle performance (e.g. after a marathon).
An advantage of the EM 95 muscle stimulation device is that you can adjust the intensity of the stimulation independently for four parts of the body, by using the four separately adjustable channels.
2. Important notes
WARNING!
To avoid damage to your health, we strongly advise against using the EM 95 in the following situations:
- If you have implanted electrical devices (e.g. a pacemaker)
- If you have metal implants
- If you use an insulin pump
If you have a high fever (e.g. >39^
- If you have a known or acute cardiac arrhythmia or disorders of the heart's impulse and conduction system
- If you suffer from a seizure disorder (e.g. epilepsy)
If you are pregnant
If you have cancer
After an operation, if strong muscle contractions could affect the healing process
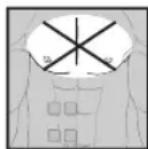
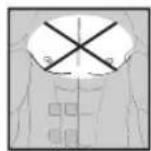
- The device must never be used near to the heart. The stimulation electrodes must not be placed on any part of the front ribcage (where the ribs and breastbone are located), especially not on the two large pectorals. This can increase the risk of ventricular fibrillation and induce cardiac arrest.
- On the skeletal skull structure, or around the mouth, throat or larynx
- In the neck/carotid artery area
In the genital area
- On acutely or chronically diseased (injured or irritated) skin, (e.g. inflamed skin – whether painful or not – reddened skin, rashes (e.g. allergies), burns, bruises, swellings – both open and healing wounds – and post-operative scars where the healing process could be affected)
- In humid environments (e.g. in the bathroom) or when bathing or showering
- Do not use after consuming alcohol
- Do not use if connected to a high-frequency surgical device.

- In the case of acute or chronic diseases of the gastrointestinal tract.
- Stimulation should not be carried out around or on the head, directly over the eyes, on the mouth, the throat (the carotid artery in particular) or using electrodes placed on the chest, the upper back or over the heart.
Before using the device, consult your doctor if any of the following apply to you:
- If you have an acute medical condition, in particular if you suspect or have been diagnosed with high blood pressure, a blood coagulation disorder, propensity to thrombo-embolic conditions or in the case of malignant neoplasms
If you have any skin conditions
If you have diabetes
- If you have any sensory impairment that reduces the feeling of pain (e.g. metabolic disorders)
- In the event of complaints linked to the stimulation treatment
- If you suffer from persistently irritated skin due to long-term stimulation at the same electrode site
IMPORTANT!
The EM 95 must only be used:
- On humans
- For the purpose for which it was developed and as specified in these instructions for use. Any improper use can be dangerous
- For external application
- With the original accessories supplied, which can be re-ordered. Failure to do so invalidates the warranty
PRECAUTIONS:
- Always pull gently on electrodes to remove them from the skin to prevent injuries in the unusual case of highly sensitive skin.
- Hold the device away from sources of heat and do not use it in close proximity (approx. 1 m) to shortwave or microwave devices, as doing so can result in unpleasant current peaks.
-
Do not expose the device to direct sunlight or high temperatures.
-
Protect the device from dust, dirt and humidity.
- Never immerse the device in water or other liquids.
- For hygiene reasons, the electrodes may only be used on one person.
- If the device does not work properly, or you feel unwell or experience pain, stop using it immediately.
- Switch off the device or the respective channel first before removing or moving the electrodes to prevent unintentional stimulation.
- Do not modify electrodes (e.g. by cutting them). This increases the current density, which is potentially hazardous (max. recommended output value for the electrodes is 9mA / cm^2 , an effective current density beyond 2mA / cm^2 requires increased awareness).
- Do not use whilst asleep, driving a vehicle or operating machinery.
- Do not use whilst undertaking any activity where an unexpected reaction (e.g. strong muscle contractions even at low intensity) could be dangerous.
- Ensure that no metallic objects (e.g. belt buckles or necklaces) come into contact with the electrodes during stimulation. If you are wearing jewellery or have piercings in the area to be treated (e.g. a navel piercing), these must be removed before using the device. Failure to do so could result in spot burns.
- Keep the device away from children to prevent potential risks.
- Make sure not to confuse the electrode cables including contacts with your headphones or other devices and do not connect the electrodes to other devices.
- Do not use the device whilst using other devices that transmit electrical impulses to your body.
- Do not use in the vicinity of highly flammable substances, gases or explosives.
-
During the initial few minutes, use the device while sitting or lying down to minimise the risk of accidental injuries as a consequence of isolated cases of vagal responses (feeling of faintness). If you feel faint, immediately switch off the device, lie down and support your legs in an elevated position (approx. 5 - 10 mins.).
-
Treatment of the skin with moisturising lotions or ointments beforehand is not recommended as this considerably increases the electrode wear and may cause unpleasant current peaks.
- This device is not intended for use by children or people with restricted physical, sensory (e.g. reduced sensitivity to pain) or mental skills or a lack of experience and/or lack of knowledge, unless they are supervised by a person who is responsible for their safety or who are instructed by such a person in how to use the device.
- If the adhesive capability of the adhesive electrodes decreases, please replace them immediately. Do not use the device until you have the new adhesive electrodes. Otherwise the unequal adhesion of the adhesive electrodes may lead to skin injuries. Replace the electrodes with new ones after having used them 20 times at the latest.
Damage
- If the device is damaged, do not use it and contact your retailer or the specified Customer Services address.
- To ensure that the device functions effectively, do not drop it or dismantle it.
- Check the device for signs of wear and tear or damage. If there are such signs of wear and tear or damage or if the device was used improperly, it must be returned to the manufacturer or retailer before further use.
- Switch the device off immediately if it is faulty or not working properly.
- Never attempt to open and/or repair the device yourself. Repairs may only be carried out by Customer Services or authorised retailers. Failure to comply with this instruction will void the warranty.
- The manufacturer is not liable for damage resulting from improper or incorrect use.
Notes on handling batteries
- If your skin or eyes come into contact with fluid from a rechargeable battery cell, flush out the affected areas with water and seek medical assistance.
- Choking hazard! Small children may swallow and choke on batteries. Store batteries out of the reach of small children.
- Observe the plus (+) and minus (-) polarity signs.
- If the battery leaks, put on protective gloves and clean the battery compartment with a dry cloth.
- Protect batteries from excessive heat.
- Risk of explosion! Never throw batteries into a fire.
- Do not disassemble, split or crush the batteries.
- Only use chargers specified in the instructions for use.
- Batteries must be charged correctly prior to use. The instructions from the manufacturer and the specifications in these instructions for use regarding correct charging must be observed at all times.
- Fully charge the battery prior to initial use (see "Charging the battery" section).
- In order to achieve as long a battery service life as possible, fully charge the battery at least twice per year.
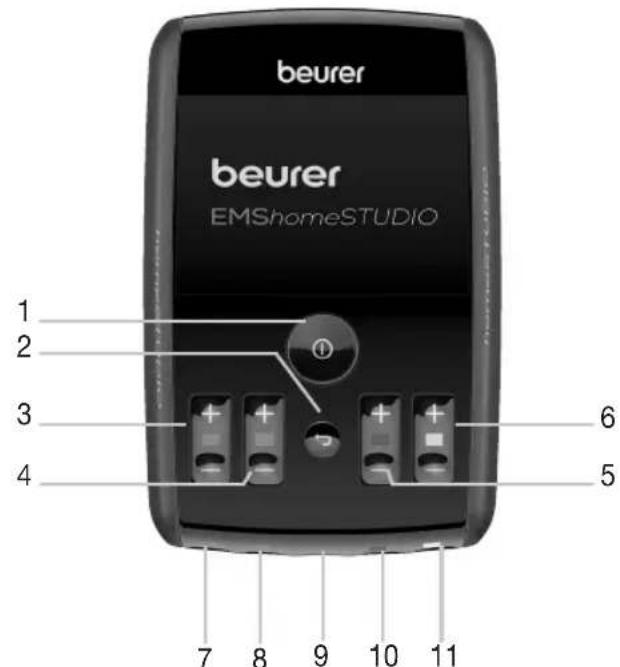
3. Device description
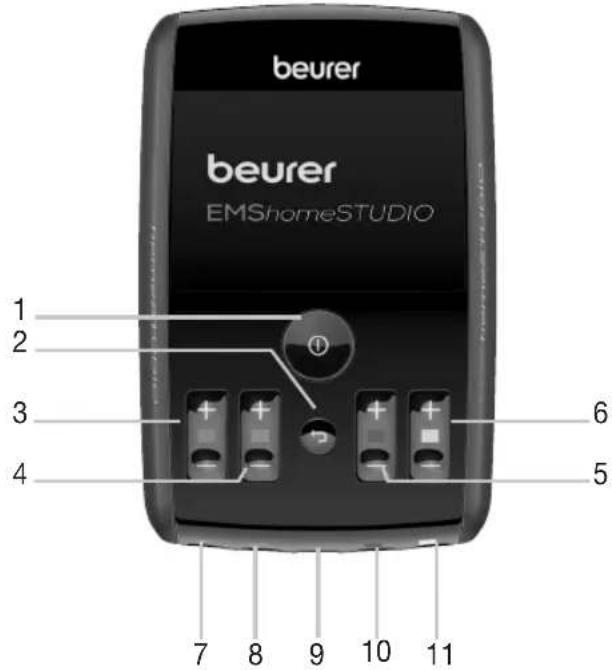
| 1 ON/OFF/OK button ① | 7 Connection socket for channel 1 (green) |
| 2 Return button ← | 8 Connection socket for channel 2 (blue) |
| 3 Intensity button for channel 1 (green) | 9 USB charging socket |
| 4 Intensity button for channel 2 (blue) | 10 Connection socket for channel 3 (red) |
| 5 Intensity button for channel 3 (red) | 11 Connection socket for channel 4 (yellow) |
| 6 Intensity button for channel 4 (yellow) | |
4. Before use
4.1 Charging the battery
Before you use the muscle stimulation device for the first time, let it charge for a minimum of 4 hours. Proceed as follows:
1. Connect the mains adapter with the muscle stimulation device using the USB charging cable.
2. Then insert the mains adapter into a suitable socket.
3. Alternatively, you can charge the muscle stimulation device by using your computer / laptop. To do so, connect the muscle stimulation device to a USB port on your computer / laptop, by using the USB charging cable.
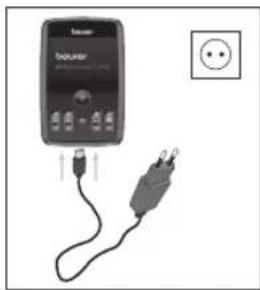
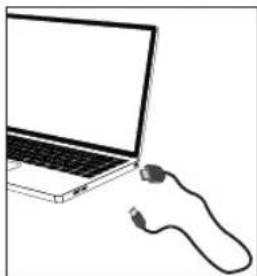

You cannot use the device while it is being charged.
4.2 Securing the belt clip
You can secure the muscle stimulation device to your belt or waistband by using the belt clip.
- To attach the muscle stimulation device to the belt clip, press the belt clip to the back of the muscle stimulation device until you hear and feel it click into place.
5.Use
5.1 Starting use
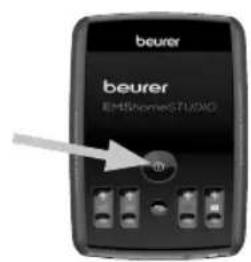
Step 1: Press and hold the ON/OFF button for around 3 seconds in order to switch on the device.
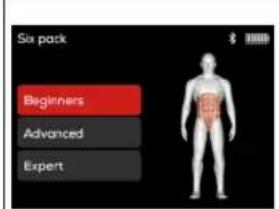
Step 2: Using the + / - buttons, choose the type of workout that you wish to do ("Fitness & Power" or "Relax & Wellbeing"). Confirm your choice by pressing the OK button. You can find an overview of all the workouts in the next section of these instructions for use.

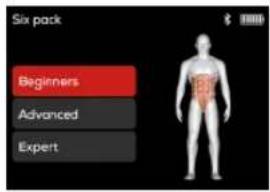
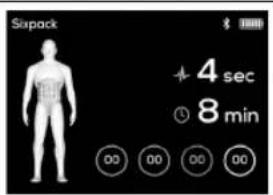
Step 3: Select your desired workout by using the + / - buttons (e.g. "Six pack"). Confirm your choice by pressing the OK button
Step 4: Select the level of difficulty for your chosen workout by using the + / - buttons. You can select one of three levels of difficulty ("Beginner", "Advanced" and "Expert") for all of workouts in the "Fitness & Power" category, except for the "Cool Down" and "Endurance" workouts. Confirm your choice by pressing the OK button ①
The individual levels of difficulty differ in the length of the stimulation and pause phases.
Step 5:
If you need to use arm and leg cuffs for your chosen workout, you need to moisten the gold contact surfaces of the arm and leg cuffs with water.
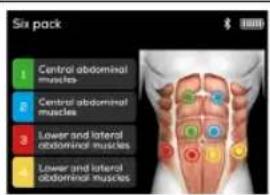
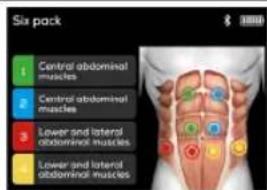
Position the adhesive electrodes and/or arm and leg cuffs as shown on the display of the device. Then connect the cables with the electrodes and connection sockets to the underside of the device. Pay attention to the colour coding on the display. Then press the OK button to continue.
Tip for putting on the cuffs: after moistening the cuffs first, fasten the ends of the cuff and then pull them up over your arm.
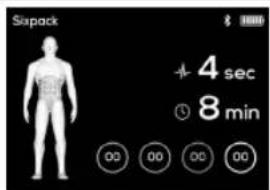
Step 6: The display of your device will indicate how much usage time remains, and the current intensity levels of the channels that you are using. You will also be able to see how many seconds of a particular impulse, or of a break between impulses, remain. The program will start automatically after you have selected the intensity level through the intensity button of the channels that you are using. Use the intensity buttons to set the intensity you want.

5.2 Notes on use
Adjusting the intensity
You can adjust the intensity level from 1 to 100 by increments of one. To speed up this process, you can press and hold the intensity button, which increases or decreases the intensity more quickly. If you are in OFF time when increasing the intensity, then the ON time will start again immediately.
Pausing use
You can pause the stimulation at any time by briefly pressing the OK button ①. To continue the simulation, re-set the desired level of intensity.
If you wish to return to the previous selection menu, press the Return button. This stops the program.
Automatic switch-off
If you stop using the device, it switches off automatically after 3 minutes. However, if you are currently on step 5 or 6, the device switches off after 5 minutes, as long as you don't press any of the buttons or commence the training.
If any of the electrodes/cuffs/cables become loose during training, the flow of electricity is interrupted and the intensity of the affected channel resets to 0 automatically. In this event, an exclamation mark will start flashing on the intensity display of this channel and the device will emit an acoustic signal (if the sound is switched on)
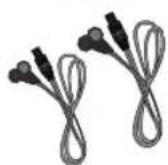
Cuff
- 2 cuffs each in sizes S and M respectively are included in the delivery. If the cuffs do not fit, you can order additional cuffs in sizes XS and L (see details in the "Replacement parts and wearing parts" section).
| Cuff size | Suitable for circumference |
| XS 22-35cm |
| S 28-45cm |
| M 36-54cm |
| L 50-70cm |
- By changing the position of the cuff, you can change the muscles to be stimulated (e.g. biceps/triceps), provided that the electrode does not surround the entire arm.
- The gold electrodes must be placed on the skin, and must be moistened with water.
- Make sure that you only moisten the gold electrodes. The back of the cuff must remain dry under all circumstances.
- Thread the thin cuff fastener through the cuff buckle in order to fasten the cuff tightly.
Each cuff is allocated one channel (2 plugs). You must not connect 2 cuffs to the same channel.
- Make sure that you place the cuffs in such a way that both gold electrodes sit on the skin securely.
Recovery break
Do not train the same part of the body more than once a day. Make sure that you wait at least 24 hours before you train that part of the body again.
Water intake
Make sure that you drink enough water before, during and after training. Drink at least one glass of water before you start your workout.
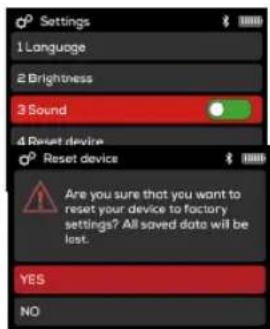
5.3 Device settings
You can adjust the following settings on your muscle stimulation device: Language, brightness and sound. You can also reset your device to the default settings and view the system information.
To access the settings menu, press and hold the ON/OFF button ① for around 3 seconds. The device will switch on.
- Use the + / - buttons to select "Settings" and confirm by pressing the OK button
- To exit the settings menu, press the Return button.
Language
The muscle stimulation device can be set in 5 different menu languages (English, German, Spanish, Italian and French)
- To change the menu language, have the device switched on and use the + / - buttons to select "Settings"; confirm by pressing the OK button ①
- Use the + / - buttons to select "1 Language" and confirm by pressing the OK button ①
- Use the + / - buttons to select your preferred language and confirm by pressing the OK button. Next you will be taken back automatically to the settings menu.

Brightness
You can adjust the brightness of the display of your muscle stimulation device.
To adjust the brightness of the display, have the device switched on and use the + / - buttons to select "Settings"; confirm by pressing the OK button ①
- Use the + / - buttons to select "2 Brightness" and confirm by pressing the OK button ①
- Use the + / - buttons to select your preferred brightness and confirm by pressing the OK button Next you will be taken back automatically to the settings menu.
Sound
You can switch the button tone of your muscle stimulation device on and off.
To switch the button tone on or off, have the device switched on and use the + / - buttons to select "Settings"; confirm by pressing the OK button ①
- Use the + / - buttons to select "3 Sound". Now, press the OK button ① to turn the button tone on or off. Green = Button tone is on Red = Button tone is off
Resetting your device
You can reset the muscle stimulation device to the default settings. All of the language, brightness and sound settings, as well as the operation period and actual stimulation time will also be reset here.
- To reset the muscle stimulation device to the default settings, use
the + / - buttons to select "Settings" and confirm by pressing the OK button ①.
- Use the + / - buttons to select "4 Reset device" and confirm by pressing the OK button You will then be asked whether you wish to reset the device to the default settings.
- Use the + / - buttons to select "YES" and confirm by pressing the OK button ①Next you will be taken back automatically to the settings menu
You can view the system information of your device in the settings menu.
- To view the system information of the device, have the device switched on
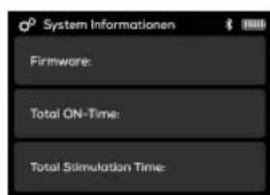
and use the + / - buttons to select "Settings"; confirm by pressing the OK button ①
- Use the + / - buttons to select "5 System information" and confirm by pressing the OK button ① Now you will be able to view the system information.
- Press the Return button in order to return to the settings menu.
5.4 Using your device with the "beurer EMS HomeStudio" app
Thanks to the "beurer EMS HomeStudio" app, it is also easy to control your device from your smartphone. The app contains additional training videos for all of the individual workouts.
To connect your device with the "beurer EMS HomeStudio" app, please proceed as follows:
Step 1: Activate Bluetooth® on your smartphone.
Step 2: Download the free "beurer EMS HomeStudio" app from the Apple App Store (iOS) or from the Google Play Store (AndroidTM).
Step 3: Start the "beurer EMS HomeStudio" app and follow the instructions in the app.
Step 4: As soon as the "beurer EMS HomeStudio" app has connected with the muscle stimulation device, a six-digit numerical code will appear on the display of the device. Enter the six-digit numerical code in the smartphone. The muscle stimulation device is now connected with your smartphone.

TheBluetooth symbol will appear on the display of your device once a connection has been established.
System requirements
iOS ≥ 10.0, Android™ ≥ 5.0
Bluetooth® ≥ 4.0
List of compatible devices:

6. Program overview
The muscle stimulation device has a total of 20 available workouts.
- 12 Fitness & Power workouts (10 programs with 3 levels of difficulty each, except with "Endurance" and "Cool Down")
- 8 Relax & Wellbeing workouts
In all of the programs you can set the impulse intensity of the channels individually.
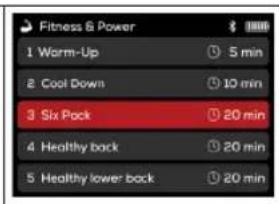
6.1 Fitness & Power workouts
| Progr. no. | Practical areas for application, indications | Frequency (Hz) | Running time (min) | Level of difficulty |
| Beginners | Advanced | Expert |
| 1 Warm up 7 5 | | | | On 4 sec. Off 4 sec. | On 6 sec. Off 2 sec. | Continuously. |
| 2 Cool down 100 10 On 1 sec. / Off 1 sec | |
| 3 Six pack 60/420 | | | | On 5 sec. Off 9 sec. | On 8 sec. Off 9 sec. | On 8 sec. Off 8 sec. |
| 4 Healthy back 40/420 | | | | On 4 sec. Off 10 sec. | On 6 sec. Off 10 sec. | On 8 sec. Off 10 sec. |
| 5 Healthy lower back 80/420 | | | | On 6 sec. Off 10 sec. | On 8 sec. Off 10 sec. | On 8 sec. Off 8 sec. |
| 6 | Strong core | 50/4 | 20 | On 6 sec. Off 10 sec. | On 8 sec. Off 10 sec. | On 8 sec. Off 8 sec. |
| 7 | Strong arms | 85 | 20 | On 3 sec. Off 4 sec. | On 4 sec. Off 4 sec. | On 6 sec. Off 4 sec. |
| 8 | Sporty legs | 85 | 20 | On 3 sec. Off 4 sec. | On 4 sec. Off 4 sec. | On 6 sec. Off 4 sec. |
| 9 | Tight bum | 30/4 | 20 | On 4 sec. Off 8 sec. | On 6 sec. Off 8 sec. | On 8 sec. Off 8 sec. |
| 10 | Strong shoulders | 75/4 | 20 | On 3 sec. Off 4 sec. | On 4 sec. Off 4 sec. | On 6 sec. Off 4 sec. |
| 11 | Endurance | 25/3 | 20 | On 7 sec. / Off 4 sec. |
| 12 | Complete body workout | 85 | 20 | On 3 sec. Off 4 sec. | On 4 sec. Off 4 sec. | On 6 sec. Off 4 sec. |
6.2 Relax & Wellbeing workouts
| Progr. no. | Practical areas for application, indications | Frequency (Hz) | Running time (min) | Impulse duration / pause duration |
| 1 | Anti-muscle ache | 7 | 10 | Continuously |
| 2 | Heavy legs | 7 | 10 | Continuously |
| 3 | Relaxed neck | 4 | 10 | Continuously |
| 4 | Relaxing massage | 20-2 | 10 | Varied |
| 5 | Stimulating massage | 3 | 10 | Continuously |
| 6 | Stretch | 100 | 10 | Continuously |
| 7 | Yoga workout | 10 | 20 | Continuously |
| 8 | Mobilise your spine | 100 | 10 | Continuously, varied |
WARNING!
Do not apply the electrodes to the front wall of the chest.
It is fundamental to the intended success of electrostimulation applications that electrodes are positioned sensibly.
The position of the electrodes on the device is intended as an initial aid to help you position the electrodes.
The following applies to the selection of electrode positions:
Electrode distance
The greater the distance between electrodes, the larger the stimulated tissue volume. This applies to the area and depth of the tissue volume. At the same time, however, the stimulation intensity of the tissue decreases the further the electrodes are apart. As a result, greater distances between electrodes mean a larger tissue volume is stimulated, but less intensively. Consequently, you must increase the impulse intensity to boost stimulation.
Use the electrodes on skin that is clean and preferably free from hair and grease in order to prolong the life of the electrodes. If required, clean the skin with water and remove hair prior to treatment.
If an electrode should come loose during use, the impulse intensity of the affected channel reduces to zero. Apply the electrode again and reset the desired impulse intensity.
7. Electric current parameters
Electrostimulation devices operate with the following electric current settings, which may affect the stimulation results differently, depending on the setting:
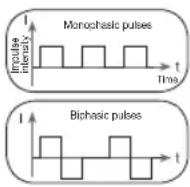
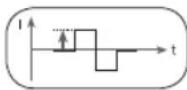
7.1 Impulse shape
This describes the time function of the electrical impulse.
It distinguishes between monophasic and biphasic pulse currents. In monophasic pulse currents, the current flows in one direction and in biphasic pulse currents the electrical impulse alternates its direction.
The EM 95 only provides biphasic pulse currents, as these relieve muscles, cause little muscle fatigue and are safe for use.
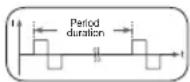
7.2 Impulse frequency
The frequency indicates the number of individual impulses per second and is displayed in Hz (Hertz). It can be calculated by determining the cyclic value for the time period. The relevant frequency determines which types of muscle fibres react best. Slow-reacting fibres react more easily to lower impulse frequencies of up to 15Hz whereas fast-reacting fibres only respond from approximately 35Hz onwards. Impulses of approx. 45 - 70Hz are linked with constant tension in the muscles and quicker fatigue. Higher impulse frequencies are therefore better to use for high-speed strength and maximum power training.
7.3 Impulse width
This indicates the duration of an individual impulse in microseconds. The impulse width therefore determines, among other things, the pene
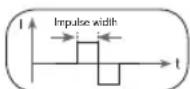
tration of the electricity, where usually larger muscle mass requires a larger impulse width.
7.4 Impulse intensity
Setting the intensity level depends on the individual sensitivity of each user and is determined by a variety of variables, such as site of application, blood supply to the skin, skin thickness and
the quality of the electrode contact. The settings should be effective but should never cause unpleasant sensations, such as pain at the site of application. While a gentle tingling indicates sufficient stimulation energy levels, any setting that causes pain should be avoided. When using the device for an extended period, you may need to adjust the intensity level, as your muscles may start to adapt to the impulse intensity.
8. Cleaning and storage
Adhesive electrodes
- To ensure that the adhesive electrodes remain adhesive for as long as possible, clean them carefully with a damp, lint-free cloth or clean the underside of the electrodes under lukewarm running water and pat dry with a lint-free cloth.
Before cleaning with water, remove the connection cables from the electrodes.
- Following treatment, stick the electrodes back onto the carrier foil.
Cleaning the arm and leg cuffs
- Only clean the arm and leg cuffs by hand.
Cleaning the device
- Clean the device after use with a soft, slightly damp cloth. If it is very dirty, you can also moisten the cloth with a mild soapy solution.
- Do not use any chemical or abrasive cleaning agents for cleaning. Ensure that no water enters the device.
Storage
- Do not make sharp bends in the connection cables or the electrodes.
- Disconnect the connection cables from the electrodes.
After use, stick the electrodes back onto the carrier foil.
- Store the device in a cool, well-ventilated space.
- Never place any heavy objects on the device.
- Allow the arm and leg cuffs to dry completely before storing them away.
9. Disposal
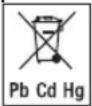
The empty, completely flat batteries must be disposed of through specially designated collection boxes, recycling points or electronics retailers. You are legally required to dispose of the batteries.
Note: The codes below are printed on batteries containing harmful substances: Pb = Battery contains lead,
Cd = Battery contains cadmium, Hg = Battery contains mercury.
For environmental reasons, do not dispose of the device in the
household waste at the end of its useful life. Dispose of the device at a suitable local collection or recycling point in your country. Dispose of the device in accordance with EC Directive - WEEE (Waste Electrical and Electronic
Equipment). If you have any questions, please contact the local authorities responsible for waste disposal.
10. Problems/solutions
pressed. How to proceed:
(1) Make sure that the battery is charged.
(2) Contact Customer Services.
The electrodes do not stick to the body. How to proceed:
(1) Clean the adhesive surface of the electrodes using a damp, lint-free cloth. Replace the electrodes if they still do not stick securely.
(2) Clean the skin prior to any application; do not use skincare lotions or oils prior to treatment. Shaving may increase the life of electrodes.
There is no noticeable stimulation. How to proceed:
(1) Press the OK button to interrupt the program. Check that the connection cables are correctly connected to the electrodes. Ensure that the electrodes are in firm contact with the treatment area. If you are using the arm and leg cuffs, ensure that they have been moistened with water.
(2) Ensure the connection plug is firmly connected to the device.
(3) Check electrode positions and ensure that the adhesive electrodes do not overlap.
(4) Gradually increase the impulse intensity.
The battery symbol is shown. How to proceed:
Charge the battery.
You have an unpleasant sensation at the electrodes. How to proceed:
(1) The electrodes are not positioned correctly. Check their positions and re-position, if necessary.
(2) The electrodes are worn. This may cause irritated skin, as even distribution of the current across the entire area is no longer guaranteed. For this reason, replace the electrodes.
Skin in the treatment area turns red. How to proceed:
Immediately stop treatment and wait until your skin has returned to its normal condition. If the redness is under the electrode and disappears quickly, there is no risk - this is caused by the locally stimulated, increased blood flow.
However, consult your doctor before you continue treatment if the skin irritation persists and if it is accompanied by an itchy sensation or inflammation. This may be caused by an allergic reaction to the adhesive surface.
11. Replacement parts and wearing parts
You can obtain the following replacement parts directly from Customer Services:
| Designation Item number | ber and/or order number |
| 8 x adhesive electrodes (45 x 45 mm) | Item 661.02 |
| 2 x cuffs
Size XS (22-35 cm) | Item 662.03 |
| 2 x cuffs
Size S (28-45 cm) | Item 662.04 |
| 2 x cuffs
Size M (36-54 cm) | Item 662.07 |
| 2 x cuffs
Size L (50-70 cm) | Item 662.08 |
- Technical specifications
| Type EM 95 | |
| Output waveform Biphasic rectangular pulses |
| Pulse length 100–350 μs | ±10% |
| Pulse frequency 4–100 Hz | ±10% |
| Output voltage Max. 120 V pp ±10% (500 ohm) |
| Output current Max. 240 mA pp ±10% (500 ohm) |
| Application time 5–20 minutes |
| Intensity Adjustable from 0 to 100 |
| Operating conditions | 10°C–40°C (50°F–104°F) at a relative air humidity of 30 – 85% |
| Storage/transportation conditions | -10°C–50°C (14°F–122°F) at a relative air humidity of 0 – 85% |
| Dimensions Approx. 136 | x 89 x 26 mm
(without belt clip) |
| Weight | 200 g (incl. belt clip) |
| Maximum tolerated atmospheric pressure | 700–1060 hPa |
| Mains operation:
Input | 100-240 V~; 50/60 Hz; 0.5 A |
| Output | 5.0 V; 0.5 A; 2.5 W |
| Average active efficiency | ≥ 76.11 % |
| No-load power consumption | ≤ 0.083 W |
| Battery:
Capacity | 1170 mAh |
| nominal voltage | 3,7 V |
| type designation | Lithium Polymer |
| Data transfer | 2400 MHz - 2483.5 MHz frequency band |
| Max. -0,32 dBm transmission power |
| The device uses Bluetooth® low energy technology |
| Compatible with Bluetooth® 4.0 smartphones / tablets |
| List of supported smartphones / tablets |
Note: If the device is not used according to the instructions specified, perfect functionality cannot be guaranteed!
We reserve the right to make technical changes to improve and develop the product.
13. Notes on electromagnetic compatibility
WARNING!
- The device is suitable for use in all environments listed in these instructions for use, including domestic environments.
- The use of the device may be limited in the presence of electromagnetic disturbances. This could result in issues such as error messages or the failure of the display/device.
- Avoid using this device directly next to other devices or stacked on top of other devices, as this could lead to faulty operation. If, however, it is necessary to use the device in the manner stated, this device as well as the other devices must be monitored to ensure they are working properly.
- The use of accessories other than those specified or provided by the manufacturer of this device can lead to an increase in electromagnetic emissions or a decrease in the device's electromagnetic immunity; this can result in faulty operation.
- Keep portable RF communication devices (including peripheral equipment, such as antenna cables or external antennas) at least 30cm away from all device parts, including all cables included in delivery. Failure to comply with the above can impair the performance of the device.
- Failure to comply with the above can impair the performance of the device.
14. Warranty/service
Beurer GmbH, Söflinger Straße 218, 89077 Ulm, Germany (hereinafter referred to as "Beurer") provides a warranty for this product, subject to the requirements below and to the extent described as follows.
The warranty conditions below shall not affect the seller's statutory warranty obligations which ensue from the sales agreement with the buyer.
The warranty shall apply without prejudice to any mandatory statutory provisions on liability.
Beurer guarantees the perfect functionality and completeness of this product.
The worldwide warranty period is 5 years, commencing from the purchase of the new, unused product from the seller.
The warranty only applies to products purchased by the buyer as a consumer and used exclusively for personal purposes in the context of domestic use.
German law shall apply.
During the warranty period, should this product prove to be incomplete or defective in functionality in accordance with the following provisions, Beurer shall carry out a repair or a replacement delivery free of charge, in accordance with these warranty conditions.
If the buyer wishes to make a warranty claim, they should approach their local retailer in the first instance: see the attached "International Service" list of service addresses.
The buyer will then receive further information about the processing of the warranty claim, e.g. where they can send the product and what documentation is required.
A warranty claim shall only be considered if the buyer can provide Beurer, or an authorised Beurer partner, with
The following are explicitly excluded from this warranty:
- deterioration due to normal use or consumption of the product;
- accessories supplied with this product which are worn out or used up through proper use (e.g. batteries, rechargeable batteries, cuffs, seals, electrodes, light sources, attachments and nebuliser accessories);
- products that are used, cleaned, stored or maintained improperly and/or contrary to the provisions of the instructions for use, as well as products that have been opened, repaired or modified by the buyer or by a service centre not authorised by Beurer;
- damage that arises during transport between manufacturer and customer, or between service centre and customer;
- products purchased as seconds or as used goods;
- consequential damage arising from a fault in this product (however, in this case, claims may exist arising from product liability or other compulsory statutory liability provisions).
Repairs or an exchange in full do not extend the warranty period under any circumstances.
FRANÇAIS
Table des matieres
Remarques relatives aux batteries
4.Uygulamadan once. 87
4.1 Sarj edilebilir pilin sarj edilmesi.. 87
4.2 Kemer klipsinin sabitlenmesi 87
5.Uygulama 88
6.1 TpeHnpOBKn Fitness & Power 107
6.2 TpeHnpOBKn Relax & Wellbeing 107
- NapameTpbi Toka 108
7.1ФорmaИмпьса. 108
7.2 Yactota nmmyibca. 108
7.3 Unpina mnyjbca 109
7.4 INTeHcBHOCTb NmnyIbca... 109
8.OuNTka n xpaHeHne. 109
9. Ytlin3aunr 109
- Henonadkn/peuene npo6nem... 110
- 3anaChbIe qactn n deTann, noBBePKeHHbIe 6bictpomy u3Hocy .110
- Texnueckne daHhble 111
- Yka3aHnno 3JIeKtpomarHHTHO COBMeCTUMOCTn... 112
- TapaHTnra/cepBucHoe 06cIyKuBaHne 112

3HnMaTeJIbHO npOHTte DaHHyIO HNCTpyKUIO NO pIIMeHEnIO, COxpaHnTe ee dIg NocJeDyUoJero NCNoIb3OBAHnI npeOcTAbJrTe DpyRM NIOb3OBATeJIaM BO3MOXHOCtB c Hei O3HaKOMtBcR, a TAKKe BcERda CneDuYnte ee yKa3aHNm.
IJa 6oJIee npocTOrO mCNoJb3OBaHnMnOCTmMyJrTOpa OTcKaHpyuTe c nOMouB BaWero cMapToHa QR-KoD BnDeOpkyKOBoDCBa, pacNOJoxKeHHb Ha TtTyJbHoN CTpaHnCe daHHO INCHtpKUn No npImeHeHIO, NOCMOTpne.
IorcheHnK CmBolam
Iop npmHeHem C cIbTO Hn3uPyoUeBO3deCTBna IOHMaETc:
TpeHnPOBkMyCKyIaTypbI JJI NOBblHeHn BblHOCTN n (nn)
TpeHnpOBka MyckyIaTypbI dny yKpeIeHnro OnpdeIeHHbIX MbIuN rpynnMbIuC cJeBIO DOCTNXKeHnX KeJaembIX npOpop- Cn TeJia.
Iop npmHeHemc C eIbpo pelaKcnpyUoero Bo3neCTBnA IOHIMaETC:
paccnaabeHneMbIuDnA CHTINx HAnpXeHHa;
yUnyuHHeNc COCToHnMbIuP npi npoRbneHnxMbIeHOn yctaIOCTn;
- yckopene perehepaun Mblu nocne BbICOKnx Harpy30K (Ha-npimep, nocne Mapafoha).
Elaorapy YeTbipem KaHanaM, HactpaNaBEmbIM OTdeIbHO, Bbl MoXeTe camocToTebHo NDo6paTb yPoBeHb INTEHCNBHOCTN CTmUJLauu npubopa EM 95 dna Kkdoi3 YeTbipex KOHeHOCTe.
2. BaxkhbIe yka3aHnA
IPEyPExKDEHNE!
Bo n36eXaHHe npuHHeHnBpeDa 3dOpOBbIO kAterOpueckn He peKoMeHdyETcH cNoJIb3OBA Tb MNOCTmUyIaTOp EM 95 B CNeDyUoxN CnyJax.
- PnHaJIuHmIMNJaHTnpOBaHHbIX 3JIeKtpUeCKNX npu6opOB (HaPpMep, KaJIOcTmMyIaTOpOB).
- Ppi HauuH MetaaJIueCKNX MMnHaTaTOB.
- Pn HooHenn HNCyJINHOBOI NOMbl.
-Пивьсоко TempeType(Hanpimep,>39°c).
- Pn n3BecThbIX nIIN ocTpbIX HapyuHEnHX cepDeHORo pNTMa nI IN dpYnx HapyuHEnHX pNTMa n IPOBOIDMOCTn cepDa.
- Pn60Je3Hx, npoTeKaIOuix C npNCtynamn (HaNPmep, 3nnneCnn).
- Ppi6epemHeHocTn.
- Ppi paKobBix 3a6oJebAHnIax.
- Pocne onepaun, npKOTOpbIX ycIneHHeCOKpaueHneMbIuM oKeT NOBpeNTb pOUECCy 3aXkBJeHn.
CneIyETn36eRaTb npIMHeHnB oBnactn cepua.CtmyIpyIOUme 3NEKTOBbI He OJIKHbI HaKJIaIBBaTcHa nepeDHOIO NOBepxHOCTb rpydHOB KJIeTKn (3OHa MeKdy pe6paMn n pyuHOB, npexDe Bcero B oBnactn obEnx 6oJIbXnx rpydHbIX MbIIU. 3To MoKeT yBeINHTb pNCK MepcaHn PpeDcePm n PpNBecTN K ocTaHOBke cepua.
HaKoCTHOaCTnYepeNa,BOJIaCTn pTa,NOIOCTN IJOTKN NIMIROPTAHN.
BobactuwencoHHoapTePM.
B o6naTn reHtAni.
- PnO octpbix nnn XPOHnuecknx 3a6oJIeBaHnIgX KOJN (paHeHnI yIN BOCnaneHnI, HApPmep npI HAIuHm6oJIe3HeHHbIX nIN 6e36oJIe3HeHHbIX BOCnaneHnI, NOKpacheHnI, CblII (HaPnpMep, anJepn), OXORax, yUnbax, ONyXoJIax, OTKpbITbIX n 3aXnBaIOx paHax, Ha NOcJeonepaUHOHbIX py6Iax, HAXOJaXxCB B CTaINn 3aXnBJIeHnI.
- PnB BbICOKO BJIaXHOCTN, HApPIMeR B BaHHoKOMHaTe NIN BO BpEM npEma Dywa.
- Nocne ynoTepe6nHa aIKoToJr.
- PnOHOBpeMeHHOM IOKJIIOueHm K BbICOKoAcTOTHOMy Xn-pyprnueckomy np6opy.
- Ppi OCTpbix nnn XpOHHuecknX 3a6oJIeBaHmJx KeIyIoUHO-KnIeH Horo TpaKaT.
CTMMyIaHHe DoJIkHa HApmyIO BO3DeIcTBoBaTb Ha rOIOBy, Ila3a, pot n lWeIO (OCo6eHNO B oBlaactn COHO apTePmN); 3anpeLaaETcra YcTaHaBnBaTb 3JeKtpoDbHa CepdIny rpydn, BepxHIO uACTb CnHbI nn ObnaCTb cepua.
Ipeep nCnoB3OBAHnem npn6opa npokohcybTnpyntc b c neaumm Bpaqom npn haJnyn y Bac:
OCTpbIX 3a6oJIeBAHnB, B OOC6eHHocTN rInneptOnHuecknx 3a- 6oJIeBAHn, HApUWeHn CBePTbIiBaEMOCTN KPOBn, CKIOHOCTN K TpOM603M6OJIuYeCKnM 3a6oJIeBAHnM nII npn NDoOp3peHn Ha 3TN 3a6oJIeBAHnA, a TaKKe npn 3IOKaueCTBeHHbIX HOBOO6pa3OBAHnX;
JIO6bIX 3a6OJIeBAHn KOxN;
-Диабета;
-IO6bIX paCCToiCTB UyBCTBUNeHBOCTN C NOHNKeHHBM 6OJIeBBIM NOpOROM (HaPnMep, PnH HApUWeHnX OMeHa BeueCTB);
XaI06,C8ra3aHHbIX CO CTmUyInpyUOILM IeEHnEM;
pa3dpaxkhen Ha Koxe n3-3a dnttebHOJ 3neKtpoHOn CTmMyJIaUN Ondoro n Toro Jx yactka.
BHIMAHHE!
IcnoB3yTe MNOCTMMyTAp0 EM 95 NCKJIHOHTeJIbHO:
- JIJIIOEi;
B CEJAX,ДЯ KOTOpbIX OH 6bl pa3pa6OtaH,И TOLko TEM CnOco6OM,KOTOpbI ONuCAH B daHHOn IHCTpyKUIM NO npIMeHEHIO (JIb6oe npIMeHHe He No Ha3HaueHMo MOKeT 6bl OnaChbIM);
- HApYxHOrO npUmeHeHHa;
COpINHnHaBbIMNpINHAnEeKHOCTMnI3 KOMTNEKTA NOCTABN INOpINHnHaBbIMN KOMNOHEHTAMN, pIno6peTaEMbIMN OTDeJIbHO; B IPOTNBHOM Cnyae rapaANTNA Tepre TcNY.
MEPbI INPEIOCTOPOXKHOCTU
CHIMaTe 3neKtpoDbI c KOxN OCTopoXH0, YTO6bl IpeDToBpaTb NOBpeXdHe HcYBCTBnTEbHO KOKN.
He noHocnte np6op K nCTOCHKAM TeTnHa n He nCnoB3yTe ero B6Jn3n (~ 1 M) KOPOTKO- mMKPOBOHOBbIX np6opob, T. K. 3TO MOKET npBODNTb K DOCAHbIM CKAqKAM TOKa.
- He noDBepraTe npB6Op BO3DeNCTBnIO npRMBIX COJHeHbIX Ly-yei nn BBICOKNX Tempeatyp.
3aunuainepn6opotnbinnrpaanBna
HnB KOem cnyae He norgykaTe np6op B Body nn Dpyrne XIKKOCTN.
- ⅢrHHeHueckx COOpaXeHn 3JeKtpoamM MoKeT NOb3oBaTbCRA TOBko OINH YeIOBeK.
- Ecnn npnbop pa60taeT heKOppeKTHO nn y Bac noBnIncB HeDOMOraHne nn 6oJn, cpa3y xe npekpatnte nCnoB3oBaHne np6opa.
-Дя удяпнг Улзамени lyakтpondи npedвapntelho Heo6XOДМо OTKЛОЧТь пибор Uл COOTBETCTBYUки КанJI,YTOБИЗБжkaTb HxKeJaTeNbHOro pa3dpaXeHry KoxN.
He npBepraTe 3neKtpOdb MoHnФuKaUu (HaNPmep, o6pe3a u).TO npBODNT K NOBbIeHINIOLOTHOCn TOKA mOKeT ppeCTABJIbT bOnachOCTb (MaKC. peKOMEHyEMOE 3NaueHne BixOJ HbIX CnHaiOB dN 3neKtpODoB 9 mA/cm², 3ΦΦeKTNBHaa NIOHTHOCTb TOKA Bbiue 2 mA/cm² Tpe6yET NOBbIeHHoro BHIMAHna).
- He npimehnre npibop Bo BpeMa, BoXdHnA bTOMoBnIa nn ynpabHeH MaunHmN oObopyoBaHnem.
He npmehnepnpbopnpBbINOnHeHHJIO6bixpa60,Bxode KOtobHnpeDcKa3yeMaepaKunna(Hanpumep,ycuHneOe COkpaueHneMbIuHECMOTpHaHN3kyIOHTeHCNBHOCTb)MOXET 6bITb ONaCHOI.
CJeIe 3a TEM, YTo6bI BO Bpemr CTmMyJrauM MeTaJIauHecknE o6BeKbI, HApnpMep npjxKn pEmHne nUeNoOyKn, He cOpnKacAnbc C 3NeKtpoamn. EcIn B 3OHe npImeHHeNn IMeIoTcYkpaWeHn IINPiPCnH (HapnpMep, Bpynke), nepeNcNoB3oBaHnEM npi6opa IN Heo6XoDmO ChrTb, T.K.B IpOTNBOM ClyJa e MOxHO NOnyHTb ToueHhle OXOrn.
Bo n36exKaHne Bo3MOxHbIX OnaChbIX CnyuaeB xpaHnte np60p B HeOCTyHOM DnIeTeMecTe.
He npTaIe Ka6eJIe 3neKtpoOB C KOHTaKTamn CO CBOUMn HayuHnKAMn IIN dpYrIMn npu6opamn, He nOdkNHOaTe 3neKtpoBk KdpYrIM npu6opam.
He nCnoJIb3yIte DaHHbI np6Op oDnHOBpeMeHNO c DpyrMM np6OpAMn, IocblaIOUIMn 3JNeKTPnueckne IMnYlbcbi BaWemy Teny.
He npimehnTe np6op B6n3n JERKO BOCJIaMeHReMbIX MaTePpnaIOB,ra3OB ININ B3pbIByATbIX BeueCTB.
B nepbblmHytbl BblonHnIe npOeDpy cnIa nn Iexka, TTO6bl B peKnx cnyaX hAcTyIeHna BaralbHO peakun (Bhe3anHbIO6MOpOK) He noDBepraTb c6eOnacHocTN onyeh Hnra TpaBM. Ecn nOBnTCs OUYueHne Cna6oCTn, HemeJeHHOOTKJIIOHTe npINbOP INOLOXnTE HOrn NOBbIwe (npimepHo Ha 5-10 mN).
- He pekomeHnyeTcnpedBapuTeIbHaon6pbaoTkaKoxnKupHbIM KpemOM INMa3bIO,3TO CINbHO yBeJIuHT N3HOC 3JKeKTpoDOB INMOKET npNBecTN K cKaUKM TOKA.
HactoI np60peHa3HaeynIy nCIOB3OBAHnJeTbM NII INOdbMN C ORpaHueHHbIMN qIN3UeCKHM, CEHCOPHBIMN BO3MOXHOCTaMn (HapnPmep, COTCYTCTBnEM 6OJEBOYyBCTBNTeBHOCTN) NII C OPAHueHHbIMN yMCTBeHHbIMN cNOco6HOCTaMn, C HeIOCTaTOOHbIMN 3HaHnMaM NIN ONItOM. NCKJIOUeHeNco
CTABJIO T CUYAN, KOrda 3a HMMOcUeCTBnEeTcHADNeXaIIN npICMOT nnn OHN NOUYuNN OT Bac NHCtpyKUN IO NCNOJB3oBAHNIPOp6opa.
- Ecnn KJIeIaJc cIocO6HocTb camOKJIeIuxxC3JIeKTPoOB CHN3ITc, HEmEJIeHHO 3aMeHInTe IN. IcNoJIb3yInTe npINbOp TOnJIbKO C HOBIMn CAMOKJIeIuMmC8 3JIeKTPoAMn. B IpOTNBOM Clyuae HepaBHomeHoe pINKJIeINBaHne camOKJIeIuxxC8 3JIeKTPoOB MOKeT NOBpeINb KOxy. 3aMeHInTe 3JIeKTPoDbI He peXe Yem nocJe KaKDbIX 20 ceAHCOB UcNoJIb3OBAHnI.
TobpeXdHne
- PnHaIuHnIOBpeKdHn He nCNoJIb3yInTe np6Op nO6paTITecb K npOaBcU ynn No yKa3aHHOMy aDpeCy cepBuChOn Cnyx6bl.
-Дяобсесенялэфкгнвон pa60ты пибopa He poHЯпу He pa3bupaTe erO.
- PnpOBepbTe npBOp Ha HAIuHne npn3HaKOB u3HocA uIN NOBpeKDeHNI. PpH HAIuHn TaKHX npu3HaKOB, a TaKKe B TOM cnyuae,ecnn npBOp nCNoJIb3OBAJcR He No HA3HaueHIno, Heo6xOdmo neped OuepeHbIM erO INCNoIb3OBAHmE o6paTITbcr K I3ROTOBNTeIO INI npOdaBuCy.
Bcnyae defeektoBnnn HnnoJaoK Bpa6oTe HemeJeHHO OTKnIOHTe np6Op.
HnB KOem Cnyuae He nbTaIteCb CaMOCToTeNbHO OTKpbItb n/nnn OTpeMOHTnpOBaTb np6Op. PEmOHThIbe pa60tbl DOJXHbI npOn3BOUITbcra TOJbKO CnyK6Oe TXNHeeCKo NODepxKn nn OfuiAJIbHbIMn DnCTpn6bHOTopAmn. HecO6JIIOHe 3TOrTOpe6oBaHnBeTe Knotepe rapaHTnN.
- I3rotobntelb He Hecet OTBETCTBeHHOCTn 3a yuep6, Bbl3BaHHbIe HeKbaHnΦnCupoBaHHbIM NIN HeHaDJIeKaUIM NCIOJb3OBAHNm np6opa.
06paueHne c aKKyMnyTopHbIM 6aTapeKamn
- Pn nopaHnn Jnkoctn n3 akkymyIaTOPHO6atapeKn Ha Koxy IIN B rJla3a HEOxOIMN IpombITb COOTBETCTBYUcN yactOK 60JIbMIM KOJInueCTBOM BObl N ObaPntbC K BpaCy.
- NaCHOCb IporNaTbIbAHnmeJIKnx DeTanei! ManeHbKne DetN MOrYT IporNtNTb AKKyMJIaTOpHbIe 6aTaapeKN INoDABNTBCR
HMM. I03TOMy akKymyIaTOPhIe 6batapeiKn Heo6xoImo XpaHHTb B HeIOCTyHOM DnI dTei MeCTe!
- 06paauite BHHMaHHe Ha 3HaKn NoJrpoHoc Tn: nHOC (+) mMHyc (-).
- No 3aBepseHn cpoKa pa6oTb aKKyMnyTopHo 6aTapeKn HaeHbTe 3aUHTbIe nepuATKn n OChTne OTcEKN 6aTaapeek cyxOi canfetKo.
3aunuatae aKKyMylTopHbIe 6aTapeKn OT Ype3MePHoro Te- IIOBOrO BO3DeiCTBn.
aChocbB3pbBa! He 6pocaTe aKKyMyIaTOpHbIe 6aTapeiKN B OROh.
He pa36bpaIte, He oTKpbIbAIte n He pa36bIaIte aKKyMylTOpHbIe 6aTapeuKn.
IcnoIb3yIte TOnbKO Te 3apAaHbIe yCTpoiCtBa, KOToPbIe OINcaHbI B INCHtpKuIN IIO pIMMeHHIO.
Ipeid nIOb3OBAHnEM aKKyMnyTOpHbIe 6aTapeKn Heo6xOmo IpaBnIbHO 3apAINb. InpaBnIbHO 3apAINKn Heo6xOIMO BcERda co6NIOaTb yKa3AHn IN3rOToBnTeJIy YKa3AHn, npBe-DeHHbIE B daHHO INCTpyKUN IO pPIMHeHIO.
- Ipeep nepbBIM INCIOJIb3OBAHMeI NOJIHOCTbIO 3apAITe aKKMyJnTOp (cM. rnaBy «3apAJa Ka aKKMyJnTOpa').
4To6bl MaKcHMaIbHO npOaITb cPOK cLyX6bl aKKMyIaTopa,3a- pKaIte erO nonHOCTbHO he peke 2 pa3 B roq.
3. OnscaHne np6opa
UPOBHN CLOXHOCTN OTJNUHOTcApyrOT Dpyra npoDOnjNtJEbHOCTbIO qa3 CTmMyIaUN N NaY3bl.
War 5.
Ecnn nBbI6paHNo TpeHnpOBKn Heo6xOIMMbMaHKeTbI nnpyK nHor, Bam HxHO CMOHTb BDOIO 30JOTyIO KOHTkTHYIO NOBepX-HOCt b MaHKeT dnn pyK n Hor.
PacnoJIOKNTe camOKnIeUneCe 3NeKTPOdbi n (n) MaHKeTb dIpyk n Hor, KaK NOKa3aHO Ha DnCnIeep np60pa. 3aTe mNODKnIOHTe Ka6JIb K 3NeKTPOdAM n COOTBETCTByIOUMrHe3dAm HA HnXKeH CTOpOHe np60pa. ObaaAte BHNMaHHe Ha CBeTHyIO INDkauio Ha DnCnIee. 3aTe m HaxMnte Ha KHONky OK 1TO6bl npoJoJXtB CTmMyJauNo.
Cobet no HanoXeHIO MaXeTbI: nocJe CmauBaHnB Odoi ChaYana BCTaBbTe pyky B MaHKeTy, a 3aTem npToHnTe ee no BaWei pyke.
War 6. Ha dinnnee OTObpaXaETcOCTabWeecB BpemN MCNOJb3OBAHIN aKtYaNbHbI yPoBeHb INTeHCNBHOCTn IINoJIb3yEMoro KaHana.Kpome TOrO,Ha dinnnee OTObpaXaETcOCTabWeecB BpemN IMNpylbCa NnNay3bI B CeKYHdx.
Iocie HaCTpoKn INHTEHCBHOCTHc nMOUbIO KHOJIKN IpeKJIQUeHn yPOBHNHTEHCHBHOCTN KaHApOB IIPOrpaMa3aNyCTNTcABOTAMuCheKn.YCTaHOBtNEOxOIMbIyPOBeHb INHTEHCBHOCTCNOMoUbIO KHONOK CMeHbI yPOBHNHTEHCHBHOCTN.
5.2 Ka3aHnK npImeHeHHo
PerynpoBka HHTeHCHBHOCTN
Bb moxte yctahabnBaTb ypoBeHb INTEHCNBHOCTN NOaROBO ot 1do 100. Ira 6bictpoHaCTpOKn yepKNAIe KhoNky CMeHbI ypoBn INTEHCNBHOCTN: ypoBeHb INTEHCNBHOCTN 6ydt NOBbIaTaBC/NOHNkaTbC4 6bictpee.
EcIn Bbl noBbIaTe ypoBeH nHTeHCnBHOCTn, haxoJcB b peKIM OFF, abTomatueckn BKIOHUTcpeKIM ON.
PpnoctahOBKa MCNoJIb3OBAHm
Bb moKeTe npnoctaHOBntb CTmMyJauNIO (nay3a) B IIO6oMOMeHT KpaTMM HaxKaTneM KHONK OK ①.ДЯ npOdoJIkeHnA CTmMyJauN yCTaHOBNTe yPOBEh nHTeHCNBHOCTn 3aHOBO.
Bo3BpaT K npedeIyEmMy MeHIO
EcIn BbXOTnTE BepHyTbC K npeBbIyUeMy MeHIO, HaxMNTe KHOK Ky Ha3aI. Tem camblm Bbl npebete nporpammy.
ABTomatnueckoe OTKJIIOUeHne
Ecnn np6op He nCnNoB3yeTcR, OH OTKnIOuaeTcA BtOMaTnuCeckn uepe3 MmHybl. Ondako ecnn npn BbInOnHeHH BaMn 5
IIN6BbHeHaxKImaTeHaKHONKnIHeHauHaeTe TpeHInpOBky, np6opOTKnIOaEcTcyepe35MnHT.
IotpepKaKoHTaKaT
EcIn BO Bpemr TpeHnpOBKn 3JeKtpOdb/MaHKeTb/ka6enl OToeINHJIOTCn, 3JeKTPnueckar Zenb pa3pbIbAetc, a INHTeHCNBHOCTb IMNylbc CaOTBETCTByIOUero KaHana aBTOMaTHUeCKn CTahOBNTCpaBHOn Hynio. Ha nHdNKaTope INHTeHCNBHOCTn IMNylbc DaHHoro KaHana MmraTe BOKNIuCaTeJIbHbN 3HaK, PnIbOp N3daeT 3ByKOBoi CnHai (PnBkLIouEHHom 3ByKe).
MaHkeTa
B KOMNJIeK T NoCTaBkIN BXOJrT NO DBe MaHKeTbI pa3Mepa S m M. EcIn pa3Mep MaHXeT He NpXoJrT, Bbl MoKTe 3aKa3aTb MaH KeTbI pa3Mepa XS n LdoNoJIHTeNbHO (CM. HOpopMauHIO B rJaBe «3anachIbe Yactn n Detann, NpDBePxeHhIbe 6bICTpomy n3Hocy").
IpoBODITe TpeHINPOBKN DnA ODNHOI TOJ Xe YactN TeJa He Haue 1 pa3a B DeHc. CneINTe 3a TEM, YTo6bMeKdY TpeHINPOBKaMn OHOH I ToJ Xe YactN TeJa 6bla BbIepXkaHa Nay3a He MeHee 24 YacOB.
NocTyJIeHne BOdBi
CneIte 3a TEM, YTObI BbINBaTb Heo6xoDmOE KOJIueCTBO BOBIO do TpeHIpOBKn, BO BpEmr Hee I nocJe. BbInTe He MeHee OJHOcTaKaHa BOBoI nePeI TpeHIpOBKoI.
5.3 Hactpoyn np6opa
Bb moke Te yctaHOBTb Ha MIOCTMMyIaTope CJeDyUOme HAcTPOKn: 3bIK, rpkocTb u 3Byk. Kpome TOrO, Bb moke Te BblONHHTb BO3BpaueHeNKe 3aBOcKmHacTpoiKaM nPocMaTpBaTb HOpMaunio 06 ycTaHOBLeHHoB B npbope cnCTeme.
OTkpbltne MeHIO Hactpoek
YTo6bI nonactb B MeHIO HAcTpoE, yDepKnBaTe KHOkny BKJ./Bbl-KJI. TeueHne npu6I. 3 cekyHd. Pnp6op BKIOuaeTcra.
C NOMOJIbIO KHOJOK+/-BbIbepNTe“HAcTpoIKN"HaxMNTe DnnoTBePckJeHHKONKy OK①
- YTo6bI BbIaTN n3 MeHIO, HaxKMnTe KhoNky «Ha3aJ.
3blK
MeHIO B MNOCTMmYJTope DoCTyHnHO Ha nTn Ra3bIKax (HEmeUcKOM, aHJIINCKOM, INCnAHHCKOM, NTaJIbYHCKOM, ppaHcy3CKOM).
-ДяСмЕныязblaMeHIO BbI6epuTe Ha BKIOueHHom npu6ope
C NOMOJIbIO KHOJOK +/—“HAcTpoI-KN" NIOITBePdNTe BbIbOp KHOJIKON OK ①
C NOMOUIKHOHOK+/-BbI6epuTe1R3bIKnHaXMMTeIINPONTBepeKHeHHKHOHNKy OK①

C NOMOJIbIO KHONOK +/—BbI6epNTe HxKbIy3bIK nHaXKMITE KHOKNY OK IaI NaITBePxxDeHnA. 3aTeM Bbl aBTOMaTnueckn nonaTe B MeHIO HAcTpoE.K
RpkocTB
Bb moKeTe MeHrTb npKoCTb dncIner MNoctmMyrTopa.
-IMrCMeHbI rpkocTn DmCnnBra6pePNTe Ha BkHIOyeHHOM npnbope C nOMOuKHOKN+/-“HaCTpoKn"nNoTBePnte Bb6Op KHNKOIK OK①
C NOMOJIbIO KHOJOK +/—BbIepeHTe 2RpKoCTb> HnKaHmTe IINrIPOITBePKeHnKHOKNKY OK
C NOMOJIbIO KHOJOK +/BbI6epNTe Heo6XoIMMbI yPoBeHb JpKocTn HaXMITE KHOJky OK IaNoTBePjKe.3aTeM BblABTomTuYeCKn IonoJeTe B MeHIO HAcTpoE.K.
3Byk
Bb moKeTe BkIIOUaTb N OTKIIIOuA Tb 3ByK KHOIOK MNOCTMMyJrTopa.
IINBKNIOHNEUNOTKNOOENH3ByKa BbIbepnTe Ha npbope c NOMOUIKHOHOK+/-“HaCTpoiKn"N NOITBepnTe BblOp KHOHKOIK OK ①
C NOMOJIbIO KHOJIOK +/ -BbI6epnTe «3 3Byk》.Tenepb Bbl MoXeTeBKJIHOHTb MIN OTKJIHOHTb 3ByK, HaxaBaHa KHOKNy OK①3eJIeHbI = 3ByK BKJIIOUeHKpaCHbI = 3ByK OTKJIIOUeH
Bo3BpaT K 3aBODcKIM HacTpoiKaM
BbMOKTe BbINONHb CbPOc HAcTPOe MNOCTMMyIaTOpa Do 3aBOcknx. Pn3TOM 6ydyT CbPOWeHb HAcTPOkN 3bIka, RpKOcTN N 3ByKa, a TaKKe npo
dOJXnTeJIbHOCTb pa6oTbI nΦaKTnuecka npOdoJXnTeJIbHOCTb CTmUyrau.
- BbIOJIHHeHBO3BpataK 3aBOIDcIM HAcTPOKAM BbI6epNTe Ha BKJIOHcHOM npIbOpe C NOMOUsIO KHOIOK +/ -HAcTPOKn" HAAKMITE KHONKY OK nnoTBePckJeHn.
C NOMOJIbHO KHOJOK +/BbI6epHTe 4 Bo3BpaT K 3aBOJCKMn HAcTpOJkAM> n HaxMtTe IIN NOITBePKeJeHn KHOJky OK ① 3aTEM np6Op cnpocit Bac, dEInCTBnTEJIbHO JIN Bbl XOTNe BblIOJHHb BO3BpaT K 3aBOJCKMn HAcTpOJkAM.
C NOMOJIbIO KHOJOK +/ -BbIepeITe IA u HaxMITE KHOKNy OKDnIPOITBepKdEHH.3aTeEM Bbl ABTomATUeCKN IOnaTe B MeHIO HAcTPOEK.
HΦopmaun 06 yctahOBJIeHHoB B npIbope cncTeMe
B hactpoikax Bbl moKeTe npocMaTpBaTb mHΦopMaζIO O cncTe Me np6opa.
-Дяпсмогра Инфорmaи O сnteMe npiбopa Bьбepnte C nOMOькнОК +/—HactpoKn» n noTBePNTe Bb6op KhoNkoN OK ①
C NOMOuBIO KHOIOK +/ - BBi6epnte 5 INHΦopMaunO CnCTEmE" n HA- XMMTEnIaNOITBePckDeHnR KNOKY OK OTepeb Bbl MoKeTe npocmaTpuBaTb INHΦopMaunO CnCTEmE, yctahOBHeHHoB nPi6ope.
Haxmte KhoNky Ha3aD] nI npexo- da B MeHO HAcTpoE.

5.4 Nolb3OBaHne npnbopom c nOmoUo npnIOxehna beurer EMS HomeStudio
PpInoxeHne beurer EMS HomeStudio no3Bolnt Bam ydo6Ho nIb3oBaTbc np6opom C nOmoUbcoMaprfoHa. B npInoxeHn Bbl MoKeTe pOcMOTpeB dOnOIHTeJIbHbIe BnDeOpONK c ynpaxHeHnMI K bIbpaHHbIM TpeHIpOBKaM.
B MnoctmyJrTop BCtpoeHO 6oee 20 TpeHnpOBOuHbIX nporpaMM.
12 TpeHIpOBok Fitness & Power-Workouts (10 nporpaMm C tpeMa ypoBnMn cNoXHoCTn, KpOme npoRpaMMbI «BbIepKka» n Cool Down).
8 TpeHnpoBok Relax & Wellbeing.
IINBCEX IporpamM MOKHO HAcTPONTb INHTEHCNBHOCTb IMNpyJbCa KaHaIOB.
6.1 TpeHnpOBKn Fitness & Power
6.2 TpeHnpOBKn Relax & Wellbeing
CTeHb HHTeHCNBHOCTn HaCTpAnBaetc INHINBUNyAIBHO B COOTBETCTBm C Cy5beKTHNHBIMN OUYueHnM NOLb3OBaTeJn ONPeDEJIReTcR pa3NJuHbIMN BeJNUHAM, TAKIMN KAK 3OHa
nPIMHeHnKPOBOCh6KeHnE KOxN,TOIuHaKOxN KauEcTBO KOHTaKToB 3NeKToDOB.PaKTmuecka HAcTPOKa MoKet 6bItb 3ΦeKTHBHO,ODhako OHa He DOJXHa Bb3bIBaTB HEnpnaTHbIX OUyUeHn,HanPIMep 6oHn Ha yUacTke npIMHeHn. JERKoe nokaJIbBAHne rOBoPnt O DoCTaTOOH 3Heprn CTmUyAun, HO CJeNyET N36eRaTb HAcTPOeK,Bb3bIBaIOux 60JeBbE OUySeHn. Pn IpoDoJXkTeNbHom pIMHeHn Pnp6opa MoKet NTpe-6oBaTbcnpeHaactPoKa BCJeDCTBnE PnoceccOB PnNBbKaHn Ha yUacTke npIMHeHn.
8. OuInCTka n XpaHeHne
Camoknienuece3neKtpodbl
T06bl oecneHb aRe3HIO 3JKeKTPoOB Ha MaKcMmaHb DInI-TehBm CpOK, OCTopoxHO OUnuAte 3JKeKTPoDb BlaXHO caI-FeTKoB 6e3 BOPca HIN IpombIbaTe HIXHIO Uactb 3JKeKTPoOB NO TEPIOI npOTOHIO BOO IN pocuyinte IN, IpOMOKHyB CaIF-FeTKoB 6e3 BOPca.
IpeoOuNcTKoBBOeOTcoeHnTeKa6eN OTOJNEKTPoIDOB.
OuNTKa MaHKeT dny pyK HOr
- IpoBODITe OYnCTky MaHKeT dIy pyK N HOr NCKJIIOHTeJIbHO BpyHyIO.
OuncTkapnp6opa
Iocne nCnoJb3OBAHn OOnuaiTe np6op MrgKo, cnerKa BlaxHoN caTKeKo. Pn CInbHom 3aqr3HeHm CaTKeKy MoXHO CMOHTb Cna6bIM MbJbHbIM pactBOPOM.
He nCnoJIb3yIe TnOuNCTKIN XIMNUeCKNe OUHCTNTeIN NIM MOIO- Une cpeCDtBA.
Cneinte 3a TEM, YTO6bI B npnbop He nonana Boda.
XpaHeHne
He npereu6aute coeHHntbHbIe npoBoda n 3neKtpoDbI.
- OToeDInHnTe npOBoA ot 3neKtpoOb.
- Pocne npimeneHnHaKneTe 3NeKTpoDbI O6paTHo Ha Hecuuyo nnEhky.
XpaHnTe npnbop B npoxJaHOM npoBeTpnaEMom MeCTe.
He cTaBbTe Ha npmbop TjKxJbIe npdMeTbI.
MaHKeTbI DnI pyK n HOr dOJIxKHbI BbICOXHyTb nepeI TeM, KaK Bbl y6epeTe np6op.
9. YtJIn3aunr
Bb6pacbBaIte nCIOJIb3OBAHbIe, NOJHOCTbIO pa3PJAKeHHbIe 6aTapeKIN B CNEUAnbHbIe KOHTeIHHeBpI, CDABaITe B NYHKtBI npMeMa cTeOxOIOB NIM B Mara3INbI 3JIeKTPOoBOpyOBaHnIA. 3aKOH 603bIaET Bac OcyueCTbJIbYtUNIm3aUIO aKKymyIaTOPob.
Yka3aHne. 3n3naKn npEynpeXdaIOT O haNcHn B aKKyMylTOpax CneDyUOUX TOKcNHyBIX BeueCTB: Pb = 6atapeKKa coepKNT cBnHeC, Cd = 6atapeKKa coepKNT KaMn, Hg = 6atapeKKa coepKNT pTyb.

B INHTepecax 3aunTbOkpykaioe Cpebl no OKOHann Cpoka cnjck6bl cneyety Tynn3npoBaT np6op OTdEhHO
OT 6bIIOBOrO Mycopa. Ytunn3aunna DOnJkHa npOn3BOuNTb Cya Hepe3 COOTBeCTByUoJIne nyHKtbl c6opBa Baaen CTpaHe. Pnp6Op CJeDyET yTunn3HpoBaTb corNaCHO dIpeKTNBc EC no OTxODam 3JIeKtpueeCKoro n 3JIeKTPoH
Horo obopyoBAnia - WEEE (Waste Electrical and Electronic
Equipment).ПиВОЗнКНOBЕМВОВРСОВOBбрацайТecь B MEcTHYIO KOMMyHaJIbHyIO CJIyX6y,OTBETCTBeHHYIO 3a YTNJIN3aUHOTXODOB.
10. HenonlaKn/peuene npo6jem
Pn6op He BKIOaEcHaxaTMEM KONKu BKJ./BbIKI. ①HTo deNaTb?
(1)Y6eHntecbB TOM,HTO aKKyMnyTOp 3apJKeH.
(2) 06paTntecB B cepBnCHHyo CnyK6y.
3neKtpoDbI OTCoeHnHryOTcT TaTo deJaTaB?
(1) PpOtpnTe KneIkyIO NOBepxHocTb 3JIeKtpooB BnaXHOi caIpETKOI 6e3 BOPca. EcII aIRe3NIA 3JIeKtpooB He BOCCTaHOBUNAcB, INx HEO6XoIMo 3aMeHHTb.
(2)IpeepnpimmeHHeMeOuCTteKoKy,HeNCnOJIb3yIteJIOcBOH nIM MacNo IaT Ta. YdaJeHne BOLOC MOKeT NOBicITb aIRe3IO 3NeKTPoIDOB.
CTHmIyIaIpy npakTnueckn He3aMeTHa. YTo deJaTaB?
(1)OctaHOBnTe nporpaMMy HaxKaTne KHNKnO.K. PpOBepbTe npabNtBHOCTb COeINHeHn PpOBoBOc C 3NeKTPoDAMn. Y6eNTecb, YTO 3NeKTPoDb KOHTaKtpyIc C 6pbAsTaBaEMOn NOBepxHocTbIO. NcIOJIb3yra MaHKeTbI dI pyK n HOr, y6eNTecb, YTO OHN CMOHeHb BODoI.
(2)Y6eIITecb,HTo ITeKepe CoeHNHtBHorO npOBoJa noKluoyen K npIbOpy.
(3)ПоверпгурпспогхеонеэнкгpoOB,CneДNTe 3a Tem,чTo6bI Oи He paCOnorarJINcBpyrHaDpyre.
(4) NocTeHNO yBEnuHbAaTe nHTeHCNBHOCTb MMnYbCa.
OTo6paxKaetc cHMBoN 6aTapeKn. YTo deNaTb?
3apndte aKKyMnyaTOp.
HenpnaThbIe ouyueHnHa 3neKtpoJax. YTo deNaTb?
(1) Θл ekтpoДы pa3MseHb HENpaBnIbHo. ПрOBepTe pa- noLoXeHne 3EkTpoDOb, pRn Heo6xOuMoCTn yCTaHObTe IN npaBnIbHo.
(2) 3JIeKTpOdbI n3Hocnncb. HepaBHomepHoe paCnpedeJeHne TOka MoKeT Bbl3BaTb pa3dpaXeHne Koxn. I03ToMy 3aMeHInTe 3JIeKTpOdbI.
Koxha ha yuctke 6pa6otkn Kpacheet. TTo deJatb?
HemeIeHNO ocTaHOBnTe o6pa6Oky nNooxKnTe, noka He BocCTaHOBnTc HOpMaIbHoe COCToRHe KOKN. BbICTpoe NOKpachHeNKe KOKN IOd 3NEKTPOOM HeONaCHO, OHO ObbChReTCs 60JIee INHTeHCNBHbIM KpOBoo6paueHEm B COOTBeTCTByUoLcEM MeCTe.
Ecni pa3paKHe Ha KoxHe I npoxoNT nnoBnEeTc 3yD nI BocnaJIeHne,To nepe DaJIbHeNIM MCNoJIb3OBAHnEM pIn6opa Heo6xOIMO npokOHcyJIbTIpoBaTc C BpaOM. Bo3MOXHO,3TO Bbl3BaHO aJIleprNeK KJIeEBOn NOBepxHOCTn.
11. 3anachbIe qactn n deTaJIH, noDBepXeHHbIe 6bl- cTpOMy n3Hocy
B cepBnchOn cnyx6e Bbl moKeTe 3aKa3aTb cIeNyUoJe 3aNaChbIe deTann.
| Наменованные Apтукун | bHBий HOMEОД
HOMe рдя зараза3a |
| 8самokлаяхся
эльектpondов (45 x 45 MM) | Арт. 661.02 |
| 2 манжetebl
Размер XS (22-35 сM) | Арт. 662.03 |
| 2 манжetebl
Размер S (28-45 сM) | Арт. 662.04 |
| 2 манжetebl
Рazmep M (36-54 сM) | Арт. 662.07 |
| 2 манжetebl
Рazмер L (50-70 сM) | Арт. 662.08 |
- TexHHueckne daHHbIe
The Bluetooth® word mark and logos are registered trademarks owned by Bluetooth SIG, Inc. and any use of such marks by Beurer GmbH is under license. Other trademarks and trade names are those of their respective owners.
Apple and the Apple logo are trademarks of Apple Inc., registered in the U.S. and other countries. App Store is a service mark of Apple Inc., registered in the U.S. and other countries.
Google Play and the Google Play logo are trademarks of Google LLC.
Android is a trademark of Google LLC.

Beurer GmbH • Söflinger Straße 218 • 89077 Ulm, Germany • www.beurer.com
www.beurer-gesundheitsratgeber.com • www.beurer-healthguide.com