
KCBWX 45600 - Wine cellar KITCHENAID - Free user manual and instructions
Find the device manual for free KCBWX 45600 KITCHENAID in PDF.
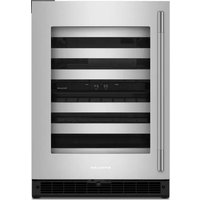
| Product type | Refrigerated wine cellar |
| Brand | KitchenAid |
| Model | KCBWX 45600 |
| Capacity | From 36 to 46 bottles depending on configuration (standard 36, maximum 46) |
| Temperature range | 6 °C to 18 °C (adjustable) |
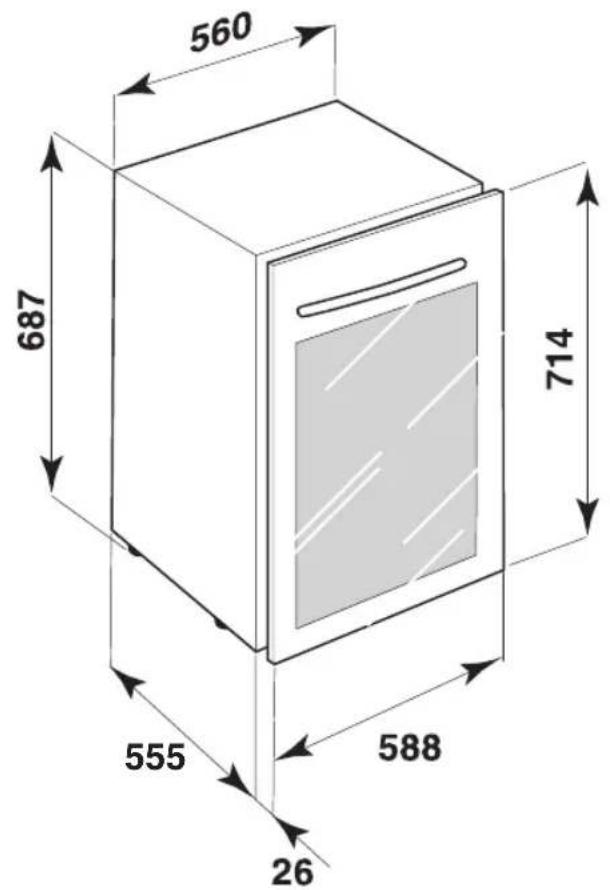
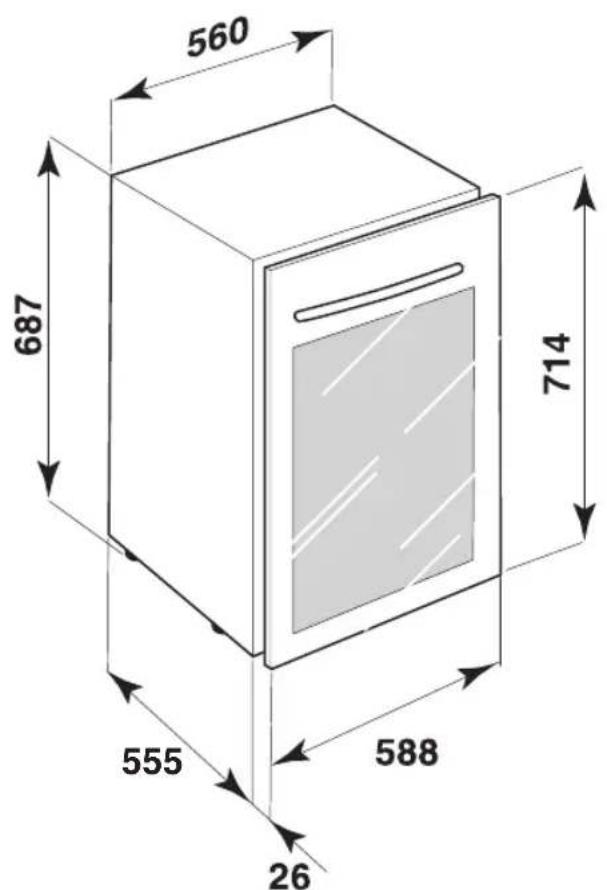
| Dimensions (H x W x D) | 82 x 59 x 53 cm (estimate) |
| Weight | Approximately 45 kg |
| Power supply | 220-240 V, 50/60 Hz |
| Climate class | SN, N, ST, T (from 10 °C to 43 °C) |
| Refrigerant | R134a (HFC) or R600a (HC, isobutane) |
| Shelf material | Oak wood (5 standard shelves) |
| Interior lighting | LED (manual control) |
| Dual zone function | Yes, with removable divider (upper zone adjustable, lower zone warmer) |
| Defrost | Automatic |
| Door | Glass, non-reversible |
| Control panel | Electronic with digital display and buttons (+/-), light, on/off |
| Noise level | Less than 42 dB (estimate) |
| Energy consumption | Approximately 150 kWh/year (estimate) |
| Warranty | 2 years (standard) |
Frequently Asked Questions - KCBWX 45600 KITCHENAID
User questions about KCBWX 45600 KITCHENAID
0 question about this device. Answer the ones you know or ask your own.
Ask a new question about this device
Download the instructions for your Wine cellar in PDF format for free! Find your manual KCBWX 45600 - KITCHENAID and take your electronic device back in hand. On this page are published all the documents necessary for the use of your device. KCBWX 45600 by KITCHENAID.
USER MANUAL KCBWX 45600 KITCHENAID
Instructions for use
Mode d'emploi
Gebruiksaanwijzing
The appliance which you have purchased is a wine cellar - a professional appliance intended exclusively for keeping wines.
For best use of your appliance, please read these instructions carefully. In them you will find a description of the appliance and useful tips on keeping wines.
Keep this booklet for future consultation.
- After unpacking the appliance, make sure that the door closes. Inform your retailer of any damage within 24 hours.
- Wait for at least two hours before switching the appliance on, so that the cooling circuit has time to reach full efficiency.
- Make sure that the installation and electrical connection are carried out by a qualified engineer according to the manufacturer's instructions and the local rules in force.
SAFEGUARDING THE ENVIRONMENT
I. Packing
The packing material is 100% recyclable and is labelled with the recycling symbol. Please dispose of all packing responsibly and carefully. Keep the packaging material (plastic bags, polystyrene parts, etc.) out of the reach of children because it is potentially hazardous.
2. Scrapping/Disposal
The appliance has been made with recyclable material.
This appliance is marked in conformity with European Directive 2002/96/EC, Waste Electrical and Electronic Equipment (WEEE). Making sure that it is scrapped correctly helps to prevent any adverse consequences for health and the environment.
The symbol on the product, or on the documents accompanying this appliance indicates that this product should not be disposed of as household waste. Please dispose of this appliance at an Electrical & Electronic Equipment Collection point as in accordance with local environmental regulations for waste disposal. When it is scrapped, make it unusable by cutting the power cable and removing the doors and shelves so that children cannot access the inside easily.
Scrap it according to the local rules for the disposal of waste and take it to a collection point. Do not leave it unattended even for a few days because it is a source of danger for children. For details of your local Collection Point please contact your Local Authority.
Information:
This appliance does not contain CFCs. The refrigerant circuit contains R134a (HFC) or R600a (HC) (see the rating plate inside the appliance).
For appliances with Isobutane (R600a): isobutane is a natural gas which has no effect on the environment but is inflammable. Make sure that the cooling circuit pipes are not damaged.
Declaration of conformity

- This appliance has been designed, manufactured and sold in conformity with: - safety objectives of the "Low Voltage" Directive 2006/95/CE (which replaces 73/23/CEE and subsequent amendments); - the safety requirements in the "EMC" Directive 2004/108/EEC, modified by Directive 93/68/CEE.
The appliance's electrical safety is only assured when it is correctly connected to an efficient earthing system complying with legal provisions.
GENERAL PRECAUTIONS AND SUGGESTIONS
- Use the wine cellar only to store wines and do not put any other type of food into it.
- Be careful not to cover or obstruct the appliance's ventilation openings.
To avoid the risk of suffocation and becoming trapped, do not allow children to play or hide inside the appliance.
- Before any maintenance or cleaning, unplug the plug from the power socket or switch off the electrical power.
- Only an authorised person can replace the power supply cable.
- Do not keep explosive substances in the appliance.
- Be careful when moving the appliance not to damage flooring (e.g. parquet).
- Do not use extensions or multiple adapters.
- The appliance is not intended for use by young children or unsupervised infirm people.
- Do not damage the cooling fluid circuit.
- Do not use electrical appliances inside the wine cellar, if they are not of the type recommended by the manufacturer.
- Place the appliance in a dry and well-ventilated room. The appliance is designed to work in rooms where the temperature falls within the following intervals, which in turn are a function of the climatic class given on the data plate: the appliance may not work correctly if it is left for a long time at a temperature higher or lower than the interval specified.
| Climatic Class | Room T. (°C) | Room T (°F) |
| SN from 10 | to 32 from 50 | to 90 |
| N from 16 | to 32 from 61 | to 90 |
| ST from 16 | to 38 from 61 | to 100 |
| T from 16 | to 43 from 61 | to 110 |
Important:
- If large amounts of wine are put in the appliance, it may take several days for it to reach a constant temperature.
- Caution! The storage temperature must never drop below +6^ .
- When the appliance is working, drops of dew or frost may form on the inner liner wall. This depends on the operation. There is no need to scrape the frost off or dry off the dew. The back wall defrosts automatically. The defrost water is automatically conveyed to a drain hole, and then collected in a container where it evaporates.
- The bottles can be stored neatly on the wooden racks. Each shelf can bear a maximum weight of 40Kg .
Remember when arranging
- Place the bottles in a central position on the rack.
- When closing the door make sure that the bottles do not touch the glass door.
- Caution: highly concentrated alcohol must be kept hermetically closed and in a vertical position.
- Because of the circulation of air in the refrigerator, different temperature zones form:
The colder zones are those near the back wall, the warmer zones are close to the door glass.
- Always store bottled wines individually and not in cases or cardboard boxes.
INTRODUCTION TO WINE
Storing wine
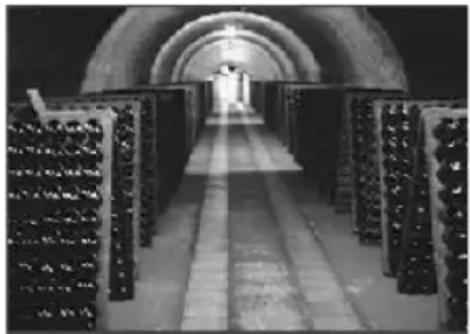
As is well known, wine will keep for a long time; if kept in a suitable place white wines will keep for about two years from the date of harvest. Light red wines can be kept for up to two years although preferably they should be consumed within a year. While some full-bodied red wines can keep for ten years and heavy red wines even twenty years. When you buy a bottle of wine put it in the cellar or another suitable place immediately. Three factors are vital in the process which starts from the cultivation of the grape, through to ripening, harvesting and wine making: light, air humidity and room temperature. If the taste of the wine is to reach full maturity while maintaining the wine's bouquet, it must be stored with these three factors in perfect balance.
Storage space
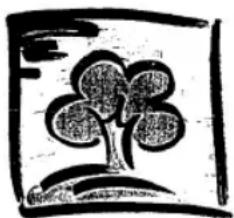
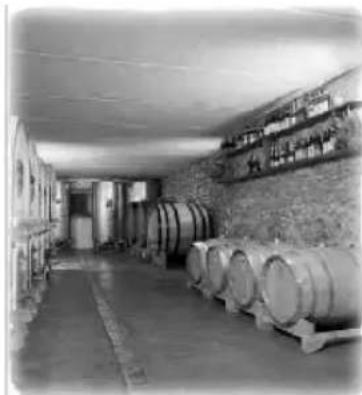
Not everyone has an underground storage space which can be used as a cellar. Recently technology has evolved to produce a suitable substitute for the classic wine cellar. The Wine Cellar which you have purchased is a special appliance designed to contain and store wines correctly. It should not be used to store fruit, vegetables or other food, but only your favourite bottles of wine. So, without having a cellar area, every type of wine can be correctly stored, matured and enjoyed.
Storage rules
A vital rule for keeping your favourite bottles is that they should be placed on their sides or inclined so that the wine bathes the cork. Many people think that this causes the well-known "cork" smell. In reality contact between the wine and the cork helps the elasticity of the cork so guaranteeing its effectiveness. Being able to remove the bottles easily avoids accidental shaking which, like vibration, could cause the sediments to suspend again, so altering the appearance of the wine over time. Move your bottles as little as possible and let the wine rest. Also avoid letting the bottles come into contact with the bottom wall because this would not only affect efficient defrosting but could ruin the bottle labels because of the drops of water collected during defrosting. The shelves on which the bottles are placed are made of wood, which efficiently absorbs any vibrations and keeps the bottle away from the wall which transmits the cold. The bottles of wine must also be kept away from substances or places which have a strong smell because this could easily be transmitted to the wine.
The temperature
The temperature represents a critical factor which is important throughout the wine's life cycle. It determines wine's good development while it remains in the bottle to mature. For best storage the temperature must be kept constant between 8 and 12^ . Rapid and wide changes of temperature must be avoided: too high a temperature dilates the liquids and speeds up the maturing process, while too low a temperature (below 4 - 5^ ) could cause the precipitation of tartrates, which could affect the wine's appearance. In extreme cases in which the temperature drops below 0^ , the wine may freeze and cause the cork to be expelled.
The cork
The cork is a fundamental component of a bottle of wine: its quality, chosen by the wine producer, is very important for the maturation of the wine itself. The perfect condition of the cork, in the bottles which we buy, depends exclusively on the standards of use and storage used by the producer or bottler.
STORING THE BOTTLES
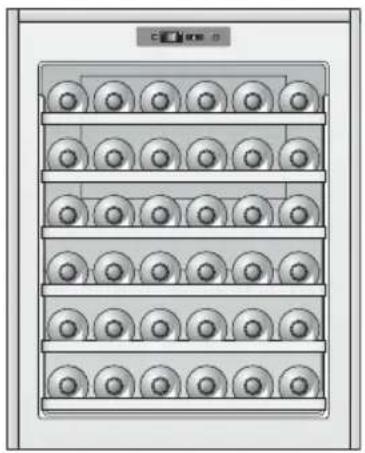
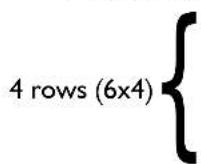
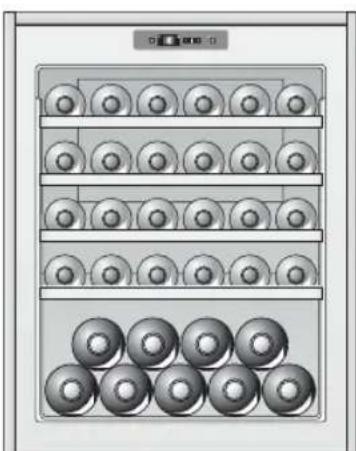
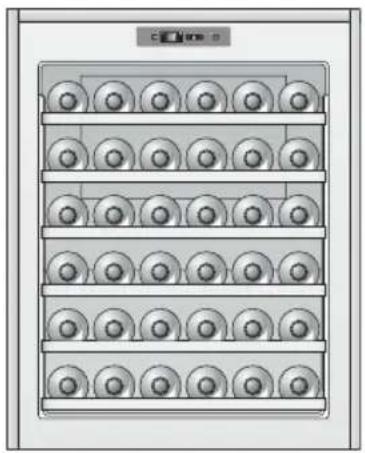
Classical storage with 36 bottles
If you want to arrange the bottles for storing wine so that they are visible and easy to take out, we recommend the 36-bottle configuration (Bordeaux bottle or mixed Bordeaux bottle and German-type bottle). Position a maximum of 6 bottles in the niches of each of the 5 wooden shelves; another 6 bottles can be placed in the slots on the bottom of the cellar to give a total of 36 bottles.
The wooden shelves have a locking system to avoid accidental removal which could cause the bottles to fall. The larger bottles (German-type bottle) should be placed on their side.
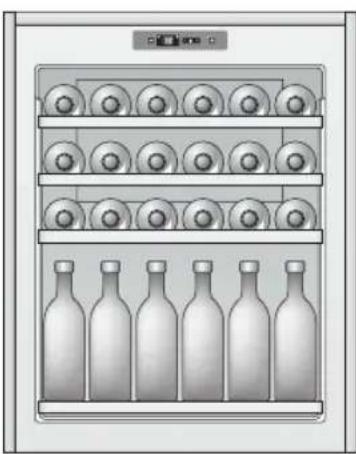
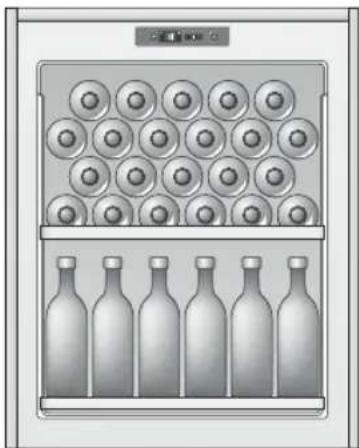
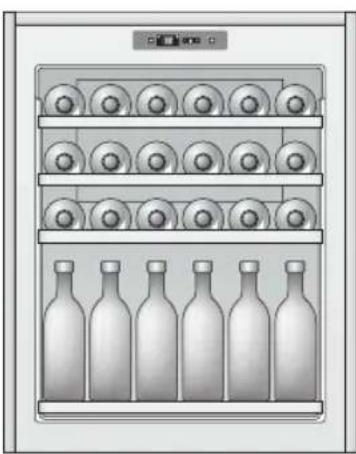
Storage with Champagne bottles.
Because Champagne bottles are larger than normal ones, a maximum of 5 must be placed on the bottom of the cellar. If you want to store more Champagne bottles remove the 5th shelf and stack the bottles on top of the bottles placed on the base of the cellar but in the reverse direction. Up to 9 Champagne bottles can be stored in this way.
Taking out the wooden shelves
To take out the wooden shelves proceed as follows:
I. Hold the front part of the shelf with one hand.
2. Remove the shelf slowly by pulling it slowly towards you one third of its length.
If there are only a few bottles
If there are not enough bottles to fill the wine cellar they should be distributed between all the available shelves, avoiding loading them all at the top or all at the bottom. So that they can be more easily seen from outside, they should be placed centrally on all the shelves.
STORING THE BOTTLES
Possible configurations for storing bottles
STANDARD
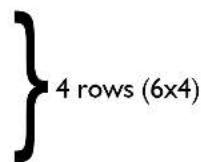
36 Bottles (100% on their sides)
5 racks used
STORAGE
44 Bottles (100% on their sides)
I rack used
STORAGE
42 Bottles
(50% on their sides and 50% upright)
3 racks used
MAXIMUM STORAGE
46 Bottles (48% on their sides
and 52% upright)
I rack used
STORING CHAMPagne BOTTLES
Never take out more than one sliding shelf at once.
TABLE OF THE BEST SERVING TEMPERATURES FOR WINES
The table gives the indicative temperatures at which the wine should be served.
If the wine must be served at a higher temperature than that set inside the cellar, it should be left out for as long as is necessary.
| Barolo 17°C | |
| Barbaresco 17°C | |
| Beaujolais 13°C | |
| White Dry Bordeaux 8°C | |
| Red Bordeaux 17°C | |
| White Burgundy 11°C | |
| Red Burgundy 18°C | |
| Brunello 17°C | |
| Champagne 6°C | |
| Chianti Classico 16°C | |
| Passito di Pantelleria 6°C | |
| Rosé Cote de Provence 12°C | |
| Dry and Sweet Spumanti 6°C |
| Verdicchio 8°C | |
| White Trentino wines | 11°C |
| White Franciacorta wines 11°C | |
| Dry white wines | 8°C |
| Friuli wines | 11°C |
| Rhone wines | 15°C |
| Dry White Loire wines | 10°C |
| Liqueur Loire wines | 7°C |
| Red Loire wines | 14°C |
| Liqueur raisin wines | 8-18°C |
| Vins Nouveaux | 12°C |
| Light Red wines, without much tannin | 14°C |
| Quite full-bodied Red wines, with some tannin | 16°C |
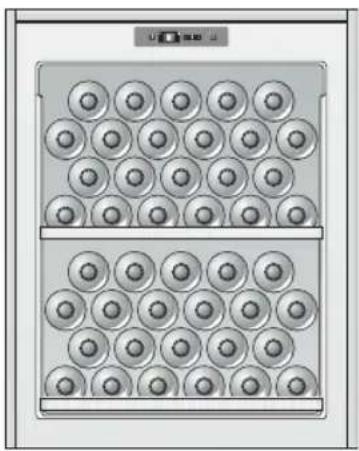
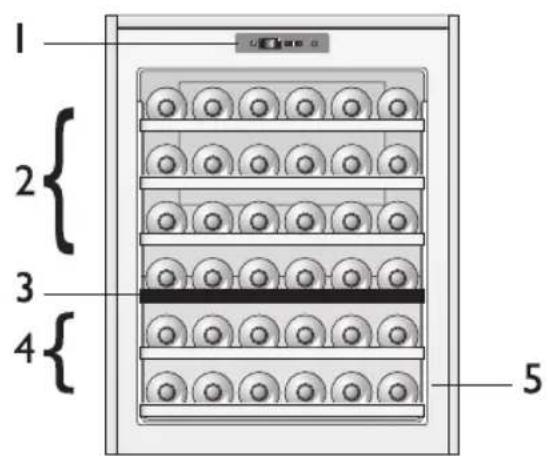
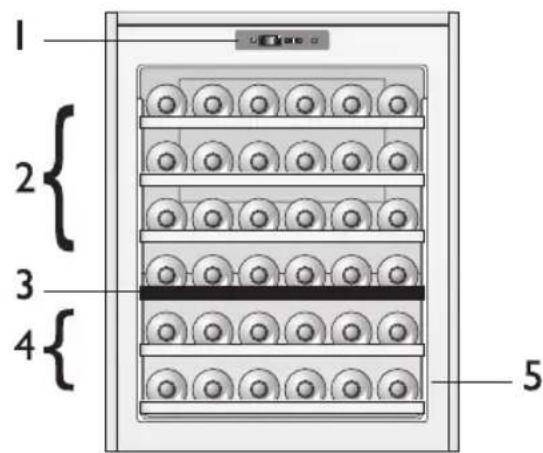
DESCRIPTION OF THE APPLIANCE
I. Electronic Control Panel
2. Upper compartment with racks
3. Removable separator (black)
4. Lower compartment
5. Rating plate
HOW TO OPERATE THE APPLIANCE
Preparing the appliance for use
Switching on the appliance
Insert the plug to start the appliance and then set the temperature on the front panel. A green pilot light comes on to indicate that the appliance is switched on.
The product has an internal light that does not come on automatically when the door is opened, but can be switched on as necessary from the control panel by pressing the relevant button.
Setting the temperature
For the appliance to work correctly we recommend setting the temperature according to the indications given in the "Introduction to wine" section.
Note:
The room temperature, the door opening frequency and the position of the appliance can influence the internal temperatures.
Description of the control panel
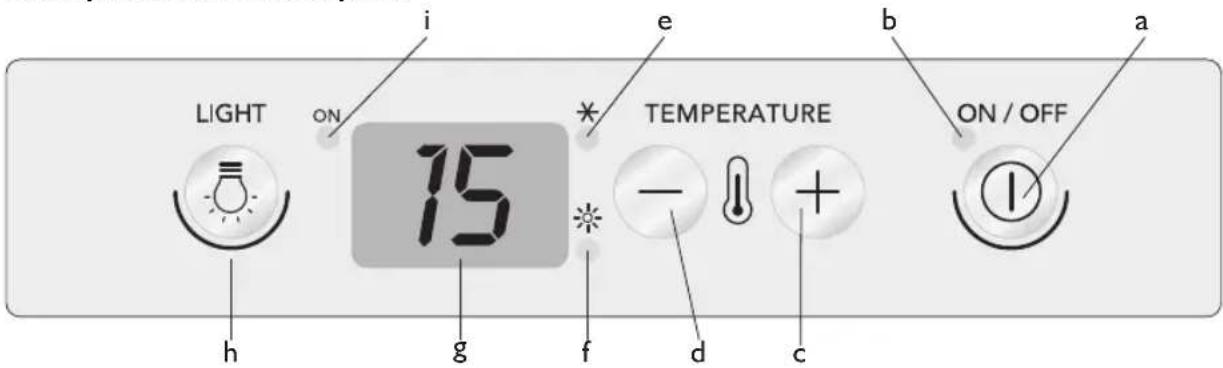
a) ON/OFF button: appliance on/off
b) appliance operating pilot light
c) (+) button to increase the temperature (max +18°C)
d) (-) button to decrease the temperature ( +6^)
e) cooling activated pilot light
h) heating activated pilot light
g) temperature in inner compartment display
h) inside light button
i) inside light pilot light
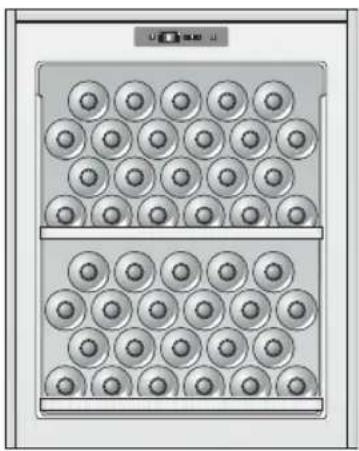
Cellar working with double or single temperature zone
The cellar is designed to work with two temperature zones or, as an alternative if the customer so requires, with a single temperature zone. For two-temperature operation position the black bottle-holder rack on the rails of the fourth shelf (starting from the first at the top), then set the temperature required in the upper zone, remembering that once the required temperature is reached the temperature of the lower compartment will be higher than that set (the temperature of the lower zone cannot be set separately).
Note:
To store the wine correctly we recommend setting the thermostat temperature at 10^ (upper compartment) to obtain a temperature of 15 - 16^ . For working with one temperature zone the black bottle-holder rack is removed and replaced with the accessory rack (the same type as the other woodcolour racks already installed). Keep the unused rack in a dry and cool place to avoid it being damaged by humidity or other atmospheric agents and thus being unusable in the future.
Setting the temperature
The appliance temperature was set in the factory and corresponds to 15^ (upper compartment).
If necessary, the temperature of the upper compartment can be changed as follows:
I. When connecting to the electrical power supply, the display shows the temperature set inside the compartment.
2. Press the (+) button for about a second; the temperature indicator will start to flash.
3. Press the (+) or (-) buttons until the required temperature has been reached.
4. Wait for 5 seconds for the indicator to shine steadily; the temperature has now been set.
5. Wait for the temperature change to take effect and put the bottles of wine in the cellar. The inside light does not come on (or goes out temporarily) when the inside temperature is higher than 24^ , so that the set temperature can be reached more quickly.
Controlling the temperature
Upper zone: the temperature of the upper zone is that normally shown on the control display.
Lower zone: the temperature of the lower zone cannot be set separately, but is higher than that of the upper compartment. To display the temperature of the lower zone just press the (-) button for a second and the temperature of the lower zone will be displayed for three seconds.
This operation can be repeated several times to check the temperature of the lower zone.
When single-temperature operation is selected by removing the separator, just see the temperature indicated on the control display, without pressing any buttons.
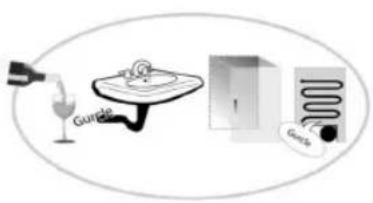
CLEANING AND MAINTENANCE
Before any maintenance or cleaning, unplug the appliance or disconnect the appliance from the power supply.
The wine cellar defrosts completely automatically.
- Occasional drops of water on the appliance's inner back wall indicate the automatic defrosting phase. The defrost water is automatically conveyed to a drain hole, and then collected in a container where it evaporates.
If necessary...
I. Empty the wine cellar completely.
2. Disconnect the appliance from the mains.
3. To prevent the formation of moulds, bad smells and oxidation, the appliance door must remain slightly open (about 3 - 4cm ).
4. Clean the appliance.
- Clean the inside regularly with a sponge dampened in lukewarm water and/or neutral detergent.
- Rinse and clean with a soft cloth. Do not use abrasives.
- Clean the outside with a soft cloth dampened with water. Do not use abrasive pastes or pads, stain removers (e.g. acetone, trichloroethylene) or vinegar.
- Clean the outside glass with a specific glass cleaner and the inside just with a damp cloth, avoiding using detergents where the wines are properly stored.
Rack cleaning
Use a damp cloth to clean the oak racks. Be careful not to damage the gasket when taking the rack out of the appliance. Open the door as wide as possible.
TROUBLESHOOTING GUIDE
Before contacting the Customer Care Center...
Problems of operation are often due to simple causes, which may be identified and solved without using any tools.
Appliance noises are normal because its fans and compressors switch on and off automatically.
Some operating noises may be reduced by:
- levelling the appliance and installing it on a flat surface
- separating and avoiding contact between the appliance and the units
- making sure that the internal components are placed correctly
- making sure that there is no contact between the bottles and the containers.
Some possible operating noises:
- a whistle when the appliance switches on for the first time or after a long time.
- a splash when the cooling fluid enters the pipes.
- a buzz when the fan start working.
- a crackle when the compressor starts.
- an unexpected trip when the compressor switches on and off.
When you hear these noises...
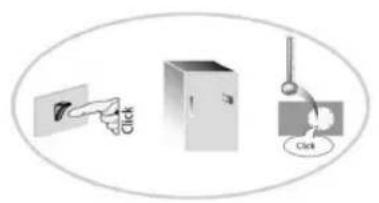
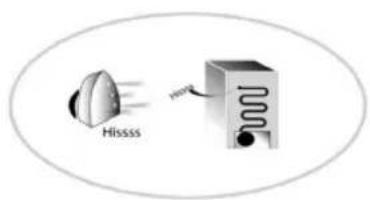
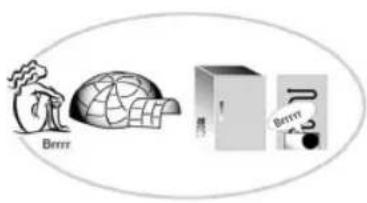
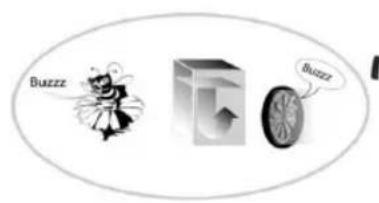
...your appliance is alive!!!
TROUBLESHOOTING GUIDE
I. The appliance does not work.
Is there a power cut?
Is the plug plugged into the socket properly?
Is the 2-pole mains switch on?
- Are the electric circuit safety devices installed in the house fully functional?
- Is the power supply cable broken?
-
The temperature inside the wine cellar is not cold enough.
-
Has the door been closed properly?
- Are the bottles stopping the door from closing?
- Has the appliance been installed near a heat source?
Is the selected temperature correct?
Is the circulation of air through the ventilation openings blocked?
- The temperature inside the wine cellar is too cold.
Is the selected temperature correct?
-
The appliance is too noisy.
-
Has the appliance been correctly installed?
-
Are the pipes in the back part touching or vibrating?
-
There is water on the bottom of the appliance.
Is the defrost water drain blocked?
REPAIR INSTRUCTION
To change the values of the temperature settings go through the procedure as following:
- Press temperature selection buttons "+" and "-" till "bOF" appears on the display
- Access to settings menu pushing button "+" now it appears "Cnf", keep pushed button "+" until it show "hyl" blinking (first parameter)
- Run through the parameter menu with button "-" up till item "OF1" appears in the display
-
Press button "+" to access the parameter modification
-
With buttons "+" and "-" the setting values of temperature can be modified
- Wait till the display stops blinking and goes back to the working temperature
- Now pushing the buttons "+" and "-" till the word "bON" doesn't appear anymore in the display, which blocks the access to the menu and saves the choosen parameter settings
AFTER-SALES SERVICE
Before contacting the Customer Care Centre:
Switch the appliance on again to see if the problem has been eliminated. If it has not, switch off the appliance and repeat the operation after one hour.
If your appliance still does not work properly after carrying out the checks listed in the troubleshooting guide and switching the appliance on again, contact the Customer Care Centre, clearly explaining the problem and specifying:
- the appliance type and serial number (given on the rating plate).
- the type of fault.
the model. - the Service number (the number after the word SERVICE on the rating plate inside the appliance).
- your full address.
- your telephone number and area code.
SERVICE
0000 000 0000
INSTALLATION
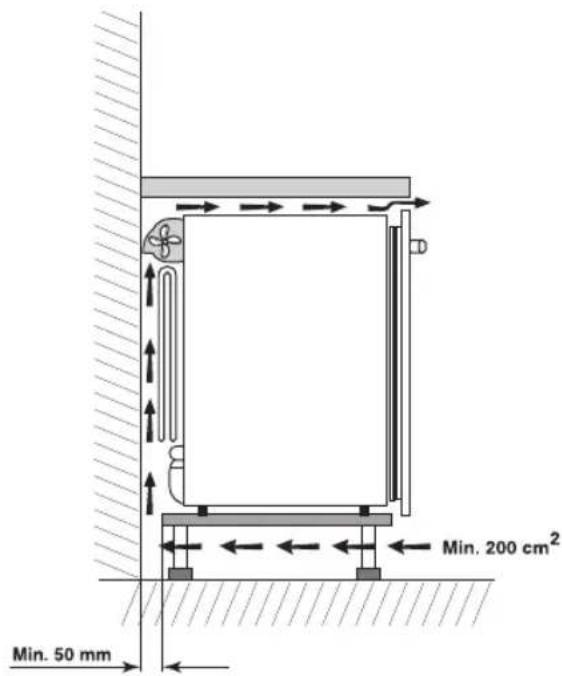
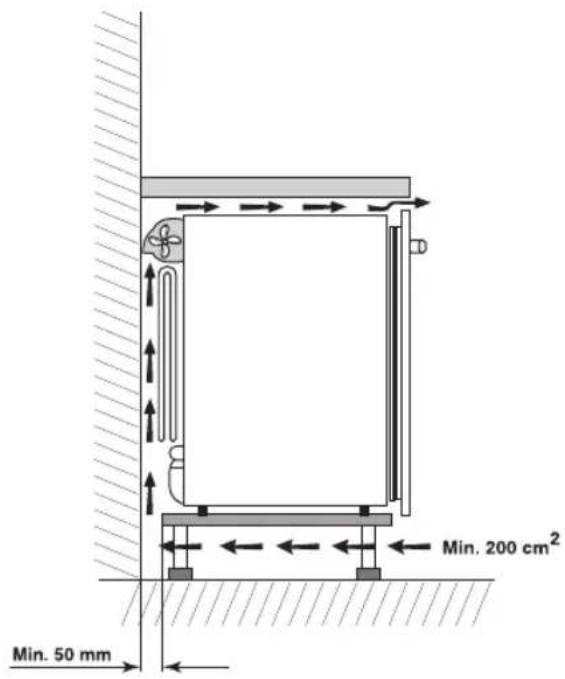
- Assemble the appliance with the correct ventilation as shown in the figures.
The doors cannot be reversed on this wine cellar.
Install the appliance away from heat sources. - Installation in a hot room, direct exposure to the sun's rays or placing the appliance near a heat source (radiators, cookers), increase power consumption and should be avoided.
-
When this is not possible, the following minimum separations should be respected:
-
30~cm from coal or oil cookers;
-
3 cm from electric and/or gas cookers.
-
Position it in a clean and well-ventilated place.
- Clean the inside (see the "Cleaning and maintenance" chapter).
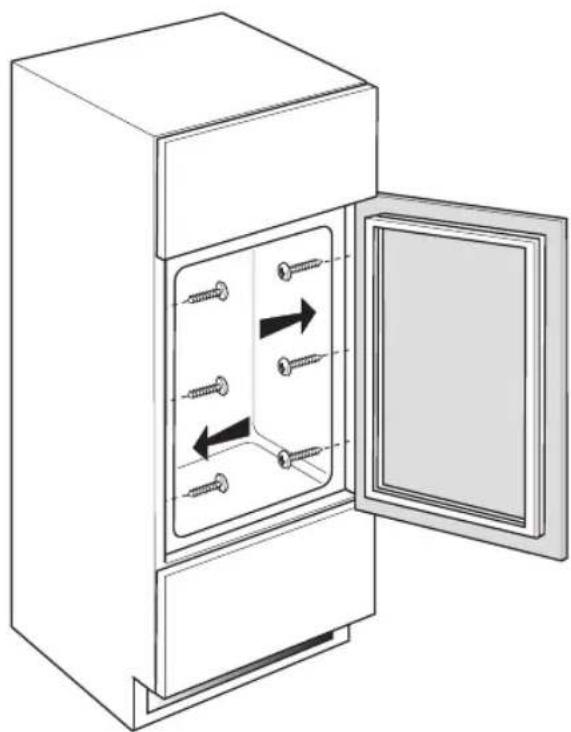
- Insert the accessories supplied.

INSTALLATION
INSTALLATION
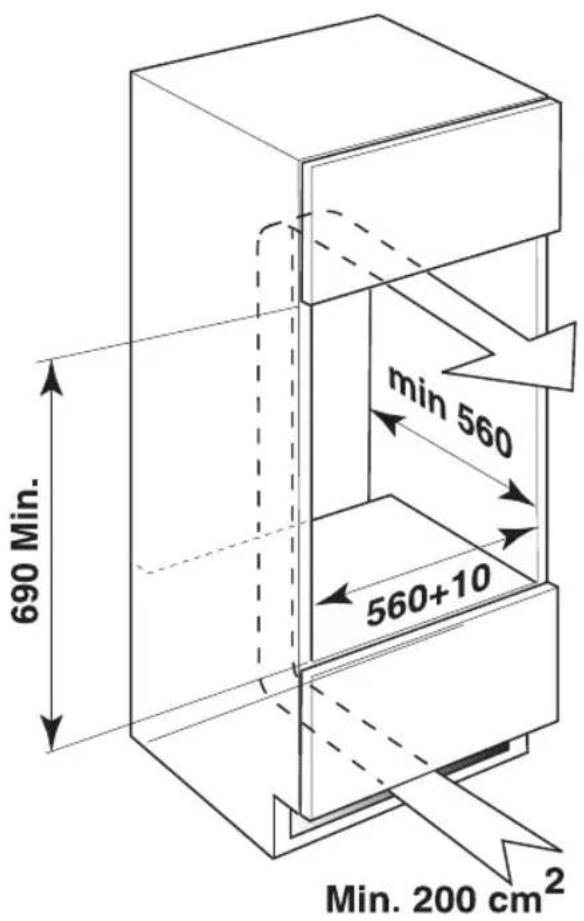
A) Installation next to kitchen units or cabinets
To allow complete 90^ opening of the door, install the product ensuring a space of at least 3.5mm between the side flanges and the doors of any adjacent kitchen units/cabinets or electrical appliances (as shown in figure 1).
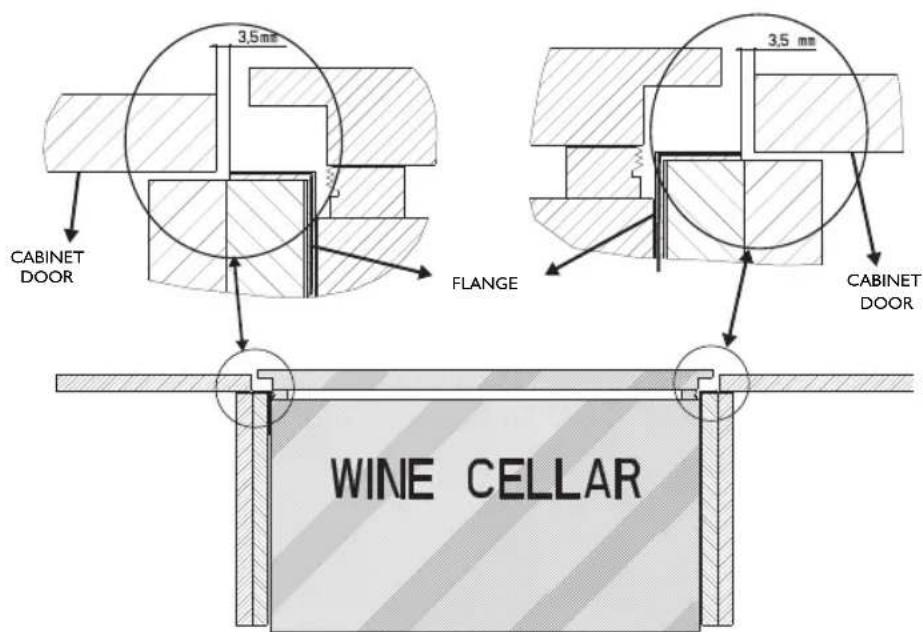
Fig.1
B) Installation next to walls
If a protruding handle is fitted, to allow complete 90^ opening of the door, install the product ensuring a space of at least 60~mm between the side flange and the adjacent wall (as shown in figure 2).
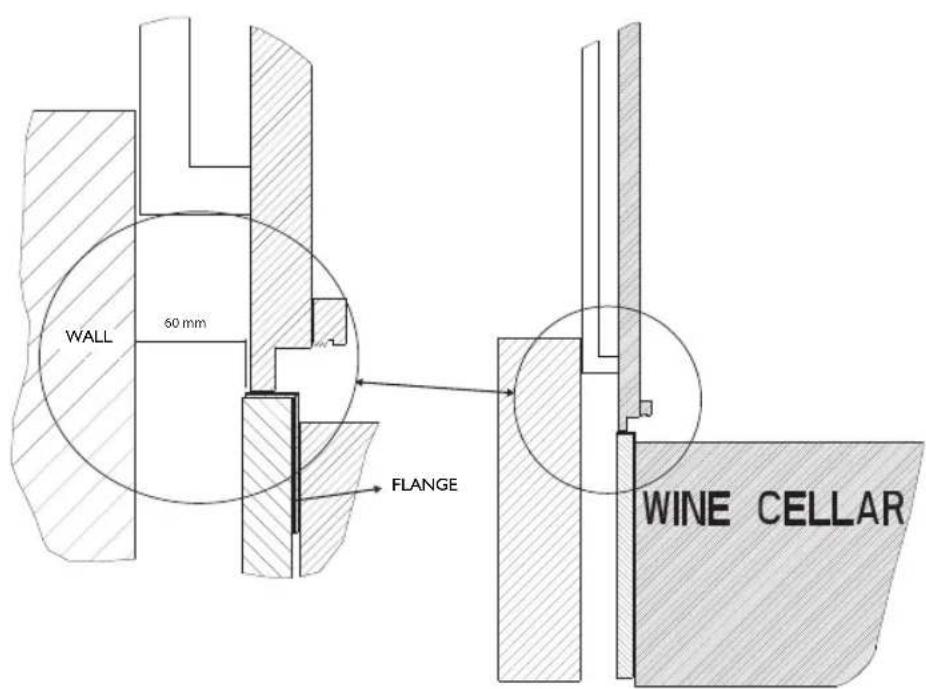
Fig. 2
Electrical connection
- The electrical connections must conform to the local regulations.
- The data on the voltage and power consumption are given on the rating plate inside the appliance.
- Earthing the appliance is obligatory by law.
- The manufacturer declines any responsibility for any damage suffered by people, animals or things caused by failure to observe the rules given above.
- If the plug and socket are not of the same type, have a qualified electrician replace the socket.
- Do not use extensions or multiple adapters.
Electrical disconnection
Electrical disconnection must be possible either by unplugging the plug or by means of a 2-pole mains switch upstream of the socket.
ELECTRICAL CONNECTION FOR GREAT BRITAIN AND IRELAND ONLY
Warning - this appliance must be earthed
Fuse replacement
If the mains lead of this appliance is fitted with a BS I363A I3amp fused plug, to change a fuse in this type of plug use an A.S.T.A. approved fuse to BS I362 type and proceed as follows:
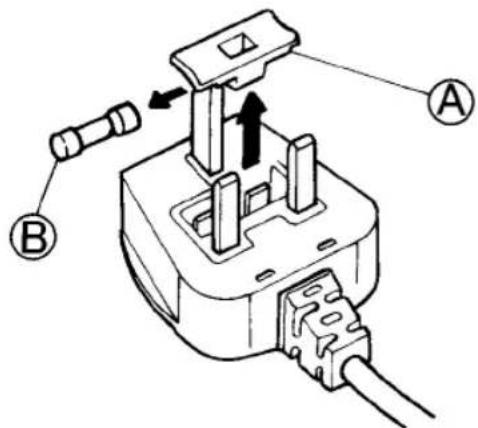
- Remove the fuse cover (A) and fuse (B).
- Fit replacement 13A fuse into fuse cover.
- Refit both into plug.
Important:
The fuse cover must be refitted when changing a fuse and if the fuse cover is lost the plug must not be used until a correct replacement is fitted.
Correct replacement are identified by the colour insert or the colour embossed in words on the base of the plug.
Replacement fuse covers are available from your local electrical store.
For the Republic of Ireland only
The information given in respect of Great Britain will frequently apply, but a third type of plug and socket is also used, the 2-pin, side earth type.
Socket outlet / plug (valid for both countries)
If the fitted plug is not suitable for your socket outlet, please contact After-sales Service for further instruction. Please do not attempt to change plug yourself. This procedure needs to be carried out by a qualified technician in compliance with the manufactures instructions and current standard safety regulations.
BESCHRIJVING VAN HET APPARAAT
I. Elektronisch bedieningspaneel
2. Bovenste gedeelte metrekken
3. Uitneembaar scheidingsprofil (zwart)
4. Onderste gedelte
5. Serienummerplatz je
HOE U HET APPARAAT MOET LATEN FUNCTIONEREN
Se as garrafas forem poucas
LIMPEZA E MANUTENÇÂO
GUIDA RICERCA GUASTI
GUIDA RICERCA GUASTI
2. Kassering/Avhending
Apparatet er fremstilt av resirkulerbart materiale.
RENGJØRING OG VEDLIKEHOLD
Jos pulloja on vahan
06bPHeTe BHHMaHne Ha noOpexKaHaTeO
- NocTaBeTe 6yTnIKnTe B UeHTpaJHo NIOJXeHne BbpypeWetKaTa.
- He 3aTbapnTe BpaTaTa, 06bPheTe BHIMAHHe 6yTnKnTe Da He Ce DoNnpaT Do CTbKNeHaTa BpTa.
BHNMaHHe: aIKoXoJ c No-BnCOKn rpaDyCmMOKe Da ce CbXpaHraBa CaMo XepMeTnueCKn 3aTBOpEn N BbB BepTKaJIHO NOLOKeHne. - IopapuIcnpkynaunTaHa Bb3dyxBxnaIINHka Ce 06pa3yBaT 3OHn Cpa3nUHa TemnepaTypa: Ha-cTydeHnte 3OHn Ca Te3N B 6n3OCT Do 3aJHaTa CTHe, a Ha-Tonlnte Ca Te3N B 6n3OCT DO CTbKJOTO Ha Bpata.
- ByTnIInpaHO BnHO BnHaRn Ce cbXpaHraBa n3BaJeHO OT ONaKOBKaTa, a He B CaHDbuN Nn KaWoHn.
BbBEHeHbB BnHOTO
CbxpaHeHne Ha BnHa
KaKTo e n3BecTHo, BnHOTo MOKe Da Ce CbXpaHbBa ONpeDeNeHO BpEme: aKO Ce DbpKAT Ha NOxOAnIO MCTO, 6eNITe BNHa MORa Da CE CbXpaHbBAT 3a OKOIO DBe rOHNOT DaTATA HA rOo3Do6epa, HO BCE NaK Ce NpeDNoHTA Da CE KHCyMnpat B pAMKte Ha eoHa rOuHa. JekTe YepBeHn BNHa Obaue MoRat Da CE CbXpaHbBAT DO DBe rOuHn, DOkATO HAKON PnBTHN YepBeHn BNHa MORa DA TpaTt Decet rOHN, A BnHata OT cyuHe Opo3De DOpn DbaIcET rOHN. Korato KynBaTe ByTNlKA BnHO, BeDHar a NocTabete B IN3bAta NIN Ha npYro NOxOAnIO MCTo. Pnp IpoceCa, KOto Tpae OT KYNTBnPaHe Ha BnHOTo Do y3PBAHe N OT MOMeHTa Ha rOo3Do6epa DO To3N HA IpOn3BOIDCTBOTO, ONpeDENa Ca TpN fakTopa: OCBeTneHne, BnaXhoCT Ha Bb3Dyxa N OKoHa TEMnepaTpya. 3a Da MoKE BKycOBtE KaueCTBa HA BnHOTo Da DCtTHaT PbNHO y3PBAHe N 3a Da ce NOdBpKa Do6bp apomat Ha BnHOTo, e Heo6xoDmTO Da CE CbXpaHbBa No Hau-Dobp HauHH, NocpeDCTBOM CbYeTaBaHe Ha Te3N Tprf fakTopa.
MactoHa cxbxpaheHne
He BCEKN pa3nONara c no3EMHO nOmeueHne, 3a da ro npncnocob 3a u36a. CbBcem HacKopo TEXHOJorNA yCnA da HamepIOCToEH 3aMeCTuTeHa KLnACNuCeKaTa BnHApCKa u36a. XnaDInNkBT u36a (Wine Cellar), c KOITo CTe ce CDoBUN, e CneUanEn UpeI, HayHo npoeKTupAH 3a NoCTabHne H cbXpaHBAHe Ha BnHaT a NO pOnxoJaH aHIn. BbTpE b Hero HAnCTNaH He Tpr6Ba Da ce cbXpaHBAt PNOIOBE, 3eNEHcyu MNeUHN IpOdyKTn, a Camo 6yTuNK oT npednoHTaHO BVHO. Taka, N 6e3 da pa3nOraTe c no3EMHO MRCTO 3a u36a, e Bb3MOxHO Da Ce NoCTnHRe Y3PRABe, cbXpaHBAHe NO pOnxoJaH NaHH N DerGCTnpaHe Ha BCEKN TIN BVHO.
PexmmHa cxbxpaHeHne
HeotmeHMO npaBnIO 3a cbxpaHbAHeto Ha BaUNTE 6yTNK BnHO e Te da 6bDat JIeHaJI NAcTpaHn I da ce DbpXaT HAKNOHNI TO TaKbB NaIN, Ye BnHOT Da MOKPN TanaTA. MHOrO XOPA MNCJIT, Ye Taka Ce NOUYABa KNaCnuecknT apOMaT Ha "Tana". B DeNCTBnTeHNOCT KOHTAKTbT Ha BnHOT C TanaT a NoOp6PBA enactuHOCTTa Ha TanaT, KoETo rapaHTnpa FyHKUHOANHOCTTa. JeCHOTO n3BaXdaHE Ha 6yTNKNTe 3a yNoTpeBa cNoCTMgA 3a npDoTbPaTbAHeto Ha cnuyaiHo pa3KnauaHe, KoETO KaTO N Bu6paunITE, MOKe Ja BnIHHe YtaKNITE, KATO NOBEYe INI NOMALKO IpomEni ECTeTNUCKBnD HA BnHOT. 3aTOBA MeCTe BAUnTE 6yTNKl KONKOTe Bb3MOXHO NO-MaIKo N OCTaBeTe BnHOT Da cN NoYBa. N36BraBte CBIO KOHTAKTA Ha 6yTNKNTe CDbHOT, Tb KaTO He Camo MoKe Da nonpeHTe Ha eOpNKacHTo OBe3CKpeKaBaHe, Ho IN da NobPeJeTne ETNKETNE Ha 6yTNKNTe, NO pRnuHa Ha KAKNTE BOda, KOtTO CE NOUYaBaT NO BpMe Ha OBe3CKpeKaBaHTo. PaΦTOBeTe, Ha KOnTO MOKe Da Ce NOpEkd 6yTNKNTe, Ca OT dPBO, MaTeplAn KOIT NOEma eOpNKacHO EBEHTaHNITE BnBpaun INoDdbPxA 6yTNkATA daneye OT CTeHNe, KOtTO npDeBaT TOnnHa INN CTyd. Dpyr ochOBen npInzup Ine da CE noDbPcxat 6yTNKNTe C BnHO daJev OT MaTeplAn mMeCTa, KOtTO CE xapaKTepn3ipat Cbc CInhen apOMaT, Tb Kato ToI MoKe Da ce npedeJe neCHO Ha BnHOT.
Temnepatypa
Tempepatpata npedctabnBa KpntuH e kAeTOp n E BaxHa npes 9eJINs cKbJn Ha XJBOT Ha BnHO, KaTO onpeDJIa do6poTo My pa3BHTne, KORATO CTOn B 6yTNkATA, 3a Da ce npeeNCTn. 3a ONTMaJIHO cbXpaHHeH, Temepatpata Tp6Ba Da CE NOdIbpxa NocToHHa B INTEPBAI OT 8 Do 12^ .OT OCHOBHa BaxHOCT e da Ce I36RbAT bprn I rOlemn Temepatypn COKObe: PpeKaJIeHO BUCOKATA Temepatypa pa3TBapr TeUHOCTnte I ppei3BnKBa YCKOPBAHe Ha y3PBAHeTO Ha BInHO, DOkaTO PpeKaJIeHO HICKATA Temepatypa (Do n PoI 45^) MoKe Da Ppei3BnKa YTaBAHe Ha DepeKeTH BInEH KAMbK, KOITo BOIN Do nobpejDahe Ha BbHNH erTeTIueckn BnI Ha BnHO.To BcPaHHe NaHE NoI 0^ , BnHOto 3ampb3Ba, KOETO MoKe Da nped3BnKBa npcbvaHe Ha TaNaTa.
Tana
Tanata npedctabnba fyndamehtanen KOMnoHENT 6ytnkata: HeHOTo KaueCTBO, n36paHO OT npOn3BODnteHa BnHOTO, e MHORO BAxHO 3a npabunHOTO y3pRABaHe Ha TOBA BnHO. OTmHOTo cBcTOHne Ha Tanata, KaKTo Hb6ytnkata, KOrTO pnpIO6NBAME, 3ABNCAT N3KJIIOHTeJIHO OT cTaHApTa Ha N3NOJ3BaHe IMATEpNaNTe, N3NOJ3BAHn OT npOn3BOIDNTeN I 6ytnIPAaHn.
KAK CE CKNAPAT BYTNJKNTE
Klaacnuecko cKaanpahe Ha 36 6ytjIkn
Ako JeaTe Da NOppeHte 6yTnKnte 3a CbXpaHeHneTo Ha BInHO Tn TaKbB HauHH, Ye Te da 6bDaT BnDmN I da Morat Da Ce BaJr TleCHO, CbBeTBaMe Bn NoppeIb6oT 36 6yTnKn (6opdoJe3 nn CmeCehn 6opdoJe3 n peHa). NocTabeTe B CneuaHnTe HnHn Ha BCEKn OT 5- Te DpbBeHn paTa MaKcImaHNO KOnUeCTBO Do 6 6yTnKn; Ose 6 6yTnKn MOrat Da ce NOCTaBRT B CneuaHnTe OTBOpn Bbpxy OCHOBaTa Ha N36aTa 3a 6yTnKn, BCNUKO o6Io 36 6yTnKn. DpbBeHn PaTOBe ca Cha6dEHN Cbc 6Ioknpaua CnCTema, 3a Da Ce N36erHe HeBOJHOTo N3BaJdaHe, KOeTo 6n MoJIIO Da npuHn NaJaHeTo Ha 6yTnKNTe. PpenOpbYBa ce Da Ce NoCTaBHT NO-ROJEMtE 6yTnKn (PeHaH).
Cklaaipane Ha 6ytniKn Champagnotta
IopapnTexHnno-tonpma pa3mep cnpmo KnaCnecknte 6yTuKn, 6yTuKnTe Champagnotta Tpr6Ba Da ce nocTabrBbpyx OCHObTaHa N36aTb MaKcImaIIHO KOInueCTBO Do 5. Ako XeJaeTe da cKnadnPate dpyr Bnu 6yTuKn OT Bnu Champagnotta, Tpr6Ba da npemecTnte 5- RaPfN 6yTuNKnTe, nocTaBeHN Bbpyx OCHObTaHa N36aTb Pr6Ba Da ce nocTabrB o6paTeH peD cnpMo npeduHnTe. No To3n HaunH Morat Da ce cKnadPrt Do 9 6yTuKn TnChampagnotta.
I3BaXdaHe Ha IbPBeHnTe paΦTOBe
3a da n3BaAnTe nbpBeHnTe paTOBe, npOeDnpaTKe KaKTo cNeDbA:
- C eɪnHaT a p bKa xBaH eTe npeɪnHaT a yacT ha paΦTa.
2.ИЗваде Te 6abHо paФТа, KaTo roДрьнHeTe KbM Bacdo1/3OT ueJINMy xOД.
Ako 6yTuNknte ca mAJko
Ako 6poT Ha 6bytNknte Ha pa3noJoxHe He e DocTaTbueH, 3a Da ce 3aBnHn XnaDnHnKa n36a, CbBeTBaMe Bn da rna pa3npedeJIte MExdy BCnKn paTOBe Ha pa3noJoxHe, KaTo n36eHTe Da rna NoCTaBNTe BCnKn 3aeJHO camo BdoJHaTa nn Camo B roPHaTa qact. 3a noD6pa Bn3yaIIN3aunr OTBh, CbBeTBaMe Bn da rna pa3noJoxHe ueHTpaJHo Bbpxv BCnKn paTOBe.
KAK CE CKNAPAT BYTNJKNTE
Bb3MOxHn nope6n 3a cKnaIpaHeTo Ha 6yTuJIknte
CTAHДAPT
36 Bytnk (100% nergann)
5 ynoTpebeHn peWeeTKn
CbXPAHEHNE
44 Bytvnki (100% Negerhaan)
1 ynoTpe6eHa peweetka
OOBCJYXBAHE
42 Bytunkn (50%)
JIeHann 50% n3npaBHeN
1. YpeBbT He pa60tn.
CnpnIe eIeKtpnuecknTOK?
He e Jn npeKbchat eJneKtpnuecknrt ka6en?
ДынлспгпркьсваHaМржkaTbKJIIOUeHJIe?
-ДалпгдзnteHTeHa eNeKtpueckataHnHCTaIauB JxNIIuTeTOФyHKUOHiPATAnpabnlo?
He en npeKbchat 3axpaHbaunr ka6en?
2. Temnepaypata BbB BbTpewHOCTTa Ha Wine Cellar He e DOCTaTbUHO HnCKa.
BpataTnnpabuHNO nIc 3aTbap?
- BytunlkiTe He npeuat nn 3a 3aTbapnHe Ha BpaTata?
- YpeIbT He e IIN HCTaIIpaH B 6bn3OcT Do
N3TOUHKn Ha TOnnHa?
- PpaBnHNo Ine n3BbpSeHo INCTaInpaHeTo Ha ypeJa?
- Tpb6nTe Ha 3aHaTa CtpaHa He ce JIN donnpat IN Bn6pnpat?
5.Иma BODa Ha IbHOTo Ha ypeHa.
KaHaJIbT 3a BODaTa OTo Obe3CKpeKjaBaHeTo He e nn 3anyuen?
Инстукциз 3A PÉMOHT
3aДа npomehnte cToHocHTte Ha NaCTpoKITE 3a TempeTaPa, N3bJIHeTe npoueDypaTa KaKTo CNeDbA:
-
HatncheTe 6yToHnTe 3a n36op Ha Tempepatya "+"и"-,"ДOKATO Ha nCnIeCe noBn "bOF".
Bne3Te B MeHIO HaCTpOKn, HATnCKaIKN 6yToH "+" Ce nOBBA "Cnf", 3aDpbXkTe HAtncHat 6yToHa "+" , DOKaTO ce NOKaKe "hy1" mIrau (nbpBn napametbp).
-ДИЖETeCEBMENHOTOCnapaMeTpnteC 6yTOH"-,DOKATOHaIINCNPIEeCEIPOBNI NO3NUIA"OF1". -
HaTnCHeTe 6yToH "+" ,3aJaBnE3eTe B MoDnΦnKaunHa npametbp.
C6byToHn"+"n"-",MOraT da ce MoiNpUpaT 3aJaDeHnTe CToHocTn Ha Tempepatpata.
-ИЗчakайтДOKATOДиСплгЯпесТандМигаиCEВьрНа pa6OTHaTe TEmпepаТура.
CeraHaTnCHTe6yToHn" ^+ "N"-,"DOKaTo dymata"bON"npctaneHa ce noRBA Ha dinCnIe, KoETO ue 6JIOKupa DoCTbna Do MeHOTO uIe apXNBupa n36paHnTe npaMeTpHa HAcTPOKnTe.
CEPBn3 3A IOpIaPbJxKA
Ipeu da ce o6bPHeTe KbM CepBn3a 3a noDpBkKa:
BkIIOUeTe OTHOBO ypea, 3a da npOBepnTe daHn HEn3npaBHOCTTa He e npeoJOnHa. Ako pe3yIITaTbTe oTPuCaTeJeH, n3KIOUeTe ypeDa OTHOBO N CneD eEH uac NOBTOpeTe onepaunra.
Ako, cIeK KaTo n3BbPunTe npOBepKInTe, n36poEHn B pKoBOOCTBOTO C INHCTpyKUnTe 3a OTkPnBaHe Ha HeN3npaBHOCTNe I cIeJ kaTo 3aJeIcTBaTe OTHOB OpeJa, BaINrTypeIPOJbJIkaBA Da He cyHNKUOnHpa npaBnHO, o6bpHeTe ce KbM CepBn3a 3a POndpbXka, ONNCBaIK NcHO HEn3npaBHOCTTa n CbOuBaBKn:
Tuna N cepinHn Homep Ha ypeHa (yKa3aHN Bbpxy Ta6eKkata C daHHnte Ha
ypeeta).
- TUNa Ha HeN3PpaBHOCT,
MOdela, - CepBn3HnH HOMep (HOMepa CneI dymata SERVICE Ha Ta6eJIkata C daHHN BbTppe BypeDa),
-Пыннсадрес,
TeIeOHHn Cn Homep N KoD 3a MExkDyrgpaDCKO N36bpaHe.
SERVICE
0000 000 0000

3a cnncbKa Ha CepBn3nte 3a TexHnuecko O6cnykBaHe, MoKeTe da ce o6aNTe 6e3nlaTHo B TeNefoHHn cHTbp Ha fnpMaTa Ha Homepa: 00800-3810-4026".
ИнстадирасЕ
- IV3BbPwTe MOHTnpaHeTo Ha n3DeJIneTo
- npn npaBnHO BeHTnIuPaHe KaKTo e
- yKa3aHo Ha n3JIoXeHIne ΦnrgpN.
- 3a Ta3n n36a wine cellar He e Bb3MOxH0 da ce O6bpHe BpaTaTa.
- INHCTaIIpaIte ypeIaIaJIeOuN3TOUHNiHa TOnJIInHa.
- INHCTaJIpaHTo B TOII NOmeUHe, IprKOTO n3JIraHa He Ha CJIbHYeBInTe JbUHn IIN pa3NoIarHaTo Ha ypeJa 6JIu3O Do TOnJIIneH N3TOUHNK (OTOnJIInTeJHn YpeN, NeuKN), yBeJIuHaBaT N3pa3XoDbaHTo Ha eJIeKTpUeCKn TOK n TpR6Ba Da ce N36rBaT.
Bcnya,ye TOBa He e Bb3MOxHO, cna3BaIte CJeDHTe MNHIMaJIHn pa3CTOARHn:
-30cmOTneukn3aBbIuuaHnHaΦTa;
-3cmOT eNEKtpnueckn n/nnra3OBn neyKn.
-
ПoctabиTe ro Ha cyxo npoBetpReMo MACTO.
-
OunchTe BbTpewHocTta (BnXTe rnaBata "NouchTbaHe n 06cnyKbaHe").
- OocTaBeTe DoctaBeHnTe Cypeda DOnbHNHTeHNn PpHaDnEcxHn Yactn.
ИHCTАЛПАРЕ

ИHCTАЛПАРЕ


- SAFEGUARDING THE ENVIRONMENT
- Packing
- Scrapping/Disposal
- Information:
- Declaration of conformity
- GENERAL PRECAUTIONS AND SUGGESTIONS
- Important:
- Remember when arranging
- INTRODUCTION TO WINE
- Storing wine
- Storage space
- Storage rules
- The temperature
- The cork
- STORING THE BOTTLES
- Classical storage with 36 bottles
- Storage with Champagne bottles.
- Taking out the wooden shelves
- If there are only a few bottles
- TABLE OF THE BEST SERVING TEMPERATURES FOR WINES
- DESCRIPTION OF THE APPLIANCE
- HOW TO OPERATE THE APPLIANCE
- Preparing the appliance for use
- Switching on the appliance
- Setting the temperature
- Note:
- Description of the control panel
- Cellar working with double or single temperature zone
- Controlling the temperature
- CLEANING AND MAINTENANCE
- If necessary...
- Rack cleaning
- TROUBLESHOOTING GUIDE
- Before contacting the Customer Care Center...
- Some operating noises may be reduced by:
- Some possible operating noises:
- When you hear these noises...
- REPAIR INSTRUCTION
- AFTER-SALES SERVICE
- Before contacting the Customer Care Centre:
- INSTALLATION
- A) Installation next to kitchen units or cabinets
- B) Installation next to walls
- Electrical connection
- Electrical disconnection
- ELECTRICAL CONNECTION FOR GREAT BRITAIN AND IRELAND ONLY
- Fuse replacement
- For the Republic of Ireland only
- Socket outlet / plug (valid for both countries)
- BESCHRIJVING VAN HET APPARAAT
- HOE U HET APPARAAT MOET LATEN FUNCTIONEREN
- Se as garrafas forem poucas
- LIMPEZA E MANUTENÇÂO
- GUIDA RICERCA GUASTI
- Kassering/Avhending
- RENGJØRING OG VEDLIKEHOLD
- Jos pulloja on vahan
- 06bPHeTe BHHMaHne Ha noOpexKaHaTeO
- BbBEHeHbB BnHOTO
- CbxpaHeHne Ha BnHa
- MactoHa cxbxpaheHne
- PexmmHa cxbxpaHeHne
- Temnepatypa
- Tana
- KAK CE CKNAPAT BYTNJKNTE
- Klaacnuecko cKaanpahe Ha 36 6ytjIkn
- Cklaaipane Ha 6ytniKn Champagnotta
- I3BaXdaHe Ha IbPBeHnTe paΦTOBe
- Ako 6yTuNknte ca mAJko
- YpeBbT He pa60tn.
- Temnepaypata BbB BbTpewHOCTTa Ha Wine Cellar He e DOCTaTbUHO HnCKa.
- 5.Иma BODa Ha IbHOTo Ha ypeHa.
- Инстукциз 3A PÉMOHT
- CEPBn3 3A IOpIaPbJxKA
- Ipeu da ce o6bPHeTe KbM CepBn3a 3a noDpBkKa:
- SERVICE
- ИнстадирасЕ
- ИHCTАЛПАРЕ
Brand : KITCHENAID
Model : KCBWX 45600
Category : Wine cellar