
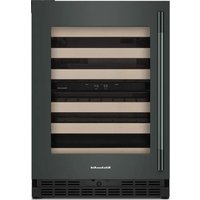
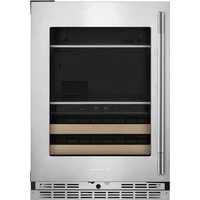
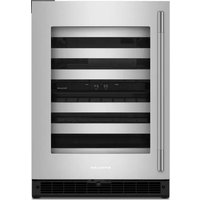
KCBWX 70600L - Wine cellar KITCHENAID - Free user manual and instructions
Find the device manual for free KCBWX 70600L KITCHENAID in PDF.


| Product Type | Wine Cellar |
| Brand | KitchenAid |
| Model | KCBWX 70600L |
| Total Capacity (bottles) | Up to 46 standard 750 ml bottles |
| Temperature Range | 5°C – 20°C (41°F – 68°F) |
| Cooling Zones | 2 independent temperature zones |
| Door Type | Full-length glass door with UV protection |
| Shelving | 5 wooden shelves, partially pull-out |
| Interior Lighting | LED lighting with on/off switch |
| Display | Digital thermometer with touch controls |
| Installation Type | Built-in or freestanding |
| Dimensions (H x W x D) | 84 cm x 59.5 cm x 57 cm (33.1" x 23.4" x 22.4") |
| Weight | 45 kg (99.2 lbs) |
| Power Supply | 220 - 240 V, 50/60 Hz |
| Energy Consumption | Approx. 150 kWh per year |
| Climate Class | SN (Extended Temperate) to T (Tropical) |
| Noise Level | ≤ 39 dB(A) |
| Refrigerant | R600a (Isobutane), environmentally friendly |
| Anti-Vibration System | Compressor mounted on dampers for quiet operation |
| Lock | Yes, key lock on door |
| Cleaning | Clean with soft cloth and mild detergent; defrost manually when ice builds up |
| Spare Parts Availability | Contact KitchenAid customer service for genuine parts |
| Warranty | 2 years manufacturer warranty |
Frequently Asked Questions - KCBWX 70600L KITCHENAID
User questions about KCBWX 70600L KITCHENAID
0 question about this device. Answer the ones you know or ask your own.
Ask a new question about this device
Download the instructions for your Wine cellar in PDF format for free! Find your manual KCBWX 70600L - KITCHENAID and take your electronic device back in hand. On this page are published all the documents necessary for the use of your device. KCBWX 70600L by KITCHENAID.
USER MANUAL KCBWX 70600L KITCHENAID
Instructions for use
KitchenAid
Safety instructions 4
Electrical connection for Great Britain and Ireland only 6
Introduction to wine 7
Storing the bottles 8
Table of the best serving temperatures for wines 10
Description of the appliance 10
How to operate the appliance 11
Cleaning and maintenance 13
Troubleshooting guide 14
After-Sales Service 15
Installation 16
Safety instructions IMPORTANT to be read and observed
Before using the appliance, read these safety instructions. Keep them nearby for future reference.
These instructions and the appliance itself provide important safety warnings, to be observed at all times.
The manufacturer declines any liability for failure to observe these safety instructions, for inappropriate use of the appliance or incorrect setting of controls.
⚠️ Very young children (0-3 years) should be kept away from the appliance. Young children (3-8 years) should be kept away from the appliance unless continuously supervised. Children from 8 years old and above and persons with reduced physical, sensory or mental capabilities or lack of experience and knowledge can use this appliance only if they are supervised or have been given instructions on safe use and understand the hazards involved. Children must not play with the appliance. Cleaning and user maintenance must not be carried out by children without supervision.
Permitted use
CAUTION: The appliance is not intended to be operated by means of an external switching device, such as a timer, or separate remote controlled system.
This appliance is intended to be used in household and similar applications such as: staff kitchen areas in shops, offices and other working environments; farm houses; by clients in hotels, motels, bed & breakfast and other residential environments.
This appliance is not for professional use. Do not use the appliance outdoors.
The bulb used inside the appliance is specifically designed for domestic appliances and is not suitable for general room lighting within the home (EC Regulation 244/2009).
The appliance is designed for operation in places where the ambient temperature comes within the following ranges, according to the climatic class given on the rating plate. The appliance may not work properly if it is left for a long time at a temperature outside the specified range.
Climatic Class Amb. T. (°C)
SN: From 10 to 32 °C
ST: From 16 to 38 °C;
N: From 16 to 32 °C
T: From 16 to 43 °C
This appliance does not contain CFCs. The refrigerant circuit contains R600a (HC). Appliances with Isobutane (R600a): isobutane is a natural gas without environmental impact, but is flammable. Therefore, make sure the refrigerant circuit pipes are not damaged, especially when emptying the refrigerant circuit.
⚠ WARNING: Do not damage the appliance refrigerant circuit pipes.
WARNING: Keep ventilation openings, in the appliance enclosure or in the built-in structure, clear of obstruction.
WARNING: Do not use mechanical, electric or chemical means other than those recommended by the Manufacturer to speed up the defrost process.
WARNING: Do not use or place electrical devices inside the appliance compartments if they are not of the type expressly authorised by the Manufacturer.
⚠ WARNING: Ice makers and/or water dispensers not directly connected to the water supply must be filled with potable water only.
WARNING: Automatic ice-makers and/or water dispensers must be connected to a water supply that delivers potable water only, with mains water pressure between 0.17 and 0.81 MPa (1.7 and 8.1 bar).
Do not store explosive substances such as aerosol cans with a flammable propellant in this appliance.
Do not swallow the contents (non-toxic) of the ice packs (provided with some models). Do not eat ice cubes or ice lollies immediately after taking them out of the freezer since they may cause cold burns.
⚠ For products designed to use an air filter inside an accessible fan cover, the filter must always be in position when the refrigerator is in function.
Do not store glass containers with liquids in the freezer compartment since they may break.
Do not obstruct the fan (if included) with food items.
After placing the food check that the door of the compartments closes properly, especially the freezer door.
⚠️ Damaged gaskets must be replaced as soon as possible.
⚠️ Use the refrigerator compartment only for storing fresh food and the freezer compartment only for storing frozen food, freezing fresh food and making ice cubes.
⚠️ Avoid storing unwrapped food in direct contact with internal surfaces of the refrigerator or freezer compartments.
Appliances could have special compartments (Fresh Food Compartment, Zero Degree Box, etc.). Unless specified in the specific booklet of product, they can be removed, maintaining equivalent performances.
C-Pentane is used as blowing agent in the insulation foam and it is a flammable gas.
Installation
The appliance must be handled and installed by two or more persons - risk of injury. Use protective gloves to unpack and install - risk of cuts.
⚠️ Installation, including water supply (if any) and electrical connections, and repairs must be carried out by a qualified technician. Do not repair or replace any part of the appliance unless specifically stated in the user manual. Keep children away from the installation site. After unpacking the appliance, make sure that it has not been damaged during transport. In the event of problems, contact the dealer or your nearest After-sales Service. Once installed, packaging waste (plastic, styrofoam parts etc.) must be stored out of reach of children - risk of suffocation. The appliance must be disconnected from the power supply before any installation operation - risk of electric shock. During installation, make sure the appliance does not damage the power cable - risk of fire or electric shock. Only activate the appliance when the installation has been completed.
⚠️ Be careful not to damage the floors (e.g. parquet) when moving the appliance. Install the appliance on a floor or support strong enough to take its weight and in a place suitable for its size and use. Make sure the appliance is not
near a heat source and that the four feet are stable and resting on the floor, adjust as required, and check that the appliance is perfectly level using a spirit level. Wait at least two hours before switching the appliance on, to ensure that the refrigerant circuit is fully efficient.
WARNING: To avoid a hazard due to instability, positioning or fixing of the appliance must be done in accordance with the manufacturer instructions. It is forbidden to place the refrigerator in such way that the metal hose of gas stove, metal gas or water pipes, or electrical wires are in contact with the refrigerator back wall (condenser coil). All dimensions and spacing needed for installation of the appliance are in the Installation instruction booklet.
Electrical warnings
It must be possible to disconnect the appliance from the power supply by unplugging it if plug is accessible, or by a multi-pole switch installed upstream of the socket in accordance with the wiring rules and the appliance must be earthed in conformity with national electrical safety standards.
Do not use extension leads, multiple sockets or adapters. The electrical components must not be accessible to the user after installation. Do not use the appliance when you are wet or barefoot. Do not operate this appliance if it has a damaged power cable or plug, if it is not working properly, or if it has been damaged or dropped.
If the supply cord is damaged, it must be replaced with an identical one by the manufacturer, its service agent or similarly qualified persons in order to avoid a hazard - risk of electric shock.
Cleaning and maintenance
WARNING: Ensure that the appliance is switched off and disconnected from the power supply before performing any maintenance operation; never use steam cleaning equipment - risk of electric shock.
Do not use abrasive or harsh cleaners such as window sprays, scouring cleansers, flammable fluids, cleaning waxes, concentrated detergents, bleaches or cleansers containing petroleum products on plastic parts, interior
and door liners or gaskets. Do not use paper towels, scouring pads, or other harsh cleaning tools.
Disposal of packaging materials
The packaging material is 100% recyclable and is marked with the recycle symbol
The various parts of the packaging must therefore be disposed of responsibly and in full compliance with local authority regulations governing waste disposal.
Disposal of household appliances
This appliance is manufactured with recyclable or reusable materials.
Dispose of it in accordance with local waste disposal regulations. For further information on the treatment, recovery and recycling of household electrical appliances, contact your local authority, the collection service for household waste or the store where you purchased the appliance. This appliance is marked in compliance with European Directive 2012/19/EU, Waste Electrical and Electronic Equipment (WEEE). By ensuring this product is disposed of correctly, you will help prevent negative consequences for the environment and human health.negative sull'ambiente e sulla salute umana.
The symbol on the product or on the accompanying documentation indicates that it should not be treated as domestic waste but must be taken to an appropriate collection center for the recycling of electrical and electronic equipment.
Energy saving tips
To guarantee adequate ventilation follow installation instructions. Insufficient ventilation at the back of the product increases energy consumption and decreases cooling efficiency. Frequent door opening might cause an increase in Energy Consumption.
The internal temperature of the appliance and the Energy Consumption may be affected also by the ambient temperature, as well as location of the appliance. Temperature setting should take into consideration these factors.
Reduce door opening to a minimum.
When thawing frozen food, place in the refrigerator. The low temperature of the frozen products cools the food in the refrigerator. Allow warm food and drinks to cool down before placing in the appliance.
Positioning of the shelves in the refrigerator has no impact on the efficient usage of energy. Food should be placed on the shelves in such way to ensure proper air circulation (food should not touch each other and distance between food and rear wall should be kept).
You can increase storage capacity of frozen food by removing baskets and, if present, Stop Frost shelf.
Do not worry about noises coming from the compressor which are described as normal noises in this product's Quick Guide.
Electrical connection for Great Britain and Ireland only
Warning - this appliance must be earthed
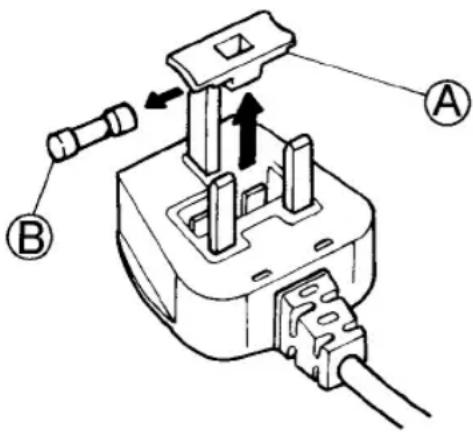
Fuse replacement If the mains lead of this appliance is fitted with a BS 1363A 13amp fused plug, to change a fuse in this type of plug use an A.S.T.A. approved fuse to BS 1362 type and proceed as follows:
I. Remove the fuse cover (A) and fuse (B).
2. Fit replacement I3A fuse into fuse cover.
3. Refit both into plug.
Important:
The fuse cover must be refitted when changing a fuse and if the fuse cover is lost the plug must not be used until a correct replacement is fitted.
Correct replacement are identified by the colour insert or the colour embossed in words on the base of the plug.
Replacement fuse covers are available from your local electrical store.
For the Republic of Ireland only
The information given in respect of Great Britain will frequently apply, but a third type of plug and
socket is also used, the 2-pin, side earth type.
Socket outlet / plug (valid for both countries)
If the fitted plug is not suitable for your socket outlet, please contact After-sales Service for further instruction. Please do not attempt to change plug yourself. This procedure needs to be carried out by a qualified technician in compliance with the manufactures instructions and current standard safety regulations.
Introduction to wine
Storing wine
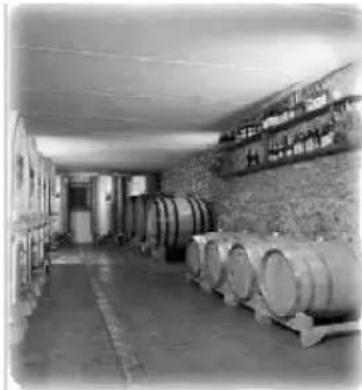
As is well known, wine will keep for a long time; if kept in a suitable place white wines will keep for about two years from the date of harvest, but should be drunk within a year. Light wines can instead be kept for up to two years, while some full-bodied red wines can keep for ten years and raisin wines even twenty years. When you buy a bottle of wine put it in the cellar or another suitable place immediately. Three factors are vital in the process which starts from the cultivation of the grape, through to ripening, harvesting and wine making: light, air humidity and room temperature. If the taste of the wine is to reach full maturity while maintaining the wine's aroma, it must be stored perfectly by the interaction of these three factors.
natural_image
Interior of a wine cellar with wooden barrels and pails, no visible text or symbolsStorage space
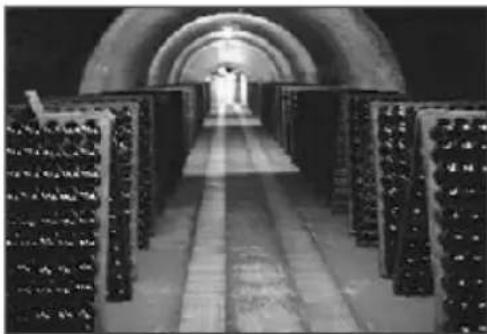
Not everyone has an underground storage space which can be used as a cellar. Just recently technology has managed to supply a valid substitute for the classic wine cellar. The Wine Cellar which you have purchased is a special appliance designed to contain and store wines correctly. In fact it should not be used to store fruit, vegetables and tins but only your favourite bottles of wine. So, without having a cellar area, every type of wine can be correctly stored, matured and enjoyed.
natural_image
Interior view of a wine cellar with rows of wine bottles and arched ceilings (no visible text or labels)Storage rules
A vital rule for keeping your favourite bottles is that they should be placed on their sides or inclined so that the wine bathes the cork. Many people think that this causes the well-known “cork” smell. In reality contact between the wine and the cork helps the elasticity of the cork so guaranteeing its effectiveness. Being able to take the bottles easily for use avoids accidental shaking which, like vibration, could cause the sediments to suspend again, so altering the appearance of the wine over time. Move your bottles as little as possible and let the wine rest. Also avoid letting the bottles come into contact with the bottom wall because this would not only affect efficient defrosting but could ruin the bottle labels because of the drops of water collected during defrosting. The shelves on which the bottles are placed must be of wood, which efficiently absorbs any vibrations and keeps the bottle away from the wall which transmits the cold. The bottles of wine must also be kept away from substances or places which have a strong smell because this could easily be transmitted to the wine.
The temperature
The temperature represents a critical factor which is important throughout the wine's life cycle. It determines wine's good development while it remains in the bottle to mature. For best storage the temperature must be kept constant in an interval between 8 and 12^ . Rapid and wide changes of temperature must be avoided: too high a temperature dilates the liquids and speeds up the wine maturing, while too low a temperature (below 4 - 5^ ) could cause the precipitation of tartrates, which could affect the wine's appearance. In the extreme case in which the temperature drops below 0^ , the wine may freeze and cause the cork to be expelled.
The cork
The cork is a fundamental component of a bottle of wine: its quality, chosen by the wine producer, is very important for the maturation of the wine itself. The perfect condition of the cork, in the bottles which we buy, depends exclusively on the standards of use and storage used by the producer or bottler.
Storing the bottles
Classical storage with 36 bottles
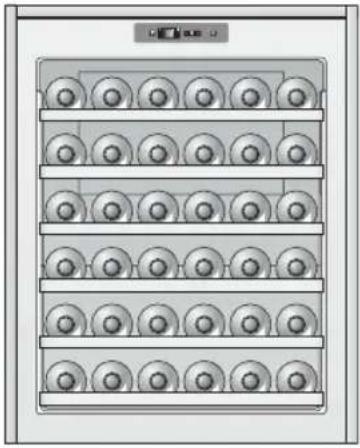
If you want to arrange the bottles for storing wine so that they are visible and easy to take out, we recommend the 36-bottle configuration (Bordeaux bottle or mixed Bordeaux bottle and German-type bottle). Position a maximum of 6 bottles in the niches of each of the 5 wooden shelves; another 6 bottles can be placed in the slots on the bottom of the cellar to give a total of 36 bottles.
The wooden shelves have a locking system to avoid accidental removals which could cause the bottles to fall. The larger bottles (German-type bottle) should be placed on their side.
Storage with Champagne bottles.
Because Champagne bottles are larger than normal ones, a maximum of 5 must be placed on the bottom of the cellar. If you want to store more Champagne bottles remove the 5th shelf and stack the bottles on top of the bottles placed on the base of the cellar but in the reverse direction. Up to 9 Champagne bottles can be stored in this way.
Taking out the wooden shelves
To take out the wooden shelves proceed as follows:
I. Hold the front part of the shelf with one hand.
2. Remove the shelf slowly by pulling it slowly towards you for 1/3 of its total travel.
If there are only a few bottles
If there are not enough bottles to fill the wine cellar they should be distributed between all the available shelves, avoiding loading them all at the top or all at the bottom. So that they can be more easily seen from outside, they should be placed centrally on all the shelves.
Storing the bottles
Other configurations for storing bottles
natural_image
Front view of a multi-tiered storage unit rack with circular components (no text or symbols visible)STANDARD
36 Bottles
(100% on their sides)
5 racks used
STORAGE 44 Bottles (100% on their sides) I rack used
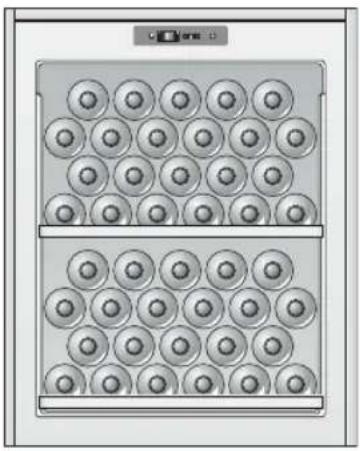
natural_image
Diagram of a multi-tiered electronic device with circular components arranged in rows (no text or symbols)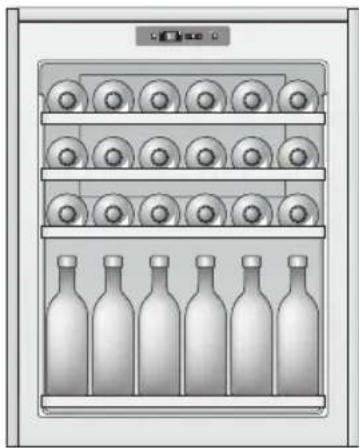
natural_image
Illustration of a multi-tiered refrigerator with six bottles on the shelves (no text or symbols visible)SERVICE
42 Bottles
(50% on their sides and 50% upright)
3 racks used
MAXIMUM STORAGE
46 Bottles (48% on their sides
and 52% upright)
I rack used
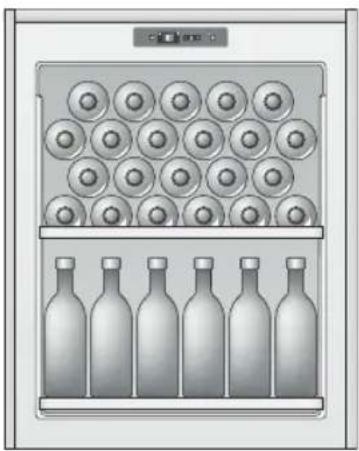
natural_image
Illustration of a refrigerator with multiple bottles on the shelves and circular compartments (no text or symbols)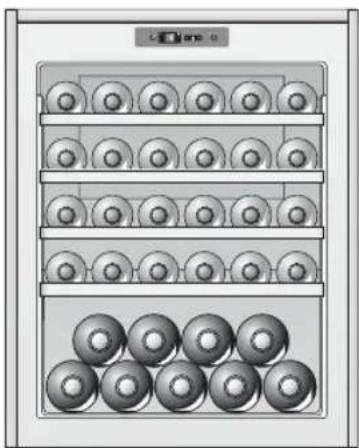
natural_image
Illustration of a multi-tiered storage unit with circular components, no text or symbols presentSTORING CHAMPAGNE BOTTLES
Never take out more than one sliding shelf at once.
Table of the best serving temperatures for wines
The table gives the indicative temperatures at which the wine should be served.
If the wine must be served at a higher temperature than that set inside the cellar, it should be left out for as long as is necessary.
| Barolo 17°C | |
| Barbaresco 17°C | |
| Beaujolais 13°C | |
| White Dry Bordeaux 8°C | |
| Red Bordeaux 17°C | |
| White Burgundy 11°C | |
| Red Burgundy 18°C | |
| Brunello 17°C | |
| Champagne 6°C | |
| Chianti Classico 16°C | |
| Passito di Pantelleria 6°C | |
| Rosé Cote de Provence 12°C | |
| Dry and Sweet Spumanti 6°C |
| Verdicchio 8°C | |
| White Trentino wines | 11°C |
| White Franciacorta wines | 11°C |
| Dry white wines 8°C | |
| Friuli wines | 11°C |
| Rhone wines | 15°C |
| Dry White Loire wines | 10°C |
| Liqueur Loire wines | 7°C |
| Red Loire wines | 14°C |
| Liqueur raisin wines | 8-18°C |
| Vins Nouveaux | 12°C |
| Light Red wines, without much tannin | 14°C |
| Quite full-bodied Red wines, with some tannin | 16°C |
Description of the appliance
I. Electronic Control Panel
2. Upper compartment with racks
3. Removable separator (black)
4. Lower compartment
5. Rating plate
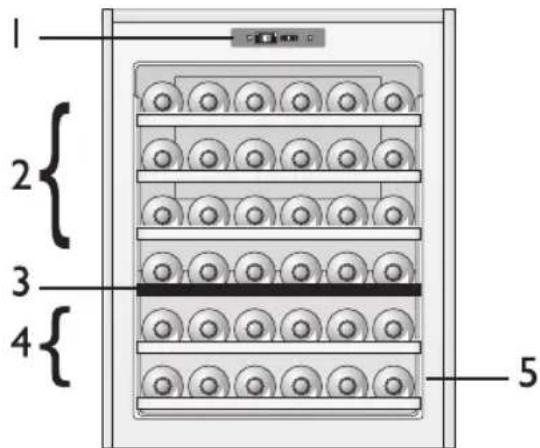
How to operate the appliance
Preparing the appliance for use
Switching on the appliance
Insert the plug to start the appliance and then set the temperature on the front panel. A green pilot light comes on to indicate that the appliance is switched on.
The product has an internal light that does not come on automatically when the door is opened, but can be switched on as necessary from the control panel by pressing the relevant button.
Setting the temperature
For the appliance to work correctly we recommend setting the temperature according to the indications given in the “Introduction to wine” section.
Note:
The room temperature, the door opening frequency and the position of the appliance can influence the internal temperatures.
Description of the control panel
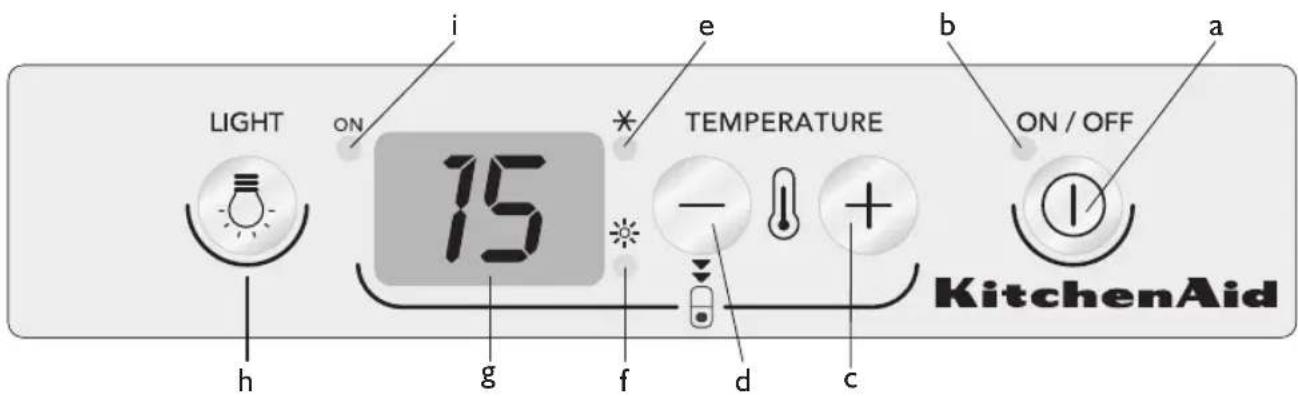
a) ON/OFF button: appliance on/off
b) appliance operating pilot light
c) (+) button to increase the temperature (max +18°C)
d) (-) button to decrease the temperature (min +6°C)
e) cooling activated pilot light
h) heating activated pilot light
g) temperature in inner compartment display
h) inside light button
i) inside light pilot light
Cellar working with double or single temperature zone
The cellar is designed to work with two temperature zones or, as an alternative if the customer so requires, with a single temperature zone. For two-temperature operation position the black bottle-holder rack on the rails of the fourth shelf (starting from the first at the top), then set the temperature required in the upper zone, remembering that once the required temperature is reached the temperature of the lower compartment will be about 6 degrees centigrade higher than that set (the temperature of the lower zone cannot be set separately).
How to operate the appliance
Note:
To store the wine correctly we recommend setting the thermostat temperature at 10^ C (upper compartment) to obtain a temperature of 15 - 16^ C. For working with one temperature zone the black bottle-holder rack is removed and replaced with the accessory rack (the same type as the other wood-colour racks already installed). Keep the unused rack in a dry and cool place to avoid it being damaged by humidity or other atmospheric agents and thus being unusable in the future.
Setting the temperature
The appliance temperature was set in the factory and corresponds to 15^ C (upper compartment).
If necessary, the temperature of the upper compartment can be changed as follows:
I. When connecting to the electrical power supply, the display shows the temperature set inside the compartment.
2. Press the (+) button for about a second; the temperature indicator will start to flash.
3. Press the (+) or (-) buttons until the required temperature has been reached.
4. Wait for 5 seconds for the indicator to shine steadily; the temperature has now been set.
5. Wait for the temperature change to take effect and put the bottles of wine in the cellar. The inside light does not come on (or goes out temporarily) when the inside temperature is higher than 24^ C, so that the set temperature can be reached more quickly.
Controlling the temperature
Upper zone: the temperature of the upper zone is that normally shown on the control display.
Lower zone: the temperature of the lower zone cannot be set separately, but is about 5^-6^ higher than that of the upper compartment. To display the temperature of the lower zone just press the (-) button for a second and the temperature of the lower zone will be displayed for three seconds.
This operation can be repeated several times to check the temperature of the lower zone.
When single-temperature operation is selected by removing the separator, just see the temperature indicated on the control display, without pressing any buttons.
Cleaning and maintenance
Before any maintenance or cleaning, unplug the appliance or disconnect the appliance from the power supply.
The wine cellar defrosts completely automatically.
- Occasional drops of water on the appliance's inner back wall indicate the automatic defrosting phase. The defrost water is automatically conveyed to a drain hole, and then collected in a container where it evaporates.
If necessary...
I. Empty the wine cellar completely.
2. Disconnect the appliance from the mains.
3. To prevent the formation of moulds, bad smells and oxidation, the appliance door must remain slightly open (about 3 - 4 cm).
4. Clean the appliance.
- Clean the inside regularly with a sponge dampened in lukewarm water and/or neutral detergent.
- Rinse and clean with a soft cloth. Do not use abrasives.
- Clean the outside with a soft cloth dampened with water. Do not use abrasive pastes or pads, stain removers (e.g. acetone, trichloroethylene) or vinegar.
- Clean the outside glass with a specific glass cleaner and the inside just with a damp cloth, avoiding using detergents where the wines are properly stored.
Rack cleaning
Use a damp cloth to clean the oak racks. Be careful not to damage the gasket when taking the rack out of the appliance. Open the door as wide as possible.
Replacement of the LED
To replace the LED, contact After-Sales service.
Do not stare at the light when it is on: it could damage your eyesight.
Troubleshooting guide
Before contacting the Customer Care Center...
Problems of operation are often due to simple causes, which may be identified and solved without using any tools.
Appliance noises are normal because its fans and compressors switch on and off automatically.
Some operating noises may be reduced by:
• levelling the appliance and installing it on a flat surface
• separating and avoiding contact between the appliance and the units
- making sure that the internal components are placed correctly
- making sure that there is no contact between the bottles and the containers.
Some possible operating noises:
- a whistle when the appliance switches on for the first time or after a long time.
- a splash when the cooling fluid enters the pipes.
• a buzz when the fan start working. - a crackle when the compressor starts.
- an unexpected trip when the compressor switches on and off.
When you hear these noises...
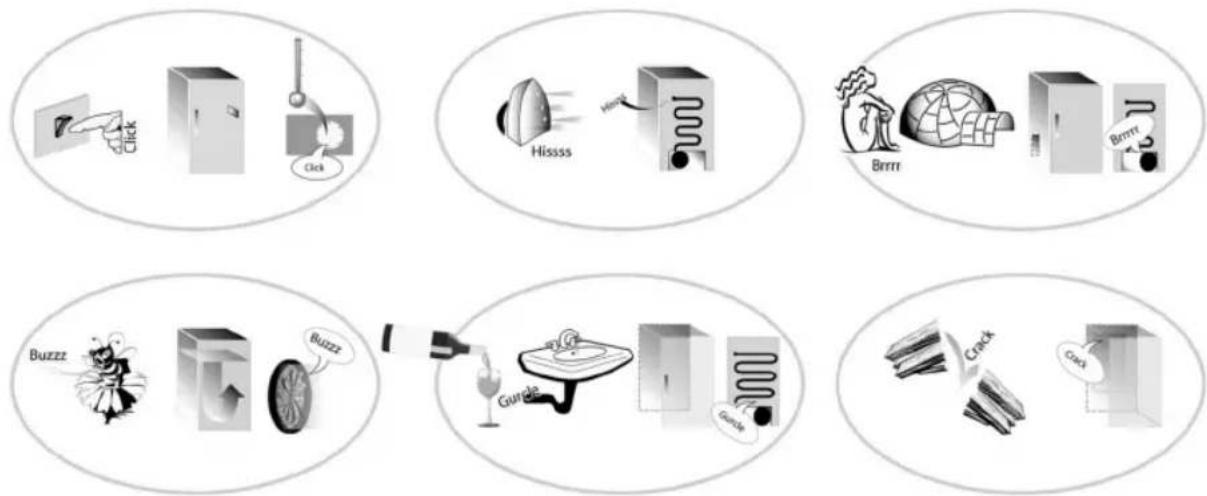
flowchart
graph TD
    A["Click"] --> B["Clock"]
    B --> C["Hit"]
    C --> D["Dot"]
    D --> E["Buzz"]
    E --> F["Game"]
    F --> G["Crack"]
    G --> H["Clock"]
...your appliance is alive and operating!!!
Troubleshooting guide
I. The appliance does not work.
• Is there a power cut?
• Is the plug plugged into the socket properly?
• Is the 2-pole mains switch on?
- Are the electric circuit safety devices installed in the house fully functional?
• Is the power supply cable broken?
2. The temperature inside the wine cellar is not cold enough.
- Has the door been closed properly?
- Are the bottles stopping the door from closing?
- Has the appliance been installed near a heat source?
• Is the selected temperature correct? - Is the circulation of air through the ventilation openings blocked?
3. The temperature inside the wine cellar is too cold.
• Is the selected temperature correct?
4. The appliance is too noisy.
- Has the appliance been correctly installed?
- Are the pipes in the back part touching or vibrating?
5. There is water on the bottom of the appliance.
• Is the defrost water drain blocked?
After-Sales Service
Before contacting the Customer Care Center...
Switch the appliance on again to see if the problem has disappeared. If not, switch it off again and repeat the operation after an hour.
If, after making the checks listed in the troubleshooting guide and switching the appliance on again, it still does not work correctly, contact the Customer Care Center, describing the problem clearly and giving:
- the appliance type and series number (given on the rating plate).
- the type of fault.
- the model.
- the Service number (the number after SERVICE on the rating plate inside the appliance).
- your full address
- your telephone number and area code
SERVICE
0000 000 00000
Installation
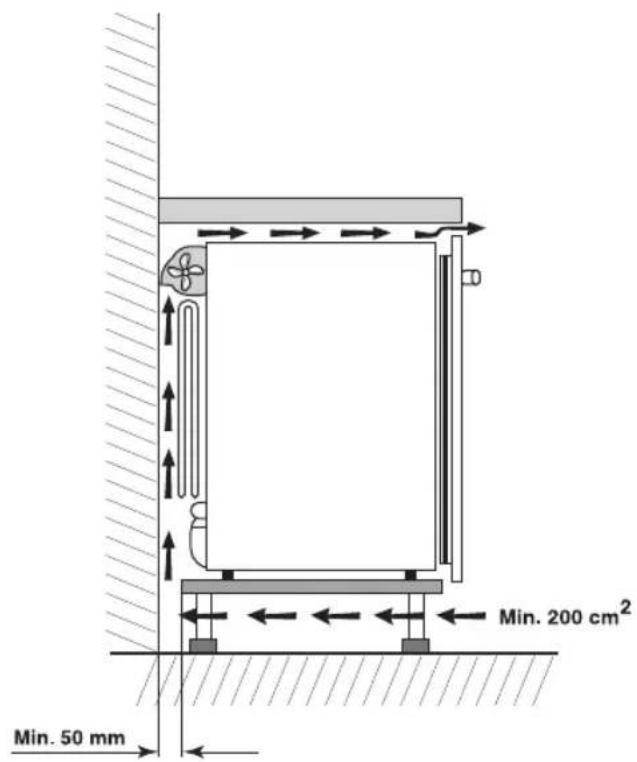
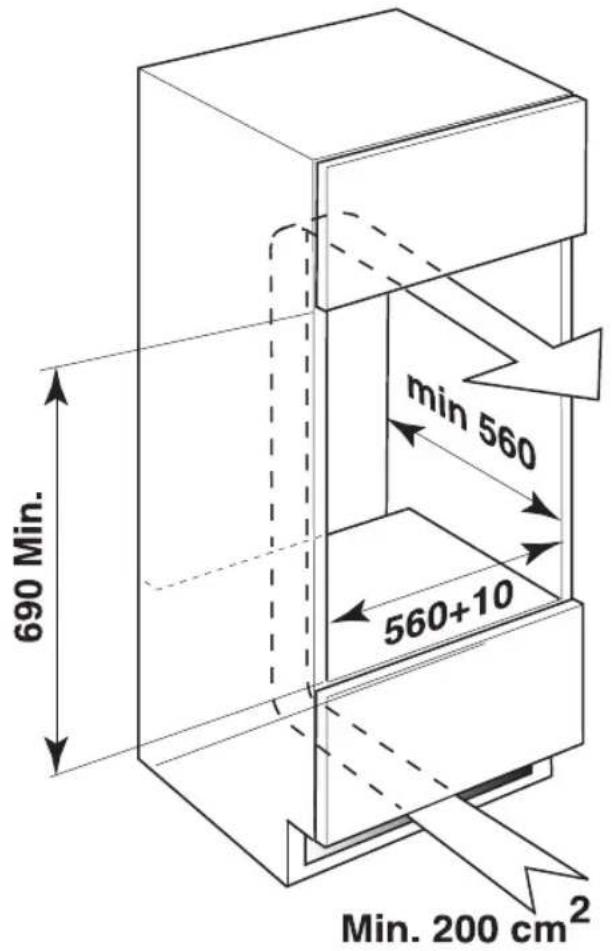
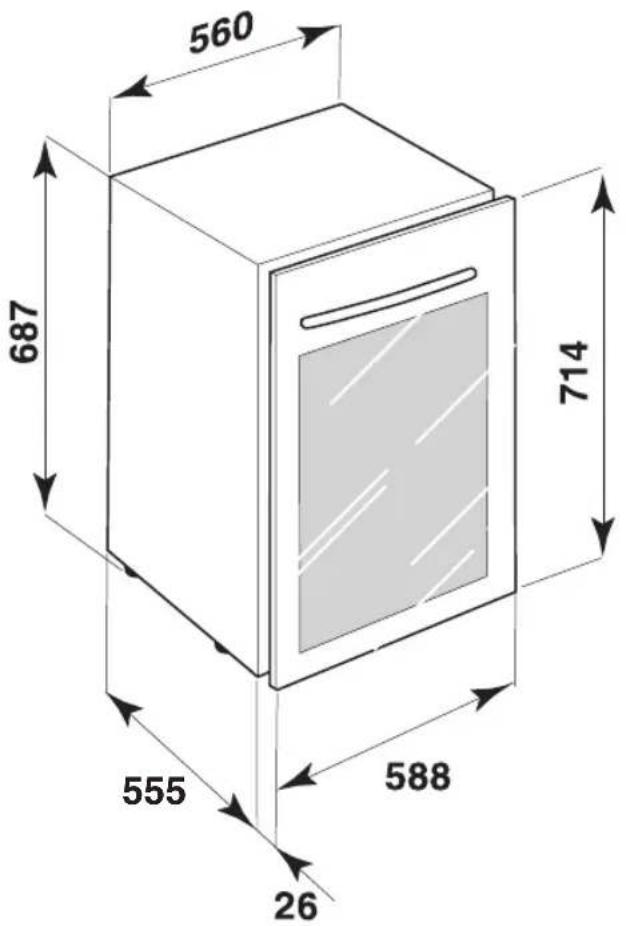
- Assemble the appliance with the correct ventilation as shown in the figures.
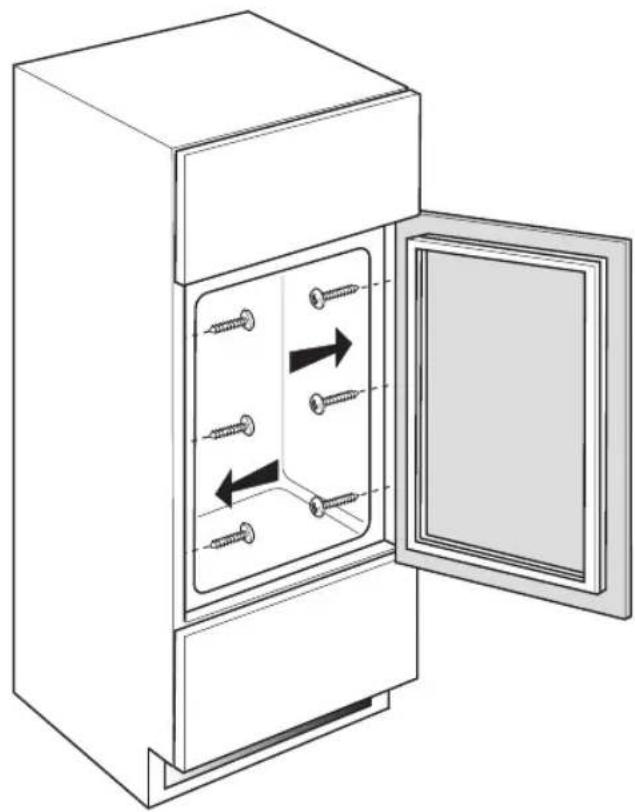
• The doors cannot be reversed on this wine cellar.
• Install the appliance away from heat sources. - Installation in a hot room, direct exposure to the sun's rays or placing the appliance near a heat source (radiators, cookers), increase power consumption and should be avoided.
- When this is not possible, the following minimum separations should be respected:
- 30 cm from coal or oil cookers;
- 3 cm from electric and/or gas cookers.
- Position it in a clean and well-ventilated place.
- Clean the inside (see the “Cleaning and maintenance” chapter).
- Insert the accessories supplied.
natural_image
Diagram of a door with screw holes and arrows indicating internal movement or force (no text or symbols)Installation
Installation
A) Installation next to kitchen units or cabinets
To allow complete 90^ opening of the door, install the product ensuring a space of at least 3.5 mm between the side flanges and the doors of any adjacent kitchen units/cabinets or electrical appliances (as shown in figure 1).
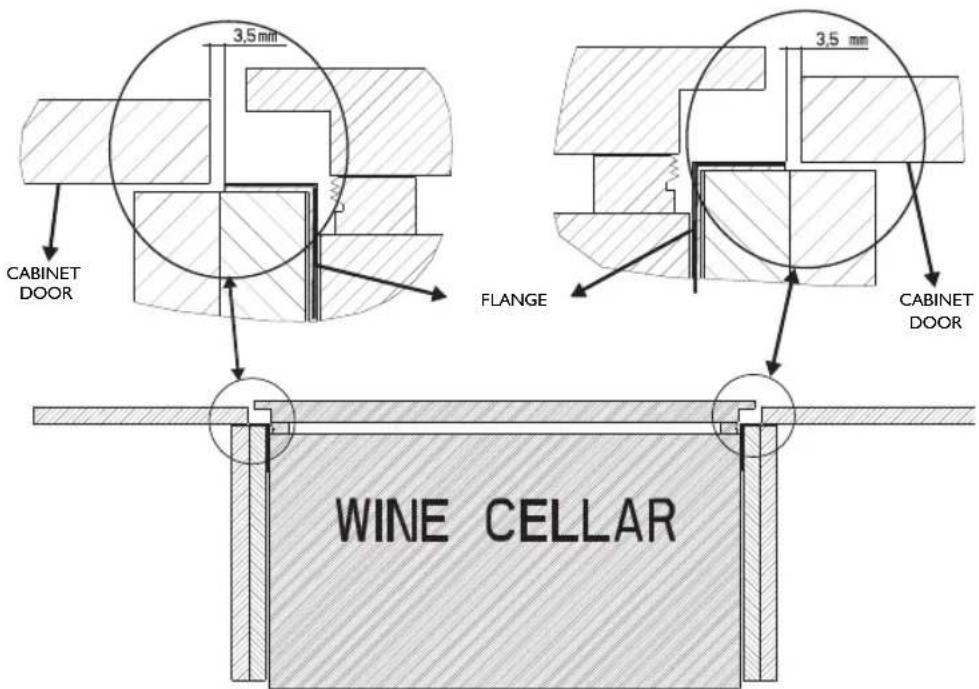
Fig. I
B) Installation next to walls
To allow complete 90^ opening of the door, install the product ensuring a space of at least 60 mm between the side flange and the adjacent wall (as shown in figure 2).
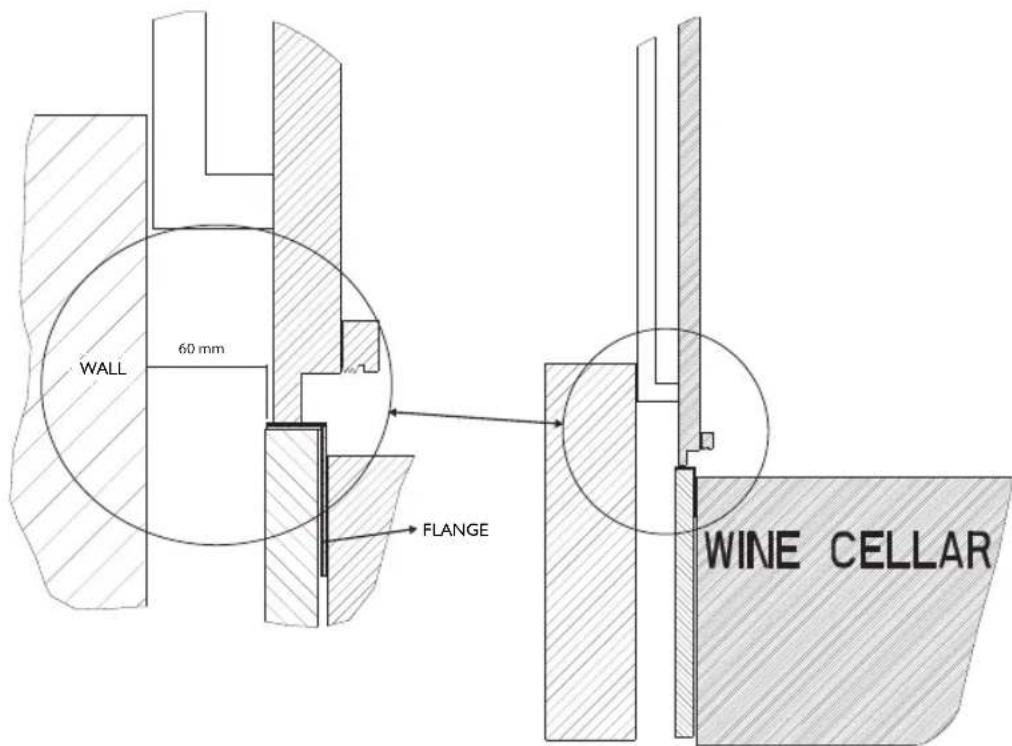
Fig. 2
Electrical connection
- The electrical connections must conform to the local regulations.
- The data on the voltage and power consumption are given on the rating plate inside the appliance.
- Earthing the appliance is obligatory by law.
- The manufacturer declines any responsibility for any damage suffered by people, animals or things caused by failure to observe the rules given above.
- If the plug and socket are not of the same type, have a qualified electrician replace the socket.
- Do not use extensions or multiple adapters.
Electrical disconnection
Electrical disconnection must be possible either by unplugging the plug or by means of a 2-pole mains switch upstream of the socket.


- Instructions for use
- KitchenAid
- Safety instructions IMPORTANT to be read and observed
- Permitted use
- Climatic Class Amb. T. (°C)
- Installation
- Electrical warnings
- Cleaning and maintenance
- Disposal of packaging materials
- Disposal of household appliances
- Energy saving tips
- Electrical connection for Great Britain and Ireland only
- Warning - this appliance must be earthed
- Important:
- For the Republic of Ireland only
- Socket outlet / plug (valid for both countries)
- Introduction to wine
- Storing wine
- Storage space
- Storage rules
- The temperature
- The cork
- Storing the bottles
- Classical storage with 36 bottles
- Storage with Champagne bottles.
- Taking out the wooden shelves
- If there are only a few bottles
- Table of the best serving temperatures for wines
- Description of the appliance
- How to operate the appliance
- Preparing the appliance for use
- Switching on the appliance
- Setting the temperature
- Note:
- Cellar working with double or single temperature zone
- Controlling the temperature
- If necessary...
- Rack cleaning
- Replacement of the LED
- Troubleshooting guide
- Before contacting the Customer Care Center...
- Some operating noises may be reduced by:
- Some possible operating noises:
- The appliance does not work.
- The temperature inside the wine cellar is not cold enough.
- The temperature inside the wine cellar is too cold.
- The appliance is too noisy.
- There is water on the bottom of the appliance.
- After-Sales Service
- A) Installation next to kitchen units or cabinets
- B) Installation next to walls
- Electrical connection
- Electrical disconnection
Brand : KITCHENAID
Model : KCBWX 70600L
Category : Wine cellar