
TLSF1024M - Switch TP-LINK - Free user manual and instructions
Find the device manual for free TLSF1024M TP-LINK in PDF.
| Product Type | Unmanaged Network Switch |
| Number of Ports | 24 x RJ45 10/100 Mbps Ports |
| Dimensions | 440 x 180 x 44 mm |
| Weight | Approximately 2.0 kg |
| Power Supply | External power adapter 12 V / 1 A |
| Key Features | Auto MDI/MDIX, IEEE 802.3x flow control, Store-and-Forward |
| Network Standards | IEEE 802.3, 802.3u, 802.3x |
| Maintenance and Cleaning | Clean with a dry, lint-free cloth. Do not use liquids or aerosols. |
| Safety | Do not open the casing. Disconnect before maintenance. Do not expose to water or humidity. |
| Spare Parts and Repairability | Not user serviceable. Contact TP-Link customer service. |
| General Information | Brand: TP-Link, Model: TL-SF1024M, Made in China |
Frequently Asked Questions - TLSF1024M TP-LINK
User questions about TLSF1024M TP-LINK
0 question about this device. Answer the ones you know or ask your own.
Ask a new question about this device
Download the instructions for your Switch in PDF format for free! Find your manual TLSF1024M - TP-LINK and take your electronic device back in hand. On this page are published all the documents necessary for the use of your device. TLSF1024M by TP-LINK.
USER MANUAL TLSF1024M TP-LINK
Unmanaged Rackmount Switch
CONTENTS
Deutsch....01
English....04
Español....07
Ελληνικά....10
Français....13
Italiano....16
Português....19
Suomi....22
Nederlands....25
Svenska....28
Norsk....31
Dansk....34
Türkçe....37
Installation
- Tischmontage
- Einschalten
Installation
- Desktop Installation
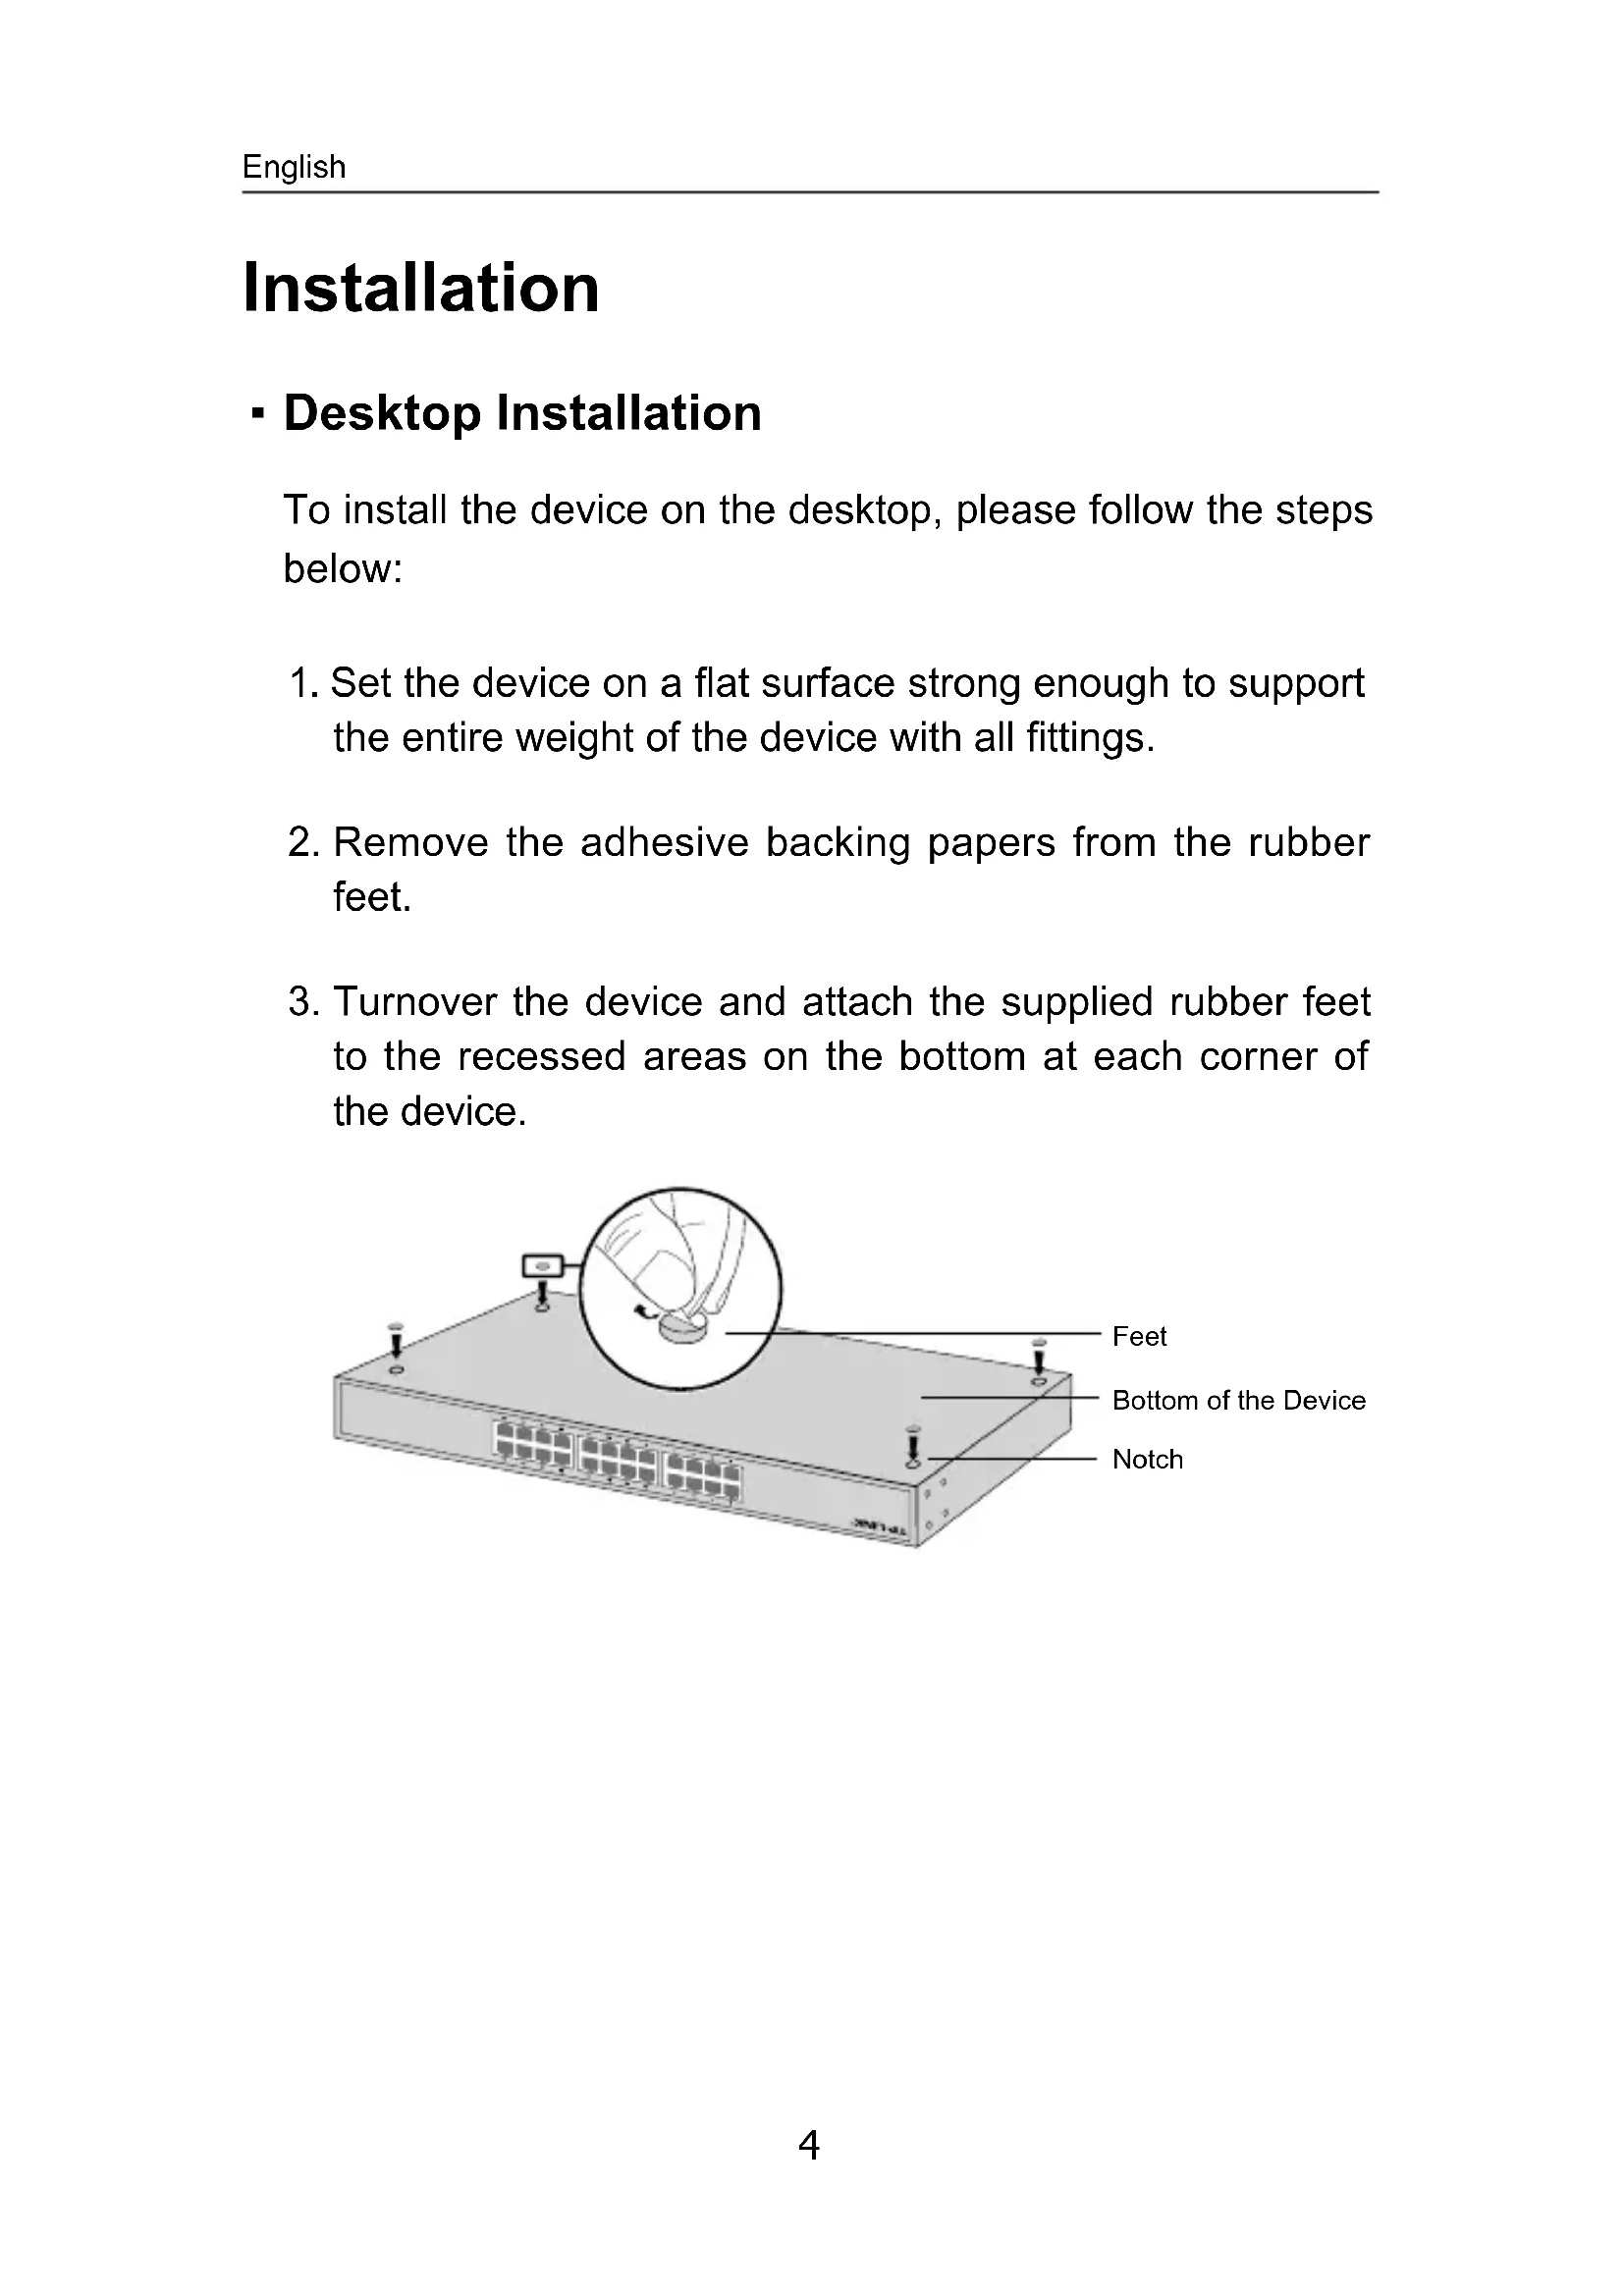
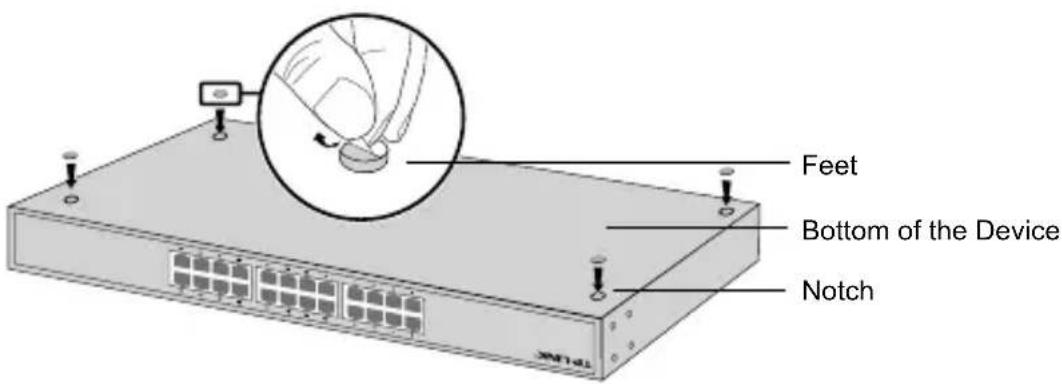
To install the device on the desktop, please follow the steps below:
- Set the device on a flat surface strong enough to support the entire weight of the device with all fittings.
- Remove the adhesive backing papers from the rubber feet.
- Turnover the device and attach the supplied rubber feet to the recessed areas on the bottom at each corner of the device.
- Rack Installation
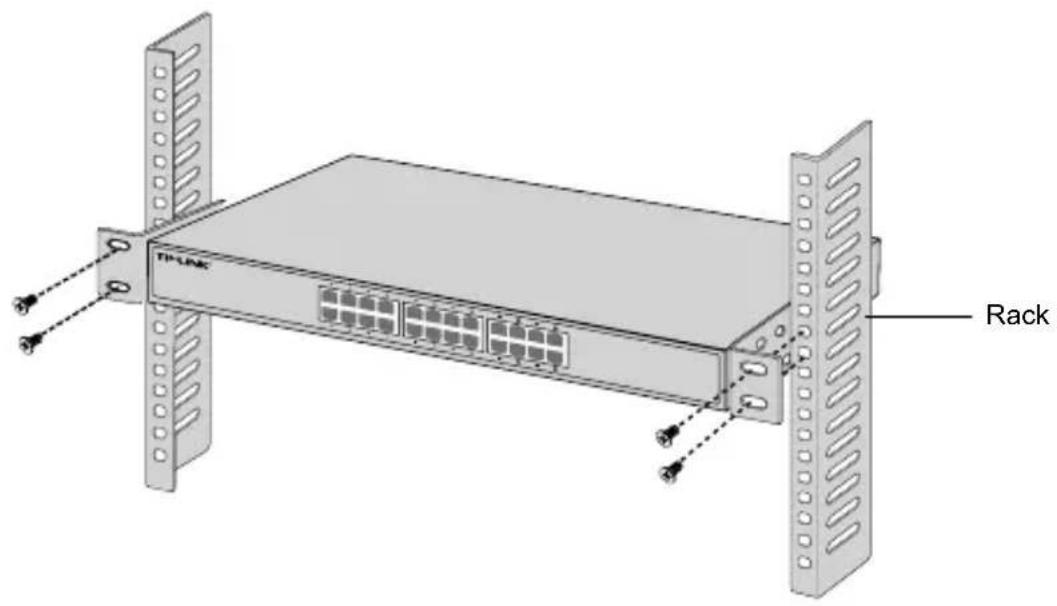
To install the device in a rack, follow the instructions described below:
- Check the grounding and stability of the rack.
- Secure the supplied rack-mounting brackets to each side of the device with supplied screws.
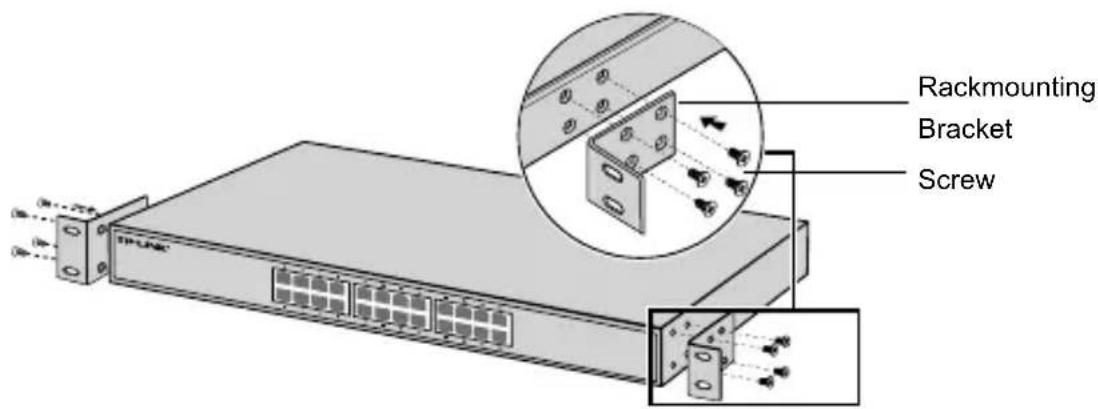
- After the brackets are attached to the device, use suitable screws (not provided) to secure the brackets to the rack.
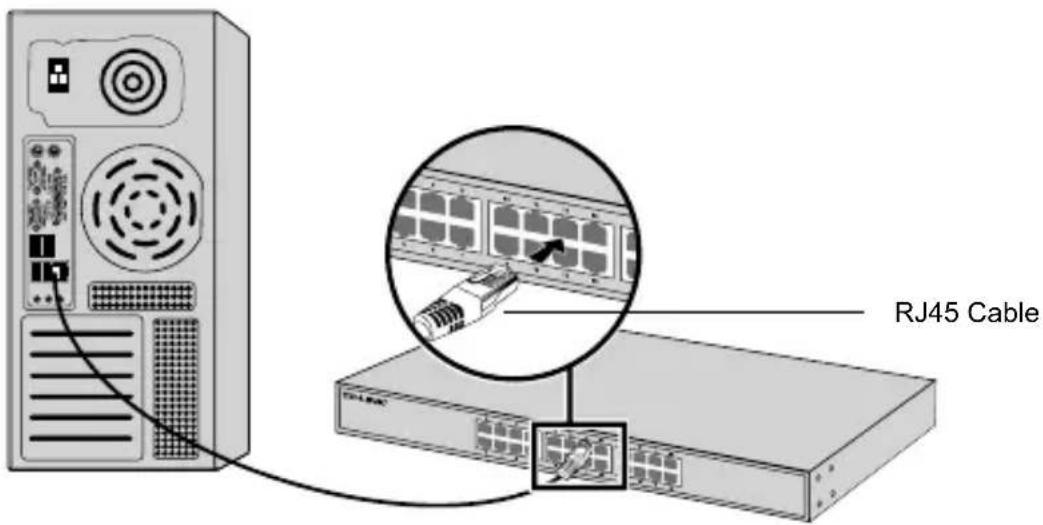
Connection
- Ethernet Port
Connect an Ethernet port of the switch to the computer by RJ45 cable as the following figure shown.
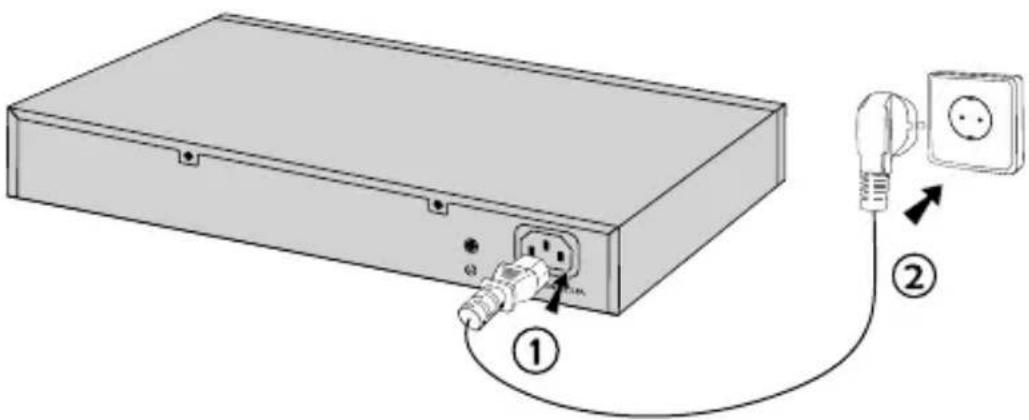
- Power On
Plug the female connector of the provided power cord into the power socket of the device, and the male connector into a power outlet.
Instalación
- Encender
Εγκατάσταση
Installation
- Pose libre
Installazione
Instalação
Asennus
- Pöytäasennus
Installatie
- Desktop installatie
Installation
- Desktop-installation
Montering
- Skrivebordsmontering
Installation
- Stationær installation
Kurulum
- Masaüstü Kurulumu
Deutsch
Sicherheitsinformation
- When a product has a power on/off button, the power on/off button is one way to turn-off the product. For products without the on/off button, the only way to completely turn-off the product is to disconnect the product or the power adapter from the power source. The disconnected device shall remain readily operable.
- Do not open this product or attempt to service it; it may expose you to dangerous high voltage or other risks. Opening a sealed component or sealed product/s will void the warranty. For product servicing, please contact us.
- Do not operate this product near water.
TP-LINK Limited Product Warranty
For TP-LINK Branded Products Only.
THIS WARRANTY GIVES YOU SPECIFIC LEGAL RIGHTS, AND YOU MAY HAVE OTHER RIGHTS THAT VARY FROM STATE TO STATE (OR BY COUNTRY OR PROVINCE).
TO THE EXTENT ALLOWED BY LOCAL LAW, THIS WARRANTY AND THE REMEDIES SET FORTH ARE EXCLUSIVE AND IN LIEU OF ALL OTHER WARRANTIES, REMEDIES AND CONDITIONS.
TP-LINK warrants the TP-LINK branded hardware product contained in the original packaging against defects in materials and workmanship when used normally in according with TP-LINK's guidelines for some period which depends on the local service from the date of original retail purchase by the end-user purchaser.
Español
South Building(floors 1,3,4,5) and 28(floors 1-4), Central Science & Technology Park, Shennan Rd, Nanshan, Shenzhen, China
Robert-Bosch-Straße 9, 65719 Hofheim am Taunus, Germany
Unit 2 & 3 Riverview (142-144), Cardiff Road, Reading, RG1 8EW
Marathonodromou 77, Marousi 151 24, Greece
Specifications are subject to change without notice. TP-LINK is a registered trademark of TP-LINK TECHNOLOGIES CO., LTD. Other brands and product names are trademarks or registered trademarks of their respective holders. No part of the specifications may be reproduced in any form or by any means or used to make any derivative such as translation, transformation, or adaptation without permission from TP-LINK TECHNOLOGIES CO., LTD. Copyright © 2016 TP-LINK TECHNOLOGIES CO., LTD. All rights reserved.
www.tp-link.com


- Unmanaged Rackmount Switch
- CONTENTS
- Installation
- - Tischmontage
- - Einschalten
- - Desktop Installation
- - Rack Installation
- Connection
- - Ethernet Port
- - Power On
- Instalación
- - Encender
- Εγκατάσταση
- - Pose libre
- Installazione
- Instalação
- Asennus
- - Pöytäasennus
- Installatie
- - Desktop installatie
- - Desktop-installation
- Montering
- - Skrivebordsmontering
- - Stationær installation
- Kurulum
- - Masaüstü Kurulumu
- Deutsch
- Sicherheitsinformation
- TP-LINK Limited Product Warranty
- Español
Brand : TP-LINK
Model : TLSF1024M
Category : Switch