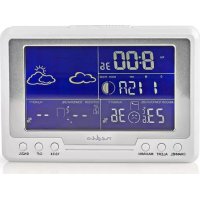
WEST203WT - Weather Station NEDIS - Free user manual and instructions
Find the device manual for free WEST203WT NEDIS in PDF.



| Product Type | Weather station with wireless outdoor transmitter |
| Brand | Nedis |
| Model | WEST203WT |
| Display | LCD digital display with backlight |
| Indoor temperature range | 0 °C to 50 °C (32 °F to 122 °F) |
| Outdoor temperature range | -50 °C to 70 °C (-58 °F to 158 °F) |
| Humidity range | 20 % – 99 % |
| Station power supply | 3 AAA (LR03) batteries or DC 4.5 V power adapter (not included) |
| Transmitter power supply | 2 AAA (LR03) batteries |
| Transmission distance | 30 m max in open field |
| Transmitter channels | 3 selectable channels (1, 2, 3) |
| Main functions | Clock with RCC (DCF), alarm, snooze, moon phase, indoor/outdoor temperature/humidity, trend, MAX/MIN values, temperature alerts |
| Time formats | 12 h / 24 h |
| Temperature units | Celsius / Fahrenheit |
| Maintenance | Clean with a dry cloth. Do not use solvents or abrasive products. |
| Safety | Do not open the device. Do not expose to water or moisture. |
| Warranty | Limited warranty (see complete manual) |
| Repairability | Repair reserved for qualified technicians. Reset button (RESET) available. |
Frequently Asked Questions - WEST203WT NEDIS
User questions about WEST203WT NEDIS
0 question about this device. Answer the ones you know or ask your own.
Ask a new question about this device
Download the instructions for your Weather Station in PDF format for free! Find your manual WEST203WT - NEDIS and take your electronic device back in hand. On this page are published all the documents necessary for the use of your device. WEST203WT by NEDIS.
USER MANUAL WEST203WT NEDIS
This weather station has 7 different language options: English, German, French, Italian, Spanish, Dutch and Danish.
The weather station has 6 different buttons: CH, ALERT, MAX/MIN, C/F, 12/24, SNOOZE/LIGHT. These buttons are used for the following functions:
1. CH Button
The CH button is used to select channel 1, 2 or 3 while receiving the signal from the transmitter. Please note that the selected channel must comply with the selected channel on the transmitter. For example: if the transmitter is set to channel 1, the weather station needs to be set to channel 1 as well.
2. ALERT Button
While in normal display mode, press this button to activate or deactivate the temperature alert function. An arrow icon will appear to indicate the function has been activated, or the arrow icon will disappear to indicate the alarm is deactivated.
While in normal display mode, press and hold this button for 3 seconds to enter the temperature alert settings. The indoor temperature digits will start flashing; press the DOWN button at the rear to set the temperature (0 °C\~50 °C) at which the station has to sound an alarm.
3. MAX/MIN Button
Press this button to display the maximum temperature and humidity of both indoors and outdoors.
Press again to display the minimum temperature and humidity of both indoors and outdoors.
4. Set Alarm
Press ALARM button at the back to display the alarm time.
To set the alarm time, press ALARM time once, the alarm time displays, hold the button for 3 seconds, alarm HOUR digit flashes, use UP or DOWN to set the alarm hour.
Press the ALARM button again, the alarm MINUTE digit flashes, use UP or DOWN to set the alarm minutes.
5. Activate/Deactivate the Alarm Function
Under Alarm Mode, press "ALARM" button at the rear to activate or deactivate the alarm function. Alarm bell sign will appear or disappear accordingly.
- C/F Button
Press the C/F button to switch the temperature display between C/F. Press and hold button for 3 seconds to force the unit to enter the RCC reception.
- 12/24 Hr Button
Press 12/24-hour button to toggle between 12/24-hour formats.
- Use Snooze
When alarm activates, press SNOOZE to stop the alarm sound, alarm will sound again after 5 minutes.
- MOON PHASE
It will calculate the moon phase automatically according to the calculator, the moon phase being divided into 8 degrees.
Temperature and Humidity:
-
Temperature range indoors: 0 °C\~50 °C (32 °F\~122 °F);
Temperature range outdoors: -50 °C\~70 °C (-58 °F\~158 °F). -
Range of humidity: 20%–99%.
-
Tendency of temperature change: one check per hour, compared to previous data. If the temperature changes more than 1 °C the arrow will be flat.
RCC Reception Mode:
- RCC reception format: DCF, the reception time is about 10 minutes.
- RCC reception way.
- It will begin to receive the RCC 3 minutes after turning on the unit.
- RCC reception graphic:
The tower graphic flashes when receiving, the tower graphic will also flash when lost or no signal. The tower graphic will not flash when synchronizing the signal, but the arc-shaped antenna symbol on top of the tower graphic is flashing. The whole RCC reception graphic will display when the reception is successful: The tower graphic will turn off and exit RCC when the signal reception fails.
Part II
There are 7 buttons at the rear: LIGHT, CHANNEL, RESET, DOWN, UP, ALARM/SET, TIME/SET. These buttons are used for the following functions:
- LIGHT Button
In normal display mode press this button, the LED will light up.
2. CH Button
Press CH button to select between channel 1, 2, and 3 when receiving a signal from transmission. Please note that the selected channel must comply with the channel set for transmission, e.g. if the transmission is set to channel 1, then the station needs to be set to channel 1 as well.
3. UP Button at the rear
The function for this button is the same as the 12/24 on the front; it can toggle between 12/24-hour formats.
4. DOWN Button at the rear
In normal display mode press this button to toggle between degrees Celsius or Fahrenheit.
5. ALARM/SET Button
Press ALARM button at the rear to display the alarm time.
To set the alarm time, press ALARM once, the alarm time displays. Press and hold the button for 3 seconds, the alarm HOUR digit flashes, use UP or DOWN to set the alarm hour.
Press the ALARM button again, the alarm MINUTE digit flashes, use UP or DOWN to set the alarm minutes. Then press ALARM again to finish the alarm setting.
The alarm icon will display after finishing the alarm setting. Press ALARM/SET again to turn off the alarm icon.
6. TIME/SET Button
Press TIME/SET button and hold for 3 seconds when beep sounds, YEAR digit flashes. Use UP or DOWN button at the rear to set the YEAR.
Press TIME/SET again twice, the MONTH digit flashes, use UP or DOWN at the rear to set the MONTH.
Press TIME/SET button again, the DATE digit flashes, use UP or DOWN at the rear to set the DATE.
Press TIME/SET button again twice, the HOUR digit flashes, use UP or DOWN at the rear to set the HOUR.
Press TIME/SET button again, the MINUTE digit flashes, use UP or DOWN at the rear to set the MINUTE.
Press TIME/SET again twice to resume normal display mode.
7. RESET Button
Press this button to reset all function.
Part III
Use the Transmitter:
For each weather station there is a transmitter. Set the channel after inserting the battery at the rear of the transmitter. There are 3 settings: channel 1, 2 and 3.
The maximum distance between the station and the transmitter is 20 m in open areas. Greater distance or buildings in-between station and transmitter will affect signal transmission and reception.
Transmitter shall be kept away from rain or water.
Part IV
Points to note:
Tolerance:
- The tolerance for temperature variation is + / - 2^ .
- The tolerance for humidity variation is + / - 5% .
Remarks:
- 3x AAA batteries or DC 4.5 V adapter are needed to operate the weather station.
- 2x AAA batteries are needed to operate the transmitter.
- The transmitter distance is 30 m.
- Transmits one time every second. The light will flash at the same time.
- Select the channel and change the temperature unit inside the battery compartment.
- When the RCC signals flashing, the handset function is turn off. Press the DOWN once to stop the RCC signal flashing; it will recover the handset function.
- The system's channel is CHANNEL1.

Safety precautions:
To reduce risk of electric shock, this product should ONLY be opened by an authorised technician when service is required. Disconnect the product from mains and other equipment if a problem should occur. Do not expose the product to water or moisture.
Maintenance:
Clean only with a dry cloth.
Do not use cleaning solvents or abrasives.
Warranty:
No guarantee or liability can be accepted for any changes and modifications of the product or damage caused due to incorrect use of this product.
General:
Designs and specifications are subject to change without notice.
All logos, brands or brand logos and product names are trademarks or registered trademarks of their respective holders and are hereby recognised as such.
Keep this manual and packaging for future reference.
Attention:

This product is marked with this symbol. It means that used electrical and electronic products should not be mixed with general household waste. There is a separate collections system for these products.
This product has been manufactured and supplied in compliance with all relevant regulations and directives, valid for all member states of the European Union. It also complies to all applicable specifications and regulations in the country of sales.
Formal documentation is available upon request. This includes, but is not limited to: Declaration of Conformity (and product identity), Material Safety Data Sheet, product test report.
Please contact our customer service desk for support:
via website: http://www.nedis.com/en-us/contact/contact-form.htm
via e-mail: service@nedis.com
via telephone: +31 (0)73-5993965 (during office hours)
NEDIS B.V., De Tweeling 28, 5215 MC 's-Hertogenbosch, THE NETHERLANDS
Teil I

- CH Button
- ALERT Button
- MAX/MIN Button
- Set Alarm
- Activate/Deactivate the Alarm Function
- Temperature and Humidity:
- RCC Reception Mode:
- Part II
- CH Button
- UP Button at the rear
- DOWN Button at the rear
- ALARM/SET Button
- TIME/SET Button
- RESET Button
- Part III
- Use the Transmitter:
- Part IV
- Points to note:
- Remarks:
- Safety precautions:
- Maintenance:
- Warranty:
- General:
- Attention:
- Teil I
Brand : NEDIS
Model : WEST203WT
Category : Weather Station