Violetta VIC002O - Camera INGO - Free user manual and instructions
Find the device manual for free Violetta VIC002O INGO in PDF.



User questions about Violetta VIC002O INGO
0 question about this device. Answer the ones you know or ask your own.
Ask a new question about this device
Download the instructions for your Camera in PDF format for free! Find your manual Violetta VIC002O - INGO and take your electronic device back in hand. On this page are published all the documents necessary for the use of your device. Violetta VIC002O by INGO.
USER MANUAL Violetta VIC002O INGO
I Getting to know your camera. 1
- Configuration & installation. 1
- Monitor screen display 2
- Preparation before capture. 2
4.Shooting. 3 - Video& Audio recording.. 7
- Audio input /output. 8
- Image review setup 10
- Other setup 12
II Software & Download. 15
- PC-CAM driver installation 15
- How to use PC CAM function 23
- How to download the photos. 23
III Maintenance. 24
IV Specification and system requirement. 27
Getting to know your camera
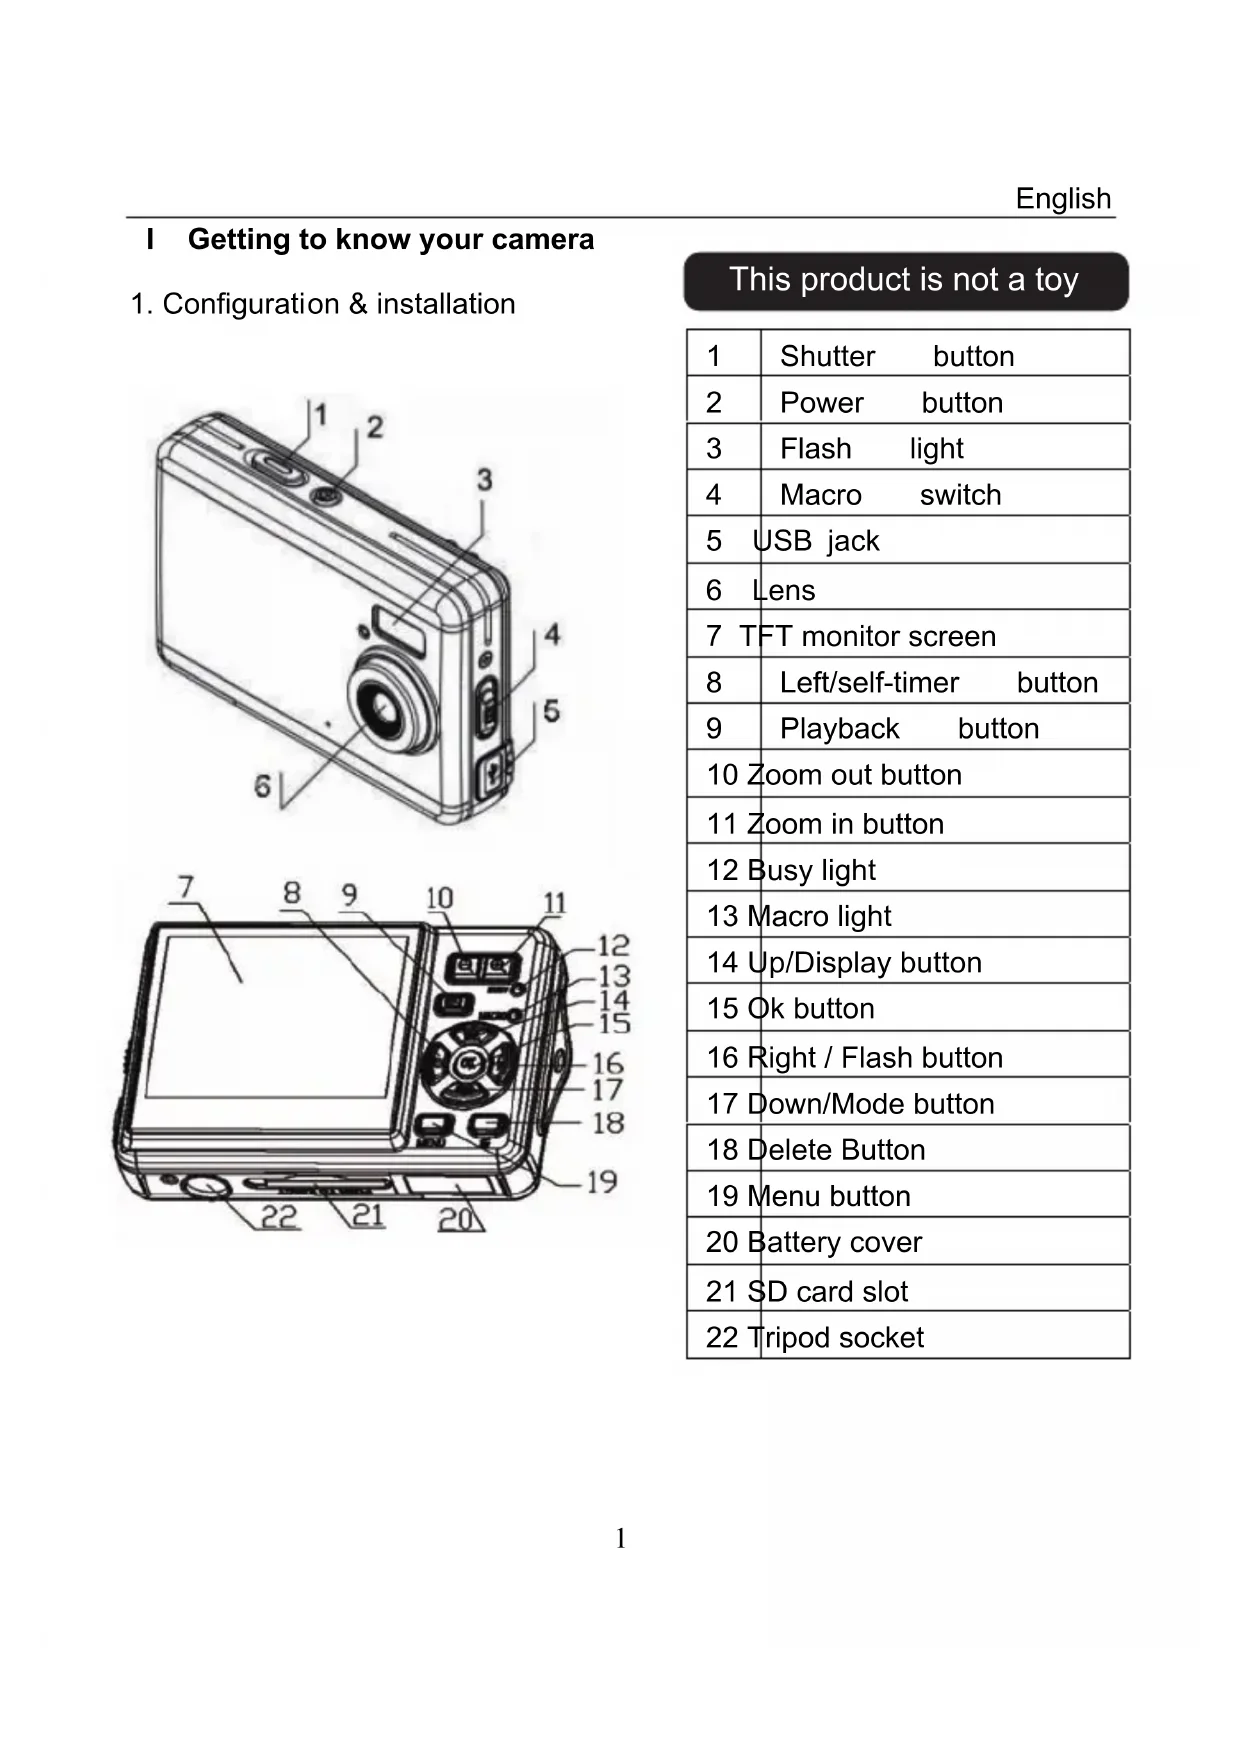
1. Configuration & installation
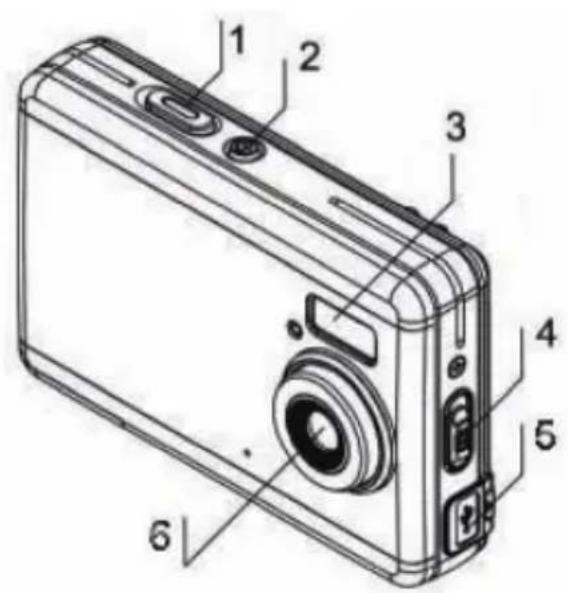
This product is not a toy
| 1 | Shutter button |
| 2 | Power button |
| 3 | Flash light |
| 4 | Macro switch |
| 5 | USB jack |
| 6 | Lens |
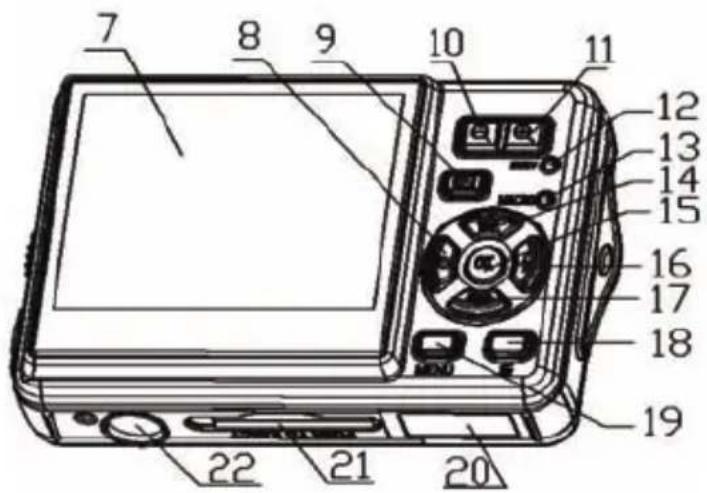
| 7 | TFT monitor screen |
| 8 | Left/self-timer button |
| 9 | Playback button |
| 10 | Zoom out button |
| 11 | Zoom in button |
| 12 | Busy light |
| 13 | Macro light |
| 14 | Up/Display button |
| 15 | Ok button |
| 16 | Right / Flash button |
| 17 | Down/Mode button |
| 18 | Delete Button |
| 19 | Menu button |
| 20 | Battery cover |
| 21 | SD card slot |
| 22 | Tripod socket |
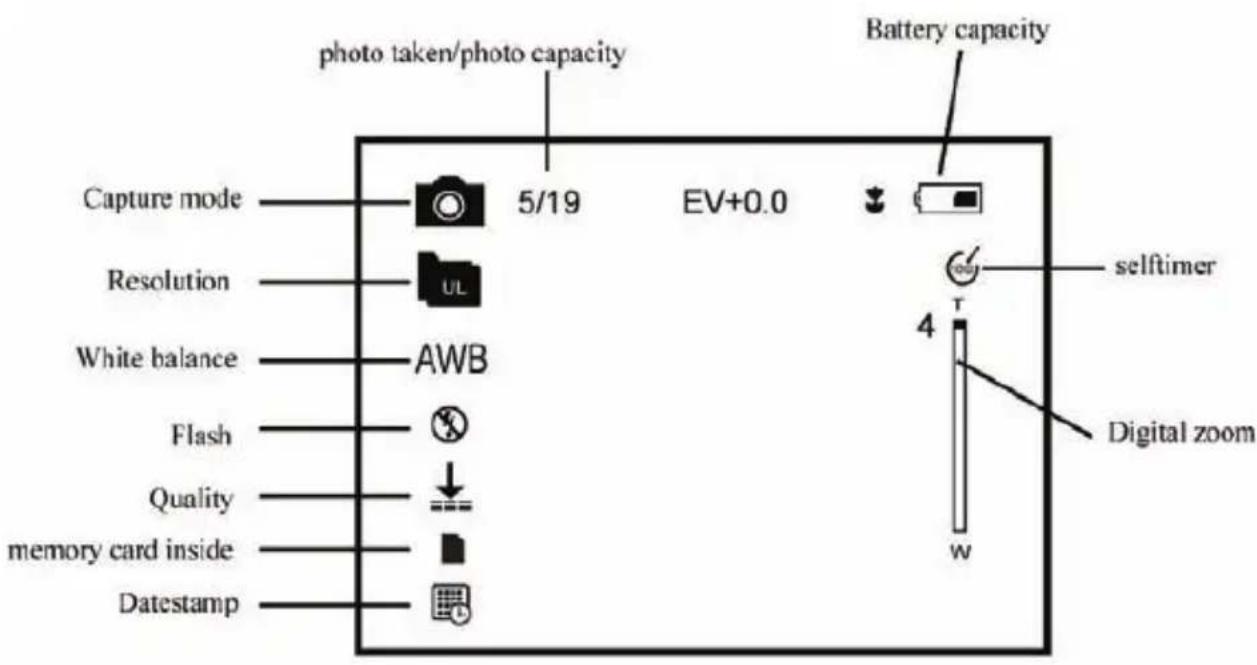
2. Monitor screen display
3. Preparation before capture
3.1 Battery
It's optional to use LR03(AAA) alkaline batteries or rechargeable batteries. Open the battery cover and load the batteries according to the polarity indicated on the battery door.
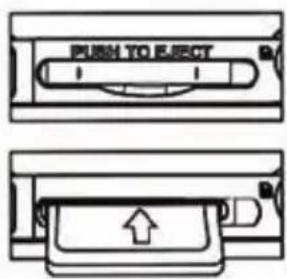
3.2 Insert the memory card
Insert the memory card to the card slot carefully. Check the right direction
before insert the memory card.
Attention: If you can not insert the SD card, take it out and insert again.
4. Shooting
1): Press POWER button to enter the default capture mode;
2): Press the SHUTTER button to take pictures.
Attention:
- Do not take the memory card or battery out when camera is saving the image, otherwise, the image won't be saved completely.
- The screen will power off automatically if the camera is not in working status for 30 seconds. Press any key to restart the screen.
4.1 Review photos
Press PLAYBACK button to view the pictures. Press the LEFT or RIGHT button to select the picture.
4.2 Delete photos
a) Press the PLAYBACK button to enter review mode.
b) Press the DELETE button to enter the DELETE mode;
c) Press the LEFT button to select "Yes";and press the OK button to delete the file.
4.3 Shooting setup
Press "MENU" to enter main menu for 2 options: "Image" mode and "Setup" mode:
Select "Image", the following settings are: Resolution, Quality, White Balance, Color Effect, Exposure, DateStamp, Selftimer, and Burst Snapshot
A. Resolution:
a) Press the UP or DOWN button to select the "resolution" mode, then press the RIGHT button for 5 options :2592x1944 , 2048x1536 , 1600x1200 , 1280x960 , 640x480. Press the UP or DOWN button to select the resolution .
b) press the "OK" button to confirm and press "MENU" button to exit.
B. Quality:
a) Press the UP or DOWN button to select "Quality" and press the RIGHT button for 3 options: "Super", "Fine", "Normal".
b) Press the UP or DOWN button to select the image quality.
c) Press the OK button to confirm and press the MENU button to exit.
C. White Balance:
a) Press the UP or DOWN button to select "White Balance", press the RIGHT button for 5 options: Auto, Day Light, Tungsten, Fluorescent, and Cloudy;
b) Press the UP or DOWN button to select the proper mode;
c) Press the "OK" button to confirm and press the MENU button to exit;
D. Color Effect:
a) Press the UP or DOWN button to select "Color Effect", press the RIGHT button for 3 options: "Color", "Sepia", "Monochrome";
b) Press the UP or DOWN button to select the color you desired;
c) Press the "OK" to confirm and press the MENU button to exit.
E. Exposure:
a) Press the UP or DOWN button to select "Exposure", and then press the RIGHT button to select;
b) Press the LEFT or RIGHT button to adjust the exposure from -2.0 to +2.0; then press the "OK" button to confirm.
F. Date Stamp:
Set up "date stamp" if you would like to show the "date" on you picture
a) Press the UP or DOWN button to select "Date Stamp", press the RIGHT button to select;
b) Press the UP or DOWN button to select "Enable" or "Disable";
c) Press the "OK" button to confirm and press the MENU button to exit.
G. Self-timer:
a) Press the UP or DOWN button to select "Selftimer", press the RIGHT button to select: "Disable", "10SEC", "20SEC";
b) Press the UP or DOWN button to select the time you desired;
c) press the "OK" to confirm and press MENU button to exit.
Attention: select "Disable" if you want to cancel the selftimer function.
H. Burst Snapshot:
You can select the Burst Snapshot to take 3 pictures continuously.
a) Press the UP or DOWN button to select "Burst Snapshot", press the RIGHT button for 2 option: "Single", "Burst";
b) Press the UP or DOWN button Select "Burst";
c) Press the "OK" button to confirm and press the MENU button to exit.
Flashlight
| Auto: Automatically turn on/off according to the light | |
| Flash on: Force on the flash | |
| Flash off: Force off the flash |
In capture mode, press the FLASH button adjust the flash mode.
- The screen is in blank when the flash is in charge status, the next image can be shot only when the charge is completed.
- If shooting with flash under a bright environment, the facular in the image will cause the incorrect exposure.
Attention: The flash does not work in "Burst snapshot" mode.
In order to save power, the flash will not work when battery is low.
Digital zoom
To view the zoom effected by LCD.
Note: digital zoom may affect the quality of image. The higher digital zoom multiples, the lower of the image quality, maximum 4X digital zoom is available.
In the camera/video/playback mode, press the ZOOM IN or ZOOM OUT button to zoom in or zoom out;
5. Video recording:
1): Press the "MODE" button to select video mode
2): Press the SHUTTER button to start video recording;
3): Press the SHUTTER button again to stop recording.
5.1 Play video files
a) Press the PLAYBACK button to view the video file.
b): Press the LEFT or RIGHT button to select the video file;
c): Press the SHUTTER button to play video file and press the SHUTTER button again to end the playing;
d): Press the OK button to pause, press it again to continue.
Attention: Please note that this camera does not support the speaker; the volume is only available when connecting with TV or PC.
5.2 Delete video file
See page 3 for detail set up.
5.3 Video recording setup
In the video mode press the "MENU" button to enter the main menu for 2 options: "video" and "setup". There are 4 options available for "video" setup: "Resolution", "Frame rate", "White balance" and "Audio".
A: Video Resolution:
a) Press the UP or DOWN button to select "Resolution", press the RIGHT button to select: 640x480 or 320x240;
b) Press the UP or DOWN button to select the resolution.
c) Press the OK button to confirm and press the MENU button to exit.
B: Frame rate:
a) Press the UP or DOWN button to select "Frame rate", press the RIGHT button for 2 options: 30FPS or 15FPS;
b) Press the UP or DOWN button to select the frame rate;
c) Press the OK button to confirm and press the MENU button to exit.
C: White balance
See page 5 for detail set up.
D: Audio Recording:
a) Press the "MENU" button under the video mode, press the UP or DOWN button to select "Audio", press the RIGHT button 2 options: "Enable" or "Disable";
b) The video is with voice recorded when select "Enable", the video is without voice recorded when select "Disable";
c) Press the OK button to confirm and press the MENU button to exit.
6. Audio recording
6.1 Audio input
a): Power on;
b): Press the "MODE" button to select Audio Mode; (
c): Press the SHUTTER button to start audio recording, the recording time will be showed on the screen;
d): Press the SHUTTER button again to stop recording.
6.2 Delete audio files
See page 4 for detail set up
6.3. Play video /audio file on TV
You can play video/audio file on TV by connecting the AV cable:
a): Power on TV and switch to AV mode;
b): Power on the camera and connect it to TV by the AV cable;
c): Press the MODE button to enter the PLAYBACK mode;
d): Press LEFT or RIGHT button to select the file. Press the SHUTTER button to play and press it again to end the playing.
e): Press the OK button to pause and press it again to continue.
Attention:
- The camera screen will automatically off when the cable is connected to the camera;
The battery will also be used when the camera connected to TV;
The TV system may affect the image quality, please adjust the camera system PAL or NTSC to comply with the TV system(see page 16); - Please adjust the TV setting if the image does not display at the center of TV screen; this is not the failure of the camera.
- Please use the cable attached to connect with the camera and TV.
7: Image review setup:
In image playback mode, press the "MENU" button to enter the main menu for 2 options: "play" and "Setup".
There are 8 Options in "play" mode: Delete Current, Delete All, lock, thumbnail, set logo, rotate, slideshow.
7.1 Delete image
a) Press the UP or DOWN button to select "delete current" or "delete all".
b) Select "Delete Current" to delete the current image. Press the RIGHT button to confirm.
c) Select "Delete All" to delete all the images. Press RIGHT button to confirm.
Attention: You can also delete current file by the DELETE button.
7.2 Lock image
a) Press the UP or DOWN button l to select "lock", press the RIGHT button for 4 options: "lock current", "lock all", "unlock current", "unlock all";
b) Press the UP or DOWN button l b select;
c) Press the OK button to confirm and press the MENU button to exit.
Attention: The locked image can not be deleted.
7.3 Thumbnail
a) Press "MENU" button in image playback mode, then press the UP or DOWN button to select "thumbnail", press the RIGHT button to
enter thumbnail mode;
b) Press the LEFT, RIGHT, UP and DOWN button Select image, then press the OK button to restore the original size.
7.4 Set Logo:
You can set the picture you like as the startup logo.
a) Press the UP or DOWN button No select "Set logo", press the RIGHT button for 2 options: "Yes", "No";
b) Press the UP or DOWN button Select "Yes";
c) Press the OK button to confirm and back to playback mode.
7.5 Rotate
a) Press the "playback" button to enter the image playback mode;
b) Press the UP or DOWN button to select "Rotate", press the RIGHT button to enter rotate mode: 90^ , 180^ and 270^ ;
c) Press the UP or DOWN button to select the rotate degree you need, then press the OK button to confirm.
Attention: The "Rotate" function does not work on resolution "2592x1944"(5Mega pixel) or above.
7.6 Slideshow:
a) Press the UP or DOWN button to select "slide show";
b) Press the RIGHT button to set slide show;
c) Press the SHUTTER button to return to the normal playback mode.
8. Other settings
A: Language (Abc):
a) Power on and press the "MENU" button to enter "Image" and "Setup";
b) Press RIGHT button to select "Setup";
c) Press the UP or DOWN button to select "Language (Abc),
d) Press the RIGHT button to enter "Language (Abc)";
e) Press the UP or DOWN button to select the language you need; then press the OK button to confirm.
B: Auto Power Off
a) Power on and press the "MENU" button to enter "Setup";
b) Press the UP or DOWN button enter "Auto Power Off";
c) Press the RIGHT button to select "Disable", "60Sec", "120Sec";
d) Press the UP or DOWN button to select power off time, then press OK button to confirm.
C: TV Output
a) Power on and press the "MENU" button to enter "Setup";
b) Press the UP or DOWN button enter "TV Output";
c) Press the RIGHT button to enter "NTSC, PAL";
d) Press the UP or DOWN button to select the proper TV system; then press the OK button to confirm.
d) Press the "MENU" button to exit.
D:PlayLogo
a) Press the UP or DOWN button to select "Play Logo";I
b) Press the RIGHT button to select "Enable" or "Disable";
c) Press the UP or DOWN button to select the operation you need; then press the OK button to confirm.
d) Press the MENU button to exit.
Attention: No startup screen is displayed when you select "Disable"
E: Light Frequency
a) Power on and press the "MENU" button to select "Setup";
b) Press the UP or DOWN button l b select "Light Frequency";
c) Press the RIGHT button to select: 50HZ or 60HZ then press the OK button to confirm.
d) Press the MENU button to exit.
F: Date/Time
a) Power on and press the "MENU" button to enter "Setup" mode;
b) Press the UP or DOWN button 口 口 enter "Date/Time";
c) Press the RIGHT button enter the Date/Time interface;
d) Press the RIGHT button to select year, month, date, hour, and minute;
e) Press the UP or DOWN button to set up the year, month, date hour and minute; and then press the OK button to confirm.
G: Buzzer
a) Power on and press the "MENU" button to select "Setup" mode;
b) Press the UP or DOWN button to select "Buzzer"; press the right button to select "Enable" or "Disable", and then press the OK button to confirm.
c) Press the MENU button to exit.
H: Format
a) Power on and press the "MENU" button to select "Setup" mode;
b) Press the UP or DOWN button to select "Format";
c) Press the RIGHT button to select "Yes" to format the camera internal memory or SD card.
d) Press the OK button to confirm and press the MENU button to exit.
Attention: All the saved files will disappear if you format the memory.
I: Default setting
a) Power on and press the "MENU" button to select "Setup";
b) Press the UP or DOWN button Select "Default setting";
c) Press the RIGHT button for 2 options: "Load", "NO",
d) Press the UP or DOWN button to select "load" to back to the default setting.
e) Press the OK button to confirm.
f) Press MENU button to exit.
J: USB Mode
Select "PC Camera" mode when you use this camera as a PC camera.
Select "Mass Storage" mode when you download, delete or upload file, it can also be used as a removable disk.
a) Power on and press the "MENU" button to enter "Setup";
b) Press the UP or DOWN button to select "USB Mode";
c) Press RIGHT button □br options: "mass storage" or "PC camera".
d) Press UP or DOWN button select;
e) Press the OK button to confirm and press MENU button to exit.
K: Firmware version
a) Power on and press the "MENU" button to enter "Setup";
b) Press the UP or DOWN button to select "Firmware version";
c) Press the RIGHT button to enter, it will show the firmware version and updated date.
d) Press OK button to exit.
II. Software & Download
1. PC-CAM driver installation
Insert the CD into the CD-ROM of your PC, An interface appears as follows, Click the "Install Camera Driver" to install the camera driver.
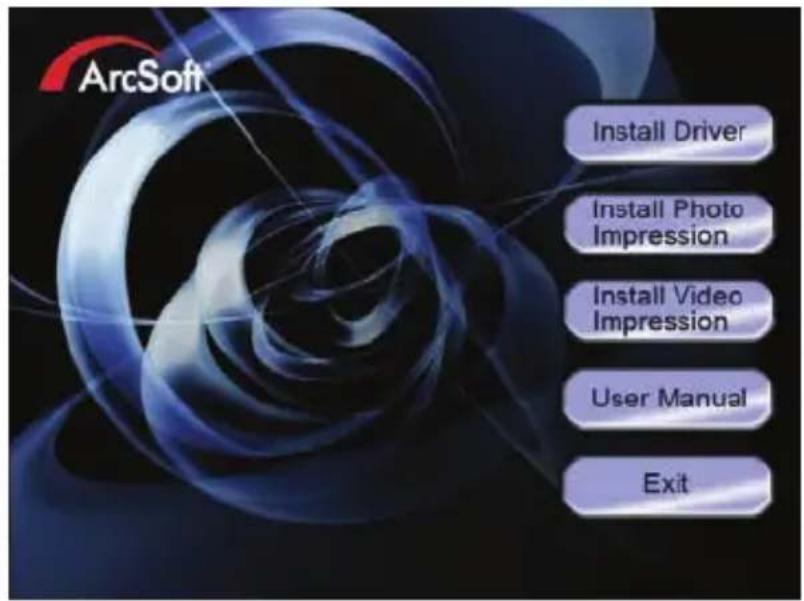
Select the installed language
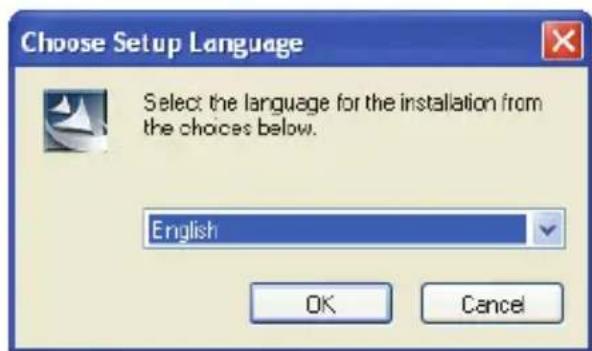
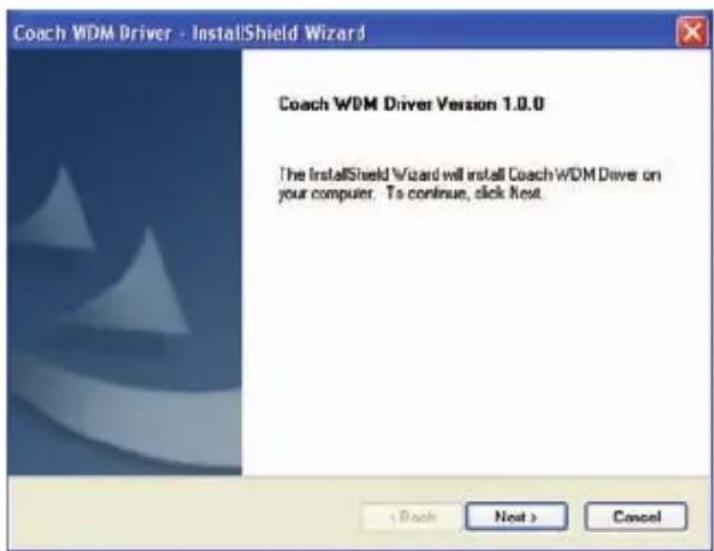
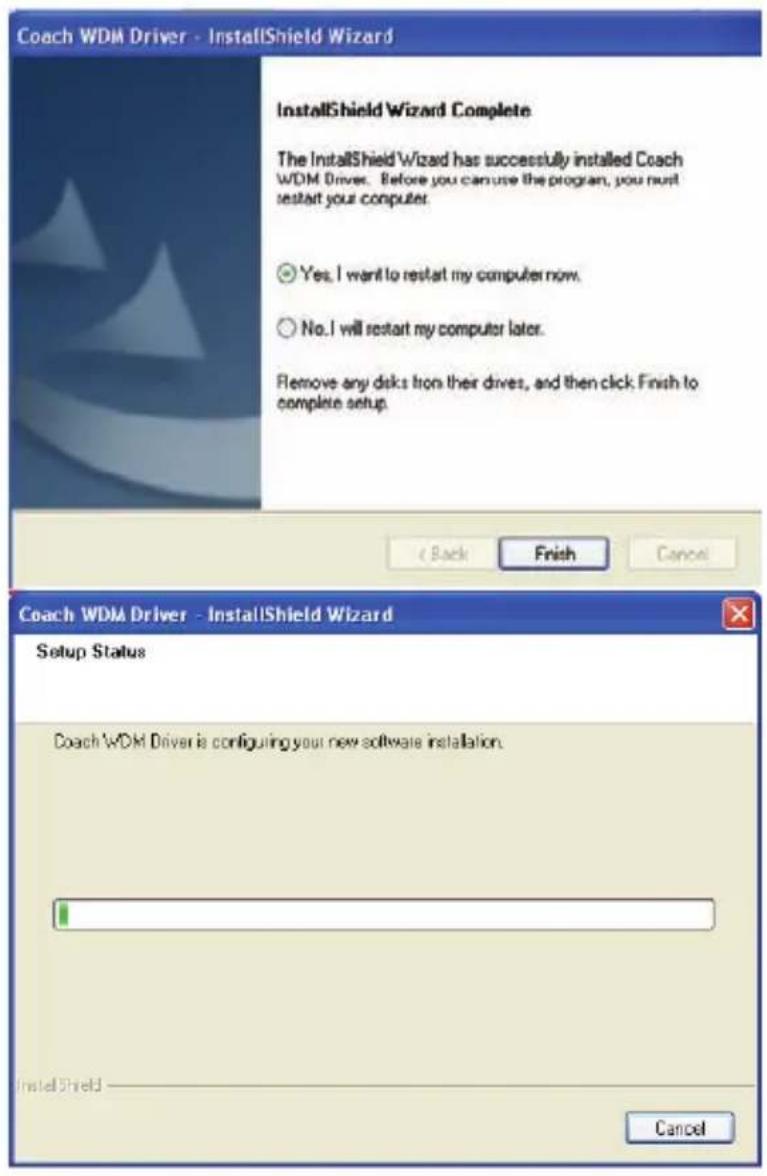
Connect the camera with PC by USB cable, Power on the camera, then press "mode" button to select "PC CAMERA"
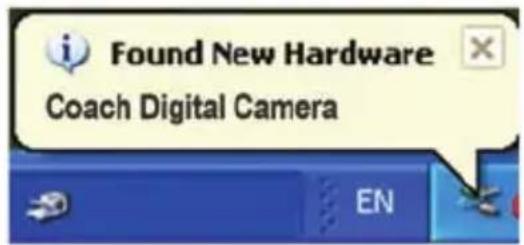
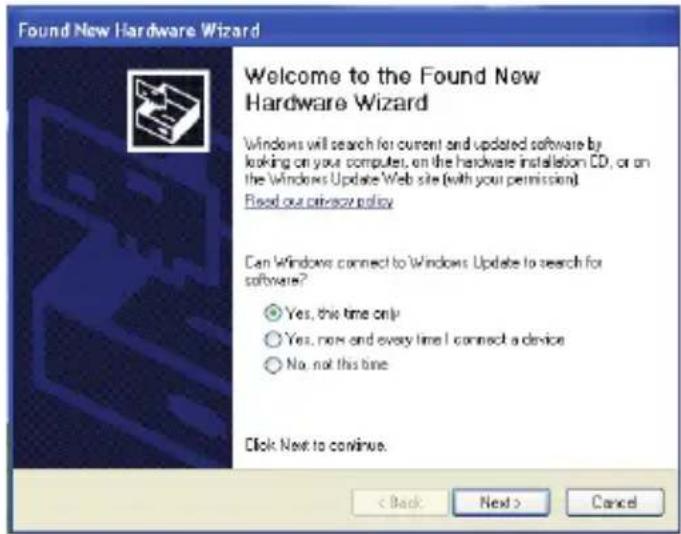
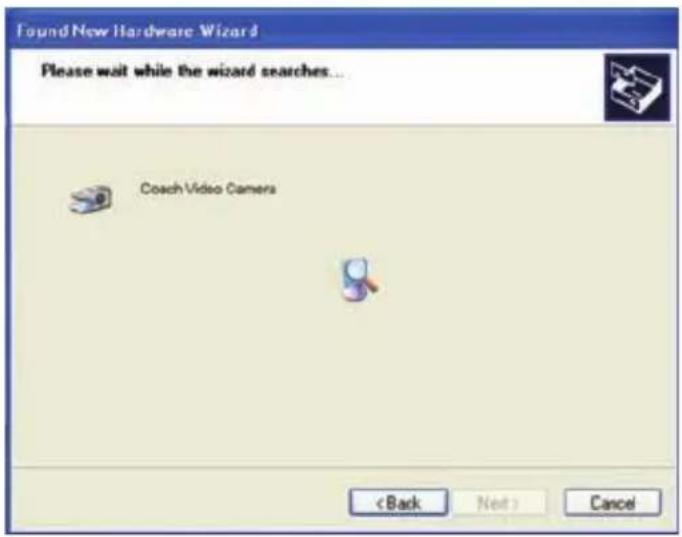
An interface "Found new hardware Wizard" appears, select "Yes, this time only", then click "next";
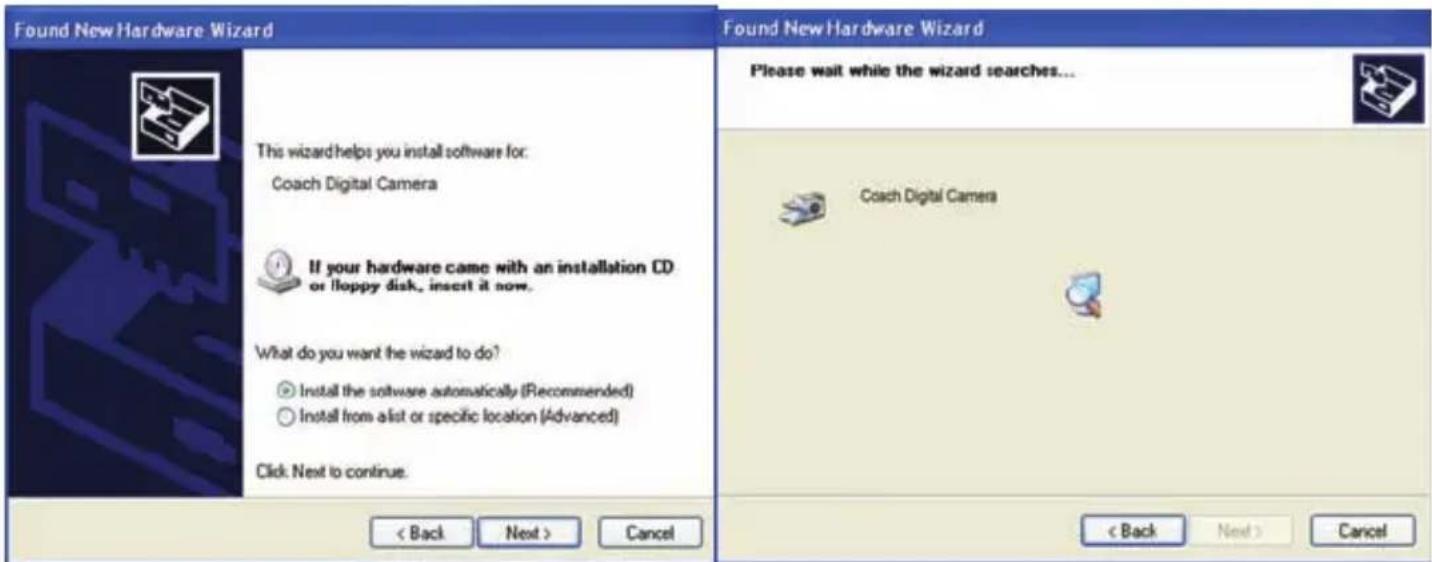
Select "install the software automatically (Recommended)", click "next";
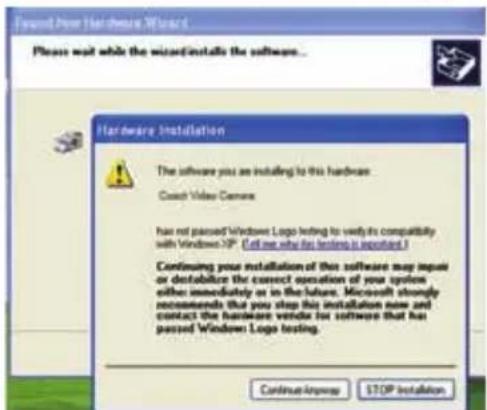
If "hardware installation" interface appears, click "Continue Anyway";
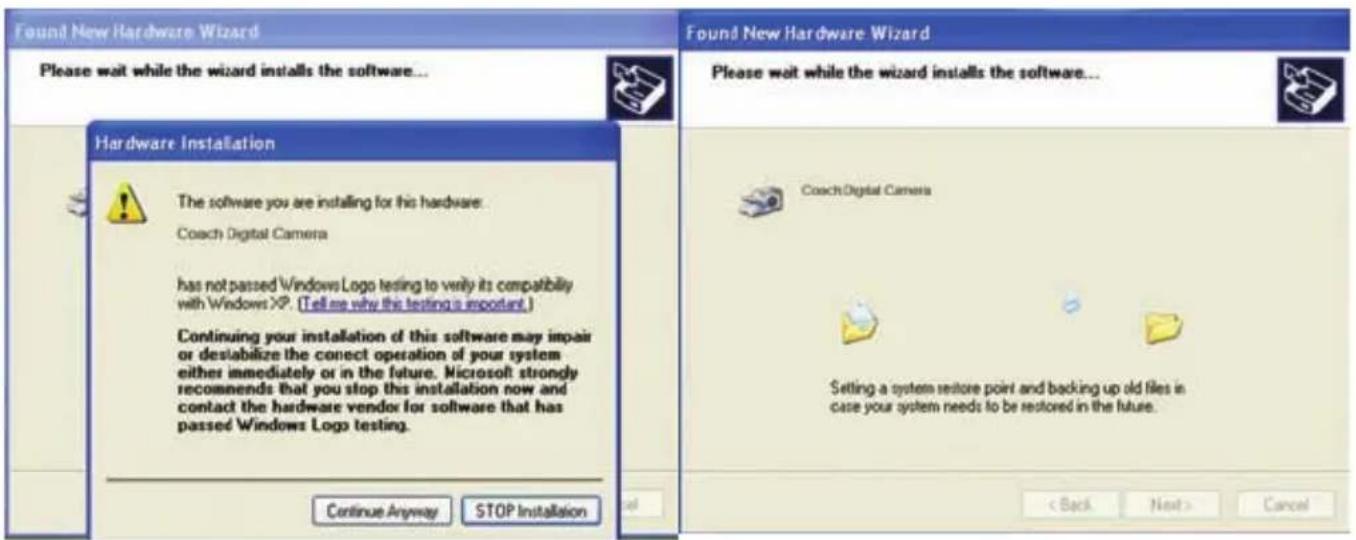
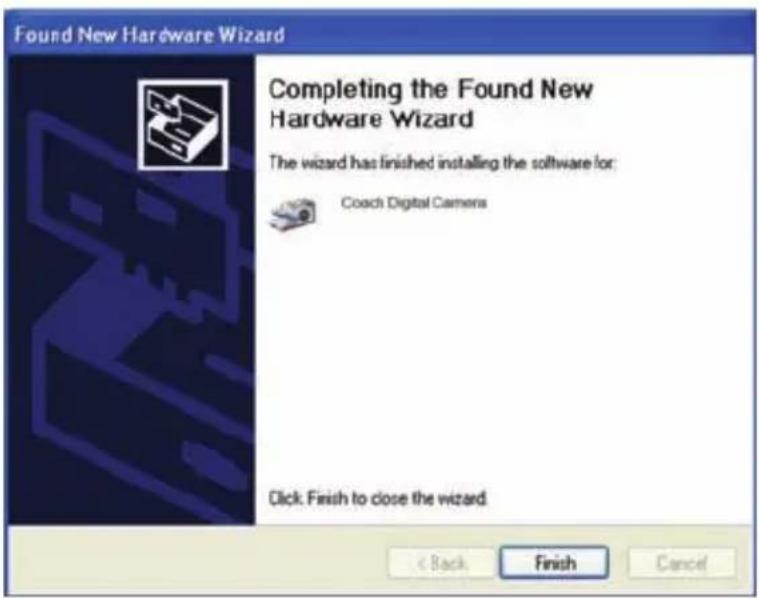
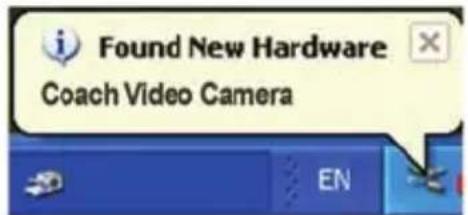
If the following interface appears, click "cancel";

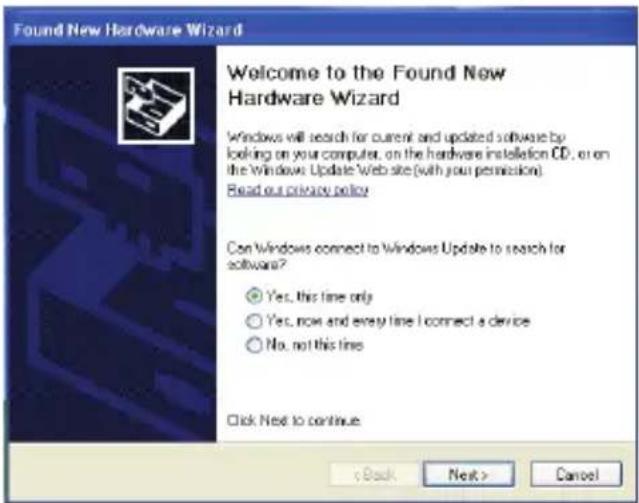
An interface "Found new hardware Wizard" appears, select "Yes, this time only", then click "next";
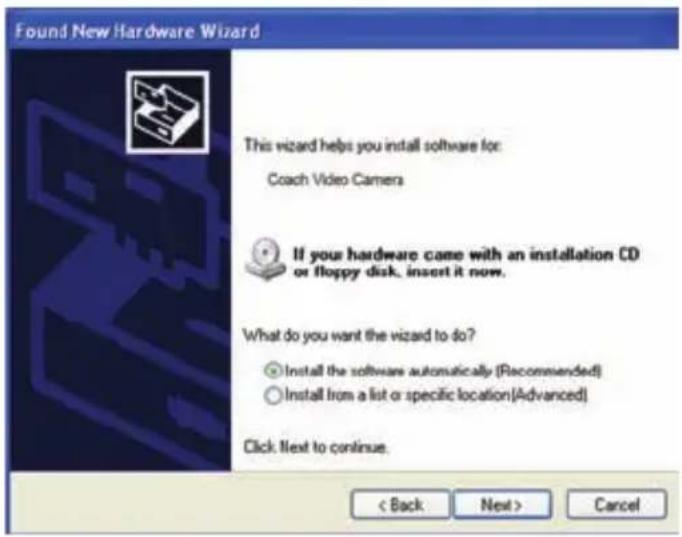
Select "install the software automatically (Recommended)", click "next";
If "hardware installation" interface appears, click "Continue Anyway";

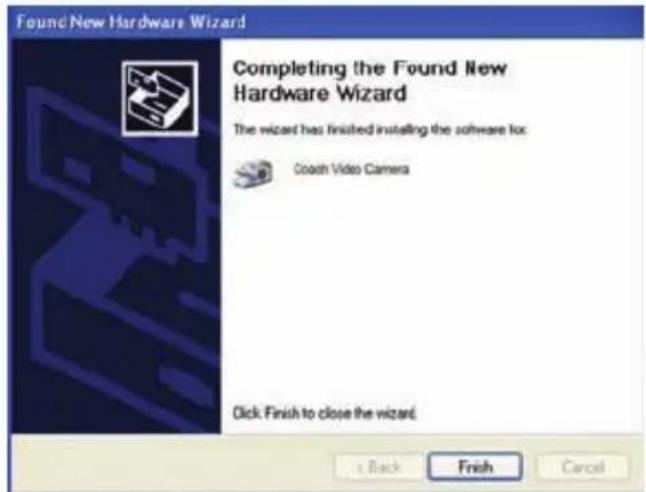
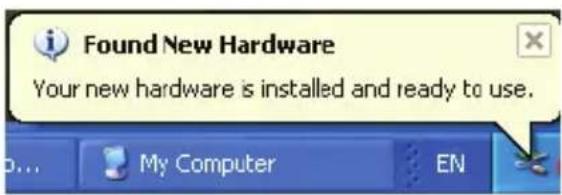
The installation is finished and now you can use the pc camera function;
2. How to use PC-CAM function
- Power on the camera, Press the "mode" button to Select "PC camera"
- Double click the icon "my computer" on the desktop of PC
- Double click the icon “”, Then you can start to use the pc-cam function
3. How to download the photos
Set the USB mode to "mass storage", and then the camera becomes a removable storage device:
a): Connect the USB cable with PC and the camera;
b): Double click the icon "my computer" on the desktop of PC;
c): Double click " ” icon
d): Double click "DCIM" file folder;
e): Copy all the files to your PC.
Attention:
- do not take out the SD card or the batteries when you copy the files to PC, otherwise the files might be destroyed or lost.
- When you download the photos, please always connect the USB cable to PC first, then to the camera; if you connect the USB cable to camera first, the screen will go blank, and if in this case, you can restart the camera.
III. Maintenance
Always keep your camera and accessories in proper condition.
1. Camera
Use dry, soft and clean cloths to wipe out the fingerprint and the dust on the lens and LCD.
Do not use rough cloths or abrasive of laundry to avoid the surface scrape of the camera.
Do not put the camera in the sun or under the high-temperature environment (such as high temperature tool bag, trolley case and so on).
Wait few minutes before use when you bring the camera from a low temperature environment to a warm environment.
2. Battery
Energy management
The energy status of the power can be displayed on LCD as below:
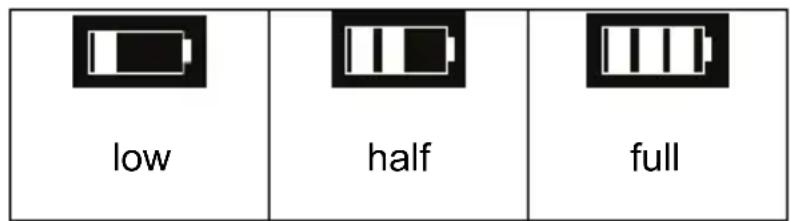
The factors influence the lifetime of the battery:
The used frequency and time of LCD;
The used frequency of flashlight;
Quantity of image shooting
Temperature (it will shorten the lifetime of the battery when the
camera is used in low temperature environment).
Note:
- Manganese battery is not allowed for this camera;
-
Don't take out the battery when power on, otherwise it will affect the internal settings and functions of the camera;
The following situation will affect the lifetime of the battery: -
LCD turn on;
- LCD in playback status for a long time.
Please replace new battery when battery low, and follow the battery instruction on when using.
Please take out the battery if you won't use the camera for a long time.
Don't insert the leakage, eroded or inflated battery into the camera.
Note: if you use rechargeable battery, please full charge the battery before using.
3. Memory card
The format is necessary in the following situations:
a): Unformatted SD card;
b): Repeat format card when it does not working in camera properly although it has been formatted before;
c): It is important to format the card first when it will be used in another camera.
Attention: please keep the card in "unlock" status before using. All data will
be deleted and unable to recover when the card is formatted, please backup the data before formatting.
Memory card format
a. Keep the card in n "unlock" status;
b. Insert the card into the camera;
c. Power on
d. Press the "MENU" button to enter "setup":
e. Press the UP or DOWN button to select "format";
f. Press the RIGHT button for 2 options: "Yes", "No". Then press the UP or DOWN button to select "yes";
g. Press the OK button to format the memory card.
Attention: do not pull out the card or take out the battery when formatting to avoid any failure of the card.
4. Security
To avoid the danger of electric shock, do not open the camera or fix the camera by yourself.
Keep the camera in dry condition, the humidity may cause the failure of the camera.
Stop using the camera immediately if the camera affected with damp. It is necessary to dry the camera in the air before reuse the camera.
IV. Specifications & system requirement:
1. Specifications of the camera
| sensor 5 Mega pixel CMOS | |
| Image resolution | 2592 x 1944, 2048 x 1536, 1600 x 1200, 1280 x 960, 640x 480 |
| storage | Internal 32 MB Flash, External SD card (8MB to 2GB) |
| File format | JPEG, MJPEG(AVI) |
| Capture Single/Burst | |
| Video Quality VGA 640x480 ,QVGA 320X240 at 30fps or 15fps | |
| snapshot speed | Electronic shutter: 1/2 ~ 1/2000 sec |
| Self timer 10 sec/20 sec | |
| zoom 4 x digital zoom | |
| White balance | Auto、Daylight、tungsten、fluorescent 、Cloudy |
| exposure control Auto | |
| flash mode | flash off, flash on, flash Auto |
| illumination | Auto |
| interface USB1.1 | |
| TV output | NTSC/PAL |
| monitor screen | 2.4" Color monitor screen |
| power | 2 XLR03( AAA) alkaline batteries、rechargeable batteries |
| OSD language | English/French/German/Spanish/TC/Italian/Portuguese/Dutch/POLISH |
| focal range | f=8.25mm |
| aperture | F=3.0 |
English
| Auto power off | 60sec/120sec |
| System required WIN20 | 00/XP/Vista/7 |
| Weight Approx. 85g(3.0) | oz)(without batteries and SD card) |
| Dimensions Approx. 85 | x 56 x 22mm(3.3x2.2x0.86 in) |
Attention: The product design and the specifications are subject to change without prior notice.
2. System required:
Windows2000/XP/Vista/7
CPU: Pentium III 800MHz and upper
Memory: 64 MB and upper memory
Disk space: At least 128 MB space free
Disposal of your old product
Note:

Electrical and electronic equipment (EEE) contains materials, parts and substances which can be dangerous to the enviroment and harmful to human health if waste of electrical and electronic equipment (WEEE) is not disposed of correctly.

Equipments which are marked with the WEEE logo (as shown on the left), should not be thrown away with your household waste. Contact your Local Authority Waste Disposal Department as they will be able to provide details of the recycling options available in your area.
Manual de usuario
Minnie Digital Camera Pack
INDICE
I. Conozca su-camera 2
- PC-CAM instalar driver 16
- Fonçoes PC-CAM 23
- Sownload asotos 23
1. PC-CAM instalar driver
3. SDownload as fotos
c): Cliqueerrasizesnaicone
Vous pouvez set the picture you like as the startup logo.
Disk space: At least 128 MB space free
d) Druk de OMHOOG of OMLAAG-knop
d) Druk de OMHOOG of OMLAAG-knop
amnetjuiste
TV-systeme te selecteren en druk de OK-knop om te bevestigen;