
Tablet 7 - Tablet INGO - Free user manual and instructions
Find the device manual for free Tablet 7 INGO in PDF.



| Product type | Touchscreen tablet |
| Brand | INGO |
| Model | Tablet 7 |
| Operating system | Android 4.0 |
| Processor | RK2906 1.2 GHz |
| RAM memory | 512 MB DDR3 |
| Internal storage | 4 GB |
| Screen size | 7 inches (diagonal) |
| Screen resolution | 800 × 480 pixels (16:9) |
| Screen type | Capacitive multi-touch 5 points |
| Front camera | 0.3 MP |
| Wi-Fi connectivity | 802.11 b/g |
| Ports | USB 2.0, miniUSB, 3.5 mm jack, microSD reader |
| Battery | Lithium-ion 3.7 V, 3200 mAh |
| Power supply | AC adapter 5 V, 2 A DC |
| Battery life (video) | Approximately 4 hours |
| Battery life (web browsing) | Approximately 4 hours |
| Battery life (music) | Approximately 30 hours |
| Supported audio formats | MP3, WMA, WAV, APE, OGG, FLAC, AAC |
| Supported video formats | AVI, 3GP/MP4, RM/RMVB, FLV, MKV, MOV, WMV |
| Supported photo formats | JPEG, BMP, GIF |
| Main functions | Internet browsing, parental control, multimedia playback, photo, e-book, app management |
| Security | Parental control with password (default 1234), protection against unauthorized sites |
| Maintenance | Avoid liquids, dust, shocks, extreme temperatures; clean with a soft dry cloth |
| Pre-installed content | Complete 4th season of Monster High + one book chapter (FR, ES) |
Frequently Asked Questions - Tablet 7 INGO
User questions about Tablet 7 INGO
0 question about this device. Answer the ones you know or ask your own.
Ask a new question about this device
Download the instructions for your Tablet in PDF format for free! Find your manual Tablet 7 - INGO and take your electronic device back in hand. On this page are published all the documents necessary for the use of your device. Tablet 7 by INGO.
USER MANUAL Tablet 7 INGO
Editor sitios web permitted: permitted.
Keys and Functions 25
I. Getting Started 26
1.1 Turn on/off 26
1.1.1 Turn on 26
1.1.2 Turn off 26
1.2 Lock/unlock the screen (sleep mode) 26
1.3 Connect to PC via USB cable 26
II. Home Screen 27
2.1 Buttons & Status Bar 28
2.2 Operations on Home Screen 28
2.2.1 Add app icon to home screen 28
2.2.2 Delete app icon from home screen 28
2.2.3 Set Home Screen Wallpaper 28
2.2.4 Find your recent operations 28
III. Program Menu 29
IV. Network Connection 30
4.1 Wi-Fi 30
4.1.1 Turn on Wi-Fi 30
4.1.2 Turn off Wi-Fi 30
4.1.3 Data Usage 30
4.1.4 More: VPN, Portable hotspot, Mobile networks 30
V. Children Browser 31
5.1 Parental Control Internet Browser 3 1
5.1.1 Browser Main Interface 3 2
5.1.2 Parental Control Settings 3 2
VI. Install and Manage Apps 3 4
6.1 Install and Manage Apps 3 4
6.1.1 Install apps 34
6.1.2 Manage apps 35
VII. Multi-media Functions 36
7.1 Music 36
7.2 Video 37
7.2.1 Video Playback 37
7.3 Gallery 3 7
7.4 Camera & Video 37
7.4.1 Take photos 38
7.4.2 Video Record 38
7.4.3 Turn off camera 38
7.5 E-book reader 38
VIII. Settings 38
8.1 Wireless & Networks 38
8.2 Device 39
8.3 Personal 39
8.4 System 40
VIII. Battery 40
Troubleshooting 41
Specifications 42
Disposal 43
PREFACE
Thank you for your purchase of this Tablet PC. With this Android 4.0 device you can carry your music and videos around, access the internet and play and work with thousands of Android apps.
Read this User Manual before using your device and keep it for future reference. This Manual will guide you through all the necessary steps to take full advantage of this amazing product.
This Tablet PC includes a Children Browser. It's the only way to access the internet, it includes a parental control filter that you can enable and disable anytime (Using a Parental Control password that should not be given to children).
When enabled the Parental Control has a white list of allowed websites that children can visit. If children try to visit a website outside the allowed list the Tablet PC will block the access and show a blocked website message.
By default Parental Control is disabled, so read carefully this guide before giving the Tablet PC to your children so you configure it in advance.
We strongly suggest you to change the parental control default password (1234) when you start the device for the first time.
WARNING
- This product is not a toy.
- Keep the product away from liquids and dust.
- Do not soak or steam sources close to the device or charger.
- Do not use the device or charger with wet hands as it may cause electric shock or cause internal wear.
- Avoid violent shocks of the device on any surface. It may cause serious damage and even cause system failure that could cause the battery to fire or even explosion of the same.
- Do not expose the device to extreme temperatures or radical changes of it.
- While using the earphone, if the volume is excessively high it may cause hearing damage. Before plugging your earphones adjust the volume to a low setting.
-
Do not disconnect the tablet suddenly when formatting or uploading and downloading, which can lead to program errors.
-
Do not dismantle the tablet by yourself, and do not use alcohol, thinner or benzene to clean its surface.
- Do not use the tablet while driving or walking.
The tablet is not moisture and water resistant. Please do not use it in a damp environment.

At full volume, prolonged listening of portable music player may damage user's hearing.
CONTENT
This product comes preloaded with the 4th season of monster High Tv episodes (In French and Spanish) and an ebook (Also in French and Spanish). In case of doing a factory reset this content will be lost.
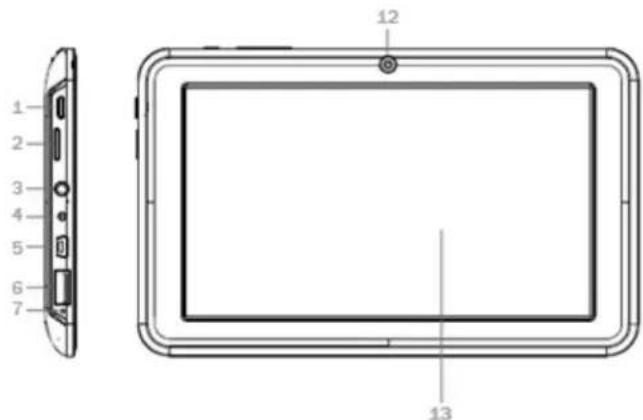
Keys and Functions

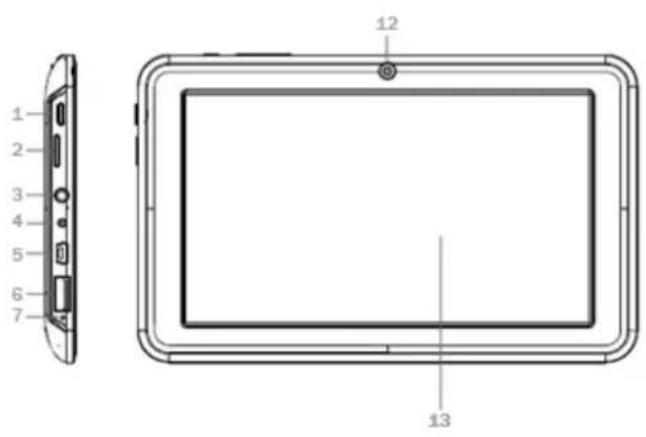

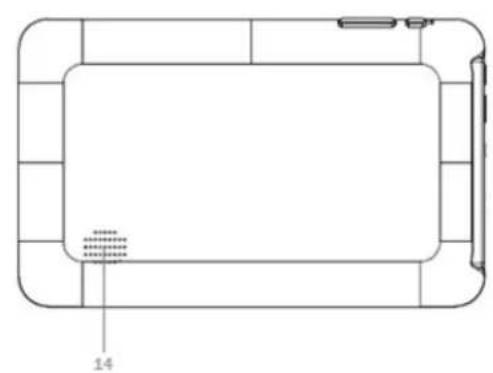

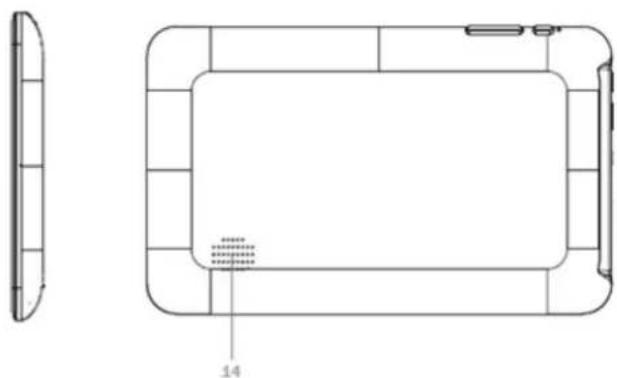
- Power: Short press for sleep/wake up mode; long press 3 seconds for power on/off; long press 8 seconds to reset
- MicroSD Card Slot
- Earphone Jack
- DC Jack: External connection to 5V DC Charger
- miniUSB Port: Data Transfer port, use the supplied USB cable
-
USB Port: External port to plug USB
-
Microphone
- LED Indicator: Lights when charging.
- ESC: Short press to return to previous screen
- VOL+: Increase volume
- VOL-: Decrease volume
12.Front Camera: 0.3MPx camera
13.5 Point capacitive Touch Panel - Speaker
I. Getting Started
1.1 Turn on/off
1.1.1 Turn on
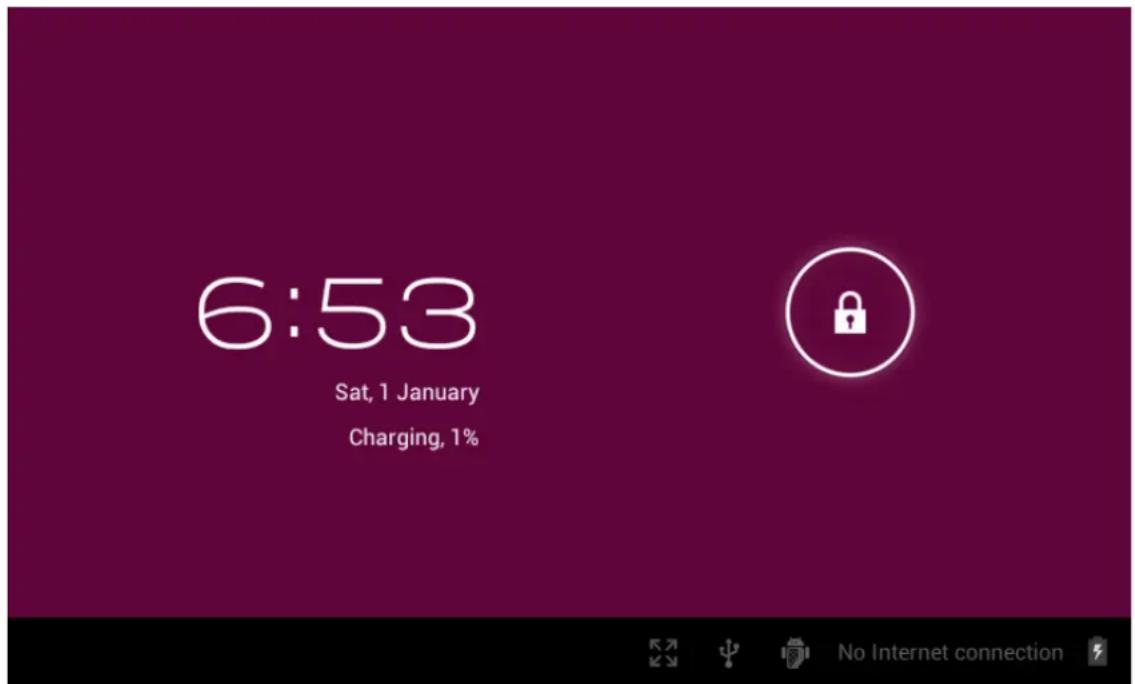
Press the power button on the side of the tablet for more than 3 seconds to turn it on. Once in the lock screen, drag the slider to unlock it.
1.1.2 Turn off
When the tablet is on, to shut it off, press and hold the power button until the "Power off" dialog appears. "Power off ⇒ "Would you like to shut down" → (your device will shut down) "OK".
1.2 Lock/unlock the screen (sleep mode)
To save battery, you may put your tablet in sleep mode by turning off the LCD display. To do this, press the power key. Do it again to bring up the lock screen.
You may set sleep time in Setting>Device>Display>Sleep>30s, 1 min, 2 min, 5 min, 10 min, 30 min, your tablet will in sleep mode after your setting sleep time.
1.3 Connect to PC via USB cable
When connected to PC with USB cable it will automatically connect as a media device, the USB
indicator appears in the status bar.
After connect, you can find the following files in your PC as a removable disk:
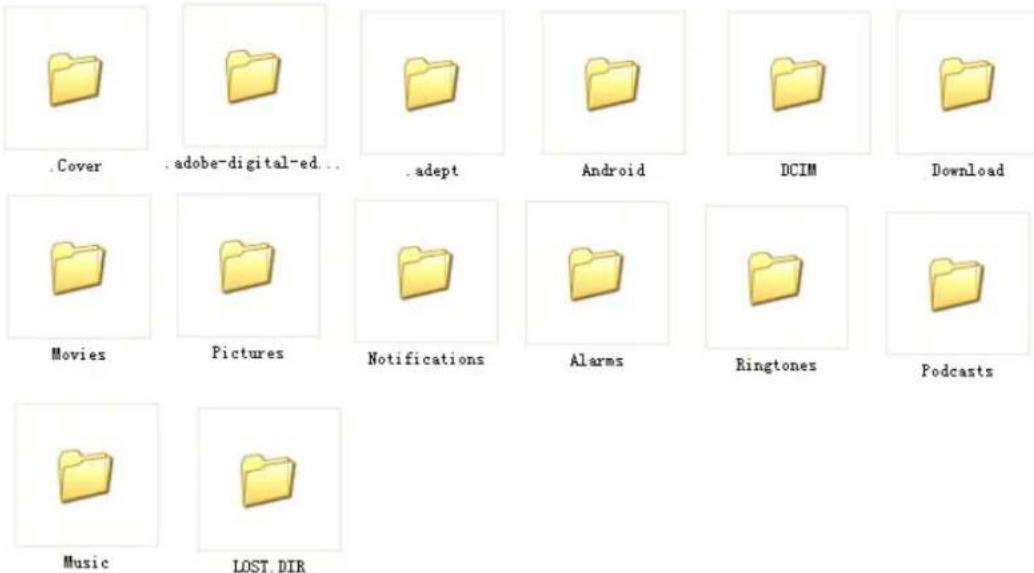
Note: You should put your file into the folder corresponding to, otherwise the player will not able to identify your file.
To disconnect from PC, use the remove Media option from your operating System.
II. Home Screen
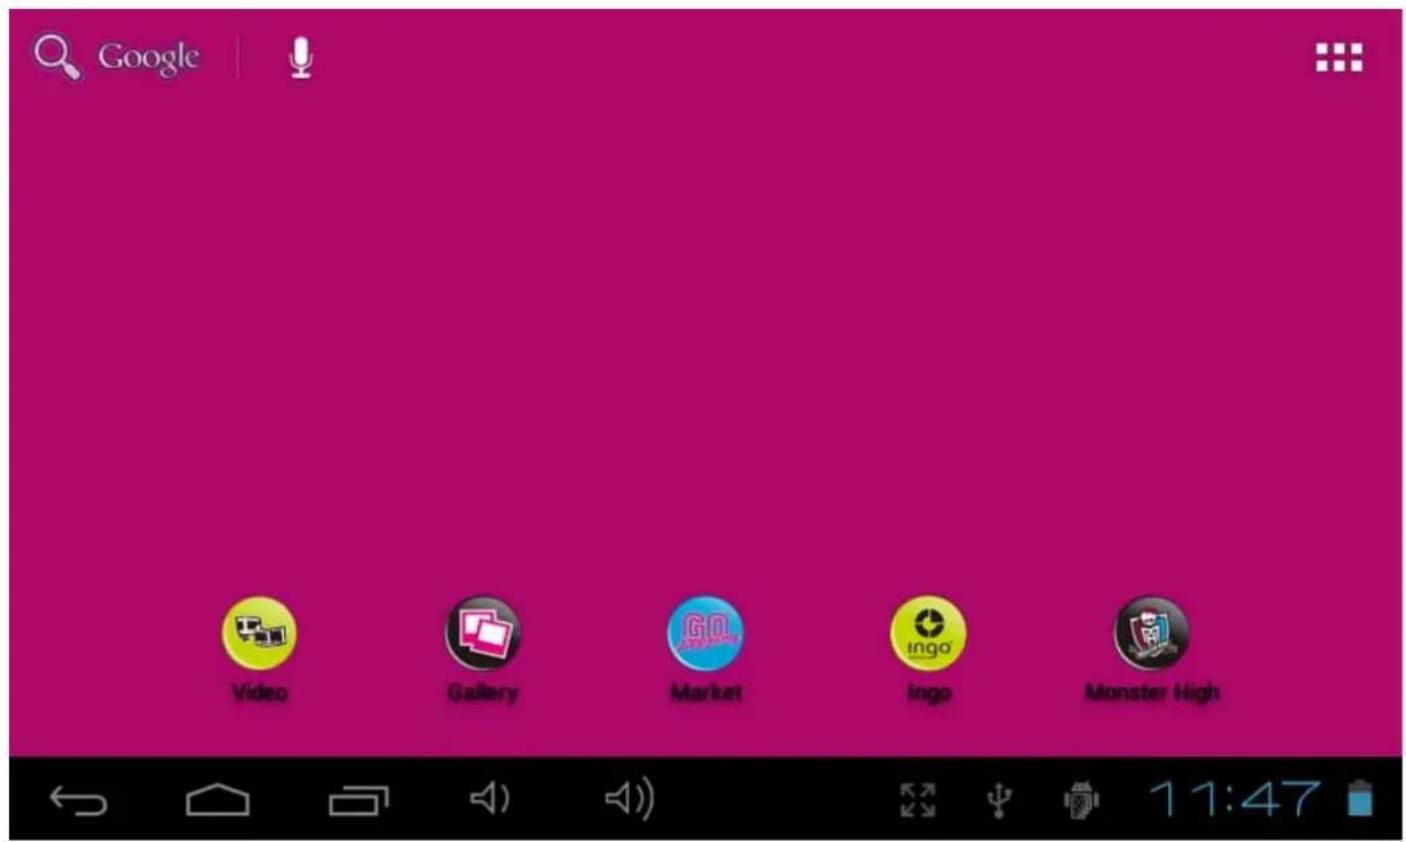
2.1 Buttons & Status Bar
At the bottom of the Home screen you will find the navigation buttons and the Status bar.

- Return: Touch it to go to previous screen. Same function as the ESC key.
- Home: Direct access to Home Screen
- Recent Operation: Touch to access a menu with the recent open apps. The latests are shown first
- Vol-: touch it to reduce the volume
- Vol+: touch it to increase the volume
- Screen: Adjust screen zoom: Standard Screen, Full Screen by Stretch, Full Screen by Scale
4:51 - Status Bar: Touch to make the notifications bar appear. It includes date, time, internet connection status, battery status, settings status (Wi-Fi, Auto-rotate screen, brightness, volume) At the top left of the Home screen is your Application: - App Panel: touch it to view all applications.
2.2 Operations on Home Screen
2.2.1 Add app icon to home screen
Within the App Panel, touch and hold any icon, the icon will appear in the home screen where you can drag it to your desired position.
2.2.2 Delete app icon from home screen
On the main screen, touch and hold undesired icon till it becomes movable. The icon will turn into a trash can. Drag the item to the trash can and release it when it turns red.
2.2.3 Set Home Screen Wallpaper
Tap and hold your finger on any open space on your home screen, and select "Wallpapers" from the pop-up menu. You can select a wallpaper from your Gallery, your downloaded Live wallpapers and system standard Wallpapers.
Note: You can save pictures in the Gallery first, and then set it as wallpaper.
2.2.4 Find your recent operations
Tap and hold in the status bar. The recently opened applications will show in this list.
III. Program Menu
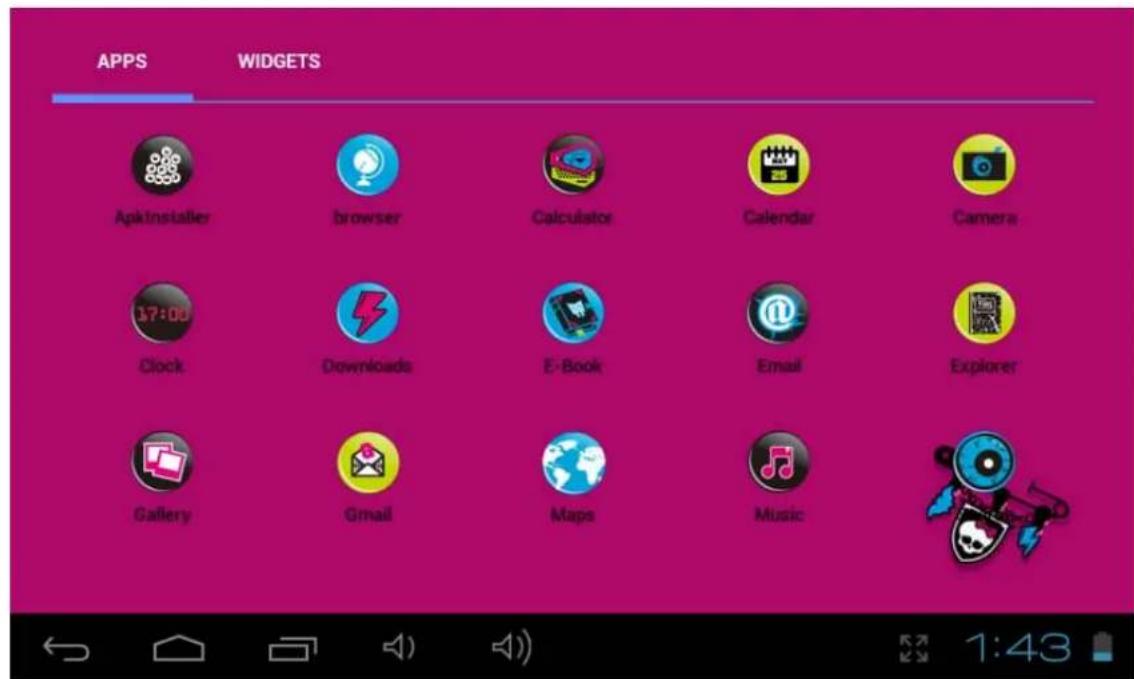
Here you have a short explanation of the default installed programs.
ApkInstaller: Program for installing and uninstalling applications.
Explorer: Open the Explorer to access Micro SD Cards and internal storage media. The Explorer is a practical manager for documents and all types of data.
Browser: Access the world wide web. Refer to parental control browser explanation in order to enable parental restrictions.
Camera: Front 0.3MPX camera, refer to 7.4.
E-mail: Program for retrieving, processing and sending e-mails.
GMail: Program for retrieving, processing and sending e-mails through Google account.
Google Maps: Application to display maps.
Free Advanced Task Manager: Close the unnecessary opened applications.
Calculator
Calendar: Manage schedules - can be synchronised automatically with a Google account.
Clock: Time display and setting alarm functions.
Downloads: Access your downloaded files
Settings: Changing the basic settings of the Tablet.
Sound Recorder: Dictation Device Function.
Music: Access the music player
Video: Access the video player
Gallery: Manage and display images and videos - also enables synchronisation with Picasa web albums.
E-Book: A program for reading and managing e-books.
Search: Search items, files and contacts in your device and the world wide web.
IV. Network Connection
4.1 Wi-Fi
In order to use Wi-Fi you must be within range of a WiFi router and have its network password in case it's Password protected. Under Setting>Wireless & networks, tap "Wi-Fi". Ensure that both Wi-Fi and Network Notification are enabled with green check marks. After a moment, your Wi-Fi networks list should populate. If you need to rescan for available networks, tap "Wi-Fi", then will automatically scan. For secured networks, you need to input the password or some other form of access agreement acknowledgement via a browser.
We advise you to safeguard your wireless internet router according to the WPA protocol instead of the WEP protocol. When using WEP, be aware that the tablet does not support all channels and the range is lower than when using WPA.
4.1.1 Turn on Wi-Fi
Within the App Panel, tap "Settings" → then "Wireless & networks" → "Wi-Fi" → "ON" to turn on and scan. Your tablet lists the networks it finds within range. Tap a network to connect. If necessary, enter NetworkSSID, Security, and Wireless password, and tap "Connect". When your tablet is connected to the network, the wireless indicator appears in the status bar. Waves indicate signal strength
4.1.2 Turn off Wi-Fi
To turn off Wi-Fi, tap "OFF" under "Wi-Fi". Turn off Wi-Fi when you're not using it, to extend the life of your battery between charges.
4.1.3 Data Usage
Mobile data: you may check the data by tap "ON"
Set Mobile data limit.
Data usage cycle: current usage cycle, change cycle
4.1.4 More: VPN, Portable hotspot, Mobile networks
Add VPN network
VPN type: PPTP
Portable Wi-Fi hotspot: Choose to active portable hotspot AndroidAP
Configure Wi-Fi hotspot: enter into Network SSID, Security, Password
Mobile Network Setting
Modem Power: Turn on/off modem power
Data enabled: Enable data access over Mobile network
Data roaming: connect to data services when roaming
Access Point Names
Use only 2G networks: Save battery
Network Operators: Select a network operator
Search networks (search for all available networks)
Select automatically (Automatically select preferred network)
Note: Network status icons turn green if you have a Google Account added to your tablet and the tablet is connected to Google services, for syncing your Gmail, Calendar events, contacts, for backing up your settings, and so on.
V. Children Browser
5.1 Parental Control Internet Browser
This Tablet PC includes a Children Browser. It's the only way to access the internet, it includes a parental control filter that you can enable and disable anytime (using a password that should not be given to children).
When enabled the Parental control has a white list of allowed websites that children can visit. If children try to visit a website outside the allowed list the Tablet PC will block the access and show a blocked website message.
By default Parental Control is disabled, so read carefully this guide before giving the Tablet PC to your children so you configure the Parental Control in advance.
Also we recommend you to change the parental control default password (1234) when you start the device for the first time.
Before using your browser, make sure Wi-Fi or internet is connected. Refer to the User Manual to see how to activate it.
Before using your browser, make sure Wi-Fi or internet is connected. Refer to chapter 4 of this User Manual to enable it.
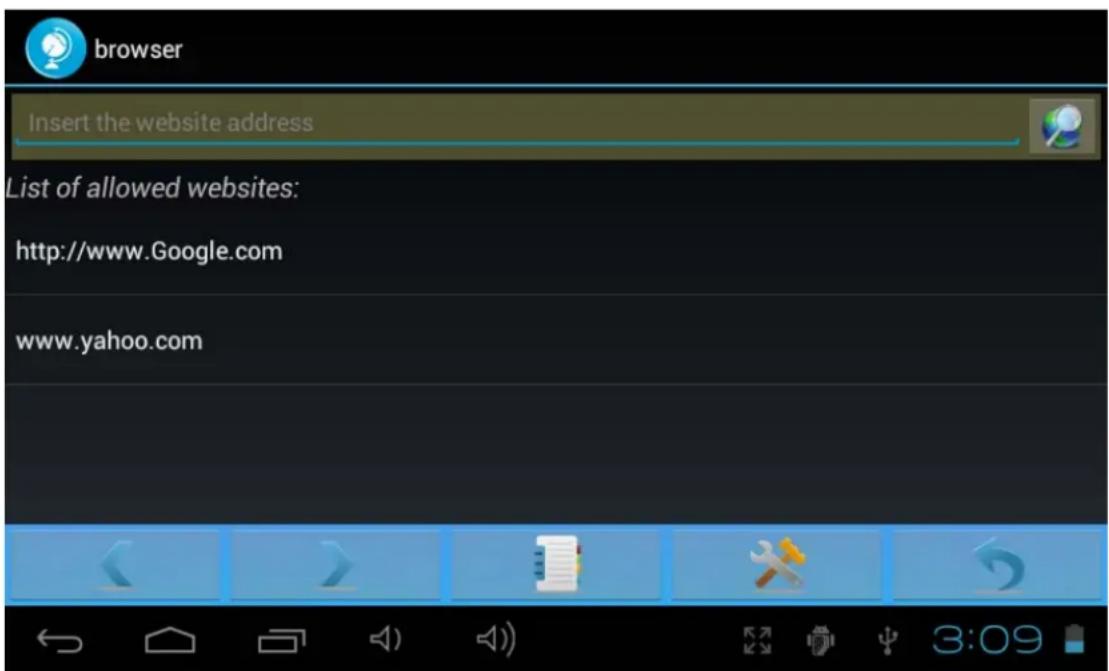
On the main screen, tap the browser icon to open your browser.
5.1.1 Browser Main Interface
Address Bar:
Insert the website address Insert the website address you w
want to visit or
the item you want to search.
NOTE: Website address must be full, with http://in front
Go button:

After entering a website address or search item press it to visit.
List of allowed websites: Here you will have a list of the websites children are allowed to visit. By default this list has some children-safe links included by us. You can edit it anytime using the options explained below. When Parental control is enabled children can only access the websites from this list.
List of allowed websites:
http://www Google.com
www.yahoo.com
Navigation icons:

Previous Page


Next Page

Direct access to Allowed websties list

Direct access to Parental Control Settings

Exit Children Browser
5.1.2 Parental Control Settings
Tap

enter into parent control interface:
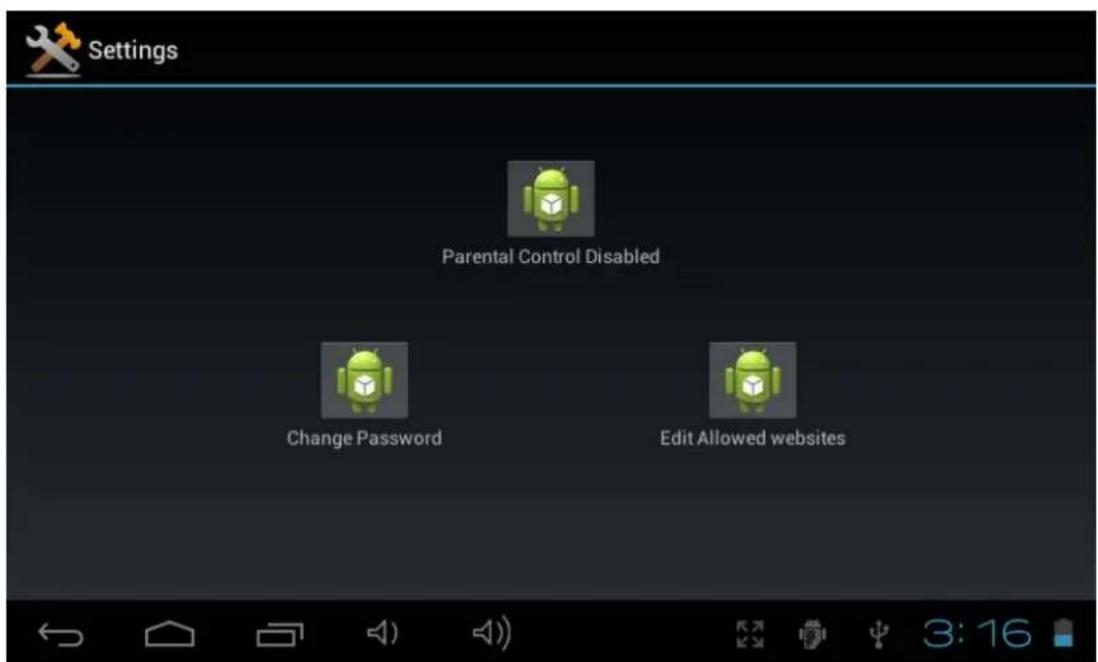
Parental Control Disabled: Press this icon to enable / disable parental control. By default
Parental Control is disabled. After you press you will need to insert the password and press ok. By default password is 1234, we recommend you to change the password as soon as you start the device for the first time.
When you enable the parental control this icon will show Parental Control Enabled.
Change Password: Press this icon to change the Parental Control password. Default password is 1234, we recommend you to change the default password as soon as you start the device for the first time.
You will need to enter the current password (Default password is 1234, we recommend you to change it as soon as you start the device) and enter twice the new password.
Edit Allowed websites: Pressing the icon you will be able to edit the Allowed websites list.
First you will need to enter the Parental Control password (Default password is 1234, we recommend you to change it as soon as you start the device)
After enter the correct Password, you will see the following window:
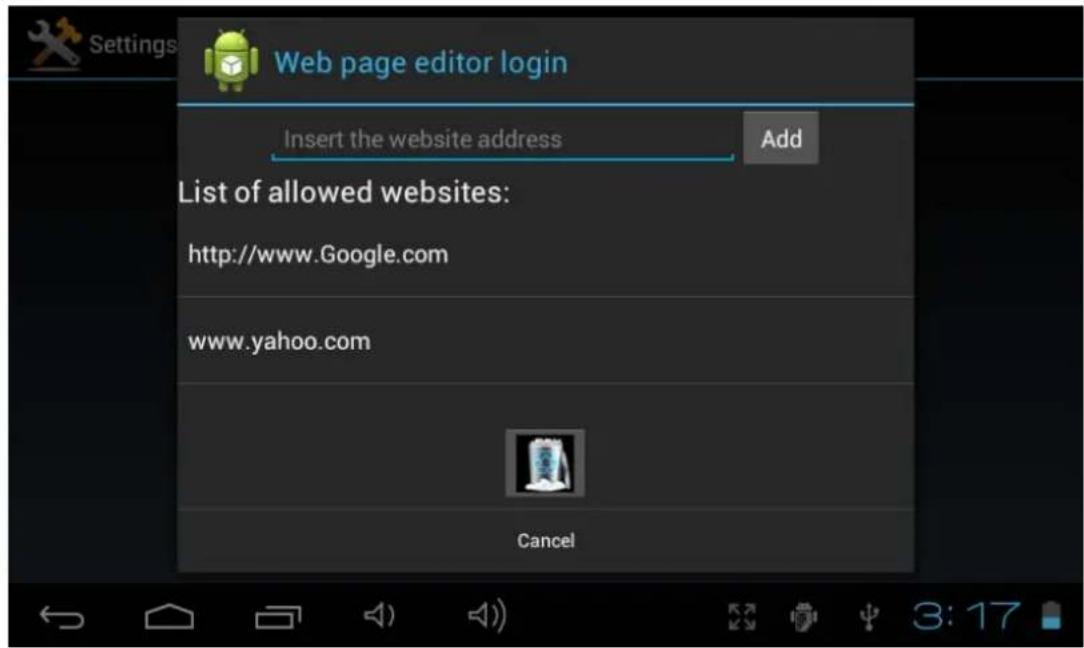
-
Input a new website to the allowed websites list. Press Add to confirm it.
-
Current allowed websites.
-
Erase a website from the current list: Select the website from point 2 and press the

VI. Install and Manage Apps
6.1 Install and Manage Apps
6.1.1 Install apps
Go to the "ApkInstaller" to install and manage your apps. To install a downloaded or copied application, follow below steps:
- Open the 'ApkInstaller' → 'Install' → then tap "Internal Memory" or "SD Card" to access to your Apk files you previously saved.
- They will appear at the right side.
- Select the Apk files you want to install and follow the on screen instructions.
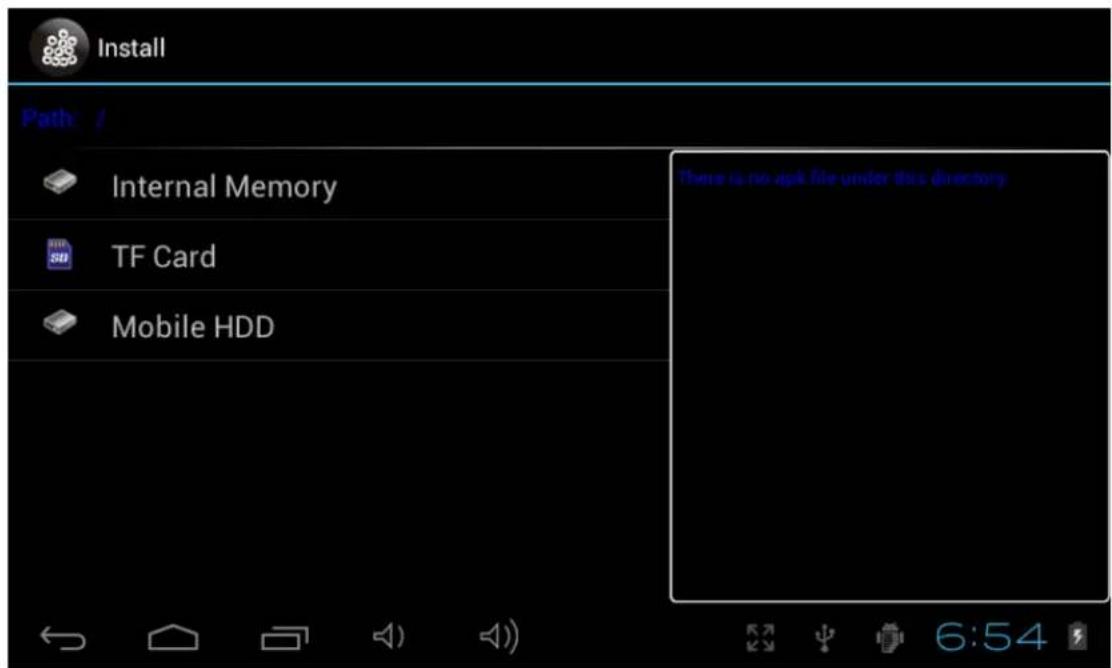
Note: Make sure the .apk file is workable on android 4.0, and the suffix is .apk.
The first time you want to install an app, you need go to Setting>Device Administration>Unknown sources, choose allow installation of non-Market apps, then back to install and follow the guide.
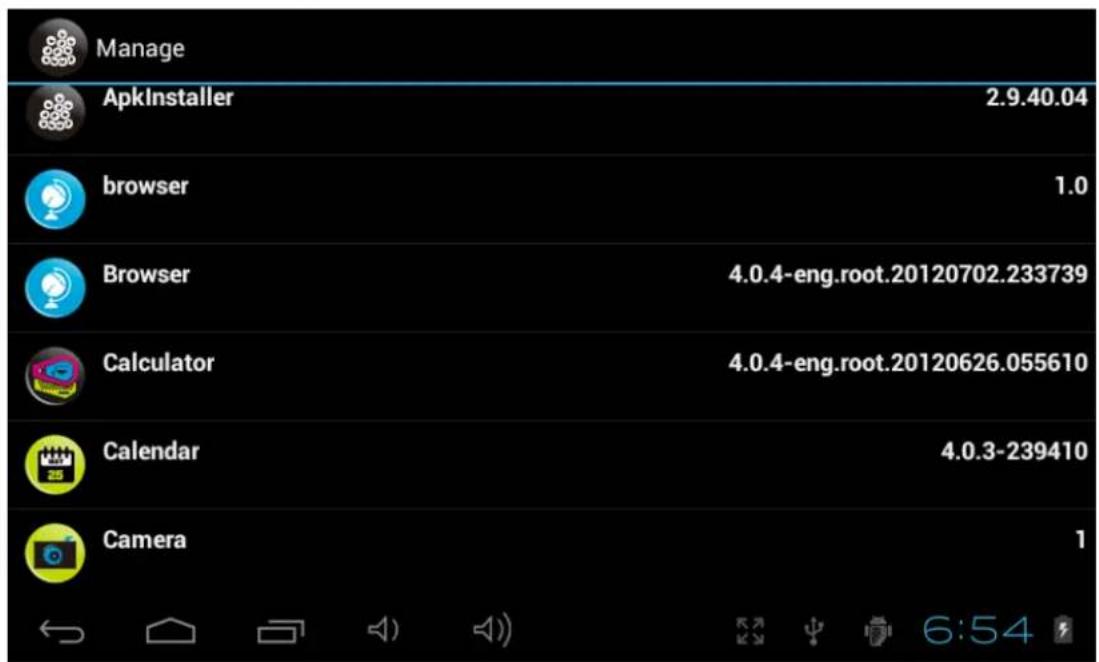
6.1.2 Manage apps
When you want to manage all your apps, Open the 'APKInstaller' → 'Manage' You can launch, export or uninstall the application.
To manage apps, you can also go to "Applications" under "Settings" to manage applications. "Settings" → "Device" → "Apps"
VII. Multi-media Functions
7.1 Music
After loading your music onto your tablet, tap the music icon to launch the music player. You'll be given the option of selecting by Artist, Album, Song, or Playlist. Tap to select. The media player allows you to shuffle, skip, or pause your current selection and even displays the album artwork when available.

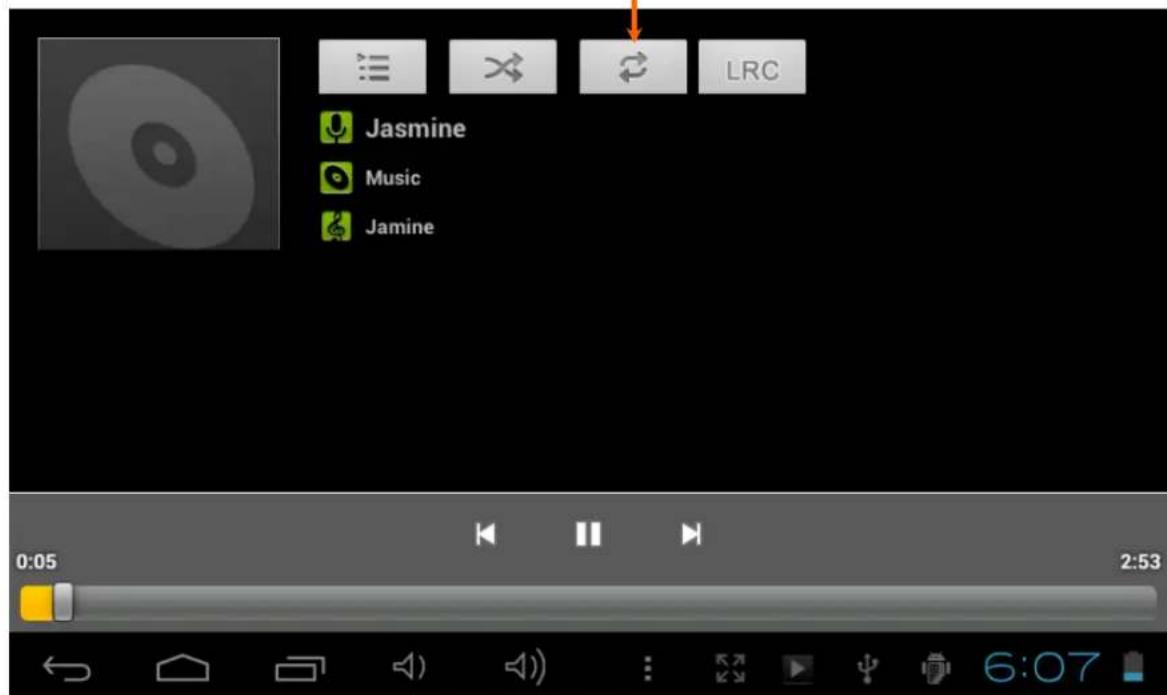
In audio playing mode, tap to get more functions:

7.2 Video
7.2.1 Video Playback
You can play videos stored on your tablet or SD card. Tap Video icon to launch the video player; select the video you'd like to play; found the toolbar along the bottom of the screen to pause or fast forward your video or go to the next video.
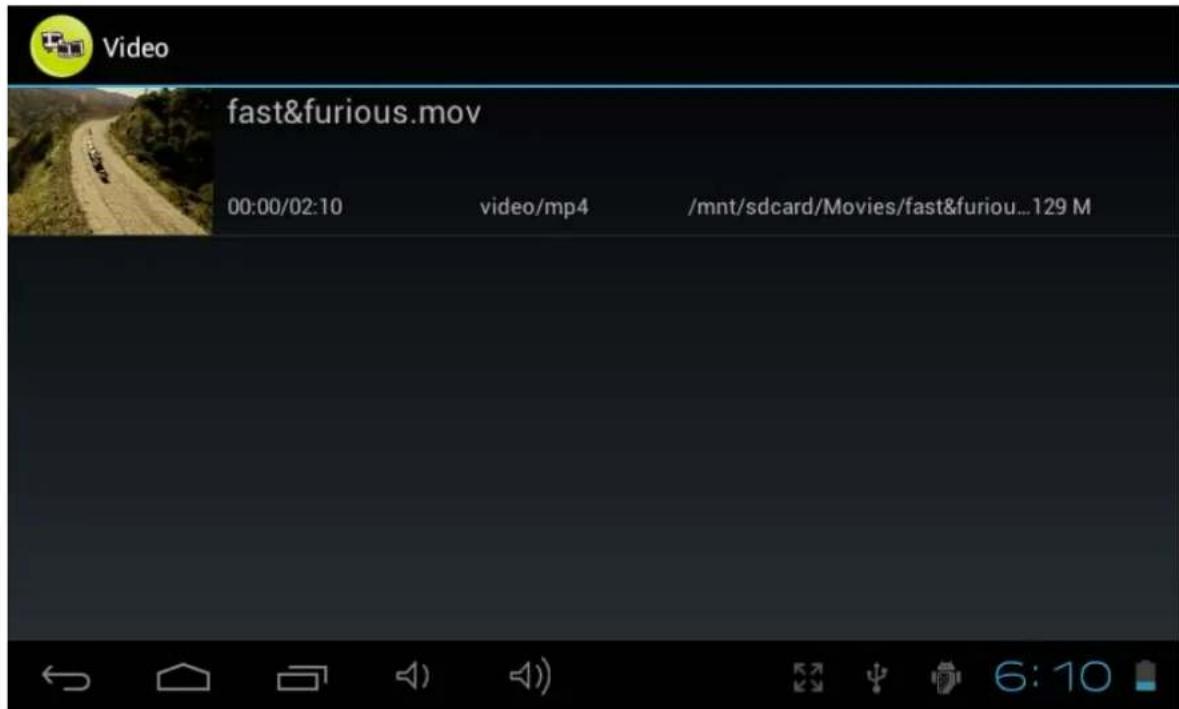

With the Wi-Fi on, you are also able to view on-line flash video.
7.3 Gallery
After loading your media, tap Gallery icon to launch the Gallery. Tap the desired picture to display. To scroll through your collection, tap left or right. By tapping the menu icon, you may delete an image, or share it. You can even set images as your wallpaper.
7.4 Camera & Video
Tap the camera icon in the App Panel to open the camera.
7.4.1 Take photos
Your tablet is provided with a built-in 0.3MP web camera.
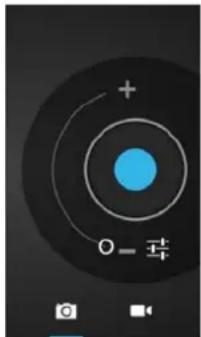
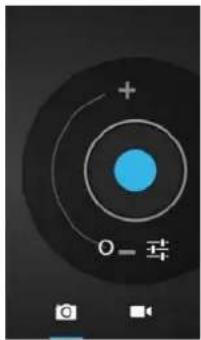
Tap to take photos.
Hold and move the roll ball to focus the camera.
Tap the on the middle side each time for taking a photo.
Tap to enter into camera setting:
Tap "A/W" to adjust white balance; Auto, Incandescent, Daylight, Fluorescent, Cloudy;
Tap "SCN" to choose scene mode: Auto, Night
Tap to choose camera settings: store location, picture size(VGA,OVGA)
Where you view the photos?
You may view the photos you have taken by tapping the tab on the upper right corner. Or you can go to "Gallery" to view the photos.
7.4.2 Video Record
Tap record videos.
Hold and move the roll ball to focus the video.
Tap the on the middle side each time to start recording and tap stop button to stop.
Recorded videos can be viewed in "Video player".
7.4.3 Turn off camera
When camera is on, press the back icon or the ESC key to exit the camera interface.
7.5 E-book reader
The tablet supports many eBook formats such as PDF, PDB, E-Pub, FB2....
Tap the "E-Book" icon to open your book shelves and view your book list. Touch the "EBook" and select a book to read.
VIII. Settings
Tap the "Settings" icon to go to settings menu.
8.1 Wireless & Networks
Refer to III Internet Connection
8.2 Device
Sound settings
The 'Sound' settings contain the media's volume control, selection of notification sounds, Alarm volume, system sounds.
Display settings
Includes brightness, wallpaper, auto-rotate screen (G-sensor), sleep, Font size.
Sleep: 30 seconds, 1 minute, 2 minutes, 5 minutes, 10 minutes or 30 minutes are available. For example, if you select 30 seconds, the display will be switched after 30 seconds of inactivity and screen lock is activated.
Press the 'Power' button to reactivate the Display. Push the 'Lock' button to lift the screen lock.
Storage
Here you can see the current memory usage and available storage
Battery
Here you can view the status of the battery
Apps
Here you can manage your applications
8.3 Personal
Accounts & sync
General synchronization settings:
- Background data
- Automatic synchronization
Account management: Management of user accounts
Location services
Here you can activate the automatic recognition of the location.
Security
Here you can activate or change the screen protection and the password for access to the tablet. Further you can determine if you want to download apps from other sources then the official Android market.
Language & input
Set the system language and input method.
Backup & Reset
Secure my data: Here you can define if different settings should be stored on Google servers.
Touch 'Factory data reset' to reset the device to factory settings.
All settings, self-installed apps and data stored on internal memory will be deleted.
8.4 System
Date & time
If your network does not support automatic setting of time,
you can set the time, time zone and date manually after deactivating automatic settings.
Accessibility
Here you can set the access to the system, text size, the rotation of the screen etc.
Developer options
Here are extra tools for developers.
About Tablet
Here you will find information of the tablet like battery use, version of the software etc.
VIII. Battery

Very Low Battery

Full Battery

Charging Battery
indicates that the power of Battery is full. When the battery level becomes too low, a prompt comes up to note you to charge your tablet.
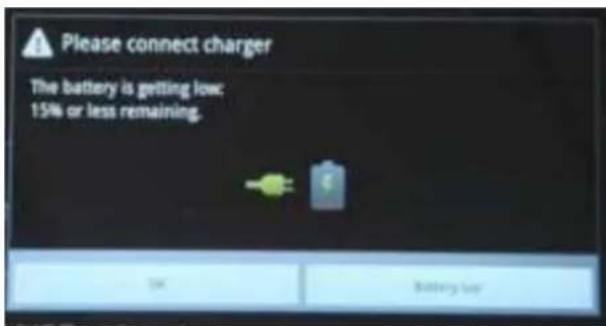
The tablet can be charged with a 5V output DC adaptor when it is on or off.
On the lock screen, the charge status can be found on the upper left corner, as shown below.
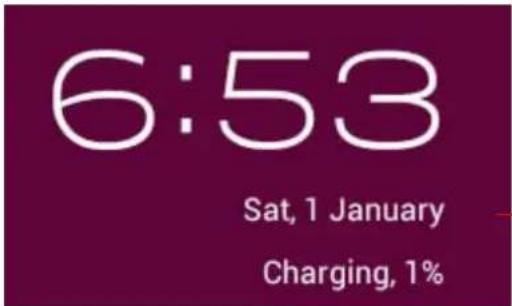
Indicating 1% charged
Troubleshooting
-
Tablet doesn't power ON.
-
Check the tablet's power level, charge it with the adaptor for 2 hours and check again.. Or connect your tablet with your computer via USB cable to see if it can be powered on.
-
No sound from earphone
-
Check if volume is set to '0'. Or earphone may be broken, please change another one.
-
Loud noise from earphones or speaker
-
Check if there is dust in the earphone or speaker. Check if the file is broken.
-
Tablet gets locked and doesn't respond to touch or buttons.
-
Reset your tablet. You can use a pin to stab the reset hole to restart your tablet.
-
Screen drift or unresponsive screen
-
To correct it, you may Go to Settings → Accessibility → Touch panel calibration to calibrate it;
- In case calibration can not be carried out, you may press the power button for about 15 seconds to force the tablet to shut down. Calibration will be automatically done as soon as you start up your tablet again.
-
Use a USB mouse to carry out calibration operations on your tablet.
-
Application not workable
-
Not all Android apps are compatible with all Android devices. If you have downloaded the app try to download it again and reinstall it.
-
How delete a Google account?
-
If an account is added, the account is shown in "Accounts & sync" of "Settings", where you may also add another account. To delete an undesired account, go to "Settings" → "Privacy settings" → "Factory data reset". Your tablet's internal storage, installed apps, etc. will also be deleted, except pre-installed apps and the data in your flash memory. Be careful before you carry out this operation.
Specifications
- Panel: Multi-Touch & capacitance panel 800*480 (16:9)
- Processor: RK2906 1.2GHz
- Ram: DDR3 512MB
Storage Capacity : 4GB
OS: Google Android 4.0 - Camera: 0.3MPX Front
- Speedy Wi-Fi 802.11b/g(TD,WCDMA,EVDO)
- Support 3G dongle
- USB 2.0 port to support OTG function
- Support YouTube up to 720P and HTML5 video playback
- Battery: Li-ion battery 3.7V, 3200 mAh
Adaptor: output 5V 2A DC, input 100~220V AC 50~60HZ - Playback time: Video about 4 hours, Web browsing 4 hours, Music 30 hours,
- Audio file supported: MP3, WMA,WAV, APE,OGG,FLAC, AAC
- Photo file format supported: JPEG, BPM, GIF
Video file support: AVI, 3GP/MP4, RM/RMVB, FLV, MKV, MOV, WMV
Disposal

Electrical and electronic equipment (EEE) contains materials, parts and substances which can be dangerous to the environment and harmful to human health if waste of electrical and electronic equipment (WEEE) is not disposed of correctly.
Equipment, which is marked with the WEEE logo (as shown on the left), should not be thrown away with your household waste. Contact your Local Authority Waste Disposal Department as they will be able to provide details of the recycling options available in your area.

Used batteries are hazardous waste and NOT to be disposed of with the household waste! As a consumer you are legally obligated to return all batteries for environmentally responsible recycling – no matter whether or not the batteries contain harmful substances*. Return batteries free of charge to public collection points in your community or to shops selling batteries of the respective kind.
Only return fully discharged batteries.
- Rechargeable batteries should be charged under adult supervision.
- The supply terminals are not to be short-circuited.
- Used batteries are hazardous waste and NOT to be disposed of the household waste!!
- Return the batteries to your dealer or to collection points in your community.
- Keep batteries away from children. Children might swallow batteries.
Contact a physician immediately if a battery was swallowed.
- Check your batteries regularly to avoid battery leakage.
- Batteries shall not be exposed to excessive heat such as sunshine, fire or the like.
- CAUTION: Danger of explosion if battery is incorrectly replaced
C
Ingo Devices assumes no responsibility for any errors that may appear in this manual.
Due to our continuous improvement, Ingo Devices reserves the right to change without notice, product offerings, specifications and compatibility.
www.ingodevices.com
PRÉFACE 45
ATTENTION 45
Contenu. 46
YcTpaHHeHHeNCnPaBHOCTeI 193
TexHuueckue xapaKmepucmuu 194
YTNIN3ALIN 194
ПРЕДИСЛOBVE
БлагорамьмВасяпокуг STORО палшETHORO kOMMbIOTepa.Cnomоцью daHHORO yCTpoiCTBaHa 6a3e Android 4.0 BbIMoKTeBЛIObOM MeCTe CnyuATb My3bIKy, CMOTpeTBnIDeo,ПользOBaTbCS INTEpHETom,IrpaTbИ pa6OtaTb C TBICaYe ПиLOXKeHni.
Ipeed nCnoJb3OBaHnem yCTpOJCTBa npOHTte daHHoe pyKOBoDCTBO noJb3OBaTeJIy I COxpaHnte ero dJaNbHeJWeRo nCNoJb3OBaHnra. DaHHoe pyKOBoDCTBO npEIOCTaBNT Bam BcIO Heo6XODMyU INOpMauHIO dJa TORO, UTo6bl Bbl NOnHOmep Mepe MOrII HacnaKDaTbcra BO3MOxHOCTaMn 3TOrO yDNBtEnbHO rpoDyKta.
3TOT pIaHHeTHbI KOMbIOTep BkIIOHaET B c6e DTeckn 6pay3ep. IporpaMa JbIeTcE dINHCTBeHHbIM CnOCOBom nOlyeHnA DOCTyNa B INTEpHET N COePxNt fNlbTp POInTeNbCKoro KOHTPOJIa, KOTOpBIM MOXHO BkIIOuATb N OTKIOUaTb B IIO6oe BpeM (C NOMoCbIO napOra PoDInTeNbCKOTo KOHTPOJIa, KOTOpBIM He CJIeDuYeT COo6uAtb DeTAM).
BkIoueHbI pOHTeJIbckn KOHTpOB nMeET 6eIbI cncOK pa3peUeHHbIX caITOB, KOTOpBIE dETN MOrYT nOceuATb. EcNI dEtN nonbIaTcra NocETnTb caIT, He BXODaIIM B cncOK pa3peUeHHbIX, PIIaHWeTHbI KOMNbIOTeP 3abNOKpyet DoCTyn I NOKaXET COoBSeHne O TOM, YTO caIT 3abNOKnpOBaH.
No ymoJauHIO fHKcua POINTeJIbCKOrO KOHTPOJr OTKJIuOyeHa, NO3OMy BHIMaTeJIbHO npouTIne 3TO pyKOBOdCTBO dIra TORo, YTO6bl yCTaHOBnTB Heo6xOIMMbIe HAcTPOJKn BaWero npanAHWEthoro KOMNbIoTEpa, nepeI TEM, kak DaTb erO BaWM dETAM.
Mbl hactoTeIbHo peKomeHnyem Bam n3MeHnTb yCTaHOBHeHHbI no yMOJIaHIO npOJIb poIteJIbCKOrO KOHTpOJIa (1234) BO BpeM nePBoTo IcNoJIb3OBaHnY yCTpoiCTBa.
BHUMAHNE
- ΘTOT npodykt He yBnIeTcN irpyuKoN.
-ДерхиTe yctpoiCTBO BdaIи OT xNkOcTeи nbIи.
He noDBepraTe nCTOuHnKn, 6n3Kne K nnaHseTy nn 3apAHOmy yCTPOIcTBY, BO3DeIcTBnIO npa nn BODbl.
He 6epnte npanweT nn 3apndoe yctpoNCTBO MOKpbIMn pykam. 3TO MOKET npNBecTN K nopaxeHIO 3JNEKTpUneCKM TOKOM nn CTaTb npuHHoB BHyTpEHHero N3HOca. - I36eAte cnIbHbIX yIapOB ycTpoIcTBa O IIO6yIO NOBepxHOCTb. 3TO MOKe TpINBeCTN K cepBe3HbIM IOBpeKdEHNm I daKe Bbl3BaTb C60I CnCTeMbI, YTO MOKe CTaTb PpUHHoN K BO3rOpAHnIg BaTapeu nn daKe ee B3pbIbA.
He noDBepraTe yCTPOiCTBO BO3DeIcTBnIO 3KCTpeMaJIbHbIX TeMnepaTyp IIN ee paIkaJIbHbIX nepenaIOB.
- Iprn nCnoJb3OBAHn HayuHKOB CnUHKOM BbICOKa rPOMKocb MoKeT npNBecTu K NOBpeXdEHNcIyxa. Ipeed noKnUoyHeHem HayuHKOB yBeDNTecb, YTO yPOBeHb rPOMKoCTNuBJIeTCr Hn3KmM.
He otknouaTe nnaHweT BO BpeM aOpMaTnpOBaHn, 3arpy3Kn i cKaunBaHn, 3TO MOKeT npBecTu K nporpaMMhBIM Own6kam.
He pa3bpaIte nHaHwet camocToTeNbHO He nCNoB3yIe aNkoRoi, 6eH3n Hnn pactBOpHTeJIb dIra OYNCTK erO NOBepXHOCTNI.
He nCnoJIb3yIte yCTpoIcTBO B npOceCE BOKDeHnMaUINbI INI npOryJKN.
- Планшет HeяВЯгетсуCTОчBBIM K BlaRe n BOde. loxaynCTa, He nCnoJb3yIte erO Bo BnaJHOcpe.

IpoDOnJxntbHoe npocnyuBHaHne nopTaTnBHorO My3bKaJIbHorO nHeepa Ha noNHO rPOMKoCTn MoKeT npNBecTn K NOBpeXdEHNIO cLyxa NoIb3OBaTeTn.
CODEPXAHNE
3TOT npOdyKT noCTaBnEeTc r npedyctaHOBJenHNo 4-ri ce30H Monster High 3nn3oDbI TB (Ha 6ppaHcy3ckOM n IcpanhckOM y3bikax) n KHNr (Takke Ha 6ppaHcy3ckOM n IcpanhckOM y3bikax). B Cnyae, ecn cdeNaTb c6poc 3Toro KOHTeHTa, 6yDyT notePraHbl.
Knauuu u yHKuu


99.Питане:КорOTKOeHAжатneakTNBnpyeTBXOD/BbIXODИЗСЯцeropeЖIMa;ДОЛROeHAжатneВTeueHne3ceKHyD BKIIQUaET/БblIKIQUaETПNTAHne;ДОЛROe
- Minkpofoh
- CBeToIIOHbI INHdNkATOp: RopNT BO BpEma 3apAdkn.
- KhoNka BbIXOa (ESC): kopoTkoe haxaTne
Haxatne B TeueHne 8 cekyHd BbINOJIHReT c6poc
- Cnot Kaptbi namrtn MicroSD
- Pa3bem Дя Hayшнков
- Pa3bem Дял Зардноустбгва: Bheшпee поклюецн e Зардому устpoистby (напраж. 5В пост. тoka)
- MmHn USB-nopT: NopT dIy npepaun daHHbIX c NOMOu bI npIaeraMoro USB-ka6eJra
- USB-nopT: BHeuHn nopT dIЯ ПОДКЛЮЧЕнЯ USB-akceccyapOB (3G MоДeMa, МыSiN I T.D.)
BbINOJIHReT Bo3BpaT K npeIbIyUeMy 3KpaHy
108.ΓpOMKoCTb +: yBeJIuHcHHe rPOMKOcTn
109.ΓpOMKOCTb::ymeHbUeHne ΓpOMKoCTn
110.Передniaкамера:камера 0.3MPx
111.EmKoCTHbIcHcOpHbI 3KpaH c noDepXko5-ToueyHbIX npNKOCHOBeHn
112.ДинhamNK
I. Hauano pa6ombl
1.1 BkIIOueHne/ByIKIOueHne
1.1.1 Bключени
Дя Вкюець Нжима Te 6onee 3 ckyHd Ha KhoNky BkIoueHn, paCnoLoXeHHyO c6oky
B HnKHe yactn rnaBHO rkaHa Bb hainTe KhoNk HabnraCm n ctpoky coCToHn.

-Bo3BpaT:нжмITEДЯВОЗВpaTaКпрдушемУэкраHy.БыноггТужeФункию,ЧToИ KhoIGNka ESC.
-Главhoe MeHIO:празмОДOCТунК ГлавHOMу 3KpaHy
- PocneHne onepaun: HaxmTe, YTObI NOJyHTb DOCTyn K MeHIO HeDaBHO OTKpbITbIX npJIOXeHn. PpJIOXeHn, OTKpbITbIe NocJeDHMn, OTo6paXaOTcR nepBBIMN.
- -POMKoCTb::HaxMITEIyMeHbUeHnIgPOMKOCTN
-Зкразн (настоюкma Macштаба зкрази):стадгьй зкрази, полььй зкрази в ржимеростяжени, полььй зкрази в ржиме macштабa
4:51 - Ctpoka coctoHna: HaxMnte IJn Bbl3Oba cTpOKu yBeDomIeHn. OHa noka3bIbAeT
DaTy, BpeM, COCTOHNe NOKIOUeHnK INHTepHeTy, COCTOHNe 6aTapeN, CtaTyc HacTpoE (Wi-Fi, ABTOMATueckn IOBOPOT 3KpaHa, RpKOCTb, rPOMKOCTb)
B JIeBOM BepxHem yrny rnaBHoro 3KpaHa haoTcBaun npJIOKeHn:

- NaheJI npINOxKeHn: HaxMnte, YTO6bl npOCMOTpeTB BCE npINOxKeHHa.
LcKn IcNoJIb3OBAHn DaHHbIX: TeKUcN IcKN IcNoJIb3OBAHn, N3MeHeHne IcNKJa
Cm. pa3dJIeN 3 "PoiKJIIOUeHne K INHTepHeT"
8.2 YcTpoIcTBO
Hac trokkn 3Byka
Hactpoikn 3Byka BkIouaIoT B c6bpepyIaTOp rPOMKocTN dJa MeHaΦaIIOB, Bbl6Op 3BykoB yBeDOMJIeHNI, CnHaN 6yDnIbHnKa, CNCTeMHbIe 3ByKn.
HactpoynK3KpaHa
BkIIOUaIOT IApKocTb, 06oN, ABTOMaTIueCKn IOBOPOT 3KpaHa (G-ceHCop), cPAnu peXIM, cPAnu peXIM, pa3Mep uPnΦTa.
CnAun peXm: 30 ceKHyd, 1 MNHyTa, 2 MNHyTbI, 5 MNHyT, 10 MNHyT nII 30 MNHyT. HanpImep, ecnn Bbl Bbl6epTe 30 ceKHyd, 3kpaH 6yJeT BblKnIOuATbcra NocJIe 30 ceKHyd 6e3deJCTBnA cakTNBn3aunne 6JIOKNPOBkn 3kpaHa.
ДлгTOrO,чTo6blakTINBnPoBaTb3KpaH ChOBa,HaxMnteHa KhoNky BkIIOUeHnY.ДлгСнТиь 6лoknрOBkn 3kpHaHaXmnteHa KhoNky"БлoknpoBka".
XpaHeHne
3deBbMOKeTe yBnDeTb TeKyuee IcNoJb3ObaHne namrtn KOnuYeCTBO CBOoDHoro MeCTa.
Batapea
3deBb MoKeTe NOCMTpeTb COCTOHNe aKkMyJlAToPA.
PpInloxKeHnA
3deBb MoKeTe ynpaBnTb npINOKeHnA M.
AkkayHTbI cHxpoHn3aζη
06üne hactpoiKn cHxpoH3aun:
- Mo6nJIbHbIe daHHbIe:
2.ABTOMaTnuecka CnHXPOHn3aCnA
YnpabneHne akKayHTamn: ynpabneHne yyeTHbIMN 3aIncarM Nolb3OBateJe
CepBncbl onpeJeHnMa MeCTOnoJoxHeN
3deBb MoKTe BkJIIOHTb aBTOMaTNUeCKoe ONpeJeHHe BaUero MecToHaxOxKeHnA.
Bé3onachocTb
3deBbMOKeTe BKNIOHTb NIN N3MeHNTb 3aunTy 3KpaHa N napOJb dJa DoCTyNa K nIahWeTy. TaKke Bbl MOKeTe OnpedeJIInTb, XOTNe JIN Bbl 3arpykaTb npINOKeHnA I3 dpYnx nCToHnKOB, KpOME ophiuaNbHorO Android Market.
J3bIK nCnocO6 BVbOa
YcTaHOBka Ra3bIka CnCTeMbI MeToDa BBOda.
Pe3epBHOe KOnnpoBaHne n c6poc
3aunTb mon daHHbIe: 3decBbl MoKeTe pa3peWntb coXpaHeHne
Baunx Hactpoek Ha cepbepax Google.
Bo3MOxHocTn Ia pa3pa6OToNKOB
3decb HaxoJrTcI DOnOJIHHTeJIbHbIe IHCTpyMeHTbl IJra pa3pa60TuKOB.
O nlaHwete
3deBbHaJeTe HOpMaUo O PnAHeTe, TaKyO KaK NcNoIb3OBaHne 6aTapeN, Bepn nporpaMMHOrO oBeCneueHn r T.D.
IX. Bamapej

Aa aaaee 1 1 1 1 1 1 1 1 1 1 1
Jlll lllllllllllllll
Jy
yjyj:
i 1
()
J 15
JbV 200 V.
5.1
aegaae aee aee aee aee aee aee aee aee aee aee aee
1yds
7.4.1
. 0.3
yblayy
1rds
yblaiy y 5
1yolSly12c!
"AAW"
"SCN"
(OVGA.VGA)
yss
yJaiy 1
J 1
7.4.2
y
a
a
"1
7.4.3
1
7.5
. .FB2, E-Pub, PDB, PDBFiai jyI yI iIyI yI yI yI yI yI yI yI yI yI yI yI yI yI yI yI yI yI yI yI yI yI yI yI yI yI yI yI yI yI yI yI yI yI yI yI yI yI yI yI yI yI yI yI yI yI yI yI yI yI yI
VIII.
1 1
2.1
1
aill 1 aalil l g s gssg jaiy i y d y bllg ll g s gssg g
30 10 5 1234567890
30 30 30 30
ailll jssll aew ayell sll plsln ae jae liis
yjblll lla joc li kay
Lii
jssiell 3j12: jlll
y
y
Jy
i 1
y
aaii iiaai

- PREFACE
- WARNING
- CONTENT
- KEYS AND FUNCTIONS
- GETTING STARTED
- 1.1 TURN ON/OFF
- 1.1.1 TURN ON
- 1.1.2 TURN OFF
- 1.2 LOCK/UNLOCK THE SCREEN (SLEEP MODE)
- 1.3 CONNECT TO PC VIA USB CABLE
- HOME SCREEN
- 2.1 BUTTONS & STATUS BAR
- 2.2 OPERATIONS ON HOME SCREEN
- 2.2.1 ADD APP ICON TO HOME SCREEN
- 2.2.2 DELETE APP ICON FROM HOME SCREEN
- 2.2.3 SET HOME SCREEN WALLPAPER
- 2.2.4 FIND YOUR RECENT OPERATIONS
- PROGRAM MENU
- CALCULATOR
- NETWORK CONNECTION
- 4.1 WI-FI
- 4.1.1 TURN ON WI-FI
- 4.1.2 TURN OFF WI-FI
- 4.1.3 DATA USAGE
- 4.1.4 MORE: VPN, PORTABLE HOTSPOT, MOBILE NETWORKS
- CHILDREN BROWSER
- 5.1 PARENTAL CONTROL INTERNET BROWSER
- 5.1.1 BROWSER MAIN INTERFACE
- ADDRESS BAR
- GO BUTTON
- NAVIGATION ICONS
- 5.1.2 PARENTAL CONTROL SETTINGS
- TAP
- INSTALL AND MANAGE APPS
- 6.1 INSTALL AND MANAGE APPS
- 6.1.1 INSTALL APPS
- 6.1.2 MANAGE APPS
- MULTI-MEDIA FUNCTIONS
- 7.1 MUSIC
- 7.2 VIDEO
- 7.2.1 VIDEO PLAYBACK
- 7.3 GALLERY
- 7.4 CAMERA & VIDEO
- 7.4.1 TAKE PHOTOS
- WHERE YOU VIEW THE PHOTOS
- 7.4.2 VIDEO RECORD
- 7.4.3 TURN OFF CAMERA
- 7.5 E-BOOK READER
- SETTINGS
- 8.1 WIRELESS & NETWORKS
- 8.2 DEVICE
- SOUND SETTINGS
- DISPLAY SETTINGS
- STORAGE
- BATTERY
- APPS
- 8.3 PERSONAL
- ACCOUNTS & SYNC
- LOCATION SERVICES
- SECURITY
- LANGUAGE & INPUT
- BACKUP & RESET
- 8.4 SYSTEM
- DATE & TIME
- ACCESSIBILITY
- DEVELOPER OPTIONS
- ABOUT TABLET
- TROUBLESHOOTING
- SPECIFICATIONS
- DISPOSAL
- C
- ПРЕДИСЛOBVE
- BHUMAHNE
- CODEPXAHNE
- KNAUUU U YHKUU
- HAUANO PA6OMBL
- 1.1 BKIIOUEHNE/BYIKIOUEHNE
- 1.1.1 BКЛЮЧЕНИ
- 8.2 YCTPOICTBO
- HAC TROKKN 3BYKA
- HACTPOYNK3KPAHA
- XPAHEHNE
- BATAPEA
- PPINLOXKEHNA
- AKKAYHTBI CHXPOHN3AΖΗ
- CEPBNCBL ONPEJEHNMA MECTONOJOXHEN
- BÉ3ONACHOCTB
- J3BIK NCNOCO6 BVBOA
- PE3EPBHOE KONNPOBAHNE N C6POC
- BO3MOXHOCTN IA PA3PA6OTONKOB
- O NLAHWETE
- BAMAPEJ
- 5.1
Brand : INGO
Model : Tablet 7
Category : Tablet