
MADLPRETROMKII - Turntable MADISON - Free user manual and instructions
Find the device manual for free MADLPRETROMKII MADISON in PDF.
| Product type | Turntable |
| Brand | Madison |
| Model | MADLPRETROMKII |
| Power supply | AC adapter (included) |
| Playback speeds | 33 1/3, 45, 78 RPM |
| Main functions | Vinyl playback, Bluetooth, USB/SD, AM/FM radio, vinyl to USB/SD recording |
| Connectivity | Bluetooth, AUX input, RCA outputs (L/R), USB, SD/MMC |
| Speakers | Built-in with grille |
| Radio | AM/FM with manual tuning |
| Auto stop | Yes, switchable (ON/OFF) |
| Recording | Direct from vinyl to USB flash drive or SD card |
| Maintenance and cleaning | Clean with a damp cloth. Do not use abrasive products. |
| Stylus replacement | Yes, every 3-4 months of continuous use |
| Safety | Do not use near water. Unplug during storms or prolonged inactivity. |
| Spare parts | Replaceable stylus (diamond) |
| Included accessories | AC adapter, rubber feet, 45 RPM adapter, dust cover |
| Feet | Removable for use on furniture or flat surface |
| Dust cover | Included, removable |
Frequently Asked Questions - MADLPRETROMKII MADISON
User questions about MADLPRETROMKII MADISON
0 question about this device. Answer the ones you know or ask your own.
Ask a new question about this device
Download the instructions for your Turntable in PDF format for free! Find your manual MADLPRETROMKII - MADISON and take your electronic device back in hand. On this page are published all the documents necessary for the use of your device. MADLPRETROMKII by MADISON.
USER MANUAL MADLPRETROMKII MADISON
natural_image
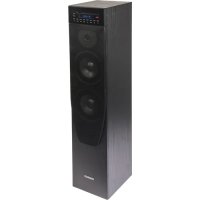
Vintage portable radio with open lid and black legs (no visible text or symbols)MAD-LPRETRO-MKII (10-5560MA)
User Manual
Imported from China by LOTRONIC S.A. Av. Z. Gramme 9 – B-1480 Saintes
Safety instructions
- Read, follow and keep these Instructions for future reference.
- Do not use this apparatus near water.
● Clean only with a damp cloth. - Do not block any of the ventilation openings. Install in accordance with the manufacturer's instructions.
- Do not install near nay heat sources such as radiators, heat registers, stoves, or other apparatus (including amplifiers) that produce heat.
- Protect the power cord from being walked on or pinched particularly at plug, convenience receptacles, and point where they exit from the apparatus.
- Only use attachments/accessories specified by the manufacturer.
● Use only with a cart, stand, tripod, bracket, or table specified by the manufacturer, or sold with the apparatus.
● Unplug this apparatus during lighting storms or when unused for long periods of time. - Refer all servicing to qualified service personnel. Serving is required when the apparatus has been damaged in any way, such as power-supply cord or plug is damaged, liquid has been spilled or objects have fallen into the apparatus, the apparatus has been exposed to rain or moisture, does not operate normally, or has been dropped.
● This mains plug is used as the disconnect device, the disconnect device shall be readily operable.
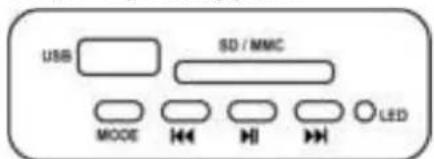
Description
- Cover
- Cartridge
- Tone arm lift lever
- Speed selection(33/45/78)
- Handle
- Legs
- Speaker grill
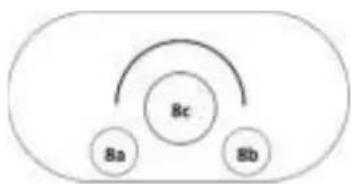
- AM/FM radio system
8a. Input selector AM/FM/BT/PHONO
8b. ON/OFF Volume control
8c. Frequency tuner
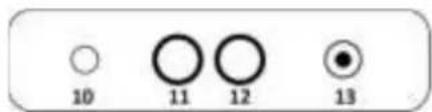
-
Platter
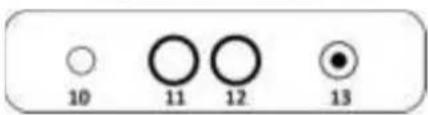
-
AUX input
- Line out Right channel
- Line out Left channel
- DC power jack
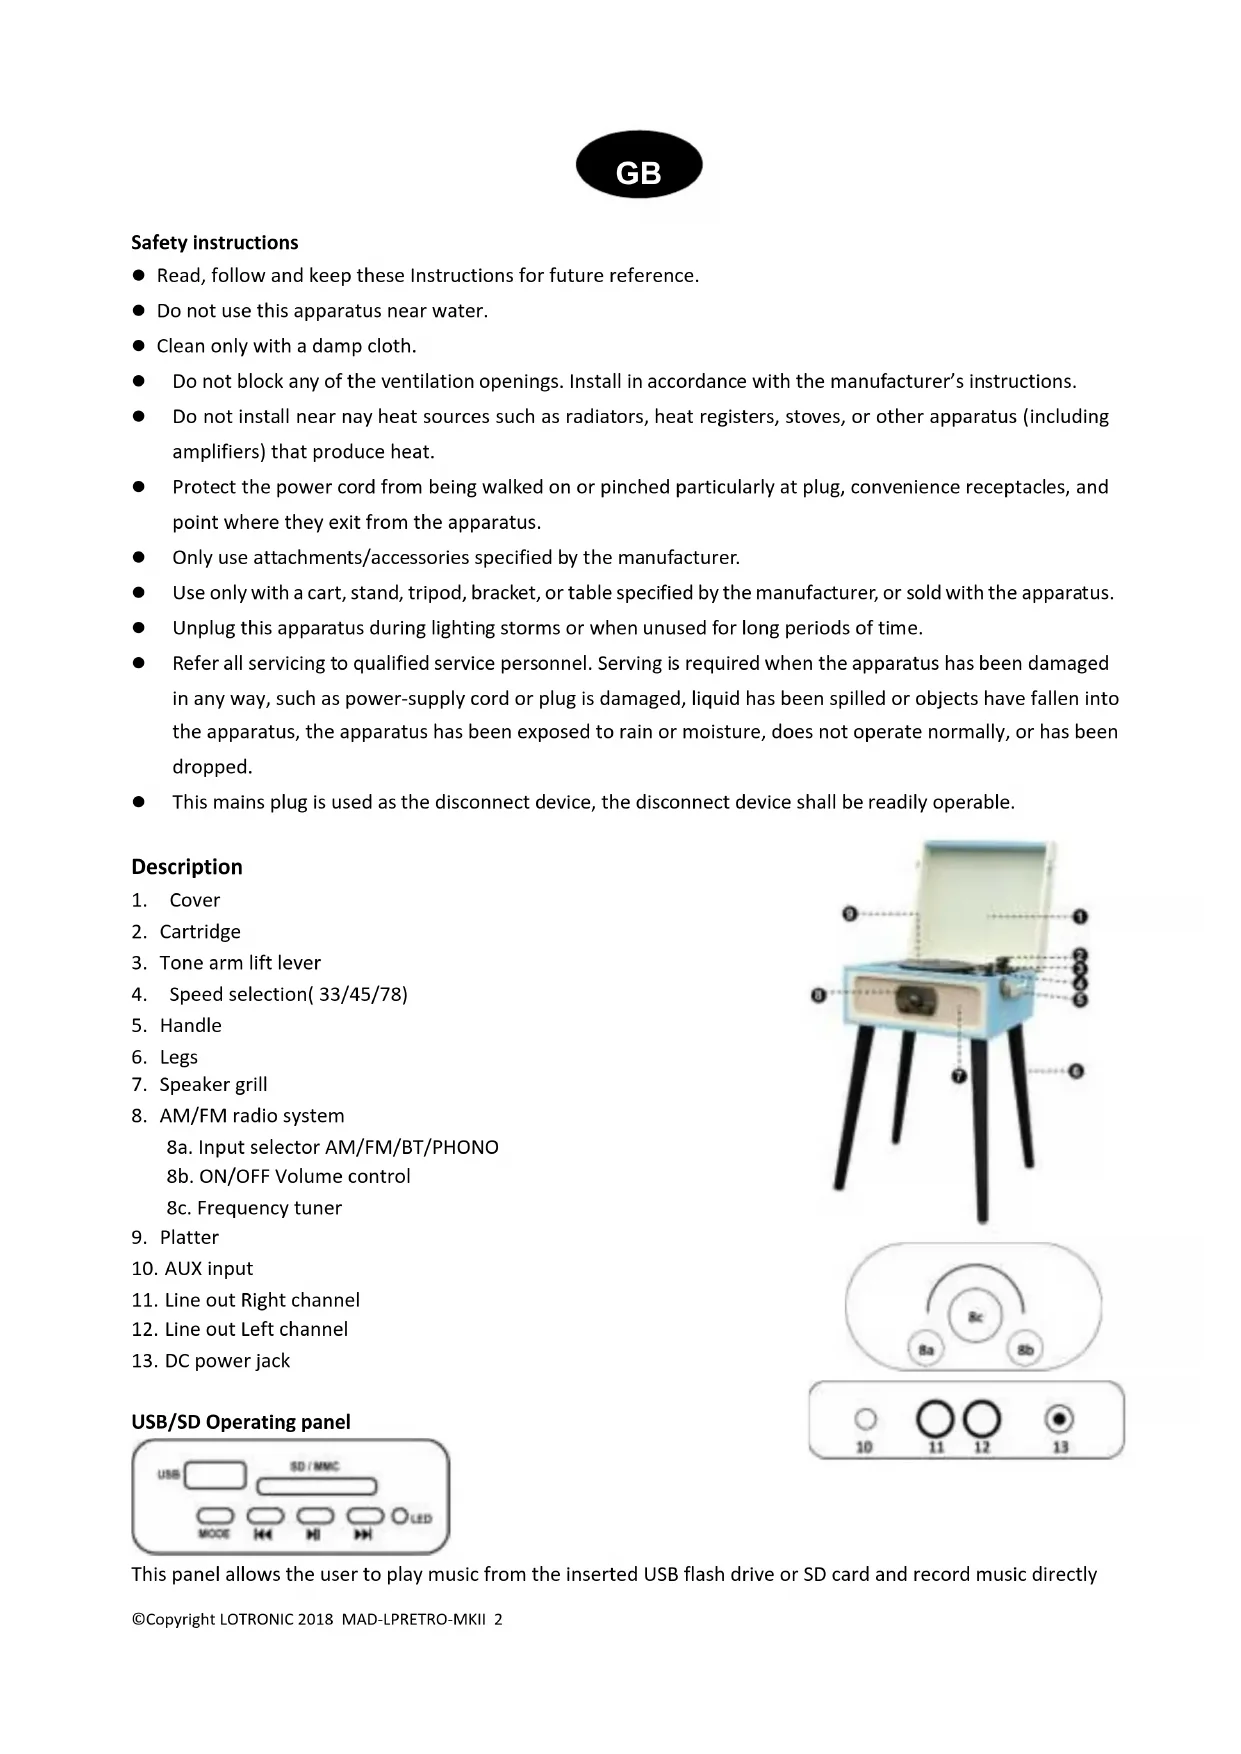
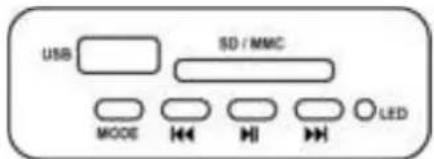
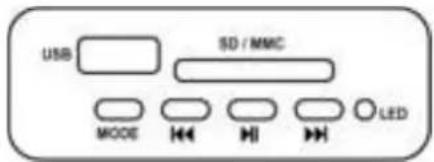
USB/SD Operating panel
This panel allows the user to play music from the inserted USB flash drive or SD card and record music directly
from the vinyl or AUX input.
: play previous track
▶: Play next track
MODE: Short press to cycle between USB/SD & BT
▶: Short press to play or pause. Long press to delete the current music. In REC mode, press to stop recording.
BT control:
When the tone arm is in rest position, the Bluetooth function is selected automatically until you press the MODE button to change between USB/SD and BT.
Remarks:
- If a USB stick or an SD card was already inserted when the unit is switched on, the music from USB or SD card will be played automatically. Press the Mode button if you wish to change into Bluetooth mode.
- To delete the current music from USB or SD card, keep the Play/Pause button pressed until the music stops playing.
- When playing a vinyl disk, keep the MODE button pressed for at least 3 seconds to start recording. Press the Play/Pause button to stop recording.
- To play the recorded file, put the tonearm back to the armrest. The music will be played automatically from USB or SD card. Then press Mode button again, the recorded file will be played.
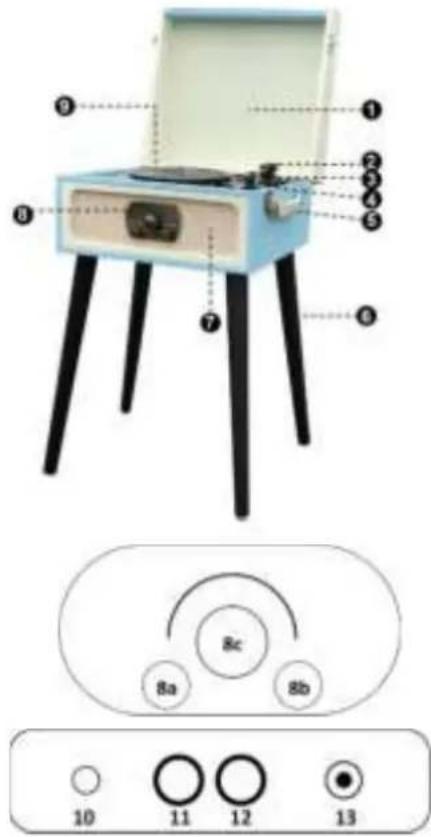
ATTACHING THE LEGS
The turntable comes with its own legs so it can stand alone. Alternatively, the legs can be removed and it can be placed on an existing table or shelf.
To attach the legs to the turntable, screw each individual leg to the metal plate on the rear of the unit. See diagram below for more details.
NOTE: If placing the turntable on a surface, attach the included rubber feet.
natural_image
Close-up of a black cylindrical object with a hexagonal base and internal components, against a red background (no visible text or symbols)POWER CONNECTION
Connect the supplied DC power adapter to the DC socket (13) on the rear panel and the other end into an appropriate mains outlet.
AMPLIFIER CONNECTION
Connect audio plugs to the input on your mixer or amplifier:
● Red plug into right channel input.
● White plug into left channel input.
Playing a record
- Open the latches on the side of the unit and lift up the id. Make sure that the arm support is secured.
- Remove the protective cover from the stylus cartridge.
- Place the record of your choice on the turntable. If it is a 45rpm, do not forget to place the adaptor on the record spindle.
- Choose the desired playing speed using the Speed select switch between 33.3, 45 and 78rpm.
- Turn on the rotary power switch of the turntable. Please note that this button also controls the volume.
-
Release the tone arm lock.
-
Raise the arm using the cue lever and place the stylus vertically over the first track of the record. The turntable will start turning automatically.
-
Use the cue lever to slowly place the stylus down onto the record's groove.
-
When the record comes to the end, the turntable will stop automatically if the auto-stop switch is on the ON position. If it is in the OFF position, the turntable will continue to spin.
Note: If your record stops before the last track finishes, set the AUTO STOP switch to OFF. Your record will now play to the end, but you will have to stop the turntable rotation manually.
Auto Stop
- When a record finishes playing, it can be controlled by the auto-stop ON/OFF switch.
- Lift up the tone arm and put it on the rest when finished.
- Replace the protective cap on the stylus and close the tone arm lock.
- Turn off the power at the mains.
Bluetooth Function
Set the input selector on BT/PHONO position.
Lift up the tone arm and put it on the rest. Then the BT function is ready for pairing.
Open your Bluetooth equipment and select MAD-LPRETRO in the list of found device.
In this mode, the turntable mode will stop automatically.
Radio Function
Set the input selector on AM or FM position.
Rotate the tuning dial on the desired radio station.
MAINTENANCE
REPLACING THE STYLUS
-Refer to the figures 1-8
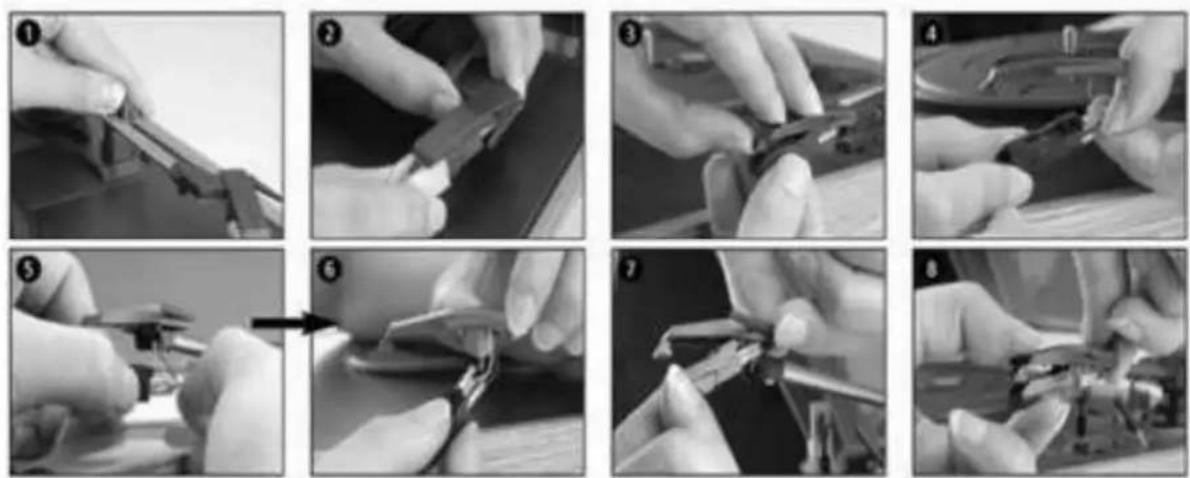
- Push the arm lock to release the tone arm.
- Take off the cap of the cartridge to access the needle.
-
Separate slightly the cartridge from the socket.
-
Unplug the audio wire from the cartridge.
To fit a new cartridge, repeat process 3 & 4 in reverse order.
Note: Please be extremely careful whilst performing this operation so as to avoid damaging the tone arm and audio line wires. The Turntable's cartridge needs to be replaced every 3 – 4 months after continuous playing.
Notes:
When you transport your turntable, don't forget to place the protective cap on the stylus and clip the tone arm on the arm rest.
| Problem Solution | |
| The unit will not power ON. Make sure the unit's power cord is connected to an appropriate electrical outlet. | |
| There is no sound. Rotate the POWER/VOLUME knob clockwise to increase the volume. | |
| The vinyl record will not play. Make sure you have selected the correct speed (33 1/3, 45 or 78 RPM). | |
| Nothing will play via the AUX OUT connection. | Make sure the cable is firmly connected and check that your external device is clean and undamaged. |
| There is no sound via the Stereo RCA port. | Make sure the cable is firmly connected to the turntable and to your amplifier or other device. |
| Check the volume on your amplifier or other device. | |

Electric products must not be put into household waste. Please bring them to a recycling centre. Ask your local authorities or your dealer about the way to proceed.

natural_image
Close-up of a black mechanical component with a hexagonal base and internal components, against a red background (no visible text or symbols)CONNEXION SECTEUR
USB/SD Bedienfeld
natural_image
Close-up of a black cylindrical object with a diamond-shaped opening, attached to a red background (no visible text or symbols)STROMANSCHLUSS
natural_image
Sequence of eight black-and-white photos showing hands using pliers to adjust or install a mechanical component, no text or symbols visible.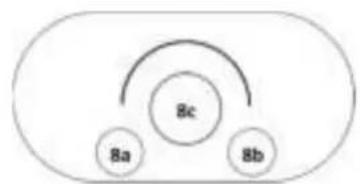
flowchart
graph TD
    A["8a"] --> B["8c"]
    C["8b"] --> B["8c"]
    B --> D["End"]
USB/SD Bediendeel
natural_image
Close-up of a black cylindrical object with a metallic connector, against a red background (no visible text or symbols)©Copyright LOTRONIC 2018 MAD-LPRETRO-MKII 15
flowchart
graph TD
    A["Bc"] --> B["Ba"]
    A --> C["Bb"]
natural_image
Close-up of a black mechanical component with a hexagonal base and metallic fittings, against a red background (no visible text or symbols)CONEXIUNEA LA ALIMENTARE
natural_image
Close-up of a black mechanical component with a hexagonal base and internal components, set against a red background (no visible text or symbols)POVEZAVA NAPAJANJA
natural_image
Close-up of a black mechanical component with a metallic housing and mounting holes, against a red background (no visible text or symbols)ALIMENTAÇÃO
- Consulte as figuras 1-8

natural_image
Close-up of a black mechanical component with a metallic housing and internal components, set against a red background (no visible text or symbols)CONEXION A LA CORRIENTE


- Safety instructions
- Description
- BT control:
- Remarks:
- ATTACHING THE LEGS
- POWER CONNECTION
- AMPLIFIER CONNECTION
- Playing a record
- Auto Stop
- Bluetooth Function
- Radio Function
- MAINTENANCE
- REPLACING THE STYLUS
- To fit a new cartridge, repeat process 3 & 4 in reverse order.
- Notes:
- CONNEXION SECTEUR
- USB/SD Bedienfeld
- STROMANSCHLUSS
- USB/SD Bediendeel
- CONEXIUNEA LA ALIMENTARE
- POVEZAVA NAPAJANJA
- ALIMENTAÇÃO
- CONEXION A LA CORRIENTE
Brand : MADISON
Model : MADLPRETROMKII
Category : Turntable