
MUZ6FW4 - Meat Grinder BOSCH - Free user manual and instructions
Find the device manual for free MUZ6FW4 BOSCH in PDF.
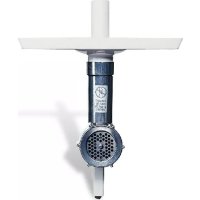


| Product type | Meat grinder (food processor attachment) |
| Brand | Bosch |
| Model | MUZ6FW4 |
| Compatibility | Bosch food processors with mixing bowl and protective lid |
| Material | Plastic (funnel, housing) and metal (auger, blade, disc) |
| Power supply | Powered by food processor motor (position 4 recommended for grinding) |
| Recommended speed | Position 4 for grinding; positions 1-3 for dough, grating, sausages |
| Capacity | Domestic use, standard culinary quantities |
| Main functions | Grind cooked meat, bacon, poultry, fish; optional accessories: pasta, coulis, shortcrust pastry, grating, sausage filling |
| Safety | Breakaway zone protecting the motor in case of overload; do not insert fingers into funnel; use only with protective lid |
| Care and cleaning | Funnel and pusher dishwasher-safe; other parts hand-washed and dried immediately; grease blades and discs with food-safe oil |
| Spare parts and repairability | Replacement breakaway zone available (Bosch after-sales); additional perforated discs MUZ7LS2/LS3/LS4; optional kits MUZ7NV1, MUZ7FV1, MUZ7SV1, MUZ7RV1, MUZ7WS2 |
| General information | User manual included; not for commercial use; subject to modifications |
Frequently Asked Questions - MUZ6FW4 BOSCH
User questions about MUZ6FW4 BOSCH
0 question about this device. Answer the ones you know or ask your own.
Ask a new question about this device
Download the instructions for your Meat Grinder in PDF format for free! Find your manual MUZ6FW4 - BOSCH and take your electronic device back in hand. On this page are published all the documents necessary for the use of your device. MUZ6FW4 by BOSCH.
USER MANUAL MUZ6FW4 BOSCH
Always follow the operating instructions for the base unit!
This appliance is designed for processing normal quantities of food for domestic use and is not suitable for industrial use.
Mincer attachment for processing raw or cooked meat, bacon, poultry and fish.
Safety Information
The mincer attachment must be completely assembled before use. Never assemble the mincer attachment on the base unit.
Before attaching/removing the mincer attachment, wait until the drive has come to a standstill and pull out the mains plug.
Operate the mincer attachment in the indicated operating position only.
Never use the mincer without the perforated disc and threaded ring.
While operating the appliance, never reach into the filling shaft, use the pusher to push in the ingredients. Risk of injury from sharp cutting discs!
Keep children away from the appliance.
Predetermined breaking point
The built-in predetermined breaking point protects the drive from damage.
The coupling part on the worm gear breaks if an overload occurs (e.g. bones fed in by mistake) and protects the appliance from damage.
Spare part available from customer service.
Overview
Please fold out the illustrated pages
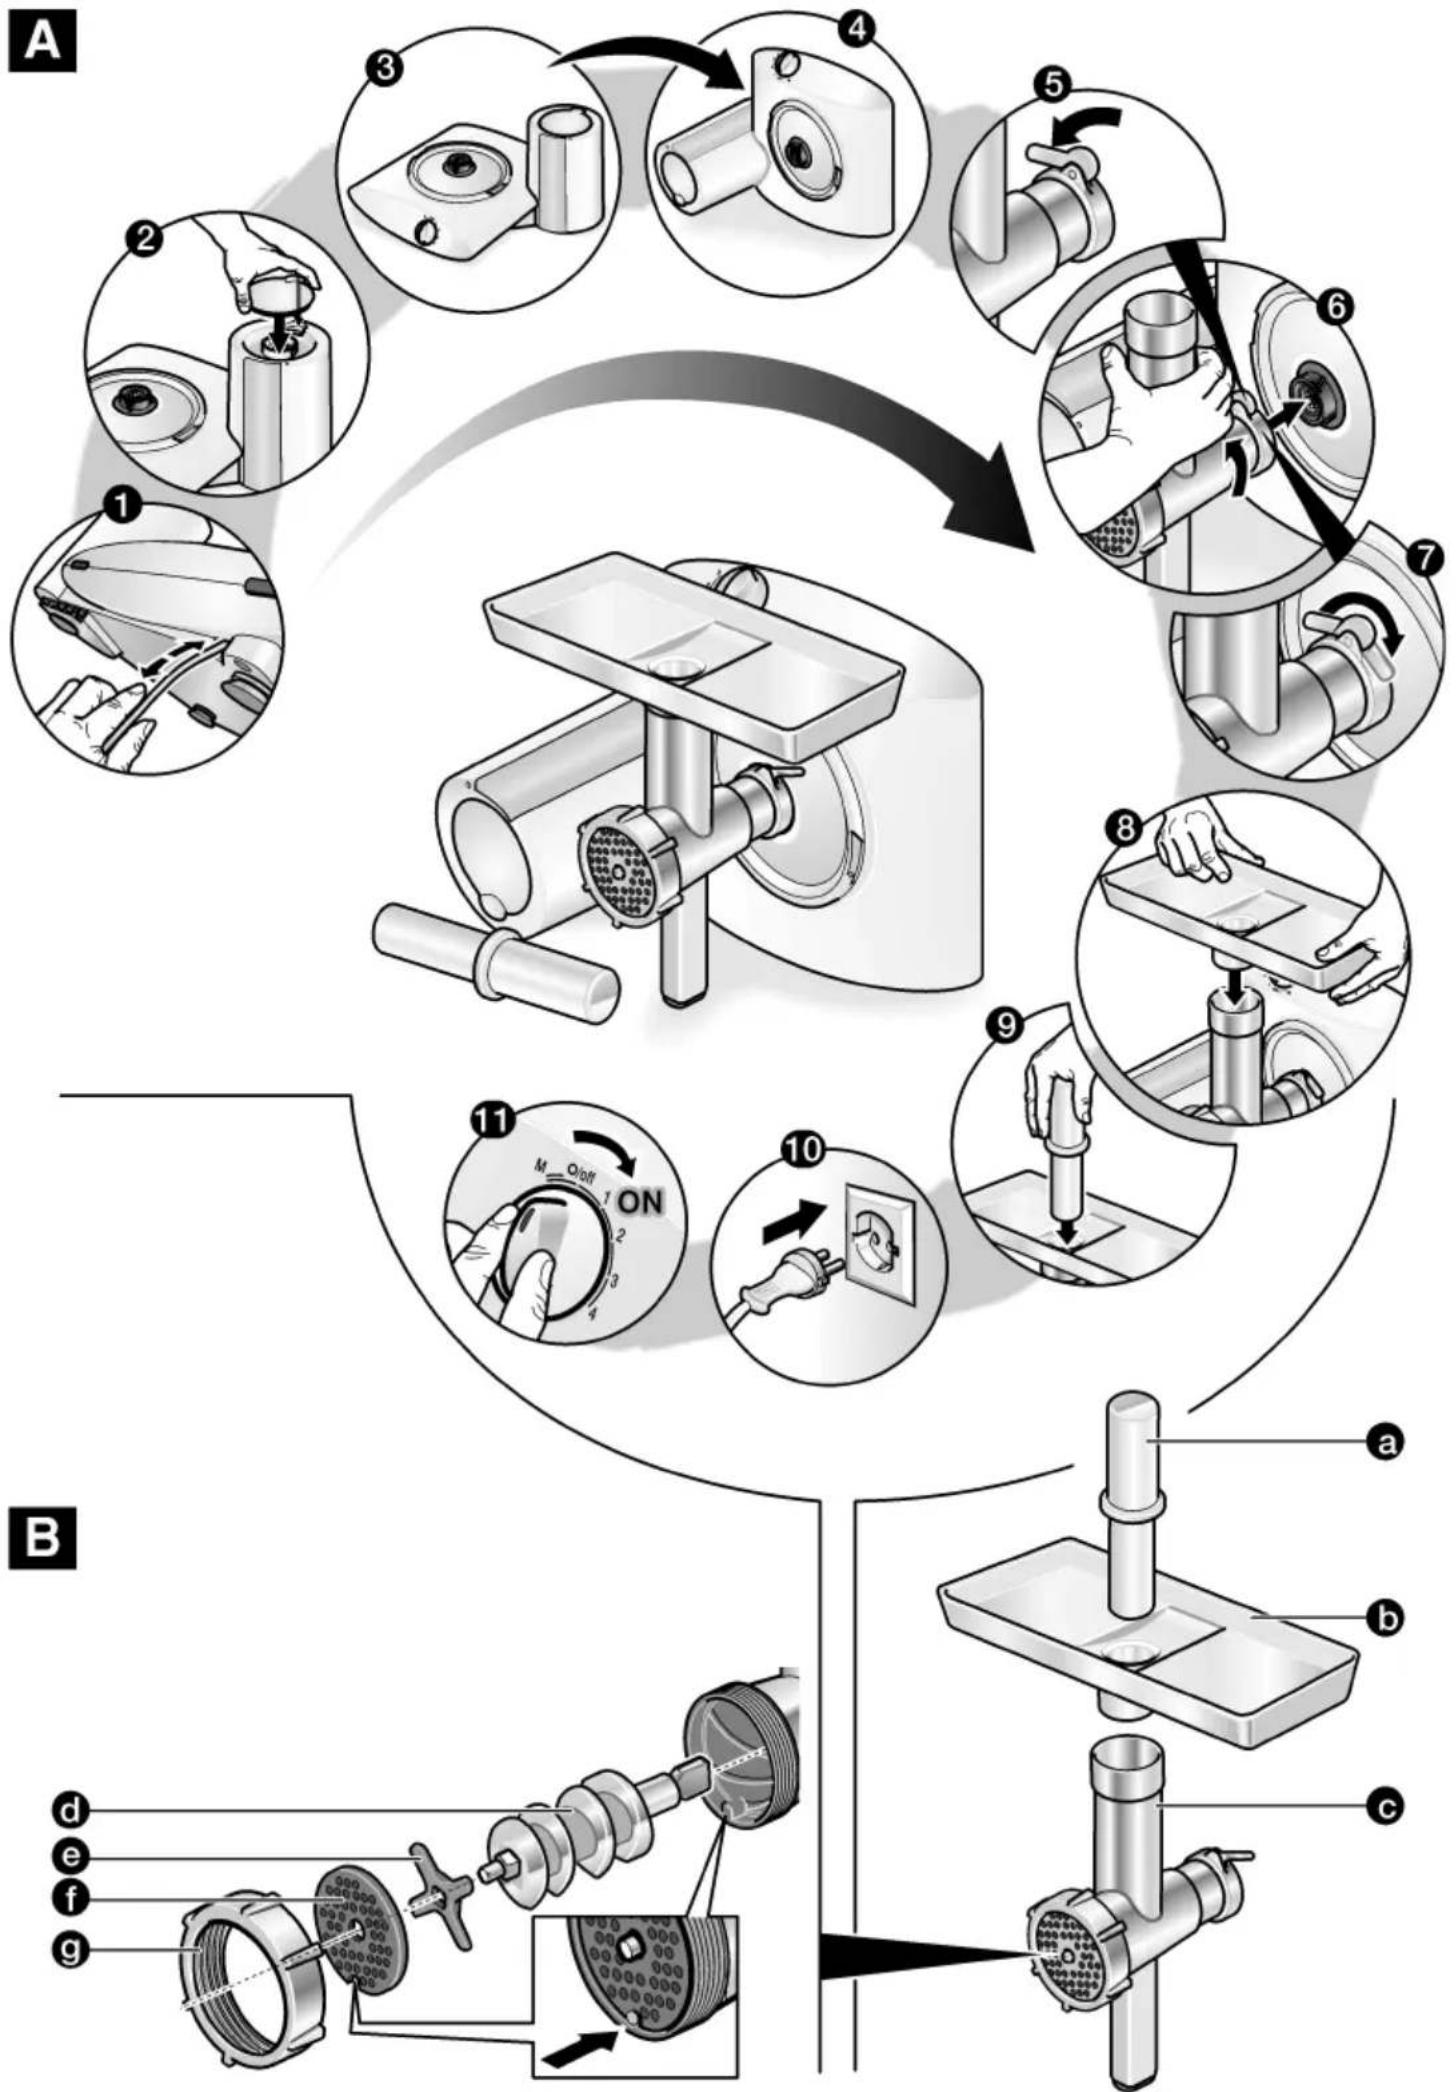
Figure B
a Pusher b Filler tray c Housing with locking lever d Worm gear e Blade f Perforated disc g Threaded ring
Operating the appliance

Important information
The appliance cannot be operated with the mincer attachment until the protective cover is placed on the blender drive.
- Thoroughly clean accessories before using for the first time, see "Cleaning and care".
Fig. A
Assembling the mincer attachment
- Insert worm gear d into the housing c.
- Insert blade e with the edges towards the perforated disc f.
- Insert perforated disc f.
- Attach threaded ring g but do not tighten fully.
Securing the attachment to the base unit
- Place the appliance on its back as indicated.
- Open the locking lever (Fig. A5).
- Place the mincer attachment, with the foot pointing downwards, on the drive for the bowl and throw the locking lever.
- Firmly screw on the threaded ring.
- Attach the filling tray.
- Insert the pusher into the filling shaft.
Operating the appliance

- Place a bowl or plate under the outlet opening.
- Place the food to be processed in the filling tray.

- Use the pusher to push in ingredients.
- Set the rotary knob to setting 4.
After using the appliance
- Switch off the appliance with the rotary switch. Pull out the mains plug.
- Open the locking lever (Fig. A5) and remove the mincer by screwing it off the appliance.
- Disassemble the mincer attachment (in reverse sequence to assembly). Clean parts.
Cleaning and servicing


Filling tray and pusher are dishwasher-proof.
Wash all other parts by hand and dry immediately (not dishwasher-proof).
Lubricate dried perforated disc and blades with cooking oil to protect against corrosion.
Optional accessory
(available from dealers)
Perforated disc sets MUZ7LS2/LS3/LS4
Pasta attachments made of metal MUZ7NV1
Fruit press attachment MUZ7FV1
Figure C
for pressing e.g. berries, tomatoes, apples, pears, rosehips (cook rosehips for 1 hour before pressing).
Extracted fruit pulp is especially suitable for making jam.
- Preparation as described for mincer attachment. Note required individual parts and sequence when assembling the fruit press attachment.
- First undo the fastening screw as far as is required to allow the pulp to flow out while still moist.
- Then adjust the fastening screw until the pulp flows out with the required moisture.
- Place the food to be processed in the filling tray. Use the pusher to push in ingredients.
- Set rotary knob to setting 4.
Biscuit attachment MUZ7SV1
Fig. D
for shaping biscuit dough or short pastry.
- Preparation as described for mincer attachment. Note required individual parts and sequence when assembling the biscuit attachment.
- Place the dough to be processed in the filling tray. Use the pusher to push in ingredients.
- Set rotary switch to setting 1, 2 or 3.
- Separate the shaped dough coming out of the appliance with a pastry cutter. Briefly switch off the food processor if the dough comes out too quickly.
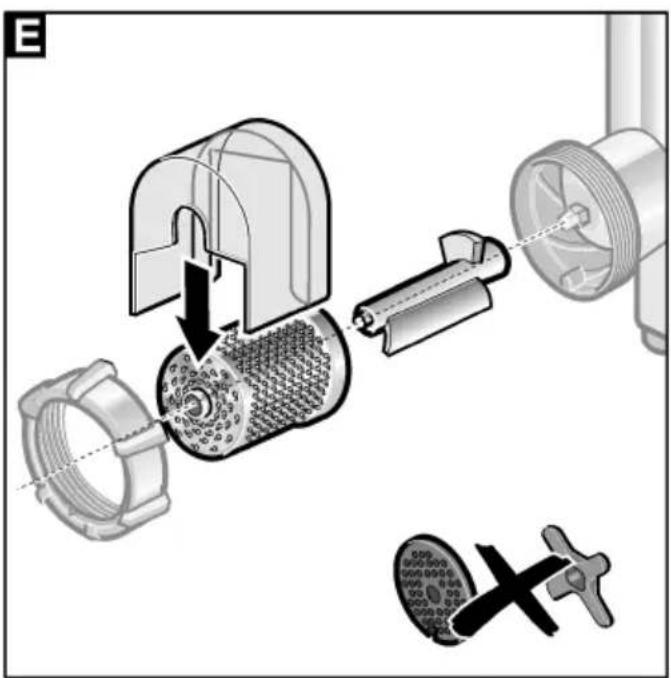
Grating attachment MUZ7RV1
Fig. E
for grating almonds, nuts, cooled chocolate and dried bread or rolls.
- Preparation as described for mincer attachment. Note required individual parts and sequence when assembling the grating attachment.
- Place the food to be processed in the filling tray. Use the pusher to push in ingredients.
- Set rotary switch to setting 1, 2 or 3.
Sausage filler set MUZ7WS2
Fig. F
for filling all types of sausage, for shaping croquettes.
- Preparation as described for mincer attachment. Note required individual parts and sequence when assembling the sausage filler set.
- Place the food to be processed in the filling tray.
- Use the pusher to push in ingredients.
- Set rotary switch to setting 2, 3 or 4.
Fig. B
Contact.
Work with the attachment-meat grinder.
Self-indication of working position
Never use the meat grinder
without the grid and the screw attachment: clean the accessories,
During work never bounce and support >
for pressure, for pressure
use the device for
and pressure. Danger of pulling the attachment
Concentrate. Meat grinder
Do not allow parts to be inserted before the guard is in place in the housing
Automatic blocking
- Insert the knife with the cutting edges facing the grid f.
Turn the grid f.
- Insert the screw attachment g
The device is protected against splashes.
The protective cover prevents accidental operation.
Adjustments during operation (for example,
when you accidentally release the lever
the protective cover closes
immediately.
Reserve parts can be ordered
for servicing.
- Place the device on a flat surface,
as shown.
- Open the charging socket (Fig. A5).
- Place the measuring attachment with the hook on the front edge for the bath and the lowering device for adjustment.
- Tighten the screws well.
- Place the hose for draining.
- Place the cap for intake and support always for draining.
Work area

Danger of injury
Turn the tools/ sharp edges
During work never turn the hose for draining. Work only with the cap for intake. Change the tools only when the machine is at a standstill. Do not put the knife for cutting.

Danger of electric shock
Before starting work on the device, disconnect the power supply. Contact.
Attention!
Do not use abrasive cleaning agents. Surfaces may be damaged.
The hose for draining or the cap for intake can be put in the machine.
- Place the remaining parts before the head opening, remove them and dry them (not wet).
- Handle the device only as intended, small machine.
Always place it for storage
Dry rack and then press to protect from rust.

Attention!
Do not wash the kokali.
For arrival use the arrival cap. - Place the rotary switch on step 4.
After finishing work
- Disconnect the device from the wall socket.
- Disconnect the plug from the contact socket of the current outlet.
- Open the cover for adjusting the attachment (Fig. A5) and with the upper screw remove the attachment! The attachment from the device. Unplug the attachment (by turning counterclockwise).
- Follow the instructions. The attachment is adjusted to the current outlet of the attachment.
Stop the drive and remove the plug.
From the socket.
The attachment can be used with the first use
Only install it in accordance with the instructions.
Keep the working position of the device as indicated in the section.
Never use the attachment without care.
For the meat grinder, use the pusher.
And the ring with thread.
During operation, never let go of the
hand from the loading chute, the pusher, and the ring on the housing.
When feeding products, use the pusher with the sharp edge
and the pusher. Risk of injury from the sharp disc.
Sharp blades! Install the pusher
Do not let children near the machine or the ring with thread.
device.
Assembly of the meat grinder attachment
Insert the ring into the housing.
Insert the knife with the sharp edge
onto the pusher disc.
- Install the adapter
through the hole
and tighten it, but not to
the specified position
The specified position protects against damage.
Part of the coupling, located on the shaft, breaks under overload (e.g., if the cutter hits an obstacle) and thus protects the combine from damage.
The spare part can be purchased at an authorized service center.
Attaching the adapter to the main
body of the combine
Place the combine on a flat surface as shown in the figure.
- Install the loading adapter and insert the pusher into the loading barrel.
- Using the adapter
Danger of injury from rotating tools/sharp knives

Danger of electric shock!

Danger! Risk of electric shock!
For all types of maintenance work on the household appliance, unplug it from the power outlet.
While the appliance is running, never put your hand into the feed tube. Push products only with the pusher. The attachment can only be replaced after the drive has come to a complete stop. Do not touch the cutting surface of the blade. Wash
Caution!
Do not use abrasive attachments or cleaning agents. The surface of the electrical appliance may be damaged.
Wash the feed insert and pusher in the dishwasher.
- Place the cutting attachment or plate under the outlet. Wash by hand and dry immediately.
- Place the feed insert intended for pre-processing products (if the appliance is equipped with one). The pre-processed products

Attention!
Do not use the meat grinder to grind bones.
The dried, pre-processed products and the knife should be lubricated with vegetable oil to prevent rusting.
Special accessory
- Pushers for products are available in specialized stores. Use the pusher.
- Turn the rotary switch to position 4.
After finishing work
Turn off the mixer using the rotary switch as described in the sections of this instruction manual. For the meat grinder attachment - unplug it from the power outlet. Refer to the safety instructions, open the fixator (figure A5) for operation and maintenance, and remove the meat grinder from the motor unit by turning it. Disassemble the meat grinder attachment (disassembly is performed in the same way as assembly, but in reverse order). - Wipe the parts.
Sets of perforated attachments for the MUZ7S1 and MUZ7LS2/LS3/LS4 models, Figure D
Metal attachments for making jam MUZ7NV1
Fruit strainer attachment MUZ7FV1
Figure C
Intended for straining juice from berries, tomatoes, apples, pears after cooking. Before straining the pulp, it should be boiled for about 1 hour. Use the pusher to push the fruit. The resulting fruit mousse is excellent for making jam. Turn the switch to position 1, 2, or 3. Remove the output dough.
- Preparation for work is carried out in the same way as for the dough mixer attachment. If the dough is too sticky, the strainer attachment should be removed and cleaned. Carefully assemble all necessary parts in the specified order. The grater attachment MUZ7RV1
- First, loosen the wing screw so that the juice can flow out of the strainer, for nuts, cooled, with moisture.
- Then adjust the wing screw so that the moisture content of the resulting juice can be varied according to your requirements, and only for nuts!
- Preparation for work is carried out
- The products are prepared in the same way as for the preparation
- Loading.
- For pushing products in the meat grinder attachment. When assembling
- Use the pusher. To assemble all necessary parts
- Turn the switch to the specified position
- Switch, position 4.
Designed for forming and shaping round sweet shortcrust pastry.
- Preparation for work is the same as for the meat grinder attachment. When assembling, carefully assemble all the necessary individual parts in the specified order. Place the designated dough processing insert into the loading chute. Use the pusher to push the dough through.
Set of attachments for filling sausages MUZ7WS2
Figure F
Designed for filling sausages of any kind, as well as for forming rockets.
- Preparation for work is the same as for the meat grinder attachment.
- When assembling the sausage filling attachment, carefully assemble all the necessary individual parts in the specified order.
- Place the designated food processing insert into the loading chute. Use the pusher to push the products through.
- Set the rotary switch to position 2.3nn4.
Right to make changes
remains.
MUZ7WS2
F
Aolulol 0
1uS u 1du
v 15
y
j 1
1
aai 1
puiuiei 1
∴ 21 1
Jlbs1 Jjzoo jgolsh
1
Jnnn nn nnnnne aannnne ane annnne
Therefore, m : x = 1 or 3x + 4y + 1 = 0
C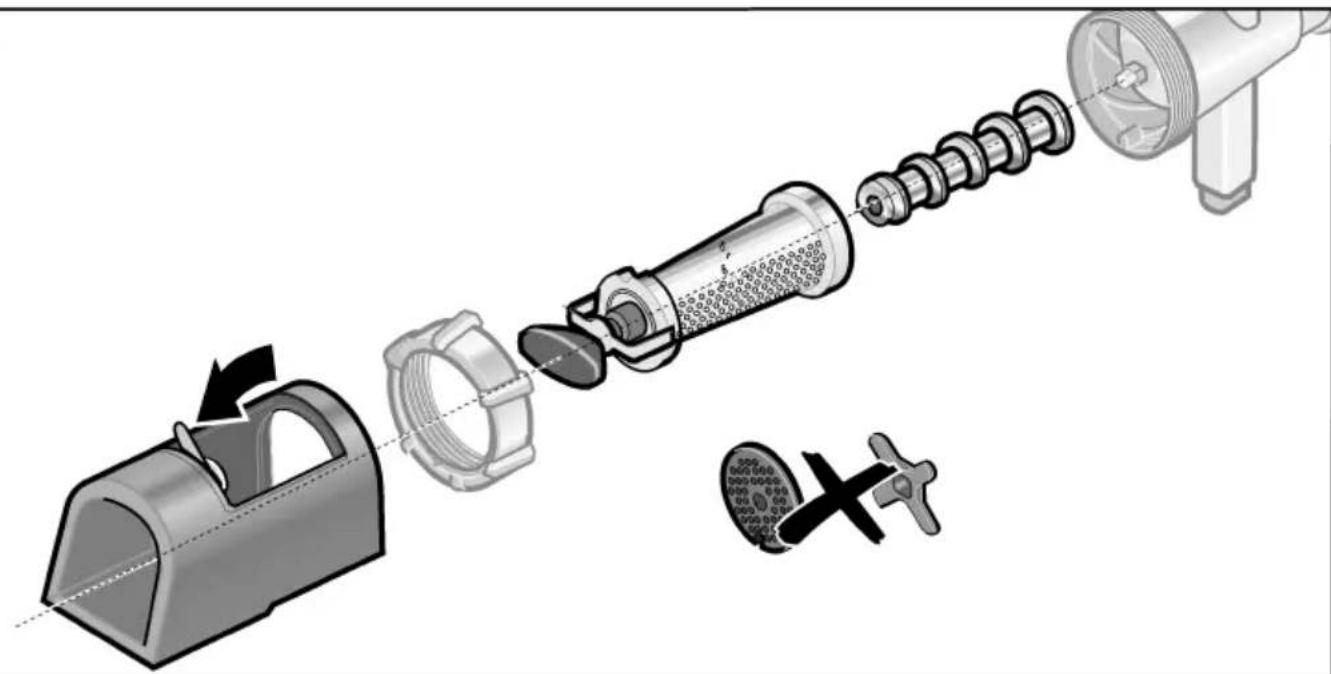
D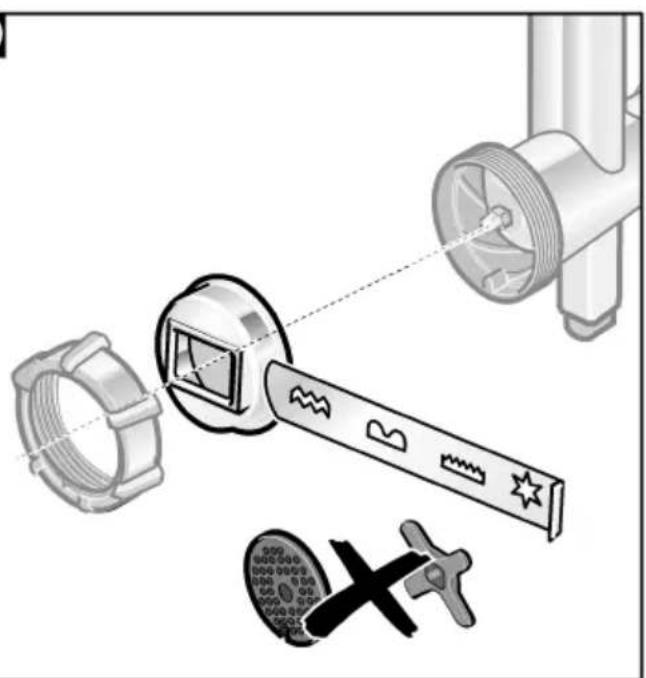
F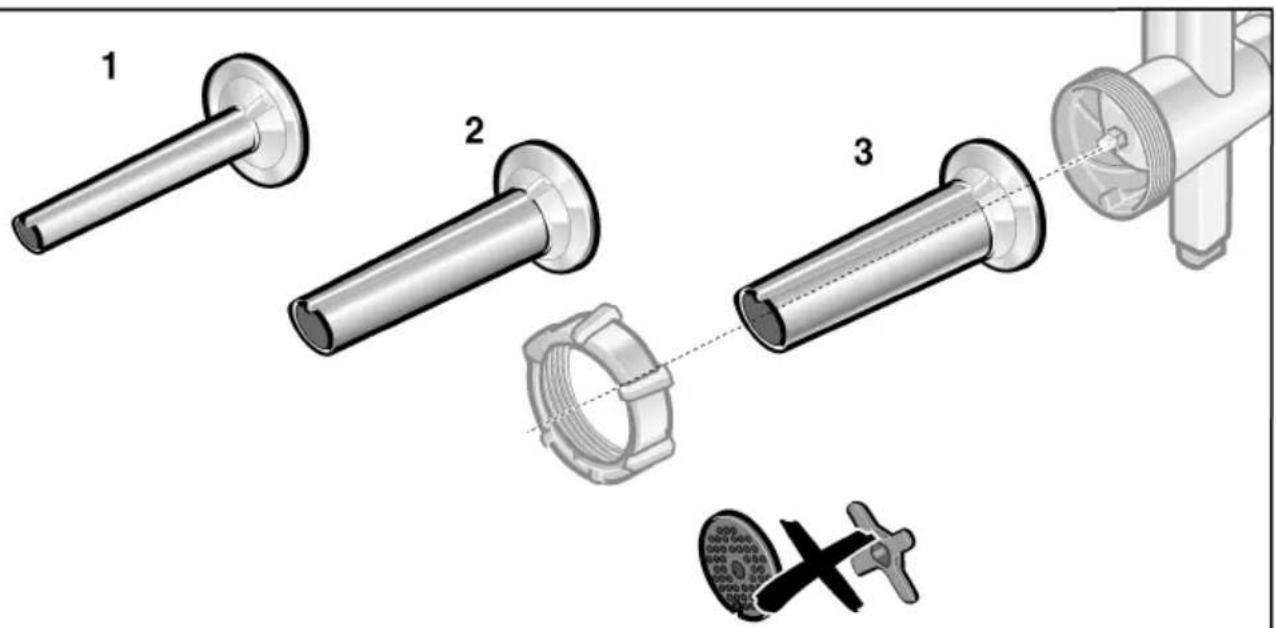



- ALWAYS FOLLOW THE OPERATING INSTRUCTIONS FOR THE BASE UNIT
- SAFETY INFORMATION
- PREDETERMINED BREAKING POINT
- OVERVIEW
- PLEASE FOLD OUT THE ILLUSTRATED PAGES
- OPERATING THE APPLIANCE
- IMPORTANT INFORMATION
- FIG. A
- ASSEMBLING THE MINCER ATTACHMENT
- SECURING THE ATTACHMENT TO THE BASE UNIT
- AFTER USING THE APPLIANCE
- CLEANING AND SERVICING
- OPTIONAL ACCESSORY
- PERFORATED DISC SETS MUZ7LS2/LS3/LS
- PASTA ATTACHMENTS MADE OF METAL MUZ7NV
- FRUIT PRESS ATTACHMENT MUZ7FV
- FIGURE C
- BISCUIT ATTACHMENT MUZ7SV
- FIG. D
- GRATING ATTACHMENT MUZ7RV
- FIG. E
- SAUSAGE FILLER SET MUZ7WS
- FIG. F
- FIG. B
- AUTOMATIC BLOCKING
- WORK AREA
- DANGER OF INJURY
- TURN THE TOOLS/ SHARP EDGES
- DANGER OF ELECTRIC SHOCK
- ATTENTION
- AFTER FINISHING WORK
- ASSEMBLY OF THE MEAT GRINDER ATTACHMENT
- THE SPECIFIED POSITION
- BODY OF THE COMBINE
- PLACE THE COMBINE ON A FLAT SURFACE AS SHOWN IN THE FIGURE
- DANGER OF INJURY FROM ROTATING TOOLS/SHARP KNIVES
- DANGER! RISK OF ELECTRIC SHOCK
- CAUTION
- SPECIAL ACCESSORY
- SET OF ATTACHMENTS FOR FILLING SAUSAGES MUZ7WS
- FIGURE F
Brand : BOSCH
Model : MUZ6FW4
Category : Meat Grinder