
CompactPower MFW3630A - Meat Grinder BOSCH - Free user manual and instructions
Find the device manual for free CompactPower MFW3630A BOSCH in PDF.
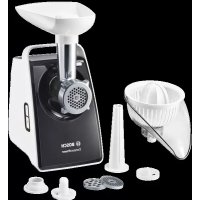


| Brand | Bosch |
| Model | CompactPower MFW3630A |
| Product type | Meat grinder with multi-function accessories |
| Main uses | Meat grinder, sausage stuffer, kibbeh attachment, pasta maker, spritz cookies attachment, grater, citrus juicer |
| Number of speeds | 2 (slow and fast) |
| Reverse function | Yes |
| Power supply | 220-240 V ~ 50/60 Hz |
| Rated power | 1200 W (approx.) |
| Maximum operating time | 10 minutes without interruption |
| Perforated discs included | Fine (2.7 mm), medium (4 mm), coarse (8 mm) |
| Additional accessories | Sausage stuffer, kibbeh attachment, pasta die (spaghetti, tagliatelle), spritz cookies insert, grater with inserts, citrus juicer |
| Overload protection | Drive blade with predetermined breaking point |
| Safety lock | Yes, lock button for assembly/disassembly |
| Maintenance | Clean accessories by hand, wipe the base with a damp cloth, do not immerse the base |
| Blade material | Stainless steel (approx.) |
| Warranty | According to conditions of the country of purchase |
| After-sales service | Bosch customer service, spare parts available |
Frequently Asked Questions - CompactPower MFW3630A BOSCH
User questions about CompactPower MFW3630A BOSCH
0 question about this device. Answer the ones you know or ask your own.
Ask a new question about this device
Download the instructions for your Meat Grinder in PDF format for free! Find your manual CompactPower MFW3630A - BOSCH and take your electronic device back in hand. On this page are published all the documents necessary for the use of your device. CompactPower MFW3630A by BOSCH.
USER MANUAL CompactPower MFW3630A BOSCH
Read and follow the operating instructions carefully and keep for later reference! Enclose these instructions when you give this appliance to someone else.
If the instructions for correct use of the appliance are not observed, the manufacturer's liability for any resulting damage will be excluded.
This appliance is intended for domestic use only. Use the appliance for processing normal quantities of food for domestic use.
The appliance and accessories (depending on the model) are suitable for the following purposes:
Meat mincer: for cutting and mixing raw and cooked meat, bacon, poultry and fish.
Sausage filler: for making sausages and meat rolls.
Kebbe maker: for making dough and minced meat pockets.
Pasta maker: for making spaghetti or tagliatelle.
Whirl maker: for making whirls.
Shredding attachment: for shredding, grating and cutting up food.
Citrus press: for squeezing juice out of citrus fruits.
Food which is to be processed must not contain any hard components (e.g. bones). The appliance should not be used for processing other substances or objects. Additional applications are possible if the accessories approved by the manufacturer are used. Use the appliance only with genuine parts and accessories.
Never use the attachments or slicing / shredding inserts on other appliances. Only use matching parts for the relevant attachments.
Only use the appliance indoors at room temperature and up to 2000 m above sea level. Do not place the appliance on or near hot surfaces, e.g. hobs.
Your work surface should be easily accessible, resistant to moisture, firm, flat, dry and large enough to prevent any harm from splashing and to let you work unhindered.
This appliance can be used by persons with reduced physical, sensory or mental capabilities or lack of experience and knowledge if they have been given supervision or instruction concerning safe use of the appliance and if they understand the hazards involved. Keep children away from the appliance and connecting cable and do not allow them to use the appliance.
Children must not play with the appliance. Cleaning and user maintenance must not be performed by children.
Safety instructions
Danger of electric shock and fire
The appliance may only be connected to a power supply with alternating current via a correctly installed socket with earthing. Ensure that the protective conductor system of the domestic supply has been correctly installed.
Connect and operate the appliance only according to the type plate specifications. Do not use if the mains cable or appliance show any signs of damage. To avoid potential hazards, repairs such as replacing a damaged cable must only be carried out by our customer service personnel. Never connect the appliance to timer switches or remote-controllable sockets. Never leave the appliance unattended while it is switched on! We recommend that the appliance is never switched on for longer than is necessary to process the ingredients.
The mains cable must not come into contact with hot parts or be pulled across sharp edges. Never immerse the base unit in water or place it in the dishwasher. Do not steam-clean the appliance. Do not use the appliance with damp hands and do not operate at no load. The appliance must always be disconnected from the mains after each use, whenever the appliance is unattended, prior to assembly, disassembly or cleaning and in the event of a fault.
Risk of injury
Immediately after using the appliance wait for it to stop. Before fitting or replacing attachments, the appliance must be switched off and disconnected from the mains.
Do not grasp the sharp blades and edges of the shredding and slicing inserts. Keep hands clear of rotating parts. Never reach into the feed chute or outlet opening. Never put the food to be processed into the feed chute with your hands. Only use the pusher provided! Never clean the sharp blades and edges of the shredding and slicing inserts with your bare hands.
Caution! Risk of damaging the appliance
Check that there are no foreign objects in the feed chute or attachments. Do not poke objects (e.g. knives, spoons) in the feed chute or outlet opening.
Only allow the appliance to run uninterrupted for a maximum of 10 minutes. Then switch off and allow to cool down to room temperature.
Important!
It is essential to clean the appliance as described after each use or after it has not been used for an extended period. → “Care and daily cleaning” see page 25
Congratulations on the purchase of your new Bosch appliance.
On the following pages of these operating instructions you will find useful information for safe use of this appliance.
We request that you read these operating instructions carefully and observe all instructions. This ensures you will be able to enjoy this appliance for a long time, and the results will confirm your choice of this appliance.
Retain these operating instructions for subsequent use or for the next owner. You can find further information about our products on our website.
Content
Intended use 17
Safety instructions 18
Overview. 20
Before using for the first time. 20
Control and display elements. 21
Overload protection 21
Speed setting. 21
Reversing function 21
Base unit. 22
Base attachment 22
Shredding attachment 23
Citrus press attachment 24
Care and daily cleaning 25
Recipes 25
Tips 27
Disposal 27
Guarantee 27
Spare parts and accessories 28
Troubleshooting 29
Overview
→Fig. A
1 Base unit
a Drive for attachments b Button I or O/I c Button O or 1·2 | rev d Operation indicator e Release button f Carrying handle g Storage compartment with cover h Mains cable i Cable storage compartment
2 Base attachment
a Housing b Feed chute c Filling tray d Pusher e Worm gear with agitator paddle f Threaded ring
3 Meat mincer insert
a Blade b Perforated disc, fine (2.7 mm)* c Perforated disc, medium (4 mm) d Perforated disc, coarse (8 mm)
4 Sausage filler insert
a Bearing ring b Sausage filler nozzle
5 Kebbe insert*
a Conical ring b Kebbe nozzle
6 Pasta insert*
a Disc for spaghetti b Disc for tagliatelle c Cleaning tool
7 Whirl insert*
a Dough nozzle b Forming disc (rotatable)
→Fig. 3
8 Shredding attachment*
a Housing b Feed chute c Cap d Filling tray e Pusher f Slicing insert g Shredding insert, coarse h Shredding insert, fine i Grating insert
9 Citrus press attachment*
a Collecting tray b Filter insert c Pressing cone d Driving shaft with spring
- depending on the model
The operating instructions refer to different models of the appliance. An overview is provided on the pages that feature the figures. → Fig. M
Spare parts and accessories are
available from Customer Service or at
www.bosch-home.com. → "Spare parts
and accessories" see page 28
Before using for the first time
Before the new appliance can be used, it must be fully unpacked, cleaned and checked.
Caution!
Never operate a damaged appliance!
- Remove the base unit and all accessories from the packaging.
- Remove the packaging material that is present. Dismantle any assembled parts into their individual parts. Do this in reverse order, as described under "Preparation". Check all parts for completeness.
→ Fig. A/B
Inspect all parts for visible damage. Thoroughly clean and dry all parts before using for the first time.
→ "Care and daily cleaning" see page 25
Control and display elements
MFW35...
Button I
Press button I to switch on the appliance. The drive will start up at once.
Button O
Press button O to switch off the appliance. The drive stops.
MFW36../MFW38...
Button O/I
Press button O/I to switch on the appliance. The drive starts running immediately with speed 2 (fast). Press button O/I again to switch off the appliance. The drive stops.
Button 1·2 | rev
Pressing button 1-2 | rev briefly switches the speed of the appliance between 1 (slow) and 2 (fast). → "Speed setting" see page 21
Pressing and holding button 1-2 | rev starts the reversing function. → "Reversing function" see page 21
All models
Operation indicator
The operation indicator lights up when the appliance is switched on. On models with the reversing function the function indicator flashes for as long as the 1·2 | rev button is pressed.
Release button
Press the release button to unlock an attachment fitted on the appliance. Only when the release button is pressed is it possible to turn the attachment clockwise and remove it from the base unit.
Cable storage compartment
The mains cable can be pulled out of the cable storage compartment or pushed back in again. Only ever pull the cable out as much as is required.
Storage compartment
Unused perforated discs belonging to the meat mincer can be kept in the storage compartment and it closed with the cover.
Overload protection
To prevent serious damage to your appliance if the base attachment is overloaded, the agitator paddle has a notch (predetermined breaking point). If overloading occurs, the agitator paddle will break at this point. A new agitator paddle is available from Customer Service (No. 630701). Spare parts with a predetermined breaking point are not covered by our warranty obligations.
Replace agitator paddle

- Release the screw in the agitator paddle with a screwdriver (PH2) and remove the faulty paddle.
- Fit a new agitator paddle and screw tight again.
Speed setting
ONLY MFW36.../MFW38...
Using the speed setting feature, the speed can be set to 1 (slow) or 2 (fast).
Caution!
For certain applications, it is imperative to use speed 1 (slow). Take note of the recommended speeds! See table → Fig.
- Switch on the appliance with button O/I. The appliance will run at speed 2 (fast). Press button 1-2 | rev briefly. The appliance will switch to speed 1 (slow). Press button 1-2 | rev briefly. The appliance will switch back to speed 2 (fast).
Reversing function
ONLY MFW36.../MFW38...
The reversing function is designed to release food that has got stuck by briefly running the worm gear in reverse. The reversing function switches off automatically after 15 seconds.
Caution!
Never press and hold button 1-2 | rev continuously while the appliance is switched on. Only press and hold button 1-2 | rev continuously once the appliance has come to a complete stop.
- Switch the appliance off with button O/I and wait until the drive has stopped. Press and hold button 1-2 | rev. After approx. 5-10 seconds, release button 1-2 | rev and wait for the drive to come to a standstill.
- Switch the appliance on again with button O/I.
Note:
If food that has got stuck is not released by briefly putting the appliance into reverse, switch the appliance off, unplug and clean it. → "Care and daily cleaning" see page 25
Base unit
Preparation
Risk of injury!
Do not insert the mains plug until all preparations for working with the appliance are complete and the required attachments are assembled correctly and connected to the base unit.
- Place the base unit on a stable and level work surface. Pull the mains cable out of the cable storage compartment to the required length.
The base unit is now prepared.
Base attachment
The base attachment can be used for the following applications:
Meat mincer
For chopping up raw or cooked food. Select the appropriate perforated disc depending on the type and consistency of the food to be processed. → "Tips" see page 27
Sausage filler
For filling artificial and natural casings with sausage meat. For producing meat rolls.
Kebbe maker
For producing tubes of dough or minced meat.
Pasta maker
For producing spaghetti or tagliatelle.
Whirl maker
For producing 3 different dough profiles for whirls.
Note: Other applications are possible using the base attachment and appropriate accessories available from Customer Service.
Caution!
When assembling the different individual parts, make sure that the notched markings on the inserts match up with the relevant one on the housing.
Preparation for meat mincer
Risk of injury!
Do not reach into the sharp knife.
Caution!
Always only use one perforated disc.
See Fig. D
- Insert the worm gear with the agitator paddle at the front in the housing.
- First fit the knife and then the required perforated disc onto the worm gear.
- Fit the threaded ring onto the housing and screw tight in a clockwise direction without using force. The meat mincer is now prepared.
Preparation for sausage filler
See Fig. 3
- Insert the worm gear with the agitator paddle at the front in the housing.
- First fit the bearing ring onto the worm gear and then the sausage nozzle into the housing.
- Fit the threaded ring onto the housing and screw tight in a clockwise direction without using force.
The sausage filler is now prepared.
Preparation for kebbe maker
→Fig.
- Insert the worm gear with the agitator paddle at the front in the housing.
- First fit the conical ring onto the worm gear and then the kebbe nozzle into the housing.
- Fit the threaded ring onto the housing and screw tight in a clockwise direction without using force.
The kebbe maker is now prepared.
Preparation for pasta maker
→Fig. 6
- Insert the worm gear with the agitator paddle at the front in the housing.
- Insert the required pasta disc into the housing.
- Fit the threaded ring onto the housing and screw tight in a clockwise direction without using force.
The pasta maker is now prepared.
Preparation for whirl maker
→Fig. H
- Insert the worm gear with the agitator paddle at the front in the housing.
- First fit the dough nozzle into the housing and then the forming disc.
- Rotate the forming disc until the required profile is at the bottom.
- Fit the threaded ring onto the housing and screw tight in a clockwise direction without using force.
The whirl maker is now prepared.
Use
Note: The food is processed in different ways depending on the application.
"Recipes" see page 25
The following example describes use of the base attachment as a meat mincer:
riangle Risk of injury!
- Do not reach into the feed chute with your hands.
- Only use the pusher when adding more food.
Caution!
- Do not process bones, gristle, sinews or other solid components.
- Do not process frozen meat.
- Do not apply great force with the pusher.
- Fit the prepared attachment onto the drive of the base unit, holding it at an angle.
- Turn the attachment anticlockwise until you hear it click into position.
- Fit the filling tray and insert the pusher in the feed chute.
- Prepare your food. Chop up large parts beforehand so they fit into the feed chute without having to press them in.
- Place a suitable container under the attachment. Add the prepared food to the filling tray.
- Connect the mains plug. Switch on the appliance.
Note (MFW36.../MFW38...):
After switching on, the appliance runs at the ideal speed 2 (fast).
- Use the pusher to slide the food down the feed chute, applying light pressure.
- Once you have finished, switch off the appliance and pull out the mains plug.
- Remove the filling tray and pusher.
- Hold down the release button and turn the attachment clockwise until it disengages.
- Remove the attachment, take it apart and clean all parts. See "Care and daily cleaning" on page 25.
Shredding attachment
For shredding, grating and slicing items such as cheese, fruit, vegetables, nuts, almonds, dried bread rolls and other hard foodstuffs. Select the appropriate insert depending on the type and consistency of the food to be processed. See "Tips" on page 27.
Preparation
Risk of injury!
Do not reach into the sharp blades and edges of the shredding, grating and slicing inserts.
See sequence of figures J.
- Open the cap. Fit the required insert into the housing.
- Close the cap until you hear it click into position.
The shredding attachment is now prepared.
Use
Risk of injury!
- Do not reach into the feed chute with your hands.
- Only use the pusher when adding more food.
Caution!
- The pusher can only be inserted in one direction.
- Remove hard shells (e.g., on nuts).
- Do not apply great force with the pusher.
Caution! (MFW36.../MFW38...)
- Always use the shredding and cutting inserts at speed 1 (slow).
- Use the grating insert at speed 2 (fast).
→ "Speed setting" see page 21
→ Sequence of figures K
- Fit the prepared attachment onto the drive of the base unit, holding it at an angle.
- Turn the attachment anticlockwise until you hear it click into position.
- Fit the filling tray and insert the pusher in the feed chute.
- Prepare your food. Chop up large parts beforehand so they fit into the feed chute without having to press them in.
- Place a suitable container under the attachment. Add the prepared food to the filling tray.
- Connect the mains plug. Switch on the appliance.
Caution! (MFW36.../MFW38...)
After switching on, the appliance runs at speed 2 (fast). To use the shredding and cutting inserts, you must press button
1·2 | rev once to switch to speed 1 (slow). "Speed setting" see page 21. 7. Use the pusher to slide the food down the feed chute, applying light pressure. The food is now cut up or shredded.
- Once you have finished, switch off the appliance and pull out the mains plug.
- Remove the filling tray and pusher.
- Hold down the release button and turn the attachment clockwise until it disengages.
- Remove the attachment, take it apart and clean all parts. See "Care and daily cleaning" on page 25.
Citrus press attachment
For squeezing juice out of citrus fruits, e.g. lemons, oranges, grapefruits.
Preparation
Risk of injury!
The attachment for the citrus press is directly assembled on the base unit. Do not insert the mains plug until all preparations for working with the appliance are complete.
Caution!
The base unit is moved through 90° for preparation and use of the citrus press attachment. Never use other attachments in this position.
Sequence of figures
- Hold the base unit by the carrying handle and carefully tip up so the drive points upwards. Possibly turn the base unit to make the buttons easily accessible.
- Insert the driving shaft with the spring element pointing down in the drive of the base unit.
Caution!
It should be possible to push the driving shaft down lightly with your finger. It must not get sticky with residue from juice or become blocked with pips or foreign bodies.
- Fit the collecting tray onto the drive at an angle.
- Turn the collecting tray anticlockwise until you hear it click into position.
- Fit the filter insert onto the collecting tray.
- Fit the pressing cone onto the driving shaft.
The citrus press attachment is now fitted to the base unit and prepared.
Use
→ Sequence of figures M
- Cut the citrus fruits in half.
- Place a suitable container under the attachment.
- Connect the mains plug. Switch on the appliance. The drive is running.
Caution! (MFW36.../MFW38...)
After switching on, the appliance runs at speed 2 (fast). To use the citrus press, you must press button 1·2 | rev once to switch to speed 1 (slow). → "Speed setting" see page 21
- Position the halved citrus fruits with the cut surface on the pressing cone and press down. As soon as the fruit is pressed onto the pressing cone, the cone will rotate.
- To finish the process, reduce the pressure on the cone.
- Once you have finished, switch off the appliance and pull out the mains plug.
- Hold down the release button and turn the attachment clockwise until it disengages.
- Remove the attachment, take it apart and clean all parts. → "Care and daily cleaning" see page 25
Notes:
- To obtain the largest amount of juice, the pressing procedure should be repeated a few times.
- The filter insert with the pulp and pips should be emptied as necessary.
Care and daily cleaning
The appliance, all attachments and the relevant accessories must be thoroughly cleaned after each use.
Risk of electric shock!
- Disconnect the mains cable from the socket prior to cleaning.
- Never immerse the base unit in liquids and do not clean in the dishwasher.
Risk of injury!
Do not reach into the sharp blades and edges of the shredding and slicing inserts.
Caution!
- Do not use any cleaning agents containing alcohol or spirits.
- Do not use any sharp, pointed or metal objects.
- Do not use abrasive cloths or cleaning agents.
Fig. N gives an overview of how to clean the individual parts.
- Wipe the outside of the base unit with a soft, damp cloth and dry off.
- Dismantle the attachments used in reverse order (see "Preparation" for the relevant attachment). Clean all accessories with a detergent solution and a soft cloth/sponge or with a soft brush.
- Allow all parts to dry.
Notes:
- Immediately rub metal parts dry and apply a little cooking oil to protect them from rust.
- Discolouration of plastic parts may occur when processing foods such as carrots. This can be removed with a few drops of cooking oil.
Recipes
Note (MFW36.../MFW38...):
For all operating steps, set the speed to 2 (fast).
Kebbe
Dough pockets:
- 500 g lamb, cut into strips
- 500 g bulgur wheat, washed and drained
- 1 small onion, chopped
Process the lamb and wheat with the meat mincer, alternating between the two (perforated disc, fine). Mix the dough thoroughly and mix in the onion. Process the mixture another two times with the meat mincer.
Filling:
- 400 g lamb, cut into strips
- 2 medium-sized onions, chopped
- 1 tablespoon of oil
- 1 tablespoon of flour
- 2 teaspoons of pimento. Salt and pepper. Process the lamb with the meat mincer (perforated disc, fine). Fry the onions until golden brown.
- Add the lamb and fry until well done.
- Add the remaining ingredients. Fry everything gently for about 1-2 minutes. Pour off the excess fat. Leave the filling to cool down.
Prepare the kebbe:
Use the kebbe maker to process the mixture for dough pockets. Cut off pieces 7.5 cm in length from the hollow strand of dough. Press one end of the dough pocket to seal. Insert a little filling in the opening and also seal the other end of the dough pocket. Heat the oil (approx. 180°C) and deep-fry the dough pockets for about 6 minutes until golden brown.
Bread dumplings
- 300 g fresh white bread -20 ml milk
- 40 g butter or margarine -3 eggs
- 1 tbsp finely chopped onions
- Parsley -A little flour Salt and pepper Cut the bread into slices 10 mm thick and halve lengthways. Add 20 ml of milk and soak. Process the moistened bread for approx. 50 secs with the meat mincer (perforated disc, medium).
- Add the finely chopped onions, parsley and melted butter and mix.
- Add the whisked eggs, salt and pepper and mix into the bread dough.
Leave the dough to prove for several minutes. Then knead again. Shape the dumplings with wet hands. Roll the dumplings in flour. Place dumplings in boiling water and leave to simmer for approx. 20 minutes. Do not bring to the boil!
Pasta
Basic recipe for pasta dough with eggs:
- 230 g wheat flour (type 405) or finely ground wheat flour -2 eggs
Note: You will obtain the best results if you make the dough with the Bosch MUM5 food processor and stirrer (maximum quantity:
1 x basic recipe).
Process all ingredients briefly (10 x about 3 seconds) with the stirrer on setting M. If required, add more flour.
Making pasta:
Prepare the base unit using the pasta maker and required insert. - Add a small amount of the dough to the filling tray. - Switch on the appliance and press the dough into the chute with the pusher. Cut the pasta to the required length directly at the outlet with a knife and place on a piece of cotton or wooden board dusted with flour.
Whirls
Basic recipe for shortcrust pastry:
- 125 g butter (room temperature)
- 100-125 g sugar -1 egg -1 pinch salt -A little lemon peel or vanilla sugar
- 250 g flour Baking powder if required
Note: You will obtain the best results if you make the dough with the Bosch MUM5 food processor and stirrer.
Mix all ingredients with the stirrer for about 1/2 minute at setting 1 (1), and then for about 2-3 minutes at setting 6 (3).
Making the biscuits:
Prepare the base unit using the whirl maker and the required dough profile. - Add part of the dough to the filling tray. - Switch on the appliance and press the dough into the chute with the pusher. - Remove the dough directly at the outlet in the required length and place on a baking tray dusted with flour or covered with greaseproof paper.
Tips
Meat mincer
Using the perforated discs
- Perforated disc, fine (2.7 mm) for: cooked chicken / pork / beef, cooked liver, cooked fish for soups; raw pork and beef for meat loaf; raw liver, meat and bacon for liverwurst; pork for Mettwurst
- Perforated disc, medium (4 mm) for: pork and beef for pâté and Cervelat sausage
- Perforated disc, coarse (8 mm) for: roast pork for goulash soup; leftovers (joint, sausage) for bakes. If you require a finer consistency to your processed food, process it several times or use different perforated discs one after the other (coarse, medium, fine).
- You can add other ingredients (e.g. onions, spices) directly during processing. This ensures all ingredients are mixed together thoroughly.
Sausage filler
Soak natural casing in lukewarm water for about 10 minutes before processing. - Do not stuff casings too full or the sausages may burst during boiling or frying.
Shredding attachment
Caution! (MFW36.../MFW38...)
- Always use the shredding and cutting inserts at speed 1 (slow).
- Use the grating insert at speed 2 (fast). → "Speed setting" see page 21
Using the inserts
- Slicing insert: for carrots, celery, kohlrabi, courgettes
- Shredding insert (coarse): for carrots, nuts, hard cheese (e.g. Emmentaler)
- Shredding insert (fine): for nuts, hard cheese, Parmesan cheese
- Grating insert: for potatoes, Parmesan cheese, nuts
Disposal
Dispose of packaging in an environmentally-friendly manner. This appliance is labelled in accordance with European Directive 2012/19/EU concerning used electrical and electronic appliances (waste electricity and electronic equipment - WEEE). The guideline determines the framework for the return and recycling of used appliances as applicable throughout the EU. Please ask your specialist retailer about current disposal facilities.
Guarantee
The guarantee conditions for this appliance are as defined by our representative in the country in which it is sold. Details regarding these conditions can be obtained from the dealer from whom the appliance was purchased. The bill of sale or receipt must be produced when making any claim under the terms of this guarantee.
Changes reserved.
Spare parts and accessories
| Spare parts and accessories | ||
| 2.7 mm | 638407 | Perforated disc (fine) for meat mincer |
| 4 mm | 637985 | Perforated disc (medium) for meat mincer |
| 8 mm | 637986 | Perforated disc (coarse) for meat mincer |
| 637987 | Sausage filler: for filling artificial and natural casings with sausage meat. For producing meat rolls. | |
| 12000397 | ||
| 638281 | Kebbe maker: for producing tubes of dough or minced meat. | |
| 12001096 | Pasta maker: For producing spaghetti or tagliatelle. Whirl maker: For producing 3 different dough profiles for whirls. | |
| 12011263 | Shredding attachment: for shredding, grating and slicing | |
| 798161 | Slicing insert for the shredding attachment | |
| 798162 | Shredding insert (coarse) for the shredding attachment | |
| 798160 | Shredding insert (fine) for the shredding attachment | |
| 798130 | Grating insert for the shredding attachment | |
| 791603 | Citrus press attachment: for squeezing oranges, lemons and grapefruits. | |
| Spare parts and accessories are available from retailers and Customer Service. | ||
Troubleshooting
| Problem Cause Remedy | ||
| The appliance does not start when switched on. | Appliance has no power supply. | Insert the mains plug in the socket. |
| The appliance is running normally, but the food is not being processed. | The appliance was overloaded, and the agitator paddle has broken at the predetermined breaking point. | Switch the appliance off and wait until it has stopped. Unplug the appliance, remove the attachment, take it apart and clean. Replace the agitator paddle. → “Overload protection” see page 21 |
| The food is not being processed or only very slowly. | The attachment or worm gear is blocked. | Appliance without reversing function: Switch appliance off, wait until it has stopped and unplug. Remove the attachment, take it apart and clean to eliminate the blockage. → “Care and daily cleaning” see page 25 |
| Appliances with reversing function: Switch off the appliance with button O/I and wait for the drive to come to a standstill. Press and hold button 1·2 | rev. After approx. 5-10 seconds, release button 1·2 | rev and wait for the drive to come to a standstill. Switch the appliance on again and continue to use it. → “Reversing function” see page 21 | ||
| The pressure on the pusher is too great or the feed chute is too full. | Reduce the pressure on the pusher and fill the feed chute with less food. | |
| The food to be processed still contains hard components. | Remove hard components. Precook/steam vegetables before processing them. | |
| The reversing function does not start. | Button 1·2 | rev was pressed too briefly. | Press and hold button 1·2 | rev until the reversing function starts. |
| The worm gear is blocked right up. | Switch the appliance off, wait until it has stopped and unplug. Remove the attachment, take it apart and clean to eliminate the blockage. → “Care and daily cleaning” see page 25 | |
| If you are unable to solve the problem, always call the hotline! You will find the telephone numbers at the back of these instructions. | ||
Overload safety 34
Storage compartment
Storage compartment
Overload safety
Overload protection. 62
Warning! MFW36.../MFW38...
Warning! MFW36.../MFW38...
Protect the microwave from strong winds with the cover.
Fig. H
- Place the container with the measuring cup into the environment.
- Place the food in the bowl, then insert the attachment.
- Insert the attachment, making sure the arrow points to the desired position below.
- Place the arrow on the ring in the bowl and press it without force in the direction of the arrows on the appliance. The attachment for fine graters is ready for use.
Time
Information (MFW36..../MFW38....):
www.bosch-home.com/tr
www.bosch-yetkiliservisi.com
Sausage attachment: For making sausages and frankfurters.
Kebab attachment: For making skewered minced meat kebabs.
Citrus press attachment: For squeezing citrus fruits.
The food to be processed must not contain hard parts (e.g., bones). Do not use the appliance for processing other substances or objects. When using attachments approved by the manufacturer, the appliance may also be used with these attachments. Only use the appliance with original parts and attachments. Never use attachments or inserts for cutting and shredding with other appliances. For the appropriate attachments, only use suitable parts.
Use the appliance only indoors and at room temperature, at an altitude not exceeding 2000 m above sea level. Do not place the appliance on hot surfaces or near them, e.g., on a stove.
a Support ring b Sausage attachment nozzle
5 Kebab attachment*
a Cone ring b Kebab nozzle
6 Nozzle
and disc for forming pasta. Disc for forming flat pasta with instrument for filling
7 Nozzle for shaped pasta*
ONLY FOR MFW36.../MFW38...
Setting the capacity allows you to set the required rotation speed: 1 (slow) or 2 (fast).
Attention!
Preparing the sausage filling
→Figure D
- First insert the plunger into the housing and lock it.
- Slide the support ring onto the plunger neck, then insert the sausage filling nozzle into the housing.
- Place the cutting ring on the housing and tighten it clockwise without applying excessive force.
Sausages are ready for operation.
Preparing the kebab nozzle
→Figure F
- First insert the plunger into the housing and lock it.
- Place the coupling ring on the nozzle body and insert it into the nozzle body.
- Place the cutting ring on the body and tighten it with the wrench, without applying excessive force.
The nozzle attachment is ready for use.
Preparation of the macaroni attachment
→Macaroni
- First insert the auger with the locking mechanism into the body.
- Insert the required disc for forming macaroni into the body.
- Install the cutting ring on the body and tighten it with the wrench without excessive force.
The macaroni attachment is ready for use.
Do not touch the sharp blades and edges of the inserts for shredding, grating, and slicing.
→Shredding
- Open the hopper. Install the desired insert into the body.
- Close the hopper so that it locks securely.
The grating attachment is ready for use.
Application
Safety instructions for operation!
- Do not put your hands into the meat grinder's feed opening. - Danger of injury! Keep hands away from the feed opening.
Warning!
- You can insert the pusher into the feed opening. - Insert the pusher (e.g., nuts). - Do not press too hard on the pusher.
Warning! (MFW36.../MFW38...)
The pusher for chopping and mincing can only be used on speed 1 (low). - The pusher for pressing can be used on speed 2 (high).
→ "Speed setting" see page 202
→Operating instructions
- Insert the prepared pusher with light pressure onto the drive of the main unit.
- Turn the pusher against the direction of the arrow until it is firmly seated in the slot.
- Place the locking bowl and insert the pusher into the feed opening. 4. Prepare the products. Pre-cut the ingredients so that they fit into the feed opening without pressing. 5. Place the pusher into the locking bowl. Put the prepared products for processing into the locking bowl. 6. Connect the plug to the socket. Switch on the device.
Warning! (MFW36.../MFW38...)
The device starts on speed 2 (high). To use the pusher for chopping and mincing, you must press the button 1-2 | rev once; the device switches to speed 1 (low). → "Speed setting" see page 202
- With light pressure, push the products to be processed into the feed opening. The products are chopped or minced. 8. When the work is finished, switch off the device and pull the plug out of the socket.
- Remove the locking bowl and the pusher.
- Press the orange button and hold it in the pressed position, and turn the nozzle clockwise until it stops turning.
- Remove the nozzle, disassemble it, and clean all parts. → "Cleaning and maintenance" see page 207
Citrus nozzle
The citrus nozzle is installed on the main body of the device and is ready for operation.
Usage
→Juices M
- Cut the citrus fruits in half. 2. Place the fruit half under the nozzle. 3. Connect the plug to the socket. Turn on the device. The drive starts working.
Attention! (MFW36.../MFW38...)
After switching on, the device starts at speed 2 (high). To use the citrus juicer, you must press the button 1-2 times; the device switches to speed 1 (low). → "Speed setting" see page 202
- Cut citrus fruits should be pressed with the cut surface against the cone of the citrus juicer and pressed down. As soon as the fruits are pressed against the cone of the citrus juicer, the cone starts turning.
- To complete the juice extraction process, reduce the pressure on the cone of the citrus juicer. 6. When the work is finished, turn off the device and remove the plug from the socket.
- Press the orange button and hold it in the pressed position, and turn the nozzle clockwise until it stops turning.
- Remove the nozzle, disassemble it, and clean all parts. → "Cleaning and maintenance" see page 207
Tips:
- To achieve optimal juice yield, the juice extraction process should be repeated several times. -If necessary, empty the strainer with coarse fruit pulp and seeds.
Before use and use of accessories, it is necessary to thoroughly clean after each use.
There is a risk of electric shock from the tube:
- It is recommended to unplug the power cord from the socket.
- Never immerse the base unit in water and do not wash it in a dishwasher.
There is a risk of injury!
Do not touch sharp blades and edges of attachments for chopping and slicing.
Attention!
-Do not use cleaning agents containing alcohol. -Do not use sharp, pointed or metal objects. -Do not use hard brushes or cleaning agents.
On the machine you will find a short description of how to clean individual parts.
■Wipe the base unit with a damp cloth and leave to dry. ■Disassemble the used attachments in reverse order (see section "Preparing the appropriate attachment"). Rinse all accessories with a mild cleaning agent, using a cloth/sponge, or rinse with soft water. Dry all parts.
Tips:
-Metal parts wipe dry and grease with cooking oil to protect against corrosion. -Stains, e.g., from carrots on plastic elements may form colored spots. They can be removed with a few drops of cooking oil.
Recipe
Tip (MFW36.../MFW38...): For all work operations set speed 2 (speed).
Ke66e
For the minced meat tubes:
-500 g of lamb, cut into strips -500 g of coarse bulgur, washed and drained -1 small onion, chopped
Grind the lamb and bulgur through a meat grinder (coarse disc, fine).
Mix the minced meat, add the onion. Mix the listed ingredients through the meat grinder.
Filling:
-400 g of lamb, cut into strips -2 medium onions, chopped
-1 tablespoon of oil -1 tablespoon of flour -2 tablespoons of tomato paste -salt and pepper Grind the lamb in a meat grinder (coarse disc, fine).
Fry until golden-brown.
-Add the lamb and fry. Add the other ingredients. Mix everything and simmer for 1-2 minutes. Remove from heat. Cool the filling.
Preparing the ke66e:
Shape the tubes with the help of a ke66e mold. Cut the tube from the mold into pieces 7.5 cm long.
Fill one end of the tube. Press the filling into the hole and also fill the other end of the tube. Heat oil (approx. 180°C) and fry the tubes in a pan for approx. 6 minutes until golden-brown.
Bread dumplings
-300 g of dry white bread -20 ml of milk -40 g of butter or margarine -3 eggs -1 tsp of finely chopped onion - parsley - a little flour -salt and pepper Cut the bread into slices 10 mm thick and soak in water. Pour 20 ml of milk and let it soak. Grind the bread pieces in a meat grinder (coarse disc with medium holes) for about 50 seconds. Add finely chopped onion, parsley, melted butter and mix the ingredients. Add eggs, salt and pepper to the bread mixture. Knead for a few minutes. Then knead again. To form dumplings, it is best to use a dumpling mold. The dumplings need to be rolled in flour. Drop the dumplings into boiling water and keep them for about 20 minutes. Do not bring to a boil!
Manufacturer
Main recipe for minced meat
Documents
Use of grating discs
- Grating discs, fine (2.7 mm): boiled chicken, pork, beef, boiled liver, boiled fish for soups; pork and beef for roast; liver, meat and fat for liver sausage; pork for raw sausage
- Grating discs, medium (4 mm): pork and beef for pâté and cervelat
- Grating discs, coarse (8 mm): smoked pork for ham; gratings (e.g., liver, sausage) for dishes with gratings. If a finer consistency of processed products is needed, repeat the grinding process and use different grating discs (coarse, medium, fine). Additional ingredients (e.g., spices, sauces) can be added directly during mixing. In this way, all ingredients are well mixed.
Sausage casings
Soak the natural sausage casing in warm water for about 10 minutes before processing. Do not fill the sausage casing too tightly, as the sausages may burst during cooking.
Grater attachment
Warning! (MFW36.../MFW38...)
The attachments for grating and slicing can only be used on speed 1 (low). The attachment for grating can be used on speed 2 (medium).
→ "Grinding" see page 202
Use of inserts
- Insert for slicing: for carrots, celery, cabbage, zucchini
- Insert for shredding (tube): for carrots, nuts, hard cheese (Parmesan, Emmental)
- Insert for shredding (grater): for nuts, hard cheese, Parmesan cheese
- Insert for grating: for potatoes, Parmesan cheese, nuts
Disposal
This product is marked in accordance with the European Directive 2012/19/EU regarding waste electrical and electronic equipment (WEEE). The directive defines the obligations, which are in force within the European Union, regarding the return and recycling of used appliances. For current disposal options, you can inquire at a specialized store.
Warranty terms
The warranty terms for this appliance are published by our competent representative in the country where you purchased the appliance. You can obtain the warranty terms at any time at the specialized store where you bought the appliance, or directly from our representative in your country. The warranty terms for the name and address can be found on the last four pages of this brochure. In addition, the warranty terms are also available on the Internet at the specified address. To use the warranty, our service must be shown the purchase receipt in any case.
Possible changes.
Spare parts and accessories
| 3anacnii chactnni ta akcescyapn | ||
| 2.7 mm | 638407 | Peшітковий дисk (дрибни) дlya м'ясорубки |
| 4 mm | 637985 | Peшітковий дисk (середни) дlya м'ясорубки |
| 8 mm | 637986 | Peшітковий дисk (крушини) дlya м'ясорубки |
| 637987 | Ковбаснишпriц: дlya заловенни Ковбасю масюштуни i натуральни Ковбаси ооблонни. Дlya Формуванни рунетев. | |
| 12000397 | ||
| 638281 | Hаcadka кeббe: дlya Формуванни фарширoveданх м'ясних котлесок кeббe. | |
| 12001096 | Мakapоннha hacadka: дlya Формуванни спагетi abо плacksх мakapони. Hаcadka дlya Фirypного чунва: дlya Фор说我- Ванни Трbox рiэновidiВ Вдсадного Фirypного чунва. | |
| 12011263 | Hаcadka-Терka: дlya Шаткуванни, Терты i Нарizанни | |
| 798161 | Вставka дlya habi3анни дlya habi3an-N-Терки | |
| 798162 | Вставka дlya Шаткуванни (крушини) дlya Насадни-Терки | |
| 798160 | Вставka дlya Шаткуванни (дрибни) дlya Насадни-Терки | |
| 798130 | Вставka дlya Терты dlya habi3an-N-Терки | |
| 791603 | Hаcadka-cokobitsckay дlya цитrucobиx: дlya Вочаюванни соку 3 лимониВ, aneльсинич греифрутib. | |
Spare parts and accessories can be purchased at a store or service center.
Help with malfunctions
Sausage attachment: for making sausages and frankfurters.
Kebab maker attachment: for making kebabs with meat and minced meat.
Let the appliance cool down intermittently for a maximum of 10 minutes. Then turn off the appliance and let it cool to room temperature.
Important!
Maintenance schedule..224
Spare parts and accessories 225
Troubleshooting assistance.. 226
Overview
Figure A
1 Main unit
a Drive for attachments b Button I or II* c Button O or 1-2 | rev* d Operating status indicator e Unlock button f Handle for carrying g Compartment for storing the lid h Mains cable i Cable compartment
2 Main attachment
a Housing b Feed tube c Feed chute d Pusher e Disc with grabber f Thread ring
3 Cutting discs
a Blade b Shredding disc for fine shredding (2.7 mm)* c Shredding disc for medium shredding (4 mm) d Shredding disc for coarse shredding (8 mm)
4 Sausage attachment parts
a Support ring b Sausage attachment nozzle
5 Kebab skewer attachment*
a Conical ring b Skewer attachment nozzle
6 Attachments for macaroni*
a Disc for fine grinding b Disc for coarse grinding c Tool d Nozzle
7 Attachment for tubular pastry*
a Nozzle for dough b Shaping disc (rotating)
→ Figure
8 Attachment for biscuits*
a Housing b Feed tube c Lid d Feed pusher e Pusher f Fine grater g Coarse grater h Fine shredder i Coarse shredder j Grater
9 Attachment for citrus juicer*
a Collection container b Filter cone c Citrus juicer cone d Drive shaft
- Depending on the model, different versions of the appliance are described in these instructions. The pages with figures show the appliance assembled. → Spare parts and accessories can be obtained through customer service or at www.bosch-home.com. → "Spare parts and accessories" see page 225
Before first use
Before using
Before using the new appliance, it must be unpacked, cleaned, and checked.
Attention!
It is strictly forbidden to put a damaged appliance into operation!
Remove the device and all accessories from the packaging. Remove the packaging material.
Disassemble the collected accessories into individual parts. The sequence of actions in this case should be the reverse of the description in the "Preparation" section.
Check the completeness of all parts.
→Figure A/B
Check all parts of the device for external damage. ■ Before first use, carefully clean and dry all parts. → "Care and daily cleaning" see p. 221
Press the button I to turn on the device. The drive starts rotating immediately.
Button O
Press the button O to turn off the device. The drive stops.
MFW36../MFW38...
Button O/I
Press the button O/I to turn on the device. The drive starts working immediately at speed level 2 (fast). Press the button O/I again to turn off the device. The drive stops.
Button 1-2 | rev
Briefly press the button 1·2|rev to switch the device speed between level 1 (slow) and level 2 (fast).
→ "Speed setting" see p. 217 Press and hold the button 1·2 | rev to activate the reverse function. → "Reverse function" see p. 217
All models
Operating indicator
When the device is turned on, the operating indicator lights up. In models with a reverse function, the indicator flashes while button 1·2 | rev is held down.
Unpacking
The device can only be plugged into a power outlet after all preparation for work with the device has been completed, including the assembly of the necessary attachments and their connection to the main unit.
Place the main unit on a horizontal surface. Pull the power cord out of the cord compartment to the required length. The main unit is ready for operation.
Main attachment
The main attachment has the following purpose:
Meat grinder
For grinding raw and cooked food products. Use the appropriate shaping discs depending on the type and consistency of the food products being processed. → "Sieves" see p. 223
Sausage attachment
For filling sausages with natural or artificial casings. For making sausages.
Shaping disc for kebbe
Do not touch the sharp blade.
Attention!
Always use only one shaping disc.
- Pre-insert the auger with the guide bushing into the housing.
- Install the guide ring on the auger shaft, then the forming disc.
- Install the threaded ring on the housing and tighten it clockwise without excessive force.
The meat grinder is ready for operation.
Preparing the sausage filler
→Figure
- Pre-insert the auger with the guide bushing into the housing.
- First install the support ring on the auger shaft, then insert the sausage nozzle into the housing.
- Install the threaded ring on the housing and tighten it clockwise without excessive force.
The sausage filler is ready for operation.
Preparing the forming attachment for kebbe
→Figure
- First install the conical ring on the auger shaft, then insert the kebbe nozzle into the housing.
- Install the threaded ring on the housing and tighten it in the direction of the arrow, without applying excessive force.
The noodle-forming attachment is ready for use.
Preparing the noodle-forming attachment
Figure
- First insert the auger with the drive pin into the housing.
- Insert the lower disc for noodles into the housing.
- Install the threaded ring on the housing and tighten it in the direction of the arrow, without applying excessive force.
The noodle-forming attachment is ready for use.
Preparing the forming attachment for stuffed pasta
Figure H
- First insert the auger with the drive pin into the housing.
- First insert the tube for dough into the housing, and then the forming disc.
- Turn the forming disc so that its profile is facing down.
- Install the threaded ring on the housing and tighten it in the direction of the arrow, without applying excessive force.
The juicer attachment is ready for operation.
Application
Note. Depending on the intended use, food products are processed differently. → "Recipes" see p. 222
Below, using an example, the use of the basic attachment as a juicer is described:
Risk of injury!
The citrus juicer attachment is assembled and ready for operation.
Application
→ See figure M
- Cut the citrus fruits in half. 2. Place the attachment under the juicer onto a suitable container.
- Connect the mains plug to the socket. Switch on the appliance. The drive starts rotating.
Attention! (MFW36.../MFW38...)
After switching on, the appliance starts working at speed level 2 (fast). To use the citrus juicer, you must press the 1|2 button once to switch to speed level 1 (slow). → "Speed setting" see p. 217
4. Place the citrus fruit halves with the cut surface facing down onto the juicer cone and press down. As soon as the fruit pulp used for juicing is placed on the juicer cone, the cone starts rotating. 5. To finish juicing, reduce the pressure on the juicer cone. 6. After finishing the work, switch off the appliance and remove the mains plug from the socket. 7. Holding the unlocking button, turn the attachment clockwise so that it releases. 8. Remove the attachment, disassemble it and clean all parts. → "Care and daily cleaning" see p. 221
Instructions.
To obtain optimal juice output, repeat the pressing several times. If necessary, clean the strainers and the pulp container.
Daily cleaning
After each use of the appliance, all attachments and accessories used must be thoroughly cleaned.
Danger of electric shock!
- Before cleaning, disconnect the power cord from the electrical outlet.
- Never immerse the main unit in liquid and do not wash it in a dishwasher.
Danger of injury!
Do not touch the sharp blades and edges of the cutting discs and blades.
Attention!
- Do not use cleaning agents containing alcohol or solvents. - Do not use metal or sharp-edged objects, as well as objects with sharp edges. - Do not use rough cloth or abrasive cleaning agents.
The figure shows an overview of cleaning the individual parts.
Wipe the main unit housing with a damp cloth and dry it. Disassemble the used attachments in reverse order (see section "Preparation" for the corresponding attachment). Clean all accessories with a mild detergent solution, a soft cloth/sponge, or a soft brush. Then let all parts dry.
Instructions.
- Metal parts should be wiped dry immediately and coated with a thin layer of cooking oil to protect against rust. - During operation, for example, carrots may leave a light coating on plastic parts. This can be removed with a few drops of cooking oil.
Recipes
YkaaHne (MFW36..../MFW38...).
For all operations, set the speed mode to 2 (fast).
Kebbe
Filling for the tubes:
-500 g of lamb, cut into strips -500 g of wheat bulgur, washed and drained -1 small onion, chopped. Load into the meat grinder alternately lamb and onion (molding disc with fine holes). Mix the mass well, add salt. Pass the mass through the meat grinder once more.
Filling:
-400 g of lamb, cut into strips -2 onions, medium size, chopped -1 tablespoon of vegetable oil -1 tablespoon of flour -2 cloves of garlic, crushed - salt and pepper. Grind the lamb in the meat grinder (molding disc with fine holes).
Fry the onion until golden-brown.
Add the lamb and fry. Add the remaining ingredients. Mix everything for about 1-2 minutes. Drain the fat. Cool the filling.
Preparing the kebbe:
Grind the mixture with the molding attachment for kebbe. Cut the resulting sausage from the filling into pieces 7.5 cm long. Seal one end of such a tube. Put a little filling into the hole and seal the other end of the tube. Heat oil (about 180 °C) and fry the kebbe in the fryer for about 6 minutes until golden-brown.
Bread dumplings
-300 g of fresh white bread -20 ml of milk -40 g of butter or margarine -3 eggs -1 tbsp of finely chopped onion - parsley - a little flour - salt and pepper
Cut the bread into slices 10 mm thick and cut them in half lengthwise. Pour 20 ml of milk and let it soak. Process the moistened bread slices in the meat grinder (molding disc with medium holes) for about 50 seconds. Add finely chopped onion, parsley, melted butter and mix. Beat the eggs, salt and pepper and add to the bread mixture. Let the dough rest for a few minutes. Then knead again. Shape the dumplings with hands moistened with water. Roll the dumplings in flour. Drop the dumplings into boiling water and leave them in the water over low heat for about 20 minutes. Do not let them boil!
Macaroni
Basic recipe for shortcrust pastry:
230 g wheat flour (type 405) or very finely ground wheat flour
Note: The best results are achieved if the dough is prepared using a food processor or Bosch mixer with a kneading hook (maximum quantity: 1 times the quantity of products from the basic recipe).
Briefly process all ingredients (about 10 times for approximately 3 seconds) with the kneading hook at step M. If necessary, add more flour.
Making pasta
Attach the basic unit with the shaping attachment and the lower insert. Place a small portion of dough into the feed chute. Switch on the appliance and push the dough through with the pusher into the feed tube. Cut the pasta directly at the outlet with a knife to the desired length and place it on a floured cloth or a damp kitchen towel or a floured board.
Figure cookies
Basic recipe for shortcrust pastry:
- 125 g soft butter (at room temperature)
- 100-125 g sugar, 1 pinch of salt
- A little lemon zest or vanilla sugar, 250 g flour
- If necessary, a little baking powder
Note: The best results are achieved if the dough is prepared using a food processor or Bosch mixer with a kneading hook.
Mix all ingredients for approximately 1/2 minute at step 1 (1), then for approximately 2-3 minutes at step 6 (3) using the kneading hook.
Making cookies
The main unit with a shaping nozzle for stuffing minced meat for testing. Place part of the test in the loading tray. Turn on the device and push the test with the pusher into the nozzle. Break off the test directly at the outlet to the desired length and place it on the parchment paper laid out.
Tips
Meat grinder
Roasted pork for goulash soup; leftovers (e.g., roast, sausage) for casseroles from leftovers
If a finer consistency of processed food is required, repeat the grinding process or use different shaping discs sequentially (with large, medium, small holes). Spices (e.g., onion, herbs) can be added directly during processing. Due to this, all spices are well mixed.
Sausages and pâtés
Soak the natural sausage casing in warm water for about 10 minutes before processing. Do not fill the sausage casing too tightly, otherwise the sausages may burst during cooking or frying.
Attachment for shredding
Attention! MFW36..../MFW38...
- Coarse grater and slicing attachment must be used in speed mode 1 (slow). Fine grater should be used in speed mode 2 (fast).
→ "Speed setting" see page 217
Use of attachments
-Slicing attachment: for carrots, raw beets, cabbage, zucchini -Shredding attachment (coarse): for carrots, nuts, hard cheese (e.g., Emmental) -Shredding attachment (fine): for nuts, hard cheese, Parmesan -Grater attachment: for potatoes, Parmesan, nuts
Disposal
Dispose of the packaging using environmentally friendly methods. This device bears the mark of compliance with European standards 2012/19/EU for the disposal of electrical and electronic equipment (WEEE). These standards define the rules in force in the EU for the return and disposal of old devices. You can obtain information about current disposal options at the store where you purchased the device.
Warranty service
You can obtain up-to-date information about warranty service conditions at your nearest authorized service center, at the service center of the manufacturer LLC "Vse Vytovye Pribory", or in the accompanying documentation.
We reserve the right to make changes.
Spare parts and accessories
| 3aunactn undanlengoctn | ||
| 2.7 mm | 638407 | Φормовочьй дис (с мелкима OTberpctnma)для масубк. |
| 4 mm | 637985 | Φормовочьй дис (с срedingу otberpctnma)для масубк. |
| 8 mm | 637986 | Φорmowchbik dnck (c kprnhbimotberpctnma)для масубк. |
| 637987 | Колбасьйшпц: дялзаплесеня Колбасьи Масьи Искустveноги Натурально колбасьо的整体观. Дя приготовленя рунetов. | |
| 12000397 | ||
| 638281 | Φормовочьнадацka дял Кебе: дя приготовленя Кебe. | |
| 12001096 | Φормовочьнадацka дял мakарон: дял пriготовленя спагеттп иллалш. Φормовочьнадацka дял Фиурно пechь: дя Формовки 3 разних прфиел喊 сесда дя Фиурно чекь. | |
| 12011263 | Пристовка дялшинков: дялшинков, пөрөрөрөрөрөрөрөрөрөрөрөрөрөрөрөрөрөрөрөрөрөрөрөрөрөрөрөрөрөрөрөрөрөрөрөрөрөрөрөрөрөрөрөрөрөрөрөрөрөрөс. | |
| 798161 | Hacadka дяpe3kn Исплбztсь в пристовке дялшинковiki | |
| 798162 | Hacadka дяшнковiki (Крuplesн) Исплбztсь в пристовке дяшнковiki | |
| 798160 | Hacadka дяшнковiki (Мелков) Исплбztсь в пристовке дяшнковiki | |
| 798130 | Hacadka-Терka Исплбztсь в пристовке дя шнковiki | |
| 791603 | Hacadka-cokobixmajka дя ситусовьх: дя OTЖIMа сokedи зд anelbsinOB, ЛIMOHOB ил греифрутов. | |
Troubleshooting assistance
24-hour hotline*: 8 (800) 200-29-61
Official website: www.bosch-home.ru
Addresses of authorized service centers, as well as all service information, are available on the official website: www.bosch-home.ru.
We recommend that you use the services of authorized service centers only.
Original accessories and care products for Bosch household appliances can be purchased at our online store: www.bosch-home.ru/store. You can familiarize yourself with the terms of ordering, payment, and delivery on the website. You can also purchase original accessories and care products at authorized service centers.
1. Product
- Model
Items 1-2 are filled in only if this data is not contained in the purchase documents of the product (cash receipt or sales receipt, sales receipt).
3. This information applies to household appliances of the Bosch trademark: coffee makers, coffee machines, kettles, scales, kitchen stoves, blenders, food processors, slicers, toasters, irons, dishwashers, electric meat grinders, juicers, choppers, mixers, hair dryers, vacuum cleaners, floor scales, irons, steam stations, hair dryers and similar products.

- Dear Ladies and Gentlemen, we inform you that confirmation of compliance of our products with mandatory requirements in accordance with the legislation is carried out in the form of mandatory certification and declaration of conformity.
Information on mandatory confirmation of conformity of devices, including data on the certificate of conformity number (declaration of conformity) and its validity period, you can obtain from LLC "BSH Household Appliances".
Manufacturer: BSH Hausgeräte GmbH, address: Carl-Wery-Str. 34, 81739 Munich, Germany.
The importer authorized by the manufacturer on the basis of an agreement with it is LLC "BSH Household Appliances", 198515, St. Petersburg, Peterhof, st. Karla Simensa, d. 1, lit. A, and in Moscow, 119071, st. Malaya Kaluzhskaya, d. 1, phone (495) 737-2777, fax (495) 737-2798.
- Mandatory information on the technical characteristics of the device is given on the nameplate of the device or on its label and/or in the accompanying documentation.
6. Accessories and care products
For trouble-free operation of your equipment and proper care, it is recommended to use only original accessories and care products. Original accessories are developed by the manufacturer, they ideally fit your device. Original accessories and care products meet the highest quality requirements of the Bosch brand, they pass factory tests to ensure maximum reliability in operation. For all questions related to accessories and care products for your household appliance, you can contact authorized service centers or the telephone support service.
7. Manufacturer's warranty
The manufacturer provides a warranty for household appliances purchased in the Russian Federation in accordance with the current legislation for a period of 1 year. For household appliances purchased in the Republic of Belarus, for which a warranty card was issued at the time of purchase, the warranty conditions apply that do not contradict the legislation of the Republic of Belarus.
8. Attention! Important information for the consumer
This device is intended for use exclusively for domestic, family, household and similar needs, not related to entrepreneurial activity to meet household needs in the field of enterprise, institution or organization. Use of the device in conditions other than those specified above is a violation of the rules and operating instructions of the device.
The factory nameplate of the device is mandatory! Please make sure it is present and keep it on the device for the entire service life of the device. Removing the nameplate leads to decommissioning of the device and possible violation of its operating rules.
The manufacturer is not responsible for defects in the device if the service department determines that they arose after the transfer of the device to the consumer as a result of violation of the rules of use, transportation, storage, exposure to third parties, force majeure (fire, natural disaster, etc.), ingress of household insects and rodents, exposure to external factors, as well as as a result of significant violations of the requirements specified in the operating instructions, including instability of electrical network parameters established by GOST 32144-2013.
We kindly ask you to keep the documents confirming the purchase (receipt, cash receipt, or other documents confirming the date and method of purchase) in order to present them to the service center when carrying out warranty repairs or when providing other services stipulated by law.
Follow the recommendations for storage and operation (operating rules) to avoid problems during operation of the device and its failure.
Serviceable products during the warranty period are repaired free of charge or replaced with new ones. The decision on the feasibility of replacement or repair is made by the service centers.
9. Service information
After the warranty period expires, our service centers and workshops of our partners are always ready to offer you their services. The list of addresses of authorized service centers is available on the official website of the manufacturer: www.bosch-home.ru.
The service life of our household appliances (except for kitchen machines and vacuum cleaners) is 2 years. The service life of kitchen machines and vacuum cleaners is 5 years. The service life of the product is calculated from the date of its purchase, or if it is impossible to determine, from the date of manufacture of the product indicated on the product nameplate in accordance with the manufacturer's standard. The date of manufacture is marked with the symbol MM.YY, where YY is the year of manufacture (e.g., 1920) and MM is the month of manufacture. To determine the year of manufacture of the device, add the number YY to 1920.
*Free round-the-clock telephone for calls within the territory of the Russian Federation.
Information about household appliances manufactured under the control of the BSH Hausgeräte GmbH concern, Carl-Wery-Str. 34, 81739 Munich, Germany, in accordance with the requirements of the Federal Law of the Russian Federation dated November 23, 2009 No. 261-FZ, legislation on technical regulation and legislation on the protection of consumer rights of the Russian Federation
Products: juicers, mixers, blenders, cutters, kitchen machines, coffee makers, meat grinders, grinders
Trademark: Bosch
ATTENTION! The product range is constantly updated. Technical characteristics of products, including energy efficiency, are constantly being improved. Products regularly undergo mandatory pre-sale verification of conformity in accordance with current legislation. Information on the current certificates of conformity and their validity periods, current information on the class and characteristics of energy efficiency of products, and information on the current product range can be obtained from the organization performing the functions of the manufacturer on the territory of the Russian Federation: LLC "BSH Household Appliances", 198515, St. Petersburg, Peterhof, Karl Sipmsa Street, 1, letter A; additionally in Moscow, 119071, Malaya Kaluzhskaya Street, 15, phone (495) 737-2777, fax (495) 737-2798.
Kompaniya OOO "BSH Bytovye Pribory", 198515, Sankt-Peterburg, g. Petergof, ul. Karla Simensa, d. 1 lit. A, filial v Moskve, 119071, ul. Malaya Kaluzhskaya, d. 15, telefon (495) 737-2777, faks (495) 737-2798 osushchestvlyaet svoyu deyatel'nost' po podtverzhdeniyu sootvetstviya produktsii trebovaniyam proizvoditelya na edinoy tamozhennoy territorii Evraziyskogo ekonomicheskogo soyuza v sootvetstvii s deystvuyushchimi tekhnicheskimi reglamentami, v kachestve upolnomochennogo izgotovitelem litsa, a takzhe vypolnyaet trebovaniya, predusmotrennye zakonom № 184-FZ "O tekhnicheskom regulirovanii" dlya lits, vypolnyayushchikh funktsii inostrannogo izgotovitelya na territorii Rossiyskoy Federatsii.
Importerom v Rossiyskuyu Federatsiyu produktsii, sertifitsirovannoy v kachestve seriynoy produktsii, yavlyaetsya OOO "BSH Bytovye Pribory", 198515, Sankt-Peterburg, g. Petergof, ul. Karla Simensa, d. 1 lit. A, filial v Moskve, 119071, ul. Malaya Kaluzhskaya, d. 15, telefon (495) 737-2777.
Organizatsiya, ukazyvayushchaya na produktsiyu v sledyashchikh identifikatsiyakh produktsii i osushchestvlyayushchaya pervichnoe razmeshchenie produktsii na rynke Evropeyskogo soyuza, yavlyaetsya Robert Bosch Hausgeräte GmbH, Carl-Wery-Str. 34, 81739 München, Germany.
Original'nym izgotovitelem, osushchestvlyayushchim ot svoego imeni izgotovlenie produktsii i otvetstvennym za ee sootvetstvie trebovaniyam primenimykh tekhnicheskikh reglamentov, yavlyaetsya BSH Hausgeräte GmbH, Carl-Wery-Str. 34, 81739 München, Germany.
Pri perevozke, pogruzke, razgruzke i khranenii produktsii sleduet rukovodstvovat'sya, pomimo izlozhennykh v instruktsii po ekspluatatsii, sleduyushchimi trebovaniyami:
Zapreshchaetsya podvergat' produktsiyu sushchestvennym mekhanicheskim nagruzkam, kotorye mogut privesti k povrezhdeniyu produktsii i narusheniyu ee upakovki.
- Neobkhodimo izbegat' popadaniya na upakovku produktsii vody i drugikh zhidkostey.
Pered perevozkoy ili peredachey khranivsheysya v ekspluatatsii produktsii pri otritsatel'noy temperature neobkhodimo ubedit'sya v otsutstvii v produktsii vody.
Produktsiya prednaznachena k ispol'zovaniyu v usloviyakh temperatury vyshe 0°C i otnositel'noy vlazhnosti, ne prevyshayushchey 93%.
Pered nachalom ekspluatatsii produktsii, dlitel'noe vremya nakhodivsheysya pod vozdeystviem otritsatel'noy temperatury, neobkhodimo vyderzhat' v usloviyakh komnatnoy temperatury neskol'ko chasov.
Pravila realizatsii produktsii opredelyayutsya predpriyatiyami-izgotovitelyami v sootvetstvii s trebovaniyami deystvuyushchego zakonodatel'stva.
Ukazaniya po utilizatsii produktsii soderzhatsya v instruktsii po ekspluatatsii i mogut byt' utochneny u munitsipal'nykh organov ispolnitel'noy vlasti.
Produktsiya, realizovannaya izgotovitelem v techenie sroka deystviya sertifikata sootvetstviya, podtverzhdaet, chto sertifikat deystvitelen i pri ee postavke, prodazhe i ispol'zovanii (primenenii) v techenie sroka sluzhby, ustanovlennogo v sootvetstvii so stat'ey 183 Zakona o pravakh potrebiteley. Srok sluzhby na produktsiyu ukazan proizvoditelem v istochnike "Informatsiya izgotovitelya o garantionom i servisnom obsluzhivanii".
The product must be identified by model designation (model-E-Nr.), trial model (model Type) and trade name, which are applied to the product, packaging and (or) contained in the operating documents. In accordance with the requirements of the standard, the manufacturer identifies the product as follows:
E-Nr. /
The material number is a unique product designation of no more than 10 characters, used in trade (commercial designation or only for household appliances) by trade organizations. The material number (model) is indicated between the code word E-Nr. and the code word /
The service index is a conditional designation assigned to the product during the production process and used by the service.
Operating documents are developed for a unified range of products for a wide assortment, therefore the manufacturer provides for the indication of the product designation in the operating documents both in full and in part, provided that this allows determining the belonging of this operating document to a specific household appliance, accompanied by these operating documents. The planning in the process of identification of the conformity of the characteristics of the household appliance to the requirements contained in the attached operating documents is carried out by analyzing the information contained in the operating documents.
The composition of the operational documentation provided by the manufacturer for the products may include this information, the instruction (manual) for operation, and information about warranty and service conditions.
The products are marked by applying to the nameplate, on the packaging label, directly on the product packaging, on the product label, or on the accompanying label. The marking is applied in accordance with the requirements of the technical regulations of the Customs Union and the EAEU.

Products that have passed the conformity assessment procedure in accordance with the requirements of the technical regulations of the Customs Union or the technical regulations of the Eurasian Economic Union are marked with the single mark of product circulation on the market of the member states of the Customs Union (Eurasian Economic Union).
The products comply with the following technical regulations of the Customs Union:
TR CU 020/2011 Electromagnetic compatibility of technical equipment - TR CU 004/2011 On safety of low-voltage equipment - TR EAEU 037/2016 On restriction of use of hazardous substances in electrical engineering and radio electronics, taking into account the date of its entry into force
Operational documentation for products is drawn up in Russian. Operational documentation in the state languages of the member states of the Eurasian Economic Union, other than Russian, is provided in accordance with the requirements of the legislation of the state of the manufacturer or the state of the customer.
Information about the product kit may be requested by phone toll-free at (800) 200-2961, and is also available on the Internet at the manufacturer's website http://www.bosch-home.ru
| ToproBoe obno3a- HnO | Anpoba- Zhuon HnT | CepTHФикAT COOTBETCTBn | Стран- MTOTOB- TeN | |||
| Релагдзяпо- Ньу Home | Да Быдч | Дембует До | Ту Ту | |||
| Соювыхмanki | ||||||
| MCP3000 CNZP3 | C-DE.AR46.B | 7.3451 08.02.2016 | 07.02.2021 | № Б devi | ||
| MES25A0 CNCJ | C-DE.AR46 | 7.3741 08.02.2016 | 07.02.2021 | К Та | ||
| MES25C0 CNCJ | C-DE.AR46 | 7.3741 08.02.2016 | 07.02.2021 | К Та | ||
| MES25G0 CNCJ | C-DE.AR46 | 7.3741 08.02.2016 | 07.02.2021 | К Та | ||
| MES3500 CNCJ | C-DE.AR46 | 7.3741 08.02.2016 | 07.02.2021 | К Та | ||
| MES4000 CNC | C-DE.AR46 | 46.7.3451 08.02.2016 | 07.02.2021 | К Та | ||
| MES4010 CNC | C-DE.AR46 | B.7.3451 08.02.2016 | 07.02.2021 | К Та | ||
| Реки | ||||||
| MAS4000W CNAS11ST1 C-DE.AR46.B.73634 19.02.2016 18.02.2021 | CNAS11ST1 C-DE.AR46.B.73634 19.02.2016 18.02.2021 | C-DE.AR46.B.73634 19.02.2016 18.02.2021 | C-DE.AR46.B.73634 19.02.2016 18.02.2021 | C-DE.AR46.B.73634 19.02.2016 08.02.2021 | C-DE.AR46.B.73634 19.02.2016 18.02.2021 | C-DE.AR46.B.73634 19.02.2016 18.02.2021 |
| MAS4104W CNAS11EV1 C-DE.AR46.B.73634 19.02.2016 18.02.2021 | CNAS11EV1 C-DE.AR46.B.73634 19.02.2016 18.02.2021 | C-DE.AR46.B.73634 19.02.2016 18.02.2021 | C-DE.AR46.B.73634 19.02.2015 18.02.2021 | C-DE.AR46.B.73634 19.02.2016 18.02.2021 | C-DE.AR46.B.73634 19.02.2016 18.02.2021 | C-DE.AR46.B.7363 |
| MAS4201N CNAS11ST1 | C-DE.AR46.B.73634 19.02.2016 18.02.2021 | C-DE.AR46.B.73634 19.02.2016 18.02.2021 | C-DE.AR46.B.73634 19.02.2021 | C-DE.AR46.B.73634 19.02.2016 18.02.2021 | C-DE.AR46.B.73634 19.02.2016 18.02.2021 | C-DE.AR46.B.73634 18.02.2021 |
| MAS4601N CNAS11EV1 | C-DE.AR46.B.73634 19.02.2016 18.02.2021 | C-DE.AR46.B.73634 19.02.2016 18.02.2021 | C-DE.AR46.B.73634 19.02.2006 18.02.2021 | C-DE.AR46.B.73634 19.02.2016 18.02.2021 | C-DE.AR46.B.73634 19.02.2016 18.02.2021 | C-DE.AR46.B.736 |
| MAS6151M CNAS12 C-DE.AR46 | C-DE.AR46.B.73634 19.02.2016 18.02.2021 | C-DE.AR46.B.73634 19.02.2016 18.02.2021 | C-DE.AR46.B.73634 19.02.2015 08.02.2021 | C-DE.AR46.B.73634 19.02.2015 18.02.2021 | C-DE.AR46.B.73634 19.02.2015 18.02.2021 | C-DE.AR46.B.736 |
| MAS6151R CNAS12 | C-DE.AR46.B.73634 19.02.2016 18.02.2021 | C-DE.AR46.B.73634 19.02.2016 18.02.2021 | C-DE.AR46.B.73634 19.02.2014 18.02.2021 | C-DE.AR46.B.73634 19.02.2014 18.02.2021 | C-DE.AR46.B.73634 19.02.2014 18.02.2021 | C-DE.AR46.B.736 |
| MAS6200N CNAS12 | C-DE.AR46.B.73634 19.02.2016 18.02.2021 | C-DE.AR46.B.73634 19.02.2016 18.02.2021 | C-DE.AR46.B.73634 19.02,2016 18.02.2021 | C-DE.AR46.B.73634 19.02.2016 18.02.2021 | C-DE.AR46.B.73634 19.02.2016 18.02.2021 | C-DE.AR46.B. 73634 19.02.2016 18.02.2021 |
| MAS6210P CNAS12 | C-DE.AR46.B.73634 19.02.2016 18.02.2021 | C-DE.AR46.B.73634 19.02.2016 18.02.2021 | C-DE.AR46.B.73634 19.02 19.02.2015 18.02.2021 | C-DE.AR46.B.73634 19.02.2015 18.02.2021 | C-DE.AR46.B.73634 19.02.2015 18.02.2021 | C-DE.AR46.B.73634 19.02.2015 18.02.2021 |
| MFQ2201N CNAS12 | C-DE.AR46.B.73634 19.02.2015 18.02.2021 | C-DE.AR46.B.73634 19.02.2015 18.02.2021 | C-DE.AR46.B.73634 19.02.2014 18.02.2021 | C-DE.AR46.B.73634 19.02.2015 18.02.2021 | C-DE.AR46.B.73634 19.02.2015 18.02.2021 | C-DE.AR46.B.7363 |
| MFQ2210P CNAS12 | C-DE.AR46.B.73634 19.02.2015 18.02.2021 | C-DE.AR46.B.73634 19.02.2015 18.02.2021 | C-DE.AR46.B.73634 19.02,2015 18.02.2021 | C-DE.AR46.B.73634 19.02.2015 18.02.2021 | C-DE.AR46.B.73634 19.02.2015 18.02.2021 | C-DE.AR46.B. 73634 19.02.2015 18.02.2021 |
| MFQ2210Y CNAS12 | C-DE.AR46.B.73634 19.02.2015 18.02.2021 | C-DE.AR46.B.73634 19.02.2015 18.02.2021 | C-DE.AR46.B.73634 19.02 19.02.2015 18.02.2021 | C-DE.AR46.B.73634 19.02.2015 18.02.2021 | C-DE.AR46,B.73634 19.02.2015 18.02.2021 | C-DE.AR46.B.73634 19.02.2015 18.02.2021 |
| MFQ3500 CNAS12 | C-DE.AR46.B.73634 19.02.2015 18.02.2021 | C-DE.AR46.B.73634 19.02.2015 18.02.2021 | C-DE.AR46.B.73634 19.02 | C-DE.AR46.B.73634 19.02.2015 18.02.2021 | C-DE.AR46.B.73634 19.02.2015 18.02.2021 | C-DE.AR46.B.73634 19.02.20 |
| MFQ3555 CNAS12 | C-DE.AR46.B.73634 19.02.2015 18.02.2021 | C-DE.AR46.B.73634 19.02.2015 18.02.2021 | C-DE.AR46.B.73634 19.02 18.02.2021 | C-DE.AR46.B.73634 19.02 | C-DE.AR46.B.73634 19.02 | C-DE.AR46.B.73634 19.02 |
| MFQ3600 CNAS12 | C-DE.AR46.B.73634 19.02.2015 18.02.2021 | C-DE.AR46.B.73634 19.02.2015 18.02.2021 | C-DE.AR46.B.73634 19.19.02.2015 18.02.2021 | C-DE.AR46.B.73634 19.02 | C-DE.AR46.B.73634 19.02 | C-DE.AR46.B.73634 19.02 |
| MFQ36300 CNAS12 | C-DE.AR46.B.73634 19.02.2015 18.02.2021 | C-DE.AR46.B.73634 19.02.2015 18.02.2021 | C-DE.AR46.B.73634 19.5.0.2015 18.02.2021 | C-DE.AR46.B.73634 19.5.0.2015 18.02.2021 | C-DE.AR46.B.73634 19.5.0.2015 18.02.2021 | C-DE.AR456B.73634 19.5.0.2015 18.02.2021 |
| MFQ3640 CNAS12 | C-DE.AR46.B.73634 19.02.2015 18.02.2021 | C-DE.AR46.B.73634 19.02.2015 18.02.2021 | C-DE.AR46.B.73634 19.0 19.02.2015 18.02.2021 | C-DE.AR46.B.73634 19.02 | C-DE.AR46.B.73634 19.02 | C-DE.AR46.B.73634 19.02 |
| MFQ3640 CNAS12 | C-DE.AR46.B.73634 19.02.2015 18.02.2021 | C-DE.AR46.B.73634 19.02.2015 18.02.2021 | C-DE.AR46.B.73 6343 | C-DE.AR46.B.73634 19.02 | C-DE.AR46.B.73634 19.02 | C-DE.AR46.B.73634 19.02 |
| MFQ3650 CNAS12 | C-DE.AR46.B.73634 19.02.2015 18.02.2021 | C-DE.AR46.B.73634 19.02.2015 18.02.2021 | C-DE.AR46.B.73634 19.03 | C-DE.AR46.B.73634 19.03 | C-DE.AR46.B.73634 19.03 | C-DE.AR46.B.73634 19.03 |
| MFQ3650 CNAS12 | C-DE.AR46.B.73634 19.02.2015 18.02.2021 | C-DE.AR46.B.73634 19.02.2015 18.02.2021 | C-DE.AR46.B.73 6343 | C-RE.AR46.B.73634 19.03 | C-RE.AR46.B.73634 19.03 | C-RE.AR46.B.73634 19.03 |
| MFQ3650 CNAS12 | C-DE.AR46.B.73634 19.02.2015 18.02.2021 | C-DE.AR46.B.73634 19.02.2015 18.02. 19.02.2021 | C-DE.AR46.B.73634 19.03 | C-DE.AR46.B.73634 19.03 | C-DE.AR46.B.73634 19.03 | C-DE.AR46.B.73634 19.03 |
| MFQ3660 CNAS12 | C-DE.AR46.B.73634 19.02.2015 18.02.2021 | C-DE.AR46.B.73634 19.02 | C-DE.AR46.B.73634 19.03 | C-DE.AR46.B.73634 19.03 | C-DE.AR46.B.73634 19.03 | C-DE.AR46.B.73634 19.03 |
| MFQ3660 CNAS12 | C -DE.AR46.B.73634 19.02 | C-DE.AR46.B.73634 19.02 | C-DE.AR46.B.73634 19.03 | C-DE.AR46.B.73634 19.03 | C-DE.AR46.B.73634 19.03 | C-DE.AR46.B.73634 C-DE.AR46.B.73634 |
| MFQ3660 CNAS12 | C-DE.AR46.B.73634 19.02 | C-DE.AR46.B.73634 19.02 | C-DE.AR46.B.73634 19.03 | C-DE.AR46.B.73634 19.03 | C-DE.AR46.B.73634 19:03 | C-DE.AR46.B.73634 19:03 |
| MFQ3660 CNAS12 | C-DE.AR46.B.73634 19.02 | C-DE.AR46.B.73634 19.02 | C-DE.AR46.B.73634 19.03 | C-DE.AR46.B.73634 19.03 | C -DE.AR46.B.73634 19:03 | C-DE.AR46.B.73634 19:03 |
| MFQ3660 CNAS12 | C-DE.AR46.B.73634 19.02 | C-DE.AR46.B.73634 19.02 | C-DE.AE.R46.B.73634 19.03 | C-DE.AR46.B.73634 19.03 | C-DE.AR46.B.73634 19:03 | C-DE.AR46.B.73634 19:03 |
| MFQ3660 CNAS12 | C-DE.AR46 B.73634 19.02 | C-DE.AR46 B.73634 19.02 | C-DE.AR46 B.73634 19.03 | C-DE.AR46 B.73634 19.03 | C-DE.AR46 B.73634 19:03 | C-DE.AR46 B.73634 19:03 |
| MFQ3660 CNAS12 | C-DE.AR46 B.73634 19.02 | C-DE.AR46 B.73634 19.02 | C-DE.AR46 B.73634 19.03 | C-DE.AR46 B.7 6343 | C-DE.AR46 B.73634 19:03 | C-DE.AR46 B.73634 19:03 |
| MFQ3660 CNAS12 | C-DE.AR46.B.73634 19.02 | C-DE.AR46.B.73634 19.02 | C-DE.AR46.B.73634 19.03 | C-DE.AR46.B.7 6343 | C-DE.AR46.B.73634 19:03 | C-DE.AR46.B.73634 19:03 |
| MFQ3660 CNAS12 | C-DE.AR46.B.73634 19.02 | C-DE.AR46.B.73634 19.02 | D-DE.AR46.B.73634 19.03 | C-DE.AR46.B.73634 19.03 | C-DE.AR46.B.73634 19:03 | C-DE.AR46.B.73634 19:03 |
| MFQ3660 CNAS12 | C-DE:AR46.B.73634 19.02 | C-DE.AR46.B.73634 19.02 | C-DE.AR46.B.73634 19.03 | C-DE.AR46.B.73634 19.03 | C-DE.AR46.B.73634 19:02 | C-DE.AR46.B.73634 19:03 |
| MFQ3660 CNAS12 | C-DE.AR46.B.73634 19.02 | C-DE.AR46.B.73634 19.02 | C-DE.AR46.B.73634 19.03 | C -DE.AR46.B.73634 19.03 | C -DE.AR46.B.73634 19:03 | C -DE.AR46.B.73634 19:03 |
| MFQ3660 CNAS12 | C-DE.AR46.B.73634 19.02 | C-DE.AR46.B.73634 19.02 | C-DE.AR46.B.73634 19.03 | C -DE.AE.R46.B.73634 19.03 | C -DE.AR46.B.73634 19:03 | C -DE.AR46.B.73634 19:03 |
| MFQ3660 CNAS12 | C-DE.AR46.B.73634 19.02 | C-DE.AR46 B.73634 19.02 | C-DE.AR46 B.73634 19.03 | C -DE.AE.R46.B.73634 19.03 | C -DE.AR46 B.73634 19:03 | C -DE.AR46 B.73634 19:03 |
| MFQ3660 CNAS12 | C-DE.AR46.B.73634 19.02 | C-DE.AR46 B.73634 19.02 | C-DE.AR46 B.73634 19.03 | C -DE.AE.R46.B. 73634 19.03 | C -DE.AE.R46 B.73634 19:03 | C -DE.AE.R46 B.73634 19:03 |
| MFQ3660 CNAS12 | C-DE.AR46.B.73634 19.02 | C-DE.AR46 B.73634 19.02 | C-DE.AR46 B.73634 19.03 | C -DE.AE.R4 6343 | C -DE.AE.R4 B.73634 19:03 | C -DE.AE.R4 B.73634 19:03 |
| MFQ3660 CNAS12 | C-DE.AR46.B.73634 19.02 | C-DE.AR46 B.73634 19.02 | C-DE.AR46 B.73634 19.03 | C -DE.AE.R4 6 6343 | C -DE.AE.R4 B.73634 19:03 | C -DE.AE.R4 B.73634 19:03 |
| MFQ3660 CNAS12 | C-DE.AR46.B.73634 19.02 | C-DE.AR46 B.73634 19:03 | C -DE.AE.R4 6 6343 | C -DE.AE.R4 B.73634 19:03 | C -DE.AE.R4 B.73634 19:03 | C -DE.AE.R4 B.73634 19:03 |
| MFQ3660 CNAS12 | C-DE.AR46.B.73634 19.02 | C-DE.AR46 B.73634 19.02 | D -DE.AE.R4 6 6343 | C -DE.AE.R4 B.73634 19:03 | C -DE.AE.R4 B.73634 19:03 | C -DE.AE.R4 B.73634 19:03 |
| MFQ3660 CNAS12 | C-DE.AR46.B. 73634 19.02 | C-DE.AR46 B.73634 19.02 | C -DE.AE.R4 6 6343 | C -DE.AE.R4 B.73634 19:03 | C -DE.AE.R4 B.73634 19:03 | C -DE.AE.R4 B.73634 19:03 |
| MFQ3660 CNAS12 | C-DE.AR46 B.73634 19.02 | C-DE.AR46 B.73634 19.02 | C -DE.AE.R4 6 6343 | C -DE.AE.R4 B.73634 19:03 | C -DE.AE.R4 B.73634 19:03 | C -DE.AE.R4 B. 73634 19:03 |
| MFQ3660 CNAS12 | C-DE.AR46 B.73634 19.02 | C-DE.AE.R4 6 6343 | C -DE.AE.R4 B.73634 19:03 | C -DE.AE.R4 B.73634 19:03 | C -DE.AE.R4 B.73634 19:03 | C -DE.AE.R4 B.73634 19:03 |
| MFQ3660 CNAS12 | C-DE.AR46 B.73634 19.02 | D -DE.AE.R4 6 6343 | C -DE.AE.R4 B.73634 19:03 | C -DE.AE.R4 B.73634 19:03 | C -DE.AE.R4 B.73634 19:02 | C -DE.AE.R4 B.73634 19:03 |
| Toproboe обознaya- нiche | Диони ТУП | Росторы ТУП | Союп ТУП | Союп ТУП | Союп ТУП | Союп ТУП |
| Вл.dуч | Дуч.Буч До | Дуч.Буч До | Дуч.Буч До | |||
| Мужеры, obnevегы, искneyч龟 | ||||||
| MSM6B250 CNR11 C-DE | A46.B.73592 17.02 | 16.02.20 | 2021 | Ctobenry | ||
| MSM6B300 CNHR12 | C-DE.A46.B.73592 17.02.2016 | 6.02.2021 | C | Tobenry | ||
| MSM6B500 CNHR12 | C-DE.A46.B.73592 17.02.2016 | 6.02.2021 | C | Tobenry | ||
| MSM6B700 CNHR12 | C-DE.A46.B.73592 17.02.2016 | 6.02.2021 | C | Tobenry | ||
| MSM87130 CNH R28 C-DE.A46.B.73592 17.02.20 | 16.02.20 | 21 | Ctobenry | |||
| MSM87140 CNHR28 C-DE.A46.B.73592 17.02 | 2016 16.02 | 2021 | Ctobenry | |||
| MSM87160 CNHR28 C-DE.A46.B.73592 17.02 | 2016 16.02 | 2021 | Ctobenry | |||
| MSM87165 CNHR28 C-DE.A46.B.73592 17.02 | 2016 16.02 | 2021 | Ctobenry | |||
| MSM87180 CNH R28 C-DE.A46.B.73592 17.02 | 2016 16.02 | 2021 | Ctobenry | |||
| MSM88190 CNH R29 C-DE.A46.B.73592 17.02 | 2016 16.02 | 2021 | Ctobenry | |||
| MSM881X1 CNHR29 | C-DE.A46.B.73592 17.02.2016 | 6.02.2021 | C | Tobenry | ||
| MSM881X2 CNHR29 | C-DE.A46.B.73592 17.02.2016 | 6.02.2021 | C | Tobenry | ||
| Кухонны Комбайы | ||||||
| MCM3100W | CNCM12 | 12.02.2016 | 11.02.2021 | Ctobenry | ||
| MCM3110W | CNCM12 | 12.02.2016 | 11.02.2021 | Ctobenry | ||
| MCM3200W | CNCM12 | 12.02.2016 | 11.02.2021 | Ctobenry | ||
| MCM3201B | CNCM12 | 12.02.2016 | 11.02.2021 | Ctobenry | ||
| MCM3401M | CNCM12 | 12.02.2016 | 11.02.2021 | Ctobenry | ||
| MCM3501M | CNCM12 | 12.02.2016 | 11.02.2021 | Ctobenry | ||
| MCM4000 | CNCM20 | 12.02.2016 | 11.02.2021 | Ctobenry | ||
| MCM4100 | CNCM20 | 12.02.2016 | 11.02.2021 | Ctobenry | ||
| MCM4250 | CNCM20 | 12.02.2016 | 11.02.2021 | Ctobenry | ||
| MCM62020 | CNCM30 | 12.02.2016 | 11.02.2021 | Ctobenry | ||
| MCM64051 | CNCM30 | 12.02.2016 | 11.02.2021 | Ctobenry | ||
| MCM64085 | CNCM30 | 12.02.2016 | 11.02.2021 | Ctobenry | ||
| MCM68840 | CNCM30 | 12.02.2016 | 11.02.2021 | Ctobenry | ||
| MCM68885 | CNCM30 | 12.02.2016 | 11.02.2021 | Ctobenry | ||
| MUM4406 | CNUM5ST | 12.02.2016 | 11.02.2021 | Ctobenry | ||
| MUM4426 | CNUM5ST | 12.02.2016 | 11.02.2021 | Ctobenry | ||
| MUM4657 | CNUM5ST | 12.02.2016 | 11.02.2021 | Ctobenry | ||
| MUM4855 | CNUM5ST | 12.02.2016 | 11.02.2021 | Ctobenry | ||
| MUM4875EU | CNUM5ST | 12.02.2016 | 11.02.2021 | Ctobenry | ||
| MUM4880 | CNUM5ST | 12.02.2016 | 11.02.2021 | Ctobenry | ||
| MUM52131 | CNUM50 | 12.02.2016 | 11.02.2021 | Ctobenry | ||
| MUM54020 | CNUM51 | 12.02.2016 | 11.02.2021 | Ctobenry | ||
| MUM54240 | CNUM51 | 12.02.2016 | 11.02.2021 | Ctobenry | ||
| MUM54620 | CNUM51 | 12.02.2016 | 11.02.2021 | Ctobenry | ||
| MUM54720 | CNUM51 | 12.02.2016 | 11.02.2021 | Ctobenry | ||
| MUM54920 | CNUM51 | 12.02.2016 | 11.02.2021 | Ctobenry | ||
| MUM54D00 | CNUM51 | 12.02.2016 | 11.02.2021 | Ctobenry | ||
| MUM54G00 | CNUM51 | 12.02.2016 | 11.02.2021 | Ctobenry | ||
| MUM54I00 | CNUM51 | 12.02.2016 | 11.02.2021 | Ctobenry | ||
| MUM54P00 | CNUM51 | 12.02.2016 | 11.02.2021 | Ctobenry | ||
| MUM54Y00 | CNUM51 | 12.02.2016 | 11.02.2021 | Ctobenry | ||
| MUM56S40 | CNUM51 | 12.02.2016 | 11.02.2021 | Ctobenry | ||
| MUM57830 | CNUM51 | 12.02.2016 | 11.02.2021 | Ctobenry | ||
| MUM57860 | CNUM51 | 12.02.2016 | 11.02.2021 | Ctobenry | ||
| MUM58020 | CNUM51 | 12.02.2016 | 11.02.2021 | Ctobenry | ||
| MUM58243 | CNUM51 | 12.02.2016 | 11.02.2021 | Ctobenry | ||
| MUM58244 | CNUM51 | 12.02.2016 | 11.02.2021 | Ctobenry | ||
| MUM58252RU | CNUM51 | 12.02.2016 | 11.02.2021 | Ctobenry | ||
| MUM58420 | CNUM51 | 12.02.2016 | 11.02.2021 | Ctobenry | ||
| MUM58720 | CNUM51 | 12.02.2016 | 11.02.2021 | Ctobenry | ||
| MUM58920 | CNUM51 | 12.02.2016 | 11.02.2021 | Ctobenry | ||
| MUM58K20 | CNUM51 | 12.02.2016 | 11.02.2021 | Ctobenry | ||
| MUM58L20 | CNUM51 | 12.02.2016 | 11.02.2021 | Ctobenry | ||
| MUM59343 | CNUM51 | 12.02.2016 | 11.02.2021 | Ctobenry | ||
| MUM59363 | CNUM51 | 12.02.2016 | 11.02.2021 | Ctobenry | ||
| MUM59M55 | CNUM51 | 12.02.2016 | 11.02.2021 | Ctobenry | ||
| MUM9A32S00 | CNUM60A | 12.02.2016 | 11.02.2021 | Ctobenry | ||
| MUM9AD1S00 | CNUM61A | 12.02.2016 | 11.02.2021 | Ctobenry | ||
| MUM9AE5S00 | CNUM61B | 12.02.2016 | 11.02.2021 | Ctobenry | ||
| MUM9AX5S00 | CNUM61B | 12.02.2016 | 11.02.2021 | Ctobenry | ||
| MUM9YT5524 | CNUM61B | 12.02.2016 | 11.02.2021 | Ctobenry | ||
| MUM9YX5S12 | CNUM61B | 12.02.2016 | 11.02.2021 | Ctobenry | ||
| MUMXL2Oc | CNUM70 | 12.02.2016 | 11.02.2021 | Ctobenry | ||
| MUMXL4OG | CNUM70 | 12.02.2016 | 11.02.2021 | Ctobenry | ||
| MUMXX4OG | CNUM70 | 12.02.2016 | 11.02.2021 | Ctobenry | ||
| Коремпkn | ||||||
| MKM6003 | KM13 | 16.02.2016 | 15.02.2021 | Ctobenry | ||
| MKM6000 | KM13 | 16.02.2016 | 15.02.2021 | Ctobenry | ||
| Мирopyк | ||||||
| MFW3520G | CNFW3A | 03.12.2015 | 02.12.2020 | Потьш | ||
| MFW3520W | CNFW3A | 03.12.2015 | 02.12.2020 | Потьш | ||
| MFW3540W | CNFW3A | 03.12.2015 | 02.12.2020 | Потьш | ||
| MFW3630A | CNFW3B | 03.12.2015 | 02.12.2020 | Потьш | ||
| MFW3630I | CNFW3B | 03.12.2015 | 02.12.2020 | Потьш | ||
| MFW3640A | CNFW3B | 03.12.2015 | 02.12.2020 | Потьш | ||
| MFW385OB | CNFW3B | 03.12.2015 | 02.12.2020 | Потьш | ||
| MFW45020 | CNFW3B | 03.12.2015 | 02.12.2020 | Коть | ||
| MFW45120 | CNFW3B | 03.12.2015 | 02.12.2020 | Коть | ||
| MFW66020 | CNFW3B | 03.12.2015 | 02.12.2020 | Коть | ||
| MFW67440 | CNFW3B | 03.12.2015 | 02.12.2020 | Коть | ||
| MFW67600 | CNFW3B | 03.12.2015 | 02.12.2020 | Коть | ||
| MFW68640 | CNFW3B | 03.12.2015 | 02.12.2020 | Коть | ||
| MFW68660 | CNFW3B | 03.12.2015 | 02.12.2020 | Коть | ||
| MFW68680 | CNFW3B | 03.12.2015 | 02.12.2020 | Коть | ||
i. µ
| A | a | b | c | d | e | f | g | h | i | j | k | l | m | n | o | p | q | r | s | t | u | v | w | x | y | z | aa | bb | cc | dd | dd | dd | dd | dd | dd | dd | dd | dd | dd | dd | dd | dd | dd | dd | dd | dd | dd | dd | dd | dd | dd | dd | dd | dd | dd | dd | dd | dd | dd | dd | dd | dd | dd | dd | dd | dd | dd | dd | dd | dd | dd | dd | dd | dd | dd | dd | dd | dd | dd | d | e | f | g | h | i | j | k | l | m | n | o | p | q | r | s | t | u | v | w | x | y | z | a | b | c | d | e | f | g | h | i | j | k | l | m | n | o | p | q | r | s | t | u | v | w | x | y | z | a | b | c | d | e | f | g | h | i | j | k | l | m | n | o | p | q | r | s | t | u | v | w | x | y | z | d | e | f | g | h | i | j | k | l | m | n | o | p | q | r | s | t | u | v | w | x | y | z | d | e | f | g | h | i | j | k | l | m | n | o | p | q | r | s | t | u | v | w | x | y | z | d | e | f | f | g | h | i | j | k | l | m | n | o | p | q | r | s | t | u | v | w | x | y | z | d | e | f | g | h | i | j | k | l | m | n | o | p | q | r | s | t | u | v | w | x | y | z | d | e | f | g | h | l | m | n | o | p | q | r | s | t | u | v | w | x | y | z | d | e | f | g | h | i | j | k | l | m | n | o | p | q | r | s | t | u | v | w | x | y | z | d | e | f | g | h | l | m | n | o | p | q | f | g | h | i | j | k | l | m | n | o | p | q | r | s | t | u | v | w | x | y | z | d | e | f | g | h | i | j | k | l | m | n | o | p | q | r | s | t | u | v | w | x | y | z | d | e | f | g | h | 1 2 3 4 5 6 7 8 9 10 11 12 13 14 15 16 17 18 19 20 21 22 23 24 25 26 27 28 29 30 31 32 33 34 35 36 37 38 39 40 41 42 43 44 45 46 47 48 49 50 51 52 53 54 55 56 57 58 59 60 61 62 63 64 65 66 67 68 69 70 71 72 73 74 75 76 77 78 79 80 81 82 83 84 85 86 87 88 89 90 91 92 93 94 95 96 97 98 99 100 101 102 103 104 105 106 107 108 109 110 111 112 113 114 115 116 117 118 119 120 121 122 123 124 125 126 127 128 129 130 131 132 133 134 135 136 137 138 139 140 141 142 143 144 145 146 147 148 149 150 151 152 153 154 155 156 157 158 159 160 161 162 163 164 165 166 167 168 169 170 171 172 173 174 175 176 177 178 179 180 181 182 183 184 185 186 187 188 189 190 191 192 193 194 195 196 197 198 199 200 201 202 203 204 205 206 207 208 209 210 211 212 213 214 215 216 217 218 219 220 221 222 223 224 225 226 227 228 229 230 231 232 233 234 235 236 237 238 239 240 241 242 243 244 245 246 247 248 249 250 251 252 253 254 255 256 257 258 259 260 261 262 263 264 265 266 267 268 269 270 271 272 273 274 275 276 277 278 279 280 281 282 283 284 285 286 287 288 289 290 291 292 293 294 295 296 297 298 299 300 301 302 303 304 305 306 307 308 309 310 311 312 313 314 315 316 317 318 319 320 321 322 323 324 325 326 327 328 329 330 331 332 333 334 335 336 337 338 339 340 341 342 343 344 345 346 347 348 349 350 351 352 353 354 355 356 357 358 359 360 361 362 363 364 365 366 367 368 369 370 371 372 373 374 375 376 377 378 379 380 381 382 383 384 385 386 387 388 389 390 391 392 393 394 395 396 397 398 399 400 401 402 403 404 405 406 407 408 409 410 411 412 413 414 415 416 417 418 419 420 421 422 423 424 425 426 427 428 429 430 431 432 433 434 435 436 437 438 439 440 441 442 443 444 445 446 447 448 449 450 451 452 453 454 455 456 457 458 459 460 461 462 463 464 465 466 467 468 469 470 471 472 473 474 475 476 477 478 479 480 481 482 483 484 485 486 487 488 489 490 491 492 493 494 495 496 497 498 499 500 501 502 503 504 505 506 507 508 509 510 511 512 513 514 515 516 517 518 519 520 521 522 523 524 525 526 527 528 529 530 531 532 533 534 535 536 537 538 539 540 541 542 543 544 545 546 547 548 549 550 551 552 553 554 555 556 557 558 559 560 561 562 563 564 565 566 567 568 569 570 571 572 573 574 575 576 577 578 579 580 581 582 583 584 585 586 587 588 589 590 591 592 593 594 595 596 597 598 599 600 601 602 603 604 605 606 607 608 609 610 611 612 613 614 615 616 617 618 619 620 621 622 623 624 625 626 627 628 629 630 631 632 633 634 635 636 637 638 639 640 641 642 643 644 645 646 647 648 649 650 651 652 653 654 655 656 657 658 659 660 661 662 663 664 665 666 667 668 669 670 671 672 673 674 675 676 677 678 679 680 681 682 683 684 685 686 687 688 689 690 691 692 693 694 695 696 697 698 699 700 701 702 703 704 705 706 707 708 709 710 711 712 713 714 715 716 717 718 719 720 721 722 723 724 725 726 727 728 729 730 731 732 733 734 735 736 737 738 739 740 741 742 743 744 745 746 747 748 749 750 751 752 753 754 755 756 757 758 759 760 761 762 763 764 765 766 767 768 769 770 771 772 773 774 775 776 777 778 779 780 781 782 783 784 785 786 787 788 789 790 791 792 793 794 795 796 797 798 799 800 801 802 803 804 805 806 807 808 809 810 811 812 813 814 815 816 817 818 819 820 821 822 823 824 825 826 827 828 829 830 831 832 833 834 835 836 837 838 839 840 841 842 843 844 845 846 847 848 849 850 851 852 853 854 855 856 857 858 859 860 861 862 863 864 865 866 867 868 869 870 871 872 873 874 875 876 877 878 879 880 881 882 883 884 885 886 887 888 889 890 891 892 893 894 895 896 897 898 899 890 891 892 893 894 895 896 897 898 899 890 891 892 893 894 895 896 897 898 899 890 891 892 893 8 |
J 1
i 1
aieeall gll lglg 1s y a jil y sll Jjiall
a 1 a 1 1 1 1 1 1 1 1 1 1 1 1 1 1 1 1 1 1 1 1 1 1 1 1 1 1 1 1 1 1 1 1 1 1 1 1 1 1 1 1 1
aaiiei 1gai
JyIg) aIaIaIaIaIaIaIaIaIaIaIaIaIaIaIaIaIaIaIaIaIaIaIaIaIaIaIaIaIaIaIaIaIaIaIaIaIaIaIaIaIaIaIaIaIaIaIaIaIaa Iy JyJyJyJyJyJyJyJyJyJyJyJyJyJyJyJyJyJyJyJyJyJyJyJyJyJyJyJyJyJyJyJyJyJyJyJyJyJyJyJyJyJyJyJyJyJyJyJyJyJyJy
Kundendienst - Customer Service
AE United Arab Emirates,
BSH Home Appliances FZE
Round About 13,
Plot Nr MO-0532A
Jebel Ali Free Zone - Dubai
Tel.: 04 881 4401
mailto:service.uae@bshg.com
www.bosch-home.com/ae
Republic of Albania
ELEKTRO-SERVIS sh.p.k Rr. Shkelqim Fusha, Selite, Pallati "Matrix Konstruktion", Kati 0 dhe +1 1023 Tirane
Tel.: 42278130, -131
Fax: 42278130
mailto:info@elektro-servis.com
EXPERT SERVIS
Rugae Kavages,
Kulla B Nr 223/1 Kati I
1023 Tirane
Tel.: 44806061
Tel.: 42274941
Fax: 4 227 0448
Cel: +355 069 60 45555
mailto:info@expert-servis.al
Gate 1, 1555 Centre Road
Clayton, Victoria 3168
Tel.: 1300 369 744*
Fax: 1300 306 818
mailto:aftersales.au@bshg.com
www.bosch-home.com.au
- Mo-Fr: 24 hours
BA Bosna i Hercegovina, Bosnia-Herzegovina
"HIGH" d.o.o.
Gradačačka 29b
71000 Sarajevo
Tel.: 061 10 09 05
Fax: 033 21 35 13
mailto:bosch_siemens_sarajevo@yahoo.com
BE Belgique,Belgié,Belgium
BSH Home Appliances S.A. - N.V.
Business center FPI, floor 5,
Cherniyrah Blvd. 51B
1407 Sofia
Tel.: 0700 208 17
mailto:informacia.servis-bg@bshg.com
www.bosch-home.bg
BH Bahrain
Khalafat Est.
P.O.Box 5111
Manama
Tel.: 017400553
mailto:service@khalaifat.com
BY Belarus, Genapycb
OOO BCX BbITOBaTexHnka
Tel.: 4957372961
mailto:mok-kdhl@bshg.com
CH Schweiz, Suisse, Svizzera, Switzerland
BSH Hausgeräte AG
To arrange an engineer visit, to order spare parts and accessories or for product advice please visit www.bosch-home.co.uk or call Tel.: 0344 892 8979*
- Calls are charged at the basic rate, please check with your telephone service provider for exact charges
GR Greece, Ελλάς
BSH Ikiakes Siskeves A.B.E. Central Branch Service
17 km E.O. Athinon-Lamias & Potamou 20 14564 Kifisia
Τηλέφωνο: 210 4277701
Τηλέφωνο: 181 82
mailto:nkf-CustomerService@bshg.com www.bosch-home.gr
HK
Hong Kong
BSH Home Appliances Limited
Unit 1 & 2, 3rd Floor
North Block, Skyway House, 3 Sham Mong Road
Tai Kok Tsui, Kowloon
Hong Kong
Tel.: 2565 6151
Fax: 25656681
mailto:bosch.hk.service@bshg.com
www.bosch-home.cn
HR
Croatia
BSH kucanski uredjdi d.o.o. Ulica grada Vukovara 269P 10000 Zagreb
Tel.: 015520888
Fax: 01 6403 603
mailto:informacije.servis-hr@bshg.com www.bosch-home.com/hr
HU Hungary
IE Republic of Ireland
BSH Home Appliances Ltd. M50 Business Park
Ballymount Road Upper Walkinstown
Dublin 12
To arrange an engineer visit, to order spare parts and accessories or for product advice please call Tel: 01450 2655*
www.bosch-home.ie
- Calls are charged at the basic rate, please check with your telephone service provider for exact charges.
IL Israel,
5x72
C/S/B/ Home Appliance Ltd.
1, Hamasger St.
North Industrial Park
Lod, 7129801
Tel.: 089777222
Fax: 089777245
mailto:csb-serv@csb-ltd.co.il
www.bosch-home.co.il
IN India, Bharat,
BSH Household Appliances Mfg. Pvt. Ltd.
Arena House, Main Bldg, 2nd Floor
Plot No. 103, Road No. 12
MIDC, Andheri East
Mumbai 400 093
Toll Free 1800 266 1880*
www.bosch-home.com/in
- Mo-Sa: 8.00am to 8.00pm (exclude public holidays)
IS
Iceland
Smith & Norland hf.
Noatuni 4
105 Reykjavik
Tel.: 0520 3000
Fax: 0520 3011
www.sminor.is
IT
Italia, Italy
www.bosch-home.com/it
KZ Kazakhstan, Kazakhstan
IP Anackiy A.N. PTN-Service
Kuyshi Dina str.23/1 N3
Astana
Tel.: 717 236 64 55
mailto: ptnservice@mail.ru
Technodom Service
Utegen Batira Str. 73
480096 Almaty
Tel.: 727 258 8
mailto: lsr@technodom.kz
www.technodom.kz
Kombitechnocentr
Zhambyl st. 117
480096 Almaty
Tel.: 727 338 45 55
mailto:cts_pavel@bk.ru
www.cts.kz
TOO Evrika Service
Shimkent, Rskulova 22.
Shimkent 160018
Tel.: 727 252 44 63 75
mailto:evrika_kz@mail.ru
www.evrika.com
AV SERVICE
Abulhair hana Str. 51
Uralsk 090000
Tel.: 711 293 9949
mailto:oastafiev@avservice.kz
www.avservice.kz
LB
Lebanon
Teheni, Hana & Co.
Boulevard Dora 4043 Beyrouth
P.O.Box 90449
Jdeideh. 1202 2040
Tel.: 01 255 211
mailto:Info@Teheni-Hana.com
LT
Lithuania
Senuku prekybos centras UAB
Jonavos g. 62
44192 Kaunas
Tel.: 037 212 146
Fax: 037212165
www.senukai.lt
UAB "AG Service"
R. Kalantos g. 32
52494 Kaunas
Tel.: 070 055 655
Fax: 037331363
mailto:servisas@agservice.lt
www.agservice.lt
Baltic Continent Ltd.
Lukšio g. 23
09132 Vilnius
Tel.: 870 055 595
Fax: 052741722
mailto:info@balticcontinent.lt
www.balticcontinent.lt
UAB Emtoservis
Savanoriu pr.1 (Centrine bustine)
03116 Vilnius
Tel.: 870044724
Fax:052737368
mailto:svc@emtoservis.lt
www.emtoservis.lt
LU Luxembourg
S.R.L. "Rialto-Studio"
yn. 98
2012 KnunHeB
TeN./ΦaKc:022238180
mailto:bosch-md@mail.ru
ME Crna Gora, Montenegro
Elektronika komerc
UI.Slobode 17
84000 Bijelo Polje
Tel./Fax: 050432575
Mobil: 069324812
mailto:ekobosch.servis@t-com.me
MK Macedonia,Makeonna
GORENEC
Jane Sandanski 69 lok.3
1000 Skopje
Tel.: 022 454 600
Mobile: 070 697 463
mailto:gorenec@yahoo.com
MT Malta
Oxford House Ltd.
Notabile Road
Mriehel BKR 14
Tel.: 021 442 334
Fax: 021488656
www.oxfordhouse.com.mt
MV Raajjeyge Jumhooriyyaa, Maldives
Lintel Investments
Ma. Maadheli, Majeedhee Magu
Malé
Tel.: 0331 0742
mailto:mohamed.zuhuree@
lintel.com.mv
NL Nederlande, Netherlands
www.bosch-home.co.nz
- Mo-Fr: 8.30 am to 5.00 pm (exclude public holidays)
PL Polska, Poland
SA Kingdom Saudi Arabia,
Abdul Latif Jameel Electronics
and Airconditioning Co. Ltd.
BOSCH Service centre,
Kilo 5 Old Makkah Road
(Next to Toyota), Jamiah Dist.
P.O.Box 7997
Jeddah 21472
Tel.: 800 127 9999
mailto:palakkalin@alj.com
www.aljazeera.com.sa
SE Sverige, Sweden
BSH Home Appliances AB
Landsvagen 32
169 29 Solna
Tel.: 0771 19 70 00 local rate
Tel.: 0771 11 22 77 local rate
mailto:Bosch-Service-SE@bshg.com
www.bosch-home.se
SG Singapore
BSH Home Appliances Pte. Ltd.
Block 4012, Ang Mo Kio Avenue 10
01-01 Techplace 1
Singapore 569628
Tel.: 67515000
Fax: 6751 5005
mailto:bshsgp.service@bshg.com
www.bosch-home.com.sg
- Mo-Fr: 8.30am to 7.00pm, Sa: 8.30am to 5.30pm (exclude public holidays)
SI Slovenia, Slovenia
BSH Hišni aparati d.o.o.
Litostrojska 48
1000 Ljubljana
Tel.: 015830700
Fax: 015830889
mailto:informacije.servis@bshg.com
www.bosch-home.com/si
SK Slovensko, Slovakia
www.bosch-home.com/tr
- Calling the service center from landlines
is charged at local rates,
from mobile phones, depending on
BSH Home Appliances Private Limited
11F., No.80, Zhouzi St., Neihu Dist.
Taipei City 11493
Tel.: 0800 368 888
Fax: 02 2627 9788
mailto:bshtzn-service@bshg.com
TOB "BSH Household Appliances"
Tel.: 044 490 2095
mailto:bsh-service.ua@bshg.com
Service-General SH.P.K.
Service-General SH.P.K.
Rruga Mag Prishtine-Ferizaj
70000 Ferizaj
Tel.: 0290 321 434
Tel.: 0290 330 723
mailto:a_service@
gama-electronics.com
XS Srbija, Serbia
BSH Kučni aparati d.o.o.
Milutina Milankovica br. 9ž
11070 Novi Beograd
Tel.: 011 353 70 08
Fax:0112052389
mailto:informacije.servis-sr@
bshg.com
www.bosch-home.rs
ZA South Africa
BSH Home Appliances (Pty) Ltd.
15th Road Randjespark
Private Bag X36, Randjespark
1685 Midrand-Johannesburg
Tel.: 086 002 6724
Fax: 086 617 1780
applianceserviceza@bshg.com
www.bosch-home.com/za
bosch-infoteam@bshg.com
Thank you for buying a Bosch Home Appliance!
Register your new device on MyBosch now and profit directly from:
- Expert tips & tricks for your appliance
- Warranty extension options
- Discounts for accessories & spare parts
- Digital manual and all appliance data at hand
- Easy access to Bosch Home Appliances Service
Free and easy registration - also on mobile phones:
www.bosch-home.com/welcome
BOSCH HOME APPLIANCES SERVICE
Looking for help? You'll find it here.
Expert advice for your Bosch home appliances, need help with problems or a repair from Bosch experts.
Find out everything about the many ways Bosch can support you:
www.bosch-home.com/service
Contact data of all countries are listed in the attached service directory.
| O | |||||||
| 1 | ○ | ✓ | ✓ | ||||
| O/I | 1·2 rev | ✓ | ✓ | ✓ | ✓ | ||
| 2.7 mm | ✓ | ✓ | ✓ | ||||
| 4 mm | ✓ | ✓ | ✓ | ✓ | ✓ | ✓ | |
| 8 mm | ✓ | ✓ | ✓ | ✓ | ✓ | ✓ | |
| ✓ | ✓ | ✓ | ✓ | ✓ | ✓ | ✓ | |
| ✓ | ✓ | ✓ | ✓ | ✓ | ✓ | ||
| ✓ | ✓ | ✓ | ✓ | ✓ | |||
| ✓ | ✓ | ||||||
| ✓ | ✓ | ||||||
| ✓ | ✓ | ✓ | ✓ | ||||
| ✓ | ✓ | ✓ | ✓ | ||||
| ✓ | ✓ | ✓ | ✓ | ||||
| ✓ | ✓ | ✓ | ✓ | ||||
| ✓ | ✓ | ✓ | ✓ | ||||
| ✓ | ✓ | ✓ | ✓ | ||||
| ✓ | ✓ | ✓ | ✓ | ||||
| ✓ | ✓ | ✓ | ✓ | ||||

- SAFETY INSTRUCTIONS
- DANGER OF ELECTRIC SHOCK AND FIRE
- RISK OF INJURY
- CAUTION! RISK OF DAMAGING THE APPLIANCE
- IMPORTANT
- CONGRATULATIONS ON THE PURCHASE OF YOUR NEW BOSCH APPLIANCE
- CONTENT
- OVERVIEW
- →FIG. A
- BASE UNIT
- BASE ATTACHMENT
- MEAT MINCER INSERT
- SAUSAGE FILLER INSERT
- KEBBE INSERT
- PASTA INSERT
- WHIRL INSERT
- →FIG
- SHREDDING ATTACHMENT
- CITRUS PRESS ATTACHMENT
- BEFORE USING FOR THE FIRST TIME
- CAUTION
- CONTROL AND DISPLAY ELEMENTS
- MFW
- MFW36../MFW
- ALL MODELS
- OPERATION INDICATOR
- RELEASE BUTTON
- CABLE STORAGE COMPARTMENT
- STORAGE COMPARTMENT
- OVERLOAD PROTECTION
- REPLACE AGITATOR PADDLE
- SPEED SETTING
- ONLY MFW36.../MFW
- REVERSING FUNCTION
- NOTE
- PREPARATION
- MEAT MINCER
- SAUSAGE FILLER
- KEBBE MAKER
- PASTA MAKER
- WHIRL MAKER
- PREPARATION FOR MEAT MINCER
- SEE FIG. D
- PREPARATION FOR SAUSAGE FILLER
- SEE FIG
- PREPARATION FOR KEBBE MAKER
- PREPARATION FOR PASTA MAKER
- PREPARATION FOR WHIRL MAKER
- →FIG. H
- USE
- THE FOLLOWING EXAMPLE DESCRIBES USE OF THE BASE ATTACHMENT AS A MEAT MINCER
- RIANGLE RISK OF INJURY
- NOTE (MFW36.../MFW38...)
- SEE SEQUENCE OF FIGURES J
- CAUTION! (MFW36.../MFW38...)
- → SEQUENCE OF FIGURES K
- SEQUENCE OF FIGURES
- NOTES
- CARE AND DAILY CLEANING
- RISK OF ELECTRIC SHOCK
- RECIPES
- KEBBE
- FILLING
- PREPARE THE KEBBE
- BREAD DUMPLINGS
- PASTA
- BASIC RECIPE FOR PASTA DOUGH WITH EGGS
- MAKING PASTA
- WHIRLS
- BASIC RECIPE FOR SHORTCRUST PASTRY
- MAKING THE BISCUITS
- TIPS
- USING THE PERFORATED DISCS
- USING THE INSERTS
- DISPOSAL
- GUARANTEE
- SPARE PARTS AND ACCESSORIES
- TROUBLESHOOTING
- OVERLOAD SAFETY
- WARNING! MFW36.../MFW
- PROTECT THE MICROWAVE FROM STRONG WINDS WITH THE COVER
- FIG. H
- TIME
- INFORMATION (MFW36..../MFW38....)
- KEBAB ATTACHMENT
- NOZZLE
- NOZZLE FOR SHAPED PASTA
- ONLY FOR MFW36.../MFW
- ATTENTION
- PREPARING THE SAUSAGE FILLING
- →FIGURE D
- PREPARING THE KEBAB NOZZLE
- →FIGURE F
- PREPARATION OF THE MACARONI ATTACHMENT
- →MACARONI
- →SHREDDING
- APPLICATION
- WARNING
- WARNING! (MFW36.../MFW38...)
- →OPERATING INSTRUCTIONS
- CITRUS NOZZLE
- USAGE
- →JUICES M
- ATTENTION! (MFW36.../MFW38...)
- RECIPE
- KE66E
- PREPARING THE KE66E
- MANUFACTURER
- MAIN RECIPE FOR MINCED MEAT
- DOCUMENTS
- USE OF GRATING DISCS
- SAUSAGE CASINGS
- GRATER ATTACHMENT
- USE OF INSERTS
- WARRANTY TERMS
- HELP WITH MALFUNCTIONS
- FIGURE A
- MAIN UNIT
- MAIN ATTACHMENT
- CUTTING DISCS
- SAUSAGE ATTACHMENT PARTS
- KEBAB SKEWER ATTACHMENT
- ATTACHMENTS FOR MACARONI
- ATTACHMENT FOR TUBULAR PASTRY
- → FIGURE
- ATTACHMENT FOR BISCUITS
- ATTACHMENT FOR CITRUS JUICER
- BEFORE FIRST USE
- BEFORE USING
- OPERATING INDICATOR
- UNPACKING
- MEAT GRINDER
- SAUSAGE ATTACHMENT
- SHAPING DISC FOR KEBBE
- PREPARING THE SAUSAGE FILLER
- →FIGURE
- PREPARING THE FORMING ATTACHMENT FOR KEBBE
- PREPARING THE NOODLE-FORMING ATTACHMENT
- FIGURE
- PREPARING THE FORMING ATTACHMENT FOR STUFFED PASTA
- FIGURE H
- → SEE FIGURE M
- INSTRUCTIONS
- DAILY CLEANING
- DANGER OF ELECTRIC SHOCK
- DANGER OF INJURY
- FILLING FOR THE TUBES
- PREPARING THE KEBBE
- MACARONI
- FIGURE COOKIES
- MAKING COOKIES
- SAUSAGES AND PÂTÉS
- ATTACHMENT FOR SHREDDING
- WARRANTY SERVICE
- HOUR HOTLINE*: 8 (800)
- ACCESSORIES AND CARE PRODUCTS
- MANUFACTURER'S WARRANTY
- ATTENTION! IMPORTANT INFORMATION FOR THE CONSUMER
- SERVICE INFORMATION
- INFORMATION ABOUT HOUSEHOLD APPLIANCES MANUFACTURED UNDER THE CONTROL OF THE BSH HAUSGERÄTE GMBH CONCERN, CARL-WERY-STR. 34, 81739 MUNICH, GERMANY, IN ACCORDANCE WITH THE REQUIREMENTS OF THE FEDERAL LAW OF THE RUSSIAN FEDERATION DATED NOVEMBER 23, 2009 NO. 261-FZ, LEGISLATION ON TECHNICAL REGULATION AND LEGISLATION ON THE PROTECTION OF CONSUMER RIGHTS OF THE RUSSIAN FEDERATION
- KUNDENDIENST - CUSTOMER SERVICE
- MK MACEDONIA,MAKEONNA
- MT MALTA
- MV RAAJJEYGE JUMHOORIYYAA, MALDIVES
- NL NEDERLANDE, NETHERLANDS
- PL POLSKA, POLAND
- SA KINGDOM SAUDI ARABIA
- SE SVERIGE, SWEDEN
- SG SINGAPORE
- SI SLOVENIA, SLOVENIA
- SK SLOVENSKO, SLOVAKIA
- XS SRBIJA, SERBIA
- ZA SOUTH AFRICA
- THANK YOU FOR BUYING A BOSCH HOME APPLIANCE
- LOOKING FOR HELP? YOU'LL FIND IT HERE
Brand : BOSCH
Model : CompactPower MFW3630A
Category : Meat Grinder