PA1200BH - Drill Pattfield - Free user manual and instructions
Find the device manual for free PA1200BH Pattfield in PDF.
| Product type | Rotary hammer / Impact drill |
| Brand | Pattfield |
| Model | PA1200BH |
| Rated voltage | 230 V ~ 50 Hz |
| Rated power | 1200 W |
| No-load speed | 800 rpm |
| Impact frequency | 4000 bpm |
| Impact energy | 3.6 J |
| Max drilling capacity (concrete) | 26 mm |
| Max drilling capacity (steel) | 13 mm |
| Max drilling capacity (wood) | 40 mm |
| Sound pressure level | 96.4 dB(A) (K = 3 dB) |
| Sound power level | 107.4 dB(A) (K = 3 dB) |
| Vibrations (impact drilling) | 19.327 m/s² (K = 1.5 m/s²) |
| Vibrations (chiseling) | 17.879 m/s² (K = 1.5 m/s²) |
| Protection class | II (double insulation) |
| Functions | Drilling, impact drilling, chiseling |
| Chuck type | SDS-Plus |
| Auxiliary handle | Yes, included |
| Package contents | 1 × Rotary hammer, 1 × Auxiliary handle |
| Warranty | 3 years (according to conditions) |
| Maintenance | Clean regularly, lubricate moving parts, check cord |
| Recommended safety equipment | Safety glasses, hearing protection, dust mask |
| Intended use | Impact drilling in concrete, brick, stone; drilling in metal/wood; chiseling |
Frequently Asked Questions - PA1200BH Pattfield
User questions about PA1200BH Pattfield
0 question about this device. Answer the ones you know or ask your own.
Ask a new question about this device
Download the instructions for your Drill in PDF format for free! Find your manual PA1200BH - Pattfield and take your electronic device back in hand. On this page are published all the documents necessary for the use of your device. PA1200BH by Pattfield.
USER MANUAL PA1200BH Pattfield
text_image
Scanned image of a book with Chinese text and a red prohibition symbol, showing hands reading and browsing content.Pattfield
PROG TOOLS
Manufactured for
Hornbach Bounserkt AG
Hornbachströte 11
10879 Binhemont, Germany
Pattfield
FREE TOOLS
natural_image
Exterior view of a black and gray electric drill press (no visible text or symbols)
text_image
Illustration showing hands holding a document with images and red warning symbols, likely illustrating a safety or hazard detection concept.
PA-1200BH
DE Ausleppenzen beschränft
EH. Observer les napiés à disifier !
1
[Unreadable]
NL Let op de uitwampages!
57 Observera utiletsbladen!
02. Viz moklasnici slumby
1. 2017年1月1日
ch. Tumha S10281536 toany.
R0 Alunție la pugăra plătăl
60 Observe the following page!
74-12096 201501 1911

DE Ümschung der Original Betriebstechnung
ER: Traduction de la pénico originale
1. 2017年1月1日
1. 2017年1月2日
Verlaing aan de opprekkelijk gebruiksszernwijing
5V Overcoming av original transversing
67. Pecklad pravnikaty pravku i pravki
The following table is in Chinese:
an A##s# pr#o#n## ####s #a polizos
B0 Tradicts a inelucțășne origina
61 Original Instructions
Molou pohama 1905N
2019年1月1日
Soburne 1250 N
Roanamer 1200 W
ohertum 12012
[Unreadable]
4500 W/1201W
2、审议通过《关于公司符合重大资产重组条件的议案》
(1) 2016-04-05
Safary Institute 1205 N
m Sclt
FR Page 11
1
10
1942-16-A
51 5141
02 Strans St
50
D# D###
1.0
68. Page 10
Auchspension beschim!
Observer les pages à deplier!
Before the question answered
1. 2017年1月1日
Let op ne upkouapagni-21
Observa ulabsbladen
Viz nizklóbezi elsnekyl
Vimpala u moklasceu vinkl
Natalytic activity
in particular to probably present
Observe the Inclust page!
text_image
Labeled diagram of a drill bit with numbered parts for identification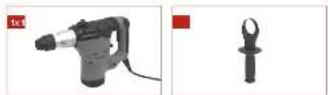
DE Listenunfang
FR Elendue de livraison
II. Malaria: compreso nella familiare
NL Leveningsomfang
5V Leveransomding
07 Bazzah dodzisky
SK Pozsah dorasky
80 Volumalist
GO Stage of delivery
Vielen Dank!
text_image
Pattfield® ERGO TOOLS1200 W Bohrhammer PA-1200BH
hergestellt für:
Hornbach Baumarkt AG
Hornbachstraße 11
text_image
Pattfield® ERGO TOOLSMarteau perforateur 1200 W PA-1200BH
fabriqué pour :
Hornbach Baumarkt AG
Hornbachstraße 11
Max. drilling capacity Calcestruzzo 26 mm
Acciaio 13 mm
Legno 40 mm
text_image
Pattfield® ERGO TOOLS1200 W Trapano a percussione PA-1200BH
fabbricato per:
Hornbach Baumarkt AG
Hornbachstraße 11
76879 Bornheim / Germania
Max. vibrationsemission
Slagborrning i betong:
a_h,HD = 19,327 ~m/s^2 / 0säkerhet K = 1,5 ~m/s^2
Mejsling:
a_h,CHeq = 17,879 ~m/s^2 / 0säkerhet K = 1,5 ~m/s^2
Buller & vibrationer
text_image
Pattfield® ERGO TOOLS1200 W Borrhammare PA-1200BH
tillverkad för
Hornbach Baumarkt AG
Hornbachstraße 11
76879 Bornheim / Tyskland
text_image
Pattfield® ERGO TOOLStext_image
Pattfield® ERGO TOOLS1200 W Vrtacie kladivo PA-1200BH
vyrobené pre:
Hornbach Baumarkt AG
Hornbachstraße 11
text_image
Pattfield® ERGO TOOLSWe are convinced that this tool will exceed your expectations and wish you joy while using it.
Please read this user manual completely and observe the safety instructions.
Scope of delivery
1x Rotary hammer
1x Auxiliary handle
If any parts are missing or damaged, please contact your Hornbach Store.
Table of content
Scope of delivery 81
Symbols 81
Safety instructions 82
Product overview 86
Intended use 86
Using the tool 86
Adjustments 87
Technical Data 88
Noise & Vibration 88
Care & Maintenance 89
Declaration of Conformity 89
Warranty 90
Disposal 90
Symbols

Please read this user manual carefully and keep it for further reference.

Warning of accident and injury to persons and serious damage to property.

Wear safety glasses for protection of your eyes.

Wear hearing protection for protection of your ears.

Wear dust mask for protection of your respiratory tract.

Do not use the tool outdoors or in damp environments.

Protection Class II
Safety Instructions
GENERAL POWER TOOL SAFETY WARNINGS

WARNING Read all safety warnings and all instructions. Failure to follow the warnings and instructions may result in electric shock, fire and/or serious injury.
Save all warnings and instructions for future reference.
The term „power tool“ in the warnings refers to your mains-operated (corded) power tool or battery-operated (cordless) power tool.
1 WORK AREA SAFETY
a) Keep work area clean and well lit. Cluttered or dark areas invite accidents.
b) Do not operate power tools in explosive atmospheres, such as in the presence of flammable liquids, gases or dust. Power tools create sparks which may ignite the dust or fumes.
c) Keep children and bystanders away while operating a power tool. Distractions can cause you to lose control.
2 ELECTRICAL SAFETY
a) Power tool plugs must match the outlet. Never modify the plug in any way. Do not use any adapter plugs with earthed (grounded) power tools. Unmodified plugs and matching outlets will reduce risk of electric shock.
b) Avoid body contact with earthed or grounded surfaces, such as pipes, radiators, ranges and refrigerators. There is an increased risk of electric shock if your body is earthed or grounded.
c) Do not expose power tools to rain or wet conditions. Water entering a power tool will increase the risk of electric shock.
d) Do not abuse the cord. Never use the cord for carrying, pulling or unplugging the power tool. Keep cord away from heat, oil, sharp edges or moving parts. Damaged or entangled cords increase the risk of electric shock.
e) When operating a power tool outdoors, use an extension cord suitable for outdoor use. Use of a cord suitable for outdoor use reduces the risk of electric shock.
f) If operating a power tool in a damp location is unavoidable, use a residual current device (RCD) protected supply. Use of an RCD reduces the risk of electric shock.
3 PERSONAL SAFETY
a) Stay alert, watch what you are doing and use common sense when operating a power tool. Do not use a power tool while you are tired or under the influence of drugs, alcohol or medication. A moment of inattention while operating power tools may result in serious personal injury.
b) Use personal protective equipment. Always wear eye protection. Protective equipment such as dust mask, non-skid safety shoes, hard hat, or hearing protection used for appropriate conditions will reduce personal injuries.
c) Prevent unintentional starting. Ensure the switch is in the off-position before connecting to power source and/or battery pack, picking up or carrying the tool. Carrying power tools with your finger on the switch or energising power tools that have the switch on invites accidents.
d) Remove any adjusting key or wrench before turning the power tool on. A wrench or a key left attached to a rotating part of the power tool may result in personal injury.
e) Do not overreach. Keep proper footing and balance at all times. This enables better control of the power tool in unexpected situations.
f) Dress properly. Do not wear loose clothing or jewellery. Keep your hair, clothing and gloves away from moving parts. Loose clothes, jewellery or long hair can be caught in moving parts.
g) If devices are provided for the connection of dust extraction and collection facilities, ensure these are connected and properly used. Use of dust collection can reduce dust-related hazards.
4 POWER TOOL USE AND CARE
a) Do not force the power tool. Use the correct power tool for your application. The correct power tool will do the job better and safer at the rate for which it was designed.
b) Do not use the power tool if the switch does not turn it on and off. Any power tool that cannot be controlled with the switch is dangerous and must be repaired.
c) Disconnect the plug from the power source and/or the battery pack from the power tool before making any adjustments, changing accessories, or storing power tools. Such preventive safety measures reduce the risk of starting the power tool accidentally.
d) Store idle power tools out of the reach of children and do not allow persons unfamiliar with the power tool or these instructions to operate the power tool. Power tools are dangerous in the hands of untrained users.
e) Maintain power tools. Check for misalignment or binding of moving parts, breakage of parts and any other condition that may affect the power tool's operation. If damaged, have the power tool repaired before use. Many accidents are caused by poorly maintained power tools.
f) Keep cutting tools sharp and clean. Properly maintained cutting tools with sharp cutting edges are less likely to bind and are easier to control.
g) Use the power tool, accessories and tool bits etc. in accordance with these instructions, taking into account the working conditions and the work to be performed. Use of the power tool for operations different from those intended could result in a hazardous situation.
5 SERVICE
a) Have your power tool serviced by a qualified repair person using only identical replacement parts. This will ensure that the safety of the power tool is maintained.
MACHINE SPECIFIC SAFETY WARNINGS FOR ROTARY HAMMERS
a) Wear ear protectors. Exposure to noise can cause hearing loss.
b) Use auxiliary handle(s), if supplied with the tool. Loss of control can cause personal injury.
c) Hold power tool by insulated gripping surfaces, when performing an operation where the cutting accessory may contact hidden wiring or its own cord. Cutting accessory contacting a “live” wire may make exposed metal parts of the power tool “live” and could give the operator an electric shock.
d) Use a metal detector to determine if there are gas or water pipes hidden in the work area or call the local utility company for assistance before beginning the operation. Striking or cutting into a gas line will result in explosion. Water entering an electrical device may cause electrocution.
e) Position the cord clear of rotating bit. Do not wrap the cord around your arm or wrist. If cord becomes entangled with the spinning bit it could entrap you causing serious personal injury.
f) Position yourself to avoid being caught between the tool or side handle and walls or posts. Should the bit become bound or jammed in the work, the reaction torque of the tool could crush your hand or leg.
g) Do not strike the bit with a hand-held hammer or sledge hammer when attempting to dislodge a bound or jammed bit. Fragments of metal from the bit could dislodge and strike you or bystanders.
h) Never place the tool down until the bit or accessory has come to a complete stop. Do not use dull or damaged bits and accessories. Dull or damaged bits have a greater tendency to bind in the workpiece.
i) When removing the bit from the tool avoid contact with skin and use proper protective gloves when grasping the bit or accessory. Accessories may be hot after prolonged use.
j) Do not run the tool while carrying it at your side. The spinning drill bit may become entangled with clothing and injury may result.

text_image
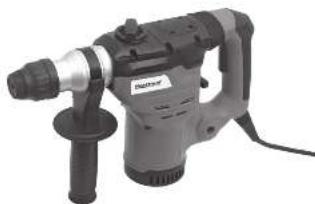
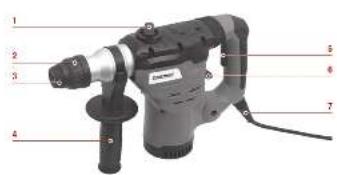
EN 85Product overview
1 Top hammer-drill / hammer switch
2 Locking sleeve
3 Chuck
4 Auxiliary handle
5 On / Off switch
6 Rear hammer-drill / drill switch
7 Power cord
Using the tool
- To switch on the tool, press and hold the on / off switch 5.
- Make sure your workpiece can not slip. Start working, while holding the tool firmly with both hands.
- To switch off the tool, release the on / off switch 5.
Intended Use
The tool is intended for hammer drilling in concrete, brick and stone. It can be set to rotation only for drilling in metal and wood and also for hammer function only for chiseling brick, concrete and masonry products. The tool is not intended for commercial use.
Any other use or modification to the tool is considered as improper use and could cause considerable dangers.
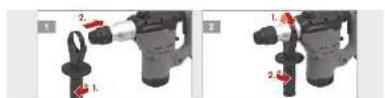
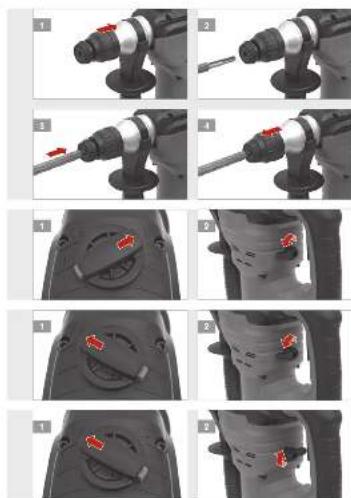
APPLY HANDLE
1 Release the noose of the auxiliary handle 4 and slide it onto the rotary hammer.

Caution! Make sure the tool is switched off and unplugged.
2 Set the desired angle and tighten the auxiliary handle 4 securely.
FIT CHISEL OR DRILL
1 Slide back the locking sleeve 2.

Caution! Make sure the tool is switched off and unplugged and protective gloves.
2 Fit the SDS-plus chisel or drill into the chuck 3.
3 Make sure that the chisel or drill is fully inserted.
4 Relase the locking sleeve 2 and check if the chisel or drill is securely fixed. To remove the chisel or drill, slide back the locking sleeve 2 and pull out the chisel or drill.
HAMMER FUNCTION
1 Set the top hammer-drill / hammer switch 1 to hammer T.

Caution! Only set operation modes while the appliance is switched off.
2 Set the rear hammer-drill / drill switch 6 to hammer-drill T:
HAMMER-DRILL FUNCTION
1 Set Set the hammer-dmill/drill switch 1 to hammer-drill Ti.

Caution! Only set operation modes while the appliance is switched off.
2 to hammer-drill T.
DRILL FUNCTION
1 Set Ste tear hamp hera drill /drill swh hammer switch 1 to hammer-drill T2.

Caution! Only set operation modes while the appliance is switched off.
2 to drill
Technical Data
Nominal voltage 230 V / \~50 Hz
Rated power 1200 W
No-load speed (n₀) 800/min
Impact rate 4000/min
Impact energy 3.6 J
Max. drilling capacity Concrete 26 mm
Steel 13 mm
Wood 40 mm
Protection Class / II

Sound pressure level ( L_pA ) 96.4 dB(A) / Uncertainty K = 3 dB(A)
Sound power level ( L_WA ) 107.4 dB(A) / Uncertainty K = 3 dB(A)
Max. vibration emission
Hammer drilling into concrete:
$$ a _ {h, H D} = 1 9. 3 2 7 \mathrm{m} / \mathrm{s} ^ {2} / \text { Uncertainty } K = 1. 5 \mathrm{m} / \mathrm{s} ^ {2} $$
Chisseling:
$$ a _ {h, \mathrm{CHeq}} = 1 7, 8 7 9 \mathrm{m} / \mathrm{s} ^ {2} / \text { Uncertainty K } = 1, 5 \mathrm{m} / \mathrm{s} ^ {2} $$
Noise & Vibration
The values given in these instructions have been measured in accordance with a standardized measurement procedure specified in EN 60745 and can be used to compare tools. It may be used for a preliminary assessment of exposure. The declared vibration data represents the main applications of the tool, but different uses of the tool or poor maintenance can result in different vibration data. This may significantly increase the vibration level over the total working period.
An estimation of the vibration level should also take into account the intervening periods, when the tool is switched off or it running but is not actually in use. This can result in a much lower vibration load over the whole working period.
Additional safety measure can be taken to protect the user from effects of vibration: Maintain the tool and its accessories, keep the hands warm and organize work patterns.
Care & Maintenance

Caution! Make sure the tool is switched off and unplugged.
- Always keep the tool clean, dry and free of oil or grease.
- Wear safety glasses to protect your eyes whilst cleaning.
- For safe and proper working, always keep the machine and ventilation slots clean.
- Regularly check to see if any dust or foreign matter has entered the grills near the motor and around the on/off switch. Use a soft brush to remove any accumulated dust.
- If the body of the tool needs cleaning, wipe it with a soft damp cloth. A mild detergent can be used but nothing like alcohol, petrol or other cleaning agent.
- Never use caustic agents to clean plastic parts.
- Lubricate all moving parts at regular intervals.
- Periodically check all fixings. These could become loose with time due to vibration.

Caution! If the supply cord is damaged, it must be replaced by the acturer or its service agent or similarized person in order to avoid haz-
Declaration of conformity
CE We declare, that the product described in Technical Data:

text_image
Pattfield® ERGO TOOLS1200 W Rotary hammer PA-1200BH
manufactured for:
Hornbach Baumarkt AG
Hornbachstraße 11
76879 Bornheim / Germany
is in conformity with the following directives:
Machinery Directive 2006/42/EC
EMC Directive 2004/108/EC
and in accordance to the following applicable harmonized standards:
EN 60745-1:2009+A11:2010
EN 60745-2-6:2010
EN 55014-1/A1:2009
EN 55014-2/A2:2008
EN 61000-3-2/A2:2009
EN 61000-3-3:2008
; A. Judous Jule
Andreas Back
Head of Quality Assurance
In case of malfunctions, which are pointing out material or manufacturing faults, please contact your Hornbach store:
- These conditions are ruling additional warranty performances and are free of charge. The warranty rules given by law will remain untouched.
- The warranty performance is limited on material or manufacturing faults and the elimination of those or alternatively exchange of the product. As our products are not constructed for professional use, we see the warranty contract as not valid, if the product is used under those circumstances. Excluded are warranty claims for transportation damages, damages coming from non-observance of the installation or user manual (like connection to wrong voltage or wrong electricity), unprofessional installation, abuse or incorrect use (like overstressing the product or usage of not approved tools or accessories), non-observance of the maintenance and safety rules, infiltration of foreign objects (like sand, stones or dust), wrong force or man inducted events (like damages by falling down) plus normal accepted attrition (like battery packs, blades and so on). The warranty claim expires if intrusions were already done.
- The warranty period is three years and is starting with the date of purchase of the product. Warranty claims must be raised within two weeks after realising the defect. Warranty claims coming later are excluded. The warranty period is neither extended after repair or exchange nor a new warranty period is started for the product or possible spare parts.
- To enforce warranty claims contact your Hornbach store and show your bill as an original or another dated buying proof. Therefore keep your receipt accurately. Explain the reason of your claims as good as
possible. Is the defect part of our warranty performance, you will get a repaired or new product at once.
Disposal
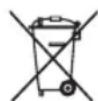
The crossed-out wheeled bin logo requires the separate collection of waste electric and electronic equipment (WEEE). Such equipment may contain dangerous and hazardous substances. These tools must be returned to a designated collection point for the recycling of WEEE and must not be disposed as unsorted municipal waste. By doing so, you will help to conserve resources and protect the environment. Contact your local authorities for more information.
Children must not play with plastic bags and packaging material, due to possible injury or danger of suffocation. Store such material safely or dispose of environmentally friendly.