
Creations Elite - Blender Vitamix - Free user manual and instructions
Find the device manual for free Creations Elite Vitamix in PDF.
| Product type | High-end blender |
| Brand | Vitamix |
| Model | Creations Elite |
| Power supply | 120 V, 50/60 Hz |
| Power | 1200 W (estimated) |
| Bowl capacity | 2 L (estimated) |
| Bowl material | Tritan (copolyester) |
| Base material | ABS plastic |
| Number of speeds | 10 variable speeds |
| Pulse function | Yes, momentary |
| Automatic programs | No |
| Blades | Stainless steel, 4 sharp blades |
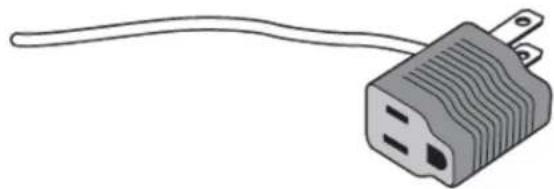
| Power cord length | 1.5 m (estimated) |
| Dimensions (H x W x D) | 43 x 20 x 25 cm (estimated) |
| Weight | 5 kg (estimated) |
| Safety | Overheat protection, auto shut-off, lockable lid |
| Cleaning | Manual cleaning: bowl and lid with soapy water, base wiped with a damp cloth |
| Replacement parts available | Bowl, lid, lid cap, tamper, blade assembly |
| Warranty | Limited warranty (see website) |
| Optional additional bowl | Dry Blade bowl for dry foods |
Frequently Asked Questions - Creations Elite Vitamix
User questions about Creations Elite Vitamix
0 question about this device. Answer the ones you know or ask your own.
Ask a new question about this device
Download the instructions for your Blender in PDF format for free! Find your manual Creations Elite - Vitamix and take your electronic device back in hand. On this page are published all the documents necessary for the use of your device. Creations Elite by Vitamix.
USER MANUAL Creations Elite Vitamix
Dealer/Distributor: This manual MUST be given to the end user.
User: Read and save these instructions.
Owner's Manual 1
Models covered in this manual:
(Some models not available in all countries)
7500
Pro-300
Pro-750
Creations Elite
To see the complete line of Vitaminix products,
visit vitamix.com/international.

Vitamix
Vita-Mix Corporation
8615 Usher Road
Cleveland, OH 44138-2103 U.S.A.
+1.440.235.4840
Refer to vitamix.com/international for distributor listing and information about warranty and service.

CONTENTS
Symbols 2
Important Instructions for Safe Use 3
Preparing for use 4
Control Panel 5
7
How To Use The Tamper 7
Care and Cleaning. 8
Troubleshooting 9
Specifications. 9
Warranty and Service. 9
SYMBOLS

Warning

Electrical shock hazard

High temperature when blending hot liquids.

Do not insert items into container while blender is in use

Read and understand owner's manual

Do not immerse

Never touch moving parts. Keep hands and utensils out of container.

Operate with lid and lid plug in place

Unplug while not in use, before cleaning, changing accessories or approaching parts that move in use
WARNING

To Avoid Injury.
Read and understand instruction manual before using this machine. Basic safety precautions should be followed, including the following.

READ ALL INSTRUCTIONS, SAFEGUARDS, AND WARNINGS BEFORE OPERATING BLENDER.
- Read all instructions.
- Not intended for use by or near children or persons with reduced physical, sensory, or mental capabilities or lack of experience and knowledge. Close supervision is necessary when any appliance is used by or near children or incapacitated persons.
- Children should be supervised to ensure that they do not play with the appliance.
- To protect against the risk of electrical shock, do not put the blender base in water or other liquid.
- Unplug from outlet when not in use, before putting on or taking off parts, and before cleaning.
- Avoid contacting moving parts.
- Do not operate any appliance with a damaged cord or plug or after the appliance malfunctions, or is dropped or damaged in any manner. Call Vitaminix Customer Service at 1.800.848.2649 or 1.440.235.4840 or email service@vitamix.com at once for examination, repair, replacement, or electrical or mechanical adjustment. If purchased outside the U.S.A. or Canada, contact your local Vitaminix dealer.
- Alteration or modification of any part of the blender base or container, including the use of any part or parts that are not genuine authorized Vitaminix parts, may cause fire, electric shock, or injury.
- The use of attachments not expressly authorized or sold by Vitaminix for use with this blender, including canning jars, may cause fire, electric shock, or injury.
- Do not use outdoors.
- Do not let cord hang over edge of table or counter.
- Do not let cord contact hot surface, including the stove.
- Keep hands and utensils out of container while blending to reduce the risk of severe injury to persons or damage to the blender. A rubber scraper or spatula may be used, but only when the Vitamix blender is not running.
- The tamper provided must be used only when the main part of the lid is in place.
- Blades are sharp. Handle or remove blade and blade assembly from the container with extreme care to avoid injury. To reduce the risk of injury, never place a blade assembly on the motor base unless assembled to the Vitamix container.
- Do not leave foreign objects, such as spoons, forks, knives or the lid plug, in the container as this will damage the blades and other components when starting the machine and may cause injury.
- Never attempt to operate with damaged blades.
- Care shall be taken when handling the sharp cutting blades when emptying the bowl and during cleaning.
- Always operate blender with lid and lid plug firmly in place. The lid plug should be removed only when adding ingredients and when using the tamper.
- When blending hot liquids or ingredients, use caution; spray or escaping steam may cause scalding and burns. Do not fill container to the maximum capacity. Always begin processing on the lowest speed setting, variable speed 1. Keep hands and other exposed skin away from the lid opening to prevent possible burns.
- When making nut butters or oil-based foods, do not process for more than one minute after the mixture starts to circulate in the container. Processing for longer periods can cause dangerous overheating.
SAVE THESE INSTRUCTIONS
NOTICE: THE FAILURE TO FOLLOW ANY OF THE IMPORTANT SAFEGUARDS AND THE IMPORTANT INSTRUCTIONS FOR SAFE USE IS A MISUSE OF YOUR VITAMIX BLENDER THAT CAN VOID YOUR WARRANTY AND CREATE THE RISK OF SERIOUS INJURY.
WARNING

Electrical Shock Hazard, Risk of Fire or Injury.
Always disconnect power before cleaning motor base or when not in use.
Do not put the motor base in water or other liquid.
Do not alter or modify any part of the motor base or container.
Do not use attachments not expressly authorized or sold by Vitamix.
Use grounded outlet only.
DO NOT remove ground.
DO NOT use an adapter.
DO NOT use an extension cord.
Failure to follow instructions can cause death or electrical shock.

PREPARING FOR USE
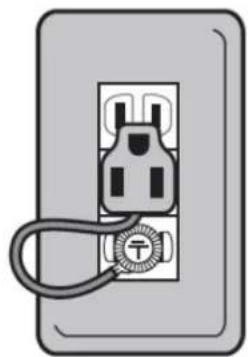
Please place the Vitamin in a level, dry location. After ensuring that the power switch is off, insert the plug into the outlet. We recommend using an outlet that has a ground connector.
The power cord has a three-prong plug, or grounded plug. This design is for safety by connecting to ground. This plug can be inserted into a standard three prong outlet.

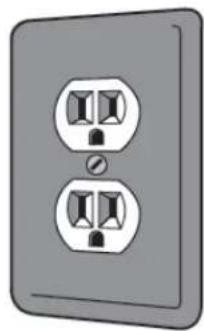
If you do not have a three-prong outlet, you can plug the power cord into a typical two prong outlet by using an adapter.
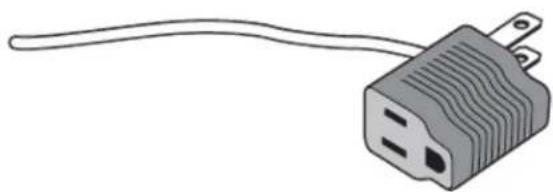
If you are uncertain whether your outlet's electrical wiring is connected to ground, please consult with an electrician. When connecting the machine to a two prong outlet, first ensure that the outlet is wired correctly, then connect it to the outlet's grounding screw.
Once your Vitamix is correctly plugged in, get it ready for using by following the "Care and Cleaning".
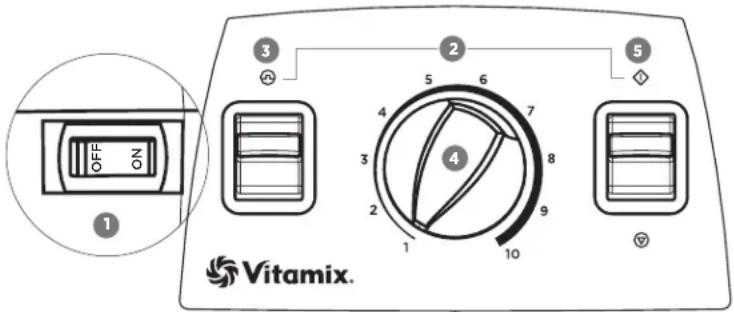
7500, Pro-300 and Creations Elite Models
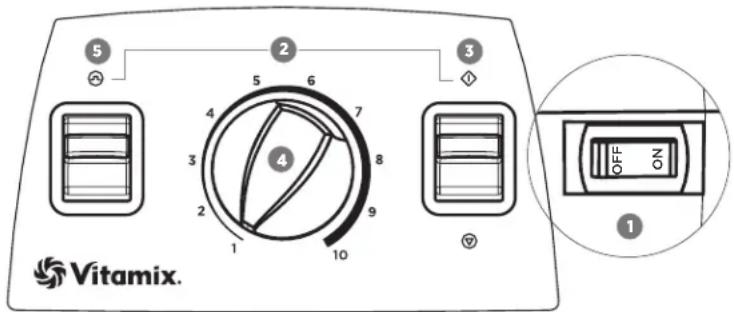
1. On/Off Switch:
The On/Off (or Power) Switch is on the right-hand side of the machine base. The On/Off Switch controls the power to the machine. BEFORE moving the On/Off Switch to the On (I) position, make sure the Start/Stop Switch is in the Stop (O) position and the Variable Speed Dial is to the far left, pointed at number 1. Move the On/Off Switch to the Off position whenever the machine will be left unattended.
2. On/Off Indication:
When the Pulse (C) and Start (D) symbols brighten, the machine is plugged in, the On/Off Switch is powered On and power is flowing.
Before blending, make sure that the Variable Speed Dial is pointed at 1. Lifting the Start/Stop Switch to the Start Position (◇) initiates the rotation of the blades and begins the blending process. Pressing down on the Start/Stop Switch to the Stop Position (⊗) will stop the blending process.
4. Variable Speed Dial:
The Variable Speed Dial selects blade rotation speeds from 1 to 10 (low to high). Always begin the blending process with the Variable Speed Dial set to 1. Make sure that the On/Off Switch is in the On (I) position. Move the Start/Stop Switch to the Start () position. Rotate the Variable Speed Dial to the desired speed setting. To stop the machine, rotate the Variable Speed Dial back to 1 and move the Start/Stop Switch back to the Stop () position. If the Variable Speed function is not working and the blades only rotate at the lowest speed (Variable Speed 1) the blender must be reset. Refer to Troubleshooting.
5. Pulse Switch (B)
Pressing down on the Pulse Switch will cause the machine to blend at the speed setting shown on the Variable Speed Dial for as long as the Pulse Switch is held down.
Pro-750 Model
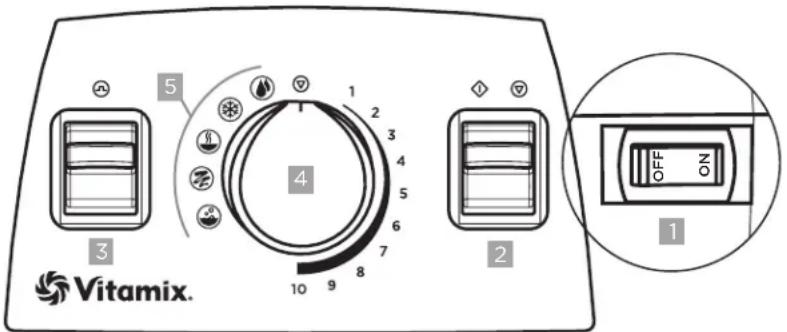
1. On/Off Switch:
The On/Off (or Power) Switch is on the right-hand side of the machine base. The On/Off Switch controls the power to the machine. BEFORE moving the On / Off Switch to the On (I) position, make sure that the marker on the Variable Speed Dial is pointed at the Stop Symbol (⑦) at the top of the dial. Move the On / Off Switch to the Off position at night and whenever the machine is left unattended. If the On / Off switch is moved to the Off position to stop a program mid-cycle, wait 30 seconds for power to recycle and the timer to reset before moving the On / Off switch back to the On position. When the Pulse, Start / Stop, and Program Symbols brighten, the On / Off Switch is in the On position and power is flowing.
After the marker on the Variable Speed Dial is rotated from the Stop Symbol (⑨) either to Variable Speed 1 or a Program, press the Start / Stop Switch to start the machine and initiate the blending process. Pressing the Start / Stop Switch again will stop the blending process.
Programs can be interrupted by pushing down the Start / Stop switch at any time. If reactivated by pushing down the Start / Stop switch, the program will start at the beginning.
3. Pulse Switch ()
Variable Speed: Pressing down on the Pulse Switch will cause the machine to blend at the speed setting shown on the Variable Speed Dial for as long as the Pulse Switch is held down.
Programs: The Pulse function can be used when a program is selected. Pushing down the Pulse switch when a program is selected will cause the machine to run at 50% of high power for as long as the Pulse switch is pushed down.
| △CAUTION | ||
| To Avoid Possible Burns, Never Start on Speeds Above 1 when Processing Hot Liquids. Escaping steam, splashes or contents may scald. To secure the contents, lock the lid and lid cap securely in place prior to operating the machine. Always start on Variable 1, then slowly increase to 10. | ||
4. Variable Speed Dial:
The Variable Speed Dial serves two functions: the use of five program settings or ten variable speed settings.
- Programs: rotate the Variable Speed Dial to the left to the desired program.
Variable Speed:
a. Rotate the Variable Speed dial to the right to 1.
b. Press down on the Start / Stop switch.
c. Rotate the Variable Speed dial to the right or left during blending to increase or decrease the speed of the blades.
d. At the end of the blending cycle, rotate the marker on the Variable-Speed dial back to the Stop Symbol (⑦) at the top of the dial.
5. Programs:
The Pro-750 is equipped with five program settings for the most commonly used recipes. Rotating the Variable Speed Dial left of center allows you to select a program for Smoothies, Frozen Desserts, Soups, Purées and a Cleaning cycle.
OPERATING INSTRUCTIONS
Important when using the Dry Blade Container:
Grinding dry material for more than two minutes could damage your machine. Regular use may result in cosmetic marring of the container and cause the blades to become dull over time. Grinding some herbs may release oils, causing the container to discolor permanently. Others have strong odors that may linger in the container, affecting the flavor of other foods. The grinding of some herbs and spices may also cause the blade to dull over time, or the container to crack.
CAUTION

Never Start on Speeds Above 1 with Hot Liquids to Avoid Possible Burns.
Escaping steam, splashes or contents may scald.
To secure the contents, lock the lid and lid plug securely in place prior to operating the machine.
Always start on Variable 1, slowly increase to 10.

Before using this container with programs or the Variable Speed option, always begin with the Variable Speed Dial pointing to the Stop Symbol (at the top of the dial.
- Load the container before placing it on the motor base.
- Fasten the 2-part lid securely. Always use the complete 2-part lid when blending (unless the tamper is inserted through the lid cap opening).
- With the motor off, set the container on the motor base by aligning it over the centering pad. Never attempt to put a container onto an operating motor base or to operate a motor base without a container properly in place.
- To begin, make sure that the On/Off switch is in the On position.
- Activate the machine by pressing the Start / Stop Switch. Your container will shift and align itself.
Variable Speed - slowly increase the Variable Speed to the desired speed.
- Programs (Pro-750 only) - Rotate the dial to the left of center to the desired program.
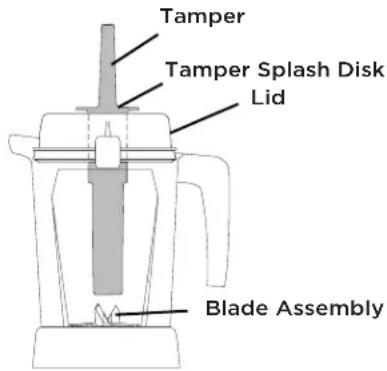
HOW TO USE THE TAMPER
WARNING


Rotating Blades Can Cause Severe Injury.
- DO NOT put hands, spatulas, etc. in the container while the machine is running or while the container is still on the base.
Lids and tamers are not interchangeable between different container styles, types, and sizes. Use the tamper that was supplied with your machine. If you do not have the correct tamper for your container, contact your local Vitaminix dealer or distributor.
IMPORTANT:
- The splash disk (near the top of the tamper) and lid prevent the tamper from hitting the blades when the lid is secured properly in the locked position.
- The container should not be more than two-thirds full when the tamper is used during blending.
- To avoid overheating during blending, DO NOT use the tamper for more than 30 consecutive seconds.
If the food does not circulate, carefully remove the lid plug while making sure the lid stays firmly in place. Release the contents by inserting the tamper through the lid plug opening. - Holding the tamper straight down may not help the ingredients circulate. If necessary, point the tamper toward the sides or corners of the container. DO NOT try to force the tamper deeper into the container.
CARE AND CLEANING
Container
To prepare your new machine for initial use, follow the procedure below. This will clean the unit and break in the motor.
Before using the Variable Speed option, always begin with the Variable Speed Dial pointing to the Stop Symbol (O) at the top of the dial.
- Fill the container half full of warm water and add a few drops of liquid dishsoap to the container.
- Snap or push the complete 2-part lid into the locked position.
- Perform one of the following procedures:
Variable Speed:
a. Rotate the Variable Speed dial to 1.
b. Press the Start / Stop switch.
c. Slowly increase variable speed to 10.
d. Run the machine for 30 to 60 seconds.
e. Rotate the Variable Speed dial to the Stop Symbol () the top of the Variable Speed dial.
Program (Pro-750 only)
a. Rotate the Variable Speed dial to the Cleaning ( ) program symbol. The program will stop automatically when complete.
b. After the program stops, rotate the Variable Speed dial to the Stop Symbol (O) at the top of the Variable Speed dial.
- Rinse and drain the container.
Lid, Lid Cap and Tamper
Separate the lid and lid cap. Wash parts in warm, soapy water. Rinse clean under running water and dry. Reassemble before use.
IMPORTANT: To ensure continued and effective performance, do not put the container, lid, lid cap or tamper in the dishwasher.
Motor Base
WARNING

Electrical Shock Hazard.
Disconnect power before cleaning machine.
Failure to follow instructions can cause death or electrical shock.

- Unplug the power cord.
- Wash the outside surface with a damp soft cloth or sponge, which has been rinsed in a mild solution of liquid detergent and warm water. Do not place the motor base in water.
- The centering pad can be removed for more thorough cleaning.
- Thoroughly clean the switches so they work freely. They may become sticky from use. Use a moistened cotton swab to clean the grooves around the water-shielded switches. Immediately dry any excess water.
- Polish with a soft cloth.
TROUBLESHOOTING
Your Vitamix motor is designed to be protected from overheating during use. This feature will cause the motor to shut off and possibly emit a light odor.
If the motor shuts off, turn off the power switch for up to 45 minutes to reset. Reset time will be extended if high room temperatures exist. If you continue to experience problems after allowing the motor to reset, contact your local Vitamix Customer Service at 1,800,848,2649 or 1,440,235,4840 immediately for instructions.
Tips to prevent "overloading" your Vitamix machine:
Only process Vitamix recipes when learning to use the machine
- Do not process recipes at lower speeds than those recommended
- Do not process recipes at higher speeds than those recommended
- Do not process recipes for longer than recommended
Use your tamper to process thicker mixtures and keep ingredients moving around and through the blades
Retainer Nut Loosening
In the event that the retainer nut at the bottom of your container loosens and no longer holds the blade assembly securely in place, DO NOT CONTINUE TO USE THE CONTAINER. Contact your local dealer or distributor immediately for instructions.
Variable Speed Reset (7500, Pro-300 and Creations Elite Models only)
If the Variable Speed Function is not working and the blades only rotate at the lowest speed (Variable Speed 1) the blender must be reset.
To reset the machine and reactivate the Variable Speed Function:
-
Push the Start/Stop Switch down to the Stop Position ( ).
-
Turn the Variable Speed Dial back to 1.
This will reset the Variable Speed Function. When you move the Start/Stop switch to the Start position, you will have full use of all variable speeds.
SPECIFICATIONS
Refer to the product label on the machine for Motor and Electrical specifications.
If you are buying a new electrical item, the Waste Electrical or Electronic Equipment (WEEE) Directive will recycle your old one for free (where applicable).
This product has been supplied from an environmentally aware manufacturer that complies with the Waste Electrical and Electronic Equipment (WEEE) Directive 2002/96/CE.
Used appliances may not be disposed of in the dustbin! If the appliance has reached the end of its service life, every user is obliged by law not to dispose of used appliances in the domestic dustbin, but rather separated from household trash, e.g. at a community or neighbourhood collection point. This is to ensure that used appliances are professionally recycled in order to avoid damage to the environment. That is why electric appliances are marked with the following symbol:
Find more information on WEEE recycling and locate your local recycling centre at www-recyclenow.com.

WARRANTY AND SERVICE
Refer to vitamix.com for international distributor listing for information about warranty and service.
©2015 Vita-Mix Corporation. No part of this publication may be reproduced or transmitted in any form or by any means or stored in a database or retrieval system without the written permission of the Vita-Mix Corporation.
BLENDERSVITAMIX
Temperature elevatedlour mulange deliquides chauds.

Programme (Pro-750 uniquely)
1. Virtakytkin (On/Off):
2. On/Off-indikation:
Nar Puls- (og () startsymbolerne bliver lysere, er maskinen sat til, On/Off-knappen er taendt og strommen Iober.
3.Start(Stop()K happen:
Per prevenire lesions.
Modelli 7500, Pro-300 e Creations Elite

1. Interru tture On/Off:
1. Interrufttore On/Off:
vitamix.com/international
Vitamix
Vita-Mix Corporation
Usher Road 8615
Cleveland, OH 44138-2103 U.S.A.
+1.440.235.4840
vitamix.com/international
D
83
83
84 1
85
86
88 1
88. 1onitwnn
89
90
90
90
□□nO
INXI 1nnn nn
77


nwnnn no

Tn nn nnnn nn nnnn nn nnnn nn

ynynnnno 0nn

Dnna nn noon noon noon y

ynnn nnnn nn nnnn nn

wnynnyn nnnn nn noannn nnnnnnnnnnnnnnnnnnnnnnnnnnnnnnnnnnnnnnnnnnnnnnnnnnnnnnnnnnnnnnnnnnnnnnnnnnnnnnnnnnnnnnnnnnnnn

#

yynnnn
y

nynnnn nnnnnn nnnnn nnnnn nn
| . . . . . . . . . . . . . . . . . . . . . . . . . . . . . . . . . . . . . . . . . . . . . . . . . . . . . . . . . . . . . . . . . . . . . . . . . . . . . . . . . . . . . . . . . . . . . . . . . . . . .. . . . . . . . . . . . . . . . . . . . . . . . . . . . . . . . . . . . . . . . . . . . . . . . . . . . . . . . . . . . . . . . . . . . . . . . . . . . . . . . . . . . . . . . . . . . . . . . . . . . . . . . . . . . . . . . . . . . . . . . . . . . . . . . . . . . . . . . . . . . . . . . . . . . . . . . . . . . . . . . . . . . . . . . . . . . . . . . . . . . . . . . . . . . . . . . . . . . . . . .. Vitamix ninhi ninhi ninhi ninhi ninhi ninhi ninhi ninhi ninhi ninhi ninhi ninhi ninhi ninhi ninhi ninhi ninhi ninhi ninhi ninhi ninhi ninhi ninhi ninhi ninhi ninhi ninhi ninhi ninhi ninhi ninhi ninhi ninhi ninhi ninhi ninhi ninhi ninhi ninhi ninhi ninhi ninhi ninhi ninhi ninhi ninhi ninhi ninhi ninhi ninhi ninbi ninbi ninbi ninbi ninbi ninbi ninbi ninbi ninbi ninbi ninbi ninbi ninbi ninbi ninbi ninbi ninbi ninbi ninbi ninbi ninbi ninbi ninbi ninbi ninbi ninbi ninbi ninbi ninbi ninbi ninbi ninbi ninbi ninbi ninbi ninbi ninbi ninbi ninbi ninbi ninbi ninbi ninbi ninbi ninbi ninbi ninbi ninbi ninbi ninbi ninBI . . . . . . . . . . . . . . . . . . . . . . . . . . . . . . . . . . . . . . . . . . . . . . . . . . . . . . . . . . . . . . . . . . . . . . . . . . . . . . . . . . . . . . . . . . . . . . . . . . .. . .. . . . . . . . . . . . . . . . . . . . . . . . . . . . . . . . . . . . . . . . . . . . . . . . . . . . . . . . . . .. . . . . . . . . . . . . . . . . . . . . . . . . . . . . . . . . . . . . . . . . . . . . . . . . . . . . . . . . . . . . . . . . . . . . . . . . . . . . . . . . . . . . . . . . . . . . . . . . . . . . . . . . . . . . . . . . . . . . . . . . . . . . . . . . . . . . . . . . . . . . . . . . . . . . . . . . . . . . . . . . . . . . . . . . . . . . . . . . . . . . . . . . . . . . . . . . . . . . . . . . . . . . . . . . . . . . . . . . . . . . . . . . . . . . . . . . . . . . . . . . . . . . . . . . . . . . . . . . . . . . . . . . . . . . . . . . . . . . . . . . . . . . . . . . . . . . . . . . . . . . . . . . . . . . . . . . . . . . . . . . . . . . . . . . . . . . . . . . . . . . . . . . . . . . . . . . . . . . . . . . . . . . . . . . . . . . . . . ? . . . . . . . . . . . . . . . . . . . . . . . . . . . . . . . . . . . . . . . . . . . . . . . . . . . . . . . . . . . . . . . . . . . . . . . . . . . . . . . . . . . . . . . . . . . . . . . . . . . ; . . . . . . . . . . . . . . . . . . . . . . . . . . . . . . . . . . . . . . . . . . . . . . . . . . . . . . . . . . . . . . . . . . . . . . . . . . . . . . . . . . . . . . . . . . . . . . . . . . . 1 3 ... .4 .5 6 ... .7 ... .8 ... .9 ... 10 ... 11 ... 12 ... 13 ... 14 ... 15 ... 16 ... 17 ... 18 ... 19 ... 20 ... 21 ... |
nniin
VITAMIX 777777777777777777777777777
nannnnn nn nnnn
#

yixin noynnnn no
nannnnnnnnn nnnn nn nnnnnnnnnnnnnnnnnnnnnnnnnnnnnnnnnnnnnnnnnnnnnnnnnnnnnnnnnnnnnnnnnnnnnnnnnnnnnnnnnnnnnnnnnnnnnnnnnnnnn
nXnXnOo
yixinyiin oio yin xin nn
Vitamix 1-7-7-7-7-7-7-7-7-7-7-7-7-7-7-7-7-7-7-7-7-7-7-7-7-7-7-7-7-7-7-7-7-7-7-7-7-7-7-7-7-7-7-7-7-7-7-7-7-7-7-
ynnn nn nnnn
nannnnnnnn
.
77nn 722 uannn
nannnnn nnnn anh ny nnnn by n

win'u7 nnon

yannnnn nn nnnnnnnnnnnnnnnnnnnnnnnnnnnnnnnnnnnnnnnnnnnnnnnnnnnnnnnnnnnnnnnnnnnnnnnnnnnnnnnnnnnnnnnnnnnnnnnnnnnnnnnnnnnnnnnnnnnnn
n 1000000000000000000000000000000
n nn nnnn nnnn nnnn nnnn nnnn nnnn nnnn nnnn nnnn nnnn nnnn nnnn nnnn nnnn nnnn nnnn nnnn nnnn nnnn nnnn nnnn nnnn nnnn nnnn nnnn nnnn nnnn nnnn nnnn nnnn nnnn nnnn nnnn nnnn
n nn nnnnnnnnnnnnnnnnnnnnnnnnnnnnnnnnnnnnnnnnnnnnnnnnnnnnnnnnnnnnnnnnnnnnnnnnnnnnnnnnnnnnnnnnnnnnnnnnnnnnnnnnnnnnnnnnnnnnnnnnnnnnnnnnnnnnnnnnnnnnnnn
Creations Elite-Pro-300,7500 n
nwnnnn ninn nnhy ninn by

.1
.2
11111111111111111111111111
n 4
.
.5
niiy 1799
Vitamix y
nna nnnnnnnnnnnnnnnnnnnnnnnnnnnnnnnnnnn
140.4849 1800.8482649 190nVitamix nnnn nn nnnn nnnn nnnn nnnn nnnn nnnn
nnnn n
:Vitamix-n won h "n ony" nyanh nny
Vitamix nnnn nn, wannnnn nn nnnn nn
yinnnnn nn nnnnnnnnnnnnnnnnnnnnnnn
yinnnnn nn nnnnnnnnnnnnnnnnnnnnnnnnnnnnnnnnnnnnnnnnnnnnnnnnnnnnnnnnnnnnnnnnnnnnnnnnnnnnnnnnnnnnnnnnnnnnnnnnnnnnnnnnn
yinnnnn nn nnnn nnnnnn nn nnnn
n nn nnnnnnnnnnnnnnnnnnnnnnnnnnnnnnnnnnnnnnnnnnnnnnnnnnnnnnnnnnnnnnnnnnnnnnnnnnnnnnnnnnnnnnnnnnnnnnnnnnnnnnn
nwnnnn
yNnNn nn nnnnnn nn nnnnnnnnnnnnnnnnnnnnnnnnnnnnnnnnnnnnnnnnnnnnnnnnnnnnnnnnnnnnnnnnnnnnnnnnnnnnnnnnnnnnnnnnn
nnnnnnnnnnnnnnnnnnn
(1) Creations Elite-Pro-300,7500 nnnn nn
n nn n 097 (1 nnnnn) nnnnnnnnnnnnnnnnnnnnnnnnnnnnnnnnnnnnnnnnnnnnnnnnnnn
nnnnnnnnnnnnnnnnnnnnnnnnnnnnnnnnnnnnn
(7) mny n (mny/nnn) Start/Stop nn by yn 1
.1907nnnnn nn nna 2
nennnnnnnnnnnnnnn nn nnnnnn (nnnnnn) Start/Stop nn nn nn nn nn nn nn nn nn nn nn nn nn nn nn nn nn nn nn nn nn nn nn nn nn nn nn nn nn nn nn nn nn nn nn nn nn nn nn nn nn nn nn nn nn nn nn nn nn nn nn nn nn nn nn nn nn nn nn nn nn nn nn nn nn nn nn nn nn nn
□□797
y
WEEWaste Electrical or Electronic Equipment)
()
2002/96/CE (WEEE) 1nwn nn nnnn nn nnnn nn nnnn nn nnnn nn nnnn nn nnnn nn

ywnn nnnnnnnnnnnnnnnnnnnnnnnnnnnnnnnnnnnnnnnnnnnnnnnnnnnnnnnnnnnnnnnnnnnnnnnnnnnnnnnnnnnnnnnnnnnnnnnnnnnnnnnnnnnnnnnnnnnn
nynnn nnnn nn nnnn nnnn nnnn nnnn nnnn nnnn nnnn nnnn nnnn nnnn nnnn nnnn nnnn nnnn nnnn nnnn nnnn nnnn nnnn nnnn nnnn nnnn nnnn nnnn nnnn nnnn nnnn nnnn nnnn nnnn nnnn nnnn nnnn nnnn
xnnn nn nnnn nn nnnn nn nnnn nn nnnn nn nnnn nn nnnn nn nnnn nn nnnn nn nnnn nn nnnn nn nnnn nn nnnn nn nnnn nn nnnn nn nnnn nn nnnn nn nnnn nn nnnn nn nnnn nn nnnn nn nnnn nn nnnn nn nnnn nn nnnn nn nnnn nn
www.recyclenow.com WEEE
nni nnnx
Vitamix.com 77
Vita-Mix Corporation 2015 Vita-Mix Corporation
113377_Rev A MULTI 01/15
MIIAENTEPVITAMIX
Eeyxepidio katoxou
Tov Avipopo/avoua: To npov yxepio PENEI va npadisotov taki xno.
Tia tov xnoTn: AiaBaoTe kai qulaEte autec tic odyiec.
Owner's Manual 1
1. DiakóntnC On/Off:
O diakontnc On/Off (n aeitoupyiac) bioketai ot n deia nepa tnc faocuNC. O diaokntc On/Off eayexi tvtpoopooia peuatoC npoc tn ouakeun. NPOTOY metakivnoete tov diaokntn On/Off otn theon (I) beaaowtheite oti o diaikontnc EvapEn/C iakonnc bioketai ot n thean diakonnc () kai ot To Xeipiotpio metaatawv taxutntw evai otpauevo tepua apotepa, dixyovvtac thv evdein 1. Metakiveite tov diaokntn On/Off ot n theon Off onote n oukeun napaevi xwcic enilaeyn.
2. Auxvia On/Off:
2015 Vita-Mix Corporation. 2015 Vita-Mix Corporation.

Vitamix
Vita-Mix® Corporation
8615 Usher Road
Cleveland, OH 44138 U.S.A.
vitamix.com

- Vitamix
- CONTENTS
- SYMBOLS
- Warning
- Electrical shock hazard
- High temperature when blending hot liquids.
- Do not insert items into container while blender is in use
- Read and understand owner's manual
- Do not immerse
- Never touch moving parts. Keep hands and utensils out of container.
- Operate with lid and lid plug in place
- Unplug while not in use, before cleaning, changing accessories or approaching parts that move in use
- To Avoid Injury.
- READ ALL INSTRUCTIONS, SAFEGUARDS, AND WARNINGS BEFORE OPERATING BLENDER.
- SAVE THESE INSTRUCTIONS
- Electrical Shock Hazard, Risk of Fire or Injury.
- PREPARING FOR USE
- 7500, Pro-300 and Creations Elite Models
- On/Off Switch:
- On/Off Indication:
- Variable Speed Dial:
- Pulse Switch (B)
- Pro-750 Model
- Pulse Switch ()
- Programs:
- OPERATING INSTRUCTIONS
- Important when using the Dry Blade Container:
- CAUTION
- Never Start on Speeds Above 1 with Hot Liquids to Avoid Possible Burns.
- HOW TO USE THE TAMPER
- Rotating Blades Can Cause Severe Injury.
- IMPORTANT:
- CARE AND CLEANING
- Container
- Lid, Lid Cap and Tamper
- Motor Base
- TROUBLESHOOTING
- Tips to prevent "overloading" your Vitamix machine:
- Retainer Nut Loosening
- Variable Speed Reset (7500, Pro-300 and Creations Elite Models only)
- SPECIFICATIONS
- WARRANTY AND SERVICE
- BLENDERSVITAMIX
- Virtakytkin (On/Off):
- On/Off-indikation:
- 3.Start(Stop()K happen:
- Per prevenire lesions.
- Modelli 7500, Pro-300 e Creations Elite
- Interru tture On/Off:
- Interrufttore On/Off:
- D
- □□nO
- #
- nynnnn nnnnnn nnnnn nnnnn nn
- win'u7 nnon
- niiy 1799
- :Vitamix-n won h "n ony" nyanh nny
- nwnnnn
- Creations Elite-Pro-300,7500 nnnn nn
- □□797
- nni nnnx
- MIIAENTEPVITAMIX
- Eeyxepidio katoxou
- DiakóntnC On/Off:
- Auxvia On/Off:
Brand : Vitamix
Model : Creations Elite
Category : Blender