MixPack Pro - Hi-fi system ALTO - Free user manual and instructions
Find the device manual for free MixPack Pro ALTO in PDF.
| Product Type | Audio Mixing Console with Effects Processor |
| Number of Channels | 8 (4 mono + 2 stereo) |
| Power Supply | 220-240 V, 50/60 Hz, 30 W |
| Dimensions (L x W x H) | 320 x 250 x 100 mm |
| Weight | 3.5 kg |
| Microphone Inputs | 4 x XLR with switchable +48 V phantom power |
| Line Inputs | 4 x 6.35 mm TRS/TS jacks (line level) |
| Stereo Aux Input | 2 x RCA (2TK IN) |
| Main Outputs | 2 x 6.35 mm jacks (MAIN OUT) |
| Monitor Output | 1 x 6.35 mm jack (MONITOR OUT) |
| Headphone Output | 1 x 6.35 mm stereo jack |
| Auxiliary Output | 2 x 6.35 mm jacks (AUX OUT) |
| Built-in Effects Processor | 16 presets (reverb, delay, chorus, flanger, etc.) |
| Per-channel EQ | 3-band (high, mid, low) |
| Master Graphic EQ | 9-band |
| Phantom Power | Switchable +48 V for condenser microphones |
| Additional Functions | Pan/Balance, AUX sends, FX mute, effect pedal |
| Maintenance and Cleaning | Clean with a dry, soft cloth; do not use solvents |
| Safety | Unplug before cleaning, do not expose to moisture |
| Spare Parts and Repairability | Contact ALTO customer service |
| General Information | 28-page user manual available for free download |
Frequently Asked Questions - MixPack Pro ALTO
User questions about MixPack Pro ALTO
0 question about this device. Answer the ones you know or ask your own.
Ask a new question about this device
Download the instructions for your Hi-fi system in PDF format for free! Find your manual MixPack Pro - ALTO and take your electronic device back in hand. On this page are published all the documents necessary for the use of your device. MixPack Pro by ALTO.
USER MANUAL MixPack Pro ALTO
text_image
ALTO PROFESSIONALMIXPACKPRO
QUICKSTART GUIDE
ENGLISH (3-6)
MANUAL DE INICIO RÁPIDO
ESPAÑOL (7 - 10)
GUIDE D'UTILISATION RAPIDE
FRANÇAIS (11 - 14)
GUIDA RAPIDA
ITALIANO (15 - 18)
KURZANLEITUNG
DEUTSCH (19 - 22)
SNELSTARTGIDS
NEDERLANDS (23 - 26)
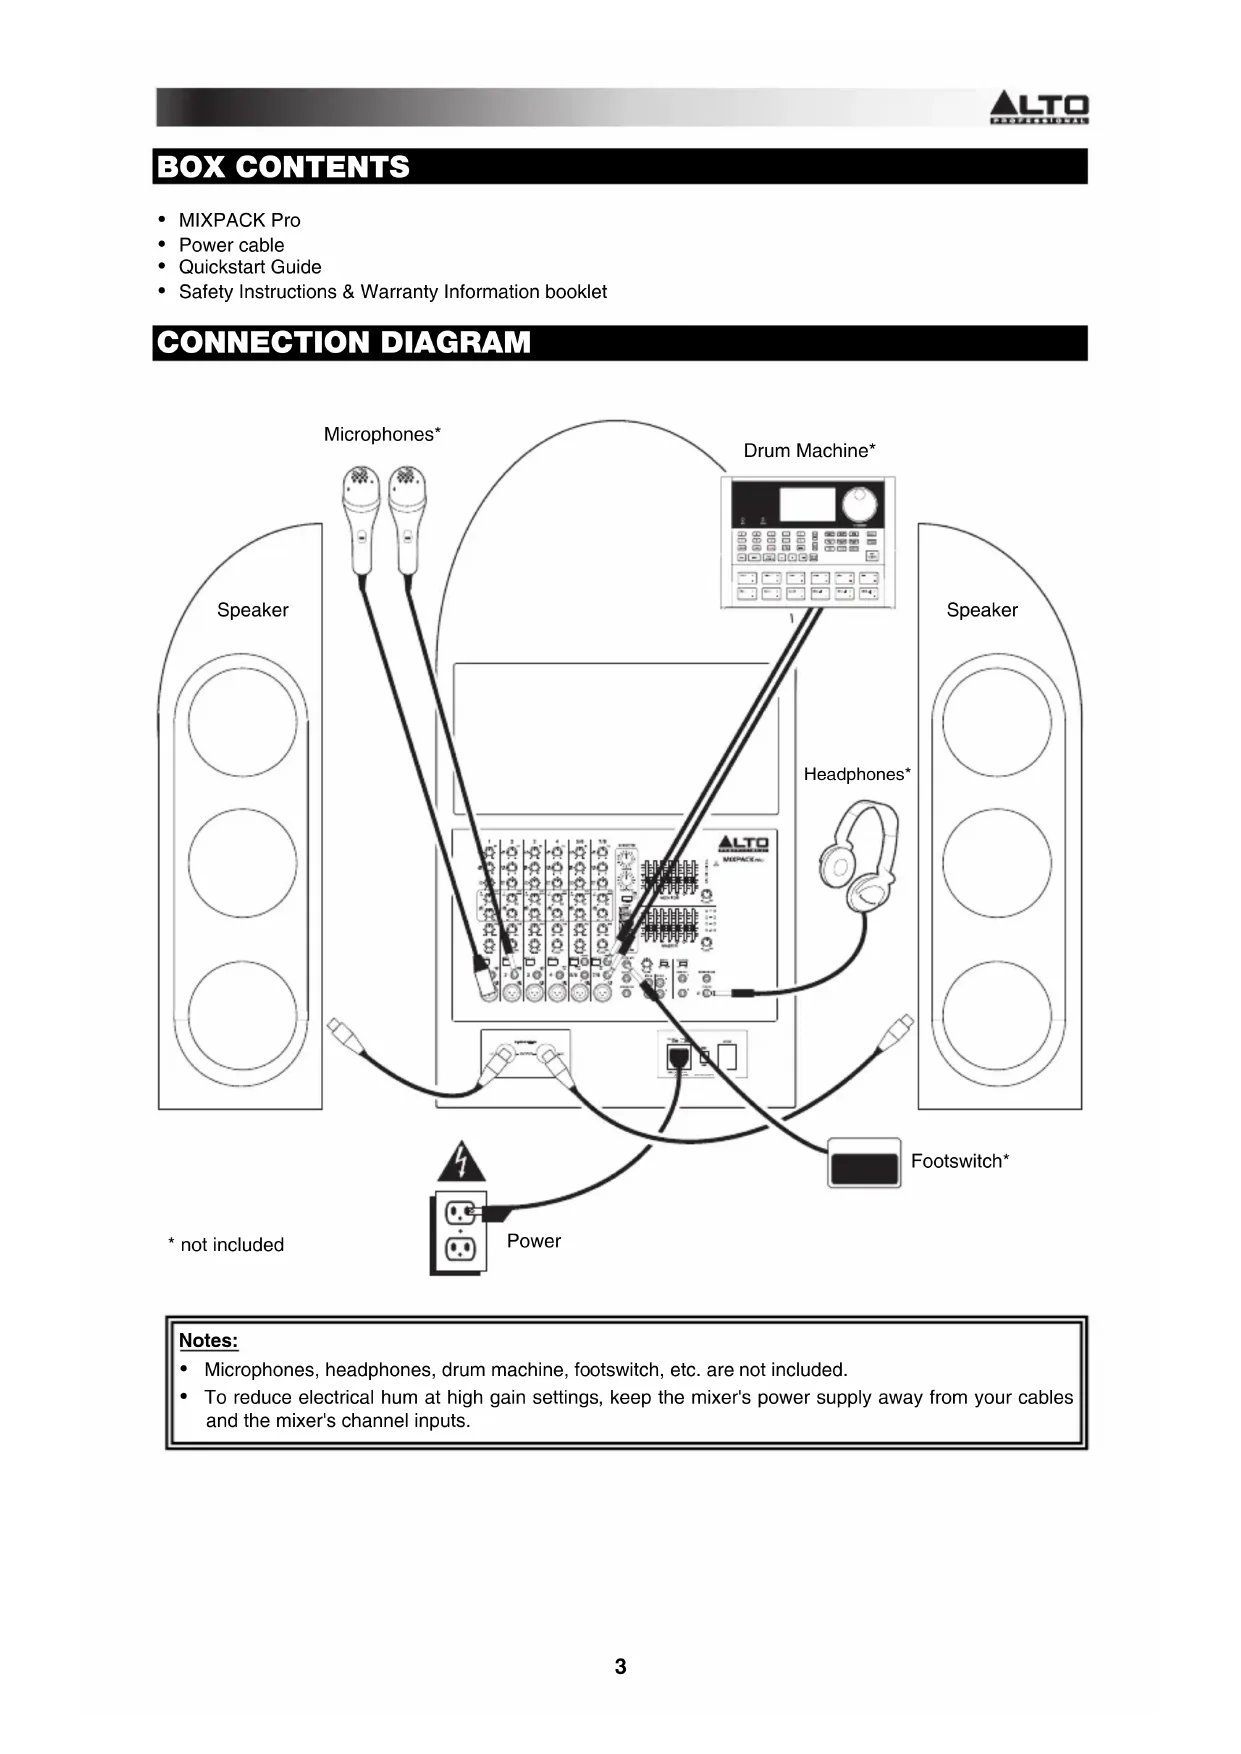
BOX CONTENTS
- MIXPACK Pro
- Power cable
- Quickstart Guide
• Safety Instructions & Warranty Information booklet
CONNECTION DIAGRAM
flowchart
graph TD
    A["Speaker"] --> B["Microphones*"]
    A --> C["Drum Machine*"]
    A --> D["Headphones*"]
    A --> E["Footswitch*"]
    A --> F["Power"]
    style A fill:#f9f,stroke:#333
    style B fill:#ccf,stroke:#333
    style C fill:#cfc,stroke:#333
    style D fill:#fcc,stroke:#333
    style E fill:#cff,stroke:#333
    style F fill:#ffc,stroke:#333
    note1["* not included"]
    note2["* not included"]
    subgraph Device
        Device1["ALTO WEPACE.com"]
        Device2["Headphones*"]
        Device3["Speaker"]
        Device4["Speaker"]
        Device5["Speaker"]
        Device6["Speaker"]
        Device7["Speaker"]
    end
Notes:
- Microphones, headphones, drum machine, footswitch, etc. are not included.
- To reduce electrical hum at high gain settings, keep the mixer's power supply away from your cables and the mixer's channel inputs.
FEATURES

other
| Feature | Value | | :--- | :--- | | POS | 8 | | RQ | 9 | | EQ | 10 | | LCK | 11 | | MAC | 12 | | RQ OUT | 13 | | LCK OUT | 15 | | MAC OUT | 16 | | STREO RQ | 17 | | STREO IN | 18 | | STRO IN | 20 | | STRO OUT | 21 | | STRO OUT | 22 | | STRO OUT | 23 | | STRO OUT | 24 | | STRO OUT | 25 | | STRO OUT | 26 | | STRO OUT | 27 | | STRO OUT | 28 | | STRO OUT | 29 | | STRO OUT | 30 | | STRO OUT | 31 | | STRO OUT | 32 | | STRO OUT | 33 | | STRO OUT | 34 | | STRO OUT | 35 | | STRO OUT | 36 | | STRO OUT | 37 | | STRO OUT | 38 | | STRO OUT | 39 | | STRO OUT | 40 | | STRO OUT | 41 | | STRO OUT | 42 | | STRO OUT | 43 | | STRO OUT | 44 | | STRO OUT | 45 | | STRO OUT | 46 | | STRO OUT | 47 | | STRO OUT | 48 | | STRO OUT | 49 | | STRO OUT | 50 | | STRO OUT | 51 | | STRO OUT | 52 | | STRO OUT | 53 | | STRO OUT | 54 | | STRO OUT | 55 | | STRO OUT | 56 | | STRO OUT | 57 | | STRO OUT | 58 | | STRO OUT | 59 | | STRO OUT | 60 | | STRO OUT | 61 | | STRO OUT | 62 | | STRO OUT | 63 | | STRO OUT | 64 | | STRO OUT | 65 | | STRO OUT | 66 | | STRO OUT | 67 | | STRO OUT | 68 | | STRO OUT | 69 | | STRO OUT | 70 | | STRO OUT | 71 | | STRO OUT | 72 | | STRO OUT | 73 | | STRO OUT | 74 | | STRO OUT | 75 | | STRO OUT | 76 | | STRO OUT | 77 | | STRO OUT | 78 | | STRO OUT | 79 | | STRO OUT | 80 | | STRO OUT | 81 | | STRO OUT | 82 | | STRO OUT | 83 | | STRO OUT | 84 | | STRO OUT | 85 | | STRO OUT | 86 | | STRO OUT | 87 | | STRO OUT | 88 | | STRO OUT | 89 | | STRO OUT | 90 | | STRO OUT | 91 | | STRO OUT | 92 | | STRO OUT | 93 | | STRO OUT | 94 | | STRO OUT | 95 | | STRO OUT | 96 | | STRO OUT | 97 | | STRO OUT | 98 | | STRO OUT | 99 | | STRO OUT | 100 | EFFECTS - PUNCTS - WAPETIONS - PROJECTS - LIK - ROLL - WMALL - WMALL - WMALL - WMALL - WMALL - WMALL - WMALL - WMALL - WMALL - WMALL - WMALL - WMALL - WMALL - WMALL - WMALL - WMALL - WMALL - WMALL - WMALL - WMALL - WMALL - WMALL - WMALL - WMALL - WMALL - WMAll - WMALL - WMALL - WMALL - WMALL - WMALL - WMALL - WMALL - WMALL - WMALL - WMALL - WMALL - WMALL - WMALL - WMALL - WMALL - WMALL - WMALL - WMALL - WMALL - WMALL - WMALL - WMALL - WMALL - WMALL - WM ALL - WM ALL - WM ALL - WM ALL - WM ALL - WM ALL - WM ALL - WM ALL - WM ALL - WM ALL - WM ALL - WM ALL - WM ALL - WM ALL - WM ALL - WM ALL - WM ALL - WM ALL - WM ALL - WM ALL - WM ALL - WM ALL - WM ALL - WM ALL - WM ALL - WM All - WM All - WM All - WM All - WM All - WM All - WM All - WM All - WM All - WM All - WM All - WM All - WM All - WM All - WM All - WM All - WM All - WM All - WM All - WM All - WM All - WM All - WM All - WM All - WM All - WM ALL - WM ALL - WM ALL - WM ALL - WM ALL - WM ALL - WM ALL - WM ALL - WM ALL - WM ALL - WM ALL - WM ALL - WM ALL - WM ALL - WM ALL - WM ALL - WM ALL - WM ALL - WM ALL MONITOR MASTER ALTO PROFESSIONAL MIXPACKPRO LEVEL ALTO PROFESSIONAL MIXPACKPRO LEVEL ALTO PROFESSIONAL MIXPACKPRO LEVEL ALTO PROFESSIONAL MIXPACKPRO LEVEL ALTO PROFESSIONAL MIXPACKPRO LEVEL ALTO PROFESSIONAL MIXPACKPRO LEVEL ALTO PROFESSIONAL MIXPACKPRO LEVEL ALTO PROFESSIONAL MIXPACKPRO LEVEL ALTO PROFESSIONAL MIXPACKPRO LEVEL ALTO PROFITION MONITOR MONITOR PROFESSIONAL MIXPACKPRO LEVEL ALTO PROFITION MONITOR PROFESSIONAL MIXPACKPRO LEVEL ALTO PROFITION MONITOR PROFESSIONAL MIXPACKPRO LEVEL ALTO PROFITION MONITOR PROFESSIONAL MIXPACKPRO LEVEL ALTO PROFITION MONITOR PROFESSIONAL MIXPACKPRO LEVEL ALTO PROFITION MONITOR PROFESSIONAL MIXPACKPRO LEVEL ALTO PROFITION MONITOR PROFESSIONAL MIXPACK PRO LEVEL ALTO PROFITION MONITOR PROFESSIONAL MIXPACK PRO LEVEL ALTO PROFITION MONITOR PROFESSIONAL MIXPACK PRO LEVEL ALTO PROFITION MONITOR PROFESSIONAL MIXPACK PRO LEVEL ALTO PROFITION MONITOR PROFESSIONAL MIXPACK PRO LEVEL ALTO PROFITION MONITOR PROFESSIONAL MIXPACK PRO LEVEL ALTO PROFITION MonITOR PROFESSIONAL MIXPACK PRO LEVEL ALTO PROFITION MONITOR PROFESSIONAL MIXPACK PRO LEVEL ALTO PROFITION MONITOR PROFESSIONAL MIXPACK PRO LEVEL ALTO PROFITION MONITOR PROFESSIONAL MIXPACK PRO LEVEL ALTO PROFITION MONITOR PROFESSIONAL MIXPACK PRO LEVEL ALTO PROFITION MONITOR PROFESSIONAL MIXPACK PRO Level ALTO PROFITION MONITOR PROFESSIONAL MIXPACK PRO Level ALTO PROFITION MONITOR PROFESSIONAL MIXPACK PRO Level ALTO PROFITION MONITOR PROFESSIONAL MIXPACK PRO Level ALTO PROFITION MONITOR PROFESSIONAL MIXPACK PRO Level ALTO PROFITION MONITOR PROFESSIONAL MIXPACK PRO Level ALTO PROFITION MONITORPROFESSIONAL MIXPACKPRO Level ALTO PROFITION MONITORPROFESSIONAL MIXPACKPRO Level ALTO PROFITION MONITORPROFESSIONAL MIXPACKPRO Level ALTO PROFITION MONITORPROFESSIONAL MIXPACKPRO Level ALTO PROFITION MONITORPROFESSIONAL MIXPACKPRO Level ALTO PROFITION MONITORPROFESSIONAL MIXPACKPRO Level ALTO PROFITION MonITORPROFESSIONAL MIXPACKPRO Level ALTO PROFITION
flowchart
graph LR
    A["4"] --> B["OUTPUT"]
    C["4"] --> D["LOT"]
text_image
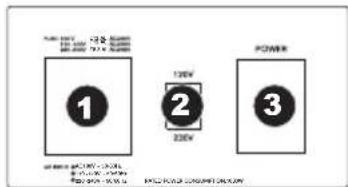
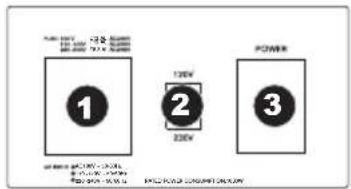
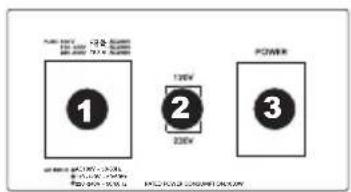
1 2 3 POWER 10W 2 DEV POWER- POWER IN – Use the included power cable to connect the mixer to a power outlet. While the power is switched off, plug the power cable into the mixer first, then plug the power cable into a power outlet.
- VOLTAGE SELECTOR – This 2-position switch sets the AC input voltage for the speaker. The switch should already be set to the correct voltage for your location. (US users should set this switch to "100-120V" whereas UK and most European users will need to set this to "220-240V.")
- POWER SWITCH – Turns the mixer on and off. Turn on the mixer after all input devices have been connected. Make sure the MASTER LEVEL knob is set to "zero" before turning it on.
- SPEAKER OUTPUTS – Connect the speakers to these outputs using 1/4" cables.
- MIC INPUT (XLR) - Connect a microphone to these inputs with an XLR cable.
- LINE INPUT (1/4") – Connect line-level devices to these inputs with 1/4" TRS cables.
- LINE INPUT (1/4") – Connect line-level devices to these inputs with 1/4" TS cables.
- HI EQ (TREBLE) – Adjusts the high (treble) frequencies of the channel.
- MID EQ (MID) - Adjusts the mid-range frequencies of the channel.
- LOW EQ (BASS) – Adjusts the low (bass) frequencies of the channel.
- AUX SEND 1 – Adjusts the channel audio (pre-fader) level that is sent to the MONITOR OUT and PHONES output.
- AUX SEND 2 – Adjusts the channel audio (post-EQ) level that is sent to the mixer's internal effects processor or AUX OUT. Turn this up for the channels that you want effects applied to. You can use this to apply effects to individual channels. (If you have an external device connected to the STEREO RTN jack, the internal effects processor will be bypassed.)
- PAN - Adjusts the (mono) channel's position in the stereo field.
- BALANCE (CH 5/6 and 7/8) – Adjusts the balance between Channels 5 and 6 and Channels 7 and 8.
-
CHANNEL LEVEL – Adjusts the audio level on the channel.
-
-20 dB SWITCH – When this button is engaged, the audio of that channel will be attenuated by 20 dB. This can help increase the headroom and reduce distortion due to an overly loud input signal that peaks frequently.
- 2TK IN – You can use a standard stereo RCA cable to connect an additional audio source to this input. The signal's volume can be adjusted with the 2TK IN LEVEL knob and sent to the monitor mix (CTRL ROOM and PHONES) or main mix (MAIN OUT).
- 2TK OUT - You can use a standard stereo RCA cable to connect this output to an external recording device. The signal sent out these RCA outputs is the same as the MAIN OUT signal.
- AUX OUT – You can use a 1/4" TRS cable to connect this output to the input of an external amplifier or active monitor to create a custom monitor mix for onstage musicians. You can adjust this level with the AUX SEND 2 knob. To use an external effects rack unit, compressor, etc. with the mixer, you can use Y-cables to connect this output to the input of your external device, then connect the outputs of the device to the STEREO RTN input.
- STEREO RTN – You can connect the output of an external device to this input with a 1/4" stereo/TRS cable. This is usually used for outboard effects devices but can also be used like an extra input channel for synthesizers, drum machines, etc. Adjust this input's volume with the AUX/DSP RET knob. (If you have an external device connected to the STEREO RTN jack, the internal effects processor will be bypassed.)
- AUX/DSP RET – Adjusts the volume of either the mixer's internal effects processor or signal being sent into the STEREO RTN. When cables are inserted into the STEREO RTN, the internal effects processor will be bypassed.
- FX MUTE – Press this button to mute/unmute the effects.
- FX CLIP/MUTE LED – The LED will flash if the mixer's internal effects processor signal is clipping. If this happens, decrease the setting of the AUX SEND 2 knob or CHANNEL LEVEL knob.
- EFFECTS SELECTOR – Selects the effect that the mixer's internal effects processor will apply to the various channels. Each channel can send different levels of audio to the processor by adjusting its AUX SEND 2 knob. See the EFFECTS section for an explanation of the available effects. (If you have an external device connected to the STEREO RTN jack, the internal effects processor will be bypassed.)
- VARIATIONS SELECTOR – Selects the amount of the effect applied to the various channels.
- FOOTSWITCH – When a latching-style footswitch is connected to this jack with a 1/4" TRS cable, it can be pressed to allow all channels to bypass the mixer's internal effects processor.
- 2TK IN LEVEL – Adjusts the level of audio sent into to 2TK IN jacks and routed to the main mix or monitor mix.
- 2TK TO - Set this switch to route the audio sent into the 2TK IN jacks to Channels 7/8 or to the main mix.
- GRAPHIC EQUALIZER - You can use these controls to adjust the equalization of the main mix (MASTER) or monitor mix (MONITOR).
- PHONES – Connect your 1/4" stereo headphones to this output. The MONITOR LEVEL knob controls the volume.
- MONITOR OUT - Use a standard 1/4" TRS cable to connect this output to your monitor or amplifier system. The level of this output is controlled by the MONITOR LEVEL knob.
- MAIN OUT – Use standard 1/4" cables to connect these outputs to the speakers. The level of these outputs is controlled by the MASTER LEVEL knob.
- MONITOR LEVEL – Adjusts the volume of the monitor mix (MONITOR OUT and PHONES).
- MASTER LEVEL – Adjusts the volume of the main mix (MAIN OUT).
- LED METERS – Shows the audio level of the main mix and monitor mix. Turn the volume down if the +10 LED lights up excessively.
- PHANTOM POWER – Activates/deactivates phantom power. When activated, phantom power supplies +48V to the XLR mic inputs. Please note that most dynamic microphones do not require phantom power, while most condenser microphones do. Consult your microphone's documentation to find out whether it needs phantom power.
- POWER LED – Illuminates when the mixer is on.
EFFECTS
TO HEAR THE EFFECTS ON A CHANNEL: Use the EFFECTS SELECTOR to choose one of the effects below, adjust the parameter with the VARIATIONS SELECTOR, then turn up the AUX SEND 2 for that channel.
| # | PRESET | DESCRIPTION | PARAMETER | RANGE |
| 1 | VOCAL 1 Reverb, simulating a room with a small delay time. | Decay timePre-delay | 0.8~1.1s0~79ms | |
| 2 | VOCAL | Reverb, simulating a small space with a slight decay time. | Decay timePre-delay | 0.8~2.5s0~79ms |
| 3 | LARGE HALL Reverb, simulating a large acoustic space. | Decay timePre-delay | 3.6~5.4s23~55ms | |
| 4 | SMALL HALL Reverb, simulating the acoustics of a stage space. | Decay timePre-delay | 1.0~2.9s20~45ms | |
| 5 | LARGE ROOM Reverb, simulating a studio with many early reflections. | Decay timePre-delay | 2.9~4.5s23~55ms | |
| 6 | SMALL ROOM Reverb, simulating a bright studio room. | Decay timePre-delay | 0.7~2.1s20~45ms | |
| 7 | PLATE Simulates bright plate reverb. | Decay timePre-delay | 0.6~6.1s10ms | |
| 8 | TAPE REVERB | Simulates classic tape delay created by multiple playback heads. | Decay timePre-delay | 1.3~5.40~84ms |
| 9 | SPRING REVERB | Simulates the lightly stretched sound of spring reverb from analog transducers. | Decay timePre-delay | 1.3~5.4s0~84ms |
| 10 | MONO DELAY | Reproduces the signal after a small period of time. | Delay period | 60~650ms |
| 11 | STEREO DELAY | Reproduces the signal after a small period of time with a slight difference between the two stereo channels. | Delay periodFeedback | 210~400ms37~73% |
| 12 | FLANGER | Classic stereo flanging effect, similar to a jet plane taking off. | Rate | 0.16~2.79Hz |
| 13 | CHORUS | Simulates the full, complex, watery sound of several instruments playing the same thing. | Rate | 0.5~5Hz |
| 14 | REVERB+DELAY | Delay effect with room reverb. | Delay periodReverse decay time | 211~375ms1.0~2.9s |
| 15 | REVERB+FLANGER | Stereo flanger effect with room reverb. | Flanger rateReverse decay time | 0.16~2.52Hz |
| 16 | REVERB+CHORUS | Stereo chorus effect with room reverb. | Chorus rateReverse decay time | 0.5~4.74Hz1.5~2.9s |
CONTENIDO DE LA CAJA
other
| Category | 1 | 2 | 3 | 4 | 5/6 | 7/8 | |---|---|---|---|---|---|---| | EQ | 8 | 8 | 8 | 8 | 8 | 8 | | LOW SET | 9 | 9 | 9 | 9 | 9 | 9 | | LOW SET | 10 | 10 | 10 | 10 | 10 | 10 | | LOW SET | 11 | 11 | 11 | 11 | 11 | 11 | | LOW SET | 12 | 12 | 12 | 12 | 12 | 12 | | LEVEL | 13 | 13 | 13 | 13 | 13 | 13 | | LEVEL | 15 | 15 | 15 | 15 | 15 | 15 | | LEVEL | 16 | 16 | 16 | 16 | 16 | 16 | | Level | 2 | 2 | 2 | 2 | 2 | 2 | | Level | 3 | 3 | 3 | 3 | 3 | 3 | | Level | 4 | 4 | 4 | 4 | 4 | 4 | | LEVEL | 5/6 | 5/6 | 5/6 | 5/6 | 5/6 | 5/6 | | LEVEL | 7/8 | 7/8 | 7/8 | 7/8 | 7/8 | 7/8 | | MFC SET | 5 | 5 | 5 | 5 | 5 | 5 | | FOOTWHECH | 26 | -27 | -28 | -27 | -28 | -28 | | STIK IN | -20 | -20 | -20 | -20 | -20 | -20 | | STIK OUT | -17 | -17 | -18 | -18 | -18 | -18 | | STIK IN N | -17 | -17 | -18 | -18 | -18 | -18 | | STIK OUT NINNINNINNINNINNINNINNINNINNINNINNINNINNINNINNINNINNINNINNINNINNINNINNINNINNINNINNINNINNINNINNINNINNINNINNINNINNINNINNINNINNINNINNINNINNINNINNINNINNINNIN NINNINNINNINNINNINNINNINNINNINNINNINNINNINNINNINNINNINNINNINNINNINNINNINNINNINNINNINNINNINNINNINNINNINNINNINNINNINNINNINNINNINNINNINNINNINNINNINNINN IN NIN NIN NIN NIN NIN NIN NIN NIN NIN NIN NIN NIN NIN NIN NIN NIN NIN NIN NIN NIN NIN NIN NIN NIN NIN NIN NIN NIN NIN NIN NIN NIN NIN NIN NIN NIN NIN NIN NIN NIN NIN NIN NIN NIN NIN NIN NIN N IN N IN N IN N IN N IN N IN N IN N IN N IN N IN N IN N IN N IN N IN N IN N IN N IN N IN N IN N IN N IN N IN N IN N IN N IN N IN N IN N IN N IN N IN N IN N IN N IN N IN N IN N IN N IN N IN N IN N IN N IN N IN N IN N IN N IN N IN N IN N IN N IN N IN N I IN M F O R T E C H S T O P T T T T T T T T T T T T T T T T T T T T T T T T T T T T T T T T T T T T T T T T T T T T T T T T T T T T T T T T T T T T T T T T T T T T T T T T T T T T T T T T T T T T T T T T T T T T T T T T T T T T t PROFESSIONAL MIXPACK PRO 37 35 33 35 34 31 30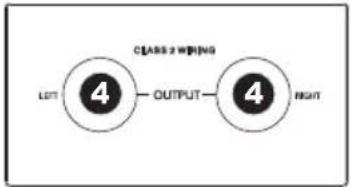
flowchart
graph LR
    A["4"] --> B["OUTPUT"]
    C["4"] --> D["RIGHT"]
text_image
1 2 3 POWER 12W 22W 12Wflowchart
graph LR
    A["4"] --> B["OUTPUT"]
    C["4"] --> D["LOT"]

text_image
1 2 3 POWER 10W 2 DEV POWERother
| Category | 1 | 2 | 3 | 4 | 5/6 | 7/8 | |---|---|---|---|---|---|---| | EQ | 8 | 8 | 8 | 8 | 8 | 8 | | LOW SET | 9 | 9 | 9 | 9 | 9 | 9 | | LOW SET+10 | 10 | 10 | 10 | 10 | 10 | 10 | | LOW SET+11 | 11 | 11 | 11 | 11 | 11 | 11 | | LOW SET+12 | 12 | 12 | 12 | 12 | 12 | 12 | | LOW SET+13 | 13 | 13 | 13 | 13 | 13 | 13 | | LOW SET+14 | 15 | 15 | 15 | 15 | 15 | 15 | | LOW SET+15 | 16 | 16 | 16 | 16 | 16 | 16 | | LOW SET+16 | 2 | 6 | 3 | 6 | 4 | 6 | | LOW SET+17 | 5 | 5 | 5 | 5 | 5 | 5 | | LOW SET+18 | 5 | 5 | 5 | 5 | 5 | 5 | | LOW SET+19 | 5/6 | 7/8 | 7/8 | 7/8 | 7/8 | 7/8 | | LOW SET+20 | 7/8 | 7/8 | 7/8 | 7/8 | 7/8 | 7/8 | | LOW SET+21 | - | - | - | - | - | - | | LOW SET+22-ALR/DOT SET | - | - | - | - | - | - | | LOW SET+23-FOOT/MATCHEM (MONITOR) | - | - | - | - | - | - | | LOW SET+24-ALR/DOT (MASTER) (MONITOR) | - | - | - | - | - | - | | LOW SET+25-ALR/DOT (MASTER) (MASTER) (MASTER) (MASTER) (MASTER) (MASTER) (MASTER) (MASTER) (MASTER) (MASTER) (MASTER) (MASTER) (MASTER) (MASTER) (MASTER) (MASTER) (MASTER) (MASTER) (MASTER) (MASTER) (MASTER) (MASTER) (MASTER) (MASTER) (MASTER) (MASTER) (MASTER) (MASTER) (MASTER) (MASTER) (MASTER) (MASTER) (MASTER) (MASTER) - ALR OUT, STIK IN, JTK IN, JTK OUT, STIK OUT, STIK OUT, STIK OUT, STIK OUT, STIK OUT, STIK OUT, STIK OUT, STIK OUT, STIK OUT, STIK OUT, STIK OUT, STIK OUT, STIK OUT, STIK OUT, STIK OUT, STIK OUT, STIK OUT, STIK OUT, STIK OUT, STIK OUT, STIK OUT, STIK OUT, STIK OUT, STIK OUT, STIK OUT, STIFLO, STIFLO, STIFLO, STIFLO, STIFLO, STIFLO, STIFLO, STIFLO, STIFLO, STIFLO, STIFLO, STIFLO, STIFLO, STIFLO, STIFLO, STIFLO, STIFLO, STIFLO, STIFLO, STIFLO, STIFLO, STIFLO, STIFLO, STIFLO, STIFLO, STIFLOW, STIFLOW, STIFLOW, STIFLOW, STIFLOW, STIFLOW, STIFLOW, STIFLOW, STIFLOW, STIFLOW, STIFLOW, STIFLOW, STIFLOW, STIFLOW, STIFLOW, STIFLOW, STIFLOW, STIFLOW, STIFLOW, STIFLOW, STIFLOW, STIFLOW, STIFLOW, STIFLOW, STIFLOW, STIFLOWER, STIFLOWER, STIFLOWER, STIFLOWER, STIFLOWER, STIFLOWER, STIFLOWER, STIFLOWER, STIFLOWER, STIFLOWER, STIFLOWER, STIFLOWER, STIFLOWER, STIFLOWER, STIFLOWER, STIFLOWER, STIFLOWER, STIFLOWER, STIFLOWER, STIFLOWER, STIFLOWER, STIFLOWER, STIFLOWER, STIFLOWER, STIFLOWER, STIFLOW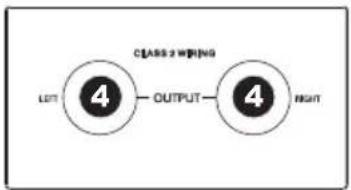
flowchart
graph LR
    A["LUT"] --> B["4"]
    B --> C["OUTPUT"]
    C --> D["4"]
    D --> E["RIGHT"]
text_image
1 2 3 POWER 12W 22Wflowchart
graph LR
    A["4"] --> B["OUTPUT"]
    C["4"] --> D["LOT"]

text_image
1 2 3 POWER 10W 2 DEV POWER2.5 KΩ (channel insert return)
≥ 10 KΩ (all other inputs)
1 KΩ (tape out)
120 Ω (all other outputs)
SNR:
94 dB
THD+N:
0.04% at +4 dBu, 1 KHz (mic, line, and stereo input channels)
GAIN:
35 dB (mic input)
15
dB
(line
input)
EQUALIZATION:
High shelving: +15 dB @ 12 KHz
M
-
The Ground Truth image displays a single, solid horizontal line. According to Rule 2 (UNDERSCORE & LINE RULES), this is a stylistic or background line, not a placeholder underscore. Therefore, the OCR result must ignore it. The provided OCR content is "____", which consists of four underscores. This is an incorrect interpretation of the line as a placeholder, violating the rule that stylistic lines must be ignored. The OCR has hallucinated underscores where none should exist based on the GT's visual context. Hence, the OCR result is inconsistent with the Ground Truth.
|
-
b
e
Low
s
ving:
+15
dB
@ 80
DSP SECTION: 24-bit A/D and D/A converters
24-bit
DSP
resolution
Effects (16 presets): Reverbs (Hall, Room, Vocal, Plate),
Delays (mono, stereo) (max delay time: 650ms)
Modulations: Chorus, Flanger, Reverb, Combinations: Reverb + Delay,
Reverb + Chorus, Reverb + Flanger
Controls: 16-position effects selector, 16-position variation selector,
clip LED, mute switch with LED indicator
NOISE (bus noise): Fader 0 dB, channels muted: -85dB (ref: +4dBu)
Fader 0 dB, all input channels set to Unity gain: -81dB (ref: +4dBu)
MAX OUTPUT: Balanced outputs: 27dBu
Aux sends: 22dBu
SPEAKER SECTION:
SYSTEM TYPE:
3-way powered system bi-amp plus passive crossover into satellite
FREQUENCY RESPONSE: 45 Hz – 20 KHz at -10 dB
SPHERICAL HORN COVERAGE: 80° H x 80° V
POWER: Low Output: 230 W RMS Class AB
Mid-High Output: 120 W + 120 W RMS Class AB
Peak:
1000
W
Peak
MAX SPL @ 1m:
119.5 dB Continuous, 122.5 Peak (calculated)
SPEAKER SPECIFICATION:
15" (381mm) low-frequency driver; 2.5" (64mm) voice coil;
4
x
6.5"
(165mm)
mid-frequency
2 x 1" (25mm) high-frequency compression driver; 1" (25mm) voice coil
Active: 125 Hz at 12 dB/Oct.
Passive: 3 KHz at 12 dB/Oct. with Electronic Dynamic Protections
AMPLIFIER SECTION:
IMPEDANCE:
Low: 4 Ω
Mid/High: 8 Ω
PROTECTIONS:
Soft start, short circuit, DC output voltage, thermal,
subsonic filter (30 Hz), 24 dB/Oct., limiter/compressor
DIMENSIONS (W x D x H):
41.2" x 27.6" x 27.6" (1060mm x 700mm x 700mm) (compact)
WEIGHT: 111.8 lbs (50.7 kg)
Inrush current at initial switch-on: 25.32A
Inrush current after power supply interruption: 11.23A
* Specifications are subject to change without notice.
www.altoprofessional.com