Transport 12 - Hi-fi system ALTO - Free user manual and instructions
Find the device manual for free Transport 12 ALTO in PDF.
| Brand | Alto Professional |
| Model | Transport 12 |
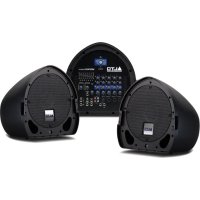
| Product type | Portable amplified sound system (active speaker) |
| Peak power | 400 watts |
| Rechargeable battery | Lithium-ion, up to 8 hours of battery life |
| Woofer | 305 mm (12") |
| Tweeter | 25 mm (1") compression driver |
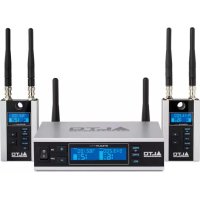
| Included wireless microphone | UHF with built-in receiver |
| Mic/Line 1 input | Combo XLR + 6.35 mm (TRS) with MIC/LINE selector |
| Stereo inputs | RCA (left/right) |
| Built-in USB player | Plays MP3, WAV, WMA from USB flash drive (FAT32) |
| Line output | 6.35 mm (TRS) mono mix |
| Voice priority function | Duck music during announcements (Voice Priority) |
| Equalization | Bass and treble (Bass/Treble) |
| Pole mount | 35 mm socket |
| Transport | Retractable handle and tilt-back wheels |
| Power supply | 100-240 V AC (cable included) |
| Power consumption | Fuse (rating indicated on device) |
| Maintenance | Clean with a dry, soft cloth. Do not use abrasive products. |
| Safety | Do not remove the grille, do not expose to rain, follow mounting standards. |
| Box contents | Transport 12, wireless microphone, microphone clip, BNC antennas, power cable, user guide, safety instructions |
Frequently Asked Questions - Transport 12 ALTO
User questions about Transport 12 ALTO
0 question about this device. Answer the ones you know or ask your own.
Ask a new question about this device
Download the instructions for your Hi-fi system in PDF format for free! Find your manual Transport 12 - ALTO and take your electronic device back in hand. On this page are published all the documents necessary for the use of your device. Transport 12 by ALTO.
USER MANUAL Transport 12 ALTO
text_image
ALTO PROFESSIONALTRANSPORT 12
User Guide
English (3 - 11)
Guía del usuario
Español (12 - 20)
Guide d'utilisation
Français (21 - 29)
Guida per l'uso
Italiano (30 - 38)
Benutzerhandbuch
Deutsch (39 - 47)
User Guide (English)
Introduction
Key Features:
• 400-watt peak power output
- Rechargeable lithium ion battery allows for up to 8 hours of continuous performance
- 12" (305 mm) woofer, 1" (25 mm) HF compression driver
- Handheld UHF wireless microphone system included
- XLR+1/4" (6.35 mm) combo mic/line input
• Voice priority feature automatically lowers music during announcements
• Built-in USB media player for convenient music playback—no DJ required
- Retractable handle and tilt-back wheels for easy transport
- 35 mm speaker pole socket for flexible positioning
Box Contents
Transport 12
Wireless Microphone
Wireless Microphone Bracket
BNC Antenna
Power Cable
User Guide
Safety & Warranty Manual
Support
For the latest information about this product (system requirements, compatibility information, etc.) and product registration, visit altoprofessional.com.
Important Safety Precautions
Please note: Alto Professional and inMusic are not responsible for the use of its products or the misuse of this information for any purpose. Alto Professional and inMusic are not responsible for the misuse of its products caused by avoiding compliance with inspection and maintenance procedures. Please also refer to the included safety and warranty manual for more information.

Caution: To reduce the risk of electric shock, do not connect Transport 12 to a power outlet while the grille is removed.
Stand-Mounting
• Always install loudspeakers in accordance with applicable electrical and building codes.
- Install the loudspeaker according to its maximum weight. Check the specifications of your stand or pole to ensure it can support the loudspeaker's weight. Also, observe all safety precautions specified by the manufacturer.
- Do not mount multiple loudspeakers on the same stand or pole.
- Always verify that the stand or pole is on a flat, level, and stable surface. Also, fully extend the legs of tripod-style stands, and ensure its legs do not present a trip hazard.
- Inspect the stand (or pole and associated hardware) before each use and do not use equipment with worn, damaged, or missing parts.
- Always be cautious in windy, outdoor conditions. You may need to place additional weight (e.g., sandbags) on stand's base to improve stability. Do not attach banners or similar items to any part of a loudspeaker system. Such attachments could act as a sail and topple the system.
- Unless you are confident that you can handle the loudspeaker's weight, ask another person to help you lift it onto the stand or pole.
- Make sure your cables are out of the way of performers, production crew, and audience so they will not trip over them, pulling the loudspeaker off the stand or pole.
Sound Level
Permanent hearing loss may be caused by exposure to extremely high noise levels. The U.S. Occupational Safety and Health Administration (OSHA) has specified permissible exposures to certain noise levels. According to OSHA, exposure to high sound pressure levels (SPL) in excess of these limits may result in hearing loss. When using equipment capable of generating high SPL, use hearing protection while such equipment is under operation.
| Hours per day | SPL (dB) | Example |
| 8 | 90 | Small gig |
| 6 | 92 | Train |
| 4 | 95 | Subway train |
| 3 97 High level desktop monitors | ||
| 2 | 100 | Classical music |
| 1.5 | 102 | Riveting machine |
| 1 | 105 | Machine factory |
| 0.50 | 110 | Airport |
| 0.25 or less 115 | Rock concert | |
Setup
Items not listed under Introduction > Box Contents are sold separately.
Example 1

natural_image
Diagram showing audio equipment connected to an acoustic guitar via a cable (no text or symbols present)Connect a guitar with an active pickup to the Mic/Line 1 Input using a 1/4" (6.35 mm) TS cable.
See Operation > Using Microphones & Other Audio Sources to learn more.
Note: When using Transport 12 with a guitar, we recommend using one with active pickups rather than passive pickups. If you use a guitar with passive pickups, connect it to an external preamp or direct input (DI) box, and connect the line-level output to the loudspeaker.
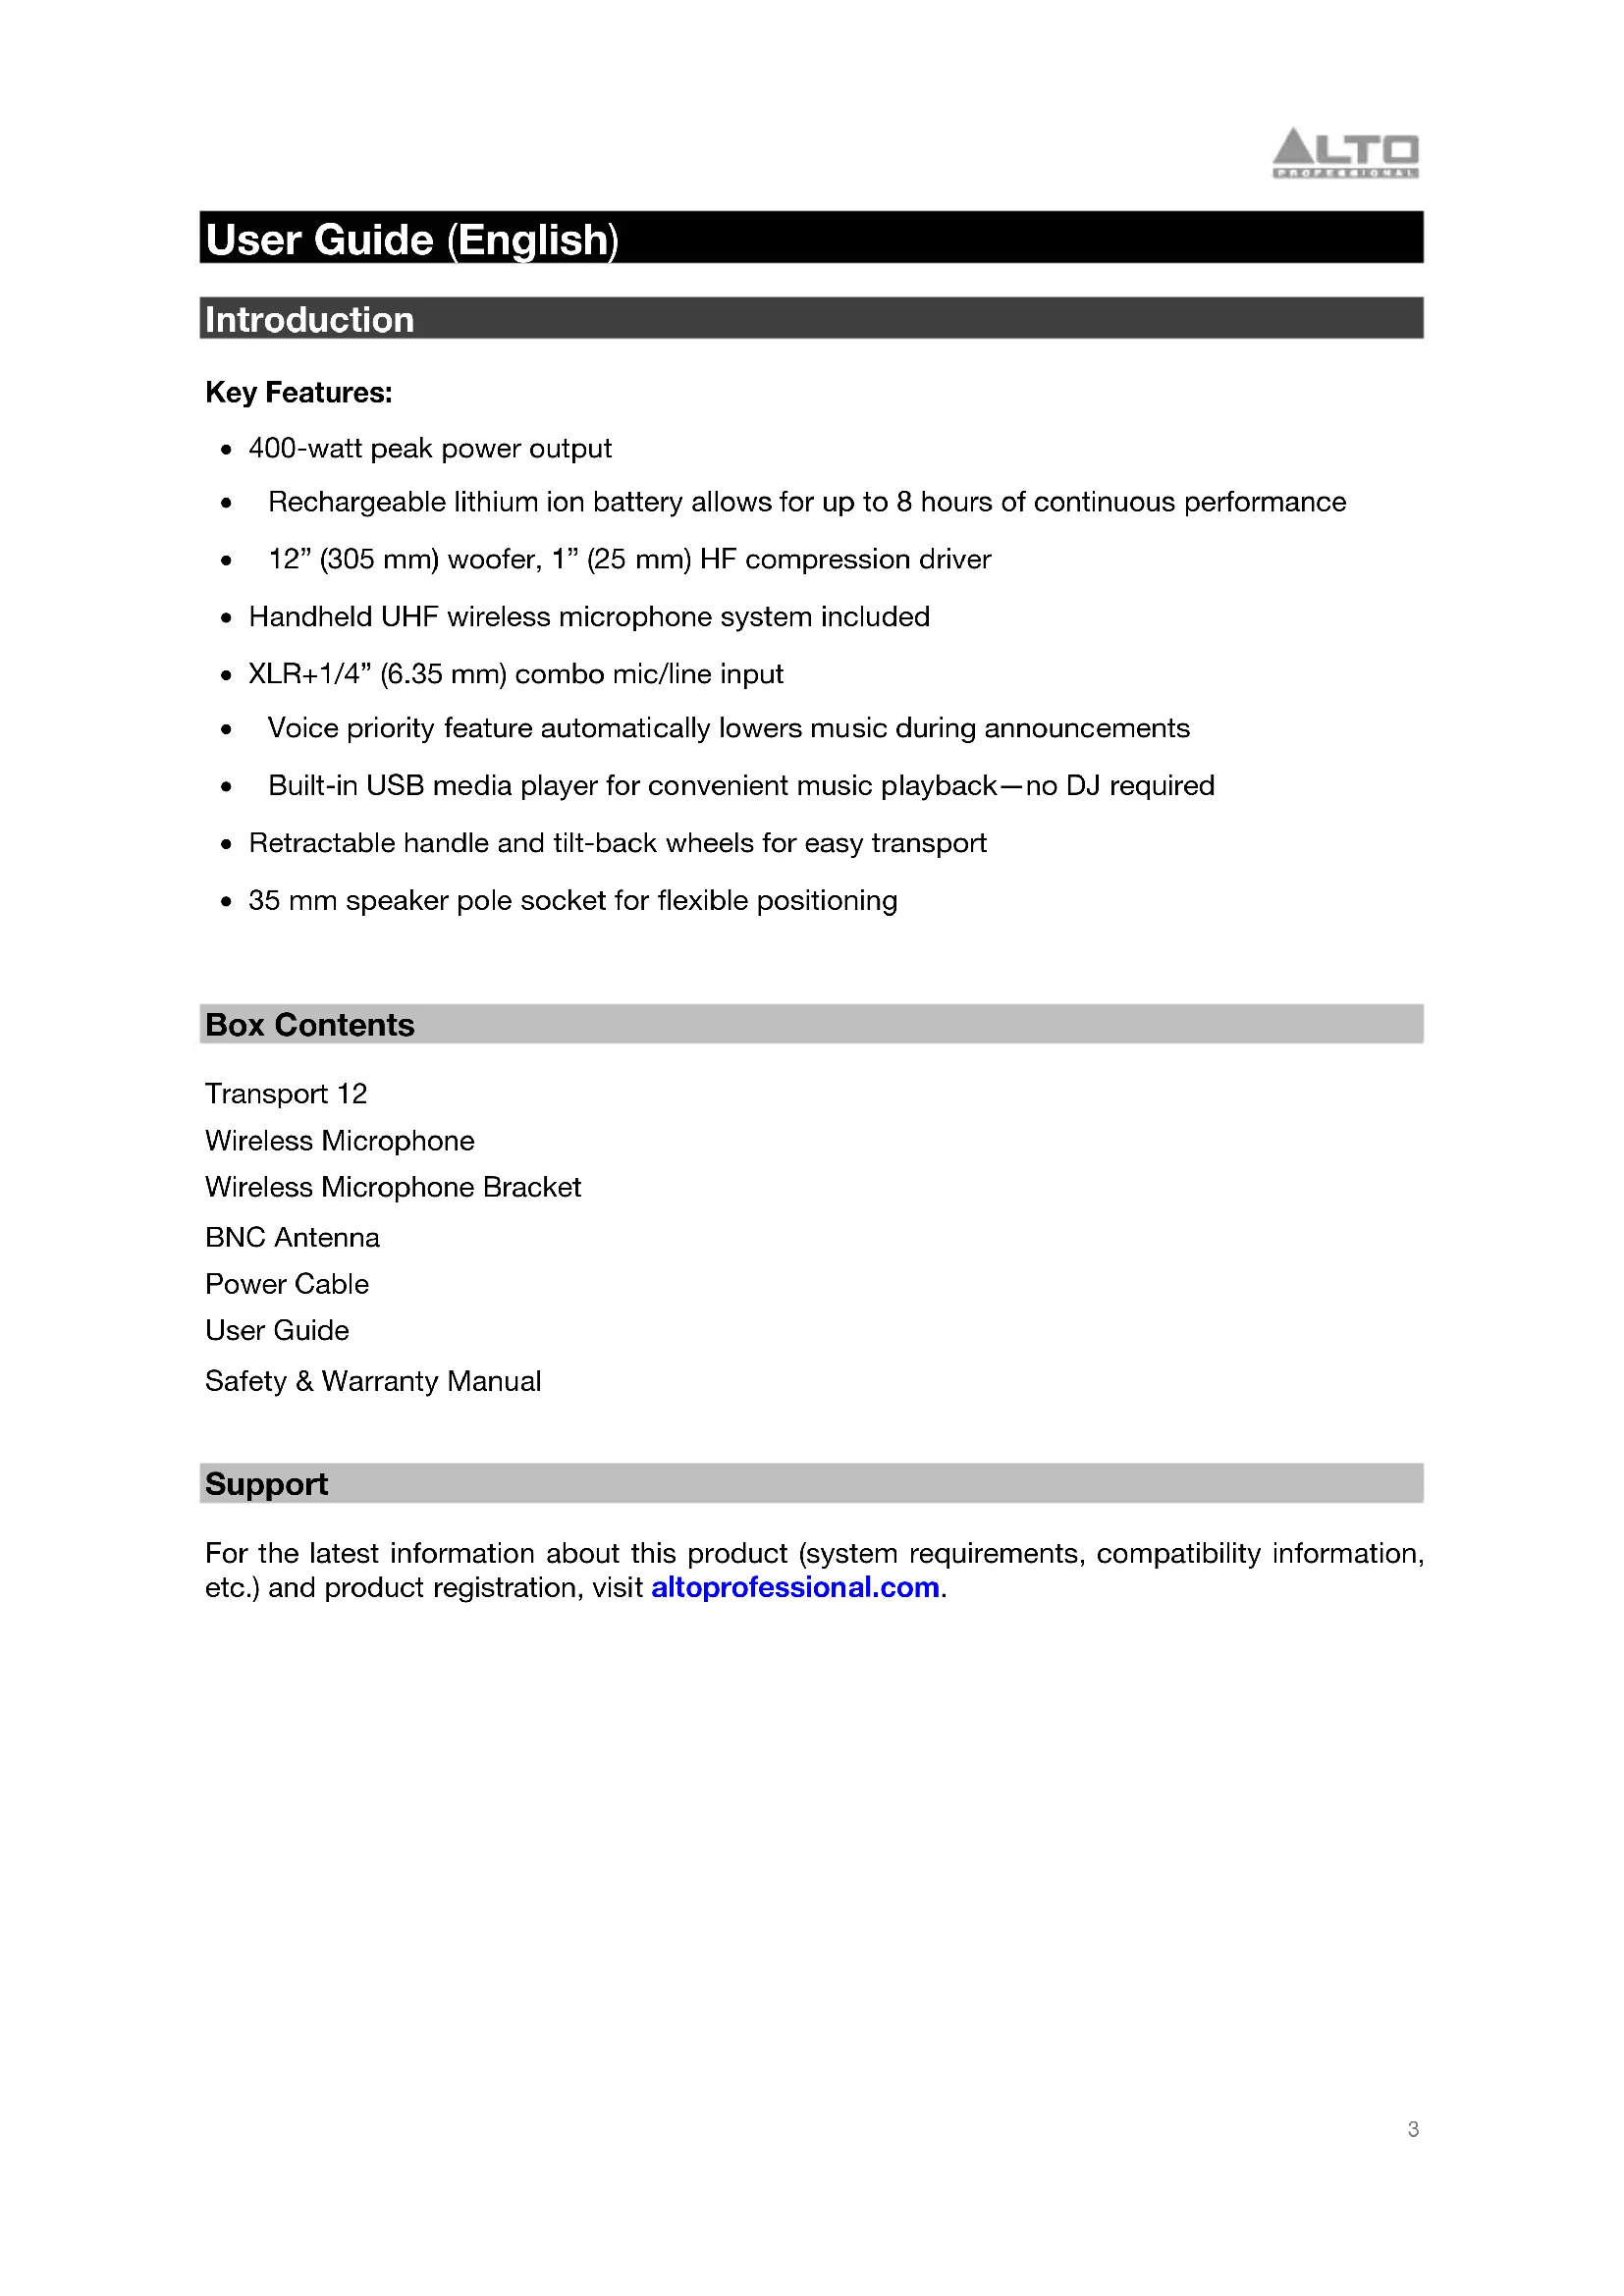
Example 2
text_image
Diagram showing a device with labeled buttons and an external microphone, illustrating audio signal transmission.Power on the wireless microphone, set the channel on the wireless receiver, and then send it to the wireless microphone. Use the wireless microphone up to 250 feet (76 meters) away from the receiver.
See Operation > Using the Wireless Microphone to learn more.
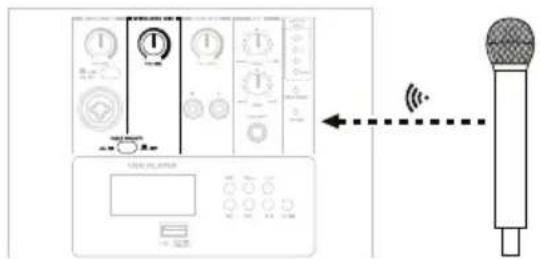
Example 3
text_image
Diagram showing connections between a device interface with labeled buttons and a smartphone displaying the screen.Connect a smartphone, tablet, or other music player to the RCA inputs using a stereo RCA cable.
See Operation > Using Microphones & Other Audio Sources to learn more.
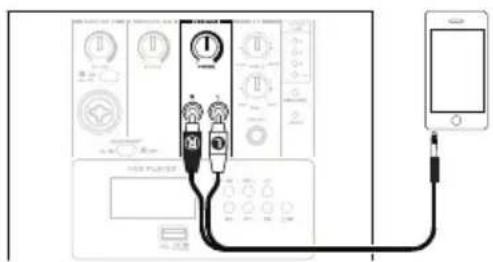
Example 4
text_image
Diagram showing a device control panel with buttons, dials, and a USB flash labeled 'USB FLAMER'Connect a USB drive with playable music files to this USB port.
See Operation > Using the USB Player to learn more.
Features
Rear Panel
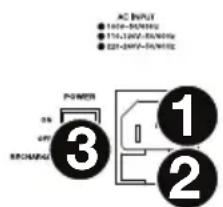
- Power Input (IEC): Use the included power cable to connect this input to a power outlet. Make sure the speaker's power switch is set to "off" when connecting or disconnecting the cable.
- Fuse Holder: If the unit's fuse is broken, lift this tab to replace the fuse. Replace it with a fuse with an appropriate rating (printed on or near the fuse holder). Using a fuse with an incorrect rating can damage the unit and/or fuse.
- Power Switch: Use this switch to power the loudspeaker on/off. Make sure all volume knobs are set to "zero" before powering it on. Set this switch to Recharge if you are charging its internal battery but not using it.
- Power Light: This light will illuminate when Transport 12 is powered on.
- Battery Level Indicator: These lights show the current amount of life in Transport 12's internal battery. When only the Low light is lit, connect Transport 12's power input to a power outlet to recharge its battery.
- Recharge Indicator: This light will be red when Transport 12's internal battery is charging. When the battery is fully charged, the light will be green.
-
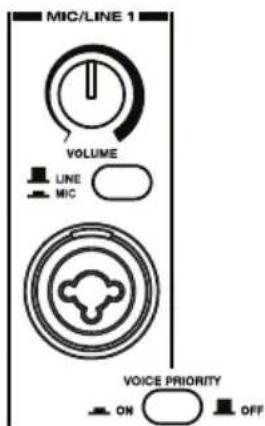
Mic/Line 1 Input (XLR or 1/4"/6.35 mm): Use a standard 1/4" (6.35 mm) TRS or XLR cable (not included) to connect an audio source to this input. Use the Mic/Line 1 Volume knob to adjust the level.
-
Mic/Line 1 Selector: Press this button to select whether the Mic/Line 1 Input is connected to a line-level audio source (the raised position) or a microphone (the depressed position).
- Mic/Line 1 Volume: Turn this knob to adjust the volume of the Mic/Line 1 Input.
- Voice Priority: Press this button to activate or deactivate the voice priority feature. When active (the depressed position), if the Mic/Line 1 Input or the wireless microphone receives an audio signal, the volume level of all other audio sources will be lowered ("ducked") so the incoming signal can be heard better. When inactive (the raised position), all other audio sources will remain at their set volume levels. See Operation > Using the Wireless Microphone and Using Microphones & Other Audio Sources to learn more.
text_image
11 12 UP SET DOWN 13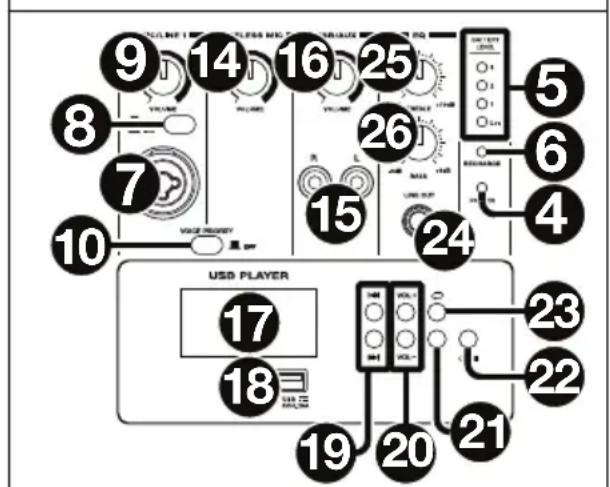
text_image
9 14 16 25 8 7 10 VOLUME VOLUME VOLUME 26 15 LINE UP LINE UP 24 5 6 4 USB PLAYER 17 18 23 22 21 19 20
TRANSPORT12
400-WATT BATTERY-POWERED SOUND SYSTEM
text_image
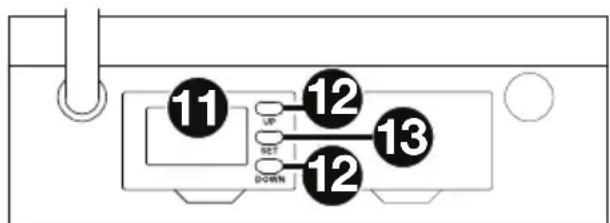
AC INPUT ● 110-250V/30Hz ● 110-250V-50V/30Hz ● 221-300V-50V/30Hz POWER 3 471 BCHAMU 1 2- Wireless Mic Display: This display shows the current reception settings of the wireless module. See Operation > Using the Wireless Microphone to learn more.
- Up/Down: Use these buttons to move to the next-highest or next-lowest channel of the wireless module. See Operation > Using the Wireless Microphone to learn more.
- Set: Press this button to confirm the current setting of the wireless receiver. See Operation > Using the Wireless Microphone to learn more.
- Wireless Mic Volume: Turn this knob to adjust the volume of the wireless microphone (included). See Operation > Using the Wireless Microphone to learn more.
- RCA Inputs: Use a stereo RCA cable (not included) to connect an audio source to these inputs. Use the USB/Aux Volume knob to adjust the level.
- USB/Aux Volume: Turn this knob to adjust the volume of the RCA inputs and USB player. This knob works in conjunction with the Vol -/+ buttons on the USB player.
- USB Player Display: This display shows the current operation of the USB player. See Operation > Using the USB Player to learn more.
- USB Port: Connect a USB drive with playable music files to this USB port. See Operation > Using the USB Player to learn more.
- Previous/Next (◀◀/▶◀): Use these buttons to move to the previous or next track. If you are currently in the middle of a track, press Previous (◀◀) to return to the beginning of the track. See Operation > Using the USB Player to learn more.
- Vol -/+: Use these buttons to lower or raise the volume of the USB player. These buttons work in conjunction with the USB/Aux Volume knob. See Operation > Using the USB Player to learn more.
- Play/Pause (▶II): Press this button to start/resume or pause playback. See Operation > Using the USB Player to learn more.
- Power/Stop (☐/☐): Press and hold this button for 3 seconds to activate or deactivate the USB player. During playback, press this button to stop playback and return to the beginning of the track. See Operation > Using the USB Player to learn more.
- Repeat (☐): Press this button to cycle through the playback modes:
• Normal (no indication): Tracks will play in their normal order and then stop. - Repeat 1 (REP 1): The current track will repeat.
- Repeat All (REP ALL): The entire sequence of tracks will repeat.
- Random (REP): The entire sequence of tracks will play in a random order.
See Operation > Using the USB Player to learn more.
-
Line Out (1/4"/6.35 mm): Use a standard 1/4" (6.35 mm) cable (not included) to connect this output to the input of another loudspeaker, mixer, audio interface, etc. The signal sent from this output is a summed mono signal of all audio sources and the USB player, post-EQ.
-
EQ (Treble): Turn this knob to increase or decrease the high (treble) frequencies.
-
EQ (Bass): Turn this knob to increase or decrease the low (bass) frequencies.
Operation
Charging the Battery
The battery level indicator shows the current amount of life in Transport 12's internal battery. When only the Low light is lit, connect Transport 12's power input to a power outlet, and set the power switch to On or Recharge to recharge its battery. While Transport 12 is recharging, the Recharge light will be on.
Tip: If you are charging the internal battery but not using Transport 12, set the power switch to Recharge.

You can use a "wired" microphone (as opposed to the included wireless microphone) or any other line-level audio source with Transport 12.
To connect a microphone or other audio source, do any of the following:
- Use a standard XLR or 1/4" (6.35 mm) cable to connect a microphone or line-level audio source to the Mic/Line 1 Input. Press the Mic/Line 1 Input Selector to select the source: put it in the depressed position if you are using a microphone; put it in the raised position if you are using line-level audio source.
To control the volume, turn the Mic/Line 1 Volume knob. If your audio source has its own volume control, you can use that, as well.
- Use a standard RCA stereo cable to connect a line-level audio source to the RCA inputs.
To control the volume, turn the USB/Aux Volume knob. If your audio source has its own volume control, you can use that, as well.
text_image
MIC/LINE 1 VOLUME LINE MIC VOICE PRIORITY ON OFFThis channel has a “voice priority” feature that you can activate or deactivate. When active, if the channel receives an audio signal, the volume level of all other audio sources will be lowered (“ducked”) so the incoming signal can be heard better. When inactive, all other audio sources will remain at their set volume levels.
To activate or deactivate the voice priority, press Voice Priority. The feature is active when the button is depressed, inactive when the button is raised.
Note: The Mic/Line 1 Input and wireless microphone share the voice priority.
Using the Wireless Microphone
Transport 12 has an included wireless microphone, which sends its signal to the wireless receiver on Transport 12's rear panel.
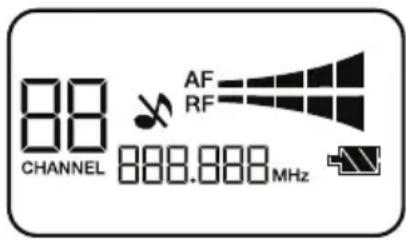
The wireless receiver's display has the following settings:
- Channel: The large 2-digit number on the left edge is the current channel. The number of available channels depends on your region.
- MHz: The 6-digit number at the bottom edge is the current frequency.
- Mute (✗): The crossed-out musical note appears when the wireless microphone signal is muted.
- RF: This meter shows the current level of reception between the wireless microphone and receiver.
- AF: This meter shows the current audio signal level sent to the wireless microphone receiver.
- Battery Level Indicator (■): The battery icon show the current amount of life in the wireless microphone's battery.
text_image
88 CHANNEL 888.888MHz AF RFTo set up the wireless microphone and receiver:
- Remove the battery compartment cover on the wireless microphone, and insert 2 AA batteries into the compartment. Make sure the polarities of the batteries (+ and -) are correct. Leave the battery compartment cover off.
- Press and hold the power button on the wireless microphone to power it on. Its Mute light will be green to indicate that it is powered on.
- Set the power switch on Transport 12 to On to power it on.
-
On the receiver, select an available channel by doing any of the following:
-
Press the Up or Down button to move through all selectable channels.
- Press and hold the Up or Down button for 3 seconds to scan quickly up or down for an unused channel.
-
Press and hold the Up or Down button for 6 seconds to move quickly up or down.
-
Make sure the wireless microphone and transmitter are within 1 foot (31 cm) of each other with the infrared transmitter (near the display) and infrared receiver (near the Gain knob) facing one another.
- After selecting a channel, press and hold the Up or Down button until the characters flash in the display. While they flash, release the button. The characters will light solidly for a second and then flash again, indicating that the wireless receiver is sending the channel information to the wireless microphone (via infrared).
- Reattach battery compartment cover on the wireless microphone.
Tips: To maintain good reception while using the wireless microphone:
Stay within 250 feet (76 meters) of Transport 12.
Keep the path between the microphone and Transport 12 clear of any obstacles.
Be sure the batteries in the wireless microphone are not low on power.
To adjust the wireless microphone's gain level, remove the battery compartment cover on the wireless microphone, and use the small plastic tool inside the battery compartment to turn the Gain knob. Reattach the battery compartment cover when you are done.
Note: This setting works in conjunction with the Wireless Mic Volume knob and input volume setting.
To adjust the input volume level:
- On the wireless receiver, press Up once quickly.
- Use the Up/Down buttons to increase or decrease the input volume level.
- Press Set to confirm the new setting.
Note: This setting works in conjunction with the wireless microphone's Gain knob and the Wireless Mic Volume knob.
To control the output volume, turn the Wireless Mic Volume knob.
Note: This control works in conjunction with the wireless microphone's Gain knob and input volume setting.
The wireless microphone has a “voice priority” feature that you can activate or deactivate. When active, if the microphone receives an audio signal, the volume level of all other audio sources will be lowered (“ducked”) so the wireless microphone signal can be heard better. When inactive, all other audio sources will remain at their set volume levels.
To activate or deactivate the voice priority, press Voice Priority. The feature is active when the button is depressed, inactive when the button is raised.
Note: The Mic/Line 1 Input and wireless microphone share the voice priority.

text_image
WIRELESS MIC VOLUME VOICE PRIORITY ON OFFThe squelch setting is a noise-reduction feature, minimizing background or ambient noise during silent moments. Higher settings allow for greater noise reduction and dynamic range, but a setting that's too high can cause intentionally quieter sounds to be silenced along with the noise. Be sure to experiment with different settings to find an optimal balance.
To adjust the squelch level:
- On the wireless receiver, press Up twice quickly.
- Use the Up/Down buttons to increase or decrease the squelch level.
- Press Set to confirm the new setting.
Using the USB Player
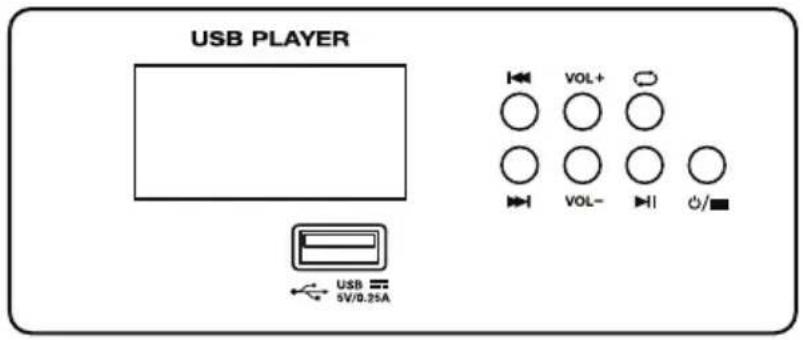
text_image
USB PLAYER USB 5V/0.25A VOL+ VOL- VOL-Important: To use the USB player, your USB drive must use a FAT32 file system. The USB player can play MP3, WAV, and WMA file formats.
To activate or deactivate the USB player, press and hold Power/Stop (☐/■) for 3 seconds.
To start or resume playback, press Play/Pause (▶II) when playback is paused or stopped.
To pause playback, press Play/Pause (▶II) during playback.
To stop playback, press Power/Stop (○/■) during playback.
To control the volume, use the Vol -/+ buttons as well as the USB/Aux Volume knob.
To move to the previous or next track, use the Previous/Next (◀/▼)Buttons.
To select a playback mode, press Repeat (○) to cycle through the available options: Repeat 1 (the current track will repeat), Repeat All (the entire sequence of tracks will repeat), or Off (no tracks will repeat).
text_image
Diagram showing audio guitar connection with instrument panel and microphone, including a guitar body silhouette.text_image
Diagram showing a device panel with labeled buttons and an external microphone, illustrating signal transmission or measurement.text_image
Diagram showing connections between a device interface with labeled buttons and a smartphone displaying the screen.text_image
Diagram showing a device control panel with labeled buttons and a digital display, connected to a USB port.text_image
88 CHANNEL 888.888 MHz AF RFtext_image
WIRELESS MIC VOLUME VOICE PRIORITY ON OFFAssistance technique
text_image
Diagram showing audio device connections with guitar body and labeled buttons, including a 100 μF power connector.text_image
Diagram showing a device panel with labeled buttons and a wireless signal transmission diagram pointing to the microphone.text_image
Diagram showing connections between a device labeled 'SAR-PLA' and a smartphone displaying a screen with an icon.text_image
Diagram showing a device control panel with labeled buttons and a USB player interface connected to a USB port.text_image
WIRELESS MIC VOLUME VOICE PRIORITY ON OFFtext_image
Diagram showing audio device connections to an acoustic guitar, with labeled knobs and a connected cable.text_image
Diagram showing a device panel with control knobs and a microphone, connected to a signal wave indicator.text_image
Diagram showing connections between a device interface with labeled components and a smartphone displaying the screen.text_image
Diagram showing a device control panel with labeled buttons and a digital display, connected to a battery terminal.text_image
88 CHANNEL 888.000 MHz AF RFtext_image
WIRELESS MIC VOLUME VOICE PRIORITY ON OFFtext_image
Diagram showing audio device connections to an acoustic guitar, with labeled knobs and portstext_image
Diagram showing a device panel with labeled buttons and a wireless signal icon pointing to the right side of a microphone.text_image
Diagram showing connections between a device labeled 'CER PLANT' and a smartphone displaying a screen with an orange screen.text_image
Diagram showing a device with labeled buttons and a connected interface, likely for electronic control or testing.text_image
AC INPUT ● 110V-550Hz ● 176.220V-88/90Hz ● 22V-400V-48/90Hz POWER ON OFF DC/DC/DC ③ ① ②text_image
88 CHANNEL 888.888 MHz AF RFtext_image
WIRELESS MIC VOLUME VOICE PRIORITY ON OFFtext_image
Diagram showing audio guitar connection with instrument panel and output line, including a guitar icontext_image
Diagram showing a device with labeled control panels and a microphone, illustrating audio signal transmission.text_image
Diagram showing connections between a device interface with labeled buttons and a smartphone displaying the 'Smart' logo.text_image
Diagram of a device control panel with labeled buttons and a digital display showing a device connected to a USB interface.text_image
88 CHANNEL 888.888 MHz AF RFtext_image
WIRELESS MIC VOLUME VOICE PRIORITY ON OFFTechnical Specifications
| System Type | Bi-amplified active vented loudspeaker with wireless microphone |
| Output Power | 400 W peak (Class D, 270 W LF + 130 W HF)200 W continuous (Class D, 135 W LF + 65 W HF) |
| Transducers | 12" (305 mm) woofer, 2" (51 mm) voice coil1" (25 mm) ferrite driver, 1" (25 mm) voice coil |
| Horn Coverage | 90°H x 45°V |
| Frequency Response | 65 Hz - 20 KHz (-6 dB) |
| Crossover Frequency | 5 KHz |
| Max SPL | 119 dB-SPL (peak, @ 1 m) |
| Input Sensitivity Channel | 1 Microphone: -35 dBu (+1 dBu)_Channel 1 Line: -10 dBu (±1 dBu)Channel 2 Aux: -10 dBu (±1 dBu) |
| Equalization | Treble: ±10 dB at 10 KHzBass: ±6 dB at 100 Hz |
| Wireless Transmission | Microphone: Wireless dynamic microphone with integrated gain knob, battery-powered (2 AA)Range: 250 feet / 76 metersFrequency Bands: 200 MHz, 800 MHz, or 2.4 GHz |
| USB Player Supported | File Systems: FAT32Supported File Formats: MP3, WAV, WMADisplay: Backlit LCD |
| Enclosure | Metal grille, trapezoidal plastic cabinet with 36 mm pole-mount socket, rubber feet, handle |
| Power | IEC: 115-120 VAC, 60 Hz; 220-240 VAC, 50 HzBattery: 25.9 V, internal lithium ion battery (6-8 hours of battery life at regular usage; 4 hours to recharge fully) |
| Dimensions(width x depth x height) | 15.0" x 14.5" x 24.0"381 x 368 x 609 mm |
| Weight | 37.5 lbs.17.0 kg |
Specifications are subject to change without notice.
Trademarks & Licenses
Alto Professional is a trademark of inMusic Brands, Inc., registered in the U.S. and other countries. All other product or company names are trademarks or registered trademarks of their respective owners.