Mixpack Express - Hi-fi system ALTO - Free user manual and instructions
Find the device manual for free Mixpack Express ALTO in PDF.
| Product Type | Mixing console with built-in effects processor |
| Brand | ALTO |
| Model | Mixpack Express |
| Number of input channels | 8 channels (4 mic/line + 2 RCA line + 1 FX return) |
| Microphone inputs | 4 inputs with XLR and 1/4" jacks |
| Line inputs | 1/4" jack inputs (channels) and RCA inputs (stereo) |
| Main outputs | 2 1/4" jack outputs (Main Out) + 1 Monitor Out |
| Headphone output | 1 stereo 1/4" jack output |
| FX Send output | 1 1/4" jack output for external effects send |
| FX Return | 1 1/4" jack input for external effects return |
| Per channel equalization | 2 bands: High (Hi EQ) and Low (Low EQ) |
| Main graphic equalizer | Built-in graphic equalizer for the main mix |
| Built-in effects processor | 16 presets: reverbs, delays, chorus, combinations |
| Effects control | Effects selector, FX AUX1 POST knob per channel, FX RET knob, On/Off activation |
| Effects pedal input | 1/4" TRS connector for footswitch bypass |
| LED indicators | Peak LED, main level indicators (+10, 0, -10, -20) |
| Power | Mains via included power cable |
| Dimensions (approx.) | Approximately 300 x 200 x 100 mm (estimation) |
| Weight (approx.) | Approximately 2 kg (estimation) |
| Housing materials | Metal chassis |
| Maintenance and cleaning | Clean with a soft dry cloth. Do not use solvents. |
| Safety | Unplug before maintenance. Do not expose to moisture. Use a grounded power outlet. |
Frequently Asked Questions - Mixpack Express ALTO
User questions about Mixpack Express ALTO
0 question about this device. Answer the ones you know or ask your own.
Ask a new question about this device
Download the instructions for your Hi-fi system in PDF format for free! Find your manual Mixpack Express - ALTO and take your electronic device back in hand. On this page are published all the documents necessary for the use of your device. Mixpack Express by ALTO.
USER MANUAL Mixpack Express ALTO
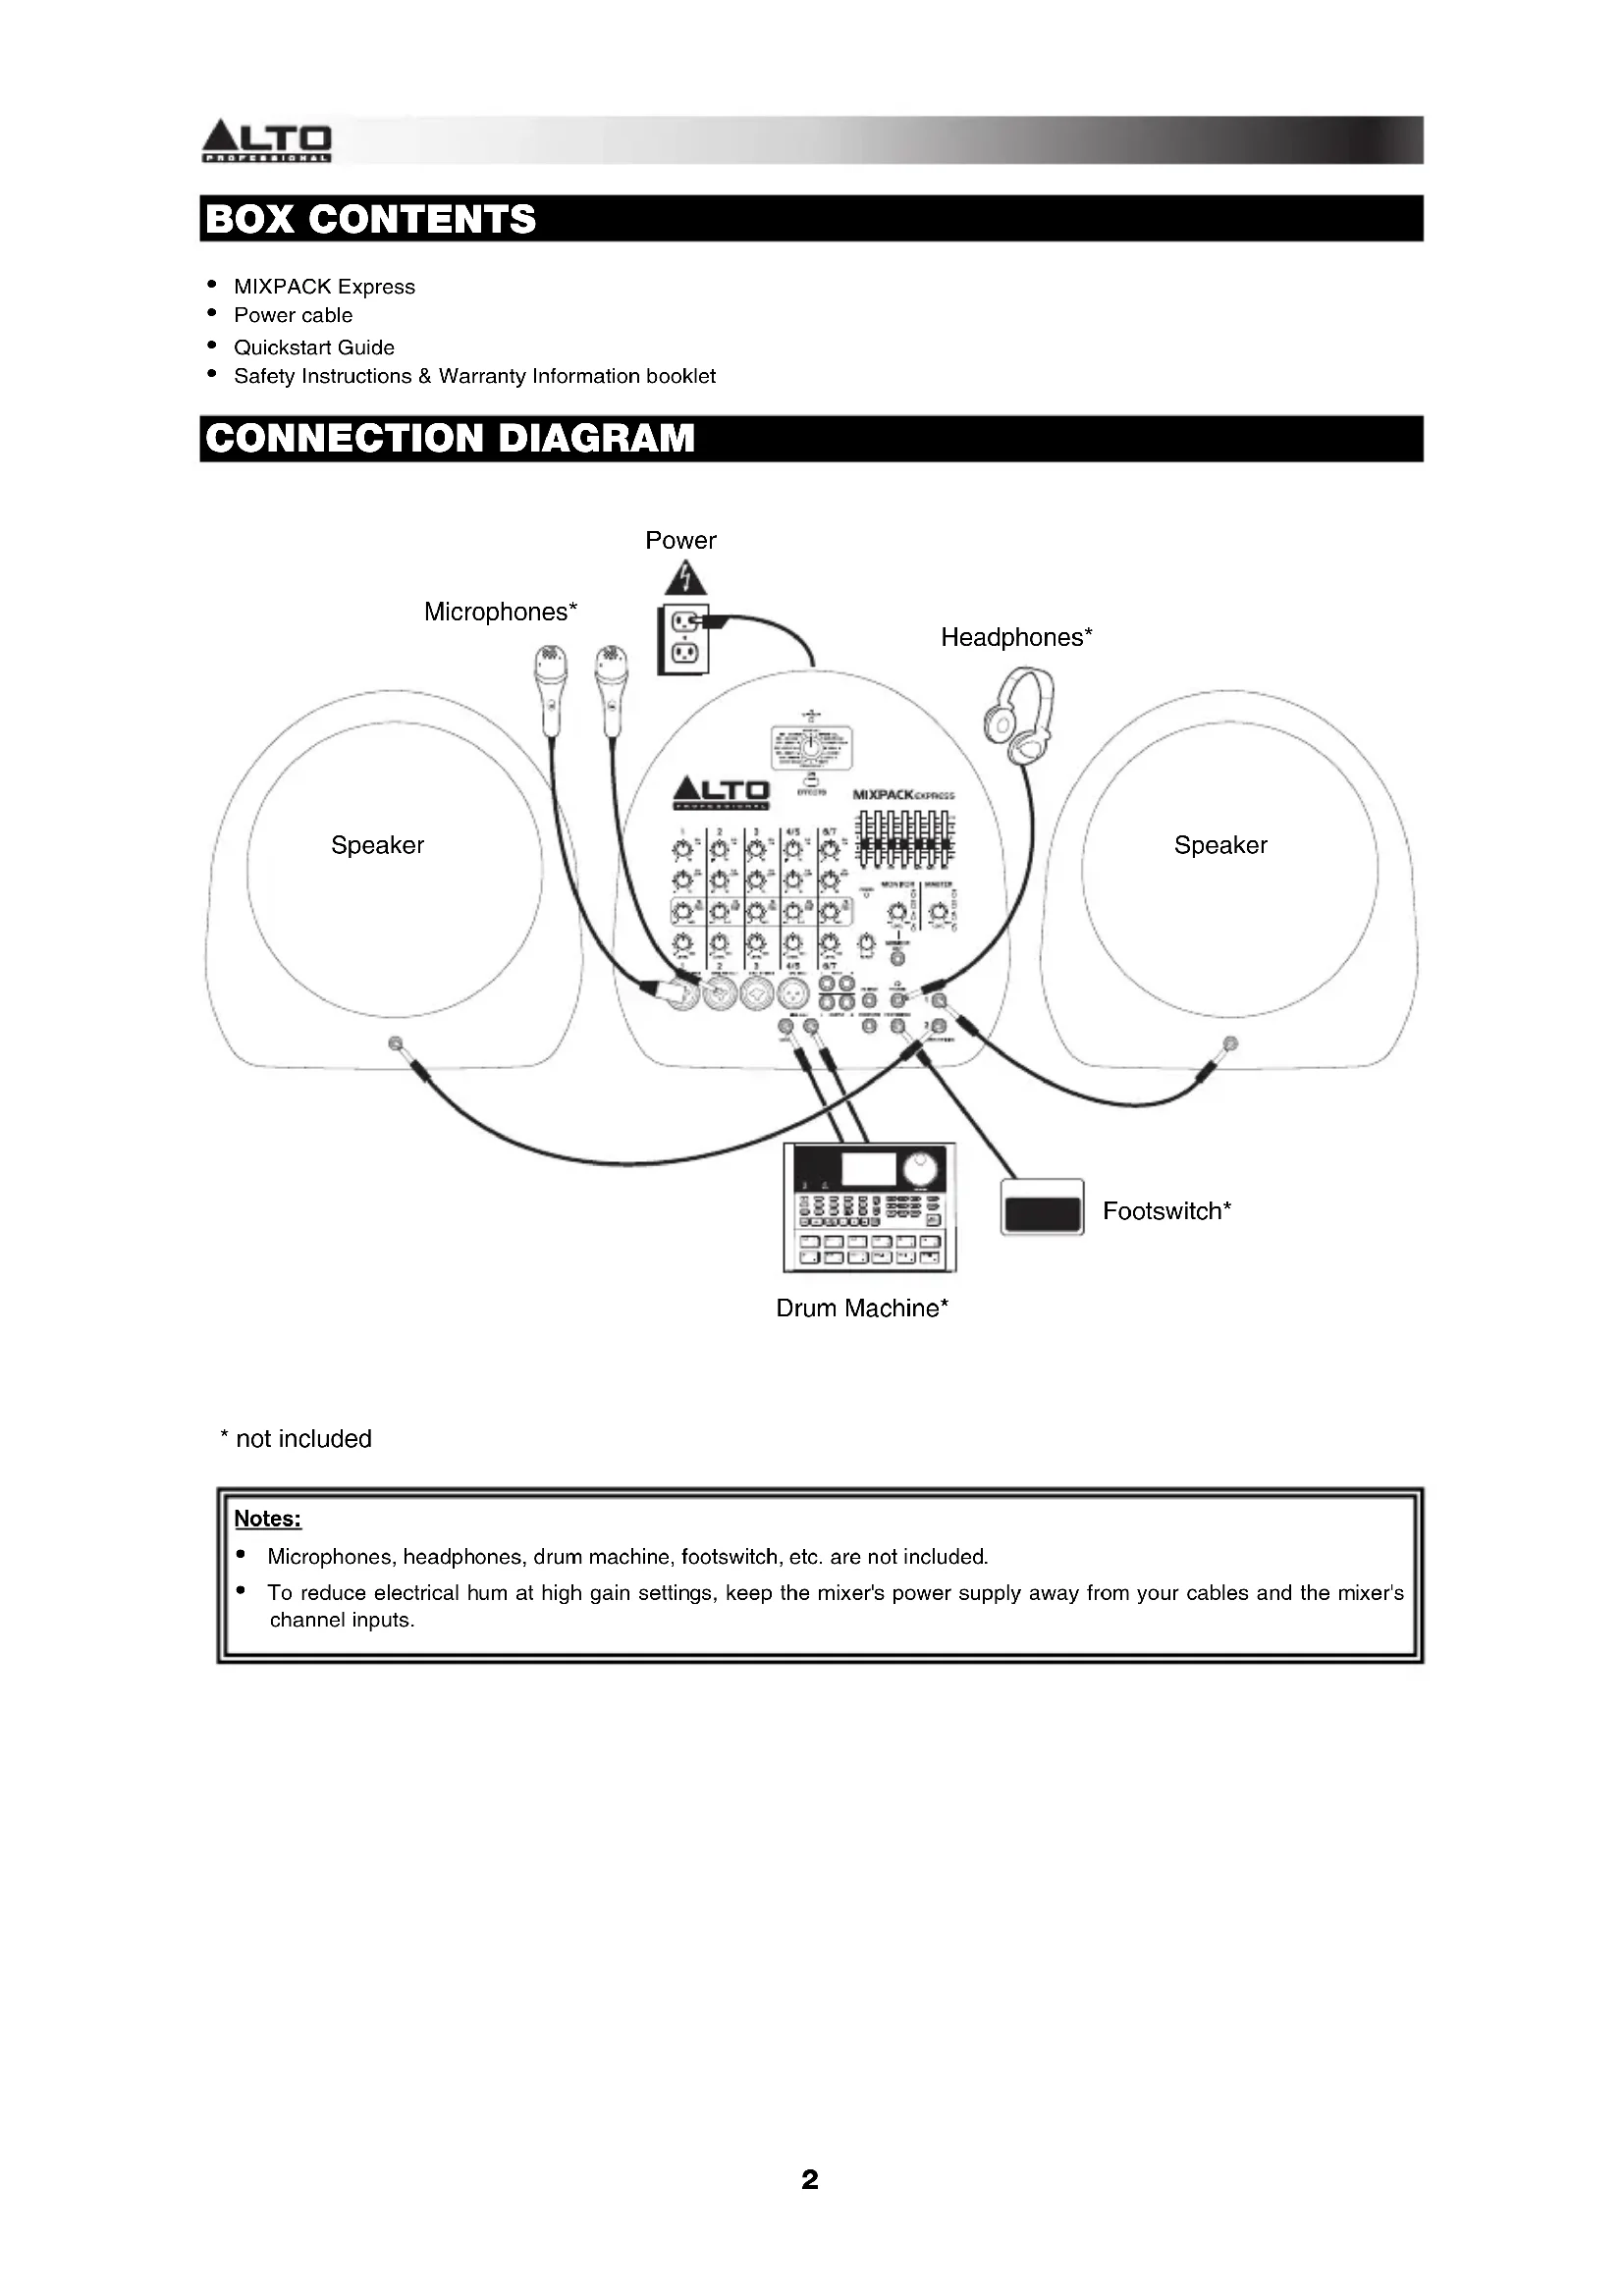
- Microphones, headphones, drum machine, footswitch, etc. are not included.
- To reduce electrical hum at high gain settings, keep the mixer's power supply away from your cables and the mixer's channel inputs.
FEATURES
- POWER IN - Use the included power cable to connect the mixer to a power outlet. While the power is switched off, plug the power cable into the mixer first, then plug the power cable into a power outlet.
- POWER SWITCH - Turns the mixer on and off. Turn on the mixer after all input devices have been connected. Make sure the MASTER LEVEL knob is set to "zero" before turning it on.
- MIC INPUT (XLR / 1/4") - Connect a microphone to these inputs with an XLR or 1/4" cable.
- MIC INPUT (XLR) - Connect a microphone to these inputs with an XLR cable.
- LINE INPUT (1/4") - Connect line-level devices to these inputs with 1/4" cables.
- LINE INPUT (RCA) - Connect line-level devices to these inputs with a standard stereo RCA cable.
- HI EQ (TREBLE) - Adjusts the high (treble) frequencies of the channel.
- LOW EQ (BASS) - Adjusts the low (bass) frequencies of the channel.
- FX AUX1 POST - Adjusts the channel audio (post-EQ) level that is sent to the mixer's internal effects processor and FX SEND. Turn this up for the channels that
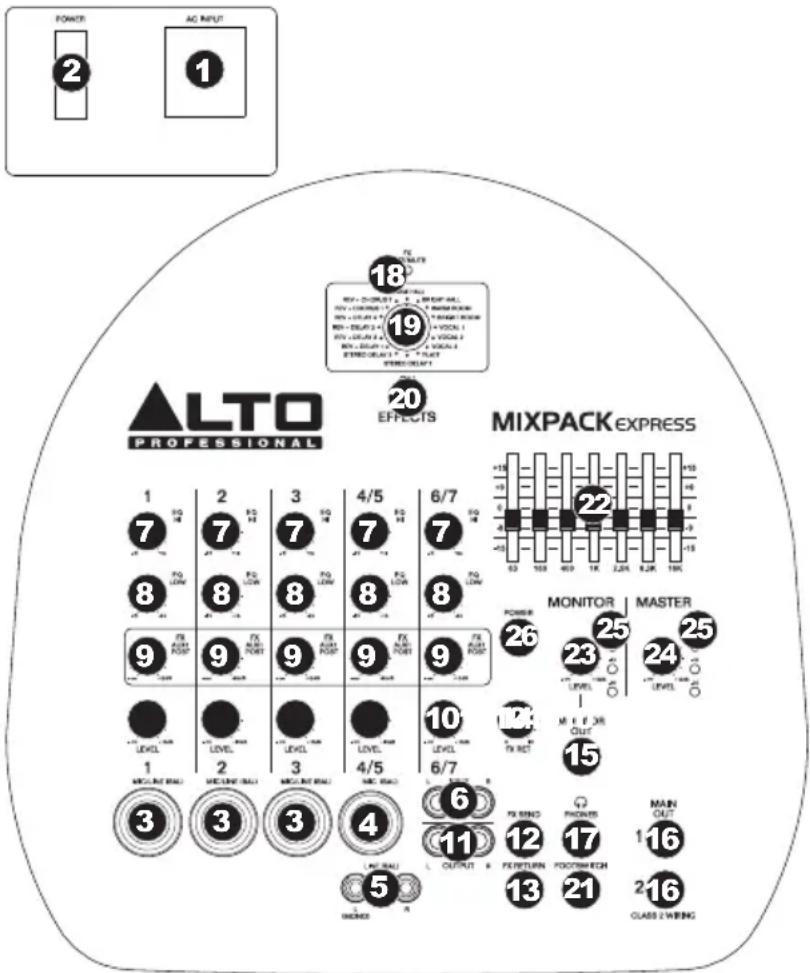
you want internal effects applied to. You can use this to apply effects to individual channels.
- CHANNEL LEVEL - Adjusts the audio level on the channel.
- TAPE OUT - You can use a standard stereo RCA cable to connect this output to an external recording device. The signal sent out these RCA outputs is the same as the MAIN OUT signal.
- FX SEND OUTPUT - You can use a 1/4'' TRS cable to connect this output to the input of an external amplifier or active monitor to create a custom monitor mix for onstage musicians. You can adjust this level with the FX AUX1 POST knob. To use an external effects rack unit, compressor, etc. with the mixer, you can use Y-cables to connect this output to the input of your external device, then connect the outputs of the device to the FX RETURN input.
- FX RETURN INPUT - You can connect the output of an external device to this input with a 1/4" mono cable. This is usually used for outboard effects devices but can also be used like an extra input channel for synthesizers, drum machines, etc. Adjust this input's volume with the FX RET knob.
- FX RET - Adjusts the volume of the signal being sent into the FX RETURN INPUT and routed to the MAIN OUT.
- MONITOR OUT - Use a standard 1/4'' cable to connect this output to your monitor or amplifier system. The level of this output is controlled by the MONITOR LEVEL knob.
- MAIN OUT - Use standard 1/4 cables to connect these outputs to the speakers. The level of these outputs is controlled by the MASTER LEVEL knob.
- PHONES - Connect your 1/4" stereo headphones to this output. The MONITOR LEVEL knob controls the volume.
- FX CLIP/MUTE LED - The LED will flash if the mixer's internal effects processor signal is clipping. If this happens, decrease the setting of the FX AUX1 POST knob or CHANNEL LEVEL knob.
- EFFECTS SELECTOR - Selects the effect that the mixer's internal effects processor will apply to the various channels. Each channel can send different levels of audio to the processor by adjusting their FX AUX1 POST knobs. See the EFFECTS section for an explanation of the available effects.
- EFFECTS ON / OFF - Press this button to mute/unmute the effects.
- FOOTSWITCH - When a latching-style footswitch is connected to this jack with a 1/4'' TRS cable, it can be pressed to allow all channels to bypass the mixer's internal effects processor.
- GRAPHIC EQUALIZER - You can use these controls to adjust the equalization of the main mix.
- MONITOR LEVEL - Adjusts the volume of the MONITOR OUT and your headphones.
- MASTER LEVEL - Adjusts the volume of the MAIN OUT.
- LED METERS - Shows the audio level of the main mix and monitor mix. Turn the volume down if the +10 LED lights up excessively.
- POWER LED - Illuminates when the mixer is on.
EFFECTS
TO HEAR THE EFFECTS ON A CHANNEL: Use the EFFECTS SELECTOR to choose one of the effects below, then turn up the FX AUX1 POST for that channel.
| # PRESET DESCRIPTION PARAMETER | |||
| 1 | VOCAL 1 Reverb, simulating a room without delay time. | Decay time: 450 ms Pre-delay: 0 ms | |
| 2 | VOCAL 2 Reverb, simulating a room with a small delay time. | Decay time: 240 ms Pre-delay: 25 ms | |
| 3 | VOCAL | Reverb, simulating a small space with a slight decay time. | Decay time: 100 ms Pre-delay: 114 ms |
| 4 | BRIGHT HALL Reverb, simulating a large acoustic space. | Decay time: 290 ms Pre-delay: 23 ms | |
| 5 | WARM HALL Reverb, simulating the acoustics of a stage space. | Decay time: 360 ms Pre-delay: 45 ms | |
| 6 | BRIGHT ROOM Reverb, simulating a studio with many early reflections. | Decay time: 210 ms Pre-delay: 23 ms | |
| 7 | WARM ROOM Reverb, simulating a bright studio room. | Decay time: 210 ms Pre-delay: 45 ms | |
| 8 | PLATE Simulates bright plate reverb. | Decay time: 290 ms Pre-delay: 10 ms | |
| 9 | STEREO DELAY Reproduces the signal after a small period of time with a slight difference between the two stereo channels. | Delay period: 352 ms | |
| 10 | STEREO DELAY Reproduces the signal after a small period of time with a slight difference between the two stereo channels. | Delay period: 238 ms | |
| 11 | REVERB+DELAY 1 Delay effect with room reverb. | Delay period: 326 ms Reverse decay time: 290 ms | |
| 12 | REVERB+DELAY 2 Delay effect with room reverb. | Delay period: 211 ms Reverse decay time: 240 ms | |
| 13 | REVERB+DELAY 3 Delay effect with room reverb. | Delay period: 375 ms Reverse decay time: 210 ms | |
| 14 | REVERB+DELAY 4 Delay effect with room reverb. | Delay period: 277 ms Reverse decay time: 150 ms | |
| 15 | REVERB+CHORUS Stereo chorus effect with room reverb. | Chorus rate: 3.67 Hz Reverse decay time: 290 ms | |
| 16 | REVERB+CHORUS 2 Stereo chorus effect with room reverb. | Chorus rate: 3.02 Hz Reverse decay time: 150 ms | |
CONTENIDO DE LA CAJA
3.9 KΩ (mic input)
≥ 10 KΩ (all other inputs)
2.2 KΩ (tape out)
120Ω (all other outputs)
SNR:
94dB
THD+N:
0.04% at 0 dBu, 1 KHz (mono input channels)
0.015% at 0 dBu, 1 KHz (stereo input channels)
EQUALIZATION:
High shelving@dB @ 12 KHz
Low
15kdtBv@g30Hz
7-band
graphic
-
equalizer:
+15dB@63Hz,
1 KHz, 2.5 KHz, 6.3 KHz, 16 KHz
DSP SECTION: 24-bit A/D and D/A converters
24-bit
DSP
resolution
Effects (16 presets): Reverbs (Hall, Room, Vocal, Plate), Stereo Delay,
Reverb + Delay, Reverb + Chorus
Controls: 16-position selector, clip LED, mute switch with LED indicator
SPEAKER SECTION:
SYSTEM
TYPE: 2-way Coax vented box
FREQUENCY RESPONSE: 65 Hz - 20 KHz at -10 dB
SPHERICAL HORN COVERAGE: 70^ × 70^
POWER:
150
300
W
W
AES
Peak
Standard
PROTECTION: Electronic circuit on driver
SPEAKER SPECIFICATION:
10^ (254mm) low-frequency driver; 2^ (51mm) voice coil;
1" (25mm) Neodymium high-frequency driver; 1" (25mm) voice coil
INPUT CONNECTIONS:
1 / 4'' (6.3mm) mono (TS) jack on each cabinet
AMPLIFIER SECTION:
OUTPUT
POWER:
350 W (EIAJ)
IMPEDANCE:
4Ω load
PROTECTIONS:
Overload, short circuit, soft clipi limiter, thermal protection fan cooling
DIMENSIONS (W× D× H)
38.7^ × 17.3^ × 18.1^ (983mm x 439mm x 460mm) (compact)
WEIGHT:
59.5
Ibs
(27)
kg)
Inrush current at initial switch-on: 2.04A
Inrush current after power supply interruption: 3.08A
- Specifications are subject to change without notice.