
1581 - Pasta machine ARIETE - Free user manual and instructions
Find the device manual for free 1581 ARIETE in PDF.
| Brand | Ariete |
| Model | 1581 |
| Product type | Electric pasta machine |
| Use | Domestic |
| Maximum flour capacity | 400 g |
| Types of pasta that can be made | Macaroni, lasagna, pappardelle, tagliatelle, spaghetti |
| Operating modes | Automatic and manual |
| Functions | Kneading and extrusion |
| Included accessories | Flour measuring cup, liquid measuring cup, brush, kneader, auger, expulsion conduit, die, container, lid, 5 pasta accessories |
| Body material | Plastic |
| Cleaning | Removable parts washable with hot water and dish soap; do not put in dishwasher; clean motor base with a damp cloth |
| Safety | Automatic stop in case of blockage; do not open during operation; do not touch moving parts |
| Repairs | Exclusively by an Ariete authorized service center |
| Compliance | Directives 2014/35/EU, 2014/30/EU, Regulation (EC) No 1935/2004 |
Frequently Asked Questions - 1581 ARIETE
User questions about 1581 ARIETE
0 question about this device. Answer the ones you know or ask your own.
Ask a new question about this device
Download the instructions for your Pasta machine in PDF format for free! Find your manual 1581 - ARIETE and take your electronic device back in hand. On this page are published all the documents necessary for the use of your device. 1581 by ARIETE.
USER MANUAL 1581 ARIETE
natural_image
Technical line drawing of a mechanical device with a central connector and mounting holes (no text or symbols)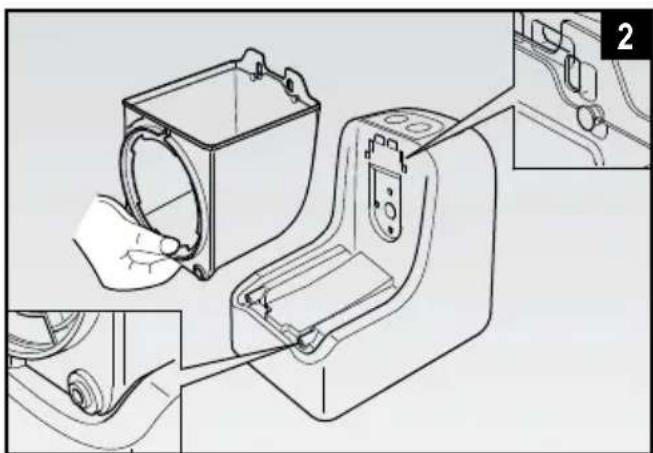
natural_image
Technical line drawing of a mechanical device with hands operating a housing component (no text or symbols)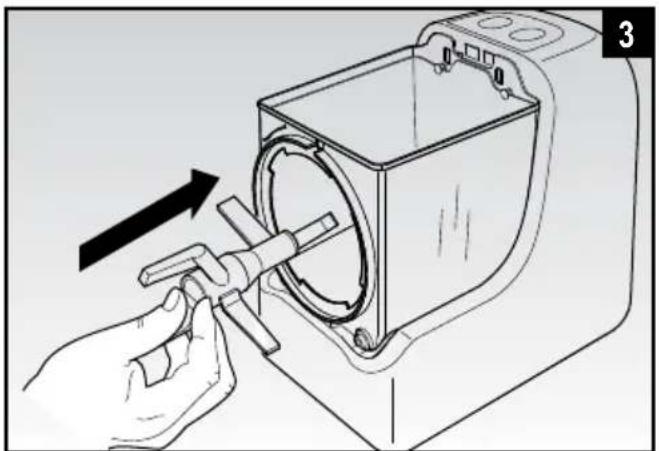
natural_image
Illustration of a hand using a tool to adjust or install a circular component, no text or symbols present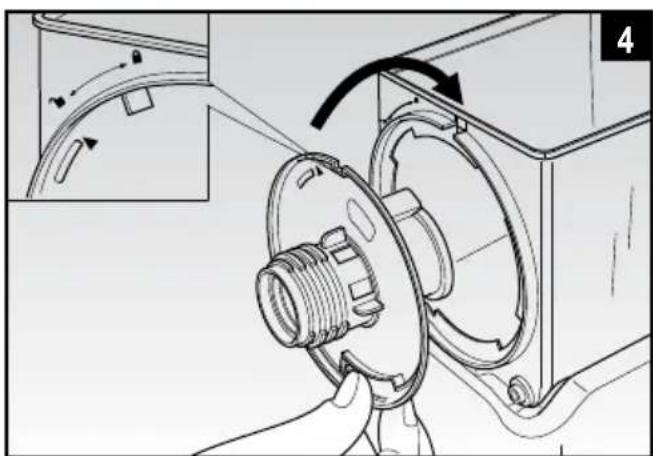
natural_image
Mechanical assembly diagram showing a hand operating a component with a rotating arrow indicating rotation (no text or symbols present)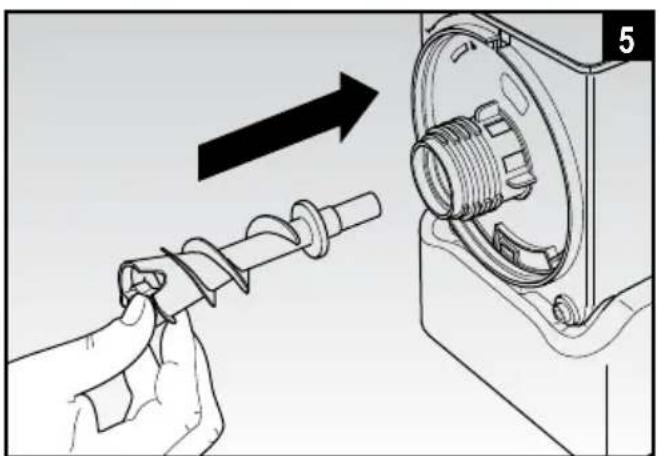
natural_image
Illustration of a hand using a screwdriver to adjust the mechanical component (no text or symbols present)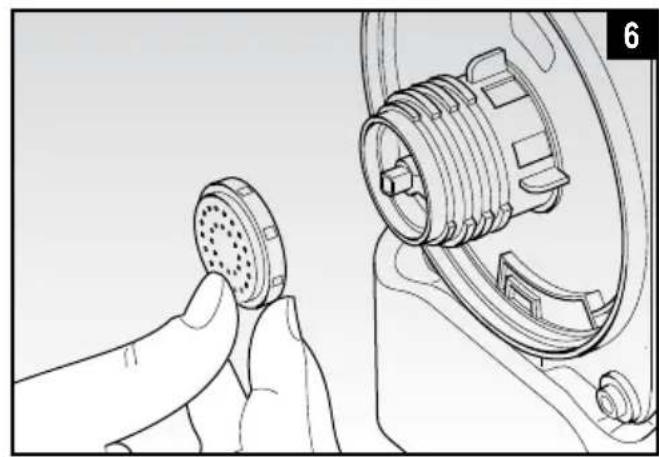
natural_image
Illustration of a hand holding a circular component next to a mechanical assembly with internal components (no text or symbols)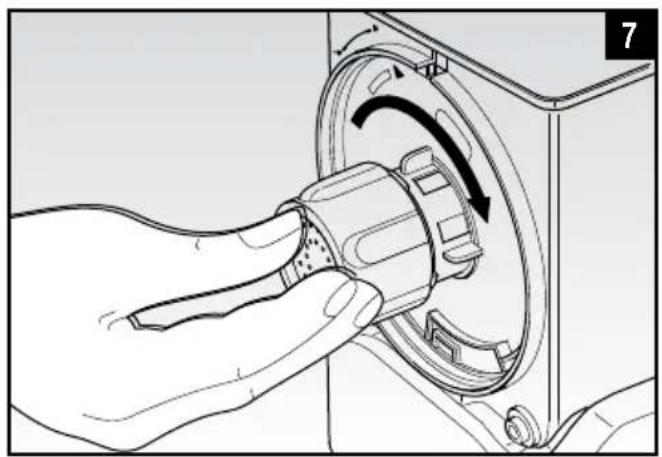
natural_image
Hand inserting a component into a device housing (no text or symbols visible)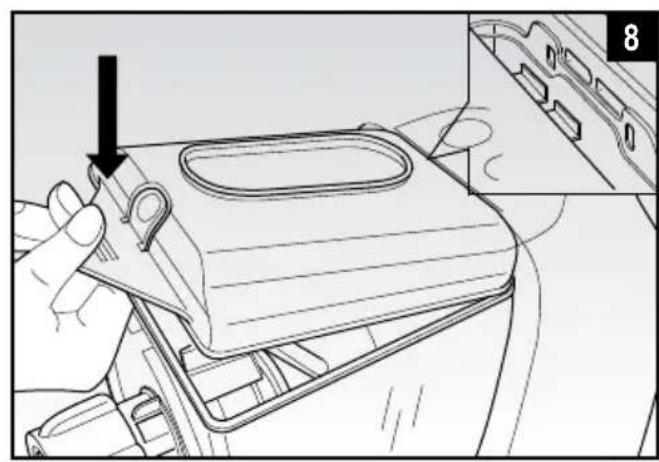
natural_image
Diagram showing a hand holding a car intake manifold with a black arrow pointing to the component (no text or symbols present)
natural_image
Line drawing of a hand holding a magnifying glass over a kitchen appliance (no text or symbols)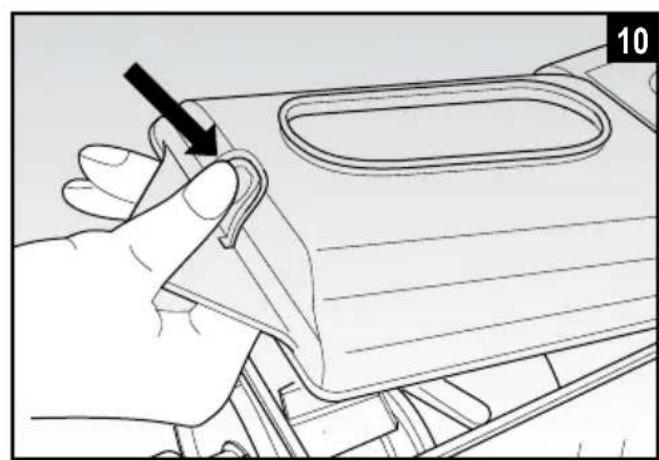
natural_image
Hand holding a plastic component with a black arrow pointing to it, no visible text or symbolsAVVERTENZE IMPORTANTI
LEGGERE QUESTE ISTRUZIONI PRIMA DELL'USO.
The necessary precautions must be taken when using electrical appliances, and these include the following:
Make sure that the voltage on the appliance rating plate corresponds to that of 1. the mains electricity.
Never leave the appliance unattended when connected to the power supply; 2. unplug it after every use.
Never place the appliance on or close to sources of heat.3.
Always place the appliance on a flat, level surface during use.4.
Never leave the appliance exposed to the elements (rain, sun, etc....).5.
Make sure that the power cord does not come into contact with hot surfaces.6.
This appliance can be used by children aged from 8 years and above and 7. persons with reduced physical, sensory or mental capabilities or lack of experience and knowledge only if they have been given supervision or instruction concerning use of the appliance in a safe way and understand the hazards involved. Do not allow children to play with the appliance. Cleaning and user maintenance must not be carried out by children unless they are older than 8 and supervised.
Children under age 8 should not be allowed to handle appliance and its power 8. cord which must be kept out of their reach.
Never place the appliance body, plug or power cord in water or other liquids; 9. always wipe clean with a damp cloth.
Always unplug the power cord from the electricity mains before fitting or remov-10. ing single attachments or before cleaning the appliance.
Always make sure that your hands are thoroughly dry before using or adjust-11. ing the switches on the appliance, or before touching the power plug or power connections.
To unplug the appliance, grip the plug and remove it directly from the power 12. socket. Never pull the power cord to unplug the appliance.
Do not use the appliance if the power cord or plug are damaged or if the appli-13. ance itself is faulty; all repairs, including substitution of power cord, must be carried out exclusively by an Ariete assistance centre or by authorized Ariete technicians in order to avoid all risks.
- In case of using extension leads, these must be suitable for the appliance power
to avoid danger to the operator and for the safety of the environment in which the appliance is being used. Extension leads, if not suitable, can cause operating anomalies.
Never allow the cord to dangle in places where it may be grabbed by a child.15.
Do not threaten the safety of the appliance by using parts that are not original 16. or which have not been approved by the manufacturer.
This appliance is designed for HOME USE ONLY and may not be used for com-17. mercial or industrial purposes.
This appliance conforms to the directives 2014/35/EU and EMC 2014/30/EU, 18. and to the regulations (EC) No. 1935/2004 of 27/10/2004 regarding material in contact with foods.
Any changes to this product that have not been expressly authorised by the 19. manufacturer may lead to the user's guarantee being rendered null and void.
In the event that you decide to dispose of the appliance, we advise you to make 20. it inoperative by cutting off the power cord. We also recommend that any parts that could be dangerous be rendered harmless, especially for children, who may play with the appliance or its parts.
Packaging must never be left within the reach of children since it is potentially 21. dangerous.
Do not block or obstruct appliance air vents.22.
Remove all inner accessories, then wash and wipe them thoroughly.23.
Do not move appliance while operating.24.
Do not place anything on the appliance while operating.25.
Never touch the parts when in motion and do not insert your fingers or kitchen-26. ware into the bowl while the appliance is operating.
Never insert food with hands. Always use the supplied containers.27.
Do not remove dough from die with your fingers while the appliance is running 28. to avoid the risk of severe injuries.

- To dispose of product correctly according to European Directive 2012/19/CE, please refer to and read the provided leaflet enclosed with the product.
DO NOT THROW AWAY THESE INSTRUCTIONS
APPLIANCE DESCRIPTION (Fig. 1)
A Motor base
B Control panel
C Macaroni die
D Lasagna/pappardelle die
E Tagliatelle die
F Spaghetti die
G Brush
H Liquid measuring cup
I Flour measuring cup
L Mixing blade
M Kneading screw
N Pasta extrusion chamber
O Nut
P Container
Q Container lid
APPLIANCE ASSEMBLY
ATTENTION: Before using the appliance, it is recommended to clean all removable parts that will be in contact with food using water and common dish detergent.
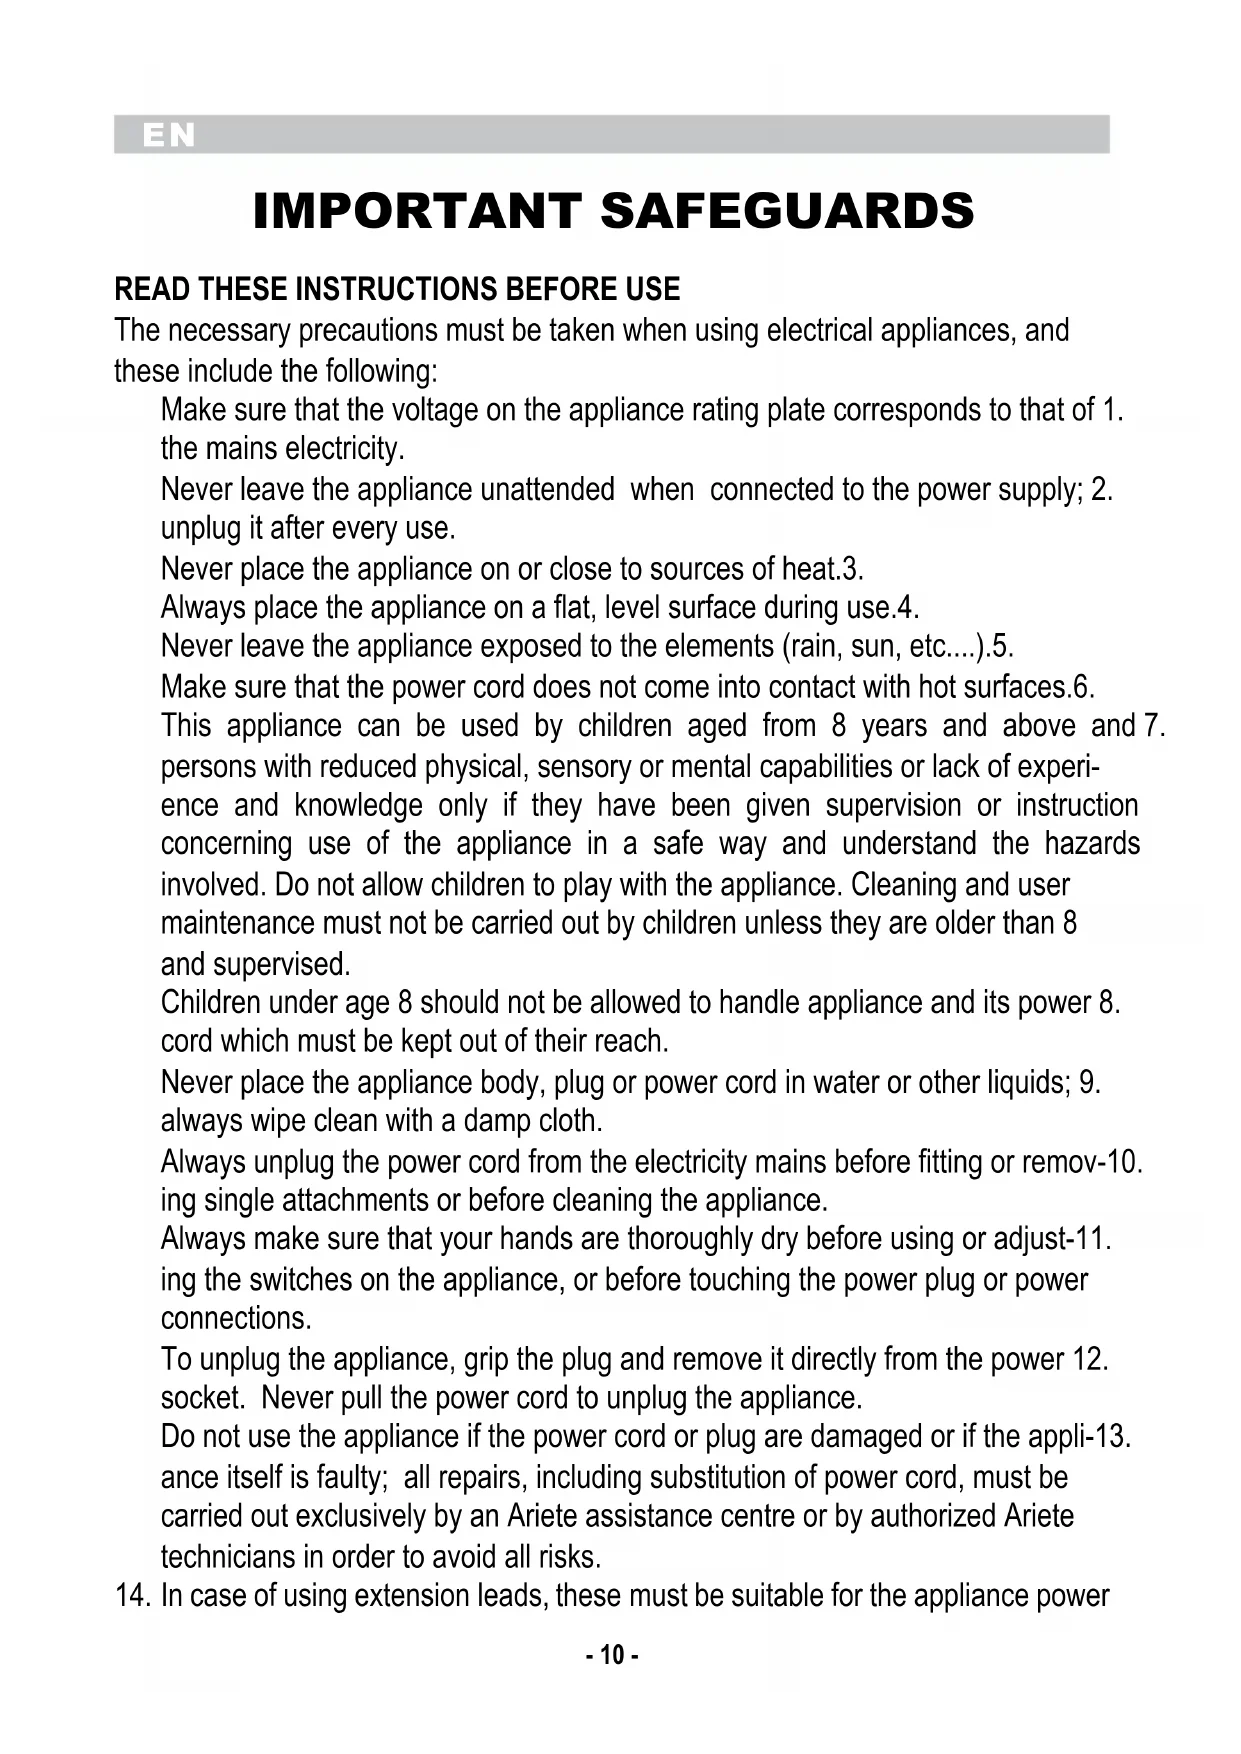
- Insert the container (P) into the motor base (A) by slightly pressing it to lock the rear pins and the front slots in the corresponding holes and the pins situated on the motor base (A) (Fig. 2).
- Place the mixing blade (L) into the container (P) by inserting it into the apposite hole on the motor base (A) (Fig. 3).
- Insert the pasta extrusion chamber (N) onto the container (P) by aligning the arrow with the sign
. Rotate the chamber (N) clockwise towards the sign
as to lock it definitively (Fig. 4).
- Screw the kneading nut (M) into the pasta extrusion chamber (N), making sure it perfectly locks in place into the apposite hole on the mixing blade (L) (Fig. 5).
- Choose the proper die, according to individual needs, and mount it on the chamber (N) (Fig. 6).
- Screw the nut (O) on the chamber (N) to lock the selected die (Fig. 7).
ATTENTION:
Before use, make sure all components are properly mounted on the appliance. When the lid (Q) is not mounted properly, the appliance does not work.
INSTRUCTIONS FOR USE
- By using the suitable measuring cup (I), pour the necessary amount of flour into the bowl (P), as indicated on the recipe, without exceeding the max. level (400 g).
- Close the bowl (P) with the suitable lid (Q), by inserting the rear tabs in the keyholes of the motor base (A); press downwards on the lid rear to lock it (Fig. 8).
- Plug the appliance and press the start button situated on the control panel (B) chosen according to the required operating mode (see following paragraph). The related indicator light close to the button itself goes on.
- After having started the appliance, pour the liquids possibly necessary for your recipe through the upper hole of the lid (Q) by using the appropriate measuring cup (M) (Fig. 9).
- Position a suitable container underneath the die and cut the extruded pasta according to the required length.
- Eventually keep the prepared pasta in the fridge.
ATTENTION:
During processing, do not add solid ingredients, with the exception of flour. Properly mix eggs and water.
During processing, do not open the bowl lid and do not touch moving parts in order to avoid the risk of injury.
Do not use the appliance repeatedly more than 3 times. After three continuous cycles, let the appliance stand for 30 minutes.
OPERATING MODES
Automatic mode
- By pressing the "AUTO/STOP" button, the appliance starts in automatic mode; it proceeds with the mixing phase for 3 minutes, and then the pasta extrusion phase follows automatically.
- At the end of the process, the appliance stops. The total operating time is approximately 15 minutes.
- By pressing the "AUTO/STOP" button during process, the machine stops; press the "AUTO/STOP" button again to restart the mixing process or the "EXT" one for the pasta extrusion phase.
Manual mode
- By pressing the "AUTO/STOP" button, the appliance starts the mixing phase.
- Mix water and flour referring to minutes indicated on the recipe, until they are suitably blended.
- By pressing the "AUTO/STOP" button during process, the machine stops. Press the operating button once more to re-start the process.
- Press the "EXT" button to proceed with the pasta extrusion phase.
ATTENTION:
DO NOT press the "EXT" button before the dough is well mixed. When selecting the "EXT" function by mistake, press the "AUTO/STOP" button, unplug the appliance and clean the pasta extrusion chamber. Restart the cycle.
During the extrusion phase, the appliance may jam and proceed with a quick remixing of ingredients; in this case, the appliance will automatically re-starts. If the appliance does not start, it might be due to a too hard dough. It is therefore necessary to re-set it according to the suitable crumb texture.
USE TIPS
- Make sure flour and water are suitably mixed together and that there is no dry flour as it might jam the appliance.
- In case of too dry flour, add 5-10 ml of water and proceed with mixing for further 2 minutes.
- In case of too wet flour, switch the appliance and unplug it; remove the dough stuck to the mixing blade (L), add some dry flour, and then mix for further 2 minutes.
APPLIANCE CLEANING
ATTENTION: Make sure the appliance is off and unplugged before disassembling it.
- After use, remove all components from the appliance, by carrying out the procedures described for assembly in the reverse order. To remove the lid (Q), slightly press the top tab and lift it (Fig. 10).
- Use a clean and soft cloth only for cleaning the motor base (A).
- All components may be cleaned using warm water and any kind of dish detergent. TO remove pasta residues from the various components, it is recommended to rinse them under running water by using the brush (G) supplied.
ATTENTION:
In order to make components cleaning easier, after use, let them immersed in warm water with a little dish detergent for 10 minutes.
Never put the motor base (A) or all components in the dishwasher.
Do not use abrasive tissues or corrosive detergents for cleaning.
After cleaning, let any part completely dry before mounting.
USE TIPS
ADDING INGREDIENTS
The dry ingredients (flour, salt, etc.) are always to be added first, followed by eggs, oil or other liquid ingredients, such as tomato sauce, spinach purée or squid ink. Only after having started the kneading program, pour the water into the appropriate opening on the lid, until the proper texture for extruding is obtained. The machine can process up to 400 g flour for a total of approximately 600 g pasta (according to recipes).
OPTIMAL TEXTURE
The extrusion device requires a dough texture neither too hard, otherwise the hopper cannot gather it, nor too soft, to prevent the pasta from sticking; the optimal texture is the crumb one. As any flour has its own water absorption level, it is not possible to indicate recipe amounts as absolute reference. Always consider that different flours may require a different amount of water. It is therefore recommended to add the water little by little and to make some attempts, especially for the first uses: after some attempts, you will be able to understand which is the optimal texture to obtain a perfect pasta extrusion.
EXTRUSION AND DRYING OF PASTA
When pasta starts coming out from die, it is recommended to support it with one hand, to prevent it from breaking, and to sprinkle semolina with the other hand. In this way, it does not stick. According to the shape chosen, evaluate the necessary length and cut the pasta with a determined rapid movement. Roll the pasta nests on a tray floured with semolina and allow to dry in a ventilated and fresh place before proceeding with cooking for at least 1 hour.
RECIPES
SEMOLINA PASTA RECIPE
400 g semolina flour
140 ml water
15 ml oil
1/2 tsp fine-grain salt
Add the flour, oil and salt in the bowl, close the lid and start the "AUTO" program. Immediately pour the water from the lid opening little by little, until the dough reaches a crumb texture. After 1.30 minutes, stop the "AUTO" program, pressing STOP, and start the EXTRUSION program ("EXT").
PASTA WITH SPELT FLOUR
200 g spelt flour
200 g semolina flour
2 whole eggs
50 ml water
15 ml oil
1/2 tsp fine-grain salt
Add the flour, eggs, oil and salt in the bowl, close the lid and start the "AUTO" program. Immediately pour the water from the lid opening little by little, until the dough reaches a crumb texture. After 1.30 minutes, stop the "AUTO" program, pressing "STOP", and start the EXTRUSION program ("EXT").
GREEN PASTA (WITH SPINACH)
300 g Italian flour type 00
100 g semolina flour
90 ml water
15 ml oil
1/2 tsp fine-grain salt
50 g spinach purée melted in 20 g water
Add the flour, spinach, oil and salt in the bowl, close the lid and start the “AUTO” program. Immediately pour the water from the lid opening little by little, until the dough reaches a crumb texture. After 2 minutes, stop the “AUTO” program, pressing “STOP”, and start the EXTRUSION program (“EXT”).
EGG PASTA
400 g Italian flour type 00
1 egg
50 ml water
15 ml oil
1/2 tsp fine-grain salt
Add the flour, eggs, oil and salt in the bowl, close the lid and start the "AUTO" program. Immediately pour the water from the lid opening little by little, until the dough reaches a crumb texture. After 1.30 minutes, stop the "AUTO" program, pressing "STOP", and start the EXTRUSION program ("EXT").
RED PASTA (WITH TOMATO)
400 g Italian flour type 00
2 whole eggs
50 ml water
15 ml oil
1/2 tsp fine-grain salt
30 gr tomato concentrate to melt in 20 ml water
Add the flour, tomato, oil and salt in the bowl, close the lid and start the "AUTO" program. Immediately pour the water from the lid opening little by little, until the dough reaches a crumb texture. After 1.30 minutes, stop the "AUTO" program, pressing "STOP", and start the EXTRUSION program ("EXT").
PASTA WITH RICE FLOUR (GLUTEN FREE RECIPE)
400 g rice flour
3 whole eggs
30 g oil
30 ml water (if required)
1/2 tsp salt
Add the flour, eggs, oil and salt in the container, close the lid and start the "AUTO" program. In case a crumb texture is not obtained, add the water from the lid opening little by little. After 2 minutes, stop the "AUTO" program, pressing "STOP", and start the EXTRUSION program ("EXT").
PASTA WITH QUINOA FLOUR (GLUTEN FREE RECIPE)
250 g quinoa flour
150 g buckwheat flour
4 whole eggs
30 ml water
30 ml oil
1/2 tsp fine-grain salt
Add the flour, eggs, oil and salt in the bowl, close the lid and start the "AUTO" program. Immediately pour the water from the lid opening little by little, until the dough reaches a crumb texture. After 2 minutes, stop the "AUTO" program, pressing "STOP", and start the EXTRUSION program ("EXT").
AVERTISSEMENTS IMPORTANTES
LIRE CES INSTRUCTIONS AVANT L'EMPLOI
BESCHRIJVING VAN HET APPARAAT (Fig. 1)
A Motorbasis
B Bedieningspaneel
- AVVERTENZE IMPORTANTI
- LEGGERE QUESTE ISTRUZIONI PRIMA DELL'USO.
- DO NOT THROW AWAY THESE INSTRUCTIONS
- APPLIANCE DESCRIPTION (Fig. 1)
- APPLIANCE ASSEMBLY
- ATTENTION:
- INSTRUCTIONS FOR USE
- OPERATING MODES
- Automatic mode
- Manual mode
- USE TIPS
- APPLIANCE CLEANING
- ADDING INGREDIENTS
- OPTIMAL TEXTURE
- EXTRUSION AND DRYING OF PASTA
- RECIPES
- SEMOLINA PASTA RECIPE
- PASTA WITH SPELT FLOUR
- GREEN PASTA (WITH SPINACH)
- EGG PASTA
- RED PASTA (WITH TOMATO)
- PASTA WITH RICE FLOUR (GLUTEN FREE RECIPE)
- PASTA WITH QUINOA FLOUR (GLUTEN FREE RECIPE)
- AVERTISSEMENTS IMPORTANTES
- LIRE CES INSTRUCTIONS AVANT L'EMPLOI
- BESCHRIJVING VAN HET APPARAAT (Fig. 1)
Brand : ARIETE
Model : 1581
Category : Pasta machine