
5195cc - Shaver BRAUN - Free user manual and instructions
Find the device manual for free 5195cc BRAUN in PDF.
User questions about 5195cc BRAUN
0 question about this device. Answer the ones you know or ask your own.
Ask a new question about this device
Download the instructions for your Shaver in PDF format for free! Find your manual 5195cc - BRAUN and take your electronic device back in hand. On this page are published all the documents necessary for the use of your device. 5195cc by BRAUN.
USER MANUAL 5195cc BRAUN
(Sharecall charged at local rates)
www.service.braun.com
English
Our products are designed to meet the highest standards of quality, functionality and design. Thank you for your trust in Braun's quality and we hope you enjoy your new Braun product.
Read these instructions completely, they contain safety information. Keep them for future reference.
Warning
Your appliance is provided with a special cord set, which has an integrated Safety Extra Low Voltage power supply. Do not exchange or tamper with any part of it, otherwise there is risk of an electric shock. Only use the special cord set provided with your appliance.
If the appliance is marked C 492, you can use it with any Braun power supply coded 492-XXXX.

This appliance is suitable for cleaning under running water and use in a bathtub or shower. For safety reasons it can only be operated cordless.
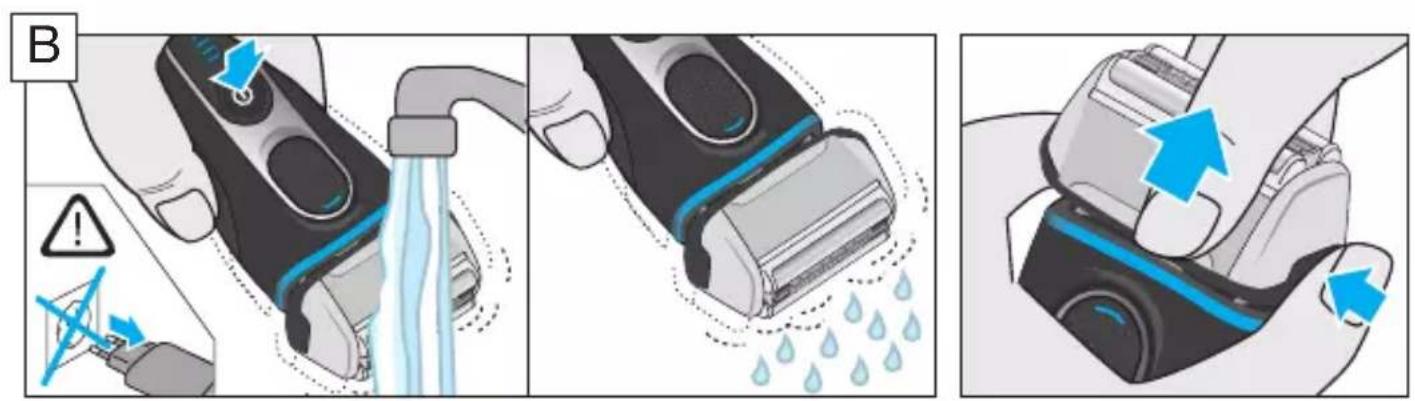
Detach the shaver from the power supply before using it with water.
Do not shave with a damaged foil or cord.
This appliance can be used by children aged from 8 years and above and persons with reduced physical, sensory or mental capabilities or lack of experience and knowledge if they have been given supervision or instruction concerning the safe use of the appliance and understand the hazards involved. Children shall not play with the appliance. Cleaning and user maintenance shall not be made by children unless they are older than 8 years and supervised.
Clean&Charge Station
To prevent the cleaning fluid from leaking, ensure that the Clean&Charge Station is placed on a flat surface. When a cleaning cartridge is installed, do not tip, move suddenly or transport the station in any way as cleaning fluid might spill out of the cartridge. Do not place the station inside a mirror cabinet, nor place it on a polished or lacquered surface.
The cleaning cartridge contains a highly flammable liquid so keep it away from sources of ignition. Do not expose to direct sunlight and cigarette smoking nor store it over a radiator.
Do not refill the cartridge and use only original Braun refill cartridges.
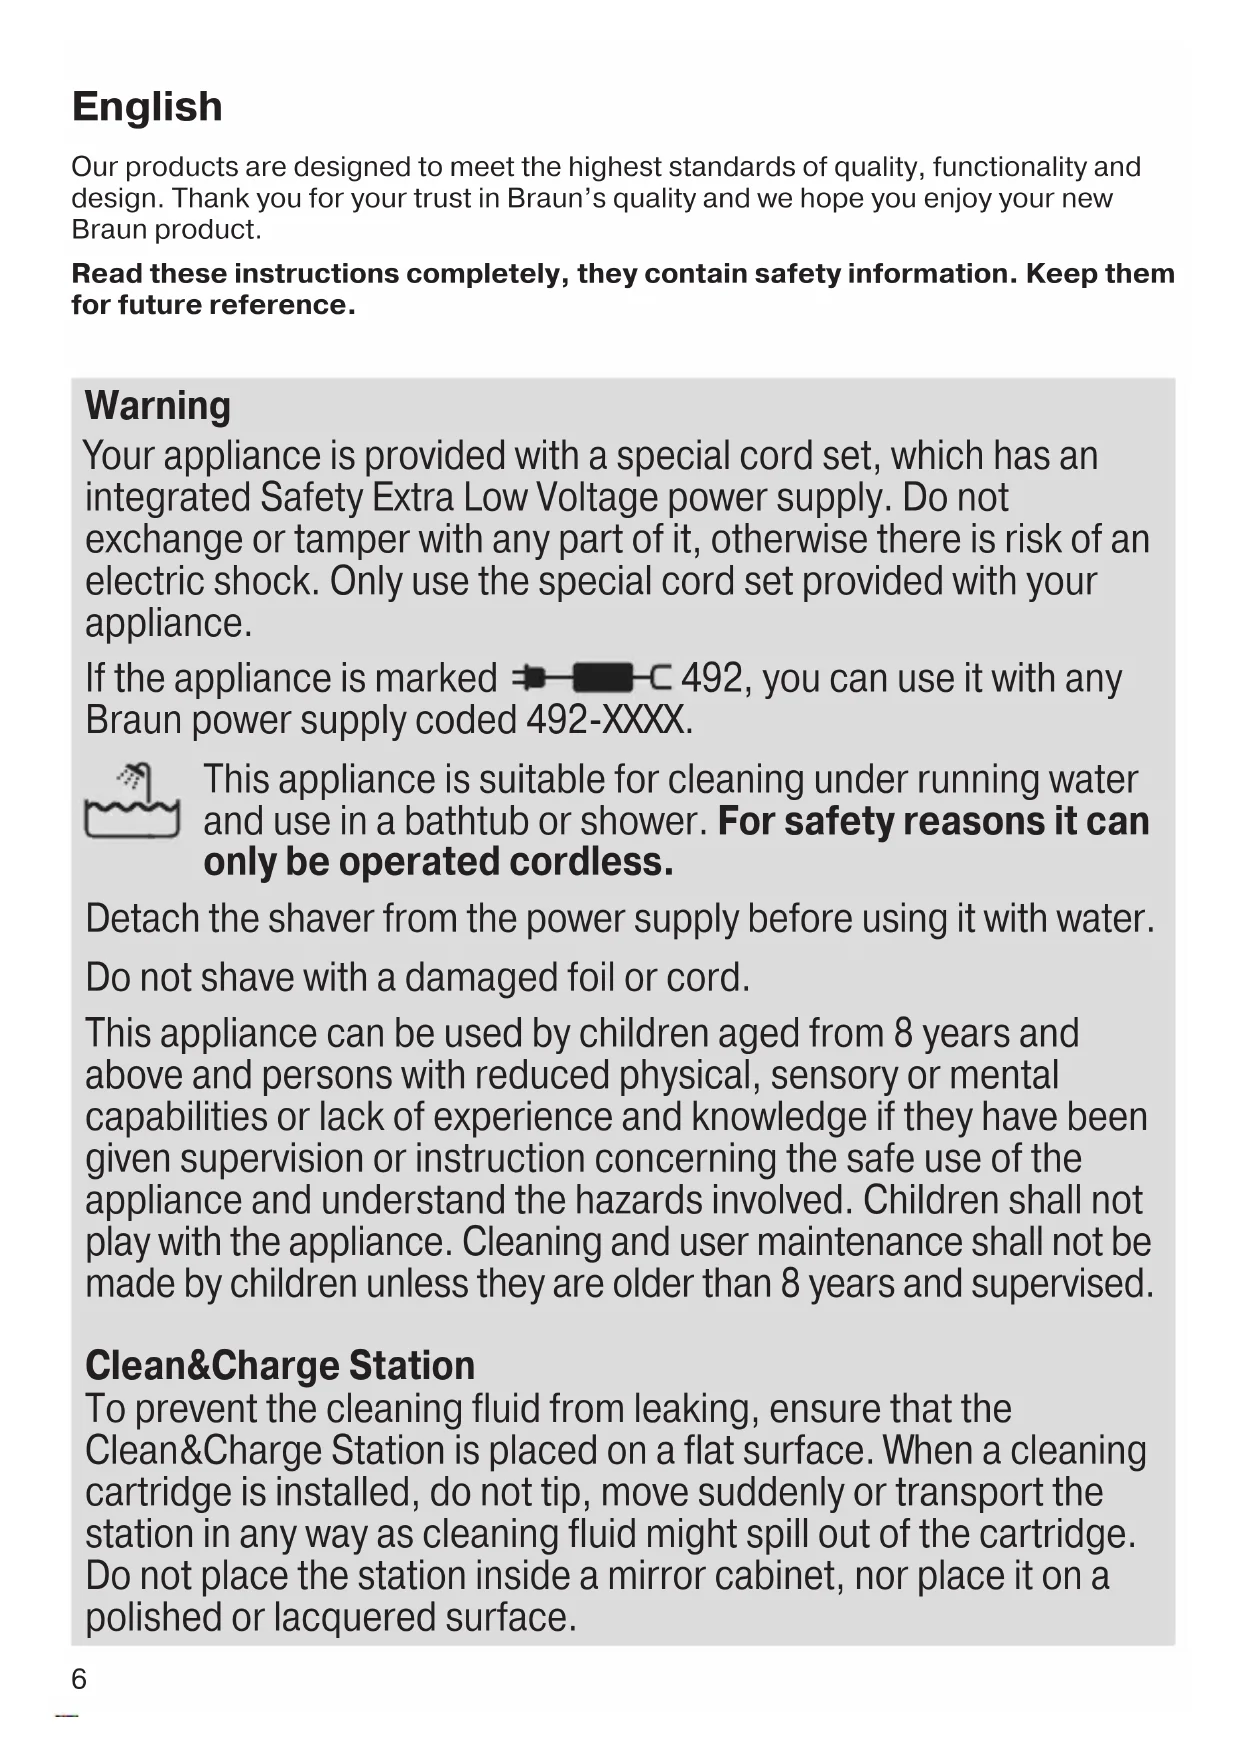
Shaver
1 Foil & Cutter cassette
2 Cassette release button
3 MultiHeadLock switch
4 On/off switch
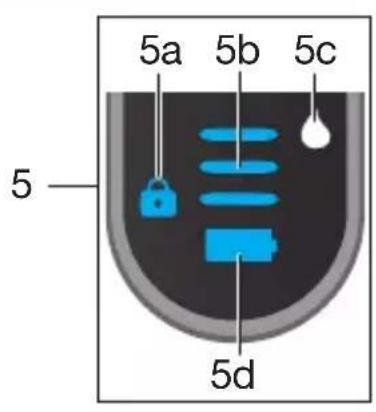
5 Shaver display
5a Lock symbol (travel lock)
5b Charging segments
5c Cleaning indicator
5d Battery symbol
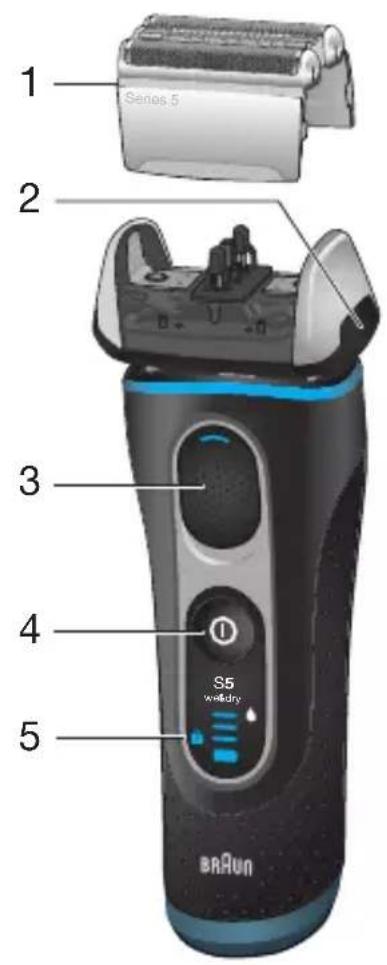
6 Long hair trimmer
7 Shaver-to-station contacts
8 Release button for long hair trimmer
9 Shaver power socket
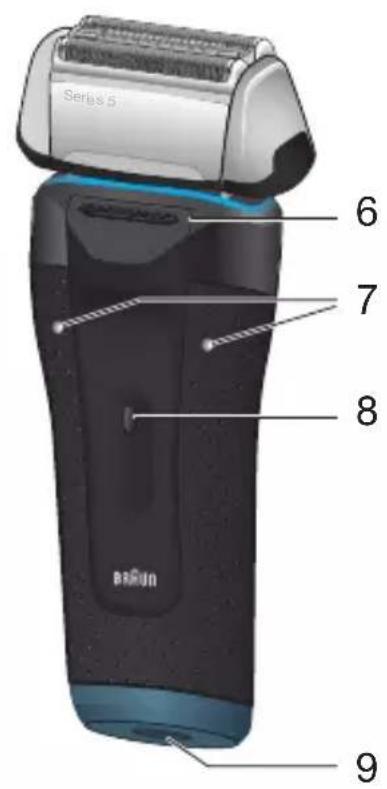
10 Special cord set (design can differ)
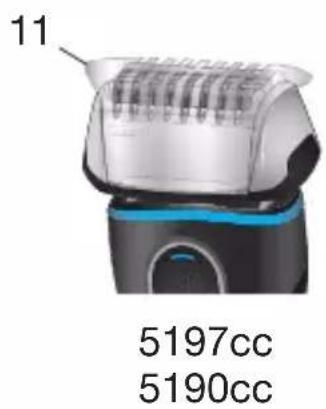
11 Protection cap
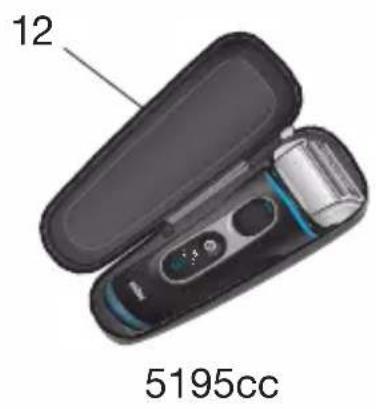
12 Travel case
* not with all models
First use and Charging
Connect the shaver to an electrical outlet by snapping the special cord set (10) into the shaver power socket (9) or via the Clean&Charge Station (see Chapter «Clean&Charge Station»).
Basic operating information
- A full charge provides up to 50 minutes of cordless shaving time. This may vary according to your beard growth and environmental temperature.
- Recommended ambient temperature for charging is 5^ to 35^ . The battery may not charge properly or at all under extreme low or high temperatures. Recommended ambient temperature for storage and shaving is 15^ to 35^ .
- Do not expose the appliance to temperatures higher than 50^ for extended periods of time.
- When the shaver will be connected to an electrical outlet, it may take some minutes until the display illuminates.
Charging / low charge
The charge status is shown in the shaver display (5).
- During charging the respective charging segment (5b) will blink.
- When the shaver is fully charged and connected to an electrical outlet, all 3 charging segments will light up for a few seconds. Then the display turns off.
- The battery symbol (5d) will flash red, when the battery is running low. You should be able to finish your shave. With switching off the shaver a beep sound reminds of the low charge status.
Using the shaver
Press the on/off switch (4) to operate the shaver.
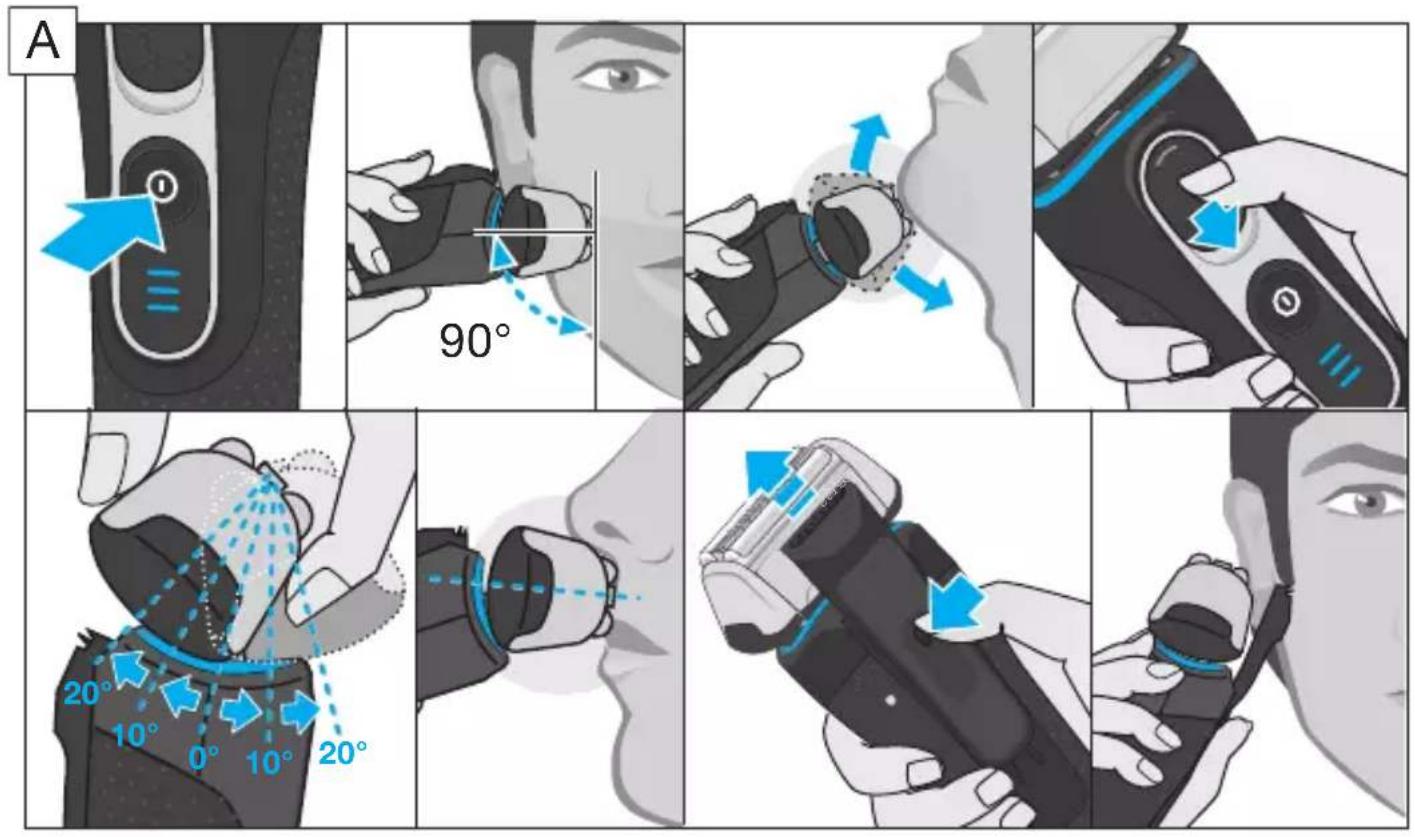
Tips for a perfect dry shave
For best results, Braun recommends you to follow 3 simple steps:
- Always shave before washing your face.
- At all times, hold the shaver at the right angle (90^) to your skin.
- Stretch your skin and shave against the direction of your beard growth.
MultiHeadLock switch (head lock)
- To shave hard-to-reach areas (e.g. under the nose) slide the MultiHeadLock switch (3) down to lock the shaver head. The shaver head can be locked in five positions.
- To change position, move the shaver head with your thumb and forefinger back or forth. It will automatically click into the next position.
- For automatic cleaning in the Clean&Charge Station the head lock should be released.
Long hair trimmer
To trim sideburns, moustache or beard press the release button (8) and slide the long hair trimmer (6) upwards.
Travel lock
The lock symbol (5a) lights up in the display when the shaver has been locked to avoid unintended starting of the motor (e.g. for storing it in a suitcase).
- Activation: By pressing the on/off switch (4) for 3 seconds the shaver is locked. This is confirmed by a beep sound and the lock symbol in the display. Afterwards the display turns off.
- Deactivation: By pressing the on/off switch for 3 seconds again the shaver is unlocked.
Manual cleaning of the shaver
Cleaning under running water
-
Switch on the shaver (cordless) and rinse the shaver head under hot running water until all residues have been removed. You may use liquid soap without abrasive substances. Rinse off all foam and let the shaver run for a few more seconds.
-
Next, switch off the shaver, press the release button (2) to remove the Foil & Cutter cassette (1) and let it dry.
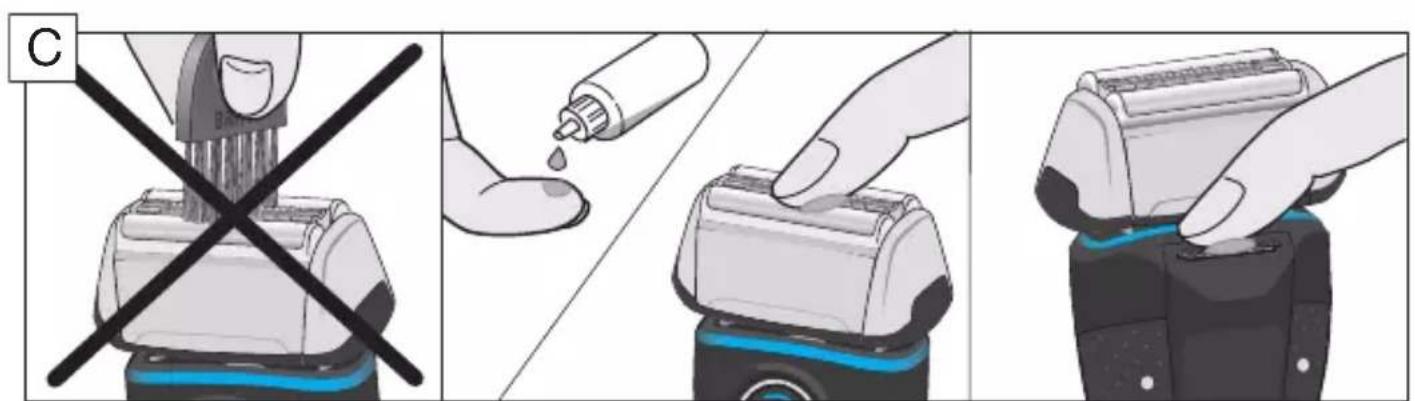
- If you regularly clean the shaver under water, then once a week apply a drop of light machine oil on top of the Foil & Cutter cassette.
The shaver should be cleaned after each foam usage.
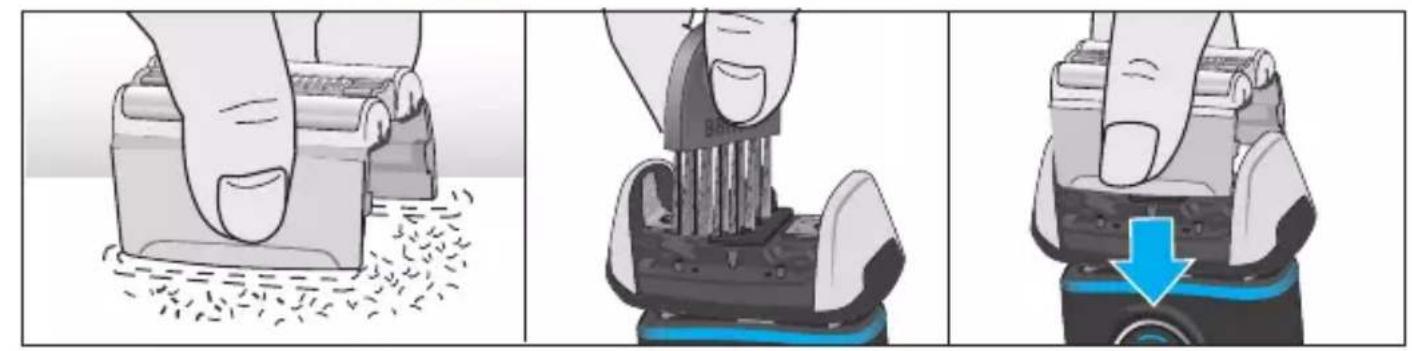
Cleaning with a brush
Switch off the shaver. Remove the Foil & Cutter cassette (1) and tap it out on a flat surface. Using the brush, clean the inner area of the pivoting head. Do not clean the cassette with the brush as this may damage it!
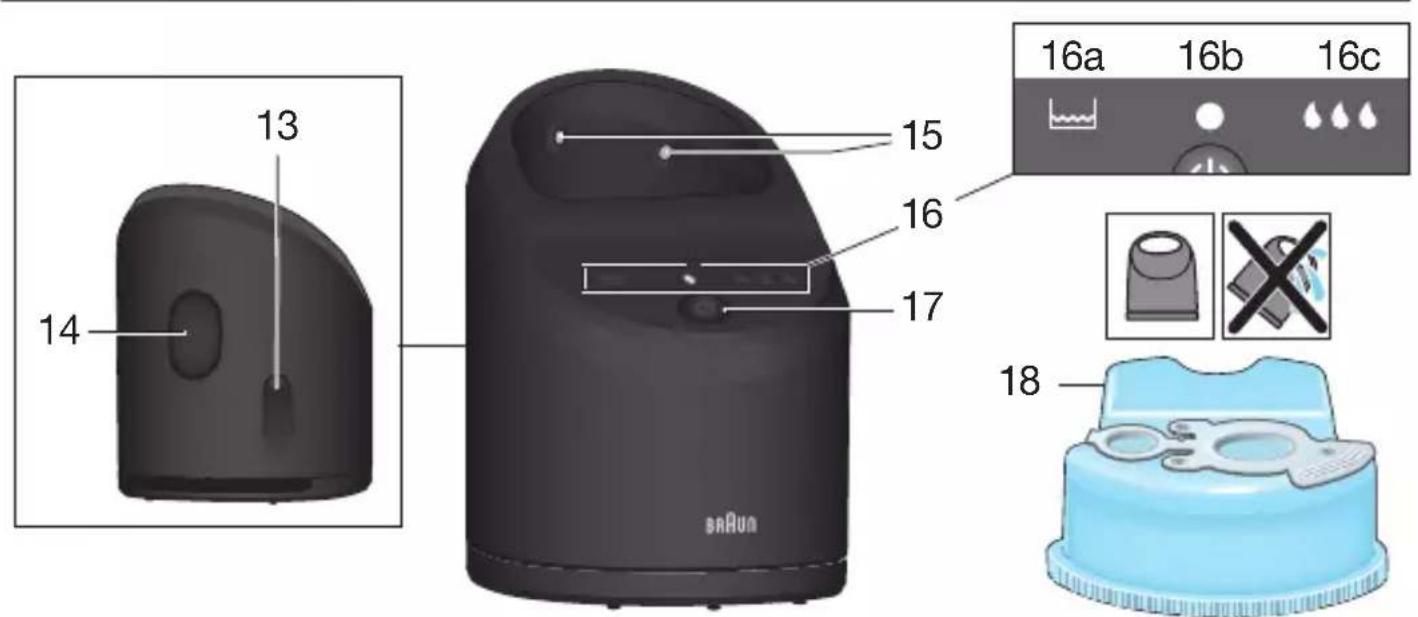
Clean&Charge Station (C&C)
The Clean&Charge Station has been developed for cleaning, charging, lubricating, disinfecting, drying and storing your Braun shaver.
13 Station power socket
14 Lift button for cartridge exchange
15 Station-to-shaver contacts
16 Clean&Charge Station display
16a Level indicator
16b Status light
16c Cleaning program indicators
17 Start button
18 Cleaning cartridge
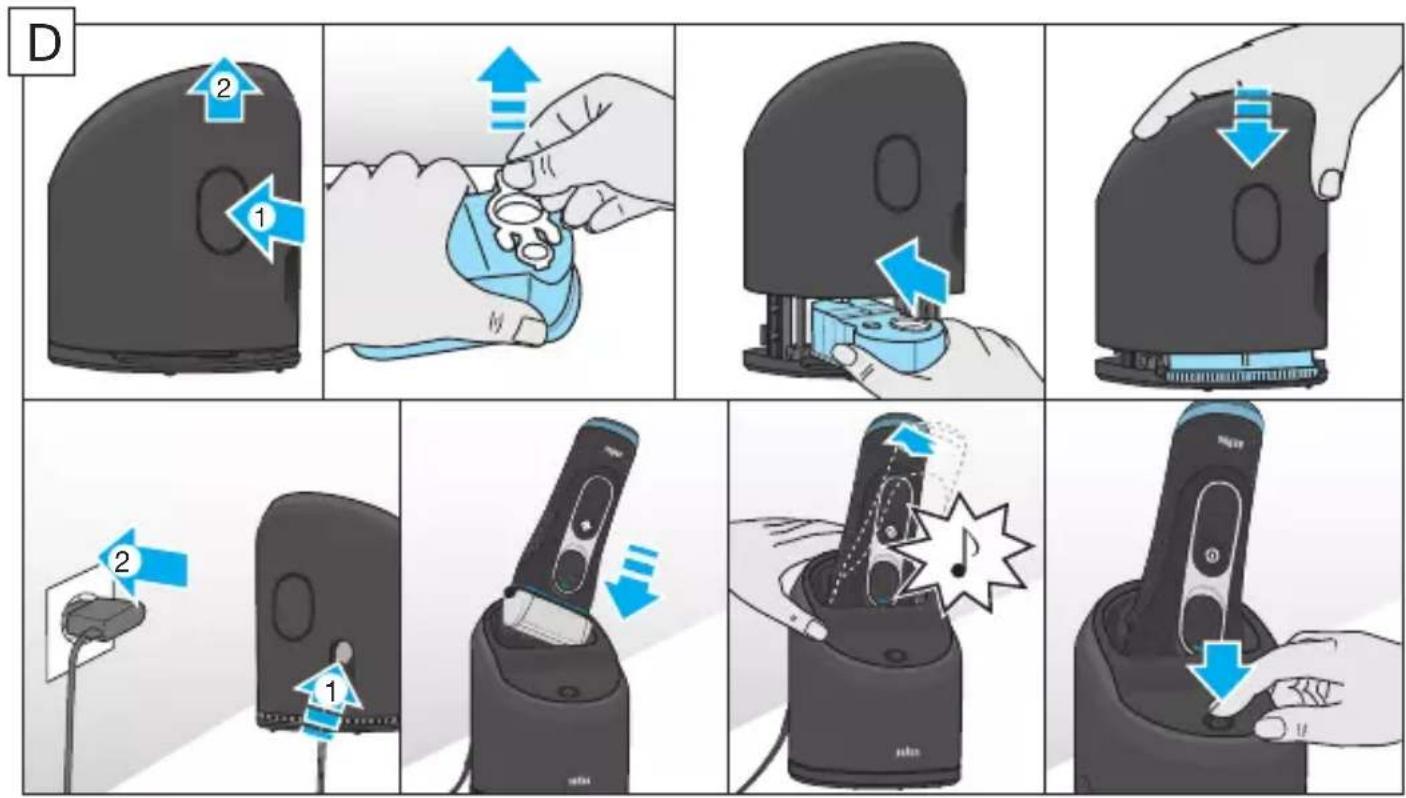
Installing the C&C
- Remove the protection foil from the C&C display.
- Press the lift button (14) at the rear side of the C&C to lift up the housing.
- Hold the cleaning cartridge (18) down on a flat, stable surface (e.g. table).
- Carefully remove the lid from the cartridge.
- Slide the cartridge from the rear side into the base of the station until it snaps into place.
- Slowly close the housing by pushing it down until it locks.
- Using the special cord set (10), connect the station power socket (13) to an electrical outlet.
Using the C&C
Important: The shaver needs to be dry and free from any foam or soap residue!
Insert the shaver in the C&C upside down, with the front showing and released head lock (3).
The contacts (7) on the back of the shaver need to align with the contacts (15) in the C&C. Push the shaver in the correct position. A beep sound confirms that the shaver sits properly in the C&C.
The C&C analyzes the hygiene status. The status is shown by the cleaning program indicators (16c) in the C&C display (16).
Charging the shaver in the C&C
Charging will start automatically when the shaver has been placed in properly.
Cleaning the shaver in the C&C
When the cleaning indicator (5c) lights up in the shaver display, insert the shaver into the C&C, as described above.
Cleaning programs
short economical cleaning
normal level of cleaning
high intensive cleaning
Start automatic cleaning
Start the cleaning process by pressing the start button (17). If status light (16b) does not shine (C&C switches to stand-by after ca. 10 minutes), press start button twice. Otherwise cleaning will not start. For best shaving results, we recommend cleaning after each shave.
Each cleaning program consists of several cycles, where cleaning fluid is flushed through the shaver head. Depending on your Clean&Charge Station model and/or program selected, the cleaning time takes up to 3 minutes. During this time the status light blinks. Leave the shaver in the station for drying. It takes several hours until remaining moisture evaporates depending on the climatic conditions.
After completing the cleaning and charging procedure, all indicators turn off.
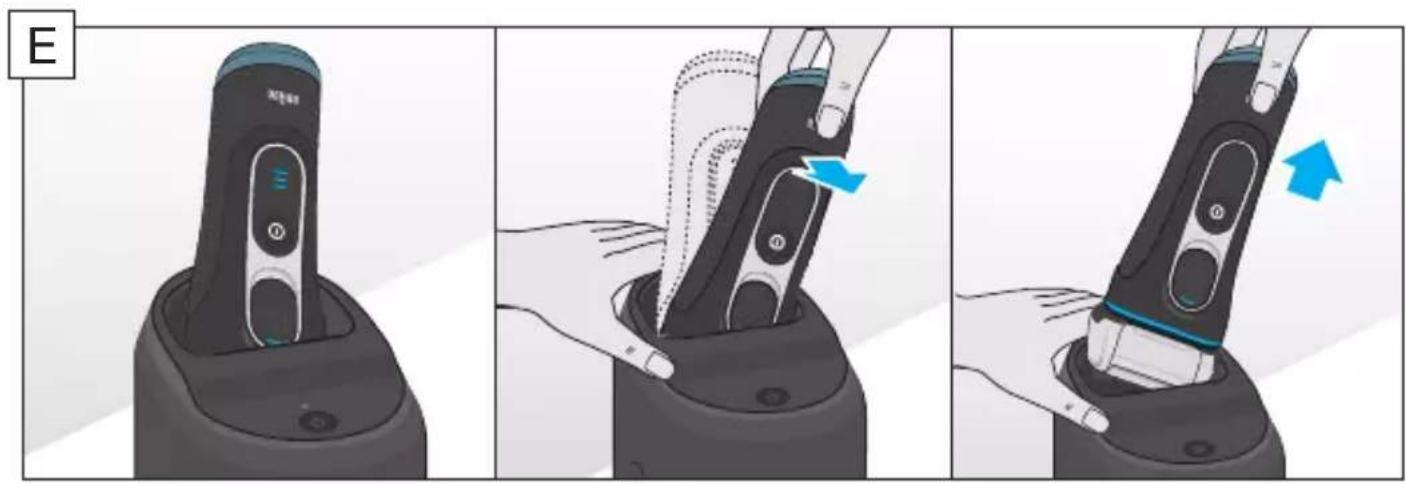
Removing the shaver from the C&C
Hold the C&C with one hand and tilt the shaver slightly to the front to release it.
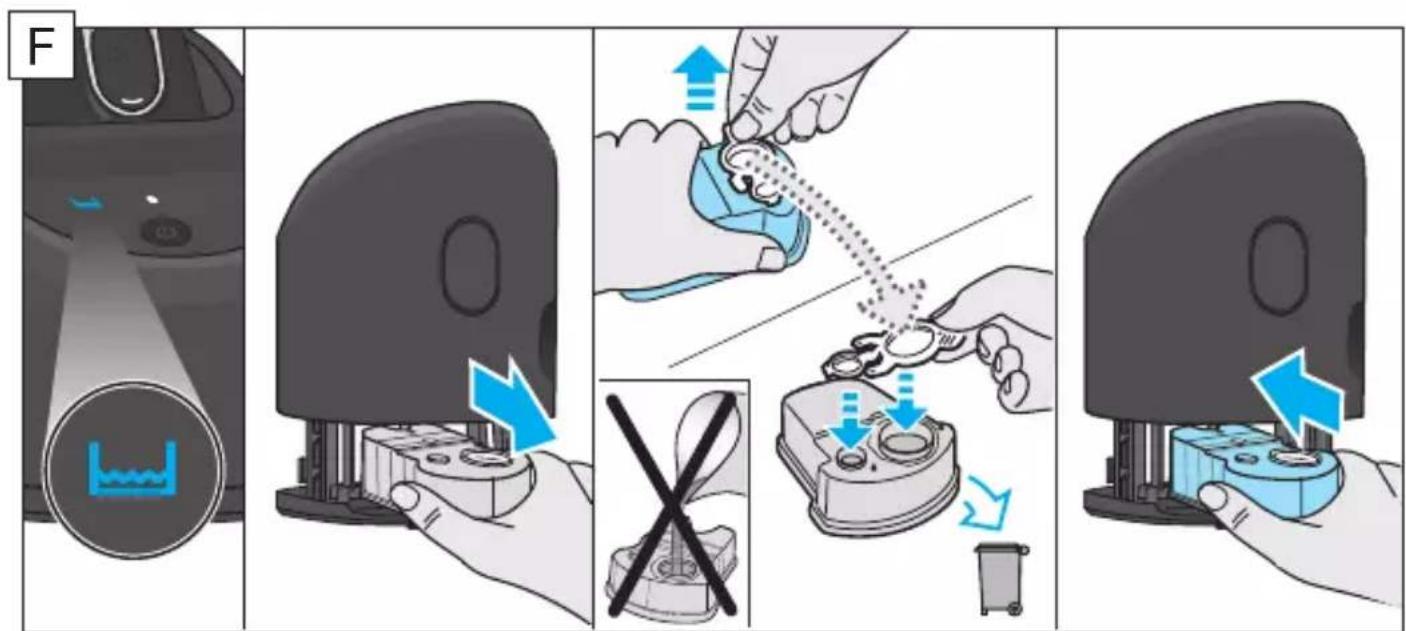
Cleaning cartridge / Replacement
When the level indicator (16a) lights up permanently red, the remaining fluid in the cartridge is sufficient for about 3 more cycles. When the level indicator blinks red, the cartridge needs to be replaced - about every 4 weeks when used daily.
After having pressed the lift button (14) to open the housing, wait for a few seconds before removing the used cartridge to avoid any dripping. Before discarding the used cartridge, make sure to close the openings using the lid of the new cartridge, since the used cartridge will contain contaminated cleaning solution.
The hygienic cleaning cartridge contains ethanol or isopropanol (specification see cartridge), which once opened will naturally evaporate slowly. Each cartridge, if not used daily, should be replaced after approximately 8 weeks to ensure optimal disinfection. The cleaning cartridge also contains lubricants for the shaving system, which may leave residual marks on the outer foil frame and the cleaning chamber of the C&C. These marks can be removed easily by wiping gently with a damp cloth.
Accessories
Braun recommends changing your shaver's Foil & Cutter cassette every 18 months to maintain your shaver's maximum performance.
Available at your dealer or Braun Service Centres:
- Foil & Cutter cassette: 52S/52B
- Cleaning Cartridge: CCR
- Braun Shaver cleaner spray
Environmental notice
Product contains batteries and/or recyclable electric waste. For environment protection do not dispose of in household waste, but for recycling take to electric waste collection points provided in your country.

The cleaning cartridge can be disposed of with regular household waste.
Subject to change without notice.
For electric specifications, see printing on the special cord set.
Trouble-Shooting
| Problem Possible | reason Remedy | |
| SHAYER | ||
| Shaver does not charge completely and keeps blinking. | Ambient temperature is out of valid range. | Recommended ambient temperature for charging is 5 °C to 35 °C. |
| Charging does not start when connected to power socket. | 1. Sometimes charging could start delayed (e.g. after long storage). 2. Ambient temperature is out of valid range. 3. Special cord set is not plugged in properly. | 1. Wait a few minutes, if charging will start automatically. 2. Recommended ambient temperature for charging is 5 °C to 35 °C. 3. Special cord set needs to snap into place. |
| Unpleasant smell from the shaver head. | 1. Shaver head is cleaned with water. 2. Cleaning cartridge is in use for more than 8 weeks. | 1. When cleaning the shaver head with water only use hot water and from time to time some liquid soap (without abrasive substances). Remove Foil & Cutter cassette to let it dry. 2. Change cleaning cartridge at least every 8 weeks. |
| Battery performance dropped significantly. | 1. Foil and cutter are worn which requires more power for each shave. 2. Shaver head is regularly cleaned with water but not lubricated. | 1. Renew Foil & Cutter cassette. 2. If the shaver is regularly cleaned with water, apply a drop of light machine oil on top of the foil once a week for lubrication. |
| Shaving performance dropped significantly. | 1. Foil and cutter are worn. 2. Shaving system is clogged. | 1. Renew Foil & Cutter cassette. 2. Soak the Foil & Cutter cassette into hot water with a drop of dish liquid. After-wards rinse it properly and tap it out. Once dry apply a drop of light machine oil on the foil. |
| Shaver head is damp. | 1. Drying time after automatic cleaning was too short. 2. Drain of the Clean&Charge Station is clogged. | 1. Clean directly after shaving to allow enough time for drying. 2. Clean the drain with a wooden tooth-pick. |
| CLEAN&CHARGE STATION | ||
| Cleaning does not start when pressing the start button. | 1. Shaver is not placed properly in the Clean&Charge Station. 2. Cleaning cartridge contains not enough cleaning fluid (display blinks red). | 1. Insert shaver into the Clean&Charge Station and push it to the rear side of the station (contacts of the shaver need to align with contacts in the station). 2. Insert new cleaning cartridge. Press start button again. |
| Increased consumption of cleaning fluid. | Drain of the Clean& Charge station is clogged. | - Clean the drain with a wooden tooth-pick. - Regularly wipe the tub clean. |
Guarantee
We grant a 2 year guarantee on the product commencing on the date of purchase.
Within the guarantee period we will eliminate any defects in the appliance resulting from faults in materials or workmanship, free of charge either by repairing or replacing the complete appliance at our discretion.
This guarantee extends to every country where this appliance is supplied by Braun or its appointed distributor.
This guarantee does not cover: damage due to improper use, normal wear or use as well as defects that have a negligible effect on the value or operation of the appliance. The guarantee becomes void if repairs are undertaken by unauthorised persons and if original Braun parts are not used.
To obtain service within the guarantee period, hand in or send the complete appliance with your sales receipt to an authorised Braun Customer Service Centre (address information available online at www.service.braun.com).
For UK only:
This guarantee in no way affects your rights under statutory law.
Français
Station Clean&Charge
Station Clean&Charge (C&C)
Installation de la station Clean&Charge
Stanice Clean&Charge
Stanice Clean&Charge (C&C)
Instalace stanice Clean&Charge
Blocare la transport
YnOTope6a Ha camo6pbchaukaTa
HaTnCHete KIOUa 3a BKn./n3Kl. (4), 3a da 3aJeIcTBate camO6pbchauKaTa.
CbBeTn 3a nIdeaJHo cyxo 6pbchene
3a Na- do6pn pezytata, Braun Bn npenopbya da cneBate 3 lecn CTbnk:
- BnHaRn Ce 6pbchTe, npeDn Da n3MneTe JInCeTo cn.
- Binhari npbxte camo6pbchaukaT a noi npab bbln (90°) Bbpxy kokaT a cn.
3.Изпьваite кожа tcибрсhteckeшу nocokata Ha pactexka Ha bpaandaTa cn.
Klou3a 6loKupaHe Ha rIaBaTa (6loKnpa rIaBaTa)
3a 6pbcheHe Ha TpydHIOOCbHN MeCTa (HaNP. NOI Hoca) Nlb3HeTe KJIoua 3a 6JoknpaHe Ha rJaBaTa (3) HANOly, 3a Da 3akNIOHTe rJaBaTa Ha cMo6pbchauKaTa. rJaBaTa Ha cMo6pbchauKaTa MoKe Da 6bDe 3akNIOUeHa B IET No3nIn.
3a da npomeHte no3nuaTa, DnKTe rnaBata Ha cMo6pbchkaTc naleu n oka3aueHa nped n Ha3a. Ta aBtOMaTHO ige upaKaHe Ha cIeBaAaTa n03nua.
3a aBtOMaTnUH NOuNCTBaHe B CTAHcIyTa 3a NOnuNCTBaHe n 3apeKdAHe, KJIoubT Ha TlAbata Tp6Ba Da 6bJe OCBO6OeH.
Tpimep 3a IbIgN KocMn
3aДа подөгэнбард, мүстаци плпбрада, натусөгэн и рүсөгэн byToHa 3aocBo6oxJaBaHe (8) n Пьзнэт Trpimepa 3a Дьлгн кocm (6) harope.
3aKJIIOUbaHe npn PbTyBaHe
CnMBoJbT 3a 3aKJIIOUBaHe (5a) CBeTba HaДиСплЯ, KOraTO CamO6pbChaЧkaTa Tpr6Ba Da 6bIe 3aKJIIOUeHa, 3a Дa ce n36eRHe HeXeJaHO CTapTInpaHc HAMOTopa (HAnp. npi npi6bIpaHc B KyΦap).
- AKTINBIPAHe: Camo6pbchauKaTa ce 3aKJIIOUBa C HaTnCKaHe Ha KJIIOuA 3a BKJI./N3KJI. (4) 3a 3cekyHdN. Toba ce notBbpxJaBA cbc 3ByKOB CNHaJI N CmBOJ 3a 3aKJIIOUBaHe Ha nCpIe. CneI TOBa nCpIeRt n3racBa.
- DeakTnBnpaHe: Camo6pbchauKaTa Ce OTKJIIOUyBa C HaTnCKaHe Ha KJIIOuHa 3a BKJ./N3KJ. 3a 3 ceKyni.
PbUHO NOuNCtBaHe Ha cMo6pbchauKaTa
3apexdaneHa camo6pbchaukaTaB C&C
3apeKdAneto cTapTnpa aBtOMaTnUHO, KOrato camO6pbchauKaTa 6bIe nocTaBeHa BbTppe npabnHIO.
Korato INDnKaTOpbT 3a NOuchTbaHe (5c) cBeTHe Ha DnCnJIe Ha camo6pbchauKaTa, NoCTaBete camo6pbchauKaTa B C&C, KaKTo e OnIcaHo nO-rope.
KpaTKO INKOHOMNUHO NOUNCBaHe
HOpMaJIHO HnBO Ha NOUcTBaHe
BNCOKO INHTeH3INBHO NOUcTBAHe
3NaOK aKKymyIaTOPa (5d) MnaeT KpaChbIM UBeTOM, KOrda 3apJd aKKymyIaTOPa 3aKaHnBaEtCra. Bbl CMOKeTe 3aKOHHTb IpoUeDpy 6pNTbJ. Ppr BBIKJIooHeHH 6pNTBbI 3ByKOBoi CNHaJ HAnOMHIT O Hn3KOM 3apJe aKKymyIaTOPa.
ИспOLTбрNTыI
Haxmnte KhoNky (4) IJI BKIOUeHn/ByIKIOUeHn 6pNTBbl.
CobetblnnaealbHoro cyxoro 6pntb
Дя onТимально 6рИтъ komпань Braun pekomeHnyet BbINOлгЯть 3 npoctbix npoцEDурbl:
- Bcerda 6peiTecsb nepeid yMbIbAHneM.
- Bcerda depxnte 6pntby nOД npaBnIbHbIM yIOM (90^) K KOxe.
- Pacta nbaite koxu n Beinte 6pntbBy B hnpablenn, npotboonokhHom HnpablenIO poCTa BOLOC.
IpeeklouateIb cncTeMbI MultiHeadLock (fukcaunr roJOBKn)
KordaHa 3kpaHe 6pntBbl 3aogptcraHnDnKaTOp OunchKn (5c), BCTaBbTe 6pntBy B 6JOK C&C, cJeDy npNBedeHHbIM Bblwe HHCTpyKcIyM.
Порогамь очирки
6bICTpaKOHOMHaOuCTKa
66 06bUHaOuNCTKa
BBICOKOHTEHCNBHAR OYNCTKA
3anyck aBTOMaTHueCKo OuNCTKn
3aynctte npocecc ounctkn, haxab Ha kHONky nyska (17). Ecn CBeTOBOJ cnHai coCTOHNy (16b) He ropnt (C&C nepexoNTB pexm OxndaHnaI npIMepHO uepe3 10 MNHT), dBaXdbi haxMITE Ha KhoNky nyska. B npOTNBOM clyuae npoceCC ounCTKN He Nauchetc. Iy 6oJee kaueCTBeHHoro pezylbTaT aPeKOMeHdyETc npOBODt b ouNCTKy nocr KeKdoi npoceDypbl 6pntb.
Kakda nporpamma OunchkN COCTON n3 HeCKoJIbKx zIKIOB IpOnyckaHn yIcTaeJ XnKocTN uepe3 roLOBky 6pntBbl. BpeM oUncTkN 3aHmaeT do 3-x MInHyT n 3aBNCNT OT moJIeN BaJero 6Ioka Clean&Charge n/IIIN Bbl6paHHoJ nporpaMMbl. B TeueHne 3TOrO BpeMeHN CBToBOJ CNrHaJI COCTOHNy 6yJeT MIRATb. OCTaBbTe 6pntBy BblCOXHyTB B 6Ioke. OctabWaaCra BlaRa IcnapReTcB TeueHne HeCKoJIbKx YacOB (BpeM 3aBNCNT OT KInMaTUnCeCKNX ycIOBn).
Kornda npoceccbl Ounchkn 3apdkn 3aBepsehbl, BCE INHdkaTopbI noracaiT.
YdaJIeHne 6pNTbI n3 6JOKa C&C
Pnpndepxmba 6loK C&C oHnoyko, cIeRka hakIOHnTe 6pntBy Bpeid n BbInbTe ee.
Ynctraun kaptpnIX / 3aMeHa
Ecnn Hndnkatop ypOBH (16a) nocToHHo rOpNT KpaChbIM cBETOM, To 3TO O3Haayet, YTO XnKoCTN B KapTpIxHe ocTalOcB npn6n3ntelbHo Ha 3 uKna. Korda nHdkaTOp ypOBH MInraet KpaCHbIM cBETOM, KapTpIxH Heo6XoDIMO 3aMeHnTb - npn ExeJnHEBHom IcNoJIb3OBAHnn 3TO Heo6XoDIMO DeJaTb npImepHO KaJdbie 4 HeJeIN.
После нажатя подьемнй Кноги (14) Дли OTКрытma OTсeca падждte Heckолькоcekyнд пered Tem, кak n3Bleuch KapTpindж, BO n36жанne cTekaHna Kapeь.пepeydynl3aциев nCNoIb3OBaHHOу KapTpindka 3akpoite OTBepCTnKpblsko, ChraTOc HOBOrO KapTpindka, NOCKOLbky B nCNoIb3OBaHHOM KapTpindxe MoKet HaxODNTbcra 3aGrpa3HeHHbЧИСТЯUП paCTBOp.
CaHntapHbI qnCTaIuK kAPTpIXC OedePXT 3TaHOJI NII N3OpponaHOL (XapaKTepnCTIKN yKa3aHbI Ha KOpnyce KapTpIXa), KOTOpbI nOcJIe OTKpbITnI MeIJIeHNO IcnapReTcI. IJIr ONTImaJIbHOJ De3INHΦeKUIN KaJdIy KAPTpIXK, eCIn erO He ICSIOJIb3OBaTB ExeJIDHeBHO, Heo6xOIMO 3aMeHЯrT npi6JIIN3ITeJIbHO pa3 B 8 HeJeJIb. YIcTЯIuN KAPTpIXK TAKKe COePXT CMa3OChIe MaTePnaJIbI dJIr 6pNTBeHHoN CnCTeMbI, KOTOpbl EMO rGYt OCTaBaTbCra Ha HApYKHOJ CTOpOHe 6peIoUeI cETKn I ChCTaIeK kamepe 6Ioka C&C. 3TN OCTaTKN MOxHO JERKO UdaJIHTb, aKKypaTHO IpOtepeB NOBepXHOCTN BIAJXHOJ TKAHbIO.
Принолжносту
Для подерхаши ONТIMальбов сффektNBHOCTN 6рNTБы KOMпань Braun peKOMeHnyet MeHЯт b kaccety c 6peIoош eTkoи npexkyuim 6IOKOM kaxdble 18 mecaeB.
Moxho npnoobpcntu y BaUero dInlepa nIIN B cepBnchbIX cEHTpax Braun:
Kacceta c 6peouei ceTko npexyum6lOKom:52S/52B
- Ynctraun KaptnpJx: CCR
CnpenJnOuNCTkN6pNTBblBraun
Tpe6obAHnK 3aunTe OkpykaIoueN cpebl
IpoodykT coidepKNT aKKymJrTOpbI n/nn nepepa6aTbIbAemble OTXoDbI 3JIeKTprUeCKOro o6OpyIDOBaHn. B cIeJx 3aunTbI OKpykaIOuSeCpeDbl He Bbl6paCbIbAitpe np6op BMeCTe C 6blTOBbIMN OTXoJaMn. IpeJaTe erO B NHyKtbl C6opa OTXoIDOB 3JIeKTprUeCKOro o6OpyIDOBaHn B BaWei CTpaHe.
YnCTaIeK KapTpIaX MoXHO yTuJIIn3uPObaTb COBMeCTHO C npOChMn 6bITOBbIMN OTxOJaMn.
Copejxahne moxet 6bIb n3MeHeo 6e3 npedBapntbHoro yBeDomJeHna.
3neKtpnueckne xapaKTepeNCTnKn yka3aHbI B MapKnipOBKe Ka6eJnTahn.

HencpapBocb Bo3moXhaj npuHa Mepbl no ycTpaHeHIO
| Брітва | ||
| Брітва не заря-хается полно-стю и вce В装配 мигаet. | Temпература okружаю-шей среы нахочич.TВе дочимого диana-зona. | Рекомендуется заряжать ріпбор ріп Temператуpe okружаюшей среы ot 5°C до 35°C. |
| Заряда не нашинается ріп пожлічесни к олікгіческій розетke. | 1. Иногда заряда может начatable с задержков (нанри-Mер, посы діл'tь-Horо xpanehу).2. Temпература okружаюшей сreme нахов-DITСВЕДОПТСВЕДОПТСВЕДОПТСВЕДОПТСВЕДОПТСВЕДОПТСВЕДОПТСВЕДОПТСВЕДОПТСВЕДОПТСВЕДОПТСВЕДОПТСВЕДОПТСВЕДОПТСВЕДОПТСB. | 1. П\'о\'ождnte HeCKOLBJKO MInHyT,Заряда Начн\'ется АВТOMATUCHESКИ.2. Р\'ekomer\'detyETcZap\'жать р\'пбор р\'п Temператуpe okружаюшey creme ot 5°C до 35°C.3. С\'ецальній к\'абелі пітанney Heo6-xODIMO 3aФИКСИРOBaTB DoJIXHbIMобразом. |
| Н\'ер\'ягній 3azanax, кOTOPь INCXODIT OT rOLOBKN BrpNTbI. | 1. Брітвения г olOBka npombyta BOДОД.2.Чисьшій kartrpv'dж Ис\'ользOBаЛВ Teue-Hne CSPOKA,п\'р\'вьlaшa-юшero 8 HeDEJIb. | 1. П\'р\'п\'омь\'ванNiBnO HeiRtBENHOJ rOLOBKN BOДОД ИС\'ОЛьЗУМ TeJny BOY U BPEMЯ O TВPEMeH NEMHOrO XnDkoGOMbIa (6e3 a6pa-3INBbIX BeIeCTB). C`h`m`te 6peI0-7uO CEkTuN I pexyuzni 6BJOK n da'nte NIM BblCOxHytB.2. 3amEny ChivstяшERO kartrpv'dж с\'e-dyetПр\'obODITb MInHmym pa3 B 8 HeDEJIb. |
| П\'р\'иЗвodіntelb-Hoc'tb akKumlya-Topa cyuge-CTBeHNO CHNXeHa | 1. Д�� кадо\"пpoze-dуры 6brp'tь TTreby-etcra NOBVIIshHoe KOJIuceCTBO 3HeprNi BCJIeDCSTBVE I3HOCa CETKN I pexyuzeRo 6lOka.2.Пр\'omb\'ьKa 6brp'tьн-Hoуг-л\'ярno, Ho 6e3 sma3bl-BaHnia. | 1. 3amEnite Kaccety c cetko i pexy-zimm 6Jokom.2. E\'cn BYI peyIy\rno pr\'ombyBaete 6prTBy BOДОI, pa3 B HeDeJIIO HaHO-CITE kaPJIIO CBETLORO MaShINHOrO MacJa HaberpX CETKN ДЯ eCma3bl-BaHnia. |
| Ф�ф�тИВHOCТь брITья суUCE- СТВЕННО СHI- ЖЕHA | 1. ИЗнош�а сетka и рекуший бlosк. 2. 3асорва срITBEнная систema. | 1. 3amehnte kaccety c cetkoi n pejux- шим sbLOkom. 2. 3amoyte kaccety c spITbENHOI cetkoi n pejuxim sbLOkom B tenloI BOde C kaJIpei cpeICTBa ДЯ МыТь посydы. Пocle замачиваня Тца- Teьно помоITE ee i CTpЯxнITE OCTaTKI BOdI. Пocle ВьICbIXAHNY HaHECnTE Ha CETKY KApIIIO CBETILOTO MaUHHOrO MaCla. |
| БрITВЕннaya ГOLOBКA Влж- най. | 1. Врем Yblscbixanria посл abTOMaTuce- ской очNTКи БлJO нedoctaToCHbIM. 2. 3асорен cSTOK bLOka пОдзapYДКи I OChSTKIN Clean&Charge. | 1. Ochшaite spITBY HeNOCpeIcTBENHO пocle spITbY,ЧТБы OCTaВИТь ДОCTaTOUHO BpeMeH NДЯ BvICbIXa- ня. 2. Cnomoшью 3ybouNCTKN IIpouchntite CTOK. |
| Блok поэзардки и очAstКи Clean&Charge | ||
| При Нжатини Na КнОПКУ рUCKa ОчAstКа He pro- иxCODIT. | 1. БрITВа He nprabIVbHo уstahOBJIeHa B sbLOke пдзapYДКи I OChSTKIN Clean&Charge. 2.Чисшй karTpriJx coderpXIT HeDOSTA- TOUHoe KOJIuYeCTBO pactBOPa (эКраH MIRaET КpacHBIM CLE- Tom). | 1. BcTaBte spITBy B sbLOk loDzapYdkn и очAstКи Clean&Chargeи пpr- ЖмITE ee K TblbHOn CTOpOHe bLOka (KoHTaKTbI spITbI DoJXHbI COBna- ДАТь с кOTaKTaMn bLOka). 2. UctahOBtte HOBVЧИSTЯшni Kap- tridж. Вовь нахмITE KhoNkY pUCKa |
| Повышени pacxOD chnstя- шero pactBopa. | 3асорен cSTOK bLOka пдзapYДКи I OChSTKIN Clean&Charge. | - Cnomoшью 3ybouNCTKN IIpouchntite CTOK. - PerugЯрно пotиралу Te EMKOCTb doUncSta. |
3JIeKTpuecka 6pntBa Braun Tn5769 c ceTeBbIM 6IOKOM nITaHnTn492-XXX CnCTeMoJ YnCTKn I NOd3apRAnTn Tn5430.
EcnHa np6op (Ha npimep, Ha pyky) HaneceHa MapknpoBka 492, ero moXho NCnOJIb3OBaTb CO BcEMn nCTOuHnKamn nITaHnra Braun c MapKnpoBkoI 492-XXXX.
Tin 492-XXXX INCTOCHNka NITaHn O3Haayet, YTO INCNOJb3OBaTB MOXHO TOnbKO INCTOCHNk INITaHn BRAun c MapKnipobKo 492-XXXX.
IcToHnKn nHTaHn Ta 492-XXX npedctabJIoT c6oB cepNIO NCTOCHNKOB nITaHnC OAnHaKOBbIMN 3JIeKTPOTEXHnueCKnMn XapaKTePNCtHKAMN; BmecTO 6yKB «X» MOryT6bIb 3uΦpbl OT 0 do 9: OHn IcNoJIb3yIOTcJ dIra BVHTpeHHeJ nnΦΦepEHuaUINI pON3BOdnteJI.
TpHmep IJIy IOBHX BOJOCnH
Iio6 niipin 6aKeH6apn,Byca a6o 60pOy,HaTnciTb CnyCKOBy KHOKky (8)i nocyhte Tprmep Ira IOBroro BOLOCs (6) Brpy.
Блokуваши рп Трансортувани
CmB0J 6IOKyBaHHa (5a) BnCBiTIIoEbCra Ha dncnpei TOni, KOJIb6pntBy 6yIo 3a6IOKOBaHO dJa yHnKHeHHa BnPaIKOBOrO 3aNyCKy eJeKTPOdBnHyHa (HaNPnKlaId IJIa 36epirAHnY bAli3i).
- AktnBaui: 6pntBa 6IokyETbcra HaTnCKaHHm i yTpmyBaHHm nepemkaaya yBIMKHeHHr/BIMKHeHHr (4) npotrrom Tpbox cekyH. Ie niTBePdJxyeTbc3ByKOBm CnHaIOM i CnMBOIOM 6IokyBaHHra Ha dncnJI. Iicra zuoro dinCnnei BmNkaetbcra.
- DeakTnBaui: 6pntBa p036JOKOByETbCra NOBtOpHm HaTnCKaHHaM i yTpmyBaHHaM
- nepemkaua yBIMKHeHHr/BIMKHeHHr npOTarOM Tpbox CEkyHd.
Pуне очишени брntви
OuHnHnPiNpOToHIO BDOIO
- YbIMKHiTb 6pntBy (6e3 πiδ'εdHaHnJa Do Jxepela KINBHeHHa) Ta npomnTe iI roJIbKy πiD rapiyOIO npOTouHOIO BOIOO, DOKN He 6yde yCyHyTO Bci 3aIIuKn BOLOCCra. MoXHa BVkOpNCToBvBaTu PiKe MIno 6e3 a6pa3NBHX peOBoH. 3MnTe BCIO NiHy Ta He BmNKaIte 6pntBy ige DeKiIbKa cekyHd.
-Писяцьог ВIMКНИТБбPNTBY,нATNCHITbHa KHONKY BUNBIBHHeHHa KacETn (2),цo6 BnHЯТи kaceTy Foil & Cutter (1),i BnCywiTb ii.
-ЯкшоBN peуларno MneTe 6pntbY y BoDi,TO pa3 Ha TnXdEnb HaneCiTb KpaPnHy JERKOro MaunHHoro MaCTnla Ha nobepxHIO kacetn Foil & Cutter.
OuHsEHHaIToyKoIO
BnMknItb 6pntBy. BnMiTb kaceTy Foil & Cutter (1) i noctykaite Heio no nlocki nOBepxHi. BnKOpncTObyuOuH uToUky, ouNCTiTB BHyTpIshHIO 3OHy rOlIBKn, yKa oBeptaetbcra. He Tpe6a uNCTnTu KaceTy uToUkoIO, 6o ce MoKe NowKOdHTn II.
Пристрий заочиени Та зарджанна Clean&Charge (C&C)Опс та komплектнICTь
CTaHcIIO Clean&Charge 6yI0 po3pObeHo IJRA OUYUeHHN, 3ApJxKaHHN, 3MaUyBaHHN, De3iHfikyBaHHN, BvCyuYBaHHN Ta 36epirAHN BaWoI 6pntBn Braun.
13 Po3'Em XnBJIeHHa CtaHci
14ПиДиOMHa KHONKaДЯЗamiHiKapTpNiJaKa
15 KoHTaKTn MIX CTaHciEIO Ta 6pntBOIO
16 Dincnpei ctaHci Clean&Charge
16a IndkaTop pIBHpiDHHnOuOuHHeHH
16b CbiTIOBni iHnKaTOp cTaTycy
16c IndikaTopi npoqrmaOn Ounuienn
17 Khonka 3anycky
18 YnCTayn KApTpnuK
YctaHOBJIeHHcC&C
3Himitb 3axnchny nIiBky 3 dincnpea C&C.
- Hatnchitb niDiomHy KhoNky (14) ha 3aDiHni naHeni C&C, 0o6 NiDnTn Kopnyc.
- POKlaɪdɪt b y u nctəyɪn Kaptpnɪdʒ (18) h a n llocky ctiɪkny nobepxHIO (hʌnpɪklaɪd h a ctiɪl).
- ObepexHo 3HiMiTb KpNtKy 3 KapTpNtJka.
- Пocуньт e Kaptrnix i3 3aHbOi nAneI IO OCHOBN CTaHcii TaK, uO6 BIn BCTaB Ha MicuE.
- NobilbHO 3akpniTe Kopnyc, HatnCKaIOuHa HbOro, Do KlaaHnra.
3a donomoroio cneuaibnoro npoBody (10) n'd'ecnHaite po3'em XNBHeHnaCTaHci (13) do eIektpuHoi pO3eTKn.
BnKOpncTaanHcC&C
Baxnbo: 6pntba ma e 6ytn cyxoo i he miCTtu nHH a6o 3aunskib mna.
BcTaBTe 6pntbY HxKhboIO paHeJIIO doIopn y C&C, 0o6 6ylo BnIDHO nepeHIO qactHy Ta BnBilbHeHNI φikCaTOp roJIbKn (3).
KoHTaKTn (7) Ha 3aHni yacTHi 6pntBn MaOTb 6yTu npuNacObaH i Do KOHTaKTiB (15) y C&C. WToBXHITb 6pNTBy B npaBnIbHe NIOJoxeHHra. 3ByKObN CNHaJI NiTBePdntb, 0o 6pNTBa pO3MiUeHa HaleXHM YHOM y C&C.
C&C aHaJI3ye cTaTyc ririEHIuHocTi. IHNiKaTOpN npoRpaMn OUnIeHHa (16c) BiO6paXaIoTB cTaTyc Ha IincnJIe i C&C (16).
3apjaHnna6pntBnBC&C
3apxHnHnNoHHeBcA BtOMaTnUHO, KOJIb6pntBa 6yJe po3TaObaHa HaJIeXHM YINHOM.
OuHsEHHa 6pntBn B C&C
KolnHa dncnlei 6pntbn 3acBITnbcra iHdkatop ouuueHHa (5c), BCTaBte 6pntby BC&C, k onncano BVne.
Поррами очNSEнна
KOPOTKE ekOHOMHe OunuHn
3BnuaHHe OuHJeHHa
iHTeHcBHe OuHueHH
Nochitb aBTomatnue OunuHn
IouhItb npoec ouuueHHaHTNCHyBnHa KhoNky 3anycky (17).
Якшо CBITLOВи iHДИКaTOp CTaTycy (16b) He CBiITbCra (C&C nepeMnKaETbcR B peXIM OuykBaHnI npi6Jn3Ho uepe3 10xbuINH),HaTNCHTb Ha KhONky 3anyCKy DbiYi.
IHaKsE OuHsEHHr He pO3NoHTbcra. Ia NaKpaUoro pe3yIbTaTy roJIHHr MPeKoMeHdyEmo OuySHeHHr NicIa KoxHOrO roJIHHr.
KoJHa npOgPama OuHSeHHa CKlaAaEbC8 3 DeKilbKOx UnkJIb, NiI qac JkNx YnCTnBHa pIiHa npOMBae roIbky bprTbn.3aJeXHo BiI moJeI BaWoI cTaHcII Clean&Charge i/ a6o obpaHOI npOgPamn OuHSeHHa 3aIMaE Do Tpbox XBnInH. IpOTraGM CbOrO yacy CBiTIOBn IHNkAtOp CTatCy 6lImae. 3aIIMTe bprTBy B cTaHcII dJa BVcUyBaHHa. 3aJeXHO BiD KJIIMaTUnHnx yMOB 3aIINsKn BOJOn MOxytB BNapOByBaTnCra Do DeKilbKOx rOdnH.
TapaHTia He CTOCyETbC TaKINX BUNaIKIB: yUKOJxEHHN, BNUKInKaHi HnnpaBnIbHnM BnKOpNCtAHnM, HopMaJIbHe 3HOWeHH NdeTaJe (HaNP., cIToCKn dIra rOJIHHa a60 pIXyUro 6IOKa), DeΦeKTn, IIO MaOTb He3NaHn BnINB Ha kICTb PObOTn PnCTPOIO. Tg rapaHTia BTPaYae Cnly, kIoo peMOHT 3dIiCHIOETbCn HE BnOBHOaxEHOIO dIra ZbOrO OcO6OIO Ta, kIoo BnKOpNCTOBYIOBcR He OpIRHaJIbHi 3anachIy qACTnHn Bnpo6Hnka.
Строк служби порукци Braun Дорове rapашиюу у два рokedу 3 мочу пindбань abo 3 MOMENTУ вгOTOBленья, якло дату пораджу hemoxлвОВ BCTaHOBHTN.
Y BUNaIky nped'ayBleHnpeKlamau3a yMOBaMn daHOi rapaHTi, nepeaTe Bnpi6 y NOBHOMy KOMNJIeKTI 3rIHO ONICY B opurHaJIbHi iHCTpyKU3 eKCnlyaTaUII pa3OM 3 rapaHTiINHM TALOHOM y 6yDb-akn cepBicHn ceHTp, kN OphiuiHO BNOHBaXeHNI npedCTaBNKOM KOMNaHII Bnpo6Hnka.
Bci iHsi BmOrn, pa30M 3 BmOramN BiDkoDyBaHHra 36ntkIB, He diiChi, kIoo HaHa a BiINOBiJaIbHiCTb HE BCTaHOBJIeHa 3aKOHHIM YIHOM.
BnnaKn,Ha kI He po3noBcIOJxKyETbcra rapaHTi:
- DeΦeKTH, BnKlnKaHi ΦOpC-MaxOpHmN O6CTaBnHaM;
- BnKOpNCTaHHa 3 npofoeciHIO MeTOIO a60 3 MeTOIO OTpMaHHaPb6yTKy;
- nopuyenHHBIMOR iHCTpyKuii 3 ekcnnyatauii;
-HeBipHe BCTaHOBLeHHHaHpyrM MepeXi XnBLeHHra (KIOe Bmaraetbca); - 3ДиСЧЕНТEXHИCHNX 3MiH;
-MexaHHi NOsKOJKeHHra - Дя пиладов, сю пацють на затырейкax - робота 3 HeViДпОВднИМn a60 cnpaцьованIMn затырейкамn, bdy-b-яki NOшКоДжЕнн, BИКЛИКаHi СпрацьованIMn abo piДтikaючимn затырейкамn;
- NOUSHKOДЖЕHЯ 3 BUNH TBAPINH, rpn3yHIB Ta KOMAX (B TOMy YnCJI y BnnaKax 3HaxODJKeHHrpn3yHIB Ta KOMAX ycepeDnHi np6OpiB)
-ДябпгВ-зIM'ЯТаabonopBaHa cIToUka.
Country of origin: Germany Year of manufacture
To determine the year of manufacture, refer to the 4-digit production code starting with PC located near the type plate. The first digit of the production code refers to the last digit of the year of manufacture. The next three digits refer to the day in the year of manufacture. Example: "PC6059" - The product was manufactured on day 059 of 2016.
LJ:LJ
gai j
J 4 J
.0gdddcly dwlloJdLol
.
.
.
JJJJJJJJJJJJJJJJJJJJJJJJJJJJJJJJJJJJJJJJJJJJJJJJJJJJJJJJJJJJJJJJJJJJJJJJJJJJJJJJJJJJJJJJJJJJJJJJJJJJJJJJJJJJJJJJJJJJJJJJJJJJJJJJJJJJJJJJJJJJJJJJJJJJJJJJJJJJJJJJJJJJJJJJJJJJJJJJJJJJJJJJJJJJJJJJJJJJJJJJJjj
JgBjI J
6) JyJyJyJyJyJyJyJyJyJyJyJyJyJyJyJyJyJyJyJy
Jaa
L) 5a)
()
J3 4) y/1y Jx y
.
.3 1/1
aJL
y
.
Joo 1
2x - 1 0 或 3x + 1 0
(1) 20 (2)
gblg aagj 1
2
wgl 3
4
5
()5a
J 5b
5c
4yj 5d
6
abdoJy aisloJI cLwOxo 7
JgBj 8
4y11 4slo 1y85 wla9
(10
*aolulb 11
*jawll 12
y
jwpljwl jgl
aSlo 10) aoljll lkl aegoo jld Jxds Jxds Jdxd aLslo
.(Clean&Charge abo>> Clean&Charge 19 (9)
aawwJllo
u 50 JJ LsU Jok
.
35 5 5
y y 1
35 15 y
.50 50
jJ/
.(5) 1
pJ .Jg Jd Jn Jn Jn Jn Jn Jn Jn Jn Jn Jn Jn Jn Jn Jn Jn Jn Jn Jn Jn Jn Jn Jn Jn Jn Jn Jn Jn Jn
.
Jn Jn Jn Jn Jn Jn Jn Jn Jn Jn Jn Jn Jn Jn Jn Jn Jn Jn Jn Jn Jn Jn Jn Jn Jn Jn Jn Jn Jn Jn Jn Jn Jn Jn Jn Jn Jn Jn Jn Jn Jn Jn Jn Jn Jn Jn Jn Jn Jn Jn Jn
y 1511 1111 1111 1111 1111 1111 1111 11
j 1 j 1 1 1 1 1 1 1 1 1 1 1 1 1 1 1 1 1 1 1 1 1 1 1 1 1 1 1 1 1 1
j0 j 492-492-XXXX
a 1 p 1 1 1 1 1 1 1 1 1 1 1 1 1 1 1 1 1 1 1 1 1 1 1 1 1 1 1 1 1 1

.
.
gA. dI I aI gJg8 Jn JbI gB 1 1 1 1 1 1 1 1 1 1 1 1 1 1 1 1 1 1 1 1 1 1 1 1 1 1 1 1 1 1 1 1 1 1 1 1 1 1
Clean&Charge
Please note down the suggested replacement date (in 18 months from now) below replacement part reference number.
52S/52B

FR Merci de prendre note de la date de remplacement suggerée (d'ici à dans 18 mois) en-dessous des numérios des pieces détachées.
PL Warto zapisć datę sugerowanej wymiany (za 18 mieszȩcy od chwili obecnej) pod numerami glównych czȩsci.
CZ Poznamenejte si navrhované datum vyměny (odted' za 18 měsíců) pod Čísla hlavnich součástí.
SK Poznamenajte si navrhovaný datum výmeny (za 18 mesiacov odteraz) pod Čísla hlavnych súčastí.
HU A fó alkatrészek cikkszáma alá jegyezze fel a csere javasolt dátumat (mostantól számítva 18 hónap).
HR Stoga vas molimo da zabilježite preporučeni datum zamjene (18 mjseci nakon današnjeg Dana) ispod brojeva modela zamjenskih dijelova.
SL Priporočen datum zamenjave (čez 18 mesecev) si zapišite pod stevilko glavnih delov.
TR Lütfen önerilendehyistirme tarihini parçannumaralarinin alta nott edin (bugünden itibaren 18 ay).
RO Vă rugăm să notați data de înlocuire sugerata (peste 18 luniÎncepænd de astăzi) sub numărul de identificare al pieselor.
BG Mon, ot6eJexTe npenopbYteHaTa DaTa 3a noMna (18 mecea ot cera) nOd HOMepa Ha KJIIOyOBITE qAcTn.
RU loxajnyiCTa, OTMeTbTe peKOMeHdyemyIO pJaHOByIO DaTy 3aMeHbI (Yepez 18 MeCraueB C MOMeHTa HauaIaNcNoJIb3OBAHnI) PRADOM C HOMepOM COOTBETCTBYUOUX KJIIOUeBBIX KOMNOHEHTOB Ha CXEMe.
UA Ppocnmo 3aIncatn peKomeHIOBaHy DaTy 3amHn (Yepez 18 micayiB BiCbOroDiHi)PiD HOMepom OCHOBHX YaCTnH.