
BBA 3774 - Bread maker CLATRONIC - Free user manual and instructions
Find the device manual for free BBA 3774 CLATRONIC in PDF.
| Technical Features | 1.5 kg capacity, 600 W power, 12 cooking programs, keep-warm function, timer up to 13 hours. |
|---|---|
| Usage | Easy to use with a digital control panel, ability to prepare different types of bread (white, whole wheat, gluten-free). |
| Maintenance and Repair | Easy cleaning thanks to a removable bread pan, replaceable parts available. |
| Safety | Overheat protection system, non-slip feet for optimal stability. |
| General Information | Dimensions: 40 x 25 x 30 cm, weight: 4.5 kg, 2-year warranty. |
Frequently Asked Questions - BBA 3774 CLATRONIC
User questions about BBA 3774 CLATRONIC
0 question about this device. Answer the ones you know or ask your own.
Ask a new question about this device
Download the instructions for your Bread maker in PDF format for free! Find your manual BBA 3774 - CLATRONIC and take your electronic device back in hand. On this page are published all the documents necessary for the use of your device. BBA 3774 by CLATRONIC.
USER MANUAL BBA 3774 CLATRONIC
-
Sweet
-
Cake
-
Whole wheat
-
Gluten free
-
Sandwich
11.Sandwich (Toastbrot)
WAARSCHUWING: Brandgevaar!
-
Basic
-
Quick I
-
Dough
-
French
-
Sweet
10.Cake
-
Whole wheat
-
Gluten free
-
Sandwich
7. Quick II (Snel II)
11.Sandwich (Geroosterd brood)
3 Bouton Weight (Poids)
2. French (Pain blanc)
3. Whole weat (Pain complete)
-
Whole wheat
-
Gluten free
-
Sandwich
Los programas "7. Quick II", "9. Jam" y "12. Bake" noSEOuen programarse con antelacion.
AVISO:
5. Sweet (Pan dulce)
-
Basic
-
Quick I
-
Dough
-
French
-
Sweet
10.Cake
3.Whole wheat
-
Gluten free
-
Sandwich
2. French (Pane bianco)
- Gluten free (Pane sanza glutine)
Thank you for choosing our product. We hope you will enjoy using the appliance.
Symbols in this Instruction Manual
Important information for your safety is specially marked. It is essential to comply with these instructions in order to avoid accidents and prevent damage to the appliance:
WARNING:
This warns you of dangers to your health and indicates possible injury risks.
CAUTION:
This refers to possible hazards to the appliance or other objects.
NOTE: This highlights tips and information.
Contents
Overview of the Components 3
General Notes 75
Special Safety Precautions for this Appliance. 76
Unpacking the Appliance 77
Start-up 77
Overview of the Components/ Scope of Delivery 77
Description Control Panel. 77
1 LCD Display Default Setting (Start Image) 77
2 Button Start/Stop 77
3 Button Weight (Weight) 77
4Programme Names. 77
5 Buttons + / - (Time) 77
6 Button Color (Colour) 78
7 Button Menu (Selection) 78
How the Appliance Works. 78
General Information 78
Signal Tones 78
Programme Memory 78
Safety Function 78
Using the Appliance 79
- Removing the Baking Tin 79
- Insert Kneading Hook 79
- Insert Ingredients 79
- Inserting the Baking Tin 79
- Starting a Programme 79
6.Adding other Ingredients 79 - Leave Dough to Rise 79
- Baking 79
- Keeping Warm 79
- Programme "12. Bake" (Extended Baking) 79
- Programme End 79
- Removing the Kneading Hook from the Bread 79
Cleaning 79
Removing and Installing the Lid. 80
Storage 80
Questions on Baking 80
The Bread Sticks to the Baking Tin After Baking. 80
How Do You Avoid the Forming of Holes in
the Bread Owing to the Presence of the Kneading Hooks? 80
The Dough Spills Over When It Is Left to Rise. 80
The Bread Rises and Spills Over Anyway. 80
When Can the Lid of the Bread Maker Be Opened
During the Baking? 80
What Do the Type Numbers for Flour Mean? 80
What Is Whole Wheat Flour? 80
What Must Be Done When Using Rye Flour? 80
What Is Gluten in Flour? 80
How Many Different Flour Types Are There and How Are They Used? 80
How Can Fresh Bread Be Made Easier to Digest? 80
What Doses of Rising Agent Should Be Used? 80
What Can Be Done if the Bread Tastes of Yeast? 81
Why Does the Bread Made in an Oven Taste Different
Form the Bread Made With the Bread Maker? 81
Questions on Bread Baking Machine 81
Mistakes with the Recipes 81
Notes Regarding the Recipes. 82
Ingredients 82
Adjust Doses 83
Add and Measure Ingredients and Quantities 83
Bread Weights and Volumes 83
Gluten Free Bread (for Allergy Sufferers) 83
Baking Results 83
Programme Sequence and Recipe Ideas 83
- Basic (Default Setting) 84
- French (White Bread) 84
3.Whole Weat (Whole Wheat Bread) 84 - Quick I (Fast I) 85
5.Sweet (Sweet Bread) 85 - Gluten free (Gluten free Bread) 85
- Quick II (Fast II) 86
- Dough (Dough) 86
9.Jam(Jam) 86
10.Cake (Cake) 87
11.Sandwich (Toasted Bread) 87
12.Bake (Bake) 87
Technical Data 88
Disposal 88
Meaning of the "Dustbin" Symbol 88
General Notes
Read the operating instructions carefully before putting the appliance into operation and keep the instructions including the warranty, the receipt and, if possible, the box with the internal packing. If you give this appliance to other people, please also pass on the operating instructions.
- The appliance is designed exclusively for private use and for the envisaged purpose. This appliance is not fit for commercial use.
- Do not use it outdoors. Keep it away from sources of heat, direct sunlight, humidity (never dip it into any liquid) and sharp edges. Do not use the appliance with wet hands. If the appliance is humid or wet, unplug it immediately.
- When cleaning or putting it away, switch off the appliance and always pull out the plug from the socket (pull the plug itself, not the lead) if the appliance is not being used and remove the attached accessories.
- The appliance and the mains lead have to be checked regularly for signs of damage. If damage is found the appliance must not be used.
- Use only original spare parts.
- In order to ensure your children's safety, please keep all packaging (plastic bags, boxes, polystyrene etc.) out of their reach.
WARNING:
Do not allow small children to play with the plastic foil. There is a danger of suffocation!
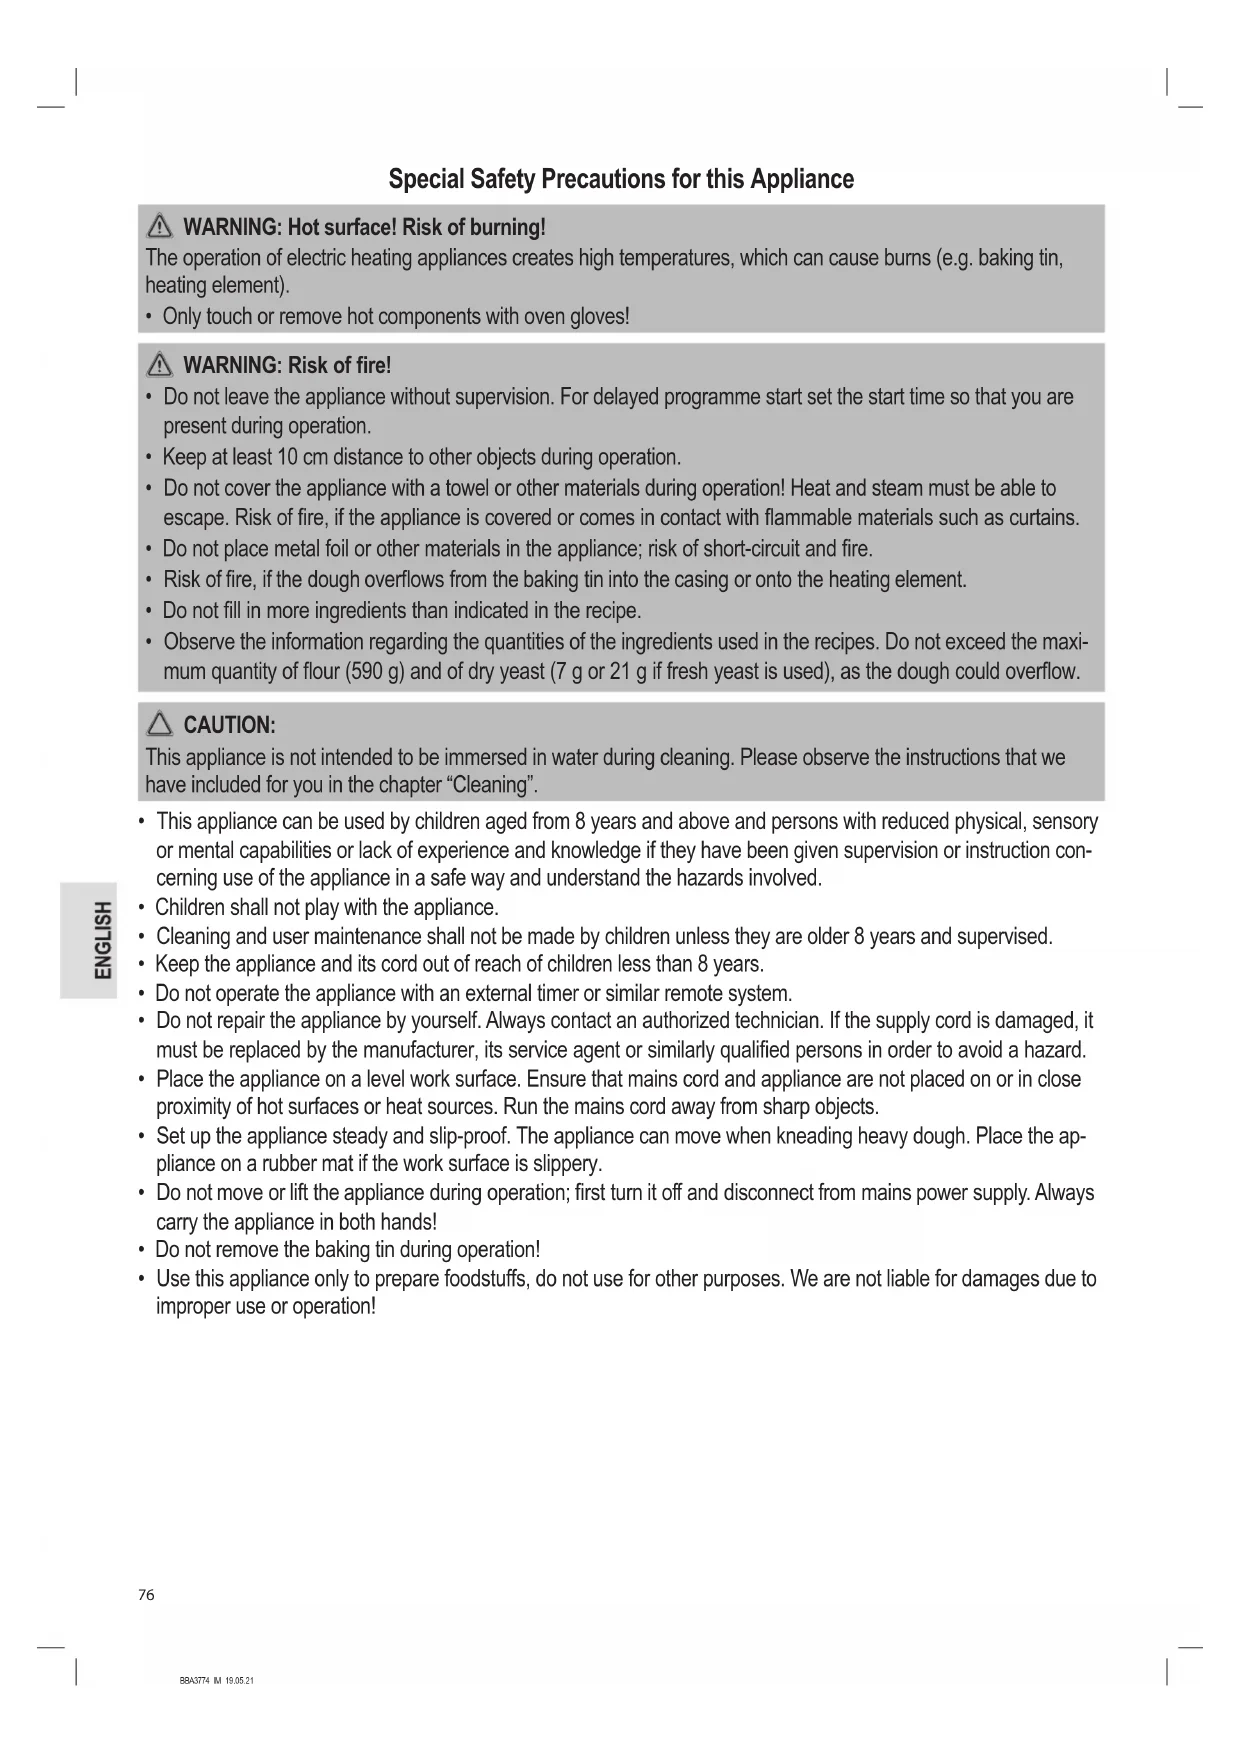
Special Safety Precautions for this Appliance

WARNING: Hot surface! Risk of burning!
The operation of electric heating appliances creates high temperatures, which can cause burns (e.g. baking tin, heating element).
- Only touch or remove hot components with oven gloves!

WARNING: Risk of fire!
- Do not leave the appliance without supervision. For delayed programme start set the start time so that you are present during operation.
- Keep at least 10cm distance to other objects during operation.
- Do not cover the appliance with a towel or other materials during operation! Heat and steam must be able to escape. Risk of fire, if the appliance is covered or comes in contact with flammable materials such as curtains.
- Do not place metal foil or other materials in the appliance; risk of short-circuit and fire.
- Risk of fire, if the dough overflows from the baking tin into the casing or onto the heating element.
- Do not fill in more ingredients than indicated in the recipe.
- Observe the information regarding the quantities of the ingredients used in the recipes. Do not exceed the maximum quantity of flour (590 g) and of dry yeast (7 g or 21 g if fresh yeast is used), as the dough could overflow.

CAUTION:
This appliance is not intended to be immersed in water during cleaning. Please observe the instructions that we have included for you in the chapter "Cleaning".
- This appliance can be used by children aged from 8 years and above and persons with reduced physical, sensory or mental capabilities or lack of experience and knowledge if they have been given supervision or instruction concerning use of the appliance in a safe way and understand the hazards involved.
Children shall not play with the appliance. - Cleaning and user maintenance shall not be made by children unless they are older 8 years and supervised.
- Keep the appliance and its cord out of reach of children less than 8 years.
- Do not operate the appliance with an external timer or similar remote system.
- Do not repair the appliance by yourself. Always contact an authorized technician. If the supply cord is damaged, it must be replaced by the manufacturer, its service agent or similarly qualified persons in order to avoid a hazard.
- Place the appliance on a level work surface. Ensure that mains cord and appliance are not placed on or in close proximity of hot surfaces or heat sources. Run the mains cord away from sharp objects.
- Set up the appliance steady and slip-proof. The appliance can move when kneading heavy dough. Place the appliance on a rubber mat if the work surface is slippery.
- Do not move or lift the appliance during operation; first turn it off and disconnect from mains power supply. Always carry the appliance in both hands!
- Do not remove the baking tin during operation!
- Use this appliance only to prepare foodstuffs, do not use for other purposes. We are not liable for damages due to improper use or operation!
Unpacking the Appliance
- Remove the appliance from the package.
- Remove all packaging material such as films, filler, cable holders and cardboard.
- Check the delivery contents for completeness.
- Check the appliance for possible transport damage to prevent hazards.
- Should the package contents be incomplete or damages be found, do not take the appliance into operation. Take it immediately back to the dealer.
Start-up
-
Clean the appliance as described in chapter "Cleaning".
-
Wait until all of the parts are dry.
-
Place the baking tin into the appliance.
4. Electric Connection
4.1. Confirm that your mains voltage matches the specifications on the type label before connecting to mains power supply.
4.2. Connect the appliance to a properly installed wall outlet.
A signal sounds and the display shows the default setting (see "Description Control Panel" "1 LCD Display"). The appliance is then ready for use.
- There is a protective layer on the heating element. To remove this, operate the appliance for approximately 15 minutes with an empty baking tin placed inside (without kneading hook). To do this, use the programme "12. Bake".
NOTE:
Any smoke or smells produced during this procedure are normal. Please ensure sufficient ventilation.
- Disconnect the mains plug from the wall socket.
- WARNING: Risk of burning!
Allow the baking tin to cool before wiping it with a damp cloth.
- Following this, you can start baking.
Overview of the Components / Scope of Delivery
A Lid handle
B Lid with viewing window
C Baking tin
D Control panel with display
E Casing
F Side ventilation slots
G Kneading hook
Accessories
a Measuring cup
b Measuring spoon
c Hook for removing the kneading hook
Description Control Panel
1 LCD Display
Default Setting (Start Image)
This displays standby mode. It corresponds with the basic programme. The display shows "I 3:00". The "I" stands for the selected programme; "3:00" stands for the programme duration. The positions of two arrows show the selected browning and the weight. The default setting after turning the appliance on is: "Higher weight" (level II) and "Medium browning" (Medium). During operation the display shows the programme duration counting down.
2 Button Start/Stop
Use this button to start, interrupt, and terminate a programme sequence manually.
- After pressing the Start/Stop button the dots on the time display start flashing. The programme shown in the display is in use.
- Briefly pressing the Start/Stop button during a programme interrupts the programme sequence (except in the "keeping warm" phase). The numbers indicating the time will flash in the display. Press the button once again briefly to continue the programme. If you do not press the Start/Stop button within 10 minutes, the programme will continue automatically.
- Press the Start/Stop button at any time to cancel the programme. Press and hold until on long acoustic signal sounds. The display shows the starting position of the programme most recently used. Press the Menu button to select a different programme. Depending on the operation mode you may have to wait for the appliance to cool down.
3 Button Weight (Weight)
In some programmes you can set the following levels:
Level I = for a smaller bread weight
Level II= for a larger bread weight
i NOTE:
- The weight of the finished bread depends on the ingredients, among other things. You can read more about this under "Notes Regarding the Recipes" "Bread Weights and Volumes". When using heavy bread doughs, such as rye-wheat bread, the bread can weigh up to 1500g .
- The levels affect the baking time. ( "Programme Sequence and Recipe Ideas")
4 Programme Names
A short description of the programme can be found in the table under item "7 Menu Button (Selection)".
5 Buttons + / - (Time)
Use the timer function to set the end time for a selected programme. This function is available for the following programmes:
- Basic
- French
-
Whole wheat
-
Quick I
- Sweet
-
Gluten free
-
Dough
10.Cake - Sandwich
The programmes "7. Quick II", "9. Jam" and "12. Bake" cannot be started with delay.
WART
When using the delayed baking function, make sure the appliance will not be unattended during operation.
- Press the + / - buttons to set the end time for the programme.
i NOTE:
- Repeatedly press the + / - buttons to move the end time of the programme by 10 minutes. If you keep the respective button pressed down, the setting will operate in fast mode.
- The end of the programme can be delayed for a maximum of 13 hours.
- When selecting another programme, the previous timer setting will be deleted.
- Do not use the timer function for recipes with perishable ingredients such as milk, eggs, fruits, yoghurt, onions, etc.!
- The timer function is not suitable for gluten-free bread, which is prepared with warm or hot water.
Example: It is now 8:30 p.m. and you want the bread ready the next morning at 7:00 a.m., in 10 hours and 30 minutes. Set this value (10:30)
on the display. It is not necessary to calculate the hours between the desired start and end of the programme (e.g. 3:00). The programme will start automatically for the bread to be ready at the set time.
- Press the Start/Stop button to activate the timer function. The dots in the time display will be flashing.
- In order to cancel the timer function, press the Start/Stop button again until you hear a signal tone.
6 Button Color (Colour)
Press this button to set the desired browning: Light (light) - Medium (medium) - Dark (dark).
7 Button Menu (Selection)
Press the Menu button to access the individual programmes. The programmes are used for the following types of bread:
| No. | Programme name | Description | Signal tone for adding ingredients |
| 1. | Basic | Default Setting - the programme for all breads, such as white bread or mixed-type bread | yes |
| 2. | French For especially light white bread yes | ||
| 3. | Whole wheat For whole wheat bread yes | ||
| 4. | Quick I | For fast preparation of white and brown bread yes | |
| 5. | Sweet For preparing sweet leavened bread yes | ||
| 6. | Gluten free | For gluten-free bread (observe the recipe when preparing the dough) | yes |
| 7. | Quick II | For faster preparation of all bread types baked using the BASIC, FRENCH, QUICK I, or SANDWICH programmes. The "rising" time is considerably shorter. This makes the bread more compact and less fluffy. (Use lukewarm liquids for this programme.) | yes |
| 8. | Dough | For preparation of dough, without baking | no |
| 9. | Jam For cooking jam and marmalade | no | |
| 10. | Cake | For pastries containing baking powder | yes |
| 11. | Sandwich | For preparation of light sandwich bread | yes |
| 12. | Bake | For baking separately prepared yeast or stirred doughs; and for re-baking bread or cake | no |
How the Appliance Works
General Information
- The bread maker offers 12 pre-installed programmes with a total of 53 different settings. The appliance includes a new programme which you can use to bake gluten-free bread for allergy sufferers.
- Almost all baking programmes offer you the choice between 2 weight settings for smaller or bigger breads.
- You can use the bread maker to bake with a delay, i.e. the programme end can be delayed for up to 13 hours.
The appliance works fully automatic and is extremely user-friendly. Hereinafter you will find time schedules and recipes for
- different kinds of bread.
- dough, which is processed otherwise,
- jam, cooked in the bread maker.
Signal Tones
The appliance emits different signal tones:
1 long signal tone
- when connecting the appliance to the mains.
- when the programme is resumed automatically, in the event it was manually interrupted beforehand (after 10 minutes).
- when manually terminating a programme.
- at the end of the keeping warm function.
1 short signal tone
- when releasing a button.
- when the programme is manually interrupted or resumed within 10 minutes.
5 signal tones in sequence
The temperature of the appliance is too high and prevents the start of a new programme. The display will show "HHH".
10 signal tones in sequence during a programme
The programme is currently in the second kneading phase. During certain programmes you may add further ingredients (seeds, fruits, nuts, etc.).
10 signal tones in sequence at the end of a programme
The programme stopped. "0:00" appears in the display next to the programme number. For all programmes, a keeping warm phase of 1 hour will start after that.
Programme Memory
In the event of a power failure, the programme will resume automatically if power is restored within a few minutes. After a longer power failure the bread maker must be restarted. This is only practical if the dough was at this time still in the kneading phase. You have to start from the beginning if baking already started!
Safety Function
After a programme finished, the appliance must cool down before you can start a new baking or kneading programme (except for the programmes "9. Jam" and "12. Bake").
The appliance will emit 5 signal tones and the display will show "HHH", indicating that the temperature in the baking chamber is too high.
- Disconnect the mains plug from the wall socket.
- Use oven mitts to remove the baking tin.
- Leave the lid open and wait until the appliance has cooled down completely. The cool-down period depends on the previous programme settings.
Using the Appliance

CAUTION: Risk of fire!
- Observe the information regarding the quantities of the ingredients used in the recipes. Do not exceed the maximum quantity of flour (590 g) and of dry yeast (7 g or 21 g if fresh yeast is used), as the dough could overflow.
- When adding the ingredients at the beginning of your baking, never do so while the baking tin is still inside the appliance.
- When adding ingredients (seeds, fruits, nuts) during the second kneading, make sure they do not fall into the baking chamber of the appliance.
NOTE:
Always keep the lid closed during the rising and baking phase, as otherwise the dough will collapse.
1. Removing the Baking Tin
Open the lid. Slightly turn the baking tin counter-clockwise until it is unlocked. Pull the baking tin up by its handle and place it on a flat surface.
2. Insert Kneading Hook
2.1. Grease the kneading hook. This will make it easier to remove the kneading hook from the finished bread.
2.2. Place the borehole of the kneading hook over the drive shaft in the baking tin. The flange of the opening must face down. Observe the flute on the shaft.
3. InsertIngredients
Ensure that the ingredients are filled into the baking tin according to the sequence determined by the recipe.
4. Inserting the Baking Tin
Place the baking tin on the shaft in the baking chamber while holding the baking tin diagonally. Slightly turn the baking tin clockwise until it locks. Close the lid.
5. Starting a Programme
5.1. Connect the power plug to a socket.
5.2. Press the Menu button to select the desired programme.
5.3. Press the Color button to select a light, medium, or dark brown-ing.
5.4. Use the Weight button to select the desired bread weight.
5.5. Press the + / - buttons to use the timer function for delayed baking.
5.6. Press the Start/Stop button. The flashing colon indicates the programme has started.
6. Adding other Ingredients
Depending on the selected programme, 10 signal tones will sound during the second kneading phase. Now you can add other ingredients to the dough as desired. Close the lid again.
7. Leave Dough to Rise
After the last kneading the bread maker sets the optimum temperature for the dough to rise. It heats up to 25^ if the room temperature is lower.
8. Baking
The bread maker adjusts the baking temperature automatically. Select the "12. Bake" programme to extend the baking process in case the bread is still too pale after baking.
9. Keeping Warm
(Except for Programmes "8. Dough" and "9. Jam")
The signal tones repeatedly after the baking programme is finished and bread or foodstuffs can be removed. At the same time the 1-hour warming phase starts. "0:00". appears next to the programme number in the display. The colon ":" is flashing. After 1 hour the signal tones and the warming phase ends. The display shows the starting position of the programme most recently used. Disconnect the mains plug from the wall socket.
10. Programme "12. Bake" (Extended Baking)
10.1. When the "keeping warm" phase is still running, press the Start/Stop button until you hear a signal tone.
10.2. Start the programme "12. Bake".
10.3. When the desired browning has been achieved, stop the programme by pressing the Start/Stop button.
10.4. Disconnect the mains plug from the wall socket.
11. Programme End
Have a grid ready and disconnect from mains power supply. Remove the baking tin with oven gloves after the programme has ended, turn it upside down and slightly shake it; turn the kneading hook drive at the bottom if the bread does not come out immediately.

CAUTION:
Do not knock the baking tin against the table or one of the edges. This could cause the baking tin to become warped.
12. Removing the Kneading Hook from the Bread
Use the supplied hook in case the kneading hook gets stuck inside the bread. Insert it through the semi-circular opening of the kneading hook at the bottom of the warm bread and hook into the lower edge (at the wing of the kneading hook). Carefully pull the kneading hook upward with the hook. You can see in which part of the bread the wing of the kneading hook is stuck. Cut the bread in that position and easily remove the kneading hook.
Cleaning

WARNING:
- Always disconnect from mains power supply and let the appliance cool down before cleaning.
- Do not submerge the appliance and the baking tin in water. To avoid the risk of electric shock and fire do not fill water into the baking chamber.

CAUTION:
- Do not use a wire brush or other abrasive objects for cleaning.
- Do not use aggressive or abrasive cleaning agents.

The baking tin is anti-stick coated. It is normal if the colour of the coating changes over time, this does not affect the function.
- Remove all ingredients and crumbs with a damp cloth from lid, casing and baking chamber.
- Wipe the baking tin on the outside with a damp cloth. The inside can be cleaned with water and a mild cleaning agent.
- Clean the kneading hooks and drive shafts immediately after use. The kneading hooks may be difficult to remove later if left in the baking tin. In this case fill warm water for approx. 30 minutes into the tin. The kneading hooks can then be removed easily.
- Use a cloth to wipe down all parts until they are dry.
Removing and Installing the Lid
For easier cleaning, you can remove the lid.

CAUTION:
Do not immerse the removed lid in water! Residual water would remain inside the lid.
- Only open the lid about 45^ , so that the grooves on the hinged opening can be seen.
- First, remove one side from the hinged opening, then the other.
- Clean the lid using a damp cloth. Dry the lid.
- To put the lid back on, hold it just as you did when you removed it, namely, at an angle of approximately 45^ . First, insert one of the grooves in the hinged opening, right at the middle. Then press the second groove into the other side of the hinge.
Storage
- Ensure that the appliance is clean and dry and has cooled down complete before storing. Store the appliance with the lid closed.
- We recommend to store the appliance in its original packaging when not using the appliance for a longer period of time.
- Store the appliance out of reach of children and at a well ventilated dry place.
Questions on Baking
The Bread Sticks to the Baking Tin After Baking.
Leave the bread to cool for about 10 minutes after baking - turn the baking tin upside down. Move the kneading hook shaft back and forth, if necessary. Grease the kneading hooks before baking.
How Do You Avoid the Forming of Holes in the Bread Owing to the Presence of the Kneading Hooks?
You can remove the kneading hooks with your fingers covered with flour before leaving the dough to rise for the last time. (→“Programme Sequence and Recipe Ideas” and the indication in the display) If you not wish to do so, use the hook after baking. If you proceed with caution, you can avoid the forming of a large hole.
The Dough Spills Over When It Is Left to Rise.
This happens in particular when wheat flour is used owing to its greater content of gluten.
Remedy:
a) Reduce the amount of flour and adjust the amounts of the other ingredients. When the bread is ready, it will still have a large volume.
b) Spread a tablespoon of heated liquefied margarine on the flour.
The Bread Rises and Spills Over Anyway.
a) If a "V"-shaped ditch forms in the middle of the bread, the flour does not have enough gluten. This means that the wheat contains too little protein (it happens during especially rainy summers) or that the flour is too moist.
Remedy:
Add one tablespoon of wheat gluten per 500g of wheat flour.
b) If the bread has a funnel shape in the middle, the possible cause can be one of the following
- the water temperature was too high,
- too much water was used,
- the flour was poor in gluten,
- draft when opening the lid during baking.
When Can the Lid of the Bread Maker Be Opened During the Baking?
Generally speaking, it is always possible while the kneading is underway. During this phase small quantities of flour or liquid can still be added.
If the bread must have a particular aspect after baking, proceed as follows:
- Before the last rising phase ( "Programme Sequence and Recipe Ideas" and the indication in the display) open the lid with caution and shortly and carve the bread crust while it is forming with a sharp pre-heated knife, scatter cereals on it or spread a mixture of potato flour and water on the crust to give it a glossy finish. This is the last time that the lid can be opened; otherwise the bread will go down in the middle.
What Do the Type Numbers for Flour Mean?
The lower the type number, the less roughage the flour contains and the lighter it will be.
What Is Whole Wheat Flour?
Whole wheat flour is made of all types of cereals including wheat. The term "whole wheat" means that the flour was ground from whole grain and hence it has a greater contents of roughage thus making the whole wheat flour darker. However, the use of whole wheat flour does not make the bread darker as is widely believed.
What Must Be Done When Using Rye Flour?
Rye flour does not contain any gluten and the bread hardly rises. In order to make it easily digestible a Rye Whole Wheat Bread with leaven is to be made.
The dough will rise only if one part of type 550 flour is added to every four parts of rye flour without gluten.
What Is Gluten in Flour?
The higher the type number, the lower the gluten contents of the flour are and the less the dough will rise. The highest quantity of gluten is contained in type 550 flour.
How Many Different Flour Types Are There and How Are They Used?
a) Corn, rice and potato flour are suitable for people allergic to gluten or for those who suffer from sprue or celiac disease. Observe our comments under "Notes Regarding the Recipes" "Gluten free Bread (for Allergy Sufferers).
b) Spelt flour is free from chemical additives because spelt grows on very poor soil and requires no fertilizers. Spelt flour is especially suitable for allergic people. It can be used in all those recipes described in the operating instructions requiring flour types 405, 550 or 1050.
c) Millet flour is especially suitable for people suffering from many allergies. It can be used in all recipes requiring flour types 405, 550 or 1050 as described in the operating instructions.
d) Durum wheat flour is suitable for baguettes thanks to its consistency and it can be replaced with durum wheat semolina.
How Can Fresh Bread Be Made Easier to Digest?
If a mashed boiled potato is added to the flour and kneaded in the dough the fresh bread is easier to digest.
What Doses of Rising Agent Should Be Used?
For yeast and leaven, which must be bought in different quantities follow the producer's instruction on the package and adjust the quantity to the amount of flour used.
What Can Be Done if the Bread Tastes of Yeast?
a) Often sugar is added to eliminate this taste. The adding of sugar makes the bread lighter in colour.
b) Add 112 tablespoons of vinegar for a small bread loaf and 2 tablespoons for a large bread loaf to the water.
c) Use buttermilk or kefir instead of water. This is possible for all the recipes and it is recommended for the freshness of the bread.
Why Does the Bread Made in an Oven Taste Different Form the Bread Made With the Bread Maker?
It depends on the different degree of humidity. The bread is baked drier in the oven owing to the larger baking space, while the bread made in the bread maker is moister.
Questions on Bread Baking Machine
| Problem Cause Remedy | ||
| Smoke comes out of the baking compartment or the vents. | The ingredients stick to the baking compartment or on the outside of the baking tin. | Disconnect from mains power supply, let the appliance cool down and clean the outside of the baking tin or the baking compartment. |
| The bread goes down in the middle and is moist at the bottom. | The bread is left too long in the tin after baking and warming. | Take the bread out of the baking tin before the warming function is over. |
| It is difficult to take the bread out of the baking tin. | The bottom of the bread loaf sticks to the kneading hooks. | Clean the kneading hooks and shafts after baking. If necessary, fill the baking tin with warm water for 30 minutes. Then the kneading hooks can be easily removed and cleaned.Grease the kneading hook a little before using it again. |
| The ingredients are not mixed or the bread is not baked correctly. | Incorrect programme setting. Check the selected menu and the other settings. | |
| The programme was terminated ahead of schedule using the Start/Stop button. | Do not use the ingredients and start over again. | |
| The lid was opened several times while the bread maker was working. | If possible, open the lid only during the kneading phases (↔"Programme Sequence and Recipe Ideas" and the indication in the display). Ensure that the lid is properly closed after opening. | |
| Long power failure while the machine was working. | Do not use the ingredients and start over again | |
| The rotation of the kneading hooks is blocked. | Check if the kneading hooks are blocked by grains, etc. Pull out the baking tin and check whether the drive shafts turn. If this is not the case contact the customer service. | |
| The appliance does not start.Signal tones 5 times. The display shows "HHH". | The appliance is still hot after the last baking cycle. | Disconnect the mains plug from the wall socket. Remove the baking tin. Allow the appliance to cool down to room temperature. Following this, you can start over again. |
| The appliance cannot be started.You hear 5 signal tones.The display shows "LLL". | The appliance is too cold. | Press the Start/Stop button and open the lid. Wait approximately 10 to 20 minutes until the appliance has heated up to room temperature. |
| The appliance cannot be started.The display shows "EE0". | The temperature sensor for the appliance is defective or broken. | Disconnect the mains plug from the wall socket. Contact our service centre or a specialist. |
| The appliance does not work. The appliance has no power supply. Check the socket with another appliance. | ||
Mistakes with the Recipes
| Problem Cause Remedy | ||
| The bread rises too fast. | Too much yeast, too much flour, not enough salt, or several of these causes | a/b |
| The bread does not rise at all or not enough. | No yeast at all or too little yeast | a/b |
| Old or stale yeast | e | |
| Liquid too hot | c | |
| The yeast has come into contact with the liquid | d | |
| Wrong flour type or stale flour | e | |
| Too much or not enough liquid | a/b/g | |
| Not enough sugar | a/b | |
| The dough rises too much and spills over the baking tin. | If the water is too soft the yeast fermentations more f/k | |
| Too much milk affects the fermentation of the yeast c | ||
| The bread has collapsed. The dough | volume is larger than the tin and the bread goes down a /f | |
| The fermentation is too short or too fast owing to the excessive temperature of the water or the baking chamber or to the excessive moistness. | c/h/i | |
| Not enough gluten in the flour l | ||
| Too much liquid g/h | ||
| Heavy, lumpy structure. | Too much flour or not enough liquid | a/b/g |
| Not enough yeast or sugar a/b | ||
| Too much fruit, whole wheat or one of the other ingredients | b | |
| Old or stale flour | e | |
| The bread is not baked in the centre. | Too much or nor enough liquid | a/b/g |
| Too much humidity | h | |
| Recipe with moist ingredients such as yogurt | g | |
| Open or coarse structure or too many holes. | Too much water | g |
| No salt | b | |
| High humidity, water too hot | h/i | |
| Liquid too hot | c | |
| Mushroom-like, unbaked surface. | Bread volume to big for the tin | a/f |
| Too much flour, especially for white bread | f | |
| Too much yeast or not enough salt | a/b | |
| Too much sugar | a/b | |
| Sweet ingredients besides the sugar | b | |
| The bread slices are unequal or lumpy. | Bread not cooled enough (the vapor has not escaped) | j |
| Flour deposits on the bread crust. | The flour was not worked well on the sides during the kneading | l/m |
Remedy Problems
a) Measure the ingredients correctly.
b) Adjust the ingredient doses and check that all ingredients have been added.
c) Use another liquid or leave it to cool at room temperature.
d) Add the ingredients specified in the recipe in the right order. Make a small ditch in the middle of the flour and put in the crumbled yeast on the dry yeast. Avoid letting the yeast and the liquid come into direct contact.
e) Use only fresh and correctly stored ingredients.
f) Reduce the total amount of the ingredients, do not use more than the specified amount of flour. Reduce all the ingredients by ^1/^3 .
g) Correct the amount of liquid. If ingredients containing water are used, the dose of the liquid to be added must be duly reduced.
h) In case of very humid weather remove 1-2 tablespoons of water.
i) In case of warm weather do not use the timer function. Use cold liquids.
j) Take the bread out of the tin immediately after baking and leave it on the grid to cool for at least 15 minutes before cutting it.
k) Reduce the amount of yeast or of all the ingredient doses by 1 / 4
1) Add a tablespoon of wheat gluten to the dough.
m) Do not grease the baking tin!
Notes Regarding the Recipes
Ingredients
Since each ingredient plays a specific role for the successful baking of the bread, the measuring is just as important as the order in which the ingredients are added.
- The most important ingredients like the liquid, flour, salt, sugar and yeast (either dry or fresh yeast can be used) affect the successful outcome of the preparation of the dough and the bread. Always use the right quantities in the right proportion.
- Use lukewarm ingredients if the dough needs to be prepared immediately. If you wish to set the programme phase timing function, it is advisable to use cold ingredients to avoid that the yeast starts to rise too early.
- Margarine, butter and milk affect the flavour of the bread.
- Sugar can be reduced by 20% to make the crust lighter and thinner without affecting the successful outcome of the baking. If you prefer a softer and lighter crust replace the sugar with honey.
- Gluten, which is produced in the flour during the kneading provides for the structure of the bread. The ideal flour mixture is composed of 40% whole wheat flour and 60% white flour.
- If you wish to add whole grains, leave them to soak overnight. Reduce the quantity of flour and the liquid (up to 15 less).
- Leaven is indispensable with rye flour. It contains milk and acetobacteria that make the bread lighter and ferment thoroughly. You can make your own leaven but it takes time. For this reason concentrated leaven powder is used in the recipes below. The powder is sold in 15g packets (for 1 kg of flour). Follow the instructions given in the
recipes (1/2, 3/4 or 1 packet). If less leaven than requested is used the bread will crumble.
- If leaven powders with a different concentration (100 g packet for 1 kg of flour) are used, the quantity of flour must be reduced by 80 g for 1 kg of flour.
- Liquid leaven sold in bags is also available and it is suitable for use. Follow the doses specified on the package. Fill the measuring cup with the liquid leaven and top it up with the other liquid ingredients in the right dosage as specified in the recipe.
- Wheat leaven, which often comes dry, improves the workability of the dough, the freshness and the taste. It is milder than rye leaven.
- Use either the Basic or Whole wheat programme when baking leavened bread. Baking ferment replaces the leaven and is purely a question of personal taste. This is very well suited for the use in the bread maker.
- Wheat bran is added to the dough if you want particularly light bread rich in roughage. Use one tablespoon for 500g of flour and increase the quantity of liquid by 12 tablespoons.
- Wheat gluten is a natural additive obtained from wheat proteins. It makes the bread lighter and more voluminous. The bread falls in more rarely and it is more easily digestible. The effect can be easily appreciated when baking whole wheat and other bakery products made of home-milled flour.
- Coloured malt is a dark-roasted barley malt. It is used to obtain a darker bread crust and soft part (e.g. brown bread). Rye malt is also suitable but it is not as dark. You can find this malt in whole food shops.
- Bread seasoning can generally be added to all our brown breads. The amount depends on your personal taste and the manufacturer's specifications.
- Pure lecithin powder is a natural emulsifier that improves the volume of the bread, makes the soft part softer and lighter and keeps it fresh for longer.
Adjust Doses
If the doses need to be increased or reduced, make sure that the proportions of the original recipe are maintained. To obtain a perfect result, the basic rules below for the adjustment of the ingredient doses must be following:
- Liquids/flour: The dough ought to be soft (not too soft) and easy to knead without becoming stringy. A ball can be obtained by kneading it lightly. This is not the case with heavy dough like rye whole wheat or cereal bread. Check the dough five minutes after the first kneading. If it is too moist, add some flour until the dough has reached the right consistency. If the dough is too dry add a spoonful of water at a time during the kneading.
- Replacing liquids: When using ingredients containing liquids in a recipe (e.g. curd cheese, yogurt, etc.) the required amount of liquid must be reduced. When using eggs beat them in the measuring beaker and fill it up with the other required liquids to the envisaged amount.
If you are living in a place located at a high altitude (more than 750m above sea level) the dough rises faster. The yeast can be reduced in these cases by 14 to 12 teaspoon to proportionally reduce its rising.
The same is true of places with particularly soft water.
Add and Measure Ingredients and Quantities
- Always put in first the liquid and the yeast at the end. To avoid that the yeast acts too fast (in particular when using the timing function), contact between the yeast and the liquid must be avoided.
- When measuring use the same measuring units, that is to say use either the measuring spoon supplied with the bread maker, or a spoon used in your home when the recipes require doses measured in tablespoons and teaspoons.
-
The measures in grams must be weighed precisely.
-
For the millilitre indications you can use the supplied measuring cup, which has a graduated scale of 50ml - 250ml .
The abbreviations in the recipes mean:
tbs = level tablespoonful (or large measuring spoon)
tsp = level teaspoonful (or small measuring spoon)
g=grams
ml = millilitre
packet = 7g dry yeast for 500g of flour - corresponds to 21g of fresh yeast
- Fruit, nuts or cereal ingredients: If you want to add further ingredients, you may do so after the 10 signal tones of the respective programmes. If you add the ingredients too early, they will be crushed during the kneading.
Bread Weights and Volumes
- You will see that the weight of pure white bread is less than that of whole wheat bread. This depends on the fact that white flour rises more and hence limits need to be posed.
- The actual bread weight depends much on the humidity of the room at the time of preparation.
- All breads with a substantial portion of wheat reach a large volume and exceed the baking tin edge after the last rising in case of the higher weight level. But the bread does not spill over. The part of the bread outside the tin is more easily browned compared to the bread in the tin.
Gluten Free Bread (for Allergy Sufferers)
- To successfully bake bread from gluten-free flour, do not use the Timer function, even if the programme permits it. Gluten-free flours require warm or hot liquid in order to rise. For this reason, you must start the programme right away.
- The crust of gluten-free bread is not as brown as the crust of bread that contains gluten. We recommend that you set the degree of browning to "Dark". In addition, you can mix an egg yolk with sweet or sour cream and coat the bread with a remaining programme time of 1:15.
Baking Results
- The baking result depends on the on-site conditions (soft water - high humidity - high altitude - consistency of the ingredients, etc.). Therefore, the recipe indications are reference points, which can be adjusted. You can find more recipes in cookbooks or on the internet. You can also use ready-mixes.
- If one recipe or another does not work out straight the first time, do not be discouraged. Try to find the cause and try it again by varying the proportions.
- If the bread is too pale after baking, you can leave it to brown with the programme "12. Bake".
Programme Sequence and Recipe Ideas
The following recipes are for various bread sizes. In some programmes a difference is made in weight.

CAUTION:
- Should you wish to bake smaller loaves, simply adjust the ingredients in the recipe accordingly.
- Ensure that the weight of the ingredients does not exceed 750g in level I or 1100g in level II
i NOTE:
The times indicated for the individual phases in the programme sequence are merely guidelines. Minor deviations may occur, as the product is under constant development.
1. Basic (Default Setting)
| Bread weight level (Default setting) | I |
| Overall time 3:00 hours 2:53 hours | |
| 1. Knead 10 minutes 9 minutes | |
| 1. Ferment 20 minutes 20 minutes | |
| Signal tones for adding ingredients during the second kneading phase | |
| 2. Knead 15 minutes 14 minutes | |
| 2. Ferment 25 minutes 25 minutes | |
| 3. Ferment 45 minutes 45 minutes | |
| Bake 65 minutes 60 minutes | |
| Keep warm 60 minutes 60 minutes | |
| Timer Function 13 hours | |
Recipe Ideas:
| Buttermilk Bread | |
| Bread weight Level | II |
| Buttermilk 300 ml | |
| Margarine/butter 1½ tbs | |
| Salt | 1 tsp |
| Sugar | 1 tbs |
| Flour type 1050 | 540 g |
| Dry yeast | 1 packet |
| Leaven Bread | |
| Bread weight Level | II |
| Dry leaven | 1/2 packet |
| Water | 350 ml |
| Margarine/butter 1½ tbs | |
| Bread spice | 1 tsp |
| Salt | 2 tsp |
| Sugar | 1 tbs |
| Flour type 1150 | 180 g |
| Flour type 1050 | 360 g |
| Dry yeast | 1 packet |
2. French (White Bread)
| Bread weight level (Default setting) | I |
| Overall time 3:50 hours 3:40 hours | |
| 1. Knead 18 minutes 16 minutes | |
| 1. Ferment 40 minutes 40 minutes | |
| Signal tones for adding ingredientsduring the second kneading phase | |
| 2. Knead 22 minutes 19 minutes | |
| 2. Ferment 30 minutes 30 minutes | |
| 3. Ferment 50 minutes 50 minutes | |
| Bake 70 minutes 65 minutes | |
| Keep warm 60 minutes 60 minutes | |
| Timer Function 13 hours | |
Recipe Ideas:
| Classic White Bread | |
| Bread weight Level | II |
| Water or milk | 300 ml |
| Margarine/butter 1½ tbs | |
| Salt | 1 tsp |
| Sugar | 1 tbs |
| Flour type 550 | 540 g |
| Dry yeast | 1 packet |
| Italian-Style White Bread | ||
| Bread weight Level | II | Level I |
| Water, boiling | 350ml | 230ml |
| Durum wheat semolina | 150g | 100g |
| Salt | 1 tsp | ¾ tsp |
| Sugar | 1 tsp | ¾ tsp |
| Flour type 550 | 350g | 230g |
| Dry yeast | ¾ packet | ½ packet |
Tip:
Stir the durum wheat semolina into the boiling water in a separate container. Allow the semolina to cool down to room temperature before putting it in the baking tray and adding the other ingredients.
3. Whole Weat (Whole Wheat Bread)
| Bread weight level (Default setting) | 1 |
| Overall time 3:40 hours 3:32 hours | |
| 1. Knead 10 minutes 9 minutes | |
| 1. Ferment 25 minutes 25 minutes | |
| Signal tones for adding ingredientsduring the second kneading phase | |
| 2. Knead 20 minutes 18 minutes | |
| 2. Ferment 35 minutes 35 minutes | |
| 3. Ferment 65 minutes 65 minutes | |
| Bake 65 minutes 60 minutes | |
| Keep warm 60 minutes 60 minutes | |
| Timer Function 13 hours | |
Recipe Ideas:
| Whole Wheat Bread | ||
| Bread weight Level | II | Level I |
| Water | 300 ml | 200 ml |
| Margarine/butter 1½ tbs | 1 tbs | |
| Egg | 1 | 1 small |
| Salt | 1 tsp | ¾ tsp |
| Sugar | 1 tsp | ¼ tsp |
| Flour type 1050 | 270 g | 180 g |
| Whole wheat flour | 270 g | 180 g |
| Dry yeast | 1 packet | ¾ packet |
Tip:
When using the timer function to delay the programme start, add some more water instead of using eggs.
| Seven Seeds Bread | |
| Bread weight Level | II |
| Water 300 ml | |
| Margarine/butter 1½ tbs | |
| Salt 1 tsp | |
| Sugar 1½ tbs | |
| Flour type 1150 240 g | |
| Whole wheat flour 240 g | |
| 7-seed flakes 100 g | |
| Dry yeast 1 packet | |
Tip:
If you want to use whole grains, soak these overnight beforehand.
4. Quick I (Fast J
| Bread weight level / | |
| Overall time | 2:10 hours |
| 1. Knead | 10 minutes |
| 1. Ferment | 10 minutes |
| Signal tones for adding ingredients during the second kneading phase | |
| 2. Knead | 10 minutes |
| 2. Ferment | 30 minutes |
| Bake | 70 minutes |
| Keep warm | 60 minutes |
| Timer Function | 13 hours |
Recipe Ideas:
| Cream Cheese Bread | |
| Water or milk | 160 ml |
| Margarine/butter 1½ tbs | |
| Egg | 1, small |
| Salt | ½ tsp |
| Sugar | 1 tsp |
| Granular cream cheese | 80 g |
| Flour type 550 | 330 g |
| Dry yeast | ½ packet |
| Farmer's White Bread | |
| Milk | 300 ml |
| Margarine/butter | 2 tbs |
| Salt | 1 1/2 tsp |
| Sugar 1 1/2 tsp | |
| Flour type 1050 | 540 g |
| Dry yeast 1 packet | |
- Sweet (Sweet Bread)
| Bread weight level | II (Default setting) | I |
| Overall time | 2:55 hours | 2:50 hours |
| 1. Knead | 10 minutes | 10 minutes |
| 1. Ferment | 5 minutes | 5 minutes |
| Signal tones for adding ingredients during the second kneading phase | ||
| 2. Knead | 20 minutes | 20 minutes |
| 2. Ferment | 30 minutes | 30 minutes |
| 3. Ferment | 45 minutes | 45 minutes |
| Bake | 65 minutes | 60 minutes |
| Keep warm | 60 minutes | 60 minutes |
| Timer Function | 13 hours | |
Recipe idea:
| Raisin Bread | ||
| Bread weight Level | II | Level I |
| Water 300 ml | 200 ml | |
| Margarine/butter | 2 tbs | 1½ tbs |
| Salt | ½ tsp | 1 pinch |
| Honey | 1 tbs | 1 tsp |
| Flour type 405 | 500 g | 330 g |
| Cinnamon | ¾ tsp | ½ tsp |
| Dry yeast | ¾ packet | ½ packet |
| Raisins 75 g | 50 g | |
- Gluten free (Gluten free Bread)
| Bread weight level | II(Default setting) | I |
| Overall time | 2:55 hours | 2:50 hours |
| 1.Knead | 10 minutes | 10 minutes |
| 1.Ferment | 10 minutes | 5 minutes |
| 2.Knead | 10 minutes | 10 minutes |
| Signal tones for adding ingredients following the second kneading phase | ||
| 2.Ferment | 30 minutes | 30 minutes |
| 3.Ferment | 45 minutes | 45 minutes |
| Bake | 70 minutes | 70 minutes |
| Keep warm | 60 minutes | 60 minutes |
| Timer Function | 13 hours | |
Recipe Ideas:
| Gluten free Bread | |
| Bread weight Level | II |
| Water, boiling | 500 ml |
| Bread baking mixtures | 600 g |
Tip:
- Mix the bread baking mixture together with the boiling water in a separate container and allow the dough to rise for approximately 30 minutes. Next, place the dough in the baking tin and start the programme immediately.
After baking, the bread must be immediately removed from the baking tin and left to cool completely before it can be sliced.
| Dark Bread | ||
| Bread weight Level | II | Level I |
| Water, lukewarm 630 ml 470 ml | ||
| Margarine/butter 1 tbs 1/2 tbs | ||
| Salt 1 tsp 3/4 tsp | ||
| Dark bread mix (by Schar) 500 g 375 g | ||
| Dry yeast 1 packet 3/4 packet | ||
| If you like, you can add: | ||
| linseed or 1½ tbs 1 tbs | ||
| walnuts or 75 g | 50g | |
| caraway seeds or | 3 tsp | 2 tsp |
| fried onions or | 75g | 50g |
| bacon cubes | 75g | 50g |
Tip:
- After kneading for approximately 8 minutes, loosen the residual dough or flour from the baking tin using e.g. a silicone dough scraper. In order to prevent a thin edge of residual dough from forming during baking, you can separate this dough edge from the baking tin once again at a remaining programme time of 1:15.
- After the second kneading phase, i.e. immediately before the second rising, you will hear the signal tones for adding ingredients. When you use this programme, the ingredients are no longer kneaded into the dough, but instead remain stuck to the surface of the bread.
7. Quick II (Fast II)
| Bread weight level | II(Default setting) | I |
| Overall time | 1:38 hours | 1:28 hours |
| 1.Knead | 13 minutes 13 minutes | |
| Signal tones for adding ingredients | ||
| 2.Knead | 5 minutes | 5 minutes |
| 3.Ferment | 35 minutes | 25 minutes |
| Bake | 45 minutes | 45 minutes |
| Keep warm | 60 minutes | 60 minutes |
| Timer Function | / | / |
Recipe Ideas:
| Onion Bread | |
| Bread weight Level | II |
| Water | 250 ml |
| Margarine/butter 1 tbs | |
| Salt 1 tsp | |
| Sugar | 1 tbs |
| Large chopped onion | 1 |
| Flour type 1050 | 540g |
| Dry yeast 1 packet | |
| Pizza Bread | ||
| Bread weight Level | II | Level I |
| Water | 375 ml 250 ml | |
| Oil | 1 tbs | 1 tsp |
| Salt 1 tsp 1/2 tsp | ||
| Sugar | 1 tsp 1/2 tsp | |
| Oregano | 3/4 tsp | 1/2 tsp |
| Parmesan cheese | 2 1/2 tbs | 1 1/2 tbs |
| Corn semolina | 100g | 65g |
| Flour type 550 | 475 g 315 g | |
| Cinnamon 3/4 tsp | 1/2 tsp | |
| Dry yeast | 3/4 packet | 1/2 packet |
8. Dough (Dough)
| Bread weight level | / |
| Overall time | 1:30 hours |
| 1. Knead | 20 minutes |
| 2. Ferment | 30 minutes |
| 3. Ferment | 40 minutes |
| Timer Function 13 hours |
Recipe Ideas:
| French Baguette | |
| Water | 300 ml |
| Honey | 1 lbs |
| Salt 1 tsp | |
| Sugar | 1 tsp |
| Flour type 550 | 540 g |
| Dry yeast 1 packet | |
Tip:
Split the dough in 2-4 parts and shape long loaves. Leave to rise for 30-40 minutes. Incise the top diagonally and bake in the oven.
| Pizza | |
| Water | 300 ml |
| Salt | ¾ tsp |
| Sugar | 2 tsp |
| Olive oil | 1 lbs |
| Flour type 405 | 450 g |
| Dry yeast 1 packet | |
Tip:
- Roll the dough, place it in a round tin and leave to rise for 10 minutes. Pierce several times with a fork.
- Spread pizza sauce on the dough and add the desired toppings.
- Bake for 20 minutes at 200^ C .
9. Jam (Jam)
| Bread weight level | / |
| Overall time | 1:20 hours |
| 1. Heat | 15 minutes |
| 2. Knead + Heat | 45 minutes |
| 3. Rest | 20 minutes |
| Timer Function | / |
Recipe Ideas:
| Strawberry Jam | |
| Fresh strawberries, washed and cut into small pieces or puréed | 600g |
| Canning sugar “2:1” 300g | |
| Lemon juice 1-2 tsp | |
Tip:
- Mix all ingredients in the baking tin, using a wooden or silicone spatula.
- After the programme starts, use the spatula to remove the residual sugar from the sides of the baking tin.
- Once the programme has finished, remove the baking tin from the appliance, using potholders or oven mitts.
- Pour the jam into clean jars and seal these well. Place the jars on the lid for approximately 10 minutes. This way, you can be sure that the lid is properly sealed.
| Orange Marmalade | |
| Oranges, peeled and finely diced | 500g |
| Lemons, peeled and finely diced | 100g |
| Canning sugar "2:1" 300g | |
Tip: Strawberry Jam
10.Cake(Cake)
- This programme is quite suitable for baking pound cake. Since the appliance operates using a kneading hook instead of a mixer/stirring rod, cakes turn out a little more firmer.
- Due to the fresh, easily perishable ingredients, you should not use the Timer function, even if the programme permits it.
- You can add different ingredients to the following basic recipe.
- Once the programme has finished, remove the baking tin from the appliance, using potholders or oven mitts.
- Place the baking tin on a damp cloth and let the cake cool for approximately 15 minutes. Then you can separate the cake from the sides of the baking tin, using a silicone spatula, and turn it over.
| Bread weight level / | |
| Overall time 1 : 50 hours | |
| 1. Knead 6 minutes | |
| 1. Ferment 5 minutes | |
| Signal tones for adding ingredients during the second kneading phase | |
| 2. Knead 10 minutes | |
| 2. Ferment 9 minutes | |
| Bake 80 minutes | |
| Keep warm 60 minutes | |
| Timer Function 13 hours | |
Recipe idea:
| Basic Recipe for Pound Cake | |
| Eggs | 3 |
| Butter | 100g |
| Sugar | 100g |
| Vanilla sugar | 1 packet |
| Flour type 405 | 300g |
| Baking powder | 1 packet |
| Additional, variable ingredients: | |
| Ground nuts or. grated chocolate or. coconut flakes or. peeled, finely diced apples | 50g |
11.Sandwich (Toasted Bread)
| Bread weight level | II(Default setting) | I |
| Overall time | 3:00 hours | 2:55 hours |
| 1.Knead 15 minutes | 15 minutes | |
| 1.Ferment | 40 minutes | 40 minutes |
| Signal tones for adding ingredientsduring the second kneading phase | ||
| 2.Knead 5 minutes | 5 minutes | |
| 2.Ferment | 25 minutes | 25 minutes |
| 3.Ferment | 40 minutes | 40 minutes |
| Bake 55 minutes | minutes | |
| Keep warm 60 minutes | 60 minutes | |
| Timer Function | 13 hours | |
Recipe idea:
| Toasted Bread | |
| Bread weight | Level II |
| Water | 150 ml |
| Milk | 150 ml |
| Margarine/butter 2 tbs | |
| Salt | 1 tsp |
| Sugar | 1 tsp |
| Flour type 550 | 500 g |
| Dry yeast | 1 packet |
12.Bake(Bake)
| Bread weight level / | |
| Overall time | 1:00 hour |
| Bake | 10-60 minutes |
| Keep warm 60 minutes | |
| Timer Function | / |
Technical Data
Model: BBA 3774
Power supply: 220-240V\~,50Hz
Power consumption: 550W
Protection class: I
Net weight: approx. 4.2 kg
The right to make technical and design modifications in the course of continuous product development remains reserved.
This appliance has been tested according to all relevant current CE guidelines, such as electromagnetic compatibility and low voltage directives, and is manufactured according to the latest safety regulations.
Disposal
Meaning of the "Dustbin" Symbol

Protect our environment: do not dispose of electrical equipment in the domestic waste.
Please return any electrical equipment that you will no longer use to the collection points provided for their disposal.
This helps avoid the potential effects of incorrect disposal on the environment and human health.
This will contribute to the recycling and other forms of re-utilisation of electrical and electronic equipment.
Information concerning where the equipment can be disposed of can be obtained from your local authority.
Instrukcja obslugi
-
Basic
-
Quick I
-
Dough
-
French
-
Sweet
-
Cake
-
Whole wheat
-
Gluten free
-
Sandwich
Programy "7. Quick II", "9. Jam" oraz,12. Bake"nie moins uruchomic
2. French (Chleb biahy)
CTC Clatronic Sp. z o.o
Ul. Brzeska 1
45-960 Opole
Usuwanie
-
Basic
-
Quick I
-
Dough
-
French
-
Sweet
10.Cake
-
Whole wheat
-
Gluten free
-
Sandwich
Tippek a receptekhez
Ossetzevok
7. Quick II (Gyors II)
CIMBOBII pImuMeHemble B DAHHOM pyKOBoCTBe NOL3OBATEJI
Baxhble pekomedauim nIg o6ceuehenBauei 6e3oanchoctn
063haenbI IOOC6EHNOy.ObraTeJIbHO CNEyIte 3TMpekomedauim,HTO6bl npedotbpaTb HecactbI CNyaua IIN NIOJOMky
H3dJIIN:
PENEYPNPEXDEHNE:
IpeDynpEkaT o6 onaHocTn Ia 3doPoBbN BO3MOxHOM pncKe nOnyuHn TpaMbI.
BHIMAHHE:
Yka3bIbaeT Ha BO3MOxHyOOnaHOCtB IJIa N3dEInn I Dpynx OkpyXahOuNX PpeMeTOB.
I I P I M E U A H N: Daet cobetb i N H C o p m a l u n.
CoepeknaHne
063op detaneepn6opa. 3
OmbaHOpMa.. 119
CneuabHbIe yka3aHnno 6e3oNaChOCTn Ira 3TOr np6opa..120
PacnaKOBka yctpoiCTBa. 121
Icnonb3OBaHne yctpoiCTBa B nepBbI pa3 121
O63op deTaneep np6opa/KomnneKT noctabkn 121
O6bIcHHeNcoCTaBa pa6oey nanei 121
1KK-dncnneHactpoika no ymonuHnno (hauanbny 3kpan)...121
2 Khonka Start/Stop 121
3 Khonka Weight (Bec) 121
4 Ha3BaHnI nporpaMm. 121
5 KhoKn+/-(DnYyBENUyMEnbUeMHN BpeMeH)...122
6 Khonka Color (uBET) 122
7 Khonka Menu (MENO Bb6opa) 122
Kak pa6oTaet np6op 122
Obuaa Hnfoopmaia 122
ToHOBBie CnHnJIb 122
XpaHHe nporpaMM 123
ФункцязauNTbl 123
IcnoB3OBaHne yctpoiCTBa 123
1.ИЗБЕЧЕпЕ ФОМБД ДЛЯ ВИЕЧК... 123
2.Bctabka kpoka dny 3ameunBaHnna 123
3. BnOKeHne INrpeDneHTOB 123
4.BCTABKaΦOpMbI DnA BblneuKn 123
5. 3anyck nporpaMMbl 123
6.Добаьпене дугх Ингpeдиentob 123
7. Oxndane HnoHnTna Tecta 123
8. Bblneka 123
9.ПодержанneВТeнлOMCoCTOЯн.. 123
10.Порогамma«12.Bake»(noBtopHЯВblneчka) 123
11. 3aBepweHHe NocpeDobateBtBHOCTn Oeapauin nporpammbI....124
12.ИЗБLEECHENE KPHOKAДЯЗAMeUNBaHnIg 3xJIe6a 124
YncTka. 124
CHaTne u yctaHOBKa KpbIuKn 124
Xpahene 124
Ipo6nemblc Bblneuko1 124
Tocne Bbineukxne6 npnnnaet K opme nBbineukn. 124
Kak n36ekaTb Dbipkn B Xnle6 ot Kpoka dna 3ameunbaHn?.....124
EcnTecToTeeHTepe3KpaI pOITBnBO BpEmNoDHaTn.124
XJIe6 nOHHMaETcR, HO K KOHcy BbIeNkOnyckaETcR. 124
Korda moxho oTkpBbA Tb KpbIshky xne6oneuKn BO Bpemra pOcecca BblneuKn? 125
B yem Baxhoctb HomepoB copTa Mykn? 125
YToTakoeobonHMyKa(IIseHnHnaMyKa rpy6oro nomona)?.....125
HTO HxHO yHtBbAtb Dn pKaHoMyKn? 125
YTO TAKOITNIOTEN BY MUKE? 125
B YEM OTINH TINOB MYK N KAK IN HCNOJIb3ObaTb? 125
Kak ynyuunbYcBOeMoctb CBexero xne6a? 125
B kaokipponopun cnpeyet nnoj30BaT BeuecTBA
Dnpa3pbixnen? 125
YTo deNaTb,ecn xIe6 nMeet Bkyc npoxkcke? 125
POnemy OTnMaTaTc Bkyc XLe6a n3 neyKn n3 xLe6oNeuKn?..... 125
Bonpocbio xne6oneue 125
Oun6kn B peuenTax 126
3ameuHn o peuntax 127
InrpeJeHnIb 127
Haetpoika KoiuectBa INrpeJeHToB 128
IobaneHne n KOnueCTBeHHoe 3MepeHne HrpeHnToB.128
Bec n o6bem xne6a 128
Be3rHIOTeHOBbI xIe6 (DnI IIODe c aJIneprIne) 128
Pe3yIbTaTbI BblneuKn 128
TocJeDoBaTeIbHObTb Opeaunn IporpaMmbl
I npimepbippeeNTOB 128
- Basic (Hacrpoika no ymoHaHHIO) 129
- French (Белный xne6) 129
3.Whole weat (XJle6 n3 oboHoi MyKn) 130 - Quick I (5bictpbii I) 130
5.Sweet (Cnajkn xne6) 130 - Gluten free (BeaHTeHOBb xne6) 131
- Quick II (БыICTpbIbII) 131
8.Dough(Tecto) 132 - Jam (Mapmena) 132
10.Cake (KeKc) 132
11.Sandwich (Xne6 dny toctob) 133
12.Bake (BbIneueKa) 133
TexHnueckne daHHbIe 133
YTNIN3aun 133
3HaueHne cunBOna «Kop3nHa» 133
OmbaHOpMaun
Ipeed Hauanom 3Kcnnyataunn npmbopa BHMaTeJIbHO npouHTaIe npnnaeraemyIO INCTpykUIO NO 3Kcnnyataunn I coxpaHITe ee B HaDeXHOM MeCTe, BmecTe C rapaHTnHBIM TaIOHOM, KACCOBbIM YekOM N, BO 0B3MOXHOCTN, KAPTOHHO KOPo6KOc yynakOBuHBM MaTePnAION. Ecn daTe KOMy- nlo nonl3obatcbn np5bOpom, O63aTeJIbHO daTBe B pndauchnHyIO INCTpykUIO no 3Kcnnyataunn.
ПользуITEcБпиборOMToIbKOчaTHbIMОБpa3OMиNoHa3NaeHnHO.Ip6Op He npedHa3HaueHdЯKoMpeUckoroMCnoIb3OBAHnA.
He noIb3yItecb npIb6pOM NOI OTKpbITbIM He6OM. IpeOxpaHnIe npIb6Op OT Japbl, npAmbIX COINHEuHbIX Lyuei, BnaXHOCTN (Hn B KOEM cnUyae He nortpykaIte erO B Ody) uJdApOB 06 octPbIe yTbnI. He npIrkacaiTecb K npIb6OpBy BnaXKnBIM pykam. Ecn npIb6Op yBaXHHICr HnHAMOK, TyT Ke BbIHbTe BNIJKY N3 pO3eTKN.
- Tocne 3KcnpyatauM, MoTaxe pInHaIeXHOCTe, YIcTKe IIN NOJOMKe np60pa Bcerda BbIHMaIte BnIKy n3 po3eTK (TAHNTe 3a BNkY, a He 3a Ka6eJIb).
- Pπb6op n Ka6eJIb cTeBOrO nHTaHnHeo6xOdImo peYIpaH0 6CNEIOBaT bHa HauNcHne CNeIOB NOpeXeHn. Ppi O6hApUkeHnNOpeXeHn IOb3ObaTbcr Pπb6pOm 3aPpeuaetc.
- IcnoJb3yIte ToJIbKO OpiHnHaJIbHbIe 3aHactN.
ИЗ coobpaжени 6e3oNaChOCTn Дя DeTeн He octabnIte NekaTb yNakOBky (Пл actNKOBbie MeuKn, KapToH, NeHONnact T.Д.) 6e3 npICMOTpa.
PENyTPEJDEHNE:
He no3BOJnIe TETR MIRpaTb C NOINATUNIEHOBONNEHKO. OnacHocTb ydyub!
CneuaJIbHbIe yka3aHn no 6e3oNaChocTn dIy 3TOrO np6opa
I PENEYIPEXEHE: TOpua nOBepxHoctb! OnacHOctb oxora!
Bo Bpempa60bI yCtpoiCTBa C 3NeKtpnueckm HarpeBOM Co3dIoT BblcOKyIO TeMnpaTyP, KOTopar MoKeT Bbl3BaTb OXOrN (HaPImEep, OT fOpMbI DJIe BblneuKN IIN HarpeBaTeJbHoro 3JeMeHTa).
Bcerda nCnoJIb3yIe npxBaTkn IIN KxOHHbIe pyKaBnIbnI npn nepemeHnn IIN CHaTmN ropAUX KOMNoHEH TOB!
I PENEYIPEXEHENE: Onacnoctb noxapa!
B o6uem cnuyae cneyet nCnoJb3oBaTb yCTpoiCTBO TOIbKO IOJ NnHbIM Ha6nOHeHMe. IInr nporpaMMbl 3aepKaHHOrO 3aNycka yCTaHOBtE BpeM 3aNycka TaK, YTObI JNUHO npcYcTcBOBaTb pnpa6ote.
Bo Bpempa60bI yctpoiCTBa co6IIOaIte MHHMaJIbHyIO dIcTaHcIO 10 cm OT dpYrNx IpeMeTOB
- He 3akpbBaIte pa6oTuOuI np6op IIOToHcE MII INbIM MaTePnaJAM! Heo6xOIM nyTb BbIXoDa TeNpy n Bnare. Korda np6op 3akpBt BocPiMaHeHIOUcMca MaTePnaJOM IIIN Kacaetc TaKnx MaTePnaJOB (HaNPmep, 3aHaBeCok), Bo3HnKaeT pNCK BO3rOpAHIA
He IomeuTe MeTnueckyo fOJIbIy IIN INHbIe MaTePnaJIb I KaMepy BblneKIn. 3To co3daet pNCK BocnnaMeHENr N/IN KOpOTKOFO 3aMbIkaHn.
- Ecni TecTo TeUeT Uepe3 KpaI IIOJaAeT B Kopnyc IIIN Ha HArpeBaTeIbHbI 3JIeMeHT, 3TO MoKET BbI3BaTb BO3rOpaHne.
- He do6abIaIe 6oJIbIe INHpeIeHToB, Yem Tpe6yeTcB peIeIe.
CneDyIe INHΦopMaun O KOINueCTBe INHpeJeHNTOB n3 pecenTa. He npeBbIaIe MaKcIMaJIbHOe KOINueCTBO Myk (590 r) n cyxnx dpoxxkei (7 r nn 21 r dny CBexnX dpoxKe), nHaYe BO3MOxHO BbITEKaHHe Tecta uepe3 kpaI.
BHIMAHNE:
3aIpeuaeTcnoIpykaTb yctpoiCTBO B BOy dIy OUHCTKN. IpocIM BaC co6JIHOaTb HNCTpyKUn, npNBedeHHbIe B pa3dene «YnCTKa».
3TO yCTPOIcTBOMOJETNCIOJIb3OBaTbC8TeBmN C 8 JET N IIOJBMI C OPGAHueHHbIMN Pn3HueCKIMN,OC3aTeNBbIMN UyMCTBeHHbIMN CNOco6HOCTaMn,a TaKKe IIOJBMI 6e3 ONbTA N 3HaHn,ecIN OHn HaxoJrTCa IOI npICMOTpOM INN 6blIN IpOuHCTpykTIpoBaHbI O6 NCIOJIb3OBaHmUyCTPOIcTBa 6e3OnaChbIM O6pa3OM N NOHMAIOT BO3MOXHbIE yrpo3bl.
- He no3BOJHte Detam nIgpaTb c np6opom.
- Ynctka n o6cnjxnbHne He doJnxHO BblnoHrTbCra DeTbMn, 3a NckIIOueHneM DeTei Ctapwe 8 neT n noD ha6nO-DeHneM B3pocJIbIX.
PacnojaraTe neyb n ceteBOH uHyB HBe DoCraeMoCTn DeTeu MnaDwe 8 JeT.
- Pn 3KcNpyataun npnbopa He nOJIb3yITeCb BblHOCHbIM BblIOHuaTeJeM C yAcOBbIM MExaHn3MOM NIN OTdJIbHOJ TeJIeMeXaHnHeCKo CNCTeMOI.
- He pemOHnpyte yCTPOcTBo camOCTeJIbHO. O63aTeJIbHO CBXNTecb c ABTOpN3OBaHHbIM MaCTepOM. PnIOBpeJHm CEtBOrO shypa, BO n36exAHne onaCHOt NopaxeHn 3IeKtpnHeckm TOKOM, shyp cIeNyET 3AmHHTy uN3OTOBInTeJI, cepBnCHOrO pndCTaBInTeJI INI dpynx KBaINOpuropBaHHbIX IINU.
- Поставыприбор на ровную поверхноctь. He pa3meшаite shhyp питаня n/nin пriбор на ratрaynx noBepx-HOCTI X IIN pRdOM C NCTOCHKAMN TEIIa. PpOLOXHTe shHypr nITAHN TAK, YTObI ppeDOTbpaTb erO KOHTAKC OCTpbIM rpaHmnpEIMTeOB.
- Поставытприбор, чобь сн He StKoЛьзин Ha CBpaДOM oem MecTe. Инчe пriбор может CmecTntbcs рр 3a-Mece Tяжелно ТесТа.Еслп пriбор должен pa6OtaTb Ha rJaDCKoi NOBepxHocTn, pIoJoxITE nOD HIM pe3INHObI KOBpIK.
He npHnmaTe n He nepenocite np6op BO BpeMpaobToI. Chauana BbIKIOUHTe erO n 3BNEKITE BUNKy 3neKtponntHa. Bcerda nepemeaate np6op dBym pykAm!
Bo BpemraaboTbHe n3BneKaTeΦopMy dIaBbIeKn!
- IcnojIb3yIte np6op TOnbKO dIg npiroTOBHeHn NUsu Hne npimeHnTe erO B IIO6bIX dpYnx ceJx. Ecn np6op He npabNtboHO 3KcIIpyaTnpyeTcN Hn HeBepHo 06cnyknaeTc, npo3BOIDTeN He Hecet OTBeTCTBeHHOCTb 3a COOTBECTByUOune NOBpeXdEHHa
PacnaKobKa yCtpoiCTBa
1.ДocTaHbTe yCtpoIcTbO n3 yNakOBKn.
2.YdaJIte BCE ynaKoBOUHbIe MaTePnAbl, TaKHe KAK PNeHKn, HAnONHHTenBHyMaTePnA,ФHKCatOpby Ka6eRn KAPToH.
3.ПоверпьteКOMПЕKTHOCTbNOCTABKN.
4.ДЯ устpenHЯ onachocTи npOBePryTe npB6Op Ha nIObIe NOBpeXdHЯ, KOTOpbIe MOrY TnOBAuTbc npI TpAHCnpTupOBke.
5.He 3KcNpyAtnpyTe yctpoiCTBO npn HauHnn NOBpeXeHn, n60 ecIn yctpoiCTBO HeKOMPNeKTHO. He3ameDNTeBbHO BepHtE noKyIKy B Mara3INH.
IcnoB3OBAHne yctpoiCTBa B nepBbI pa3
- OunCTnTe np6op, KaK onncaHo B pa3dJe «UncTka».
- Joxntecb noHOro BbcixaHnB Cex Detanei.
3.Bctabte foopmy IЯ BbIeKn B npB6op.
4.3neKtpnueckoe coeHHeHne
4.1. PpeB BCTaBKO 3NEKTPuYeCKO BUNKn B POSEtky npOBepbTe, TTO HAnpJxHeMe CETN 3NEKTPoNITAHn COBnAaEt C HanpJxHeM NITAHn PnIbOpa. 3Tn CBeDEHn y Kya3AHn O6 3TOM HAXOJrTCRA Ha TaBnUKe HAMMeHOBaHn.
4.2. PoiKIIIOHITe npBOp K npaBILbHO yCTaHOBHeHHO po3eTke 3NEKTponHTAHN C 3a3EMnEHmE.
Byet cIbIeH ToHObBcMnHaH Na DnCnpe NoBnTcH AchtpoKa no yMOrHaHIO-CM.《O6bAcHeHne cocTaBa pa6oey nAHeN》 1JK-DnCnne》).Pnp6op rotOB Kpa6ote.
- HarpeBaTeIbHbI 3IeMeHT IMeET 3aunTHbI cNoI. Iraero ydaIeHnIuCnoJIb3yIte npI6Op npIMepHO 15 MInyT co BCTabHeHOB HBytpb IyctOJ foPMoI dIg BBIneKn (6e3 Kpoka dIg 3aMeWBAHnI. Ira 3TOI uCnoJIb3yIte nporpaMMy «12. Bake).
I PIPMEUHNAI:
IpoBHeHne IeKOro DbIMa H NoCTOpOHrero 3anaxa npn 3Toi npOeDype RaBHeHne HopMaJIbHoe. ObecneHte DocTaTOHyIO BEHTNIPLAIO NOMEUHIN.
6.ИЗВЕКITE ВИКУ 3NEKТРОПТАнHA I3 рОЗТКI.
7. PEPENPPEKDEHNE:Onachoctb oxora!
IpepeBbITupaHmEBnaxHO TkaHbO fOpMbI DnRA BbINEKIN daTe fOpMe OCTbTb.
8.3aTeM MoKHO NpeHn K BbIeNeKe.
063op detae np6opa / KomJIeKT nocTabKn
A PyuKa KpbIiJkn
B KpbIuKa CO CMOTPOBBIM OKHOM
CΦopMaДЯВьIeYKn
D Pa6oay naHenb c DnCnPiem
E Kopnyc
F BOKOBOE BEHTINJRAUOHHOOTBepCTNE
G Kphok nla 3aMeuBabnna
PtpHaJaTeJxHocTn
a Mepnayaushka
b Mepnna noxka
C CpeIcTbO I3BJIeueHnKpIOKaIJIa 3aMeUWBaHn
06barchene coctaba pa6ooy nahei
1KK-ducnnne
Hactpoika no ymoluaHHIO (naaJIbHbI 3KpaH)
Ioka3bIaBETrotOBHocTbKa6oTe.CooTBETCTByET npOrpAmme 06bH Hoh BbIeKn.Ha dncnIee OTo6paXaetcra(13:00).(1)yka3bIaE TeKyuio nCOnb3yeMyIO npOrpAmmy,a(3:00)coo6uaetnpOdoKnteLbHOCT3toI npOrpAmMb.IBe BbIBeHNbIe Ha dncnIee cTpeIKN OTMeauIOT CbeDEHnO Bece N BbIbpaHHo CTeneHn NOpymAHBaHn. Iocne BKIIouEHn Pn6opora B HacTpoKe No yMOJHaHIO 6yDet Bbl- 6paHO:《BoJIbsoH Bec》(ypobHe II)N《CpeHHe NOpymAHBaHne》 (Medium).Bo Bpemra6oTb NocneDobatbHoCTb Oepaun npOrpAmMb MoKHO HabIoDaTb IO CteTuKy BpemHn,ymehbShaOuEmycs DoHyJ.
2 Khonka Start/Stop
IcnoIb3yIte 3Tu KhoNkIy dIra 3aynckA, npepbIBaHnI n 3aBepWeHnI NOcneIOBaTeNbHOCTN Opeaun InporpAMMbI BpyHyO.
- Nocne HaxataH KONIK Start/Stop ChETN BPEMeHN NOKAKET MraKoUe TOKn. 3TmnporpamMa NOKa3bIaBcET CBOIO pa60Ty.
EcnBbPempa0tbI nporpammbI kpaTkoBpeMeHHaKaTH KhoNkY Start/Stop nocneIOBaTeJIbHOCTb Oepauin nporpammbl 6ydt npepbaHa (KpOme pexmA «IOndepkaHHe B Tennom coctoHnH) LcPbIOTCHETa BPeMeHH 6dyT MfA Tb. IpnOJKeHHa pa0tbl nporpammbl CHOBa KpATkoBpeMeHHo HaxMITE daHHyO KhoNkY.Ecn KhoNka Start/Stop He 6ydt Haxata 10 MNHT, pa-6ota nporpammbl 6ydt Bo3o6HOBJeHa ABTomatueckn.
Moxho nCIOB3OBaTB KONky Start/Stop nIpyepbIBAHnnpoRpammB B IIO60m ee COCTOHN. DepKNTe KONIKy HAKaToi Do NOABHeH NINHHORO TOHOBOr CnHaHa. Ha DCNPe 6yTe NOKa3aHO CTAPTOBE NOIXeHne CamOn NocIeHne NcNtOBaHHbx nporpaMM.EcnHykHaDpyra nporpamMa, Bbl6epnte ee KONKO
Menu.B 3aBcIMoCTN OT mCNoIb3OBaBweroCpaHee pa6Oyero pexima, MoKeT Ntpe6oBaTbcra IpeDbaPITenbHO DoXdaTbcra 3aBepueHnHa3bl OxnaJckdHn.
3 Khonka Weight (Bec)
HeckoJIbKO IporpAMM N03BOJIAHOT peryIIMPOBaTb BEc No CNeDyIOUIM yPOBHM:
YpOBeHb I = nI MaIoro Beca Xne6a
YpOBeHb II = JnXne6a BoNbUoro Beca
I\PIMEaHnA:
Bec nCneueHHoro xNe6a 3aBnCT, KpOme npOeero, ot INHpeiEHTOB. MoxHO npOeCTb 6TOM B pa3dene 3aMeueHaHnO peuentax》 Bec n o6bem xNe6a).Korda nIg XNe6a nCnoJIb-3yETcra TKeJEA MyKa (HaIpIMep, pKaHaHa-NIeHNHna), 6yxAnKa xNe6a MoKET BEcNTb Do 1500 r.
Bb6paHHb ypOBeHb onpeJeIeT npoDOnKInTeNbHocTb npo- rpaMMbl. ( npimepb peentob)
4 Ha3BaHnI npOrpaMM
KpaTKe OnIcAHe NpOprpAMM PnPBeDEHO B Ta6JIue I3 NyHKTa 7 KhoNka Menu (MeHIO Bb6opa)
-
Basic
-
Quick I
-
Dough
-
French
-
Sweet
-
Cake
-
Whole wheat
-
Gluten free
-
Sandwich
Iporpammbi 7. Quick II, 9. Jam 11 12. Bake HeJIb3aIyctntb c npIMeHHeM 3aIepKn IIO BpeMeHn.

IPENDYPPEKDEHNE:
OeBcNeBtKeKopKTHbIHa3Op3a npibopom, KOrda BblneKaHne pImMeHReTc C 3aepKko IIO BpemeHn.
- IcnoIb3yIte KHOJIKN +/ -dI pyryIpyOBKn BpeMeHn Ha 3aBepse-Hne npOrpaMMbl.

ПРМЕЧАнЯ:
KaKdoe HkaTne KhoNk +/ -OToBnRaet 3aBepWeHne npo- rpaMMbHa 10 MNHT. Ecn HaKaTb N yDpKNaBaT b COOTBeCTByIOIyHO KhoNky, HactpoiKa 6yDet nPoBeDa B yCKopeHHOM pexHMe.
- MoXHO OTOJXHTb 3aBepueHHe npOprpAMMbI MaKCHMym Ha 13 Yacob.
- EcnBb6paTb DpyyI nporpammy, npdeIduaHa nactpoKa BpeMeHn 6yndT ydanena.

ПРМЕЧАнЯ:
He nIb3yIte fyHKuHTo TaMepa B peCenTax CO CBexKIMn INrpeDneHTAMn, HAnpMep MOLOKOM, RmOm, ppyKTAMn, NOrypTOM, JyKOM m T. d!
-Функиетаймера He noDxOoNT dЯхe6a6e3 rIIOTeHa (KneiKO-BHа),КOTobiy roTOBnTcHa TeNIOI uINrTopaYe BOe.
Pnmupe: ceyac 20:30 n Hxkyo BbIeuey xne6 3a 7:00 K cIeNyooemy ytpy, t.e. k 10 vacam n 30 MNHytam. 3Ty BeNHyH (10:30) Hxkyo BBectn Ha DCINlee. He Tpe6yeTcB bIuNCJrTB KOJIYeCTBO YacOB OT Haayana pa6OtBi nporpAmMBi (HaNPmuep, 3:00) n HxkyhBM BPemEH 3aBepseHnBblneukn. IporpAmma 3aIyCTnTCABTOMaYeeckn n 3aBepWNT Bblneky xne6a 3a DaahHoe BpeM.
KHOIKoN Start/Stop akTINBpyyTe fyHKUHO TaMepa.HaHHT MIRatb TOOK MEJxuYHCnAMHa DnCnnee.
EcnI Tpe6yeTcra npeBaTb yHKUHO TaMepa, HAnMaTe KOnKy Start/StopdoBOCppon3BeHnToHOBOrO CnHaHa.
6 Khonka Color (μBerT)
KhONKa nO3BOJnEaT hAcPToHTb HxKbI yPoBeH yOpymHaBaHm Light (CBeTbI) - Medium (CpeDnH) - Dark (TEMhB).
7 KhonKa Menu (MeHko BbI6opa)
Moxho nCnoB30BaT KHONky Menu, yTo6bl AKTNBnPoBaT onpeJeH HbI nporpaMMbl. DnBbIneKKn nCNoB3yIOTCnEduOuine nporpaMMbl:
Pnp6op mCnObl3yET cepIO TOHObIX CnHAnOB dIyBEOMneHnONb3OBaTeN:
1ДИINHHbI TOHOBbI CNIHAN
- PnIPOKJIIOUeHmK3JIeKTPoNTaHNO
KOrda pa6Ota nporpammbI BO306HOBnIeTcABOTAMUeCKN,POCNE npepbBaHnBpyHyIO (yepe3 10 MNHT) - pnpnpebbAHIN npoPamMbI BpyHyO
B KOHue Za3bI COXpaHeHnB TENlOM COCTOHN
1 KOPOTKNI TOHOBBI CNIHAI
- NOtBepKdHHe HaKaTn KaHONIK
-KoIgIa npepBaHHA BpyHyIO npOrpamMa BO306HOBJIeTc MeHee Yem 3a 10 MmHT
5TOHObIX CnHaNIOB nOcneIOBATEnbHO
CnIuKOM BlicOkaT Tempepatya np6opa
Ipy 3anycka HOBOI nporpaMMbl.
Hcnnne nokazbBaet
10 ToHOBbIX CnHAnOB nocJeobateJIbHO BO Bpempa6Oblnpo- rpaMbl
CenVac nporpamma Ha BtOp0iΦa3e 3ameuBbAHn. Boe eue MoKHO Do6abTb HnRpeHneHTbl (3epHa, ppyKTbl, opexn T. d.), xOTo pa6oTaHOT nporpaMMbl pa3HOro Tnna.
10TOHOBbIX CnHAnIOB NocneIOBaTeNbHO B KOHcpe pa6oTbI npoTpaMMbl
Pprrma 3abepeha. nncnne noka3bBaer 0:00 . prom c Homepom nporpaMbl. 3aTe m nBex nporpamm BbineKn HauHaetc a3a coxpaHEnr TenIoro COCTOHNr dnttehhoctbo 1 yac.
XpaHHeHne nporpamM
B cnyae abapn 3neKtponntanra pa6ota nporpammb6ydet BO3-06HOBHeHa ABOTaMHTeCKn,ecnBBOCTaHOBHeHne nOdaun 3neKtpo-nTahnaI pON3oJET 3a HECKoJIbKO MNHyT. EcnJxne ONaa nITAHNA OTKIOUaETcHa 6OJBShn CPOK, XNEOeKHyJHKHO BKNIOHTb CHOBA. 3To CNPaBeDnBO, KOrDa Ha MOMENT OCTaHOBKn nporpaMMb TECTO OCTaBaNocb Ha fao3e 3ameuHBnA.Hcnn XNe6 yXe BInekanca, daKe HeDoJIro, Notpe6yeTcCHOBA 3anyctNTb BCc c Camoro Hauana!
Функцязць
Iocne 3aBepHnH nporpMMb Cneyet DaTb npB6py OcTBtdo 3anycka HOBON pporpMMb BblneKu NIN 3ameWunBaHHa (3a NCKIOueHnEM nporpMM «9.Jam» n «12.Bake)Pnp6op nCOnb3yET 5TOHOBbIX CNIHANOB u YBEOMNEHe «HHH», Ha dncnnee, ecn ero BHTpeHHra Tempepa Tpya cnMkOM BlicOKa.
- ɪnBleɪke Tbɪŋk yɪeɪkTpɒnɪtənɪyɪn ɪs pɔːtɪkɪn.
2.ИЗВЛБЕКЛТе ФОМу ДДЯ ВБЛЕЧК, BOCПОЛБ3OBABUIMСь пnxватками КУХОньIMPyKABUЦAMN.
3.OctabTe KpbIky OTKpbITOn I DOxIMTeCb NONHOrO OCTbIAHn np60pa.BpemOCTbIBaHn6yJeT 3aBnCeTb OT xapaKTepa npdebl dyue pa60bl.
McnoB3oBaHne yctpoiCTBa
BHIMAHHE:Onachoctb noxapa!
CneIyTe INHOpMaUIN O KOINueCTBe INHPeJnENTOB n3 peJenTa. He npBbIaIe MAKcIMaJIbHOE KOINueCTBO MYKn (590 r) n cyXnx DpOxKei (7 rnn 21 r nn CBexNkX DpOxKei), INaHe BO3MOxHo BbITekAHne Tecta Ype3 KpaI.
B Hauane BbIneKn He 3aknaIbIaIte INHpeJeNHTbIBΦOpMy dIy BblneK, KOrda OHa BHyTpnpnbopa.
EcnHa BToP0i 3aMeuBaHnIO6abNIOCTcIOnOHNHTeB HbI INrpeINHeTbI (3epHa, ppyKtbl, opexn T. d.), y6eInTeCb, YTO OH He ynaJI BO BHTpeHHIOU cAcb Tb np6opa.
I PIPMEUHIA:
Ha paxax noDnHtTn Tecta n BbIeKu depKnte KpbIky 3akpItOn, Hnahe TECTO ONyCTNTcR.
1.ИЗБLEЧЕНЕФОМБДЯВБЛECHK
OTkpOte KpbIuKy. HemHoro NOBepHInTe φopMy dIa BbIeKn IpoTnB acBOBc TpeKIN Do pa3bNtOKpOBKn. BbITraHInTe φopMy dIa BbIeKn BBepx 3a pyKy. NocTaBbTe φopMy Ha NIOCKyIO pa6OHy IOBepxHOctb.
2. BctaBA KpIOKA DnI 3AmeunBaHn
2.1.CmaKbTe KpOK dIa3aMeuBnAHn.3To ynpocntn 3BneueHn Kpoka dIa 3aMeuBnAHn n3 roTOBOrO xne6a.
2.2. IomeCTIte OTBepCTe Kpoka dIra 3aMeWbAHnHa npBODHO BAN B cOpMe IINBbINEKn. Bo BPemr 3ToI onepaunBbICTyB OTBepCTH NkPOKa DOJIKeH 6blb BHn3y. YcHTbBaTe PNOCKyIO qAcTb BAJa.
3. BLOXHEHNE INHPreINHeTOB
Co6nIaTye kaa3AHbI B DaHOM peceTe noprOk BIOXeHn INHpeDnENTOBΦOpMy DnBbIneKn.
4. Bctabka φoPmbIДЯВiNeuKIN
IocTaBte foMpMy Inla BbIneKHa Na OCHOBaHne npnbopa.Bo Bpemr 3ToI onepaunn depKNTe foMpMy Inra BbIneKn no DnaRoHaN. HeMHoro nobepHnte ee no Yacoboi cTpeKe do ynpora. 3akpoTe KpbIuKy Xne-6oBoneKn.
5. 3anyck nporpaMMbl
5.1.BctabBeBUNKyJNeKtpOnnTaHnBPO3eTKy
5.2.BbI6epITe HxkyHIO nporpAMMy KHOKNKoM Menu.
5.3. Bb6epnte CBeTIOe, CpeHHee IITI TEMHOe IOdpymHnBaHne KhoKoN Color.
5.4.ИспοЛьзУгЕКнОнky WeightДЯуkaЗаняHyЖHorO Beca xNe6a.
5.5.MoKHO 3aTaTb 3aTePkaHHbI 3aNyck PpOpaMMbl KONKaMn+/-
5.6.HaKMnTe KhoNkY Start/Stop.DBe MmraHouuTe ToKn NOKaKyT, YTO npOrpamMa 3anyuHa.
6. 60abHeHnpynx HrpeHnTOB
B 3aBcIMoCTN OT BbIbpaHNo IporpamMbI, Ha BTOPO fae 3aMe- mBaHn6 ByDyT CbIbHb1 10 ToHObBIX CmHaNoB. 3aTeM, NO JeLaHIO, MOxHO Do6aBtB TcTo DOnONHHTeBhIe INHPeDIneHTbl. CHOba 3aKpOte KpbIshky.
7. OxuaHHe NOHHTN TecTa
Iocne 3aBepWeHnBaCero npocecca 3aMeunBaHHx XleboneueKa co3dact ontmamlbHyTo TempeAtpy dna NOnHnTn Tecta. OHa 6yTe Ha- rpeBaTb do 25^ ,ecnn TempeAtpy B KOMHate HNKe 3TOB BeINHMbl.
8. BbIneYka
Xne6oneyka perynnpyet TemnepaTypey abTomatueckn. Ecn nocne 3aBepseHnna pOrpAMMbI BbIneKn Xne6 ocTaeTcN cNtukom CBeTlbIM, MOxHO BOCNoJIb3ObaTbcra npOrpAMMoN «12. Bake» dIЯ NOBTOHOBIneKn Xne6a.
YctpaHHe HeNCpBaBHOCTe
a) 6eTeCb, yTo INHpeMeHTbOTMepeHb KOppeKTHO.
b) Cornacobahno 3aJaTe KOINueCTBa INHpeMeHTbI INpOBepbTe, He npOnyuJen JIn ODNH NHX.
c) NcnoB3yIte pa3HbIe KxNIOCTn ININ DOXNITecb OCTbIBaHnI DO KOMHaTHOH TEMNEpATypbl.
d)Дбавлие Ингелдentы В пордку,уka3aHHOM B pecente. HaxkTneM cdenaiTe He6oIbwoe yrIy6JIeHne B cepeDnHe n noIIOKHTe Tyda paackpoWeHbte mI cyxne dpoJxN. He doNyckaTe KOHTAKTa DpOxKeC KNDKOCTbI.
e) NcnoNb3yntoTbko CBexKne INHrpEnHeTbI, KOtOpblxpaHnncB npaBnNoHO.
f) CoKpaTnTe 6oJIe ee HcNIO INHpeJnEHTOB. He nCNoJIb3yIte KOJIuHeCTBO MyKn 60JIe, Yem yKa3aHO B peJenTE. PpN HeO6XoIMnOCTM, COKpaTnTe KOnJIueCTBO INHpeJnEHTOB Ha 1 / 3
g) Cornacyte KONUcTeBO NcOnb3yEmoM KxNkOcTn. EcIn B peCenTe yKa3aHbI BnAkhBle INHpeMeHTbl, IN KONUcTeBO DoJXHO 6bITb COOTBeCTBeHHO CHIXeHO.
h) B OTHOCHTeNbHO cbpyu noroNy nCnoJb3yIte Ha 1-2 cTOnOBbIe JIOXKMIeHbIe.
i) He noIb3yItec b TaIePOM B XapKne DnH. PpIMHeYTe XoIOHbIe KNDKOCTN.
j) Tocne BbIeNcH NHeMeIeHHo I3BnEKeTc XIe6 N3 npOTIBH N daITe EMy OCTbIb Ha peWeTke He MeHee 15 MmHT nepe Hape3KoH a JOMTN.
k) Cokpatnte KOIneCTBO IcNOLb3yEmbIX DpOxKKeI INI, pNr Heo6XoDnMOCTN, 0Buee KOINIECTBO HrPeJeHToB Ha 1/4 OTHO TELbHO yKa3aHHo B peCenTE BeMNHybl.
I) Do6aBbTe B TeCTo 1 CTOnIOByIO JIOKKy I\PSEHINHOI KJIeIKOBHbI.
m) He cma3bIaBte npoTnBeH!
3ameyaHn opeeIeTax
UHrpdeJeHentbI
JIIOBOI INHrpeDnENT IrrpaET cneunuueckypoIb B yCNEUHOB Bblneue XIE6a, NO3TOMY TOUHOE N3MepeHne kaxdORO INHrpeDnENTa He MeHee BaXHO, Yem Co6HDoHne npaBnIbHoro nopraKxN doabNeHHJ.
Hainboe Baxhble HrpeMeHTbI, HnnpMep KIOKcTb, Myka, CoIb, caxap n npoxk (MOXHO NcOJIb30BaT cyxne mN CBexne npoxk), BnnoHt Ha pe3yIbTaT pniroTOBHeHn Tecta n XnE6a. Iycnexa
BcERda HcNOrb3yTe TOUHbIe KOINuEcTBA B npaBnHOM OTHOWeHHN dpyr Kdpuyr.
IpIMHeHrTe INHPeDIneHTbB TcTlOM COCTOAHIN, ECnI TcTe 3aMe- IINBaEeTcpa3y.EcnI HyXhA IpOrpAMMA COTIOKeHHbIM 3aNycOM, INHPeDIneHTb DOJIgXHb6bITb XoIOJNbIMU, YTObI φepMeHTaUma IdoxxKe He HaHaJaCb CNIuKOM paHO.
Maprapin,Macno INMOKOBINJOTONbKOHaBcXle6a.
KoJIuYeCTBO caxapa MoXHO COKpaTbHa 20% YTObIcJeIaTB KOpOyK CBETIe N TOHbIe 6e3 INHO BO3dEiCTBnA Ha IPOCeCC Bbl- neKm. MoXHO 3aMeHtB caxap MeDOM,ecNI HxKHa 6OJee MmKJaN CBeTna KOpOyKa.
ΓIIOTeH,ΦopMpyEmbBMyKe BO BpemzAmeuBaHn,OppeIeT KOHCCTEHZKU Xne6a.Ⅱealhna MyHaCmecb CoCTOIT N340% 0boHn(eJIbHO3epHOBo)MyKn 60% BeNoy MyKn.
EcnxOueTcdoabntbcIeIMKOBoe3epHOBOCEm,npBapTeJIbHO 3aMOHTe erHaHOyCb.CoOTBeCTBEHNO COKPATNE KOINHeCTBO MYN IN KIOKTn (CHNXEHNE D^1 / s)
- Onapa ob3aTeIbHa nI pyKahOH myKn. OHa coepkNT moOuHbIe 6akTepnnn uKcCHyIO KNCOTy, yTO deJaet Xne6 nbIshBIM oObcneuBaET npemmemyIO KNCOTHOCTb. MoXHo CdeJaTbe eCaMOCToAteJIbHO, xOra HA 3TO yIeT MHO BpeMeHN. IMeHNIO03OMY B npIBeDEHHbIX dAnee peueTTax Mbl NcNoJb3yeM KOHeTpnpOBAHHyO onApy B noPoUke. TaKyO onApy MOxHO KyNtB B NaKeTnKAX NO 15r (dIa I Kr MyKn). CNeMyET cobJIoDaT b ya3aHHOe B peCenTAX KOInueCTBO (1 / 2,3 / 4) nIIN ke 1 yNaKOBKa). ChNKeHne KOInueCTBa npBeDet K KPOsaIeMcy Xne6y.
Ecn npimehraTc npoWKOBa onapa dpyro KOHcHTpaunn (naekr100rIpnI 1K myk), cneyET ymhebwnb 3TO KONHeCTBO (1K myk) npimepno ha 80 rnnn xe noDobpatb erno pecenty.
Moket nCIOB3OBAbCra KJNkAaONapa, BblNyckaemar B 3aneHah HBIX naKetax. Y6eIntecB C6bIIODeHN yka3aHm O KOJIneCTBe, npBedeHHbx HaYnakOBKe. HaleTe KJNDyO ONApy B MePhyO yauKy. Bo Bpemr 3ToOnepaunnpoBepaIte, UTO HAInTO KOJIneCTBO KJNDKOCTU, yka3aHHO B peJeTne.
- PπμmēHηme πιδηνΗΟ Μαρβί, KOTOPA RAKKE προДaΕΤΑ B CγχΟ BMIDe, yIyUΨιT KαεCTBO N BΚΥC TECTa. KpOME TOrO, 6yJET ΚόNbIe coxρaHηa CBεχεctb. πιδηνΗΝΑ Μαρа, KpOME προΥΕθo, cλa6ee pχaHΟ Μαρβί.
Icnojbayte nporpammy Basic nn Whole wheat nIy BIneyKn xne6ha onape, yTo6bl TeCTO npaBnHbNo nDnHnoc bXne6 bIn nCneueh BepHo. HatypaBHe bepMeHTnpuyoune BeueCTBa MOryt
ПИМЕHRbCByBmecTo ONapbl.3TO NIOHOCbI0 3aBNCIT OT BkycoB Ne-kaJa. Tako CnOc6 No3BOJrET CTaTb BeCbMa ycNeuHbIM nekapem Ha pbIHke.
EcnHyKeH OTHOCHTeBHO NbiHbXne6 co 3HaHTeHBbIM HAnONHeHEM,MOKHO DoabNTb B TcTeO 3epHa NiueHnIbI. NcNoJIb3yIte1 CToIOByIO NOKKy Ha 500 r MyKn I yBeINbTe KOJIueCTBO JxNkOcTnHa 12 cToIOBOI NOKKn.
-ПишениглкOTEN-3TO HATypalbHoeBEeCTBO,NOLYeHHOe N3 3ePHOBOrI pOteHnA. OH DeJIaET XNE6 ПИшHee NObBemHee. XNe6 CПишЕнчыIM TLIOTeHOM TAKKE MeHbIe NOДБерKeH OCEDAHIO BO BpEM RAIIeKIN IPyUHcYe UCBaHbAeTcR OprAHIN3MOM. OdHako 3ФФEKT INCNoJIb3OBAHnI ПИшENHOrO TLIOTeHa NOJHOCTbH IOPTNBOI NOLOXKeH B CNYae CEJIbHO3ePbOBbIX IPODyKTOB IN BblIeKN I3 MyKn DOMaUSHero NOMOA.
- CBeTHoI cOnOd -3TO xopoOIO npOxapHbI yMaMeHHbI cOnO.I. OH cnYkNT dIra nOJIyueHnI TEmHOI KOpOuKII (HaNPIMeP, pN I BbIneKe ceporo Xle6a). MOKHO TaKke NcONb3ObaTb PkaHOI cOnO,I KOToPbI He CTOnb TEmHbI. OH npOdaetcB aIntekax.
Bo BCE Tnblxne6a n3 Cmecn MMyKMOxHO DoabAaTb npraHoctn dna Xne6a. NcnoIb3yEmoe KOINueCTBO 3aBNCIT OT INuHoro Bkyca, a Taikke OYka3AHNI3ROTOBNTeJIA.
YIcTbI NeuTHIN B Nopouke RaBnEeTc HAtypaIbHbIM 3MyIbTaTOpOM,KOTOpbI yBeMNHBAeT O6bEm BblneK,CMrHaet KPOwIK INIO3BOJnETdNITeNbHO COxpaHrTB XJIeCBexkM.
HactpoKa KOJIuYeCTBa HnRpeJeHToB
Pn yBeiueHnn nnn ChnkeHnn KOnuYeCTBa Do6abIaBix HnRpe- dneHTOB CNeDyET cO6NIODaTb nponOpun, Yka3aHHbIe B ICXoHDOM peeTe. Jnla OocnKeHnHaHJNyUwero pe3ynbTaTAt Mbl peKOMeHyem CneDoBaTb 6a30BbIM IpabINlAm No Bblbopy KOnuYeCTBa INrPeJeHToB:
KIOCTM/Myka:TcTO DOJIKHO 6bIT MRAKIM (HO HE CNIJKOM) HEMHORO JINIKM, HO He TAYUM. JIeKO JENITB UAPKN I3 NERKOTecta.Odako He B CNYae TReKeIoro Tecta,HanpImep oBoHoi pXahOH MyKn HUN CEJIbHO3ePHOBOro XnE6a.PIOBepbTe TcTo Ope3 5 MNHT NOCE nep BOH qA3bl 3ameuBaHn.ECN OHO OCTaETCnMIKOM BnAAKHBm,DOabNtte HEMHORO MYKn DO DCNTHXHn npABINbHO KOHCNCTeHUn. ECNI TcTO CNIJKOM cyXoe,3ameuBAIte erO daNBse,DOabNra BODy HECKONbKMn YauHBIMN JOKKAMN.
3aMeHaJxNkOCTn:EcInBpeuente yka3aHbI HnRpeJeHtbl,coepKzAunne JxNkOCTb(MrKnn cbip,HorpyT n.T.D.),COOTBeTcBeHNO CNeDyET UMeHbWHTb KOINHECTBO NcONb3yEMoO OCHOBHO JxNkOCTn. EcIn pinnmeHReTcraio,CneDeYe pa36ntb erO B mepHyIO qauKy 3aJIINBaTb NOIpyEHHy JO DOOCTHKeHn IpeDNNCAHHOro KOINHeCTBa.
Y kntenei rohpbix paHOB (Bblwe 750 M) Tecto nOdHnmaetc6 bI-ctpee. B Takix Mectax cneDyET ppeoTbPAITb N36blTOHbI NObem 3a CHT CHKHeH N KOINueCTBa DpOKKe Ha 14 INI DaKe Ha 12 qaiHOJ IOKKN. 3Ta K peKoMeHdaCnprIMeHmBA Obnactx, rde pacnpoc-CTpaHEbI 3anaCbI MNHepaJIbHOB BoBl.
$$ \mathrm {C T .} \text {J I O X K A} = \mathrm {C T O N O B A} \text {J I O X K A} (\text {I I I I 6 0 l b s a r M e p H a r J I O X K A}) $$
$$ \text {Y .} \text {I O X K A} = \text {Y a i n h a r} \text {I O X K A} (\text {I I N M a l e H b k a} \text {M e p h a r} \text {I O X K A}) $$
$$ \Gamma = \Gamma p a m m $$
$$ \mathrm {M N} = \mathrm {M u n n n u t r p} $$
$$ \begin{array}{l} \text {y n a k . = y n a k o b k a h a 7 r c y x i n d p o x k e e . 3 T o k o n i u c e c t B O} \ \text {t p e 6 y e t c a r h a 5 0 0 r . 3 k b i n b a n e h t h o e k o n i u c e c t B O} \ \text {c b e x i n d p o x k e e p a b h o 2 1 r .} \end{array} $$
KoJIHecTb B MmIIINITpax MoJHO 3MepaTb MEPHOaIKo co 50-250 mI.
- DóbaBHeHne φpykTob, opexOB, cemH: B HECKoJIbKHX npOrpAMMax MOXHO Do6aBnIb NO JeNaHIO dpyTne INHpeDMeHTbl, KOrJa pNo3Byat 10 ToHObIX CmHAnOB. EcIn Do6aBt b INHpeMeHTbl CNIuKOM paHO, OHN Co6epyTCra H nHE NoI DeIeCTBnEM KpOka IIN 3aMeUmbAHn.
Bec n o6bem xIe6a
Moxho 3ametntb, yto nnHocTbO 6eblxneBnerE xne6a n3 oboHHo MyKn. 3TO C8BaHO C 60JIbUM NIOHnEM 6eIoro Xne6a, noTOMy cIeDyET c6NIkDaT bOppeJeHHBe OpaHnHeHn.
PeaIbHbI Bec XIe6a 3ABNCIT B YactHOCTN OT TINIOBOB BnXHOCTN BO3dyxa BO BPemr BblneKIN.
Bce copTa xne6a, oc0eHNO nIeHnHOrO, cyueCTBeHNO yBEnHBAIOTCB Oobeme. OHN OTHOCATc K HAnBoGNE TReKeNbIM COPTAM INMEOT BICOKyIO BepoARTHocTb IpeBbIeHnra pa3MePOB KOHTeHepa NocNe NOcNeDHei PAsbl NoJHrTna. OdHaKO OHN He Be bITEKaIOT uepe3 KpaJ. YAcTB Xne6a, KOtopa BbICTyaET HaKpAEM KOHTeHepa, 6ydt, PO3OMy, HemHO r MeHbIe nponeeHHo, cem Xne6 BHytpn KOHTeHepa.
- French (Bénbïy xπe6)
| Весobий уровеньхлоба | II (Насто只得 no yмочаю) | I |
| Су марhoe время 3 : 50 чаов 3 : 40 чаов | ||
| 1.Замшваиме 18 минут | 16 минут | |
| 1.Ферmentацья 40 минут | 40 минут | |
| Toювile синалы дд дд дд дд дд дд dд dд dд dд dд dд dд dд dд dд dд dд dд dд dд dд dд dд dд dд dд dд dд dд dд dд dд dд dд dд dд dд dд dд dд dд dд dд dд dд dд dд dд dд dд dд dд dд dд dд qd qd qd qd qd qd qd qd qd qd qd qd qd qd qd qd qd qd qd qd qd qd qd qd qd qd qd qd qd qd qd qd qd qd qd qd qd qd qd qd qd qd qd qd qd qd qd qd qd qd qд qd qd qd qd qd qd qd qd qd qd qd qd qd qd qd qd qd qd qd qd qd qd qd qd qd qd qd qd qd qd qd qd qd qd qd qd qd qd qd qd qd qd qd qd qd qd qd qd qd QD QD QD QD QD QD QD QD QD QD QD QD QD QD QD QD QD QD QD QD QD QD QD QD QD QD QD QD QD QD QD QD QD QD QD QD QD QD QD QD QD QD QD QD QD QD QD QD QD QD QDE QD QD QD QD QD QD QD QD QD QD QD QD QD QD QD QD QD QD QD QD QD QD QD QD QD QD QD QD QD QD QD QD QD QD QD QD QD QD QD QD QD QD QD QD QD QD QD QD QD QDAQ DQ DQ DQ DQ DQ DQ DQ DQ DQ DQ DQ DQ DQ DQ DQ DQ DQ DQ DQ DQ DQ DQ DQ DQ DQ DQ DQ DQ DQ DQ DQ DQ DQ DQ DQ DQ DQ DQ DQ DQ DQ DQ DQ DQ DQ DQ DQ DQ DQ DQ QD QD QD QD QD QD QD QD QD QD QD QD QD QD QD QD QD QD QD QD QD QD QD QD QD QD QD QD QD QD QD QD QD QD QD QD QD QD QD QD QD QD QD QD QD QD QD QD QD QDGQDGQDGQDGQDGQDGQDGQDGQDGQDGQDGQDGQDGQDGQDGQDGQDGQDGQDGQDGQDGQDGQDGQDGQDGQDGQDGQDGQDGQDGQDGQDGQDGQDGQDGQDGQDGQDGQDGQDGQDGQDGQDGQDGQDGQDGQDGQDGQDGQDGQDGqDGQDGQDGQDGQDGQDGQDGQDGQDGQDGQDGQDGQDGQDGQDGQDGQDGQDGQDGQDGQDGQDGQDGQDGQDGQDGQDGQDGQDGQDGQDGQDGQDGQDGQDGQDGQDGQDGQDGQDGQDGQDGQDGQDGQDGQDGQDGQDGQDGQDGg DGQDGQDGQDGQDGQDGQDGQDGQDGQDGQDGQDGQDGQDGQDGQDGQDGQDGQDGQDGQDGQDGQDGQDGQDGQDGQDGQDGQDGQDGQDGQDGQDGQDGQDGQDGQDGQDGQDGQDGQDGQDGQDGQDGQDGQDGQDGQDGQDGQDGQLG DGQDGQDGQDGQDGQDGQDGQDGQDGQDGQDGQDGQDGQDGQDGQDGQDGQDGQDGQDGQDGQDGQDGQDGQDGQDGQDGQDGQDGQDGQDGQDGQDGQDGQDGQDGQDGQDGQDGQDGQDGQDGQDGQDGQDGQDGQDGQDGQDGQDGq DGQDGQDGQDGQDGQDGQDGQDGQDGQDGQDGQDGQDGQDGQDGQDGQDGQDGQDGQDGQDGQDGQDGQDGQDGQDGQDGQDGQDGQDGQDGQDGQDGQDGQDGQDGQDGQDGQDGQDGQDGQDGQDGQDGQDGQDGQDGQDGQDGQDGG DGQDGQDGQDGQDGQDGQDGQDGQDGQDGQDGQDGQDGQDGQDGQDGQDGQDGQDGQDGQDGQDGQDGQDGQDGQDGQDGQDGQDGQDGQDGQDGQDGQDGQDGQDGQDGQDGQDGQDGQDGQDGQDGQDGQDGQDGQDGQDGQDGQDG |
PpHmepbpeeenta:
- Whole weat (Xne6 n3 oboHOn myKn)
3NeKtpoHtAnHe: 220-240B\~,50T
Iotpe6nemma MouHoctb: 550BaTT
Klacc 3aunmbI:
Bec HeTTo: npu6n.4,2K
CoxpaheHO npaBO Ha TexHNueckne I KOHcTpyKUHOHHbIe N3MeHeHHB pAMkAx npoDoJkaHOUsEcn pa3pa60TKn npOdykTa.
JaHHoe yCTPOIcTBo COOTBETCTBYe BCEM TEKUIM DnpeKtNBam CE, TAKIM KAK 3JNEKTpOMaHmTHaR CoBMecTMMOCTb Hn3KOe HaNPJKeHHe; OHO IPOIN3BeDEHO B COOTBETCTBm C HOBEINUMPiBaUNAM TEXHMKn 6e30NaCHOCTn.
YTNIN3aun
3HaYeHHe cMbOJa «KOp3Ha»

3aunitaokpykaiooiecpdebl:HeOnyckaetcYtun3aunna 3nektpponp6obOBmecTe CbTOBbIMOTXOdAMN.
YtJIN3aIy cTapeBWeI TexHKn I HEnCnpaBbIX 3NeKtpo np608 npOn3BODITcB rOpOcknx pNEmHBx nyHKtax.
He donyckaIte HnpeBaBnIbHoYtynIm3aumOxIOOB.3To HaHocNT Bpe OkpykaHOue CpeE N OKa3bIBaET HerATNBHOe BO3deNCTBHe Ha 3doOpBe IIOei.
Oka3bBaIte CoDcEChTBn IpOrpAmMe yTmIn3aun n DpyrIm FOpMaM nepepa60TKn 3NeKtpoHHO n3NeKtpuCheckO TxHNK.
HΦopMaIIO O nyHKTx yTIN3aIIN 6bITOBm TEXHKn MOXHO NOy- YtB MecTHbIX OpraHAX BnactN.
GARANTIEKARTE
warranty card · garantiekaart · carte de garantie · schedadi garanzia · tarjeta de garantia · cartao de garantia · garantikort · karta gwarancyjna · zaručni list · kartica jamstva · carte de garantie · ΓαραύηΝΑ καρτα · zaručnly list · garancijski list · garanciajegy · Γαραύηνικη φόρμηλρ · Γαραπήнυι ταλοῦ
juaia jiu
BBA 3774
24 Monate Garantie gemäß Garantiererklung - 24 months warranty according to warranty declaration - 24 maanden garantie volgens garantieverklung - 24 mois de garantie selon la déclaration de garantie - 24 mesi de garanzia secondo la dichiarazione di garanzia - 24 meses de garantia de acuardo con la déclaration de garantia - 24 meses de garantia, de accordo a la déclaration de garantia - 24 mandes garanti i henchold til garantibetingelsene - 24 misesc gwarancji na podstawe owiadczenia gwarancjynego - zaruka 24 mEscu podle prohlasei o zuruč - 24 mesecno jamstvo u sklady s jamstvenom deklaracionj - 24 luni garantie conform declaratiei de garantie - 24 mececa rapaniuia B cboTETBME C rapaniuHONHTA dekpanauiia - 24 mezacna zaruika podle vhyalenaio o zuruč - 24-mesecna garancija, skladno z garancjsko izjavzo - 24 hopn nap garancia a garanciafeltetelekben leirtak szerit - rapaŋha Na 24 mciuji aiinobio duary npo ranpahir - rapanrHa 24 mecaua cornaccho zablnenhblm rapanrHbM npaBnAm - 24 kdy
Kaufdatum, Handlsterpmel, Unterschrift - date of purchase, dealer stamp, signature - aankooepodium, dealerstempl, handtekening - date d'achat, tampon du concessionaire, signature - data de acquisto, limbo del rivendatore, firma - fecha de compra, sello del distribuidor, firma - data de compra, carismo do distribuidor, asinatura - kipadista, forhandierstempl, signature - data zakupu, pieczei sorzedawy, podips - datum zakupeni, zatrj opredeca, podips - datum kupovine, zig trovica, podips - data de achizje, stampila fumuzorilam, semnatura - Datar na knojnaizna, Neatel na Plopaouaia, Plovnic - datum nukiu, peclita obchodnka/ predacju, podips - datum napka, zig trovica, podips - vassarala datumai, kereskedko beyegzije alairas - datra nprodbanen, nevataknpodauia, pnozic - Datar npropotemene, Uzmannpodauia, Pnozniya

CiatRONIC
INTERNATIONAL GMBH
www.clatronic-germany.de

- WAARSCHUWING: Brandgevaar!
- Quick II (Snel II)
- Bouton Weight (Poids)
- French (Pain blanc)
- Whole weat (Pain complete)
- AVISO:
- Sweet (Pan dulce)
- French (Pane bianco)
- Symbols in this Instruction Manual
- WARNING:
- CAUTION:
- Contents
- General Notes
- WARNING:
- Special Safety Precautions for this Appliance
- WARNING: Hot surface! Risk of burning!
- WARNING: Risk of fire!
- Unpacking the Appliance
- Start-up
- Electric Connection
- NOTE:
- Overview of the Components / Scope of Delivery
- Accessories
- Description Control Panel
- LCD Display
- Default Setting (Start Image)
- Button Start/Stop
- Button Weight (Weight)
- i NOTE:
- Programme Names
- Buttons + / - (Time)
- WART
- Button Color (Colour)
- Button Menu (Selection)
- How the Appliance Works
- General Information
- Signal Tones
- Programme Memory
- Safety Function
- Using the Appliance
- CAUTION: Risk of fire!
- Removing the Baking Tin
- Insert Kneading Hook
- InsertIngredients
- Inserting the Baking Tin
- Starting a Programme
- Adding other Ingredients
- Leave Dough to Rise
- Baking
- Keeping Warm
- (Except for Programmes "8. Dough" and "9. Jam")
- Programme "12. Bake" (Extended Baking)
- Programme End
- Removing the Kneading Hook from the Bread
- Cleaning
- Removing and Installing the Lid
- Storage
- Questions on Baking
- The Bread Sticks to the Baking Tin After Baking.
- How Do You Avoid the Forming of Holes in the Bread Owing to the Presence of the Kneading Hooks?
- The Dough Spills Over When It Is Left to Rise.
- The Bread Rises and Spills Over Anyway.
- When Can the Lid of the Bread Maker Be Opened During the Baking?
- What Do the Type Numbers for Flour Mean?
- What Is Whole Wheat Flour?
- What Must Be Done When Using Rye Flour?
- What Is Gluten in Flour?
- How Many Different Flour Types Are There and How Are They Used?
- How Can Fresh Bread Be Made Easier to Digest?
- What Doses of Rising Agent Should Be Used?
- What Can Be Done if the Bread Tastes of Yeast?
- Why Does the Bread Made in an Oven Taste Different Form the Bread Made With the Bread Maker?
- Remedy Problems
- Notes Regarding the Recipes
- Ingredients
- Adjust Doses
- Add and Measure Ingredients and Quantities
- Bread Weights and Volumes
- Gluten Free Bread (for Allergy Sufferers)
- Baking Results
- Programme Sequence and Recipe Ideas
- Basic (Default Setting)
- Recipe Ideas:
- French (White Bread)
- Tip:
- Whole Weat (Whole Wheat Bread)
- Quick I (Fast J
- Quick II (Fast II)
- Dough (Dough)
- Jam (Jam)
- 10.Cake(Cake)
- Technical Data
- Disposal
- Meaning of the "Dustbin" Symbol
- Instrukcja obslugi
- French (Chleb biahy)
- Usuwanie
- Tippek a receptekhez
- Ossetzevok
- Quick II (Gyors II)
- CIMBOBII pImuMeHemble B DAHHOM pyKOBoCTBe NOL3OBATEJI
- PENEYPNPEXDEHNE:
- BHIMAHHE:
- CoepeknaHne
- TocJeDoBaTeIbHObTb Opeaunn IporpaMmbl
- OmbaHOpMaun
- PENyTPEJDEHNE:
- CneuaJIbHbIe yka3aHn no 6e3oNaChocTn dIy 3TOrO np6opa
- I PENEYIPEXEHE: TOpua nOBepxHoctb! OnacHOctb oxora!
- I PENEYIPEXEHENE: Onacnoctb noxapa!
- BHIMAHNE:
- PacnaKobKa yCtpoiCTBa
- IcnoB3OBAHne yctpoiCTBa B nepBbI pa3
- I PIPMEUHNAI:
- 063op detae np6opa / KomJIeKT nocTabKn
- PtpHaJaTeJxHocTn
- 06barchene coctaba pa6ooy nahei
- 1KK-ducnnne
- Hactpoika no ymoluaHHIO (naaJIbHbI 3KpaH)
- Khonka Start/Stop
- Khonka Weight (Bec)
- I\PIMEaHnA:
- Ha3BaHnI npOrpaMM
- IPENDYPPEKDEHNE:
- ПРМЕЧАнЯ:
- Khonka Color (μBerT)
- KhonKa Menu (MeHko BbI6opa)
- XpaHHeHne nporpamM
- Функцязць
- McnoB3oBaHne yctpoiCTBa
- BHIMAHHE:Onachoctb noxapa!
- I PIPMEUHIA:
- 1.ИЗБLEЧЕНЕФОМБДЯВБЛECHK
- BctaBA KpIOKA DnI 3AmeunBaHn
- BLOXHEHNE INHPreINHeTOB
- Bctabka φoPmbIДЯВiNeuKIN
- 3anyck nporpaMMbl
- 60abHeHnpynx HrpeHnTOB
- OxuaHHe NOHHTN TecTa
- BbIneYka
- YctpaHHe HeNCpBaBHOCTe
- 3ameyaHn opeeIeTax
- UHrpdeJeHentbI
- HactpoKa KOJIuYeCTBa HnRpeJeHToB
- Bec n o6bem xIe6a
- YTNIN3aun
- 3HaYeHHe cMbOJa «KOp3Ha»
- GARANTIEKARTE
- BBA 3774
Brand : CLATRONIC
Model : BBA 3774
Category : Bread maker