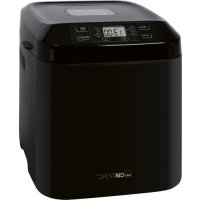
BBA 2983 - Bread maker CLATRONIC - Free user manual and instructions
Find the device manual for free BBA 2983 CLATRONIC in PDF.
| Product type | Bread machine |
| Brand | CLATRONIC |
| Model | BBA 2983 |
| Power supply | 230 V, 50 Hz |
| Power | 800 W |
| Protection class | I |
| Maximum capacity | 3 liters (approx. 1,250 g of bread) |
| Number of programs | 10 programs with 60 settings |
| Functions | Kneading, rising, baking, keep warm (1 hour) |
| Display | LCD screen |
| Timer | Delayed start up to 13 hours |
| Crust setting | Light, medium, dark |
| Bread weight | 3 levels: 750 g, 1000 g, 1250 g |
| Kneading hooks | 2 kneading hooks |
| Material of the pan | Non-stick coating |
| Cleaning | Bowl and hooks washable with water; do not immerse the appliance |
| Safety | Overheat protection (display H:OT) |
| Included accessories | Hook to remove kneading paddles, measuring spoon, measuring cup |
| Warranty | 24 months |
| After-sales service | Clatronic hotline: 0 21 52 / 20 06 - 888 |
Frequently Asked Questions - BBA 2983 CLATRONIC
User questions about BBA 2983 CLATRONIC
0 question about this device. Answer the ones you know or ask your own.
Ask a new question about this device
Download the instructions for your Bread maker in PDF format for free! Find your manual BBA 2983 - CLATRONIC and take your electronic device back in hand. On this page are published all the documents necessary for the use of your device. BBA 2983 by CLATRONIC.
USER MANUAL BBA 2983 CLATRONIC
Instruction Manual/Guarantee
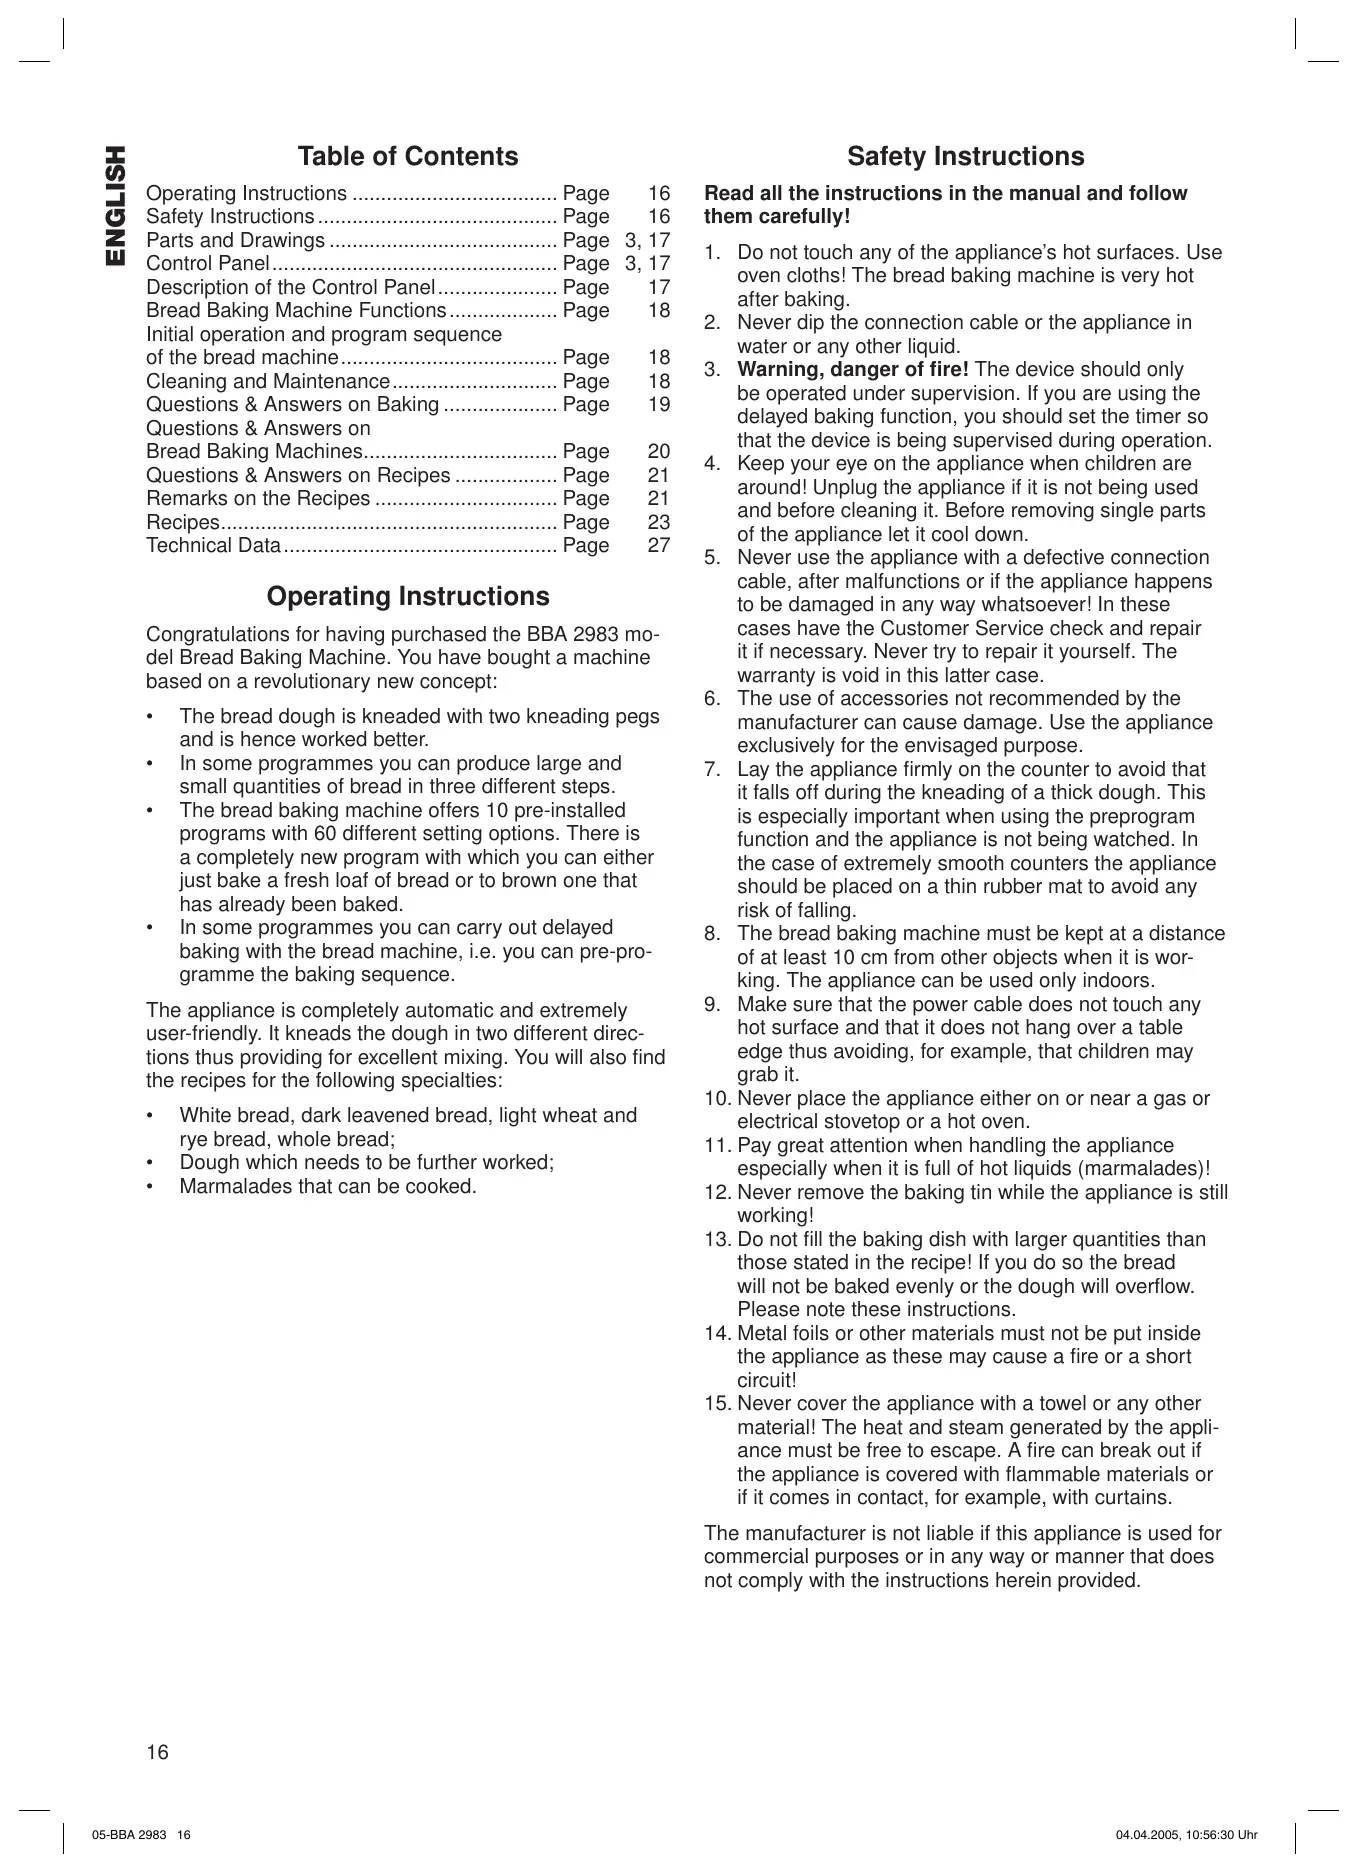
Brotbackautomat
Bread baking machine
BBA 2983
DEUTSCH
Inhalt
Parts and Drawings, Control Panel......Page 3, 17
Instruction Manual 16
Guarantee.. 27
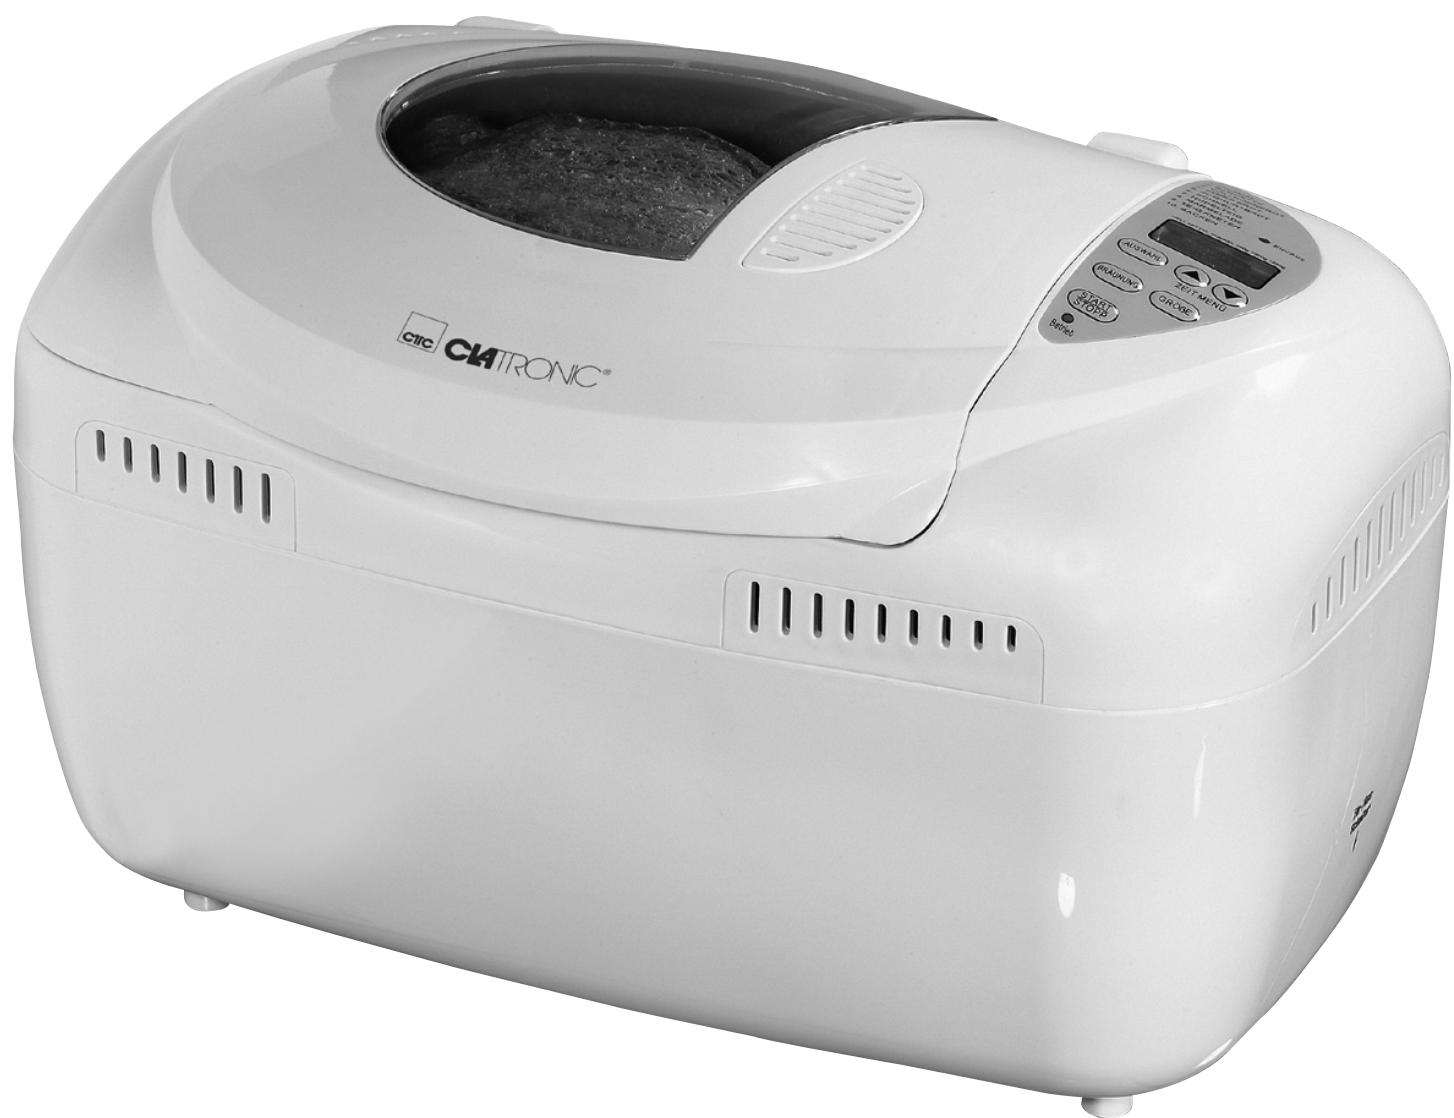
Underside of the bread machine
Bedienfeld
Control Panel
Inhaltsverzeichnis
Operating Instructions 16
Safety Instructions.. 16
Parts and Drawings Page 3, 17
Control Panel.. 3, 17
Description of the Control Panel.. 17
Bread Baking Machine Functions 18
Initial operation and program sequence of the bread machine.. 18
Cleaning and Maintenance.. 18
Questions & Answers on Baking 19
Questions & Answers on Bread Baking Machines.. 20
Questions & Answers on Recipes 21
Remarks on the Recipes 21
Recipes.. 23
Technical Data 27
Operating Instructions
Congratulations for having purchased the BBA 2983 model Bread Baking Machine. You have bought a machine based on a revolutionary new concept:
- The bread dough is kneaded with two kneading pegs and is hence worked better.
In some programmes you can produce large and small quantities of bread in three different steps. - The bread baking machine offers 10 pre-installed programs with 60 different setting options. There is a completely new program with which you can either just bake a fresh loaf of bread or to brown one that has already been baked.
- In some programmes you can carry out delayed baking with the bread machine, i.e. you can pre-programme the baking sequence.
The appliance is completely automatic and extremely user-friendly. It kneads the dough in two different directions thus providing for excellent mixing. You will also find the recipes for the following specialties:
- White bread, dark leavened bread, light wheat and rye bread, whole bread;
- Dough which needs to be further worked;
Marmalades that can be cooked.
Safety Instructions
Read all the instructions in the manual and follow them carefully!
- Do not touch any of the appliance's hot surfaces. Use oven cloths! The bread baking machine is very hot after baking.
- Never dip the connection cable or the appliance in water or any other liquid.
- Warning, danger of fire! The device should only be operated under supervision. If you are using the delayed baking function, you should set the timer so that the device is being supervised during operation.
- Keep your eye on the appliance when children are around! Unplug the appliance if it is not being used and before cleaning it. Before removing single parts of the appliance let it cool down.
- Never use the appliance with a defective connection cable, after malfunctions or if the appliance happens to be damaged in any way whatsoever! In these cases have the Customer Service check and repair it if necessary. Never try to repair it yourself. The warranty is void in this latter case.
- The use of accessories not recommended by the manufacturer can cause damage. Use the appliance exclusively for the envisaged purpose.
- Lay the appliance firmly on the counter to avoid that it falls off during the kneading of a thick dough. This is especially important when using the preprogram function and the appliance is not being watched. In the case of extremely smooth counters the appliance should be placed on a thin rubber mat to avoid any risk of falling.
- The bread baking machine must be kept at a distance of at least 10cm from other objects when it is working. The appliance can be used only indoors.
- Make sure that the power cable does not touch any hot surface and that it does not hang over a table edge thus avoiding, for example, that children may grab it.
- Never place the appliance either on or near a gas or electrical stovetop or a hot oven.
- Pay great attention when handling the appliance especially when it is full of hot liquids (marmalades)!
- Never remove the baking tin while the appliance is still working!
- Do not fill the baking dish with larger quantities than those stated in the recipe! If you do so the bread will not be baked evenly or the dough will overflow. Please note these instructions.
- Metal foils or other materials must not be put inside the appliance as these may cause a fire or a short circuit!
- Never cover the appliance with a towel or any other material! The heat and steam generated by the appliance must be free to escape. A fire can break out if the appliance is covered with flammable materials or if it comes in contact, for example, with curtains.
The manufacturer is not liable if this appliance is used for commercial purposes or in any way or manner that does not comply with the instructions herein provided.
Parts and Drawings
A Cover, removable
I Casing
B Handle
J Side vent
C Viewing panel
K Cable
D Vent
L On/off Switch
E Baking tin
On the right-hand underside of the bread machine
Accessories (not shown):
1 hook to remove the kneading pegs,
1 measuring spoon, 1 measuring beaker
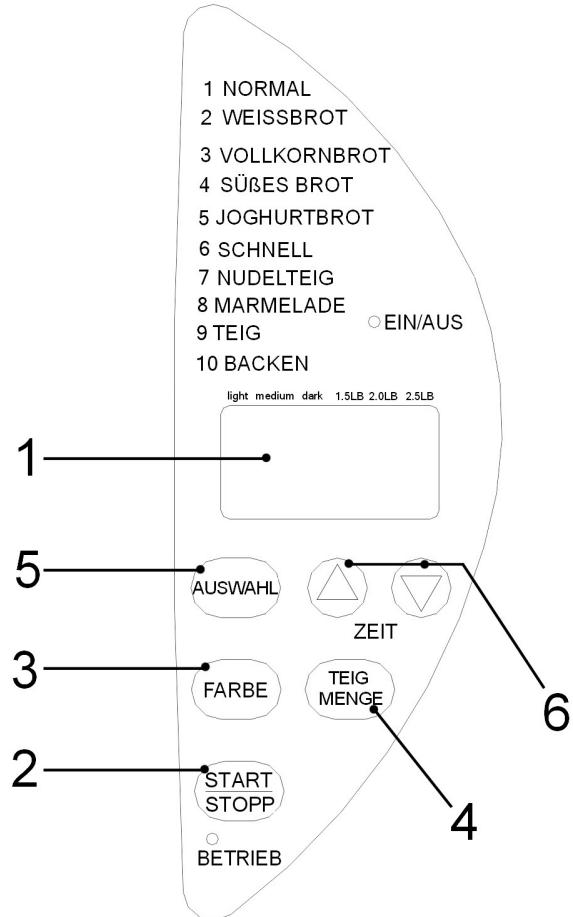
Control Panel
1 LCD display
It shows the time left before the end of the program
2 START/STOPP key
To start and stop the program
3 FARBE key
To set the desired level of browning
4 TEIGMENG key
To set 3 weight levels as described below
5 AUSWAHL key
For selecting the programmes
6 ZEIT key
To set the preprogram timer
Description of the Control Panel
Insert the plug into a properly installed 230V / 50Hz protective contact socket and switch on the appliance with the on/off switch (L).
1. DISPLAY
Basic settings
This displays signals when the appliance is ready for use. It corresponds to the normal program. "1 3:23" appears on the display.
The "1" specifies which program has been chosen and the "3:23" is the length of the program.
The positions of two arrows provide information on the selected browning level and the weight.
The basic setting after switching the appliance on is: "medium weight" and "medium browning level".
During operation the course of the program can be read on the display. As the program proceeds the digits of the set time will decrease progressively.
2. START/STOP key
To start and stop the program.
As soon as the START/STOPP key is pressed, the points of the time value start to blink.
Use the START/STOPP key to stop the program in any moment. Keep the key pressed until a signal beep is heard. The starting position of the aforementioned start program appears on the screen. If a different needs to be used, select it with the AUSWAHL key.
3. FARBE key
The desired browning level is set with this key:
HELL-MITTEL-DUNKEL
It provides for the following settings in the various programs (see table):
STUFE 750g = for a small loaf weight;
STUFE 1000g = for a medium loaf weight
STUFE 1250g = for a large loaf weight.
In the recipes you will find our recommended quantities.
5. AUSWAHL key
Use the menu button to call up the individual programmes. Use the programs for the following specialties:
- NORMAL
NORMAL) For white and wheat and rye bread. This program is used the most.
- WEISSBROT
(WHITE BREAD) For the preparation of particularly light white bread
- VOLLKORN
(WHOLEMEAL)
- SÜSSES BROT
For wholemeal bread
SWEETBREAD) For the preparation of sweet leavened dough
- JOGHURT BROT
(YOGHURT BREAD) For loaves with added yoghurt
- SCHNELL
(RAPID) For the quick preparation of white and wheat and rye bread
- NUDELTEIG
(NOODLE MIXTURE)
- MARMELADE
Knead from noodle mixture
- TEIG
(MARMALADE) To cook
- BACKEN
marmalades and jams (DOUGH)
For the preparation of dough (BAKING)
To brown bread or cakes
6. ZEIT keys
The programmes NORMAL, WHITE BREAD, WHOLEMEAL BREAD, SWEET BREAD, YOGHURT BREAD and BAKING can be started after a delay. The SCHNELL, NUDELTEIG, TEIG KNETEN and MARMELADE programs cannot be timed to start later on. The hours and minutes after which the preparation should be started need to be added to the relevant basic time for the specific program plus 1 hour of warming time (after the end of the baking process).
Example:
It is 8.30 p.m. and the bread must be ready the next morning by 7.00 a.m., i.e. in 10 hours and 30 minutes.
Press the TIME key until 10.30 appears, that is to say the time between now (8.30 p.m.) and when the bread must be ready.
When working with the timing function never use perishable ingredients such as milk, eggs, fruit, yogurt, onions, etc.!
Bread Baking Machine Functions
Buzzer function
The buzzer goes off:
- When pressing all the program keys;
- During the second kneading process in some programmes to indicate that grains, fruits, nuts or other items can now be added
- When the end of the program is reached.
During the warming phase at the end of the baking procedure the acoustic signal rings several times.
Repeat function
In case of a blackout the bread baking machine must be started again. This is possible only if the program was stopped before the kneading phase was reached. Otherwise you will have to start from the beginning!
Safety functions
If the temperature of the appliance is still too high (more than 40^ ) for a new program after using the appliance previously, H:OT will appear on the display when pressing start again and an acoustic signal is given. If this is the case, press the START/STOPP key until the H:OT message is deleted and the basic setting appears on the display. Remove the container and wait until the appliance has cooled.
The BACKEN program can be started immediately even when the appliance is still hot.
Initial operation and program sequence of the bread machine
Insert the baking tin
The nonstick baking tin must be held firmly with both hands and be placed in the middle of the baking compartment. Press the tin downwards with caution until it snaps into place. Insert the two kneading pegs on the driving shafts.
Put in the ingredients
The ingredients must be put into the baking tin in the order specified in the relevant recipe.
Switch on
Insert the plug into a duly installed 230V / 50Hz protective contact socket and switch on the appliance with the on/off switch (L).
Select the program
- Select the desired program with the AUSWAHL button.
- If possible, select the desired level of browning.
- If possible, select the desired quantity of dough.
- With the ZEIT buttons you can delay the start of the program, if possible.
- Press the START/STOPP button.
Mix and knead the dough
The bread baking machine mixes and kneads the automatically until it reaches the right consistency.
Leave the dough to rise
After the last kneading cycle the bread baking machine is heated to the optimal temperature for the rising of the dough.
Baking
The bread baking machine sets the baking temperature and time automatically. If the bread is too light at the end of the baling program, use the BACKEN program to let it brown more. To do so, press the START/STOPP key, then select the BACKEN program and start. When the desired degree of baking has been reached, stop the process.
Warming
Once the baking is over, the buzzer goes off to signal that the bread or specialty can be removed. The 1-hour warming time starts immediately.
End of the program phases
Switch off the appliance after use with the on/off switch (L) and pull out the plug. At the end of the program pull out the baking tin by using oven cloths, lay it on the counter and if the bread does not fall out of the tin onto the grid, move the knead shaft back and forth a few times until the bread comes out. If one of the kneading pegs is still stuck in the bread, take the hook supplied with the appliance. Insert it under the warm loaf of bread into the almost circular opening of the kneading peg and wedge the hook against the lower edge of the kneading peg preferably where the blade of the kneading peg is located. You can then cut the bread easily and pull out the kneading peg completely.
Cleaning and Maintenance
- Before the baking dish is used for the first time it should be briefly rinsed out with water and the dough hook cleaned.
It is highly recommended to coat the new baking tin and the kneading pegs with heat resistant grease before using them for the first time and let them heat in the oven for about 10 minutes at 160^ C . Once these have cooled down clean away (polish) the grease from the baking tin with a sheet of paper towel. This operation is to be performed to protect the nonstick coating. This operation can be repeated from time to time. - After use always leave the appliance to cool before cleaning it or putting it away. It takes about half an hour for the appliance to cool and to be ready again for baking and kneading.
- Before cleaning pull out the plug and leave the appliance to cool. Use a mild detergent. Never use chemical cleaning agents, gasoline, oven cleaners or any detergent that can scratch or ruin the coating.
-
Remove all the ingredients and crumbs from the lid, casing and baking compartment with a moist towel. Never dip the appliance in water nor fill the baking compartment with water! For easy cleaning the lid can be removed by positioning it vertically and pulling it out.
-
Wipe the outside of the baking tin with a moist towel. The baking dish can be rinsed out from the inside with water. Do not leave it too long dipped in water.
- Both the kneading pegs and drive shafts need to be cleaned immediately after use. If the kneading pegs remain in the tin, it becomes difficult to remove them afterwards. In this case fill the container with warm water and leave it to rest for 30 minutes. Then remove the kneading pegs.
- The baking tin has a nonstick coating. Do not use metal objects that can scratch the surface when cleaning it. It is normal that the color of the coating changes over the course of time. This change does not alter its effectiveness in any way whatsoever.
- Before putting the appliance away for storage, make sure that it is perfectly cool, clean and dry. Put the appliance away with the lid closed.
Questions & Answers on Baking
The bread sticks to the container after baking
Leave the bread to cool for about 10 minutes after baking – turn the container upside down. If necessary move the kneading peg shaft back and forth. Grease the kneading pegs before baking.
How do you avoid the forming of holes in the bread owing to the presence of the kneading pegs
You can remove the kneading pegs with your fingers covered with flour before leaving the dough to rise for the last time (see "Program Phase Timing" and the display messages). If do not wish to do so, use the hook after baking. If you proceed with caution, you can avoid the forming of a large hole.
The dough spills over when it is left to rise
This happens in particular when wheat flour is used owing its greater content of gluten.
Remedy:
a) Reduce the amount of flour and adjust the amounts of the other ingredients. When the bread is ready, it will still have a large volume.
b) Spread a tablespoon of heated liquefied margarine on the flour.
The bread rises and spills over anyway
a) If a V-shaped ditch forms in the middle of the bread, the flour does not have enough gluten. This means that the wheat contains too little protein (it happens during especially rainy summers) or that the flour is too moist.
Remedy:
add one tablespoon of wheat gluten for 500g of wheat.
b) If the bread has a funnel shape in the middle, the possible cause can be one of the following:
- the water temperature was too high;
too much water was used; - the flour was poor in gluten.
When can the lid of the bread baking machine be opened during the baking?
Generally speaking, it is always possible while the kneading is underway. During this phase small quantities of flour or liquid can still be added.
If the bread must have a particular aspect after baking, proceed as follows:
before the last rising phase open the lid with caution and shortly and carve the bread crust while it is forming with a sharp pre-heated knife, scatter cereals on it or spread a mixture of potato flour and water on the crust to give it a glossy finish. This is the last time that the lid can be opened, otherwise the bread will go down in the middle.
What do the type numbers for flour mean?
The lower the type number, the less roughage the flour contains and the lighter it will be.
What is wholemeal flour?
Wholemeal flour is made of all types of cereals including wheat. The term "wholemeal" means that the flour was ground from whole grain and hence it has greater contents of roughage thus making the wheat wholemeal flour darker. However, the use of wholemeal flour does not make the bread darker as it is widely believed.
What must be done when using rye flour?
Rye flour does not contain any gluten and the bread hardly rises. In order to make it easily digestible a rye wholemeal bread with leaven is to be made.
The dough will rise only if one part of 550 type flour is added to every four parts of rye flour without gluten.
What is the gluten in flour?
The higher the type number, the lower the gluten contents of the flour are and the less the dough will rise. The highest quantity of gluten is contained in 550 type flour.
How many different flour types are there and how are they used?
a) Corn, rice and potato flour are suitable for people allergic to gluten or for those who suffer from sprue or celiac disease.
b) Spelt flour is very expensive, but it is free from chemical additives because spelt grows on very pool soil and requires no fertilizers. Spelt flour is especially suitable for allergic people. It can be used in all those recipes described in the operating instructions requiring flour types 405, 550 or 1050.
c) Millet flour is especially suitable for people suffering from many allergies. It can be used in all recipes requiring flour types 405, 550 or 1050 as described in the operating instructions.
d) Durum wheat flour is suitable for baguettes thanks to its consistency and it can be replaced with durum wheat semolina.
How can fresh bread be made easier to digest?
If a mashed boiled potato is added to the flour and kneaded in the dough the fresh bread is easier to digest.
What doses of rising agent should be used?
For yeast and leaven which must be bought in different quantities follow the producer's instructions on the package and adapt the quantity to the amount of flour used.
What can be done if the bread tastes of yeast?
a) Often sugar is added to eliminate this taste. The adding of sugar makes the bread lighter in color.
b) Add 1 12 tablespoon of vinegar for a small bread loaf and 2 tablespoons for a large loaf to the water.
c) Use buttermilk or kefir instead of water. This is possible for all the recipes and it is recommended for the freshness of the bread.
Why does the bread made in an oven taste different from the bread made with the bread baking machine?
It depends on the different degree of humidity:
the bread is baked drier in the oven owing to the larger baking space, while the bread made in the machine is moister.
Questions & Answers on Bread Baking Machines
A table of problems that may occur is provided below:
| Problem | Cause | Solution |
| The machine or the display are without any function. | You have not inserted the mains plug. | Check the mains plug and the switch. |
| You have not switched on the on/off switch (L). | ||
| Smoke comes out of the baking compartment or of the vents | The ingredients stick to the baking compartment or on the outside of the baking tin | Pull out the plug and clean the outside of the baking tin or the baking compartment. |
| The bread goes down in the middle and is moist on the bottom. | The bread is left too long in the tin after baking and warming. | Take the bread out of the baking tin before the warming function is over. |
| It is difficult to take the bread out of the baking tin. | The bottom of the loaf is stuck to the kneading peg. | Clean the kneading peg and shafts after the baking. If necessary, fill the baking tin with warm water for 30 minutes. Then the kneading pegs can be easily removed and cleaned. |
| The ingredients are not mixed or the bread is not baked correctly. | Incorrect program setting. | Check the selected menu and the other settings. |
| The START/STOP key was touched while the machine was working. | Do not use the ingredients and start over again. | |
| The lid opened several timers while the machine was working. | After the last rising do not open lid. | |
| Long blackout while the machine was working. | Do not use the ingredients and start over again. | |
| The rotation of the kneading pegs is blocked. | Check that the kneading pegs are blocked by grains, etc. Pull out the baking tin and check whether the drivers turn. If this is not the case, send the appliance to the customer service. | |
| The baking tin jumps up during the kneading. | The side springs in the base inside the inner casing have lost tension. | Press the START/STOP key and interrupt the program. Pull out the container and push the springs slightly to the side. Insert the container again and close the lid. Start the program over again. |
| The dough is too thick. The kneading pegs are blocked and the container is pressed upwards. | Open the lid. Add some liquid to the dough and close the lid again. | |
| The appliance does not start. The display shows H:OT. | The appliance is still hot after the last baking cycle. | Press the START/STOP key until the basic setting appears on the display. Remove the baking tin and leave the appliance to cool. Then put the baking tin back in, set the program again and start. |
Questions & Answers on the Recipes
| Problem | Cause | Solution |
| The bread rises too fast. | - too much yeast, too much flour, not enough salt | a/b |
| - or several of these causes | ||
| The bread does not rise at all or not enough. | - no yeast at all or too little | a/b |
| - old or stale yeast | e | |
| - liquid too hot | c | |
| - the yeast has come into contact with the liquid | d | |
| - wrong flour type or stale flour | e | |
| - too much or not enough liquid | a/b/g | |
| - not enough sugar | a/b | |
| The dough rises too much and spills over the baking tin. | - if the water is too soft the yeast ferments more | f |
| - too much milk affects the fermentation of the yeast | c | |
| The bread goes down in the middle. | - the dough volume is larger than the tin and the bread goes down. | a/f |
| - the fermentation is too short or too fast owing to the excessive temperature of the water or the baking chamber or to the excessive moistness. | c/h/i | |
| The bread has a dip once the baking is over. | - not enough gluten in the flour | k |
| - too much liquid | a/b/h | |
| Heavy, lumpy structure | - too much flour or not enough liquid | a/b/g |
| - not enough yeast or sugar | a/b | |
| - too much fruit, wholemeal or of one of the other ingredients | b | |
| - old or stale flour | e | |
| The bread is not baked in the center. | - too much or not enough liquid | a/b/g |
| - too much humidity | h | |
| - recipe with moist ingredients | g | |
| Open or coarse structure or too many holes | - Too much water | g |
| - No salt | b | |
| - Great humidity, water too hot | h/i | |
| - Too much liquid | c | |
| Mushroom-like, unbaked surface | - Bread volume too big for the tin | a/f |
| - Too much flour, especially for white bread | f | |
| - Too much yeast or not enough salt | a/b | |
| - Too much sugar | a/b | |
| - Sweet ingredients besides the sugar | b | |
| The bread slices are unequal or lumpy | - Bread not cooled enough (the vapor has not escaped) | j |
| Flour deposits on the bread crust | - The flour was not worked well on the sides during the kneading. | g/i |
Solutions for the problems
a) Measure the ingredients correctly.
b) Adjust the ingredient doses and check that all the ingredients have been added.
c) Use another liquid or leave it to cool at room temperature. Add the ingredients specified in the recipe in the right order. Make a small ditch in the middle of the flour and put in the crumbled yeast or the dry yeast. Avoid letting the yeast and the liquid come into direct contact.
d) Use only fresh and correctly stored ingredients.
e) Reduce the total amount of the ingredients, do not use more than the specified amount of flour. Reduce all the ingredients by 1/3.
f) Correct the amount of liquid. If ingredients containing water are used, the dose of the liquid to be added must be duly reduced.
g) In case of very humid weather remove 1-2 tablespoons of water.
h) In case of warm weather do not use the timing function. Use cold liquids.
i) Take the bread out of the tin immediately after baking and leave it on the grid to cool for at least 15 minutes before cutting it.
j) Reduce the amount of yeast or of all the ingredient doses by 1/4.
k) Add a tablespoon of wheat gluten to the dough.
Remarks on the Recipes
1. Ingredients
Since each ingredient plays a specific role for the successful baking of the bread, the measuring is just as important as the order in which the ingredients are added.
- The most important ingredients like the liquid, flour, salt, sugar and yeast (either dry or fresh yeast can be used) affect the successful outcome of the preparation of the dough and the bread. Always use the right quantities in the right proportion.
Use lukewarm ingredients if the dough needs to be prepared immediately. If you wish to set the program phase timing function, it is advisable to use cold ingredients to avoid that the yeast starts to rise too early. - Margarine, butter and milk affect the flavor of the bread.
Sugar can be reduced by 20% to make the crust lighter and thinner without affecting the successful outcome of the baking. If you prefer a softer and lighter crust replace the sugar with honey. - Gluten which is produced in the flour during the kneading provides for the structure of the bread. The ideal flour mixture is composed of 40% wholemeal flour and 60% of white flour.
- If you wish to add cereals grains, leave them to soak overnight. Reduce the quantity of flour and the liquid (up to 1/5 less).
- Leaven is indispensable with rye flour. It contains milk and acetobacteria that make the bread lighter and ferment thoroughly. You can make your own leaven but it takes time. For this reason concentrated leaven powder is used in the recipes below. The powder is sold in 15 g packets (for 1 kg of flour). Follow the instructions given in the recipes (1/2, 3/4 or 1 packet). If less leaven that requested is used the bread will crumble.
- If leaven powders with a different concentration (100 g packet for 1 kg of flour) are used, the quantity of flour must be reduced by 80 kg for a 1 kg of flour.
- Liquid leaven sold in bags is also available and it is suitable for use. Follow the doses specified on the package. Fill the measuring beaker with the liquid leaven and top it up with the other liquid ingredients in the right doses as specified in the recipe.
- Wheat leaven which often comes dry improves the workability of the dough, the freshness and the taste. It is milder than rye leaven.
-
Use either the NORMAL or VOLLKORN program when baking leavened bread.
-
Baking ferment can used to replace the leaven. The only difference is in the taste. It is fit to be used in the bread baking machine.
- Wheat bran is added to the dough if you want particularly light bread rich in roughage. Use one tablespoon for 500g of flour and increase the quantity of liquid by 12 tablespoons.
- Wheat gluten is a natural additive obtained from wheat proteins. It makes the bread lighter and more voluminous. The bread falls in more rarely and it is more easily digestible. The effect can be easily appreciated when baking wholemeal and other bakery products made of home-milled flour.
- The black malt used in some recipes is dark-roasted barley malt. It is used to obtain a darker bread crust and soft part (e.g. brown bread). Rye malt is also suitable but it is not as dark. You can find this malt in whole food shops.
Pure lecithin powder is a natural emulsifier that improves the volume of the bread, makes the soft part softer and lighter and keeps it fresh longer.
2. Adapting the doses
If the doses need to be increased or reduced, make sure that the proportions of the original recipe are maintained. To obtain a perfect result, the basic rules below for the adapting of the ingredient doses must be following:
- Liquids/flour: the dough ought to be soft (not too soft) and easy to knead without becoming stringy. A ball can be obtained by kneading it lightly. This is not the case with heavy doughs like rye wholemeal or cereal bread. Check the dough five minutes after the first kneading. If it is too moist, add some flour until the dough has reached the right consistency. If the dough is too dry add a spoonful of water at a time during the kneading.
- Replacing liquids: When using ingredients containing liquids in a recipe (e.g. curd cheese, yogurt, etc.), the required amount of liquid must be reduced. When using eggs beat them in the measuring beaker and fill it with the other required liquid up to the envisaged amount.
If you are living in a place located at a high altitude (more than 750m ) the dough rises faster. The yeast can be reduced in these cases by 1/4 to 1/2 of a teaspoon to proportionally reduce its rising. The same is true of places with particularly soft water.
3. Adding and measuring the ingredients and quantities
- Always put in first the liquid and the yeast at the end. To avoid that the yeast acts too fast (in particular when using the timing function), contact between the yeast and the liquid must be avoided.
- When measuring use the same measuring units, that is to say use either the measuring spoon supplied with the bread baking machine or a spoon used in your home when the recipes require doses measured in tablespoons and teaspoons.
- The measures in grams must be weighed precisely.
- For the millimeter indications you can use the supplied measuring beaker which has a graduated scale of 50 to 300ml .
The abbreviations in the recipes mean:
EL = evel tablespoonspoonful (or large measuring spoon)
TL = level teaspoonful (or small measuring spoon)
g = grams
ml = milliliter
Packet = 7g dry yeast for 500g of flour corresponds to 20g of fresh yeast.
- Fruit, nuts or cereal ingredients. If you wish to add other ingredients, you can do so in specific programs (see the "Program Phase Timing" table), when you here the acoustic signal. If you add the ingredients too early, they will be crushed during the kneading.
4. Recipes for the BBA 2983 type bread baking machine
The following recipes are for various bread sizes. In some programs (see the "Program Phase Timing" table) a difference is made in the weights. We recommend you to use
STUFE 750g = for a loaf weight up to approx. 750g
STUFE 1000g = for a loaf weight up to approx. 1000g
STUFE 1250g = for a loaf weight up to approx. 1250g
5. Bread weights and volumes
- In the following recipes you will find exact indications regarding the bread weight. You will see that the weight of pure white bread is less than that of wholemeal bread. This depends on the fact that white flour raises more and hence limits need to be posed.
- Despite the precise weight indications there may be slight differences. The actual bread weight depends much on the air humidity of the room at the moment of the preparation.
- All breads with a substantial portion of wheat reach a large volume and exceed the container edge after the last rising in the case of the highest weight class. But the bread does not spill over. The part of the bread outside the tin is more easily browned compared to the bread in the tin.
- When the SCHNELL program is suggested for sweetbreads, you can use the ingredients in smaller quantities also for the SÜSSES BROT program to make a lighter bread.
6. Baking results
- The result of the baking depends on the on-site conditions (soft water – high air humidity – high altitude – consistency of the ingredients, etc.). Therefore, the recipe indications are reference points which can be adapted. If one recipe or another does not go straight the first time, do not let yourself be discouraged. Try to find the cause and try it again by varying the proportions.
If the bread is too pale after baking, you can leave it to brown with the baking program.
It is recommended to bake a test bread before actually setting the timing function for use overnight so that you can make the necessary changes if necessary.
Classic Bread Recipes
White Bread
| Level | 750 g | 1000 g |
| Bread weight approx. | 740 g | 1080 g |
| Water | 350 ml | 500 ml |
| Salt | 1 tsp | 1 1/2 tsp |
| Sugar | 1 tsp | 1 1/2 tsp |
| Durum wheat semolina | 150 g | 200 g |
| 550 type flour | 350 g | 500 g |
| Yeast | 3/4 packet | 1 packet |
| Program: WEISSBROT | ||
Nut & Raisin Bread
| Level | 1000 g | 1250 g | |
| Bread weight approx. | 900 g | 1180 g | |
| Water or milk | 275 ml | 350 ml | |
| Margarine or butter | 30 g | 40 g | |
| Salt | 1/2 tsp | 3/4 tsp | |
| Sugar | 1 tbsp | 2 tbsp | |
| 405 type flour | 500 g | 650 g | |
| Dry yeast | 3/4 packet | 1 packet | |
| Raisins | 75g | 100 g | |
| Crushed walnuts | 40g | 60g | |
| Program: SCHNELL or SÜSSES BROT | |||
| Tip: Add the raisins and nuts after the acoustic signal during the second kneading phase. | |||
| Attention! When using the SÜSSES BROT program the bread is lighter. Use the Level 1000 g doses, otherwise the volume is too large. | |||
Poppy Seed Bread
| Level | 1000 g | 1250 g | |
| Bread weight approx. | 850 g | 1380 g | |
| Water | 375 ml | 570 ml | |
| 550 type flour | 500 g | 670 g | |
| Corn semolina | 75 g | 130 g | |
| Sugar | 1 tsp | 1 1/2 tsp | |
| Salt | 1 tsp | 1 1/2 tsp | |
| Whole or milled poppy seeds | 50 g | 75 g | |
| Butter | 15 g | 20g | |
| Grated nutmeg | 1 Prise | 2 Prisen | |
| Grated Parmesan cheese | 1 tbsp | 1 1/2 tbsp | |
| Dry yeast | 3/4 packet | 1 packet | |
| Program: | SCHNELL or SÜSSES BROT | ||
| Tip: | Before the last rising open the lid briefly and coat the dough with some water and then spread the poppy seeds. Press the seeds delicately with your hand. | ||
| Attention! | When using the SÜSSES BROT program the bread is lighter. Use the Level 1000 g doses, otherwise the volume is too large. | ||
Coarse White Bread
| Level | 750 g | 1000 g |
| Bread weight approx. | 750 g | 950 g |
| Milk | 275 ml | 350 ml |
| Margarine or butter | 25 g | 30 g |
| Salt | 1 tsp | 1 1/2 tsp |
| Sugar | 1 tsp | 1 1/2 tsp |
| 1050 type flour | 500 g | 650 g |
| Dry yeast | 3/4 packet | 1 packet |
| Program: NORMAL | ||
Oat Bread
| Level | 1000 g | 1250 g |
| Bread weight approx. | 800 g | 1200 g |
| Water | 350 ml | 500 ml |
| Margarine or butter | 25 g | 30 g |
| Salt | 1 tsp | 1 1/2 tsp |
| Brown Sugar | 1 tsp | 1 1/2 tsp |
| Rolled oats – “Tender Flakes” | 150 g | 200 g |
| 1050 type flour | 375 g | 550 g |
| Dry yeast | 3¼ packet | 1 packet |
| Program: NORMAL | ||
Buttermilk Bread
| Level | 1000 g | 1250 g |
| Bread weight approx. | 860 g | 1150 g |
| Buttermilk | 375 ml | 550 ml |
| Salt | 1 tsp | 1 1/2 tsp |
| Sugar | 1 tsp | 1 1/2 tsp |
| 1050 type flour | 500 g | 760 g |
| Dry yeast | ¾ packet | 1 packet |
| Program: WEISSBROT | ||
Yogurt Wholemeal Bread
| Level | 1000 g | 1250 g |
| Bread weight approx. | 800 g | 1150 g |
| Water oder Milk | 250 ml | 300 ml |
| Yogurt | 150 g | 200 g |
| Salt | 1 tsp | 1½ tsp |
| Sugar | 1 tsp | 1½ tsp |
| Vinegar | ¾ tsp | 1 tbsp |
| Wheat wholemeal flour | 500 g | 700 g |
| Dry yeast | 1 packet | 1½ packet |
| Program: JOGHURT BROT | ||
Sweetbread
| Level | 750 g | 1000 g |
| Bread weight approx. | 750 g | 1080 g |
| Fresh milk | 275 ml | 400 ml |
| Margarine or butter | 25g | 35 g |
| Eggs | 2 | 4 |
| Salt | 1 tsp | 1 1/2 tsp |
| Honey | 2 tbsp | 3 tbsp |
| 550 type flour | 500 g | 700 g |
| Dry yeast | ¾ packet | 1 packet |
| Program: SCHNELL or SÜSSES BROT | ||
| Attention! When using the SÜSSES BROT program the bread is lighter. Use the Level 750 g doses, otherwise the volume is too large. | ||
ENGLISH
Raisin Bread
| Level | 1000 g | 1250 g | |
| Bread weight approx. | 850 g | 1100 g | |
| Water | 275 ml | 350 ml | |
| Margarine or butter | 30 g | 40 g | |
| Salt | 1/2 tsp | 3/4 tsp | |
| Honey | 1 tbsp | 2 tbsp | |
| 405 type flour | 500g | 650g | |
| Cinnamon | 3/4 tsp | 1 tsp | |
| Dry yeast | 3/4 packet | 1 packet | |
| Raisins/dry fruit | 75 g | 100 g | |
| Program: SCHNELL or SÜSSES BROT | |||
| Tip: Add the raisins or any other kind of dry fruit after the acoustic signal during the second kneading phase. | |||
| Attention! When using the SÜSSES BROT program the bread is lighter. Use the Level 1000 g doses, otherwise the volume is too large. | |||
Coarse bread
| Level | 750 g | 1000 g |
| Bread weight approx. | 780 g | 980 g |
| Water | 300 ml | 450 ml |
| Salt | 1 tsp | 1 1/2 tsp |
| Dried wheat leaven * | 25 g | 40 g |
| 1050 type flour | 500g | 750g |
| Sugar | 1 tsp | 1 1/2 tsp |
| Dry yeast | 3/4 packet | 1 packet |
| Program: WEISSBROT | ||
| * Wheat leaven improves the dough consistency, the freshness and the taste. It is milder than rye leaven. | ||
Onion bread
| Level | 1000 g | 1250 g |
| Bread weight approx. | 860 g | 1180 g |
| Water | 350 ml | 500 ml |
| Salt | 1 tsp | 1 1/2 tsp |
| Sugar | 1 tsp | 1 tsp |
| Grilled onions | 50 g | 75 g |
| 1050 type flour | 540 g | 760 g |
| Dry yeast | 3/4 packet | 1 packet |
| Program: SCHNELL | ||
Rye Bread
| Level | 750 g | 1000 g |
| Bread weight approx. | 780 g | 1050 g |
| Water | 350 ml | 450 ml |
| Dried leaven * | ½ packet | ¾ packet |
| Salt | 1 tsp | 1 ¼ tsp |
| Sugar | ½ tsp | ¾ tsp |
| Rye malt | 10 g | 15 g |
| Rye flour | 300 g | 400 g |
| 1050 type flour | 200 g | 260 g |
| Yeast | 1 packet | 1½ packet |
| Program: VOLLKORN | ||
| * Dried leaven is concentrated and it comes in 15g packets. | ||
Potato Bread
| Level | 1000 g | 1250 g | |
| Bread weight approx. | 1000 g | 1400 g | |
| Water or milk | 300 ml | 400 ml | |
| Margarine or butter | 25 g | 30 g | |
| Eggs | 1 | 1 | |
| Mashed boiled potatoes | 150 g | 200 g | |
| Salt | 1 tsp | 1 1/2 tsp | |
| Sugar | 1 tsp | 1 1/2 tsp | |
| 1050 type flour | 630 g | 780 g | |
| Dry yeast | 1 packet | 1 1/2 packet | |
| Program: SCHNELL | |||
Leavened Bread
| Level | 750 g | 1000 g |
| Bread weight approx. | 740 g | 1050 g |
| Dried leaven * | ½ packet | ¾ packet |
| Water | 350 ml | 450 ml |
| Bread spices | ½ tsp | ¾ tsp |
| Salt | 1 tsp | 1½ tsp |
| Rye flour | 250 g | 340 g |
| 1050 type flour | 250 g | 340 g |
| Dry yeast | 1 packet | ½ packet |
| Program: NORMAL | ||
| * Dried leaven is concentrated and it comes in 15g packets. | ||
Coarse Wholemeal Breads
Bavarian Wholemeal Bread
| Level | 1000 g | 1250 g | |
| Bread weight approx. | 850 g | 1180 g | |
| Water | 300 ml | 360 ml | |
| Wheat wholemeal flour | 400 g | 570 g | |
| Rye wholemeal flour | 125 g | 150 g | |
| Salt | 1 tsp | 1 1/2 tsp | |
| Caraway | 1 tbsp | 2 tbsp | |
| Average-sized potato, boiled and mashed | 100 g | 150 g | |
| Dried leaven | 1/2 packet | 3/4 packet | |
| Dry yeast | 3/4 packet | 1 packet | |
| Program: VOLLKORN | |||
| Tip: Instead of caraway you can use also 1/2 teaspoon (5g) of coriander, fennel or aniseed. | |||
Cereal Bread
| Level | 1000 g | 1250 g | |
| Bread weight approx. | 960 g | 1350 g | |
| Water | 450 ml | 650 ml | |
| Wheat wholemeal flour | 175 g | 250 g | |
| Rye wholemeal flour | 175 g | 250 g | |
| Coarse rye meal | 50 g | 70 g | |
| Unripe spelt grain meal | 50 g | 70 g | |
| Buckwheat meal | 50 g | 70 g | |
| Sunflower seeds | 35 g | 50 g | |
| Pumpkin seeds | 35 g | 50 g | |
| Linseeds | 1 tbsp | 1 1/2 tbsp | |
| Sesame | 1 tbsp | 1 1/2 tbsp | |
| Salt | 1 tsp | 1 1/2 tsp | |
| Honey | 1 tsp | 1 1/2 tsp | |
| Dried leaven | 1/2 packet | 3/4 packet | |
| Dry yeast | 1 packet | 1 1/2 packet | |
| Program: VOLLKORN | |||
Spelt Bread
| Level | 1000 g | 1250 g | |
| Bread weight approx. | 940 g | 1350 g | |
| Buttermilk | 400 ml | 500 ml | |
| Spelt wholemeal flour | 230 g | 280 g | |
| Rye wholemeal flour | 180 g | 230 g | |
| Coarse spelt meal | 180 g | 180 g | |
| Sunflower seeds | 75 g | 100 g | |
| Salt | 1 tsp | 1 1/2 tsp | |
| Sugar | 1 tsp | 1 1/2 tsp | |
| Dried leaven | 3/4 packet | 1 packet | |
| Dry yeast | 3/4 packet | 1 packet | |
| Program: | NORMAL | ||
| Tip: | Open the lid of the appliance briefly before the last rising, wet the bread with warm water, spread the spelt or rolled oats and press them slightly with your hand. | ||
Pollard Bread
| Level | 1000 g | 1250 g |
| Bread weight approx. | 850 g | 1350 g |
| Water | 350 ml | 570 ml |
| Margarine or butter | 30 g | 40 g |
| Salt | 1 tsp | 1 1/2 tsp |
| Sugar | 1 tsp | 1 1/2 tsp |
| Wheat pollard | 75 g | 100 g |
| Wheat germs | 50 g | 70 g |
| Vinegar | 1 tbsp | 1 1/2 tbsp |
| Wheat wholemeal flour | 400 g | 650 g |
| Dry yeast | 3/4 packet | 1 packet |
| Program: VOLLKORN | ||
Brown Bread
| Level | 1000 g | 1250 g |
| Bread weight approx. | 920 g | 1080 g |
| Water | 400 ml | 450 ml |
| Coarse rye wholemeal | 180 g | 180 g |
| Rye wholemeal flour | 180 g | 180 g |
| Wheat wholemeal flour | 230 g | 280 g |
| Black malt (made of roasted barley malt – sold in whole food shops – it gives a dark color to the inside of the bread | 10 g | 15 g |
| Salt | 1 tsp | 1 1/2 tsp |
| Sunflower seeds | 75 g | 100 g |
| Dark beet syrup | ¾ tsp | 1 tbsp |
| Dry yeast | ¾ packet | 1 packet |
| Dried leaven | ¾ packet | 1 packet |
| Program: VOLLKORN | ||
Pure Wheat Wholemeal Breadt
| Level | 1000 g | 1250 g |
| Bread weight approx. | 860 g | 1150 g |
| Water | 350 ml | 550 ml |
| Salt | 1 tsp | 1 1/2 tsp |
| Vegetable oil | 1 tbsp | 1 1/2 tbsp |
| Honey | 3/4 tsp | 1 tsp |
| Beet syrup | 3/4 tsp | 1 tsp |
| Wheat wholemeal flour | 500 g | 760 g |
| Genuine wheat gluten | 3/4 tbsp | 1 tbsp |
| Dry yeast | 3/4 packet | 1 packet |
| Program: VOLLKORN | ||
Dough Preparation
You can easily prepare dough with the TEIG program of your bread baking machine. The dough can be further worked and baked in your oven.
During the 2nd kneading phase add the ingredients when you hear the acoustic signal.
In the TEIG program there are no differences in the baking levels. We will provide the doses that can be prepared. Here are a few recipes:
French Baguette
| Bread weight approx. | 850 g | 1280 g |
| Water | 375 ml | 550 ml |
| Dried wheat leaven | 25 g | 50 g |
| Salt | 1 tsp | 1 1/2 tsp |
| Sugar | 1 tsp | 1 1/2 tsp |
| 550 type flour | 525 g | 700 g |
| Durum wheat flour | 75 g | 100 g |
| Dry yeast | 3/4 packet | 1 packet |
| Program: TEIG | ||
- Divide the dough when ready into 2 - 4 parts, form long loaf shapes and leave them to rest for 30 - 40 minutes. Make a series of diagonal cuts on the top surface and put the bread to bake in the oven.
Coffee Cake
| Ingredients for a cake pan of | 22 cm Ø | 26 cm Ø |
| Milk | 170 ml | 225 ml |
| Salt | 1¼ tsp | 1½ tsp |
| Egg yolk | 1 | 1 |
| Butter or Margarine | 10 g | 20 g |
| 550 type flour | 350 g | 450 g |
| Sugar | 35 g | 50 g |
| Dry yeast | 1½ packet | 3¼ packet |
| Program: TEIG | ||
Take the dough out of the container and work it.
- Make a round or square shape with it and add the following fillings.
| Melted butter | 2 tbsp | 3 tbsp |
| Sugar | 75 g | 100 g |
| Grated cinnamon | 1 tsp | 1 1/2 tsp |
| Crushed nuts | 60 g | 90 g |
Icing, as much as you like
- Spread the butter on the dough.
- Mix the sugar, cinnamon and nuts in a bowl and spread them on the butter.
- Leave the dough to rest for 30 minutes in a warm place and then bake.
Pretzels
| Ingredients for pretzels | 9 pieces | 12 pieces |
| Water | 200 ml | 300 ml |
| Salt | 1/4 tsp | 1/2 tsp |
| 405 type flour | 360 g | 540 g |
| Sugar | 1/2 tsp | 3/4 tsp |
| Dry yeast | 1/2 packet | 3/4 packet |
| 1 egg (slightly beaten) to spread | ||
| Coarse-grained salt to spread | ||
| Fill all the ingredients except the egg and coarse-grained salt in the container. | ||
| Program: TEIG | ||
- When the acoustic signal rings and the display shows 0:00, press the START/STOPP key.
- Heat the oven to 230^ .
- Divide the dough into pieces and form a long thin roll out of each piece of dough.
- Make the pretzels and lay them on a greased baking tin.
- Coat the pretzels with the beaten egg and then spread the salt.
- Bake the pretzels at 200^ C for 12-15 minutes in the preheated oven.
Noodle mixture
| 405 type flour | 250g | 500g |
| Water | 2-3EL | 4-6EL |
| Salt | 1½ tsp | 1 tsp |
| Eggs | 2 | 4 |
| Program: NUDELTEIG | ||
Marmalade
It is easy to make jams or marmalades with the bread baking machine. Even if you have never made marmalade before, it is worth giving it a try. You can be sure to make especially tasty marmalades.
Proceed as follows:
- Wash fresh, ripe fruit. Peel the apples, peaches, pears and other hard-peeled fruits.
- Always use the recommended doses, as these are precisely determined for the MARMELADE program. Otherwise the marmalade risks to boil too early or to spill over.
- Weigh the fruit, cut it into small pieces (max 1 cm) or make a puree with it and put it into the container.
- Add the 2:1 jellifying sugar in the specified quantities. Do not absolutely use normal sugar or 1:1 jellifying sugar, as the jam will not be thick enough.
- Mix the fruit with the sugar and start the program that runs completely automatically.
After 1'20" the acoustic signal is given. You can fill the marmalade into glass jars. Close the jars well.
Strawberry Jam
| Washed and cleaned fresh strawberries, either cut into pieces or pureed | 900 g |
| 2:1 jellifying sugar | 500 g |
| Lemon juice | 1 tbsp |
- Mix all the ingredients in the container with a plastic scraper.
- Select the MARMELADE program and start.
- Remove the sugar remains on the side of the container with a spatula.
- When the acoustic signal is given, take the container out of the appliance with oven cloths.
- Fill the marmalade into glass jars and close them well.
Technical Data
Model: BBA 2983
Voltage: 230 V, 50 Hz
Power input: 800 W
Protection class:
Capacity: 3 liters
(equal to approx. 1,250 g of bread)
This device has been tested according to all relevant current CE guidelines, such as electromagnetic compatibility and low voltage directives, and has been constructed in accordance with the latest safety regulations.
Subject to technical changes without prior notice!
Guarantee
The device supplied by our Company is covered by a 24 month guarantee starting on the date of purchase (receipt).
During the life of the guarantee any fault of the device or its accessories *) ascribable to material or manufacturing defects will be eliminated free of charge by repairing or, at our discretion, by replacing it. The guarantee services do not entail an extension of the life of the guarantee nor do they give rise to any right to a new guarantee!
Proof of the guarantee is provided by the proof of purchase. Without proof of purchase no free replacement or repair will be carried out.
If you wish to make a claim under the guarantee please return the entire machine in the original packaging to your dealer together with the receipt.
*) Damage to accessories does not mean automatic free replacement of the whole machine. In such cases please contact our hotline. Broken glass or breakage of plastic parts are always subject to a charge.
Defects to consumables or parts subject to wearing (e.g. motor pistons, kneading blades, drive shafts, spare remote control, spare toothbrushes, saw blades, etc.) as well as cleaning, maintenance or the replacement of said parts are not covered by the guarantee and hence are to be paid!
The guarantee lapses in case of unauthorized tampering.
After the expiry of the guarantee
After the expiry of the guarantee repairs can be carried by the competent dealer or repair service against the payment of the ensuing costs.

CHATRONIC®
INTERNATIONAL GMBH
D-47906 Kempen/Germany · Industriering Ost 40
Telefon 02152/2006-888
Internet: http://www.clatronic.de·email: info@clatronic.de