Max Sport - Kids tricycle Chipolino - Free user manual and instructions
Find the device manual for free Max Sport Chipolino in PDF.
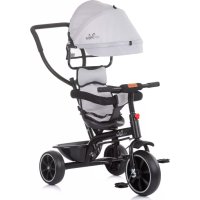
| Product type | Child tricycle |
| Brand | Chipolino |
| Model | Max Sport |
| Recommended age | From 1.5 years |
| Maximum user weight | 25 kg |
| Main materials | Plastic and metal |
| Assembly | By an adult only, tools not provided (screwdriver, wrench) |
| Adjustments | Adjustable height and tilt handlebar, adjustable parent handle (2 positions), 360° rotatable seat, reclining backrest |
| Included accessories | Folding canopy, front basket (capacity 0.2 kg), rear basket (capacity 0.5 kg), cup holder, safety rail, footrest, steering column |
| Safety | Adult supervision required, no brakes, do not use on roads, remove parent handle in self-drive mode |
| Usage | Flat and safe surfaces, away from vehicles, only during the day |
| Maintenance | Clean with soft cloth and mild detergent, lubricate mechanisms, do not immerse |
| Storage | In a clean and dry place, protected from sun, rain and humidity |
| Spare parts | Use only genuine Chipolino parts |
| Repairability | Contact the retailer or authorized service, do not modify the structure |
| Wheel type | 3 wheels (one front, two rear) with mudguards |
| Folding | Folding canopy, foldable footrest and handlebar |
Frequently Asked Questions - Max Sport Chipolino
User questions about Max Sport Chipolino
0 question about this device. Answer the ones you know or ask your own.
Ask a new question about this device
Download the instructions for your Kids tricycle in PDF format for free! Find your manual Max Sport - Chipolino and take your electronic device back in hand. On this page are published all the documents necessary for the use of your device. Max Sport by Chipolino.
USER MANUAL Max Sport Chipolino
TO ASSURE SAFE USAGE OF THIS PRODUCT
FOLLOW ALL WARNING, INSTRUCTIONS AND
RECOMMENDATIONS GIVEN IN THIS USER MANUAL!
WARNING!
WARNING! USE ONLY UNDER DIRECT ADULT SUPERVISION!
WARNING! THIS TOY DOES NOT HAVE BRAKES!
WARNING! THIS TOY IS NOT SUITABLE FOR CHILDREN UNDER 1.5 YEARS OF AGE!
WARNING! FOR USE BY CHILDREN AGED 1.5 YEARS AND ABOVE AND A MAXIMUM CHILD WEIGHT OF 25 KG.
WARNING! DO NOT USE IF THE CHILD WEIGHS OVER 25 KG TO AVOID OVERLOADING THE TOY STRUCTURE!
WARNING! BEFORE USING, INSTRUCT THE CHILD ON PROPER USE AND SAFETY RULES.
WARNING! USE THE TOY ONLY AS INTENDED.
WARNING! USE THE TOY ONLY DURING DAYLIGHT ON LEVEL, SECURED AREAS, AND AT A SAFE DISTANCE FROM STREETS AND ROADS WITH VEHICLE TRAFFIC.
WARNING! TO AVOID INJURY RISK, ALWAYS REMOVE THE PARENT HANDLE WHEN THE CHILD IS OPERATING THE TOY INDEPENDENTLY!
WARNING! KEEP AWAY FROM FIRE AND OTHER HEAT SOURCES!
The assembly of the TOY must be performed ONLY by an adult!
Do NOT allow children under 3 to be present before the TOY is fully assembled to avoid access to small and unassembled parts.
This TOY tricycle is intended for one child ONLY.
Do NOT allow children to push the tricycle!
This TOY is NOT suitable for running or sliding!
Do NOT use the TOY if you find missing or damaged parts.
Do NOT allow the child to stand on the footrest or seat to avoid injury.
The child should wear shoes when using the TOY!
Do NOT attach additional straps or accessories to the TOY to avoid risk of strangulation!
Do NOT load more than 0.5kg in the rear storage basket and no more than 0.2kg in the front basket.
Do NOT place objects or luggage on the handlebar and parent handle to prevent the risk of injury from overloading, imbalance, or tipping the TOY!
During storage and transportation, do NOT place items or heavy objects on the TOY to avoid structural damage.
Do NOT use another vehicle to pull the TOY!
Do NOT allow the child using the TOY or children nearby to touch the wheels or place objects in them!
Use away from rivers, pools, stairs, or obstacles!
Do NOT make changes or modifications to the structure of the TOY! If necessary, contact the retailer or authorized service for consultation and repairs.
Do NOT use spare parts and other components not provided by the manufacturer! The manufacturer does not assume responsibility for safety if non-original or unapproved parts are used.
- Keep plastic packaging away from children to avoid suffocation risks!
PRODUCT FEATURES
The TOY is suitable for children aged over 1.5 years and weighing up to 25kg
This is a functional TOY designed to develop your child's initial skills in handling and coordinating hand and foot movements when independently operating a tricycle or bicycle.
WARNING! Remove the parent handle when you are confident that the child can ride and control the tricycle independently.
ASSEMBLY AND FUNCTIONS
1. MAIN PARTS
- Frame
- Fork
- Front wheel
- Rear wheel
- Handlebar
- Parent handle
- Canopy
- Seat
-
Padding
-
Safety rail
- Cup/bottle holder
- Front storage basket
- Fender
- Rear storage basket
- Accessories
- Steering shaft
Please check that the described unassembled parts are present in the package. Some parts of the toy may be pre-assembled by the manufacturer.
IMPORTANT! Follow the instructions and assembly sequence exactly as outlined in the text and illustrations in this manual.
WARNING! CHECK THE FIXING SECURITY AFTER COMPLETING EACH OPERATION!
WARNING! Tighten the screws well but do not overtighten. Loose screws may lead to disassembly of product parts and injury to the child.
Required tools: wrench and screwdriver (not included).
2. INSTALLING THE FORK (WITH FRONT WHEEL AND FENDER) TO THE FRAME TUBE
2-1 - Place the fender (13) between the two tubes of the fork, as shown in the illustration.
2-2 - Secure the fender with a screw using a screwdriver.
2-3 - Attach the front wheel to the fork tubes. Press the pins (a) and insert until the pins are visible through the holes. You will hear a "click" when it's secured.
2-4 - Place the caps (from the accessories set - 15) on the front frame tube, as shown in the illustration.
2-5 - Insert the fork tube through the front frame tube.
3. INSTALLING THE HANDLEBAR
3-1 - Remove the screw (b) and nut attached to the handlebar.
3-2 - Place the front storage basket, then attach the handlebar to the fork so the fork and handlebar holes align. Secure with the screw and nut (c).
3-3 - Simultaneously press buttons (d) and move the handlebar forward or back to adjust its height.
4. INSTALLING THE REAR WHEELS
4-1 - Attach the rear axle (e) to the rear wheel.
4-2 - Attach the rear wheel to the frame and press until you hear a "click." Check that the wheel is secure by pulling it from the frame. Attach the other rear wheel in the same manner.
4-3 - To remove each wheel, press the release button (f) and pull the wheel off.
4-4 - Press and attach a decorative cap (g) from the accessories set (15) onto each wheel.
5. INSTALLING THE PARENT HANDLE
5-1 - Insert the plastic sleeves on both sides of the frame, as shown.
5-2 - Press the pin (h) and slide the lower part of the parent handle through.
5-3 - Press the pin (h) and insert the upper part over the lower part of the parent handle until you hear a "click" and the pin appears through the hole.
5-4 - To remove, move the red lever down, press the pin, and detach both parts of the parent handle.
6. INSTALLING THE SEAT
6-1 - Always ensure the red lever on the parent handle is up before installing the seat.
6-2 - Remove the nuts from the screws underneath the seat.
6-3 - Position the seat on the frame (the screws should go through the holes) and secure with the nuts.
Here is the full translation of the remaining assembly steps and maintenance instructions.
7. INSTALLING THE PADDING
7-1 - Place the padding over the seat.
7-2 - Thread the shoulder straps through the openings in the padding and seat.
7-3 - Twist the end of the shoulder straps, as shown in the illustration, to secure them to the seat.
7-4 - After installing the safety rail (see step 8), position the part of the padding between the child's legs over the rail and secure with snap buttons.
8. INSTALLING THE SAFETY RAIL
Insert each arm of the safety rail into the side openings on the seat, as shown in the illustration. Push until you hear a "click" and it locks into place. To remove the rail, press the release buttons (K) on both sides and pull the rail outward.
9. INSTALLING THE CANOPY
Insert both ends of the canopy into the corresponding holders on the seat, as shown in the illustration.
10. INSTALLING THE STEERING SHAFT
10-1 - Place the cap (m) on the fork bracket.
10-2 - Insert the bent end of the steering shaft into the corresponding hole in the fork bracket (with the cap in place).
10-3 - Unfold the footrest. Attach the other end of the steering shaft to the bracket at the bottom
of the parent handle and secure it with a nut using a wrench.
11. INSTALLING THE REAR STORAGE BASKET
11-1 - Remove the plastic-head screw (n) from the rear storage basket.
11-2 - Position the rear basket at the back of the frame, aligning the holes on the basket and frame, then secure with the plastic-head screw.
12. INSTALLING THE CUP/BOTTLE HOLDER
The cup or bottle holder can be installed on either side of the parent handle. Slide the holder down onto the desired side of the handle to secure it.
13. FOLDING AND UNFOLDING THE CANOPY
Pull to unfold or push with your hand to fold the canopy.
14. ROTATING THE SEAT 360^
Press the red button below the seat and rotate the seat. After rotation, the seat can be locked in two positions - facing forward or facing the adult. A "click" will be heard when secured in each position.
15. FOLDING THE FOOTREST TOWARDS THE FRAME
Fold the child's footrests inward. Press the outward pin (1) and rotate the entire footrest upward. A "click" will indicate that it is secured. To unfold, press the outward pin (1) and rotate the footrest down.
IMPORTANT! When the tricycle is operated by an adult, use the footrest unfolded, and fold it inward when the child is controlling the tricycle independently.
16. ADJUSTING THE PARENT HANDLE HEIGHT
The parent handle can be adjusted to two height positions.
16-1 - Press the pin (2) and move the handle up or down to the desired position. The pin (2) should lock into the hole with a "click."
16-2 - For extra security, move the red lever up to lock the chosen position.
17. ADJUSTING THE HANDLEBAR POSITION
Press the buttons (d) simultaneously and move the handlebar forward or backward to adjust its position.
18. UPPER FOOTREST FOR THE CHILD
The upper footrest (a) is stored under the seat. To use, pull it out with both hands as shown in the illustration.
19. ADJUSTING THE SEAT BACKREST
The backrest can be set in an upright or reclined position in both seat orientations - facing forward or backward toward the adult.
19-1 - Seat facing forward - Press the backrest adjustment buttons (b) simultaneously and set the backrest to either upright or reclined.
19-2 - Seat facing the adult - Rotate the seat to face the adult. Fold the handlebar (1), pull out the upper footrest (2), and press the adjustment buttons (b) simultaneously to recline the backrest (3).
The tricycle can be operated by an adult using the parent handle or by the child independently after removing the parent handle, canopy, and safety rail.
WARNING! REMOVE THE PARENT HANDLE ONLY WHEN YOU ARE CONFIDENT THAT THE CHILD CAN OPERATE THE TRICYCLE INDEPENDENTLY.
MAINTENANCE AND CARE INSTRUCTIONS
Periodically check the condition of each part.
Do not immerse the TOY in water. Clean with a soft cloth dampened with water or a neutral liquid cleaner.
Do not clean with harsh cleaners containing abrasives, ammonia, bleach, or alcohol.
Regularly lubricate the moving mechanisms.
Avoid using on sandy surfaces.
Do not store the TOY in hot areas or near heat sources to prevent deformation.
Store the TOY in a clean, dry place. Avoid exposing it to environmental conditions such as direct sun, rain, humidity, or sudden temperature changes!
Always dry the TOY thoroughly before storing it to prevent mold if stored while damp.
For normal operation issues, consult an authorized service center for repairs.
CARACTERISTIQUES DU PRODUIT
YNYTCTABA IN IPNOPYKA Y OBOM IPIPUPHNIKU!
yN03OPEHbA!
UNo3OPEHBe! KOpNCTHTIcAMO IOJ DnIPEKTHIM HAn3OPOM ODPACNEOCOBe!
YNO3OPEHBe! OBA INIPTAUPKA HEMA KOUHNUE!
YNO3OPEHBe! OBA INIPTAUPKA HINJE NIOODHA 3A DEUY MIAJbU OD 1,5 IOnHE!
YNO3OPEHBe! HAMEHbEHO DEU CTAPJOJ O1,5TOINHE N MAKcIMAJHE TEXHHe DO 25 Kf.
YIO3OPEHBeIHE KOPNCTITNAKO DETE NABNIJE OJ25K-ONACHOCTODPENEOTEPETHEKA KOHCTPYKUNJE!
UPOE! PPE YOTPEBE UYNTIN DETE Y PPABUNHUY OTPEBY IN PABNJBA E3BENHOCTN.
UNo3OpeHBe! KOpNCTHTNIIITPAUKy CAMO Y IPEBUNBEHE CBPXE.
YNO3OPEHBe! KOPNCTHTI INIPAUKY CAMO NO DAHY, HA PABHIM I OBE3BETEHIM IOBPWHAMA,DAJEKO OJ YNJUCA I CAOBPATAJA.
YIIO3OPEHbE! Ia Bn CE IN36EJIa IOBPeDA, YBEK YKJIOHHTN POINTEJBCKy PYKv KADA JETECAMOCTAJHO KOPNCIn NIPAAky!
YNO3OPEHBeI DPKATN DAJIbE OJ BATPE N PPyTNX IN3BOPA TOINOTE!
CacTabbabe He ngpaueke Mopa o6aBntn NCKJbUyHBO Odpacna oc6ba.
He Do3BOnITn Deu MnaJoh oD 3 roDInHe npCycTBo npe Hero uTo je ngpaKa y notnyHocTn cKnonJIbeHa - onaCHOCT OJ MaNIX DeNoBa.
Obaj TpoToUkaW je HameHbEn cAmO 3a jeIHO dTe.
He do3BONHTn Deu n da rypajy TpoToKaI.
Irrpaauka Hnje noroHa 3a Tpuahe nn KIn3aHe.
Hekopncttu ako HeocTajy nn cy oUteheHn JeIOBn.
He do3BOnHn DeTeTy da cToJn Ha ocNoHcy 3a Hore nn CeDnHTy.
Te Mopa Hocu n oyhy TKOM yntpe6e.
He npuBpuHnBaTn DoaTne TpaKe nn DoaTke - onaCHOCT OI ryeHa.
He onTepehnuBn Bnue 0,5 k y 3aHb y Kopny n Bnue oD 0,2 k y npedhy Kopny.
He cTaubbTu npedMeTe nn npTbaH a ynpabBa u nn pOnteBcKy pyKy - onachocT od npeBpTaHa nn noBpeDe.
Pn cKnadniTeHy n TpaHcnpTy He CTabBaTn Tepe Tnn TeWeKe npedMeTe Ha irpaay Da 6n ce n3berna othe KaOHCTpyKuJe.
He Byhni ngpauchky dpyHM BO3HJOM.
He 03Bolntu DeTeTy Koje Kopnctu nIrpauky IIN dpyroj deu y 6bn3nH da do npjy ToKOBe nn y6auyj npedMeTe y Hux.
Kopncntn daNEKO od peka, 6a3eHa, cTeeneHua n npenpeka.
He BpHInu 3MeHe nn MoNnKauJe KOHcTpyKuJe. 3a cepBnC ce o6paTn npOaBcy nn OBnaShenom cepBnCy.
He KopnCTHT pe3epBHe deNoBe KoJn Hcy od npOn3Bohajau - npOn3Bohaju He odroBa 3a 6e36dHocT npu ynoTpe6n HeopnHaHnHex DeNoBA.
Pnactny ambaanky dpkaTn BaH domaaja dee - onachocT od ryweha.
KAPAKTEPNUCTNIKE IPOU3BOIDA
IrrpaJe noroHa 3a deu cy stapiny od 1,5 roHHe n TeKHe do 25 kr.
Obo je yHKUHOHaHa nIgpaKa HameHeHa pa3Bojy noeTHnx BeHTnHa DeTeTa y pyKOBaBy I KoopDInHaunj npokpeTa pykU Hory npu cAmocTaNHom ynpaBbaBy TpoToKhAem nn 6nuklom.
YNO3OPEIe! YKNoHnTn poNTeBcKy pyKy KaJa cTe CnrypHn Da DeTe MoKe CamoCTaJIHo Da BO3N I KOHTPOJIWe TpoToUkaI.
CKJIAPANBE IN ΦYHKUNJE
1.ГЛABHINДЕЛOBN
- PaM
- Bnbyka
- PpeHbToaK
4.3aHbTuayak - Ynpabbaay
- POnTeBcKa pyUka
- HndctpeuHnua
- CeDnIuTe
- Nopnora
- 3aHTnTHa npeUka
11.Држачачу/фпашиу - PpeHbKa Kopna
13.Блатобразн - 3aɪbɑkɒpɑ
- Ппбор
- YnpabBbauka ocobna.
PpOBepnte da Jn cy CBN HabeJeHn HeCACTaBJIbeHn DeJIOBn PnpCyTHn y NaKeTy. HeKn DeJIOBn Mory 6HTN npeTxOJHO CKJONJIbeHn Od CTpaHe npOn3BOJaua.
BAXHO! Патуе уntcTa в рedingд слanaы taMu Кадо щпсану TeKCTу Илүстрацида.
YNO3OPEHbE! PIOBepTe yUbpshnBaHe NaKoH CBAkor Kopaka! 3aBPHTe BnJke YBpCTo, An He npBnue - na6abN BuJm MOry n3a3BaTn Packnanahe n NobpeDy Deteta.
IotppebaH anaT: KJbU N oDnjua (Hncy yKJbUyeH).
2. MOHTAXA BnJbUwKE (CA INPEdHbIM TOcKOM IN BJIATOBPAHOM) HA PAM
2-1:ПocTaBnTn 6NaTo6paH (13) n3MeHy dBe ueBn BnByIke.
2-2:YyBpCTnTn 6NaTo6paH BujkOM.
2-3:ПичВрстNTиnpeДиToчakHaBnByuKky - npITNCHTN NINHOBe (a)doK He ,KNKHy".
2-4: Пoctabитканицe (n3 npnbopa 15)Ha npedby ueb paMa.
2-5: YMeTHyTn UeB BnByUke Kpo3 npEiHy UeB paMa.
3. MOHTAXA ynpabjbauA
3-1: CkHnTe Bjuak (b) n HApTky ca ynpabJbaya.
3-2: NocTaBnTe npEdbky Kopny, 3aTm ynpabBaH a BnBykky Tako da ce pyne noklanajy. YUbpCTnTE BuJkom HABpTKOM (c).
3-3:Исторемно ппунштей дугмад (d) И подеситу вису.
4. MOHTAXA 3AДьnx TOUKOBA
4-1:Прикльуне OCOBину (e) Ha 3aДи ToyaK.
4-2:ПичВрCTNTeTOUaKHa pamДOKHeЧуjete "КИн"ПюверпTe NOBlaueHbEm.ПоновITE 3a dpyrToaK.
4-3: 3a cnndahe npntncnTe dyrme (f) n n3Bucnte TOHaK.
4-4: CtabNTe IekopatNBHy Kaniu (g) n3 np6opa Ha CBaKn ToaK.
5. MOHTAXA POДNTEJBСКЕ_PYЧКЕ
5-1: YmTe nactnue haype ca o6e ctpahe pama.
5-2:Припсніт e nH (h) n npOBuNTe doBn deo pyuKe.
5-3:ПиТСнITE nIN (h) n yMeTHnTe rOpHb n Deo npeko DoHer dOK He ,KNKHe".
5-4: 3a cnndahe nomepuTe uPBEny nonnyr HaoJe, npTnCHNe nnH n pa3DBojnte deIOBe.
6. MOHTAXA CEDNUTA
6-1: YBepnte ce da je uPBeHa nonyra Ha pyuKn noDnHyTa.
6-2: CkHHTe HABPTke ca Bnjaka nCnoD ceNnTa.
6-3: NocTaBnTe ceiHnTe Ha pam n yUbpcTnTe HABpTKama.
7. NOCTABJbAHe NODIOFE
7-1: Ctabnte noDnory npeko ceiWtA.
7-2: IpoBvUTe KaIWeBe KpO3 OTBope.
7-3:3abjte kpaJ kaunueBa da ux fncnpaTe.
7-4: Nocne yrpaHbe 3aHTnThe npeyke (TaKa 8), fHKcnpajTe Deo noDnore n3MeHy Hory.
8. MOHTAXA 3AUHTITHE INPEUKE
YMeTHnTe Kpake npeUke y 6oUHe OTBOpe ceNtTa DOK He "KInKHy".3a cKnDaIbe npITnCHnTe dYrMaI (K).
9. MOHTAXA HADCTPEUSHNUE
YMeTHnTe o6a Kpaja y DpKauhe Ha ceiHHTy.
10. MOHTAXA YNPABJaAчKEOCOBHHe
10-1: NocTaBnTe KaHnUy (m) HaДрЖaU BnJbUshKe.
10-2: YmTeHnTe cabJeHn Kpaj oCOBHe y OTbOp dPkkaHa.
10-3:Пичврстпдуг Края 3а Джай Н родnteьсков руки И оснчypajTe HaBPtKOM.
11. MOHTAXKA 3AДьE KOPПЕ
11-1: CkHnTe BnjaK ca nnaCTnHOM rnaBOM (n).
11-2:ПoctabiteКорnyиУчрстITEВьkom.
12.ДРЖАЧЗAЧАШУ/ФЛАшИСY
IocTaBnTe ra Ha XeJbeHy cTpaHy poDnTeJbCKe pyUke n rypHnTe HADone.
13. CKJIAPANAHB/E/PACKJIAPANAHB E HADCTPEUHNUCE
NobuyuTe da packlonnTe, rypHNe da cklonnTe.
14. POTAUJIJA CEDNIJTA 360^
PnTCHNTe CpBeHo DyRMe NcNoD CeDnWTa N OKpeHnte ra. 3aKbUyaba ce y noNoXaje ,HaPeD" IIN ,Ipema OdpacnOM".
15. CKJIAPANHEOCJIOHua3AHOFE
PnTncHnte cnoJbHN nH (1) n OkpeHnte ocNoHa..KnK" 03Haayaba qnknpaHe.
BAKHO! Kaia odpacnny npabbajy, ocnoha mopa 6ntn packnonbeH; KaI dTe cmo BO3N- CKNONbeH.
16. NODEUBAHbE BnCnHEPOINTEJBCKe Puyke
PnTncHte nH (2) nOdecnte Ha XeJbeHy BnCnHy dOK He ,KInkHe". 3a doaTHy cnryphocT noDnHnte uPBeHy nonyry.
17. NOIDEWABAHBe YNPAJBbAuta
PnTnCHnTe DyMa(d) n nomepajte HappeHa3a.
18. TOPHbN OCLIOHAU 3A HOFE
CknadnWTeH nCnoD ceNwTa. N3ByuNTe oBe pyKe da KopnCTnte.
19. ПОДЕШАВАБЕ HACJOHA CEDИШТА
Mоже ьntи успавно пи блaro harHyTo,у оba cmepa opиJTauNiJe.
19-1: Hanpei - npntncnTe dymaI (b) n noDECHTe.
19-2:Прema ODPacnOM - OKpeHnTe ceDnUTe, CKIOnnTe ynpaBbau, n3ByuTe rOpHbOcNoHaU IN PpNTuCHnTe dYrMaI (b).
TpoToUkaWeM MoKe ynpaBbAtn Odpacna ocoba npeKo poDnteJbCKe pyKe nIi DeTe camocTaJIHO nocNe ykNaHbHaBy puKe, HndCTpeShnCe n 3aWtNTHe npeKe.
YN03OPEHbE!
YKIOHnTe pOHTeBcky pykcy cMo KaJa CTe CNrpyHn Da DeTe MoKe cMOCTaHNo Da BO3N.
yIyTCTBO 3A ODPXKABAHe
- PepnoDnHNO npOBepaBajTe cTaHe CBAKOr DeJa.
- He notanatn irpaKy y BODy. UcTnTm MeKOM Kpnom HabnaKeHOM BOdOM nIN 6NaRIM HeyTpapanHm CpeDCTBOM.
- Hekopnctntn cpeintBa ca a6pa3nBnma, amOHnjaKOM, n36eJbNbaueM nn anKOxOJom.
-
PeioBHO IOMa3yjTe NOKpeTHe MexaHn3Me.
-
I36erabajte ynoTpe6y Ha neckOBHTIM NOBpunHaMa.
- He cklaadnTHTn irpaayKHa BpeIIM MecTIma nn y 6nn3HH n3Bopa TOnlote da 6nCTe cnpeuHn DeOpmaunjy.
-Чуваши На чистом, субом мecту, заштейновом od ДиpeктHor сунца, кише, в鞘е И наглих помена Temперatype. - ПУВЕК Temeьно осушп.Tиpe cKладиштЕнда 6и ce cnpeuHa nojaba 6yнaco je irpaKaВlaЖHa.
-ycnyajy yobuajenx npo6nema y paNy o6paTte ce OBnaushenom cepBnchom ueHTpy.
BAJHO-BHIMATEJIHO IPOUHTAJTE IN COUYBAJTE 3A ИДHA YNOTPEBA
3A BEE3BENHA YNOTPEBA HA OBOJ IPOIN3BOI
CNEDETEIIN CNTE INPEUYIPENYBAHBA,YNATCTBA
I INPEINOPAKN DADEHN BO OBOJ INPUPAChNK!
ПЕДУПЕДУBAHA!
PENyPENyBAHbE! KOPNCTETECAMO NOI INPEKTEH HAD3OP HA BO3PACEH!
PENEYPNPEYBAHbE!OBAAIPTPAKAHEMACONIPAPKIN
PENEyPENEYBAHbE! OBAA INPAUKA HE E COOdBETHA 3A DELAI NOMIAIN OJ 1,5 FOINHA!
PENEYNPENYBAHbE! HAMEHETA E 3A DELA NOCTAPN O,1,5 FOINHA I CO MAKCMJNAHTEKENHAD25KΓ.
PNEyPENyBAHbE! HE KOPNCTETE AKO DETETO E NOTEUKO OJ 25 K - PN3IK OJ PPOITTOBAPYBAHbE HA KOHCTPYKUNJATA!
PENEYPNEPENYBAHBe! PENE YNOTPEBA, YNATETE FO DETETO 3A INPABUNHA YNOTPEBA INPABUNA 3A BE3BEOHCT.
PENyPENyBAHbE! KOpNCTETE JA INPAyKATA CAMO 3A HAMEHETATA LJI.
PPEyPeyBAIbe! KOPICTETE JA CAMO PPEKY DEH, HA PAMHN OBE36EENIOBPHN, DAJEKY OD YJINU IN COOBPAKAJ.
PENEYPENEYBAHBe!3AAN3BENHETEIOBPEDA,CEKORAOTCTPAHETEJAPOINTEJCKATA PAUKKA KORA DETETO CAMOCTOJHO JA YNPABYBA INPAUKATA!
PENEYPENEYBAHbE! PIXETEPONAJEKY OJ ORAH INIpyrN 3BOPN HA TOJIINHA!
MOnTaXaTAmopaJaI3BpHINNCKJNUYHBO Bo3paCha JnHocT.
He I03BOnyBaJTe Dea NoI 3 rOuHn Da 6uDat npCytN IoDeKa IrpaKaTa He e cEIOCHO COCTaBeHa - ONaCHOCT Od MaNN DeNoBn.
Oboj Tpuizukn e HameHet cMo 3a eHNO dTe.
He do3bonybajte da ra Typkaat TpuNknot.
IrpauKaTa He e nOrOHa 3a TpuAbe nn JnN IIn3raHe.
He KopucTeTe ako 3a6eJeknte HeIOCTacyBaUKN NIN OUI TeTeHN DeNoBn.
He Do3BOnyBaJTe DeTeTo Da CTOn Ha OcNoHecOT 3a Ho3e IIN Ha CeDNHTeTo.
DeTeTo Tpe6a Da Hocn ObyBkn Pnp KOpncTeHe.
He npikaaybajte dononHnTeJIHpeMeHH nn DoaToU - onachOCT od rywehe.
He ctabajte noBeke od 0,5 Kr Bo 3aHaTa Kopna n He noBeke od 0,2 Kr Bo npedHaTa.
He cTabeJte npedmetn nn 6araX Ha ynpaByBaHOT nnn pOnteIckata paKa - onachocT od nobpeada n npebpTyBaHbe.
PnCknaIpaHe nn TpaHcnpT He cTaBajTe TeuKn npEdMeTN Bp3 nIrpauKaTa 3a da n36erHeTe OHTeYBaHe.
He Bneche ja irpaKaTa co pyro Bo3nIo.
He Do3BOnyBaJTe DeTeTo Hn Dpyr Na BO 6nHa Da rN Donnpaat Tpkanata Nn da CTabaat npedMeTn BO HNB.
KopncTeTe ja daNeky od peKn, 6a3eHn, ckaHn nn npenpeKn.
He BpweTe N3MeHn HIn MoDnΦnKauHn Ha KOHCTpyKunjaTa. 3a cepBnC KOHTaKTnpajTe npOdaBaHn OBnacteH cepBnC.
He KopncTePe3epBHN DeIOBN KOH He ce OINpOIN3BOIDNTeIOT - pON3BOIDNTeIOT He npe3ema oIroBOPHOCT 3a 6e36eIHOC7 npn ynoTpe6a Ha HeOpnInHaHn DeIOBN.
Yybajte ja nlaactnHata am6aJaxa noaneky od deca - onachocT od rywebe
KAPAKTEPNUCTIKN HA IPOU3BOJOT
IrpaukaTa e cooDbetHa 3a deca noctapn od 1,5 roiHa n co TeKHa do 25 kr.
Oba e cyHKUHOHaHa irpaUka HameHeTa 3a pa3BbBaHBe Ha NOyETHe BeuTHnHa BaUeTo DeTe 3a paKByBaHe i KoOpdHaCuJa Ha DvXeHbTa Ha paUeTe n Ho3eTe npn camocToJHo Bo3eHe TpuZIKI INN BeNoCInPeI.
I P E D Y N P E D Y B A H E! O T C T p a H e t e j a p o n t e n c k a t a p a k a k o r a c t e c n y p h i d e k a d e t e T O M o X e c a m o c t o J H D a B O 3 N I d a r o K O H T p o l n p a T p u z u k n oT.
COCTABYBAHbE IN ΦyHKUIN
1.1.ΓJIABHNI DEJIOBNI
- Pam
- BnInuKa
- PpeHNo Tpkano
- 3aHnToPkano
- PaKa 3a ynpaByBaHe
- Podintelcka paukka
- HndctpeuHnua
- CeNiUTe
-
Nopnora
-
3aHTnTHa npeUka
11.Држачаашa/шиwe - Празда Корпа
- KaJIHnK
- 3aɪnə kɒpna
- Пибор
- YnpaByBaUka oCOBnHa.
PpOBepTe DaJIIN CNTe HaBeDeEHn HecOCTaBEHn DeIOBn Ce npCytN BO NaKyBaHbETo. HeKoI DeIOBn MoKe Da ce pETXODHO COCTaBEHn OJ npON3BOIDHTeIOT.
BAxHO! CneTe ryn yNaTCTBaTa n peDoCneIOT Ha COCTaByBaHBe TOUHO KAKO ITO e OINMaHO BO TEKCTOT IN NlycTpaunnte.
PNEyPENyBAHbE! POBepyBajTe ja cnrypHocTa Ha npucbpctyBaHeTo no 3aBpUyBaHe Ha cekoja onepaujia!
PPEyPENEYBAHbE! 3aBpTeTe rN upafoBnTe UbpTo, HNe npemHory-Ja6abu NpafoBN MoKe Da IOBeDaT DO packNoynBaHe n NobpeHa DeTeTO.
Iotppe6Hn aIaTn: Knyu n upaqurrep (He ce BknyueHn).
2. MOHTAXA HA BUNIyKA (CO I PEPdHO TPKAJIO N KAJHnK) HA PAMOT
2-1: NocTaBete ro KaJIHnKOT (13) nOmeIy DBeTe ueBkn Ha BnIyUkata.
2-2: YUbpcTeTe ro KaHnKoT co UpaΦ.
2-3:Пикачete ro npeДHOTo TpkaIHO ha BnIyUkata, npITNCHETe nI rIInTe (a)doKeHa ce noJaBaT Hn3 dynKInTe n He ce ue „KlnK".
2-4: NocTaBete rKannte (oD npn6opot 15) Ha npedHaTa pamHa ueBka.
2-5: BmetheTe ja Bnnykata Hn3 npedHaTa cebKa Ha paMOT.
3. MOHTAXA HA PAUKATA 3A YYPABYBAIbE
3-1: Oτιστρανητε το υραφοτ (b) έν Ḁνβρτκατα οπραύκατα.
3-2: NocTaBeTe ja npEHaTa Kopna, noToa npKauTe ja paKaTa Ha BnIyShKaTa Taka wTo dynKInTe da ce ycOrJaacat. YUbpcTeTe co upaΦ n HABpTKa (c).
3-3: NcToBpeMeHo npTnCHeTe rN KOtHbTa (d) n npIarOdeTe ja BucnHaTa.
4. MOHTAXA HA 3ADHNTE TPKAJA
4-1:Пикауete ja 3aДнота OCOBиHA (e) Ha 3aHOTO Tpkalno.
4-2:Пикayete ro TpkaIIOTo Ha paMOT n npTnCHeTe IdoEka He yyeTe „KNIK". ПрOBepeTe co NOBNeKyBaHbe. NOBtOpete 3a dpyroTo Tpkano.
4-3: 3a Da ro n3BaInte TPKaIono, npNTnCHete ro oCno6oDyBaUkOTo KOHc (f) uN3BNeueTe.
4-4: NocTaBeTe DeKopaTINBHa Kana (g) od npnbopot Ha cekoe Tpkano.
5. MOHTAXA HA POДNTEЛСКATA PAчKA
5-1: BmTeHeTe r n pIaCTnHHTe yApn Ha DBeTe CTpaHn oD paMOT.
5-2:ПиNTUCHETe ro nHOT (h)И npOBJIeHTe ro DOJIHHOT DeI Ha paYkata.
5-3:ПиТиСHTeToIINHOT(h)ИВМETHeTeToIropHNotДeN BP3doJIHnOTdoIDEka He „KNKHe".
5-4: 3a BaIeHbe, cnyuTeTe ja CpBHeHaTa paUka, npTnCHte Ro NnOH n OndJeTe r DeNoBtE.
6. MOHTAXA HA CEDNIWTETO
6-1: Ocnypete ce deka cpBeHaTa paKa Ha podnteIckata paKa e noDnHata.
6-2: OTePAnHe Tn HABpTKInTe oN UpaΦOBInTe nOd CeINuTTo.
6-3: NocTaBete ro ceiNtTeTo Ha pAMOT n 3aTeHHeTe CO HABPTKNTe.
7. NOCTABYBAHbE HA NODIOTATA
7-1: Ctabete ja noDnorata Bp3 ceNiHTeTo.
7-2:Повleteг范围内penHHTeH3OTBOpHTe.
7-3: 3aBPTeTe rKpaEBnTe 3a da rN cncpaTe.
7-4: NnHCTaIauJa Ha 3aWtHTHaT npueKa (YeKOp 8), denot Mery Ho3eTe npuBpCTeTe ro Co KOnuHbA.
8. MOHTAXA HA 3ALWTTHATA INPEUKA
BmeTheTe n KpaunTe BO cTpaHnHnTe OTbOpHa ceiWTeTo DoEka He ,KnKnat". 3a BaJeHe, npTncHeTe n konuNbata (K).
9. MOHTAXA HA HADCTPEUHNUATA
BMeTHeTe rN Dbata Kpaja BO dpXaUHTe Ha ceDNWTeTO.
10. MOHTAXA HA YNPABYBAUKATAOCOBUNHA
10-1: NocTaBeTe ja kanaYeTo (m) Ha DpKaUToH aBnNyShKaTa.
10-2: BmetheTe ro CBneHnot Kpaj Ha OCOBHaTb BO OTBOPOT Ha DpxKaHOT.
10-3: OTBopTe ro ocNoHyBaOT 3a Ho3e N npuBpcTeTe ro dpyNnot Kpaj Ha dpxKaOT Ha poNTeNcKaTa paKa ca HOBPTka.
11. MOHTAXKA HA 3ADHATA KOPNA
11-1: OtctpaheTe ro wpaΦoT co nlaCTmHa rIaBa (n).
11-2: IocTaBeTe ja KOpNaTaNpNcBpcTeTe co wpaΦoT.
12. MOHTAXA HA ДРЖАСТ 3A ЧАSHA/ШИSE
Noctabete ro Ha nocakyBaHaTa cTpaHa OpoNTeJIckaTa paKa N IIN3Hete HApOly.
13. CKJIOIyBAHbE IN PACKJIIOIyBAHbE HA HADCTPEUHNUcATA
NobJeTe 3a OTBopaHBe, TypHeTe 3a 3aTbopaHBe.
14. POTAUJIJA HACEDNIWTETO 360^
PnTnuchTe ro cpBeHOTo KOnue noD ceNtTeTo n 3aBpTeTe. 3aknyeTe BO nOx6a Happei nn KOH BO3paCHNOr.
15. CKJIOnyBAHbE HA OCJIOHYBAuOT 3A HO3E
PnTncHeTo HaBOpEshHnot nH (1) n 3aBpTeHaRope DokeKa He ,KnKHe"
BAKHO! Kora Bo3paceH ynpaByBa, oCIOHyBaHO Tpe6a da e OTBopeH; KORA DeTeTo BO3N - CKNONeH.
16. ПИЛАГОДУBAHBЕHA BИСИHATA HA POДNTEJICKATA PACHKA
IpnTnCHeTe ro nHOT (2) nnoceTe Ha cakaHaTa BnCnHa DoKeKa He ,KInkHe". NOnIrHeTe ja CpBeHaTa paKa 3a DOnoJIHnTeJIHa CNrpyHocT.
17. ПИЛАГОДУBAиЕ HA PaukATA 3A ynpabvbaHbE
3. INSTALAREA GHIDONULUI
6. INSTALAREA SCAUNULUI
9. INSTALAREA BALDACHINULUI
6. INSTALAR O ASSENT
WAARSCHUWING! CONTROEER DE BEVESTIGING NA ELKE HANDELING!
6. INSTALACE SEDADLA
6-1 - Pred instalaci sedadla se vzdy ujistete, ze je Červená páčka na rodičovské rukojeti nahore.
6-2 - Odstraţne matice ze šroubù pod sedadlem.
6-3 - Umistete sedacku na ram (srouby by mely prochazet otvory) a zajistete ji maticemi.