STNP1300B - Pump STANLEY - Free user manual and instructions
Find the device manual for free STNP1300B STANLEY in PDF.
| Technical Specifications | STANLEY STNP1300B electric pump, 1300 W power, maximum flow rate of 3000 L/h, maximum pressure of 4.5 bars. |
|---|---|
| Usage | Ideal for pumping clear water, draining basements, pools, and garden irrigation. |
| Maintenance and Repair | Regularly check and clean the filter to ensure optimal operation. Store in a dry place. |
| Safety | Equipped with thermal protection to prevent overheating. Do not immerse the electrical plug in water. |
| General Information | 2-year warranty, weight 5 kg, compact dimensions for easy storage. |
Frequently Asked Questions - STNP1300B STANLEY
User questions about STNP1300B STANLEY
0 question about this device. Answer the ones you know or ask your own.
Ask a new question about this device
Download the instructions for your Pump in PDF format for free! Find your manual STNP1300B - STANLEY and take your electronic device back in hand. On this page are published all the documents necessary for the use of your device. STNP1300B by STANLEY.
USER MANUAL STNP1300B STANLEY
natural_image
Technical line drawing of a mechanical pump assembly (no text or symbols)SXGP900XFBE
SXGP1300XFBE


CE
SXGP900XFBE SXGP1300XFBE
| EN | Please read these instructions carefully before use. Please retain these instructions for future reference.In case of problems or difficulties, please contact the consumer helpline: www.2helpu.com | Page: 5-14 |
| IT | Leggere attentamente queste istruzioni prima dell'uso. Conservare queste istruzioni per future consultazioni.In caso di problemi o difficoltà, contattate l'helpline consumatori: www.2helpu.com | Pagina: 15-25 |
| BG | Прочетеме внимателно тези указания преди употреба. Запазете тези указания за справка.При проблеми или затруднения се обърнете към отдела за обслужване на клиенти: www.2helpu.com | Страница: 26-36 |
| CS | Před použitím si pozorně přečtěte tento návod. Laskavě si uložte tento návod pro budoucí použití.V případě jakýchkoli problémů nebo potíží laskavě kontaktujte linku pomoci zákazníkům: www.2helpu.com | Strana: 37-46 |
| DA | Læs disse instruktioner omhyggeligt inden brug. Opbevar disse instruktioner til senere brug.Kontakt kundeservicetelefonen i tilfælde af problemer eller vanskeligheder: www.2helpu.com | Side: 47-56 |
| DE | Lesen Sie bitte diese Bedienungsanleitung vor Gebrauch aufmerksam durch.Bewahren Sie diese Bedienungsanleitung sorgfältig auf, damit Sie sie auch später zu Rate ziehen können.Wenden Sie sich im Falle von Problemen bitte an die Verbraucher-Hotline: www.2helpu.com | Seite: 57-67 |
| EL | Диабáστε προσεκτικά αυτές τις οδηγίες πριν από τη χρήση. Филáξτε αυτές τις οδηγίες για μελλοντικές αναφορές.Σε περίπτωση προβλημάτων ή δυσκολιών, επικοινωνήστε με τη γραμμή helpline υποστήριξης καταναλωτών: www.2helpu.com | Σελίδα: 68-78 |
| ES | Leer atentamente estas instrucciones antes de usar el equipo. Guardar estas instrucciones para poder consultarlas en el futuro.En caso de problemas o dificultades, ponerse en contacto con el servicio de asistencia al cliente: www.2helpu.com | Página: 79-89 |
| ET | Enne kasutamist lugege see juhend tähelepanelikult läbi. Hoidke juhend hilisemaks kasutamiseks alles.Probleemide või raskuste ilmnemisel pöörduge klienditoe poole: www.2helpu.com Lk: 90-99 | |
| FI | Lue ohjeet huolellisesti ennen käyttöä. Säilytä ohjeet huolellisesti tulevaa käyttöä varten.Jos kohtaat ongelmia, ota yhteys kuluttajien helpline-palveluun: www.2helpu.com Sivu: 100-108 | |
| FR | Lire attentivement ces instructions avant emploi. Conserver ces instructions pour toute consultation à venir.En cas de problèmes ou de difficultés, contacter l'assistance consommateur : www.2helpu.com | Page : 109-119 |
| HR | Molimo vas da prije uporabe pažljivo pročitate ovaj priručnik. Sačuvajte ove upute za buduće korištenje.Ako naidete na kakve probleme ili poteškoče, molimo vas da se obratite službi za podršku korisnicima: www.2helpu.com | Stranica: 120-129 |
| HU | A készülék használatba vétele előtt gondosan olvassa el az útmutatót. A későbbi hivatkozások érdekében örizze meg az útmutatót.Kérdés vagy probléma esetén forduljon ügyfélszolgálatunkhoz: www.2helpu.com 130-139. oldal | |
| LT | Prieš pradédami naudoti jrenginj, atidžiai perskaitykite šias instrukcijas. Išsaugokite šias instrukcijas, kad bet kada galétumète jas věl perskaityti.Jei kyla problemų arba sunkumu, kreipkitės į klientų pagalbos liniją: www.2helpu.com | Puslapiai: 140-149 |
| LV | Pirms lietošanas, lüdzu, rūpigi izlasiet šo pamācibu. Lüdzu, saglabājiet šos norādījumus turpmākai uzziņai.Ja rodas kādas problēmas vai grūtibas, lüdzu, sazinieties ar klientu palīdzības dienestu: www.2helpu.com | Lappuse: 150-159 |
| NL | Lees deze gebruiksaanwijzing vóór het gebruik aandachtig door. Bewaar deze gebruiksaanwijzing voor latere raadpleging.Contacteer bij problemen of moeilijkheden de hulplijn voor de gebruikers: www.2helpu.com | Pagina: 160-170 |
| NO | Les disse instruksjonene noye før bruk. Ta vare på instruksjonene for senere bruk.Ved problemer eller vanskeligheter, kontakt kundeservice: supporth@annovireverberi.it | Side: 171-180 |
| PL | Przed użyciem należy uważnie przeczytać niniejszą instrukcję obsługi. Instrukcję należy zachować na przyszłość.W razie jakichkolwiek problemów lub trudności można skontaktować się z działem pomocy technicznej pod adresem:www.2helpu.com | Strona: 181-191 |
| PT | Leia atentamente estas instruções antes de utilizar o aparelho. Conserve estas instruções para consultas futuras.Em caso de problemas ou dificuldades, contacte a helpline de atendimento aos consumidores: www.2helpu.com | Página: 192-202 |
| RO | Vä rugäm sä citiți cu atenție aceste instrucțiuni înainte de utilizare. Vä rugäm sä păstrați aceste instrucțiuni pentru consultarea pe viitor.În caz de probleme sau dificultăți, vä rugäm sä contactați linia de asistență a clienților: www.2helpu.com | Pagina: 203-212 |
| RU | Внимательно прочитаŭme эти инструкции до начала использования. Сохраните инструкции для пользования ими в будущем.При появлении проблем или затруднений обращайтесь в отдел обслуживания клиентов: www.2helpu.com | Страница: 213-223 |
| SK | Pred použitím si, prosím, pozorne prečítajte tento návod. Tento návod si odložte na použitie v budúcnosti.Ak narazíte na akékolvek problémy alebo tažkosti, obråtte sa na linku pomoci pre zákazníkov: www.2helpu.com | Strana: 224-233 |
| SL | Pred uporabo pazljivo preberite ta navodila. Ta navodila shranite za prihodnjo uporabo.Če naletite na težave, se obrnite na službo za pomoč kupcem: www.2helpu.com | Stran: 234-243 |
| SV | Läs bruksanvisningen noggrant före användning. Förvara bruksanvisningen för framtida bruk.Vid ev. problem eller frågeställningar, kontakta kundtjänst på: www.2helpu.com | Sid.: 244-253 |
| TR | Kullanmadan önce, bu talimatları dikkatlice okuyunuz. Bu talimatları, ileride danışmak için saklayınız.Problem veya zorluk durumunda, tüketici yardım hattına başvurunuz: www.2helpu.com | Sayfa: 254-263 |
| UK | Перед експлуатацією уважно прочитаŭте юю інструkcію. Зберіайте юю інструkcію для подальшого використання вдовідкових цілях. У разі виникнення проблем або трудношів звертайтеся до нашої служби підтримки:www.2helpu.com | Сторінки: 264-274 |

1
natural_image
Simple line drawing of a 3D box with an arrow indicating rotation or movement (no text or symbols)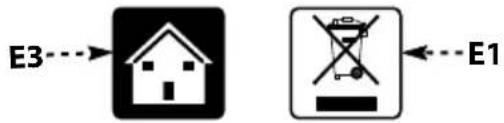
text_image
E3 E1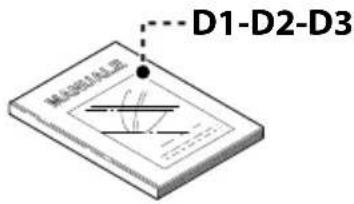
text_image
D1-D2-D3 M-0001-0002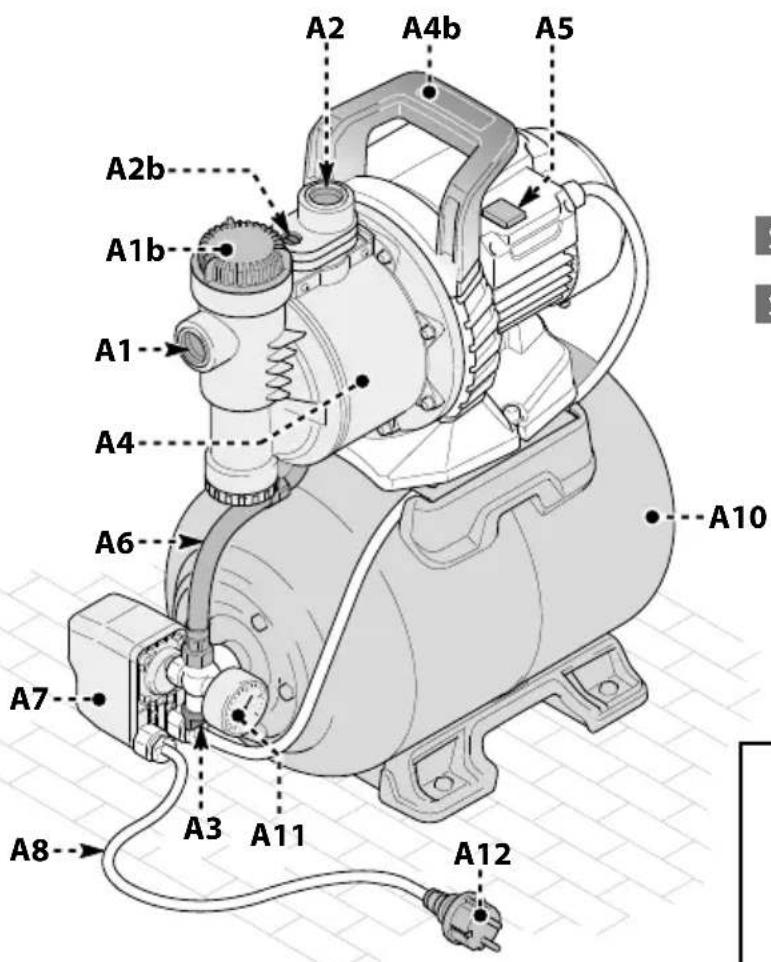
text_image
A2 A4b A5 A2b A1b A1 A4 A6 A10 A7 A3 A11 A8 A12SXGP900XFBE
SXGP1300XFBE
text_image
A9A9b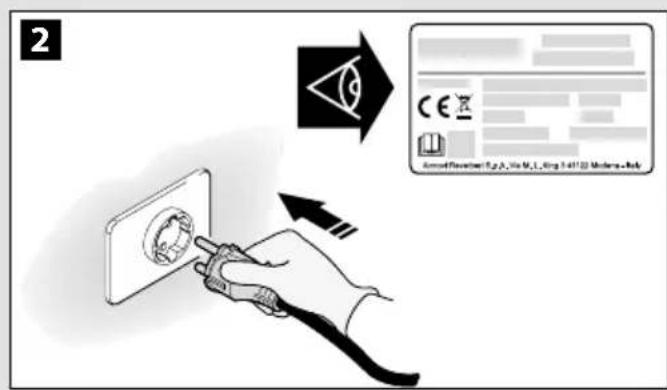
text_image
2 Accred Version 1.2.3, Vio M.1, King 7-4112 Modern Italy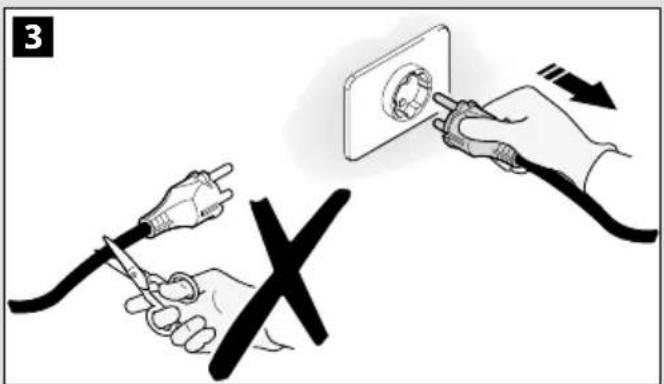
text_image
3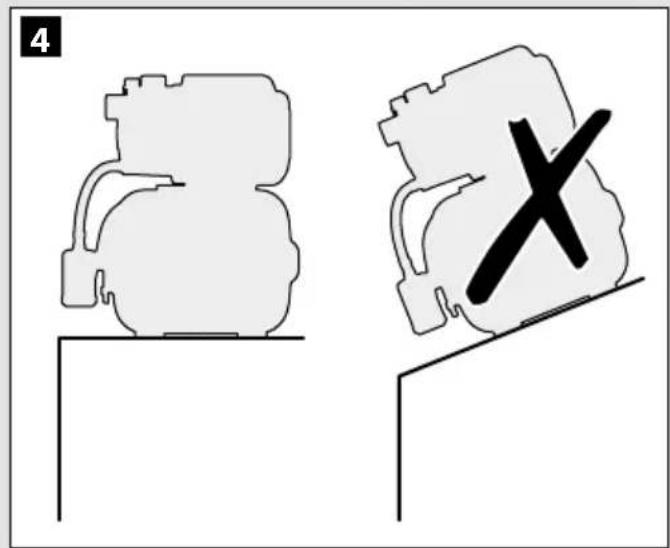
natural_image
Two abstract diagrams showing a top-down view of a vase-like object and a cross symbol on a surface (no text or labels)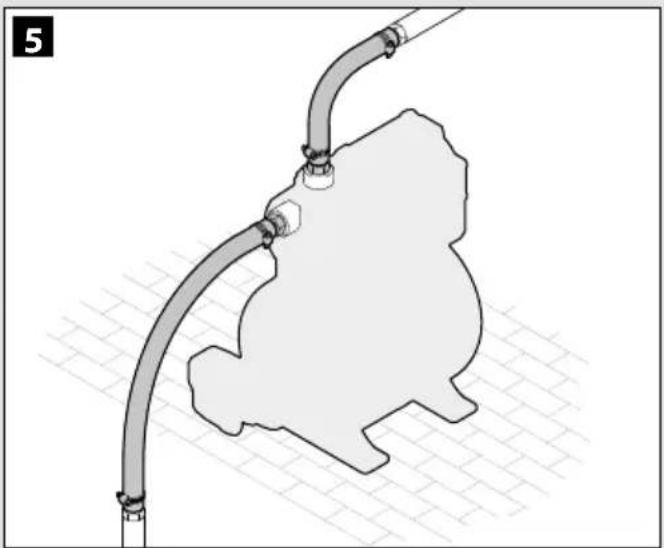
natural_image
Diagram of a pipe installation with a shaded area and numbered label '5' (no text or symbols on the diagram itself)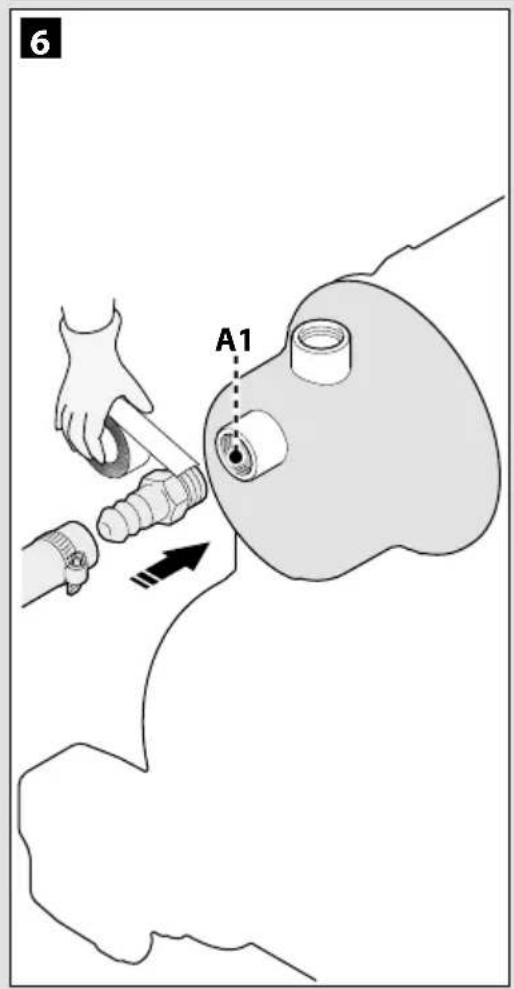
text_image
6 A1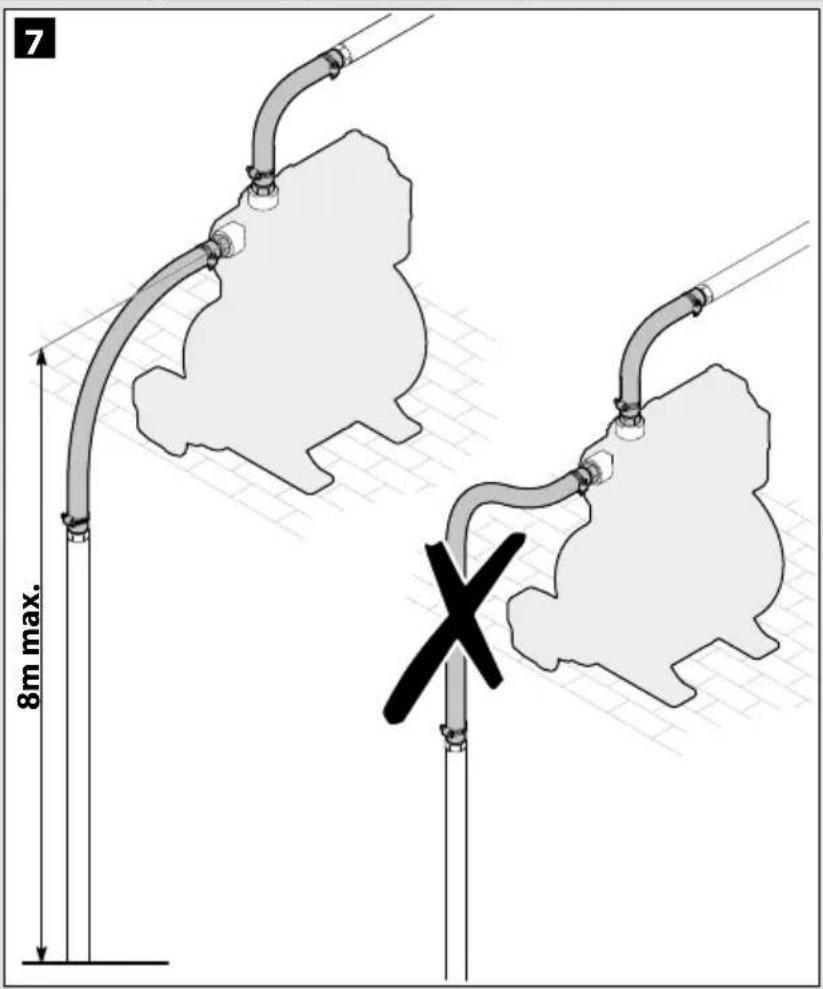
text_image
7 8m max. X1 SAFETY INSTRUCTIONS
1.1 The appliance you have purchased is produced by one of Europe's top manufacturers of household and gardening pumps. Our appliances are not designed to withstand the stresses typical of commercial or industrial use, or for continuous duty. You must know and comply with the instructions provided in this manual to get the most from your pump. During connection, use and servicing of the appliance, take all possible precautions to protect your own safety and that of the people in the immediate vicinity. Read the safety regulations carefully and comply with them strictly; failure to do so may put health and safety at risk or cause expensive damage. The manufacturer is not responsible for any damage caused by incorrect or improper use.
2 SAFETY DECALS / INFORMATIVE DECALS
2.1 Comply with the recommendations of the decals affixed to the appliance. Check that they are present and legible; otherwise, fit replacements in the original positions.
⚠ Warning - Danger
Please read these instructions carefully before use.
Symbol E1. The appliance must not be disposed of as household waste; it may be returned to the dealer on purchase of a new appliance. The appliance's electrical and electronic parts must not be reused for improper uses because they contain substances which constitute health hazards.
Symbol E3. Indicates that the appliance is intended for household use.

CE CE Symbol. Indicates that the appliance complies with the relevant EU directives.
ON/OFF switch position Indicates the position of the ON/OFF switch.
$$ \begin{array}{l} I = \text { Switch ON } \ 0 = \text { Switch OFF } \ \end{array} $$

Guaranteed sound power level

This produce is rated in insulation class I. This means that it is equipped with a protective earthing conductor (only if the symbol appears on the appliance).

3 SAFETY RULES / RESIDUAL RISKS
3.1 SAFETY PRECAUTIONS: DO NOTS
3.1.1 Injury hazard! DO NOT allow the appliance to be used by children or persons with impaired physical, sensory or mental capabilities, or who do not have the necessary experience and knowledge. Children must not use the appliance as a toy. Cleaning and user maintenance must not be carried out by children.
3.1.2 Explosion or poisoning hazard! Never use the appliance with flammable, toxic or aggressive liquids, or liquids with characteristics incompatible with its proper operation.
3.1.3 Injury hazard! Do not point the water jet at people or animals.
3.1.4 Electrocution hazard! Do not point the water jet at the appliance, electrical parts or other electrical devices.
3.1.5 Short-circuit hazard! Do not use the appliance outdoors in the rain. This does not apply to submersible pumps, which may also be used in the rain; however, it is essential to ensure that the connections of the plug (A12) and any extension leads used are protected from water splashes and flooding.
3.1.6 Injury hazard! Do not allow the appliance to be used by children, persons with impaired physical, sensory or mental capabilities, or any unauthorised persons.
3.1.7 Electrocution hazard! Do not touch the plug (A12) and/or socket with wet hands.
3.1.8 Electrocution and short-circuit hazard! If the power cable (A8) is damaged, it must be replaced by the manufacturer, one of its authorised Service Centres or similarly qualified persons in order to prevent all risks.
3.1.9 Explosion hazard! Do not use the appliance if the suction or delivery hose is damaged.
3.1.10 Injury hazard! Place the appliance in a stable position; when using the appliance in the vicinity of swimming-pools, garden ponds or other outdoor bodies of water, keep it at least 2 m from the water's edge and protect it from falling into the water or flooding. This does not apply to submersible pumps, since they can be used immersed in water.
3.1.11 Injury hazard! Check that the appliance is fitted with the data plate which carries its specifications; contact your dealer at once if it is missing. Appliances without data plate must not be used, since they cannot be identified and are potentially hazardous.
3.1.12 Explosion hazard! No adjustment of control valves, safety valves or other safety devices, or tampering with their settings, is permitted.

3.1.13 Scalding hazard! In the event of a pressure switch malfunction or water supply failure, the water left inside the pump body (A4) may overheat and cause scalding when discharged.
3.1.14 Injury hazard! Do not use the appliance unattended if there is the risk of fouling.
3.1.15 Short-circuit hazard! Do not move the appliance around by pulling the plug (A12), the power cable (A8) or other connection fixtures; use the handle (A4 b).
3.1.16 Explosion hazard! Do not allow vehicles to drive over the suction or delivery hose. Do not drag or transport the appliance by the suction or delivery hose.
3.1.17 Injury hazard! Do not use the appliance when people or pets are in the pumped liquid, or may come into contact with it.
3.2 SAFETY PRECAUTIONS: MUSTS
3.2.1 Short-circuit hazard! All electrical conductors must be protected from splashes of water.
3.2.2 Electrocution hazard! Only connect the appliance to an electrical power source compliant with the relevant standards (IEC 603641-1); during start-up, the appliance may generate interference on the electrical system. Only connect the appliance to a socket fitted with a residual current device rated at 30 mA or less. Use only electrical extension leads compliant with the relevant regulations, approved for outdoor use and with gauge at least equal to that of the appliance's power cable. Power cables wound onto reels must be completely unwound.
3.2.3 Danger! The appliance must never operate dry; always fill the pump body (A4) with water before starting it. Even a short period of operation without water may cause damage.
3.2.4 Accidental switch-on hazard! Always disconnect the plug (A12) from the power socket before carrying out any work on the appliance.
3.2.5 Danger! To guarantee the appliance's safety, the maximum temperature of the pumped liquid must not exceed 35^ C. The ambient temperature must not drop below +5^ C.
3.2.6 Danger! The appliance is not designed to pump drinking water or water for human consumption. The pumped water may be contaminated by lubricant leaks.
3.2.7 Injury hazard! Maintenance and/or repair of the appliance or electrical components must only be carried out by specialist staff.
3.2.8 Injury hazard! Discharge residual pressure before disconnecting the hose from the appliance; to do this, disconnect the appliance from the electricity supply and open a user outlet.
3.2.9 Injury hazard! Before use, and at regular intervals, inspect the accessories and check the appliance's components for signs of failure and/or wear.

4 GENERAL INFORMATION
4.1 Use of the manual
This manual forms an integral part of the appliance and should be kept for future reference. Please read the manual carefully before installing/ using the appliance. If the appliance is sold, the seller must pass on this manual to the new owner along with the appliance. Ensure that every user has access to the manual before the appliance is started up, and is able to find out about the safety and operating instructions.
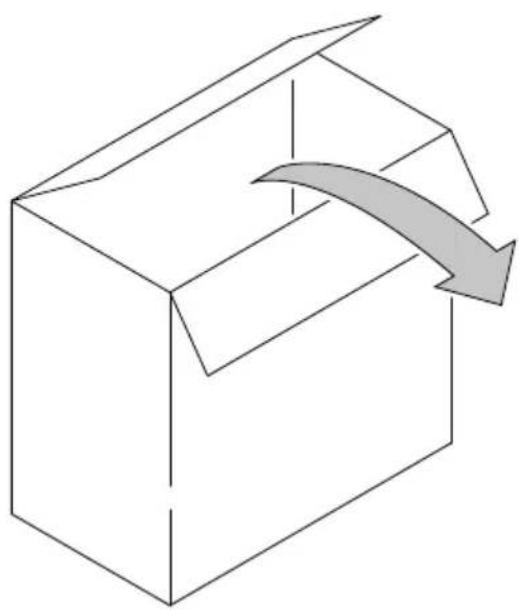
4.2 Delivery
The appliance is delivered in a cardboard box.
The supply package is illustrated in fig.1.
4.2.1 Informative material supplied with the appliance
D1 Use and maintenance manual
D2 Safety instructions
D3 Warranty regulations
4.3 Disposing of packaging
The packaging materials are not environmental pollutants but must still be recycled or disposed of in compliance with the relevant legislation in the country of use.
5 TECHNICAL INFORMATION
5.1 Intended use
The appliance is designed to pump clean water from wells or rainwater cisterns for gardening or for use in household water supply systems; these appliances may not be used for pumping drinking water. Dirt, sand and sediments are abrasive and damage the impeller. Fit suitable filters to trap these particles upstream of the pump. Chemically aggressive substances in the pumped liquid damage the appliance.
The minimum permitted hourly flow rate is 80 l/h (1.3 l/min). These appliances are not suitable for drip irrigation systems, since the water flow rate is too low, meaning that the pumped liquid is unable to cool the appliance as required.
The appliance must be installed in a dry, well ventilated place, protected from frost and weather, with an ambient temperature not exceeding 35^ C. It must never be installed or used in the rain, in damp locations or in wells.
The appliance conforms to the EN 60335-2-41 European standard.
5.2 Improper use
Use by unskilled persons or those who have not read and understood the instructions in the manual is forbidden.
Supplying the appliance with flammable, explosive, toxic or chemically aggressive liquids is forbidden.
Use of the appliance in a potentially flammable or explosive atmosphere is forbidden.
All modifications to the appliance are prohibited. Any modifications made to the appliance render the warranty null and void and relieve the manufacturer of all liability under civil and criminal law.
Grinding and polishing substances, or other substances which attack materials, damage the appliance. These appliances are not suitable for pumped liquids containing abrasive sand, mud or clay. These appliances are suitable for pumping water for sanitary purposes, but not for pumping drinking water!
Faecal substances may not be pumped with these appliances.
5.3 Main components (fig. 1)
A1 Threaded suction fitting
A1b Integral pre-filter (if installed)
A2 Threaded delivery fitting
A2b Filler cap (if installed)
A3 Drain plug
A4 Pump body
A4b Handle
A5 ON/OFF switch
A6 Reinforced hose
A7 Pressure switch
A8 Power cable
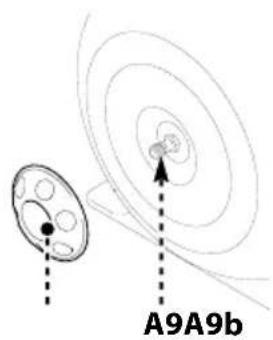
A9 Valve
A9b Valve cap
A10 Tank
A11 Pressure gauge
A12 Plug
6 INSTALLATION

Warning - danger!
All installation and assembly operations must be performed with the appliance disconnected from the mains power supply (fig. 3).

Warning - danger!
Before use, always perform a visual check on the appliance, and especially the plug (A12) and power cable (A8), for damage. A damaged appliance must not be used; in the event of damage, have the appliance inspected by the Service Centre or an authorised electrician.

Warning - danger!
If the power cable (A8) is cut, the warranty becomes null and void and a replacement genuine power cable (A8) must be installed during the repair, at the customer's expense (even in case of repair under warranty). If it is necessary to extend the power cable (A8), only use an extension with gauge at least equal to that of the original power cable (A8). Never lift the appliance or remove the plug (A12) from the socket by means of the power cable (A8).
6.1 Assembling the appliance
Before the appliance is put into operation, the suction and delivery hoses must be connected. Place the appliance in a stable position on a flat surface, in a location protected from flooding (fig. 4).
To prevent the transmission of vibrations to the pipes or walls, place the appliance on a rubber mat and use lengths of hose (which must be resistant to suction and pressure) immediately upstream and downstream of the appliance (fig. 5) to dampen the vibrations.
6.2 Fitting the suction hose

Warning - danger!
If your device does not have an integral pre-filter, a check valve must be installed between the suction hose and the suction fitting (A1): this valve ensures that the suction hose is not pressurised, which could cause leaks or bursts.
The suction hose conveys the water from the suction point to the appliance. Connect the suction hose to the threaded fitting (A1). Check that the suction hose fitted is airtight, since any leaks may reduce the appliance's flow rate or completely prevent it from drawing in water. The suction hose must be at least 25 mm (1") in diameter and must be resistant to crushing and vacuums.
Use of a suction hose with foot valve is recommended. To ensure an airtight connection, use Teflon tape (12 - 15 layers) (fig. 6). Make sure that there is sufficient water in the suction point and that the hose suction zone is permanently below the water level.
Since the maximum suction lift of self-priming pumps is 8 metres, the appliance must be no more than 8 m above the water level in the suction point. The horizontal part of the suction hose must rise continually from the suction point to the appliance, to prevent the formation of air bubbles in the hose, which could impair operation of the appliance (fig. 7).
A pre-filter must be installed between the suction hose and the suction fitting (A1), unless the appliance has an integral pre-filter (A1 b).
6.3 Filling the appliance
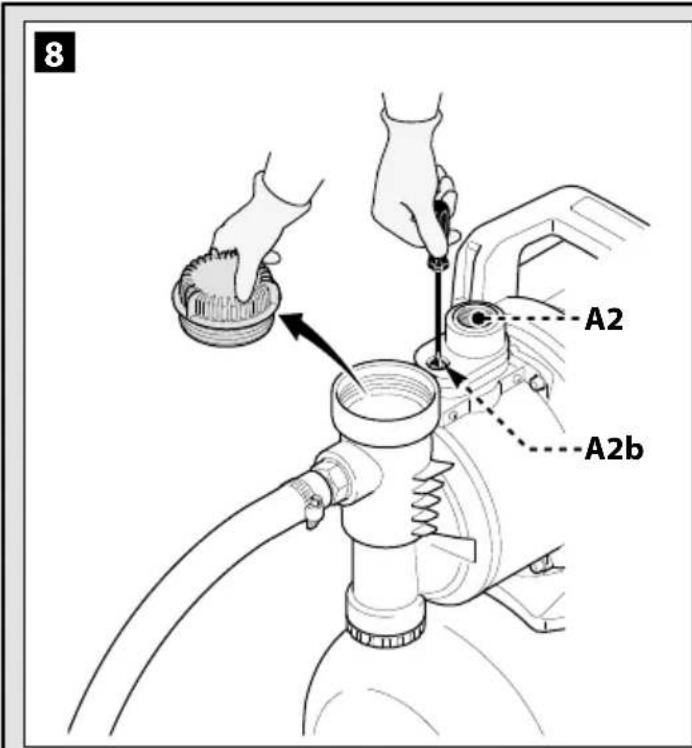
Before fitting the delivery hose, completely fill the pump body (A4) and the suction hose with water through the delivery fitting (A2). The pump can also be filled through the filler cap (A2 b), if present (fig. 8).
Bubbles form during filling of the pump body (A4) and must be discharged by tilting the appliance slightly in various directions. Fill again and repeat this procedure until the water level is just below the filling hole.
If the appliance has an integral pre-filter, more water must be added through the cap of the pre-filter (A1 b). Open the cap, fill with water to the rim and screw the cap back on by hand (fig. 8).
6.4 Fitting the delivery hose
The delivery hose fitting is on the top of the appliance (A2). The hose should be connected to a hose or pipe with the largest possible diameter (at least 19 mm, 34 "). Smaller diameters drastically reduce the appliance's flow rate. To ensure an airtight connection, use Teflon tape (12 - 15 layers) (fig. 9).
In a household pumping system, the connected pipes are permanently pressurised. Therefore, we recommend the use of a reinforced hose, capable of withstanding this permanent pressure, when connecting to a permanent distribution system.
Warning - danger!
The use of garden hoses or suction hoses on the appliance's delivery side is not permitted if the pipes are permanently pressurised, since the continuous pressure combined with wear and fatigue of the materials may cause them to burst or tear even after only a short time. Garden hoses may only be used when not permanently pressurised, e.g. when they are installed downstream of a stop valve or a water supply tap, and only ever outdoors.
6.5 Safety Measures
The user must prevent damage arising from the flooding of premises or other causes in the event of a failure of the appliance or external components by adopting suitable measures (e.g. installation of an anti-flooding protection circuit, alarm system, backup pump, collection tank or similar features), which must be connected to a separate, fail-safe electrical circuit. The safety measures must be suited to the specific conditions of use and must be able to reduce and/or prevent the damage caused by water leaks.
The user must also install a spray guard to prevent water leaks or splashes due to a pump failure from causing damage. A backup pump or a floor drain must be installed to ensure that any water from leaks is promptly removed. Otherwise, an alarm system can be installed to trigger an alarm and/or an emergency shut-down of the appliance and water supply in the event of a water leak, before damage to the equipment or property can occur.
We also recommend raising all equipment in appliance installation rooms about 5-10 cm above the floor so that any water leaks will not cause immediate damage. The manufacturer accepts no liability for damage caused by failure to comply with this recommendation.
Warning - danger! Dry operation
If the appliance runs for more than 5 minutes with the water suction point closed, it may be damaged due to overheating. Switch off the appliance when the normal water flow is obstructed.
Dry operation will damage the appliance beyond repair, so never allow it to run dry for more than 10 seconds.
7 ADJUSTMENTS
7.1 Preliminary adjustments
Our appliances are preset in the factory and users must not modify these settings.
8 START-UP
Warning - danger!
All installation and assembly operations must be performed with the appliance disconnected from the mains power supply (fig. 3).
8.1 Start-up
Once all the pipes have been connected and the pump body (A4) is full of water, the plug (A12) can be connected and the ON/OFF switch (A5) turned to ON. During the priming phase, the delivery pipe must be open to allow the air in the system to escape and to enable the water pressure to build up. If the suction hose is not completely full of water, it may take the appliance up to 7 minutes to become fully operational. If the water has not pressurised after the maximum priming time stated, switch the appliance off and proceed as described in the troubleshooting plan (chapter 11).
8.2 Technical information
The appliance's stated flow rate values are maximum values, which are reduced if external components (e.g. delivery hose, elbows, pre-filter, etc.) are used. This should be borne in mind when choosing the appliance. The actual flow rate for specific installation conditions is stated in the flow rate graph (fig. 12).
9 MAINTENANCE
Warning - danger! The system is pressurised!
Before any maintenance procedure and/or during troubleshooting, disconnect the power cable (A8) from the socket.
Check that the connection hoses or the appliance's tank (A10) are not still pressurised. To ensure this, turn on a user (water supply tap) and drain all the water from the system. All maintenance and cleaning work can then be carried out.
9.1 Cleaning the filters
Clean the pre-filter (A1 b) regularly with clean water and/or inspect it to ensure that it is not fouled (fig. 10). Sluice the filter compartment with clean water.
9.2 Checking the pressure in the tank (A10)
To ensure that the appliance operates correctly, the pressure in the tank (A10) must be checked at regular intervals (3-4 times a year); it must be 1.5 bar. To check the pressure, unscrew the valve cap (A9 b) on the tank (A10) and check the pressure by connecting an air pump with pressure gauge to the valve (A9) (fig. 11). If the pressure is less than 1.5 bar, restore it to that value.
Insufficient air pressure causes the appliance to malfunction and leads to wear of the rubber diaphragm in the tank (A10). Any damage to the appliance caused by incorrect pressure in the tank (A10) is not covered by the warranty.
10 STORAGE

Warning - danger! The system is pressurised!
Before any maintenance procedure and/or during troubleshooting, disconnect the power cable (A8) from the socket.
Check that the connection hoses or the appliance's tank (A10) are not still pressurised. To ensure this, turn on a user (water supply tap) and drain all the water from the system. All storage procedures can then be carried out.
It is essential to protect the appliance from frost, and in case of temperatures of +5°C or below it must be uninstalled and stored in a dry place, protected from frost. After disconnecting the suction and delivery hoses, unscrew the drain plug (A3) and tilt the appliance to drain out all the water in the tank (A10). To empty the pump body (A4) turn the appliance upside down to drain the water from the delivery fitting (A2).
EN
11 TROUBLESHOOTING
| Problems Possible causes Remedies | ||
| The motor is running but the appliance does not suck in water | 1) The pump body (A4) was not filled with water before start-up. 1) | Fill the pump body (A4, see point 6.3). |
| 2) Suction hose not airtight. | 2) Check that the recommended accessories were used. Check that the suction hose is airtight, use Teflon tape on the threads. | |
| 3) Foot valve suction strainer obstructed. 3) Clean foot valve and suction strainer. | ||
| 4) Delivery side air unable to escape because suction point is closed. | 4) During priming, open the suction points (water supply tap, water hoses). | |
| 5) Not enough time allowed. | 5) Completely fill the suction hose with water and wait up to 7 minutes after the appliance is started. | |
| 6) Excessive suction lift. 6) Reduce the suction lift (max. 8 m). | ||
| 7) Suction hose not immersed in water. | 7) Check the water level in the well or cistern and lengthen the suction hose if possible . | |
| Motor does not start 1) No mains power. | 1) Check the voltage, connect the plug (A12). | |
| Water flow rate insufficient | 1) Suction lift and/or head excessive. | 1) Excessive suction lift and head and external components all reduce the flow rate! This is not a malfunction. |
| 2) Foot valve suction strainer obstructed. 2) Clean the suction strainer. | ||
| 3) Water level in suction point drops too fast. 3) Immerse the foot valve in a greater depth of water. | ||
| 4) The appliance's flow rate is being reduced by soil in the water. | 4) Clean the pump body (A4) by directing a jet of water in through the suction fitting (A1) and delivery fitting (A2), and if necessary have the appliance checked by the Service Centre. Use a pre-filter if the appliance does not have an integral pre-filter (A1 b). | |
| The thermostat is cutting out the appliance | 1) Motor overloaded due to friction between dirt particles and impeller.Dry operation or flow of water insufficient. | 1) Clean the inside of the pump body (A4) by directing a jet of water in through the delivery fitting (A2), leave the thermostat to cool for about 1 h, and if necessary have the appliance checked by the Service Centre. |
| 2) Dry operation. | 2) Check that there is water present, leave the thermostat to cool for about 1 h, and if necessary have the appliance checked by the Service Centre. | |
| The appliance continually switches on and off | 1) No check valve on suction hose, water flowing back from suction hose. | 1) Check whether a foot or intermediate valve is installed on the suction side. |
| 2) Rubber diaphragm in tank (A10) faulty. | 2) Replace the rubber diaphragm or the tank. Contact the Service Centre. | |
| 3) No air pressure in tank. | 3) Fill the tank (A10) with air by means of the relative valve (A9) to a pressure of 1.5 bar (see Maintenance). | |
| 4) Delivery side not airtight. | 4) Seal the delivery side to render it airtight, check that the system is airtight. | |
| The appliance operates continually | 1) The switch-off pressure set for the pressure switch is too high. | 1) Notify the Service Centre and have the switch-off pressure adjusted. |
| 2) Delivery side not airtight. | 2) Seal the delivery side to render it airtight, use Teflon tape on the threads. | |
WARRANTY
The warranties relating to the appliances described in this manual are conditional on compliance with all the recommendations it contains, especially those relating to use, installation and operation.
We grant a warranty of 24 months (12 months for professional sales) from the date of purchase for the product described, covering defects in material or workmanship in accordance with current legislation. Requests for service under warranty must be accompanied by the original proof of purchase.
The warranty does not cover the costs of dismantling and installing the appliance concerned in the place of use, travel costs to and from the place of use for repair staff, or transport costs.
Claims arising from incorrect installation or operation, unsuitable conditions of use, negligence, commercial use or inappropriate repair attempts are not covered by the warranty and no responsibility is accepted for them; normal wear and tear is also excluded.
The resulting costs, and especially inspection and transport costs, will be charged to the sender and/or the appliance's operator. This also applies, in particular, when a warranty request is submitted but the appliance is found to be operating perfectly with no defects, or the problem is not due to defects in materials or workmanship.
Before return to the user, every product undergoes strict technical inspection. Repairs under warranty must only be performed by one of our Service Centres or an authorised repair workshop. Attempted repairs by the customer or unauthorised third parties during the warranty period will result in the loss of all warranty entitlement.
Cutting off the power plug and/or shortening the power cable result in loss of warranty entitlement.
Work done by us under warranty does not extend the duration of the warranty, or give rise to a new warranty period for the parts replaced or repaired.
All further entitlement, including the right to discounts, changes or compensation, or consequent damage of any kind, is excluded.
In the event of malfunction, contact the point of sale where the product was purchased, showing proof of purchase.
| Technical Data Unit SXGP900XFBE SXGP130XFBE | |||
| Voltage V/Hz | 230 V ~ 50 Hz 230 V ~ 50 Hz | ||
| Power W 900 1300 | |||
| Max. head (Hmax) | m | 42 50 | |
| Max. flow rate (Qmax) l/h | 3300 4200 | ||
| Working pressure bar | 1.5~3.0 1.5~3.0 | ||
| Max. water temperature (Tmax) | °C | 35 35 | |
| Max. suction lift | m | 8 | 8 |
| Max. particle size | ∅ mm | 0 | 0 |
| Protection class | - | ||
| Motor insulation | - | Class B | Class B |
| Motor protection | - IPX4 IPX4 | ||
| Sound power level LWA(EN ISO 3744) | dB (A) | 80 83 | |
| Net weight | kg | 15.3 16.2 | |
| Gross weight | kg | 16.6 17.2 | |
| Fitting diameter | mm | 25.4 25.4 | |
| Cable length | m | 1 | 1 |
| Tank volume | l | 24 24 | |
Subject to technical modification!
1 ISTRUZIONI PER LA SICUREZZA
Palun lugege need juhised enne kasutamist hoolikalt

Sümbol E1. Seadet ei tohi visata olmejäätmete hulka.
I = Interruptor ligado 0 = Interruptor desligado

STANLEY Service Addresses & Contact Details
| Belgique et Luxemburg E. Walschaertstraat 14 www.stanleyworks.be | ||
| België en Luxembourg 2800 Mechelen Enduser.be@SBDinc.com | ||
| Belgium BE-NL= +32 15 47 37 63 | BE-FR = +32 15 47 37 64BE Fax: +32 15 47 37 100 | |
| Danmark Roskildevej 22 www.stanleyworks.dk | ||
| 2620 Albertslund kundeservice.dk@sbdinc.com | Fax: 70224910 | |
| Deutschland Richard Klinger Str. 11 www.stanleyworks.de | ||
| 65510 ldstein info@sbdinc.de | Tel: 06126-21-1Fax: 06126-21-2770 | |
| Ελλάς Ημερος Τόπος 2 - Χάνι Αδάμ www.stanley.gr | ||
| Ασπρόπυργος -19300 -Αττική | Greece.Service@sbdinc.comTηλ: +30 210 8985208Φαξ: +30 210 5597598 | |
| España | Parque de Negocios “Mas Blau”Edificio Muntadas, c/Bergadá, 1, Of. A608820 El Prat de Llobregat (Barcelona) | www.stanleyworks.esrespuesta.postventa@sbdinc.comTel: 934 797 400Fax: 934 797 419 |
| France | 5, allée des hêtresBP 30084, 69579 Limonest Cedex | www.stanleyoutillage.frscufr@sbdinc.comTel: 04 72 20 39 77Fax: 04 72 20 39 00 |
| Schweiz | In der Luberzen 42 | www.stanleyworks.ch |
| Suisse | 8902 Urdorf | verkaufch.sbd@sbdinc.comTel: 044 - 755 60 70Fax: 044 - 730 70 67 |
| Svizzera | ||
| Ireland | 210 Bath Road; Slough, Berks SL1 3YD UK | www.stanleytools.co.ukTel: +44 (0)1753 511234Fax: +44 (0)1753 512365 |
| Italia | Energypark-Building 03 sud, Via Energy Park 620871 Vimercate (MB) Tel. 039-9590-200 | www.stanley.itFax 039-9590-313 |
| Nederlands | Stanley Black & Decker Netherlands B.V.Postbus 836120 AD Born Tel : +31 164 28 30 63 | www.stanleyworks.nlEnduser.NL@SBDinc.comNL Fax: +31 164 28 32 00 |
| Norge | Postboks 4613, Nydalen0405 Oslo | www.stanleyworks.nokundeservice.no@sbdinc.comFax: 45 25 08 00 |
| Österreich Oberlaaerstrasse 248 www.stanleyworks.deA-1230 Wien service.austria@sbdinc.com | ||
| Tel: 01 - 66116 - 0Fax: 01 - 66116 - 14 | ||
| Portugal Quinta da Fonte - Edificio Q55 D. Diniz www.stanleyworks.ptRua dos Malhões, 2 e 2A - Piso 2 Esquerdo resposta.posvenda@sbdinc.com2770 - 071 Paço de Arcos Tel: 214 66 75 00 | ||
| Fax: 214 66 75 75 | ||
| Suomi PL 47 www.stanleyworks.fi00521 Helsinki customerservice.fi@sbdinc.com | ||
| Puh: 010 400 4333 | ||
| Sverige Box 94 www.stanleyworks.se431 22 Mölndal kundservice.se@sbdinc.com | ||
| Fax: 31 68 60 08 | ||
| United 210 Bath Road; Slough, Berks SL1 3YD www.stanleytools.co.ukKingdom | ||
| Tel: +44 (0)1753 511234Fax: +44 (0)1753 512365 | ||
| Hungary | Rotel Kft. | www.stanleyworks.hu |
| service@rotelkft.hu | ||
| 1163 Budapest,Thököly út 17. | Tel +36 1 404-0014Fax+36 1 403-2260 | |
| Czech Republic | BAND SERVIS CZ s.r.o.K Pasekam 4440760 01 Zlín, Czech Republic | www.stanleyworks.czhttp://www.bandservis.czTel.: +420 577 008 550Fax.: +420 577 008 559 |
| Slovakia | BAND SERVIS s.r.o.Paulinska 22917 01 Trnava, Slovakia | www.bandservis.skTel.: +421 335 511 063Fax.: +421 335 512 624 |
| Poland | Erpatechul. Bakaliowa 2605-080 Mościska | www.stanleyworks.plTel.: +48 22 431 05 00Fax.: +48 22 468 87 35 |
| Slovenia | G-M&M d.o.o.Brvace 111290 GrosupljeSlovenija | www.g-mm.si |
| gmm@g-mm.siT: +386 01 78 66 500F: +386 01 78 63 023 | ||
| Cyprus | IOANNOU J.14A Ath.Diakou street1046- Nicosia -Cyprus | ioannou.ioannis@cytanet.com.cyTel: +357 22344302Fax: +357 22348098 |
text_image
8 A2 A2b
text_image
9 A2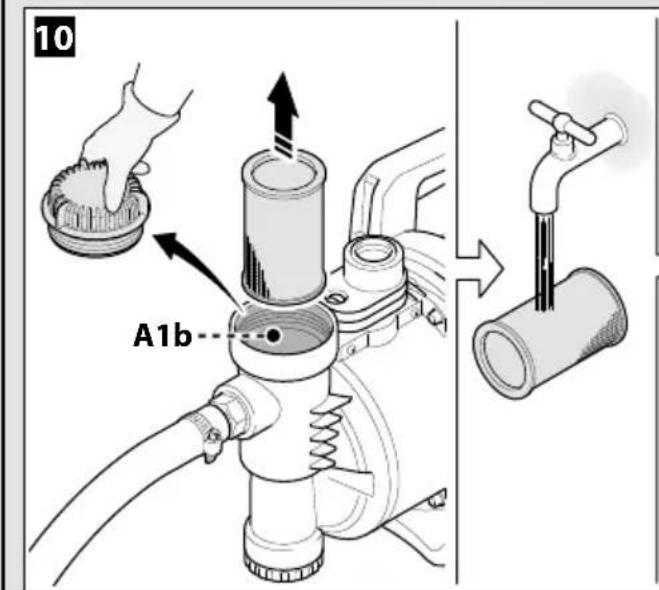
text_image
10 A1b
text_image
Technical diagram illustrating a mechanical assembly process with labeled parts and directional arrows indicating assembly steps.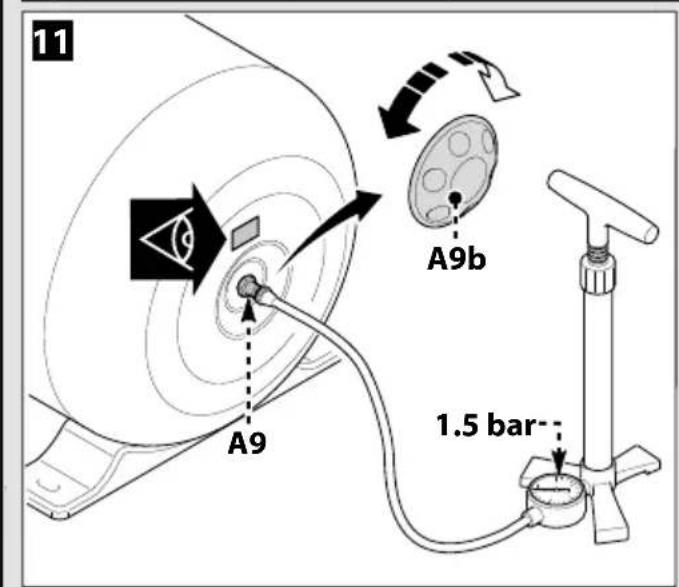
text_image
11 A9 A9b 1.5 bar-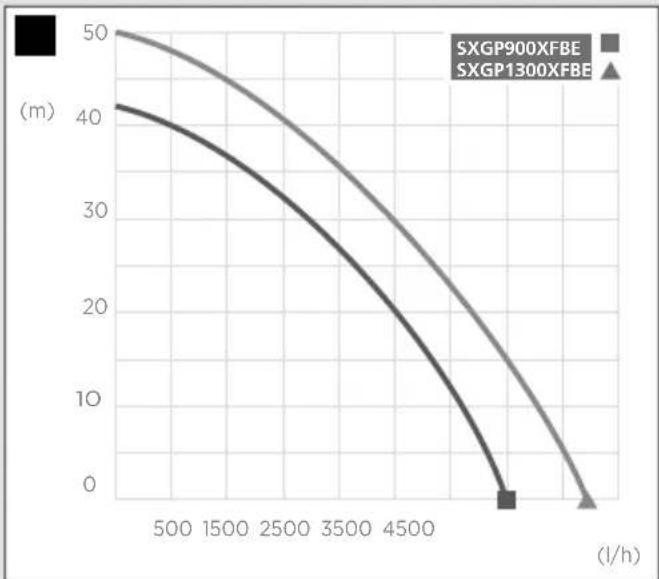
line
| Time (l/h) | SXGP900XFBE (m) | SXGP1300XFBE (m) | | ---------- | --------------- | ---------------- | | 500 | 50 | 42 | | 1500 | 45 | 38 | | 2500 | 40 | 32 | | 3500 | 35 | 26 | | 4500 | 30 | 20 | | 500 | 25 | 15 | | 550 | 20 | 10 | | 600 | 15 | 5 | | 650 | 10 | 0 |STANLEY.
is a registered trademark of The Stanley Black & Decker Corporation used under license.
The product is manufactured and distributed by:
Annovi Reverberi S.p.A. Via M.L. King, 3 - 41122 Modena (Italy).
All the rights reserved.
© 2017 Stanley Black & Decker Corporation