IAN 360594 - Sun shade sail FLORABEST - Free user manual and instructions
Find the device manual for free IAN 360594 FLORABEST in PDF.
| Product type | Solar shade sail with LED lighting |
| Sail dimensions | Approximately 3.25 x 3.25 x 3 m (triangle) |
| Power supply | 220-240 V~ mains adapter or integrated solar panel |
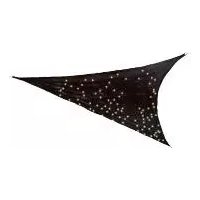
| Number of LEDs | 110 LEDs (non-replaceable) |
| Total power consumption | Approximately 1 W (light chain + adapter) |
| LED operating voltage | 4.5 V === |
| Protection rating | IP44 (protected against splashing water) |
| Battery type | Ni-MH, AA, 1.2 V, 600 mAh |
| Mains adapter | Model S016G045W8D, input 220-240 V~, output 4.5 V===, 1.6 W, IP44, class II |
| Lighting modes | Continuous light, flashing, combination |
| Timer function | 6 hours on / 18 hours off (with mains adapter) |
| Mounting | Wall or tree mounting with hooks and ropes provided |
| Wind resistance | Dismantle if wind > 40 km/h |
| Care instructions | Clean with a dry cloth; do not machine wash |
| Ambient temperature | Outdoor and indoor use, avoid heat sources |
| Delivery contents | Sail, mains adapter, solar panel, rope, 3 wall plugs, 3 carabiners, 3 screw hooks, power cable, manual |
| Warranty | 3 years |
| After-sales service France | Tel. 0800 904 879, email owim@lidl.fr |
| Repairability | LED and battery replaceable by user; mains adapter non-replaceable |
Frequently Asked Questions - IAN 360594 FLORABEST
User questions about IAN 360594 FLORABEST
0 question about this device. Answer the ones you know or ask your own.
Ask a new question about this device
Download the instructions for your Sun shade sail in PDF format for free! Find your manual IAN 360594 - FLORABEST and take your electronic device back in hand. On this page are published all the documents necessary for the use of your device. IAN 360594 by FLORABEST.
USER MANUAL IAN 360594 FLORABEST
natural_image
Black-and-white night sky with scattered bright stars and a window frame, no visible text or symbolsSONNENSEGEL MIT LED-SOLARBELEUCHTUNG / AWNING WITH LED SOLAR LIGHTING / VOILE D'OMBRAGE AVEC LED SOLAIRES
DE AT CH
AWNING WITH LED SOLAR LIGHTING
Assembly, operating and safety instructions
NL BE
ZONNEZEIL MET LED-SOLARVERLICHTING
natural_image
Technical line drawing of a rectangular electronic component with mounting holes and a flat panel, labeled 'B' in the top-left corner (no text or symbols on the diagram itself)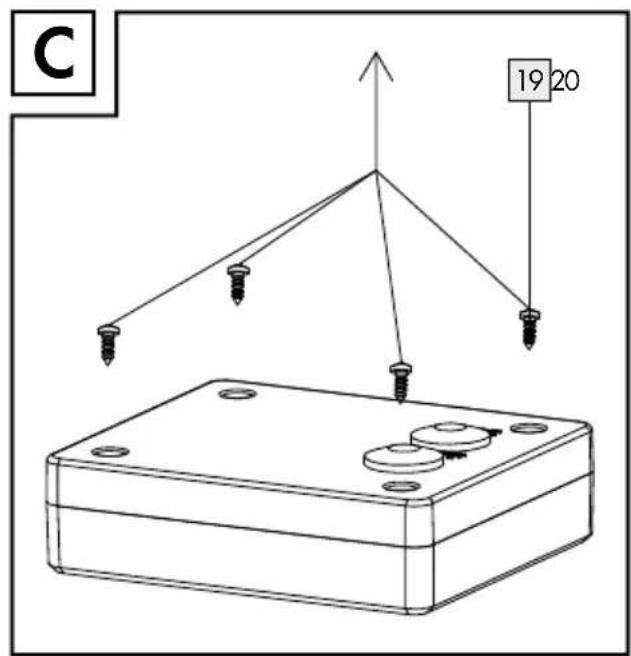
natural_image
Technical line drawing of a mechanical housing with two views: top shows top view with mounting holes and a small component, bottom shows front view with internal compartments and a curved cutout (no text or symbols)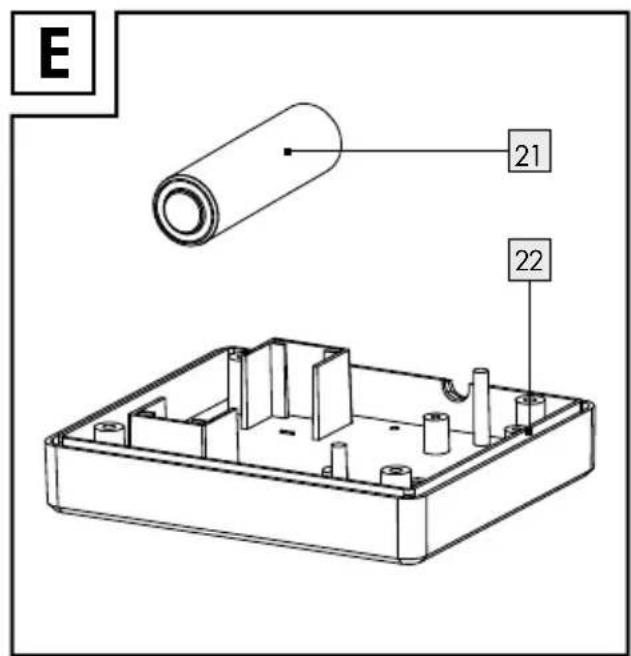
List of pictograms used ...... Page 22
Introduction Page 22
Proper use....Page 22
Description of parts and features ...... Page 23
Technical data Page 23
Included items......Page 24
Safety information...... Page 24
Safety instructions for batteries/rechargeable batteries...... Page 27
Inserting / replacing the rechargeable battery......Page 28
Installation Page 28
Mounting the product ...... Page 29
Use Page 30
Timer function (for use with mains adapter only) .... Page 31
Dismantling the product ...... Page 32
Cleaning and care ...... Page 32
Troubleshooting (for use with solar panel)...... Page 32
Disposal Page 33
Warranty Page 34
Warranty claim procedure Page 35
Service......Page 35
| List of pictograms used | |||
 | This symbol means that the operating instructions must be observed before using the product. |  | Short-circuit-proof safety isolating transformer |
 | Direct current/voltage |  | Independent lamp control gear |
 | Alternating current/voltage | Polarity of output terminal | |
 | Splashproof |  | Suitable for in- and outdoor use. |
 | Protection class II |  | This icon indicates that the product is mains operated. |
 | Protection class III |  | 6 hour timer with automatic repetition on a daily basis |
Awning with LED solar lighting
the specified applications. If you pass the product on to anyone else, please ensure that you also pass on all the documentation with it.
- Introduction
We congratulate you on the purchase of your new product. You have chosen a high quality product. The instructions for use are part of the product. They contain important information concerning safety, use and disposal. Before using the product, please familiarise yourself with all of the safety information and instructions for use. Only use the product as described and for
• Properuse
This product is suitable for use in- and outdoors and for providing protection against the sun in outdoor areas. This product is intended for use in private, domestic environment only and not for commercial purposes.
• Description of parts and features
1 Sun sail
2 Connector (mains cable)
3 Socket (mains cable)
4 Union nut (mains cable)
5 Mains adapter
6 Timer button with LED indicator
7 Socket (sun sail)
8 Union nut (sun sail)
9 Connector (solar panel)
10 Mode button (solar panel)
11 ON / OFF button (solar panel)
12 Solar panel
13 Carabiner
14 Fixing screw
15 Dowel
16 Rope
17 Ring
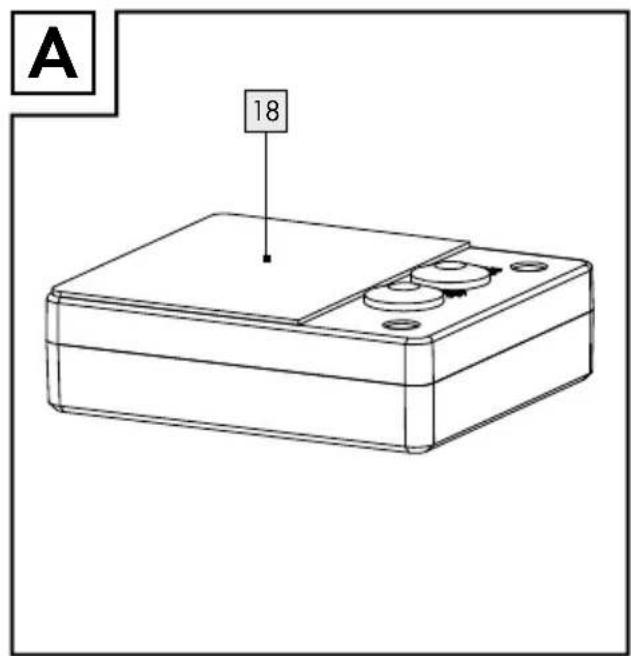
18 Velcro tape
19 Screws (battery compartment cover)
20 Battery compartment cover
21 Battery
22 Battery compartment
- Technicaldata
LED light chain
(sun sail) +
Mains adapter:
Total power
consumption: approx. 1 W
LED light chain
(sun sail):
Operating voltage: 4.5V ===
LED: 110 LEDs (not
replaceable)
Light chain
power (sun sail): 0.35 W
Protection system: IP44 (splash-proof)
Rechargeable
battery:
1 x recharge-
able battery
Ni-MH, AA/
1.2V/
600 mAh
Mains adapter:
Nom. voltage
input: 220-240V\~,
50 / 60 Hz,
0.12A
Rated output
voltage (U rated): 4.5 V---
Max. working
output voltage
(U out): 4.5 V

Rated output
Power (P rated): 1.6 W
Protection class: II/
Protection system: IP44 (splash-proof)
Mains adapter (model-nr.:
S016G045W8D) GS approved.
SELV: Safetyextra
low voltage
Ta:Maximum
rated ambient temperature
Tc:Ratedmaximum
operating temperature of the case of a controlgear
- Includeditems
1 Sun sail
1 Mains adapter
1 Solar panel
1 Rope
3 Dowels
3 Carabiners
3 Fixing screws
1 Mains cable
1 Set of installation instructions and instructions for use

Safety information
BEFORE USING THE PRODUCT, PLEASE FAMILIARISE YOURSELF WITH ALL OF THE SAFETY IN- FORMATION AND INSTRUC- TIONS FOR USE! WHEN PASSING THIS PRODUCT ON TO OTHERS, PLEASE ALSO IN- CLUDE ALL THE DOCUMENTS!
Please read all safety notes and instructions. Failure to comply with these may result in severe injuries.
In the case of damage resulting from non-compliance with these operating instructions the guarantee claim becomes invalid! No liability is accepted for consequential damage! In the case of material damage or personal injury caused by incorrect handling or non-compliance with the safety instructions, no liability is accepted!

WARNING!
DANGER OF DEATH
AND ACCIDENTS FOR TODDLERS AND CHILDREN!
Never leave children unsupervised with the packaging material. The packaging material represents a
danger of suffocation. Children frequently underestimate the dangers. Please keep children away from the product at all times.
This product is not a toy and should not be played with by children. Children are not able to understand the dangers that can occur when handling this product.
This product can be used by children aged from 8 years and above and persons with reduced physical, sensory or mental capabilities or lack of experience and knowledge if they have been given supervision or instruction concerning use of the product in a safe way and understand the hazards involved.
WARNING!
leave children unattended. The product is not a climbing frame or toy. Make sure that nobody climbs or leans on the product, particularly children. The product could become imbalanced and tip up. This may result in injury and/or damage.
■ Children shall not play with the product. Cleaning and user maintenance shall not be
made by children without supervision.
■ Ensure that the product is installed by suitably experienced or qualified persons only.
⚠️ CAUTION! RISK OF OVERHEATING! Do not operate the product inside the packaging.
- Do not pull the product mains cable and make sure it is laid down properly so that no one walks or trips over it.
The product can be used on all surfaces officially classified as being of "normal flammability". - Do not attach any other objects to the product.

Avoid the danger of death from electric shock!
Before use, ensure that the mains voltage available is the same as the required operating voltage for the product (220-240 V\~).
■ Before connecting the product to the mains you should always check the product and the mains lead for any damage.
■ Never use the product if you discover that it is damaged in any way.
This light set's external flexible tube is nonreplaceable. Hence if it becomes damaged you must dispose of the entire product.
■ The LED lamps are not replaceable.
■ Use the product only with a mains adapter type S016G045W8D. Failure to observe this advice will invalidate any claims under the warranty.
■ Never open any of the electrical parts or insert any kind of object into them.
■ Protect the mains cable from sharp edges, mechanical loads and hot surfaces.
- Do not install with sharp fasteners or nails.
■ Always unplug the mains adapter 5 from the socket before installation, dismantling or cleaning.
■ Never touch the product plug or the product itself with wet hands.
■ The product must not be electrically connected to another set of lights.
The product is only suited for use with the included mains adapter (Model No. S016G045W8D).
■ Please note that the mains adapter continues to draw a small amount of power even if
the lamp is turned off as long as the mains adapter is plugged into a power outlet. To switch the product off completely, unplug the mains adapter from the socket.
The LEDs are not replaceable. If the LEDs fail at the end of their life, the entire product must be replaced.

Risk of injury and risk of damage to property!
The sun sail protects you against direct sun impact. Nevertheless take care about a sufficient sun protection for your skin.
■ Be careful during mounting and demounting with open pipe ends because there is a risk of injury!
Take sun sail down in case of expected wind speeds of more than 40 km / h (brisk wind, large twigs and trees moving, and wind clearly audible).
■ Open fires, grills, patio heaters and others under or near the sun sail are not permitted.
■ Water pockets must be emptied as they form!
■ Do not leave the sun sail unattended in an assembled condition!
Safetyinstructions for batteries/rechargeable batteries
■ DANGER TO LIFE! Keep batteries/rechargeable batteries out of reach of children. If accidentally swallowed seek immediate medical attention.
■ Swallowing may lead to burns, perforation of soft tissue, and death. Severe burns can occur within 2 hours of ingestion.
DANGER OF EXPLOSION! Never recharge
non-rechargeable batteries.
Do not short-circuit batteries / rechargeable batteries and/or open them. Overheating, fire or bursting can be the result.
■ Never throw batteries/recharge-able batteries into fire or water.
- Do not exert mechanical loads to batteries/rechargeable batteries.
Risk of leakage of batteries / rechargeable batteries
- Avoid extreme environmental conditions and temperatures, which could affect batteries / rechargeable batteries, e.g. radiators / direct sunlight.
If batteries/rechargeable batteries have leaked, avoid contact with skin, eyes and mucous membranes with the chemicals! Flush immediately the affected areas with fresh water and seek medical attention!
WEARPROTECTIVE GLOVES! Leaked or
damaged batteries/rechargeable batteries can cause burns on contact with the skin. Wear suitable protective gloves at all times if such an event occurs.
In the event of a leakage of batteries/rechargeable batteries, immediately remove them from the product to prevent damage.
■ Only use the same type of batteries/rechargeable batteries. Do not mix used and new batteries/rechargeable batteries.
■ Remove batteries/rechargeable batteries if the product will not be used for a longer period.
Risk of damage of the product
■ Only use the specified type of battery/rechargeable battery!
■ Insert batteries/rechargeable batteries according to polarity marks (+) and (-) on the battery/rechargeable battery and the product.
Use a dry lint-free cloth or cotton swab to clean the contacts on the battery/rechargeable battery and in the battery compartment before inserting!
■ Remove exhausted batteries / rechargeable batteries from the product immediately.
- Inserting / replacing the rechargeable battery
Note: The rechargeable battery is pre-installed. Only use batteries as stated in the "Technical data" chapter.
☐ To remove the rechargeable battery, switch the product off using the ON / OFF button ^11 and disconnect the solar panel ^12 from sun sail ^1 .
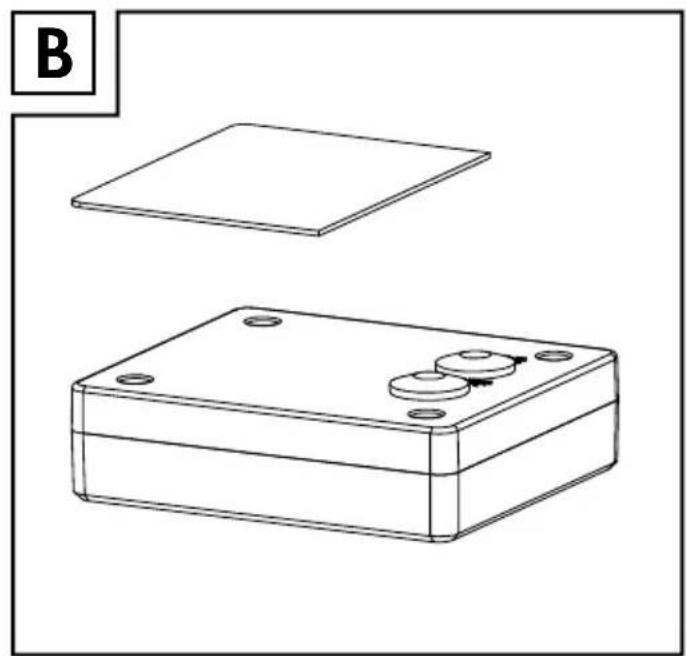
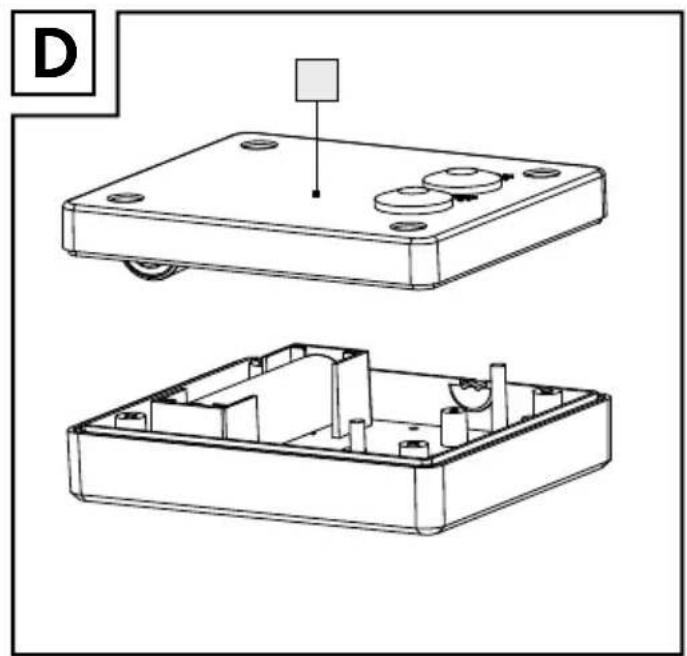
Open the battery compartment 22 on the back side of the solar panel 12 by loosening the screws 19 of the compartment cover 20 (see Fig. C).
☐ Remove the the old rechargeable battery [21] .
☐ Insert a new rechargeable battery (see Fig. E).
Note: When inserting the rechargeable battery 21, ensure the correct polarity. This is indicated in the battery compartment 22.
☐ Close the battery compartment 22 by screwing the battery compartment cover 20 back on using the screws 19.
Note: Make sure the sealing ring is secured correctly before.
- Installation
Note: You will need an electric drill.
WARNING! RISK OF
ELECTRIC SHOCK! Ensure that you do not damage any electricity cables in the wall or ceiling.
⚠️ CAUTION! RISK OF INJURY!
Read the operating instructions for your drill.
Note: The included mounting material is suitable for ordinary solid concrete or masonry construction. Other wall substrates may require other fastening materials. Seek specialist advice if necessary.
When selecting the mounting location, pay attention to the following:
☐ Ensure that the product illuminates the desired area. You can swivel the product into the desired position.
☐ Ensure that the solar panel 12 is mounted in a place with direct sunlight.
☐ Ensure that the solar panel 12 is not installed where there are strong temperature fluctuations, e.g. due to heating devices.
☐ Ensure that the solar panel 12 is installed far away from unnatural light sources and in southern direction.
☐ When choosing a location, bear in mind that you will need additional space beyond the surface area of the sun sail 1 itself (approx. 3,25 x 3,25 x 3 m) for the rope 16.
☐ Please also make sure that there is sufficient space around the outside of the sun sail 1 and
that no tripping hazards are created.
☐ Ensure that the connector 2 of the mains cable can reach the socket 7 of the sun sail 1. Max. distance between the mains adapter 5 and the sun sail 1 is approx. 10 m.
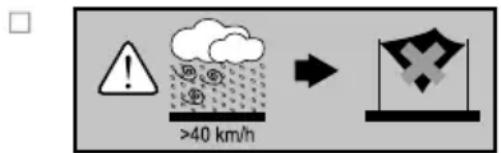
Dismantling of the product at expected wind speeds of more than 40 km / h (fresh wind, larger branches and trees move, and the wind is clearly audible).
Tip: Before embarking on your trip, make yourself familiar with the assembly instructions. Practice putting up the sail and check that all the parts are present and defect free.
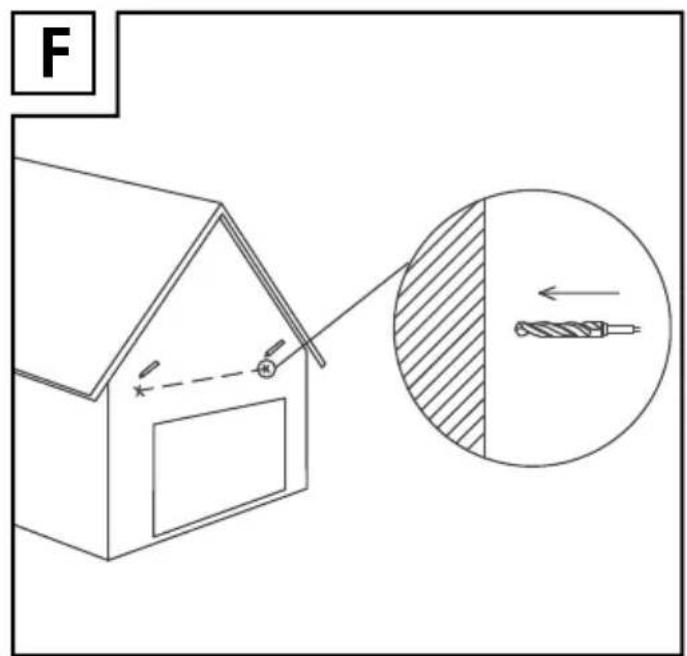
- Mounting the product (see Fig. F-I)
Before drilling the fixing holes, ensure there are no gas, water or electrical lines that could be drilled into or damaged in the area where you will be drilling. Mark the drill holes.
☐ Now drill the fixing holes ( 5.5 mm, depth approx. 30 mm) (see Fig. F).
☐ Insert the dowels 15 into the drill holes (see Fig. G). Attach the fixing screw 14 into it (see Fig. H).
☐ Use the carabiners 13 to connect the ring 17 of sun sail 1 and fixing screws 14. For some case, you may use a piece of the rope 16 to connect the carabiners 13 and ring 17. Alternatively, the sun sail 1 can also be attached without fixing screws 14 and carabiners 13. To do this, connect the ring 17 directly to a piece of the rope 16 (see Fig. I).
Note: You can cut the rope into the length you needed. 16
Note: The minimum and maximum force required to mount and dismount the sun sail 1 is approx. 50 N and 100 N.
☐ Attach the loose end of the sun sail 1 to a suitable location such as a tree trunk. To do this, connect the ring 17 directly to one end of the rope 16 and attach the loose end of the rope 16 e.g. to a tree trunk so that the rope 16 is taut (see Fig. I).
Note: Also ensure that there is enough room for people to pass by safely and that the
rope 16 does not present a trip hazard.
☐ Ensure that the solar panel 12 is orientated towards the sun and fasten it using the velcro tape 18.
Use
Note: Remove all packaging materials from the product.
For use with mains adapter 5:
☐ Connected the socket 7 of the sun sail 1 to connector 2 of mains cable.
☐ Please screw down the union not 8 of the sun sail 1 clockwise.
☐ Connect the mains adapter 5 to the socket 3 of the mains cable.
☐ Please screw down the union nut 4 of mains cable clockwise.
☐ Insert the mains adapter 5 into the mains socket. The product is switched on.
☐ Press the timer button with LED indicator 6 to switch to the next lighting mode. When you reach lighting mode 3, the next press of timer button with LED indicator 6 switches the product back into lighting mode 1.
The order of the lighting modes is as follows:
- Steady on
- Flash
- Combination
☐ Pull the mains adapter 5 out of the mains socket to switch off the product.
For use with solar panel 12:
☐ Connect the connector 9 of solar panel 12 to the socket 7 of the sun sail 1.
☐ Please screw down the union nut 8 of the sun sail 1 clockwise.
☐ Press ON/OFF button 11 of solar panel 12 to switch on the product (The product will light up only in dark.).
☐ Press the mode button 10 of solar panel 12 to switch to the next lighting mode. When you reach lighting mode 3, the next press of mode button 10 of solar panel 12 switches the product back into lighting mode 1.
The order of the lighting modes is as follows:
- Steady on
- Flash
- Combination
☐ Press ON/OFF button 11 of solar panel 12 again to switch off the product.
●Timerfunction (for use with mains adapter 5 only)
☐ To switch on the timer function, press and hold the timer button with LED indicator 6 after the product is connected to the socket of power supply. The timer button with LED indicator 6 will light up when the timer function is activated.
☐ The product glows permanently for 6 hours and will be followed by a subsequent pause of 18 hours. The different light modes can be use in timer function. Afterwards, the product will light up again at its designated turn on time for 6 hours followed by a subsequent pause of 18 hours.
☐ To switch off the timer function, press and hold the timer button with LED indicator 6 again and the light of the timer button with LED indicator 6 will be turned off.
☐ When the timer function is switched off, the product glows continuously. To switch off the product completely, the mains adapter 5 has to be unplugged from the power socket.
- Dismantling the product
☐ Disassemble the product in the reverse order (see chapter "Mounting the product").
☐ Please make sure all the parts have been removed.
☐ Only a dry, lint-free cloth should be used for cleaning.
☐ Allow all parts dry thoroughly before you pack the sun sail 1 away again. This will pre vent mould, odours and colour changes.
Replace the rechargeable battery 21 if, after a certain amount of time, the light duration diminishes noticeably despite good exposure to sunlight. Only use the correct size and recommended type of rechargeable batteries (see "Technical data").
- Cleaning and care
⚠️ CAUTION! RISK OF ELEC- TRIC SHOCK! First remove the mains adapter 5 from the socket.
⚠️ CAUTION! RISK OF ELEC- TRIC SHOCK! For reasons of electrical safety the product must never be cleaned with water or other liquids or immersed in water.
- Do not use any solvents, petrol ∅ similar items. This would damage the product.
■ Never wash the sail sun sail 1 in a washing machine. - Do not use any sharp objects as these will damage the coating.
●Troubleshooting(for use with solar panel)
Note: This product has delicate electronic components. This means that if it is placed near an object that transmits radio signals, it could cause interference. If you notice that the product is malfunctioning, remove any sources of interference from the area of the product.
Note: Electrostatic discharges may cause product to malfunction. In the event of such malfunctions, remove the rechargeable battery briefly and reinsert it.
| Error Cause Solution | ||
| The light will not switch on even though the sun shone on the product all day. | Artificial sources of light, e.g. street lighting, are interfering with the product. | Mount the product in a place where it cannot be disturbed by other sources of light. |
| The light does not come on or comes on only briefly. | The rechargeable battery is broken or there was not enough daylight. | Replace the rechargeable battery or mount the product in a place where it can receive more sunlight. |
●Disposal
The packaging is made entirely of recyclable materials, which you may dispose of at local recycling facilities.
Observe the marking of the packaging materials for waste separation, which are marked with abbreviations (a) and numbers (b) with following meaning: 1-7: plastics/20-22: paper and fibreboard/80-98: composite materials.
Contact your local refuse disposal authority for more details of how to dispose of your worn-out product.
To help protect the environment, please dispose of the product properly when it has reached the end of its useful life and not in the household waste. Information on collection points and their opening hours can be obtained from your local authority.

The product and packaging materials are recyclable, dispose of it separately for better waste treatment. The Triman logo is valid in France only.
Faulty or used batteries / rechargeable batteries must be recycled in accordance with Directive 2006/66/EC and its amendments.
Please return the batteries / rechargeable batteries and / or the product to the available collection points.
Environmentaldamage through incorrect disposal of the batteries/rechargeable batteries!
Batteries / rechargeable batteries may not be disposed of with the usual domestic waste. They may contain toxic heavy metals and are subject to hazardous waste treatment rules and regulations. The chemical symbols for heavy metals are as follows: Cd = cadmium, Hg = mercury, Pb = lead. That is why you should dispose of used batteries / rechargeable batteries at a local collection point.
●Warranty
The product has been manufactured to strict quality guidelines and meticulously examined before delivery. In the event of product defects you have legal rights against the retailer of this product. Your legal rights are not limited in any way by our warranty detailed below.
The warranty for this product is 3 years from the date of purchase. The warranty period begins on the date of purchase. Please keep the original sales receipt in a safe location. This document is required as your proof of purchase.
Should this product show any fault in materials or manufacture within 3 years from the date of purchase, we will repair or replace it – at our choice – free of charge to you. This warranty becomes void if the product has been damaged, or used or maintained improperly.
The warranty applies to defects in material or manufacture. This warranty does not cover product parts subject to normal wear, thus possibly considered consumables (e.g. batteries) or for damage to fragile parts, e.g. switches, rechargeable batteries or glass parts.
- Warrantyclaim procedure
To ensure quick processing of your case, please observe the following instructions:
Please have the till receipt and the item number (e.g. IAN 123456_7890) available as proof of purchase.
You will find the item number on the rating plate, an engraving on the front page of the instructions for use (bottom left), or as a sticker on the rear or bottom of the product. If functional or other defects occur, please contact the service department listed either by telephone or by e-mail.
You can return a defective product to us free of charge to the service address that will be provided to you. Ensure that you enclose the proof of purchase (till receipt) and information about what the defect is and when it occurred.
Service
GB
Service Great Britain
Tel.: 08000569216
E-Mail: owim@lidl.co.uk
IE
Service Ireland
Tel.:1800200736
E-Mail: owim@lidl.ie
CE IP44
extra lage spanning (Safety Extra Low Voltage)
Ta:Maximale
(U rated): 4,5 V ===
Maks. robocze
napięcie wyjściowe
(U out): 4,5 V ===
Znamionowa moc
NOSTEOCHRANNÉ RUKAVICE! Vyteklé
salida (U rated): 4,5 V ===
Máx. tensión de
trabajo de salida
(U out): 4,5 V ===
Potencia nominal
de salida (P rated): 1,6 W