HG03610 - Sun shade sail FLORABEST - Free user manual and instructions
Find the device manual for free HG03610 FLORABEST in PDF.
User questions about HG03610 FLORABEST
0 question about this device. Answer the ones you know or ask your own.
Ask a new question about this device
Download the instructions for your Sun shade sail in PDF format for free! Find your manual HG03610 - FLORABEST and take your electronic device back in hand. On this page are published all the documents necessary for the use of your device. HG03610 by FLORABEST.
USER MANUAL HG03610 FLORABEST
SONNENSEGEL / SUN SHADE SAIL / VOILE D'OMBRAGE
DE AT CH
SONNENSEGEL
Assembly and safety advice
NL BE
ZONNESCHERM
GB / IE Assembly and safety advice Page 12
Scope of delivery and parts description......Page 13
Technical data Page 13
Safety advice ...... Page 13
Assembly Page 16
Assembling the product ......Page 17
Dismantling the product....Page 18
Cleaning Page 18
Disposal Page 18
Warranty Page 18
Warranty claim procedure....Page 19
Service......Page 19
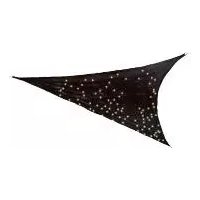
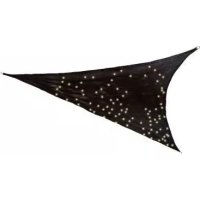
Sun shade sail
- Introduction
We congratulate you on the purchase of your new product. You have chosen a high quality product. Familiarise yourself with the product before using it for the first time. In addition, please carefully refer to the operating instructions and the safety advice below. Only use the product as instructed and only for the indicated field of application. Keep these instructions in a safe place. If you pass the product on to anyone else, please ensure that you also pass on all the documentation with it.
• Properuse
This product is suitable for providing protection against the sun in outdoor areas. The product is not intended for commercial use.
- Scope of delivery and parts description
1 Sun shade sail
2 1 Tensioning cable
3 Springs
(Model A and B: 4 parts / Model C and D: 6 parts)
4 Snaphooks
(Model A and B: 4 parts / Model C and D: 6 parts)
- Technical data
Dimensions:
Model A and B: approx. 415 x 415 x 415 cm
Model C and D: approx. 300 x 200 cm
Weight:
Model A and B: approx. 1.73 kg
Model C and D: approx. 1.65 kg

Safety advice
PLEASE READ THE ASSEMBLY INSTRUCTIONS
BEFORE USING THE PRODUCT! PLEASE KEEP THE ASSEMBLY INSTRUCTIONS IN A SAFE PLACE!
DANGER TO LIFE AND RISK OF ACCIDENTS FOR INFANTS AND CHILDREN! Never leave children alone and unsupervised with the packaging material. It poses a danger of suffocation.
- Keep children away from the work area when the product is being assembled. It
poses a risk of suf- focation as children may swallow or in- hale small parts or plastic film.
⚠️ CAUTION! RISK OF INJURY! En- sure that all parts are undamaged and have been as- sembled appropriately. Risk of injury exists if assembled incorrectly. Dam- aged parts can affect safety and function.
- Check regularly that all parts are firmly in position. Tighten the ring bolts if
necessary using a pair of pliers.
■ Take care that you do not trap or crush your fingers while assembling the product.
■ The sail protects you against direct sun impact. Nevertheless take care about a sufficient sun protection for your skin.
⚠️ CAUTION!RISK OF INJURY!
Never under any circumstances as- semble the product in a strong wind or rain.
■ Select a piece of land that is as flat and firm as possible to erect your sun shade sail.
■ Assembly in the wrong order could damage the sun shade sail. The manufacturer accepts no liability of any kind.
⚠️ CAUTION! DANGER OF POISONING AND DAMAGE TO PROPERTY!
Do not light any fires underneath the product and keep it away from sources of heat.
■ You should also familiarise yourself with the local fire protection regulations (e.g. camping site, tent pitch).
Take note of the effects of the weather and climate
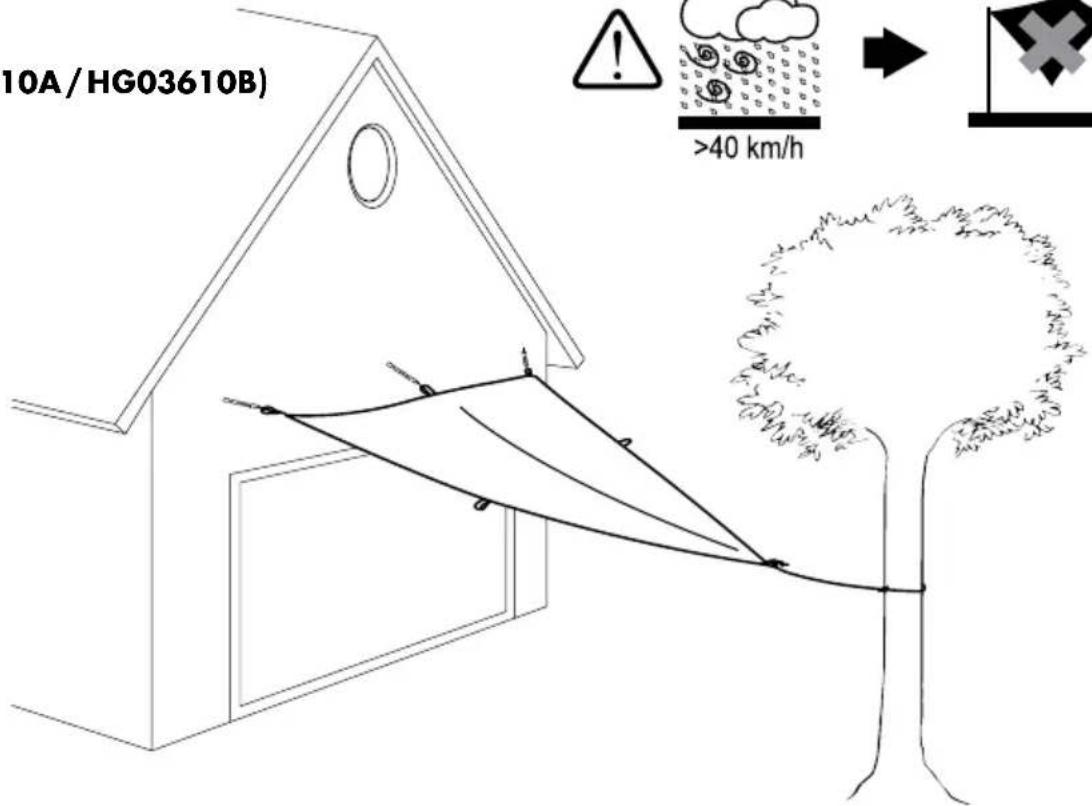
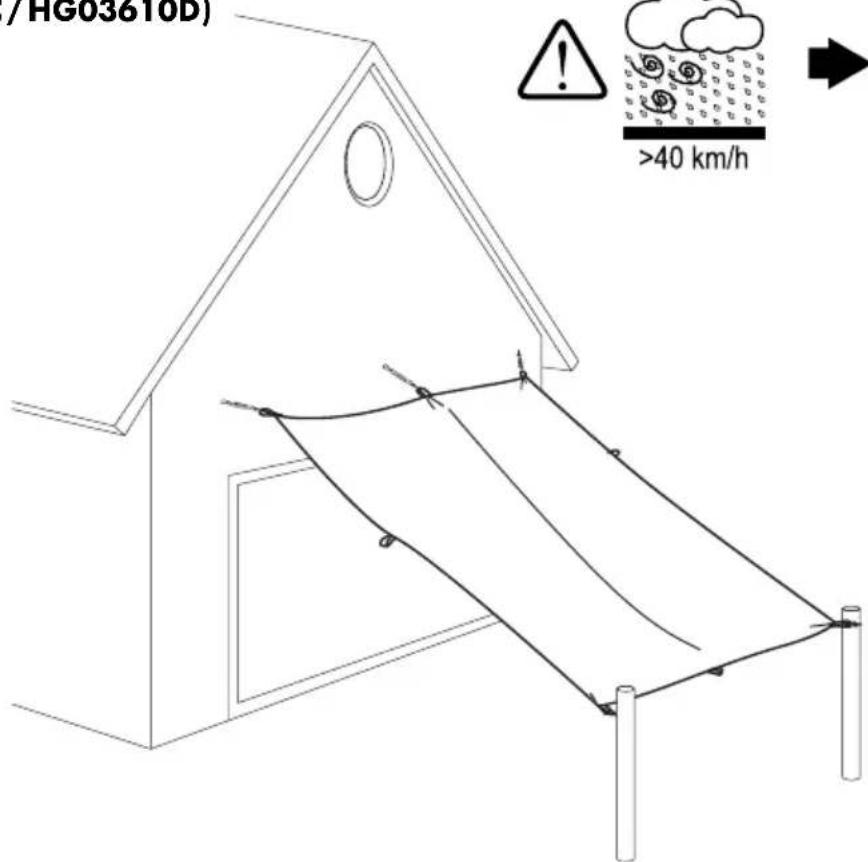
Take down the sun shade sail before heavy snowfall or a storm or rain.
■ Damaged poles or other components should be replaced by new ones.
WARNING!
Water pockets must be emptied as they form.
■ The sun shade sail must be constructed so that water can run off.
■ Never under any circumstances assemble the product in a strong wind or rain.
■ Tighten the ropes and make sure no sagging of any ropes.
- Assembly
Note: Product assembly requires at least 2 persons.
- Verify that the scope of delivery is complete.
The scope of delivery does not include ring bolts for assembly. Ask the retailer about ring bolts suitable for the respective wall structure.
- Do not leave unattended in the built-up state.
The sun shade sail must be constructed so that water can run off.
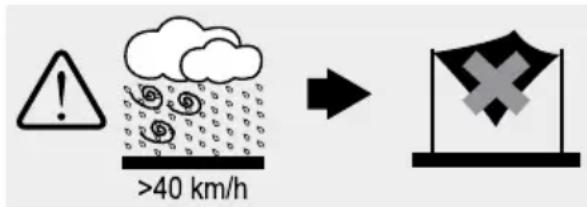
Dismantling of the product at expected wind speeds of more than 40 km/h (fresh wind, larger branches and trees move, and the wind is clearly audible).
• Assembling the product
Note: Remove all packaging material from the product.
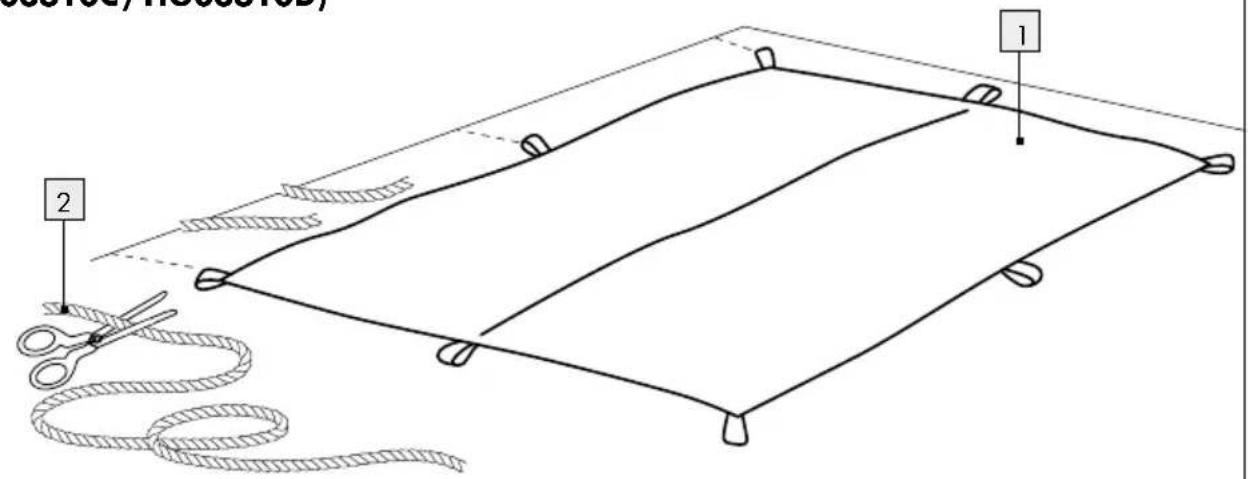
Figure A:
☐ Spread out the sun shade sail in front of the assembly site and use a measuring tape to transfer
the length of the sun shade sail 1 to the wall on which it will be mounted.
☐ Mark the positions for the ring bolts (not included in the scope of delivery) on the wall and mount these.
☐ Tighten the ring bolts using a pair of pliers.
Figure B:
☐ Cut the tensioning cab into several parts. Ensure that the length of the individual parts is enough to be able to knot them.
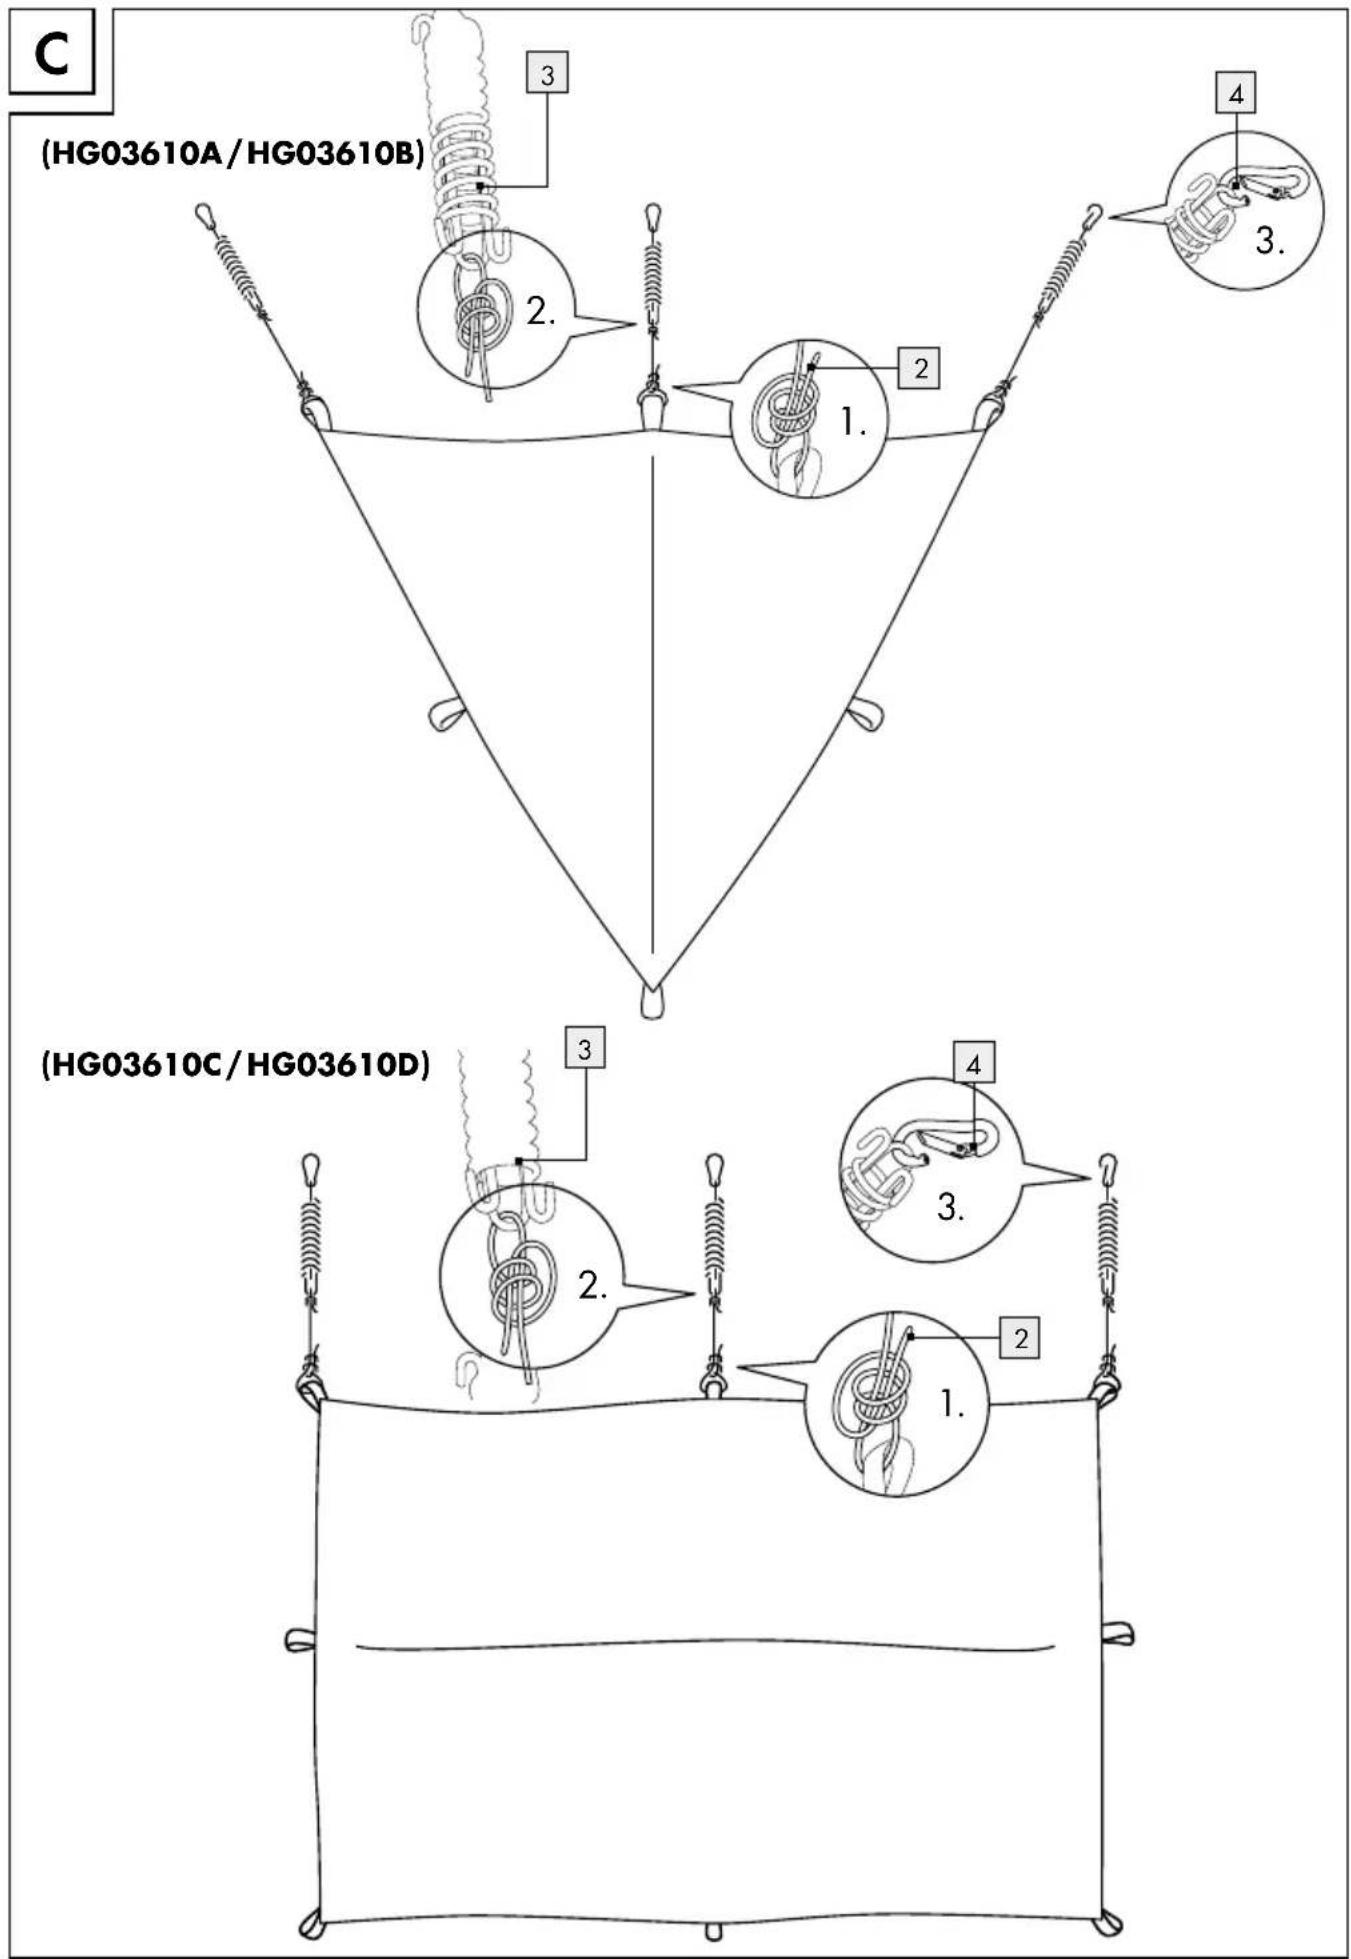
Figure C:
Now thread one end of the tensioning cable parts through a loop of the sun shade sail 1. Tie the tensioning cable parts into a tight knot.
☐ Thread the other end of the tensioning cable parts through a spring 3 and tie a tight knot.
☐ Attach a snap hook to the other end of each spring 3.
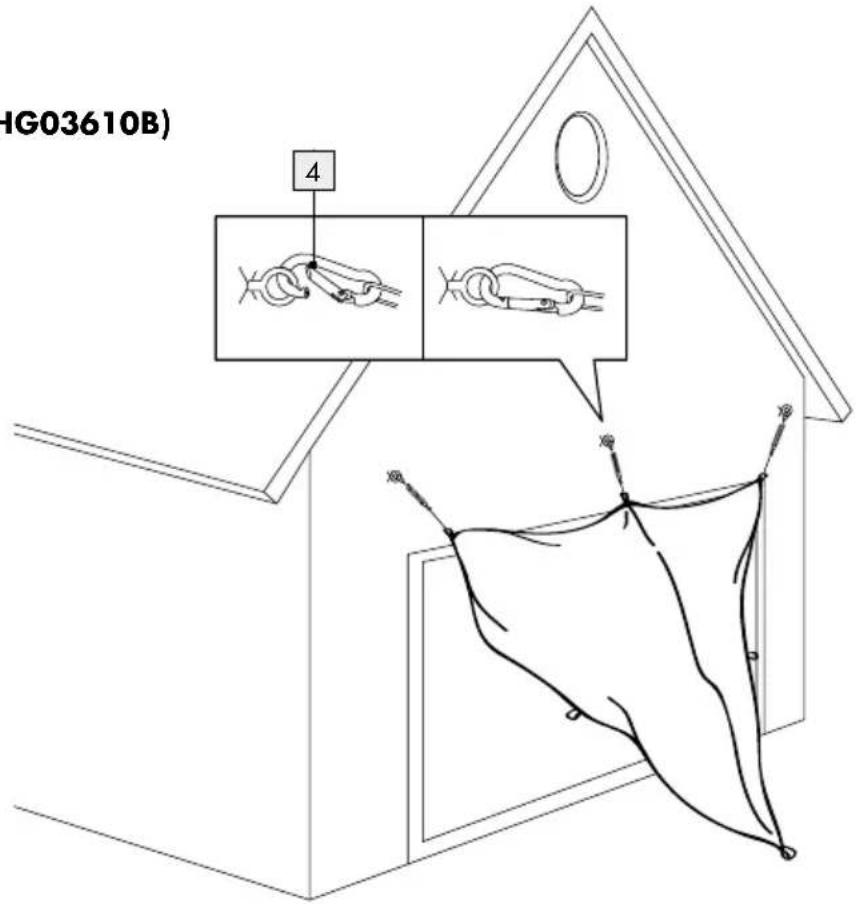
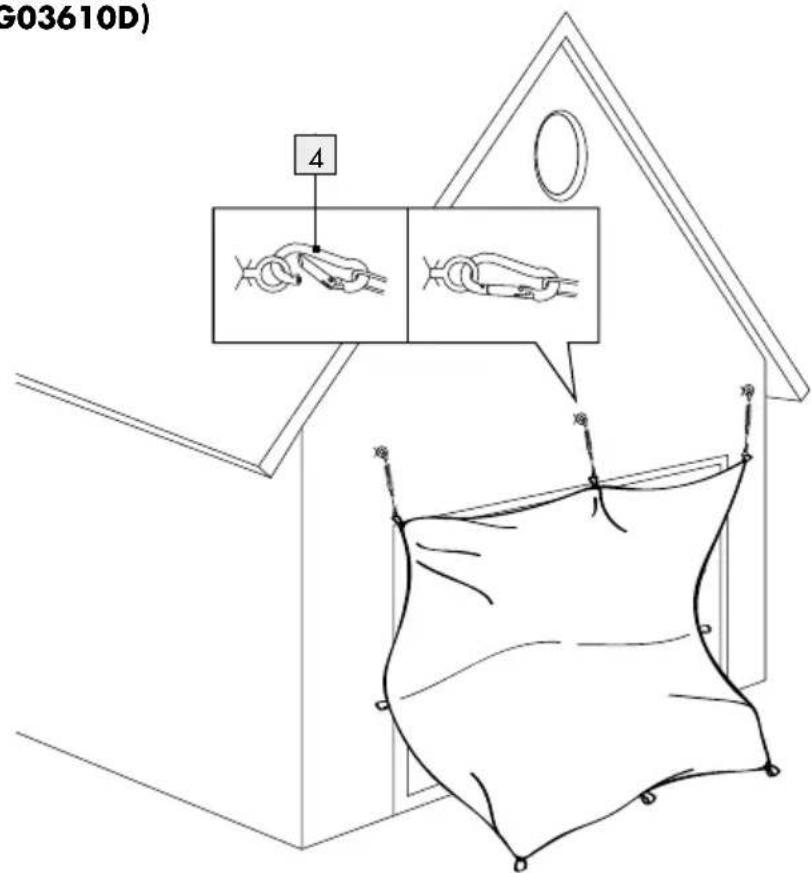
Figure D:
Now hang the sun shade sail 1 from the wall. To do so, connect the individual ring bolts to a snap hook 4.
Figure E:
☐ Attach the loose end (Models A and B) or both of the loose sides (Models C and D) of the sun shade sail 1 to a suitable location such as a tree trunk.
●Dismantlingthe product
☐ Disassemble the product in the reverse order.
- Cleaning
■ Never wash the sun shade sail in a washing machine.
- Do not use any sharp objects as these will damage the coating.
☐ Remove dirt from the sun shade sail with a soft sponge and clean water.
☐ Allow all parts dry thoroughly before you pack the sun shade sail away again. This will prevent mould, odours and colour changes.
- Disposal
The packaging is made entirely of recyclable materials, which you may dispose of at local recycling facilities.
Contact your local refuse disposal authority for more details of how to dispose of your worn-out product.
- Warranty
The product has been manufactured to strict quality guidelines and meticulously examined before delivery. In the event of product defects you have legal rights against the retailer of this product. Your legal rights are not limited in any way by our warranty detailed below.
The warranty for this product is 3 years from the date of purchase. Should this product show any fault in materials or manufacture within 3 years from the date of purchase, we will repair or replace it – at our choice – free of charge to you.
The warranty period begins on the date of purchase. Please keep the original sales receipt in a safe
location. This document is required as your proof of purchase. This warranty becomes void if the product has been damaged, or used or maintained improperly.
The warranty applies to defects in material or manufacture. This warranty does not cover product parts subject to normal wear, thus possibly considered consumables (e.g. batteries) or for damage to fragile parts, e.g. switches, rechargeable batteries or glass parts.
●Warrantyclaim procedure
To ensure quick processing of your case, please observe the following instructions:
Please have the till receipt and the item number (e.g. IAN 123456_7890) available as proof of purchase. You will find the item number on the type plate, an engraving on the front page of the instructions (bottom left), or as a sticker on the rear or bottom of the appliance.
If functional or other defects occur, please contact the service department listed either by telephone or by e-mail. You can return a defective product to us free of charge to the service address that will be provided to you. Ensure that you enclose the proof of purchase (till receipt) and information about what the defect is and when it occurred.
Service
GB
Service Great Britain
Tel.: 0800 404 7657
E-Mail: owim@lidl.co.uk
IE
Service Ireland
Tel.: 1890 930 034
(0,08 EUR / Min., (peak))
(0,06 EUR/
Min., (off peak))
E-Mail: owim@lidl.ie
Introduction Page 21
4 karabina (model A a B: 4 kusy / model C a D: 6 kusü)
- Technické údaje
Rozměry:
Model A a B: cca 415 x 415 x 415 cm
Model C a D: cca 300 x 200 cm
Hmotnost:
Model A a B: cca 1,73 kg
Model C a D: cca 1,65 kg
Bezpečnostní pokyny
PŘED POUŽITÍM SI PŘEČTĚTE NÁVOD K MONTÁŽI! NÁ- VOD K MONTÁŽI PEČLIVĚ USCHO- VEJTE!
NEBEZPEČÍ OHROŽENÍ ŽIVOTA A ZRA- NĚNÍ PRO MALÉ A VELKÉ DĚTI!
4 karabíny (model A a B: 4 kusy / model C a D: 6 kusov)
- Technické údaje
Rozmery:
Model A a B: cca. 415 x 415 x 415 cm Model C a D: cca. 300 x 200 cm
Hmotnost':
Model A a B: cca. 1,73 kg
Model C a D: cca. 1,65 kg

(HG03610C/HG03610D)
D
(HG03610A / HG03610B)
(HG03610C/HG03610D)
E
(HG03610A/HG03610B)


(HG03610C/HG03610D)


OWIM GmbH & Co. KG
Stiftsbergstraße 1
74167 Neckarsulm
GERMANY
Model-No.: HG03610A/HG03610B/
HG03610C/HG03610D
Version: 12/2019